
How To: Quick/Easy Civic/Integra Trailing arm bushing replacement (also ES Poly Vs. Mugen)
 04-10-2006, 11:07 AM
#1
Honda-Tech Member
Thread Starter
I've been having some severe issues with my rear stepping out under hard cornering at HPDE's. My rear would step out wide and abruptly before my tires even started to complain (very exciting at Roebling Road at 70 MPH). JDogg suggested that my ES poly trailing arm bushings may be binding, so Friday evening before I went to VIR I replaced them with Mugen hard rubber bushings. I took some pictures and thought I'd share:
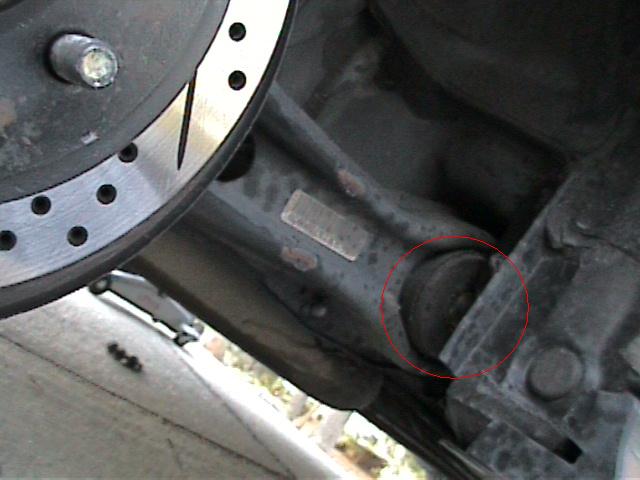
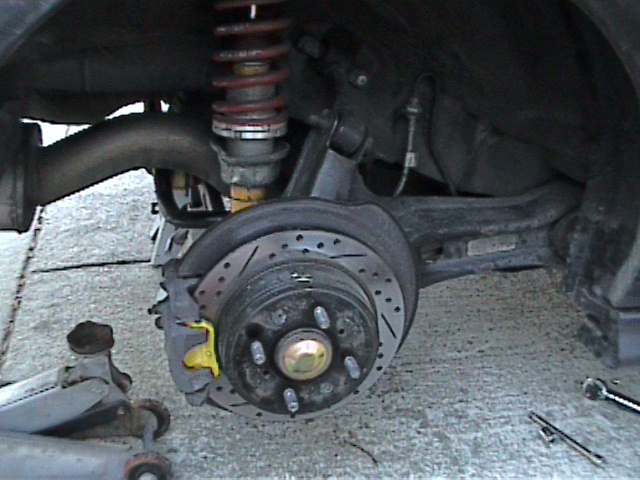
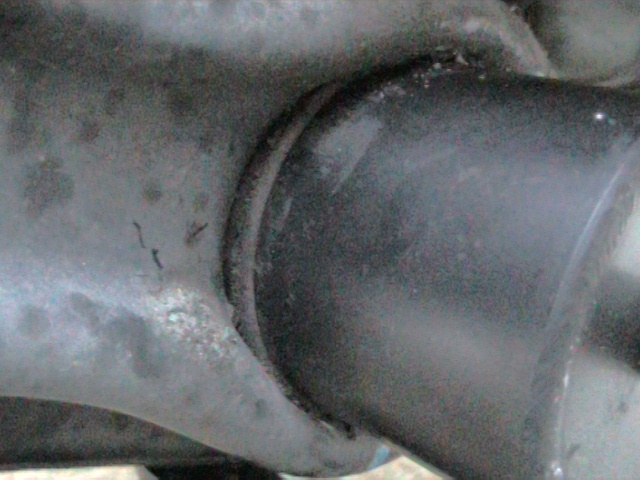
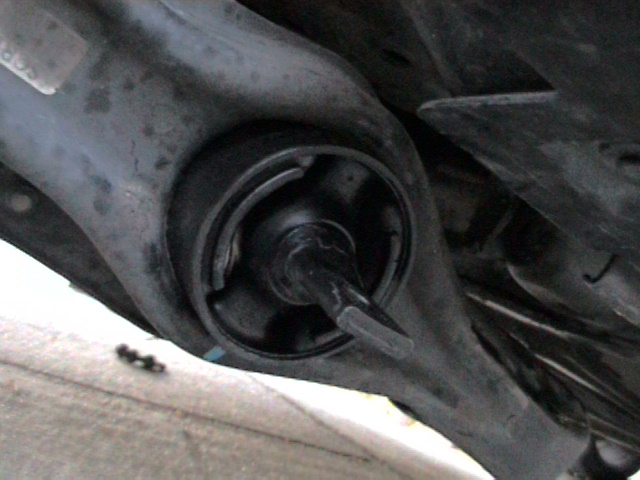
In case you don't know, the trailing arm is what your rear suspension pivots on, here is a pic showing it, the brakes bolt on to the back of it:

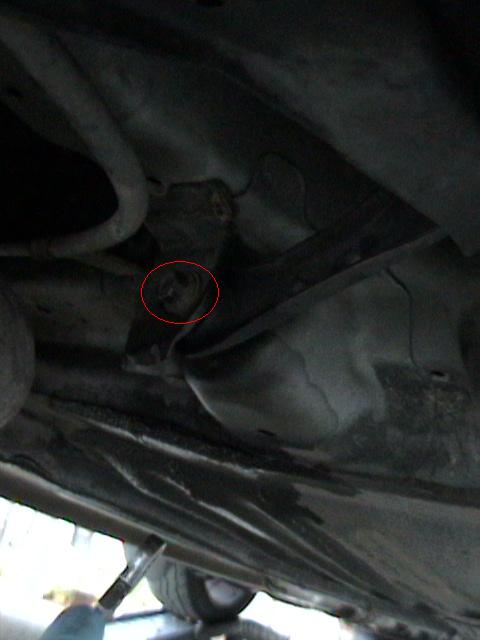
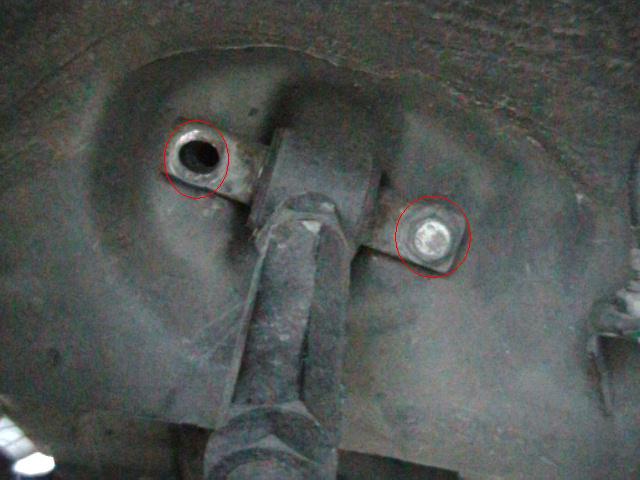
Here's a pic of the other end, I circled the ES poly bushing that I'm replacing:
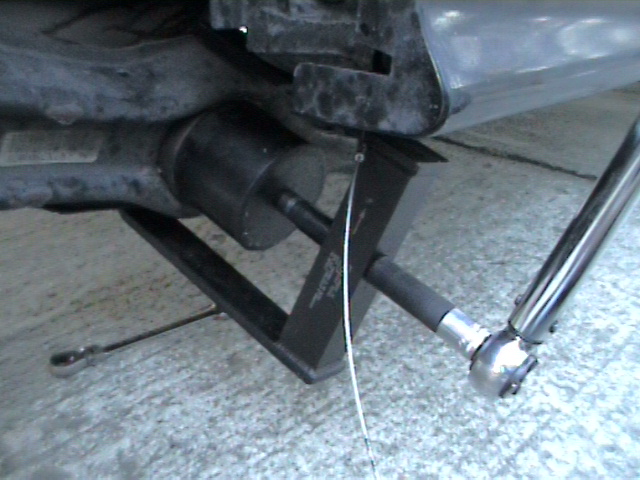
Here's the tool you will need if you want to DIY, otherwise you have to remove the trailing arms and take them to a machine shop:
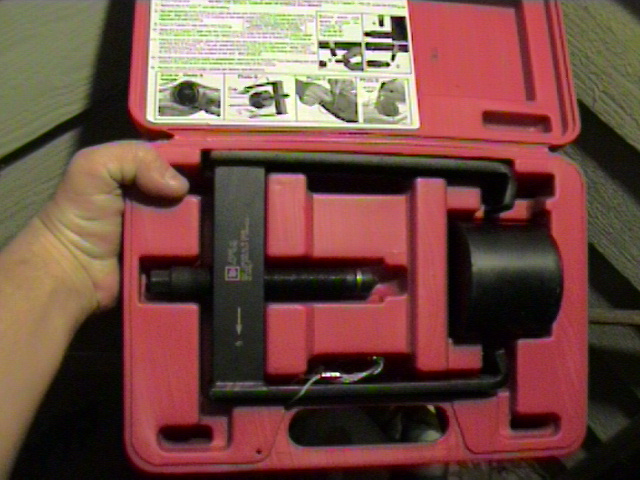
You can buy it from Skyway Tools for $169 shipped, they were great to deal with and shipped the tool the same day that I ordered it. Here's a link:
http://shoptoolsshoptools.com/shopexd.asp?id=2784
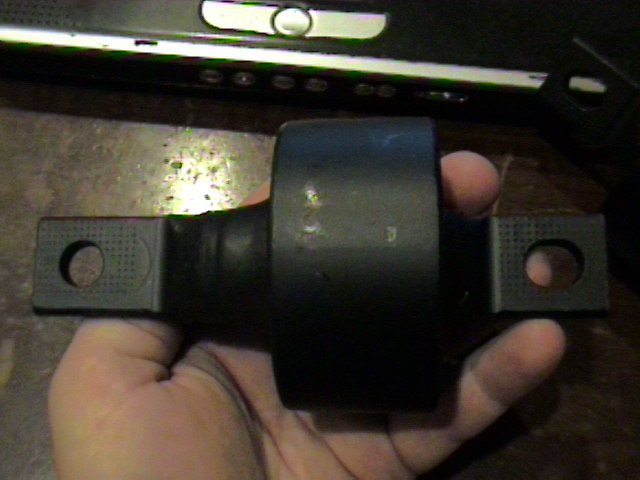
Here are the Mugen bushings, they look exactly like OEM Honda bushings and probably are, but they only cost $40 more, so I took a chance that they were inproved in some way over OEM:

You'll need to measure a couple of things before you remove the bushings, because they need to be installed to the same depth and clocked correctly or they will be twisted under normal driving and will probably not last as long.
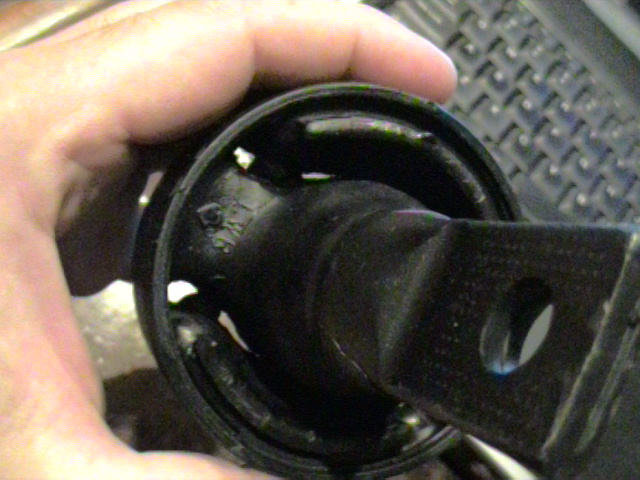
First you have to clock them, and it must be done with the car sitting on level pavement on all 4 wheels, just like it normally sits. I'm going to show a picture of me clocking it with the suspension dropped because that's the only way you can see what I'm doing (I have no lift, did this in the driveway), but when you clock yours you will have to reach up under there and do it by feel. I just put a metal ruler on the flat part of the tab on the center metal shaft of the bushing and used it to draw a line with a Sharpie on the trailing arm. When you install the new bushing, rotate it so that the ruler lines up with the line when you put it on the same place on the new bushing.
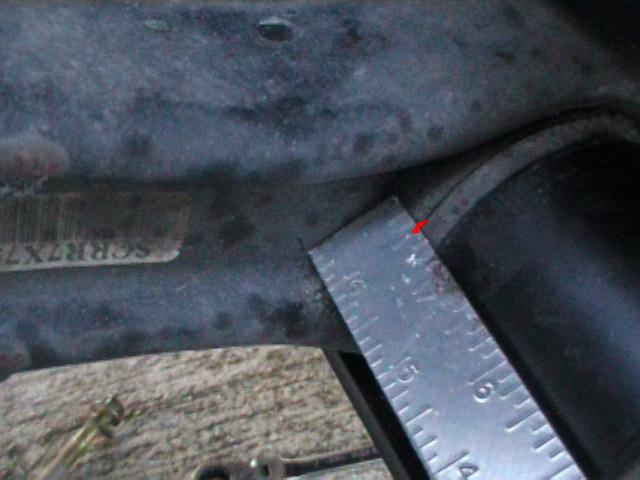
Here's a picture of the ruler on the tab:

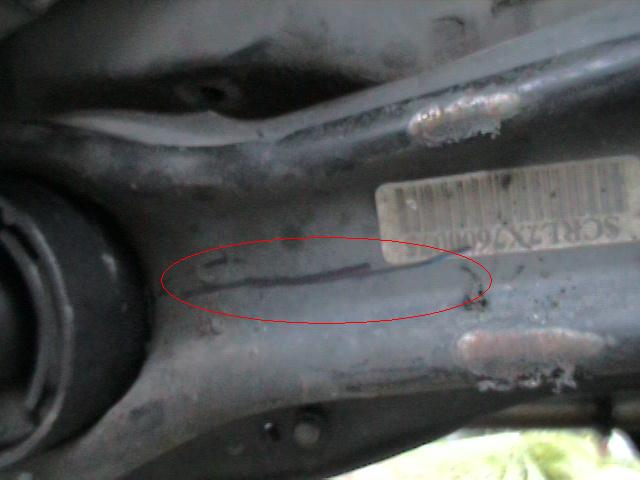
Here's a shot of just the line that I made on the trailing arm:
Next you measure how far the bushings are in the hole, I just used a ruler and measured to the edge of the metal bushing housing from the trailing arm (I MS Painted a red line on it to show where to measure to). Mine had just under .5" of metal sticking out of the hole. Make sure you press in the new ones just to where the old ones were (in my case, just under .5" out of the hole).
Now it's time to take it off, you will need to jack up the rear of the car and remove the back wheels. Make sure you chock the front wheels and support the back of the car on jackstands:
Now you need to remove five bolts, first the toe adjustment bolt. Before you loosen this bolt, mark where it is in it's hole with a Sharpie, because if you don't put it back in the exact same spot then it will mess up your alignment.
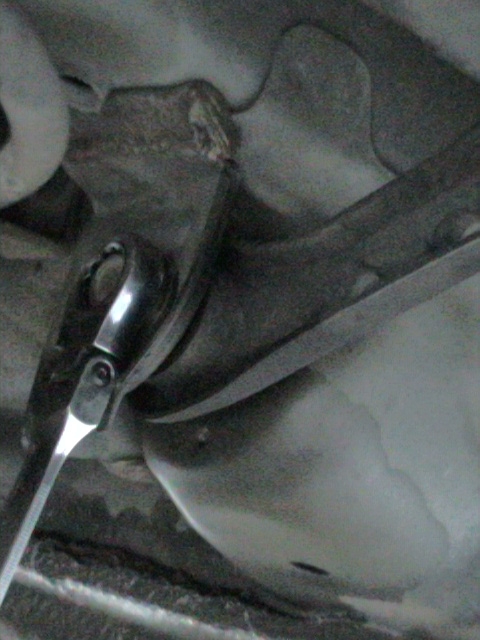
Here's the bolt, it's on a little metal arm that's all the way at the front of your trailing arm:
I removed mine with a ratcheting wrench:
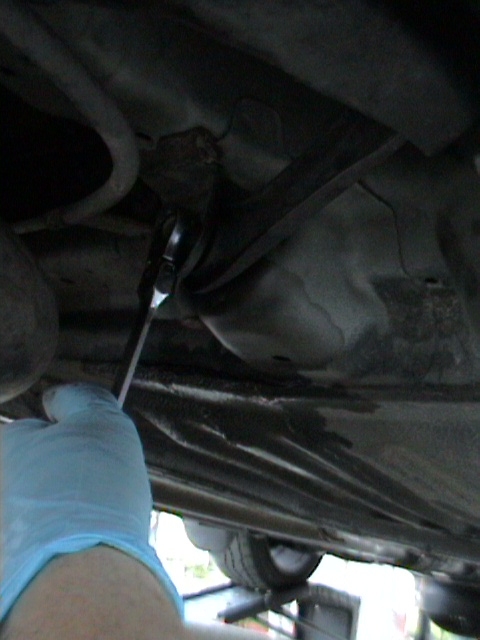
Next remove the two bolts in the center metal shaft of your trailing arm bushing. Here's a picture of the bolts looking up at the middle of the trailing arm from the bottom:
the trailing arm will hang down a bit, let it hang.
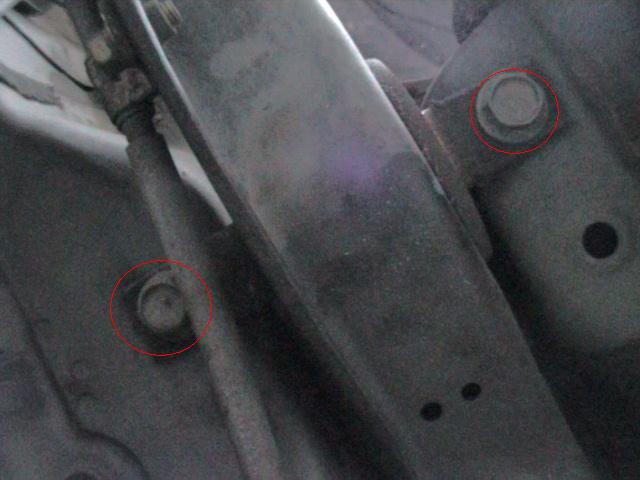
Next remove the bolts in the small upper arm, yours may look different from mine (mine are the camber-adjustable aftermarket kind), but they have the same two bolts that hold them on the car. Here are some pictures (I had already removed one of the bolts when I took the picture):

Now the arm will hang down under the car almost enough to get the bushing tool on it. You can prop it down with a piece of wood, of I just stuck my foot in there to hold it down to put the tool on it.
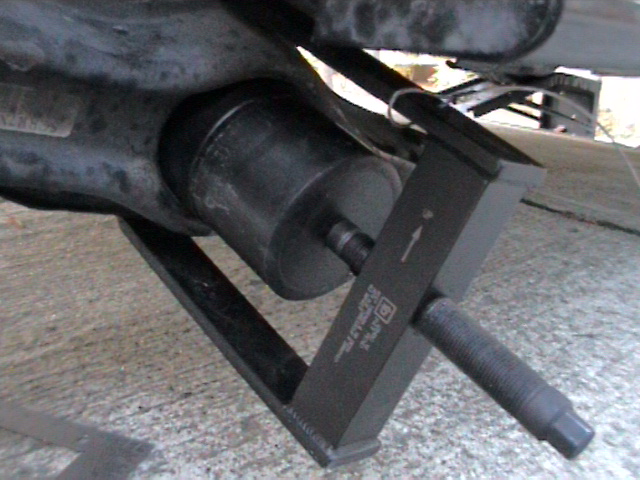
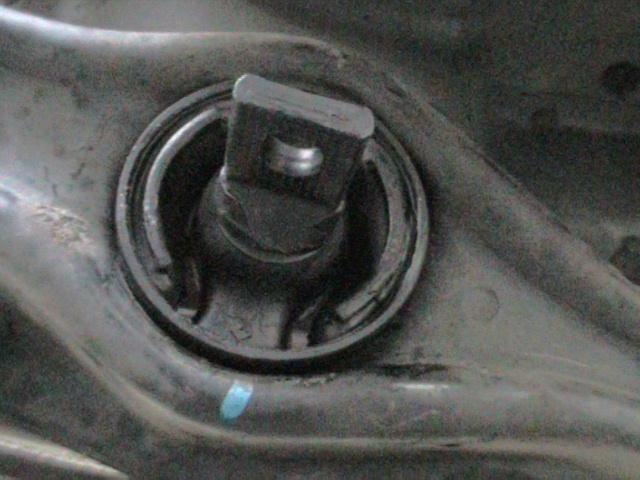
You hook the hooks on the tool around the edges of the trailing arm over the bushing (it is asymmetrical, so pay attention to the arrow that tells you which side is supposed to be pointing up), then place the cup over the bushing and ratchet the bolt on the tool down to push the bushing out of the control arm:

The bushing eventually drops out of the other side, just make sure it doesn't get behind the emergency brake cable and push it over too far:

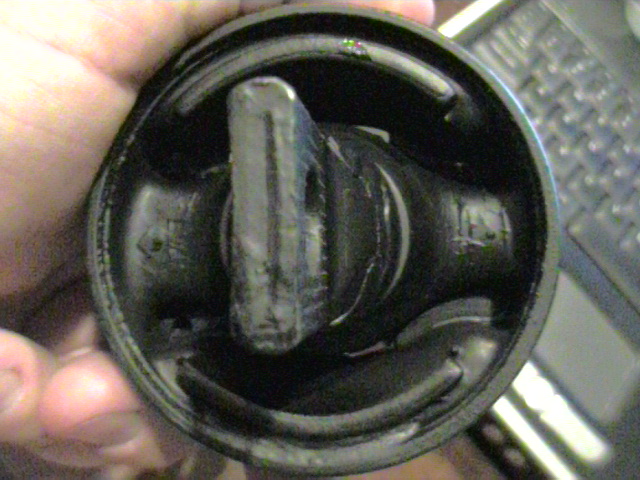
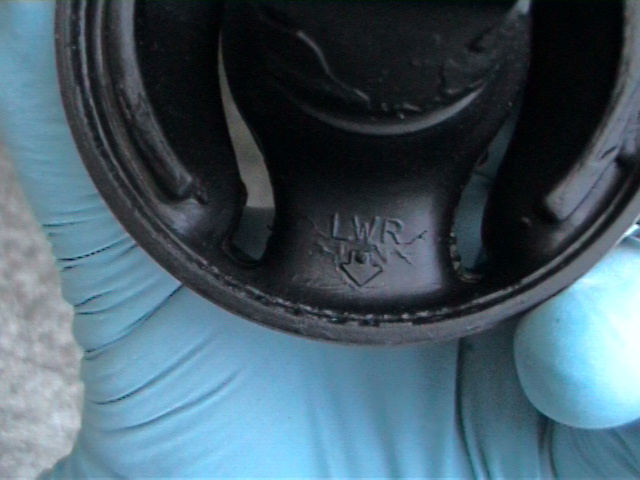
Clean up the hole a bit (I used brake cleaner and a rag), then seat the new bushing in the hole by hand. The bushing is directional, so make sure the bottom side, marked with the letters "LWR" and an arrow, is on the bottom:
Next make sure the new bushing is aligned to the mark you made on the trailing arm:

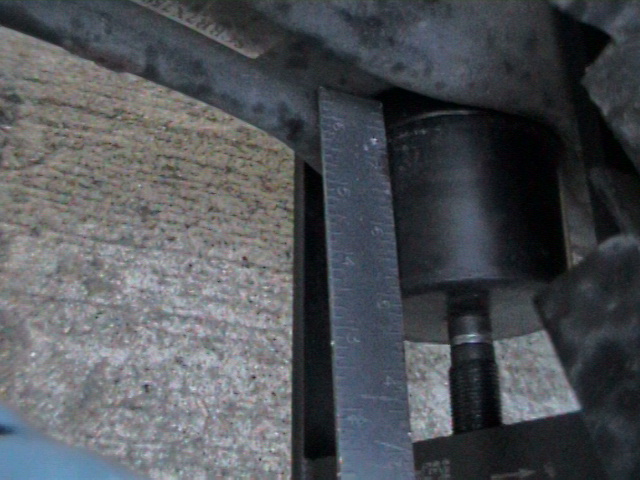
With the bushing seated solidly by hand, put the tool with the cup over the new bushing, then turn the bolt to push the bearing into the trailing arm, exactly like you did earlier to remove the old bushing:
Push it in until it is in the hole the same amount as the original bushing:
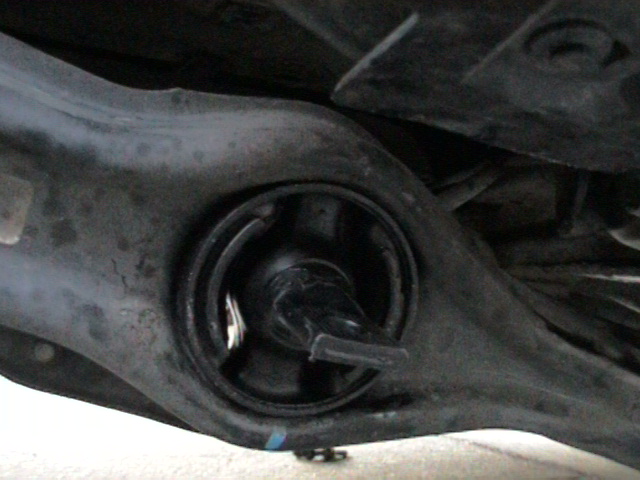
Now you've got it in there, just like new:

It bolts back together in the reverse order of how it came apart, just make sure to tighten down the toe adjustment bolt in the exact same position that it was in originally or your alignment may be off.
This took me about an hour, but would take a lot less time if I did it again, the tool is really quick and easy to use.
The new bushings made a huge difference at VIR, it was like I had a different car. The rear is much more stable and no longer steps out. I was able to push the car much harder than I previously could, it was really amazing.
In case you don't know, the trailing arm is what your rear suspension pivots on, here is a pic showing it, the brakes bolt on to the back of it:
Here's a pic of the other end, I circled the ES poly bushing that I'm replacing:
Here's the tool you will need if you want to DIY, otherwise you have to remove the trailing arms and take them to a machine shop:
You can buy it from Skyway Tools for $169 shipped, they were great to deal with and shipped the tool the same day that I ordered it. Here's a link:
http://shoptoolsshoptools.com/shopexd.asp?id=2784
Here are the Mugen bushings, they look exactly like OEM Honda bushings and probably are, but they only cost $40 more, so I took a chance that they were inproved in some way over OEM:
You'll need to measure a couple of things before you remove the bushings, because they need to be installed to the same depth and clocked correctly or they will be twisted under normal driving and will probably not last as long.
First you have to clock them, and it must be done with the car sitting on level pavement on all 4 wheels, just like it normally sits. I'm going to show a picture of me clocking it with the suspension dropped because that's the only way you can see what I'm doing (I have no lift, did this in the driveway), but when you clock yours you will have to reach up under there and do it by feel. I just put a metal ruler on the flat part of the tab on the center metal shaft of the bushing and used it to draw a line with a Sharpie on the trailing arm. When you install the new bushing, rotate it so that the ruler lines up with the line when you put it on the same place on the new bushing.
Here's a picture of the ruler on the tab:
Here's a shot of just the line that I made on the trailing arm:
Next you measure how far the bushings are in the hole, I just used a ruler and measured to the edge of the metal bushing housing from the trailing arm (I MS Painted a red line on it to show where to measure to). Mine had just under .5" of metal sticking out of the hole. Make sure you press in the new ones just to where the old ones were (in my case, just under .5" out of the hole).
Now it's time to take it off, you will need to jack up the rear of the car and remove the back wheels. Make sure you chock the front wheels and support the back of the car on jackstands:
Now you need to remove five bolts, first the toe adjustment bolt. Before you loosen this bolt, mark where it is in it's hole with a Sharpie, because if you don't put it back in the exact same spot then it will mess up your alignment.
Here's the bolt, it's on a little metal arm that's all the way at the front of your trailing arm:
I removed mine with a ratcheting wrench:
Next remove the two bolts in the center metal shaft of your trailing arm bushing. Here's a picture of the bolts looking up at the middle of the trailing arm from the bottom:
the trailing arm will hang down a bit, let it hang.
Next remove the bolts in the small upper arm, yours may look different from mine (mine are the camber-adjustable aftermarket kind), but they have the same two bolts that hold them on the car. Here are some pictures (I had already removed one of the bolts when I took the picture):
Now the arm will hang down under the car almost enough to get the bushing tool on it. You can prop it down with a piece of wood, of I just stuck my foot in there to hold it down to put the tool on it.
You hook the hooks on the tool around the edges of the trailing arm over the bushing (it is asymmetrical, so pay attention to the arrow that tells you which side is supposed to be pointing up), then place the cup over the bushing and ratchet the bolt on the tool down to push the bushing out of the control arm:
The bushing eventually drops out of the other side, just make sure it doesn't get behind the emergency brake cable and push it over too far:
Clean up the hole a bit (I used brake cleaner and a rag), then seat the new bushing in the hole by hand. The bushing is directional, so make sure the bottom side, marked with the letters "LWR" and an arrow, is on the bottom:
Next make sure the new bushing is aligned to the mark you made on the trailing arm:
With the bushing seated solidly by hand, put the tool with the cup over the new bushing, then turn the bolt to push the bearing into the trailing arm, exactly like you did earlier to remove the old bushing:
Push it in until it is in the hole the same amount as the original bushing:
Now you've got it in there, just like new:
It bolts back together in the reverse order of how it came apart, just make sure to tighten down the toe adjustment bolt in the exact same position that it was in originally or your alignment may be off.
This took me about an hour, but would take a lot less time if I did it again, the tool is really quick and easy to use.
The new bushings made a huge difference at VIR, it was like I had a different car. The rear is much more stable and no longer steps out. I was able to push the car much harder than I previously could, it was really amazing.
 04-10-2006, 11:37 AM
#3
Member
Join Date: Jan 2006
Location: just north of Tijuana
Posts: 1,126
Likes: 0
Received 0 Likes
on
0 Posts
<TABLE WIDTH="90%" CELLSPACING=0 CELLPADDING=0 ALIGN=CENTER><TR><TD>Quote, originally posted by TunerN00b »</TD></TR><TR><TD CLASS="quote">Nice writeup. Thank you.</TD></TR></TABLE>
amen
amen
04-10-2006, 11:46 AM
#4
Senior Member
Join Date: Oct 2001
Location: RIP Craig Jones
Posts: 30,826
Likes: 0
Received 0 Likes
on
0 Posts
FYI - when removing the TA from the Upper Arm, I'd remove the single bolt from the trailing arm, not the 2 in the chassis - the bolts going into the chassis are prone to being cross threaded with teh weight of the TA/brakes on them.
Nice write up
Nice write up
04-10-2006, 11:49 AM
#6
Honda-Tech Member
Thread Starter
<TABLE WIDTH="90%" CELLSPACING=0 CELLPADDING=0 ALIGN=CENTER><TR><TD>Quote, originally posted by .RJ »</TD></TR><TR><TD CLASS="quote">FYI - when removing the TA from the Upper Arm, I'd remove the single bolt from the trailing arm, not the 2 in the chassis - the bolts going into the chassis are prone to being cross threaded with teh weight of the TA/brakes on them.
Nice write up </TD></TR></TABLE>
That's a good point, I actually put a jack under my LCA's to lift the whole assembly up a bit to make it easier to line it up right.
Nice write up
</TD></TR></TABLE>That's a good point, I actually put a jack under my LCA's to lift the whole assembly up a bit to make it easier to line it up right.
04-10-2006, 01:07 PM
#7
<TABLE WIDTH="90%" CELLSPACING=0 CELLPADDING=0 ALIGN=CENTER><TR><TD>Quote, originally posted by .RJ »</TD></TR><TR><TD CLASS="quote">Nice write up </TD></TR></TABLE>
This is great...thanks.
This is great...thanks.
Trending Topics
 04-10-2006, 01:12 PM
#9
Senior Member
Join Date: Oct 2001
Location: RIP Craig Jones
Posts: 30,826
Likes: 0
Received 0 Likes
on
0 Posts
<TABLE WIDTH="90%" CELLSPACING=0 CELLPADDING=0 ALIGN=CENTER><TR><TD>Quote, originally posted by mperezkr »</TD></TR><TR><TD CLASS="quote">where did you get the tool from</TD></TR></TABLE>
Reading ownz your ***.
Reading ownz your ***.
04-10-2006, 01:14 PM
#10
Honda-Tech Member
Join Date: Dec 2005
Location: Mesa (Phoenix), Arizona
Posts: 913
Likes: 0
Received 0 Likes
on
0 Posts
This is bad ***. I just orderd my OEM bushings and this is exactly what i needed. Thank you.
How would u remove the bushing without the tool.
How would u remove the bushing without the tool.
04-10-2006, 01:18 PM
#11
Senior Member
Join Date: Oct 2001
Location: RIP Craig Jones
Posts: 30,826
Likes: 0
Received 0 Likes
on
0 Posts
<TABLE WIDTH="90%" CELLSPACING=0 CELLPADDING=0 ALIGN=CENTER><TR><TD>Quote, originally posted by drumminforev »</TD></TR><TR><TD CLASS="quote">How would u remove the bushing without the tool.</TD></TR></TABLE>
A press - which is cheaper than the tool from Northern Tool
A press - which is cheaper than the tool from Northern Tool
04-10-2006, 01:36 PM
#12
I just had this idea. I know many people would want to change the rta bushings but find 170 is expensive for a one time use. Why don't we all make a little list or so with the peeps that want to get it and...
(a) We could all chip in and buy it and lend it to others when done (the reality is that some peeps are not honest and would prolly jeep it)
(b) Someone BUYS it with their money( I don't have a problem buying it), then rents it out but you have to leave a DEPOSIT for the full amount via PAYPAL. When the tool is returned in good shape, money is refunded minus 20-30 dollars for usage and shipping.
In the end the rental would pay for the tool itself.
If anyone thinks this is a good idea please PM me to let me know.
I don't mean to hijack your thread but I think we could all help each other on this one. Thanks.
The following users liked this post:
04-10-2006, 01:50 PM
#14
Go Tigers!
<TABLE WIDTH="90%" CELLSPACING=0 CELLPADDING=0 ALIGN=CENTER><TR><TD>Quote, originally posted by kraven9 »</TD></TR><TR><TD CLASS="quote">I just had this idea. I know many people would want to change the rta bushings but find 170 is expensive for a one time use. Why don't we all make a little list or so with the peeps that want to get it and...
(a) We could all chip in and buy it and lend it to others when done (the reality is that some peeps are not honest and would prolly jeep it)
(b) Someone BUYS it with their money( I don't have a problem buying it), then rents it out but you have to leave a DEPOSIT for the full amount via PAYPAL. When the tool is returned in good shape, money is refunded minus 20-30 dollars for usage and shipping.
In the end the rental would pay for the tool itself.
If anyone thinks this is a good idea please PM me to let me know.
I don't mean to hijack your thread but I think we could all help each other on this one. Thanks. </TD></TR></TABLE>
I would be down for that.
(a) We could all chip in and buy it and lend it to others when done (the reality is that some peeps are not honest and would prolly jeep it)
(b) Someone BUYS it with their money( I don't have a problem buying it), then rents it out but you have to leave a DEPOSIT for the full amount via PAYPAL. When the tool is returned in good shape, money is refunded minus 20-30 dollars for usage and shipping.
In the end the rental would pay for the tool itself.
If anyone thinks this is a good idea please PM me to let me know.
I don't mean to hijack your thread but I think we could all help each other on this one. Thanks.
</TD></TR></TABLE>I would be down for that.
04-10-2006, 01:58 PM
#15
FYI to the original poster of this thread:
You've got a huge no-no going on with your suspension. I noticed your using coil-overs that sit inside spring cup on your koni shocks. Our local Honda-Tech Koni rep (CRX Lee) has stated on countless occasions that this is a dangerous and unacceptable way to use coil-over sleeves with koni shocks. The adjustable snap ring on the shock body will not be loaded properly by that spring cup if the spring pressure is not located on the spring seat (outer most diameter). A harsh enough impact can cause failure of the snap-ring, leaving you stranded with a bottomed out suspension...
I'm also gonna take a wild guess that your front shocks are set up the same way with the coil-over sleeve resting on the lower spring perch.
As far I've seen, only Ground Control & Koni themselves make the proper sleeves that are designed to sit directly on the snap ring (no spring cups or plates)...
Think about it...
BTW: Your review & install DIY is really good...
04-10-2006, 05:39 PM
#16
Honda-Tech Member
Thread Starter
Originally Posted by .RJ
A press - which is cheaper than the tool from Northern Tool
I thought about that, but this tool let's me do it on the car very quickly. It's worth it to me not to have to remove the brakes and the whole trailing arm. Plus the cup on the tool is cut to fit exactky inside the bushing sleeve, it makes it very easy to press it straight out.
Originally Posted by kraven9
I just had this idea. I know many people would want to change the rta bushings but find 170 is expensive for a one time use. Why don't we all make a little list or so with the peeps that want to get it and...
(a) We could all chip in and buy it and lend it to others when done (the reality is that some peeps are not honest and would prolly jeep it)
(b) Someone BUYS it with their money( I don't have a problem buying it), then rents it out but you have to leave a DEPOSIT for the full amount via PAYPAL. When the tool is returned in good shape, money is refunded minus 20-30 dollars for usage and shipping.
In the end the rental would pay for the tool itself.
If anyone thinks this is a good idea please PM me to let me know.
I don't mean to hijack your thread but I think we could all help each other on this one. Thanks.
(a) We could all chip in and buy it and lend it to others when done (the reality is that some peeps are not honest and would prolly jeep it)
(b) Someone BUYS it with their money( I don't have a problem buying it), then rents it out but you have to leave a DEPOSIT for the full amount via PAYPAL. When the tool is returned in good shape, money is refunded minus 20-30 dollars for usage and shipping.
In the end the rental would pay for the tool itself.
If anyone thinks this is a good idea please PM me to let me know.
I don't mean to hijack your thread but I think we could all help each other on this one. Thanks.
Originally Posted by 94eg!
FYI to the original poster of this thread:
You've got a huge no-no going on with your suspension. I noticed your using coil-overs that sit inside spring cup on your koni shocks. Our local Honda-Tech Koni rep (CRX Lee) has stated on countless occasions that this is a dangerous and unacceptable way to use coil-over sleeves with koni shocks. The adjustable snap ring on the shock body will not be loaded properly by that spring cup if the spring pressure is not located on the spring seat (outer most diameter). A harsh enough impact can cause failure of the snap-ring, leaving you stranded with a bottomed out suspension...
I'm also gonna take a wild guess that your front shocks are set up the same way with the coil-over sleeve resting on the lower spring perch.
As far I've seen, only Ground Control & Koni themselves make the proper sleeves that are designed to sit directly on the snap ring (no spring cups or plates)...
Think about it...
BTW: Your review & install DIY is really good...
You've got a huge no-no going on with your suspension. I noticed your using coil-overs that sit inside spring cup on your koni shocks. Our local Honda-Tech Koni rep (CRX Lee) has stated on countless occasions that this is a dangerous and unacceptable way to use coil-over sleeves with koni shocks. The adjustable snap ring on the shock body will not be loaded properly by that spring cup if the spring pressure is not located on the spring seat (outer most diameter). A harsh enough impact can cause failure of the snap-ring, leaving you stranded with a bottomed out suspension...
I'm also gonna take a wild guess that your front shocks are set up the same way with the coil-over sleeve resting on the lower spring perch.
As far I've seen, only Ground Control & Koni themselves make the proper sleeves that are designed to sit directly on the snap ring (no spring cups or plates)...
Think about it...
BTW: Your review & install DIY is really good...
04-11-2006, 03:56 AM
#17
<TABLE WIDTH="90%" CELLSPACING=0 CELLPADDING=0 ALIGN=CENTER><TR><TD>Quote, originally posted by rmcdaniels »</TD></TR><TR><TD CLASS="quote">
I'd do that for people if they gave me the deposit and paid for shipping. Otherwise it's just going to sit in my shop until I save up enough for a set of spherical bearings. The thing is very heavy duty, looks like it could stand up to a lot of use. As long as people keep it cleaned and the threaded part coated with grease, I don't see any reason not to let people use it.
</TD></TR></TABLE>
Excellent. I'll let you know when I'm ready.
04-12-2006, 04:17 AM
#19
Honda-Tech Member
iTrader: (1)
Join Date: Jul 2002
Location: Everywhere you want to be
Posts: 1,388
Likes: 0
Received 2 Likes
on
2 Posts
I think I'm going to break down and buy that tool unless someone wants to rent it to me?? please?
04-12-2006, 04:57 AM
#20
Honda-Tech Member
Thread Starter
<TABLE WIDTH="90%" CELLSPACING=0 CELLPADDING=0 ALIGN=CENTER><TR><TD>Quote, originally posted by Touch »</TD></TR><TR><TD CLASS="quote">I think I'm going to break down and buy that tool unless someone wants to rent it to me?? please?</TD></TR></TABLE>
Paypal me a deposit and a few $ for shipping and I'll be happy to let you borrow mine. e-mail address is in my profile.
Paypal me a deposit and a few $ for shipping and I'll be happy to let you borrow mine. e-mail address is in my profile.
04-13-2006, 09:17 PM
#21
Trial User

Join Date: Aug 2000
Posts: 125
Likes: 0
Received 0 Likes
on
0 Posts
I am a complete Noob on this topic, so please be gentle.
-What was/is the reason you used poly bushing for the trailing arm?
-What is the reason(other than worn bushing) for going to harder bushings than stock?
-How do you know if the bushings need to be replaced?
-Is there a noticeable difference if you replaced "good" stock bushings with harder bushings? ---> like the difference felt when replacing the stock shifter bushings with ES bushings.
Good write up with lots of info. Now instead of buying the tool, couldnt you use a two jaw puller with the correct sized cup?
04-13-2006, 10:19 PM
#22
Honda-Tech Member
Thread Starter
<TABLE WIDTH="90%" CELLSPACING=0 CELLPADDING=0 ALIGN=CENTER><TR><TD>Quote, originally posted by carblegal »</TD></TR><TR><TD CLASS="quote">I am a complete Noob on this topic, so please be gentle.
-What was/is the reason you used poly bushing for the trailing arm?
-What is the reason(other than worn bushing) for going to harder bushings than stock?
-How do you know if the bushings need to be replaced?
-Is there a noticeable difference if you replaced "good" stock bushings with harder bushings? ---> like the difference felt when replacing the stock shifter bushings with ES bushings.
Good write up with lots of info. Now instead of buying the tool, couldnt you use a two jaw puller with the correct sized cup? </TD></TR></TABLE>
-I thought the poly bushings would be stiffer than the rubber ones, they were, but there were other issues
-harder rubber = less play in the suspension
-if they are broken (easy to see if the rubber cracks)
-maybe, maybe not, there's a lot of people that think the Mugen bushings are overpriced OEM bushings, so it's hard to say
Maybe a puller would work, give it a try.
-What was/is the reason you used poly bushing for the trailing arm?
-What is the reason(other than worn bushing) for going to harder bushings than stock?
-How do you know if the bushings need to be replaced?
-Is there a noticeable difference if you replaced "good" stock bushings with harder bushings? ---> like the difference felt when replacing the stock shifter bushings with ES bushings.
Good write up with lots of info. Now instead of buying the tool, couldnt you use a two jaw puller with the correct sized cup? </TD></TR></TABLE>-I thought the poly bushings would be stiffer than the rubber ones, they were, but there were other issues
-harder rubber = less play in the suspension
-if they are broken (easy to see if the rubber cracks)
-maybe, maybe not, there's a lot of people that think the Mugen bushings are overpriced OEM bushings, so it's hard to say
Maybe a puller would work, give it a try.
04-14-2006, 06:53 AM
#23
Member
Join Date: Oct 2002
Location: Winnetka, Calif, USA
Posts: 2,351
Likes: 0
Received 0 Likes
on
0 Posts
Nice write-up!
Just one question about that tool however; Honda / Integra basically use two different diameter bushings (the Integra being larger), does the tool work with both sizes?
Wes Vann
Just one question about that tool however; Honda / Integra basically use two different diameter bushings (the Integra being larger), does the tool work with both sizes?
Wes Vann
04-14-2006, 07:11 AM
#24
Here is a small clip from the products details: "Works on: Honda; Civic 1988-2000, CRX 1988-1991, Del Sol 1993-1997 Acura; Integra 1994-2001 PATENT PENDING"
Aparently it does not work on the older 90-93 DA Integra trailing arm bushings (larger diameter). I suppose that making your own cup for the DA bushing wouldn't be too hard if you felt it would save you some time and/or money. Let's just hope that somebody doesn't buy this tool, only to find out that they got DA trailing-arms on their car from a suspension swap...
Aparently it does not work on the older 90-93 DA Integra trailing arm bushings (larger diameter). I suppose that making your own cup for the DA bushing wouldn't be too hard if you felt it would save you some time and/or money. Let's just hope that somebody doesn't buy this tool, only to find out that they got DA trailing-arms on their car from a suspension swap...
04-14-2006, 11:44 PM
#25
Honda-Tech Member
Join Date: Jan 2005
Location: b00sting my D16s, SoWis, USA
Posts: 7,015
Likes: 0
Received 7 Likes
on
5 Posts
I know this tool was posted a few months ago - or at least I read about it here in the archives just a few months ago Anyways, I think in that thread they mentioned NT had an adapter for the DA? From what I remember, the DA is just an 1/8" or so larger. I think I even remember someone installing a smaller bushing into a large hole by leaving the large bushing's sleeve in. I think if nothing else, you've just have to machine a plate that size & stick it to the cup - that seems like a fun job, doesn't it?
Anyways, I think in that thread they mentioned NT had an adapter for the DA? From what I remember, the DA is just an 1/8" or so larger. I think I even remember someone installing a smaller bushing into a large hole by leaving the large bushing's sleeve in. I think if nothing else, you've just have to machine a plate that size & stick it to the cup - that seems like a fun job, doesn't it?
