

 03-31-2015, 10:27 AM
Last edit by: IB Advertising
See related guides and technical advice from our community experts:
Browse all: Honda Accord Brake Guides
- Honda Accord: How to Replace Brake Pads, Calipers and Rotors
Step by step instructions for do-it-yourself repairs
Browse all: Honda Accord Brake Guides

1997 Accord Brakes Tutorial
06-17-2005, 02:52 PM
#1
Honda-Tech Member
Thread Starter
Join Date: Jun 2002
Location: San Jose, CA, USA
Posts: 153
Likes: 0
Received 0 Likes
on
0 Posts
Images are back up and working. I'll retake some of the manual pictures since these ones are kinda faded and look terrible.... If I missed some pictures somewhere just let me know which ones you'd like to see....
After reading about how "simple" brake changes were for my car I decided "what the heck I'll give it a shot and see what happens."
While performing this task I thought it might be helpful to other people to see the mistakes/successes I had in changing my brakes. I'm sure other people
have some different ways/procedures on brake changes and I encourage their feedback or criticism on any part of this tutorial. Please be specific with your criticism.
Special thanks to my dad for helping and coming up with ideas. I also want to thank Ken, Alvin, and Hung at Kragen for the parts. With that, let's get started.
We are replacing the worn out rotors and brake pads for the 1997 Honda Accord in this tutorial (front brakes only).
**All parts were purchased at Kragen (except the custom hub puller)
**Note, do not lift the car on jacks until step 3
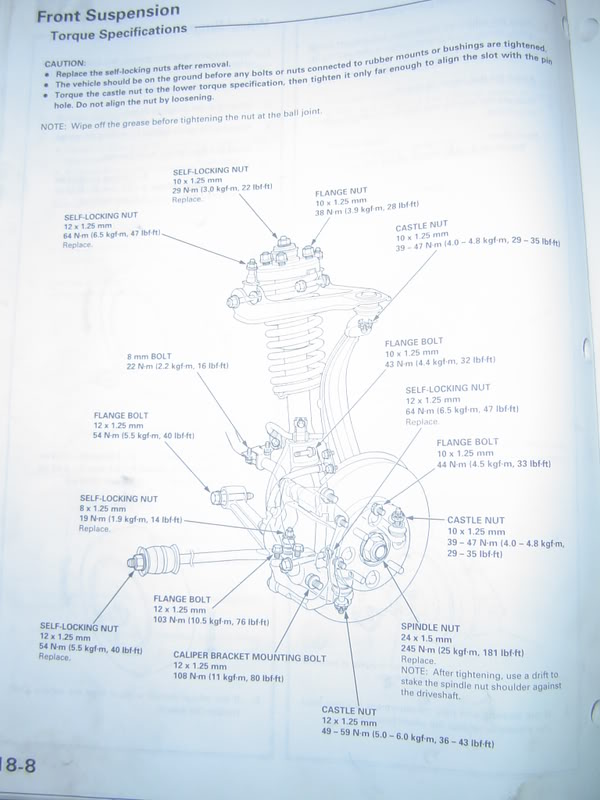
**Included are the Honda Abstract pics from the Accord Service Manual (for educational purposes only). Purchasing a Service Manual from Helm Inc. is a great idea/investment.
**When I say "Apply to both sides" that means do whatever step your on to both passenger and driver side.
**I'll be wearing nitrile gloves for most of the procedure since its a bitch to wash off the grease and stuff. My dad (who is a bit hardcore) decided not to wear them.
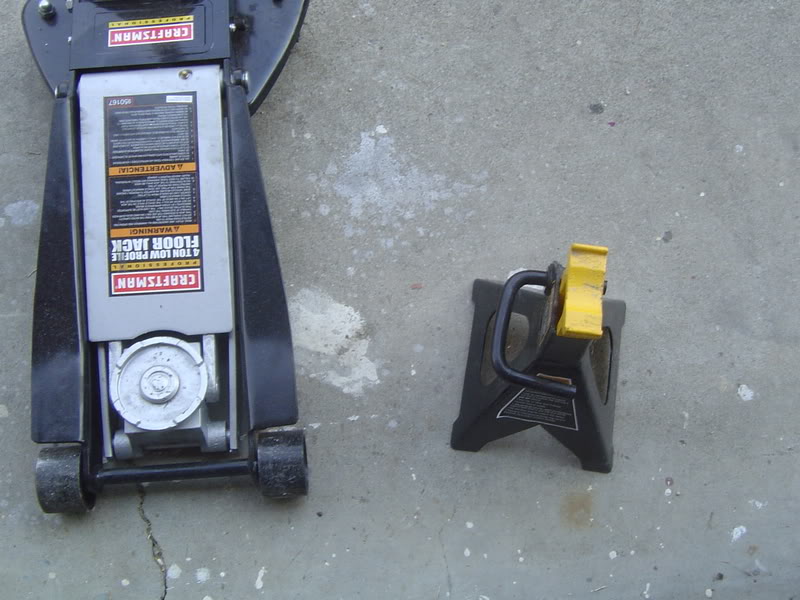
1. Get your tools ready. Socket set, Hub Puller from JC Whitney, torque wrench, breaker bar, ratchets, C clamp.
Of course a floor jack with jack stands
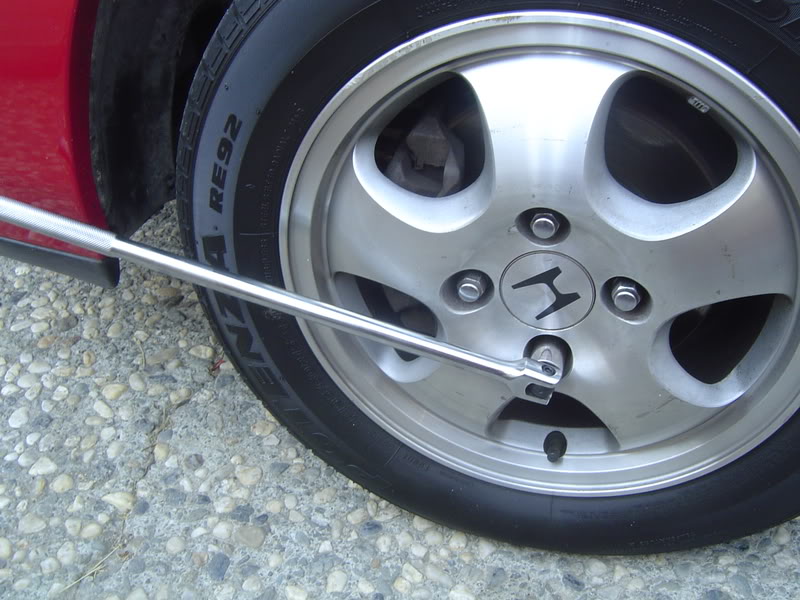
2. Now let's take a look at the car. Standard 4 bolt alloy wheels.
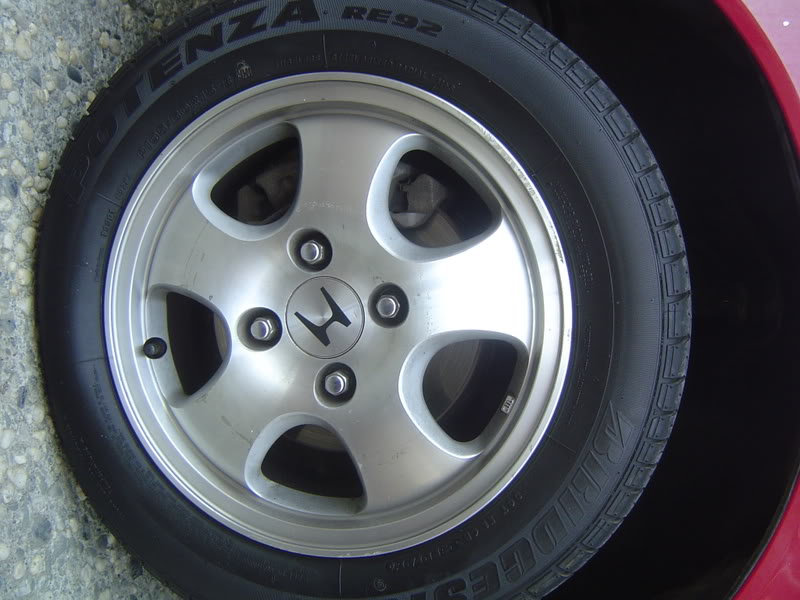
To take off the wheel get the correct socket, an extension, and some type of pole to get leverage.
I used a regular socket in the picture. Also, note the pole for leverage. Simply untorque the lug nuts to get them loose. Apply to both sides.
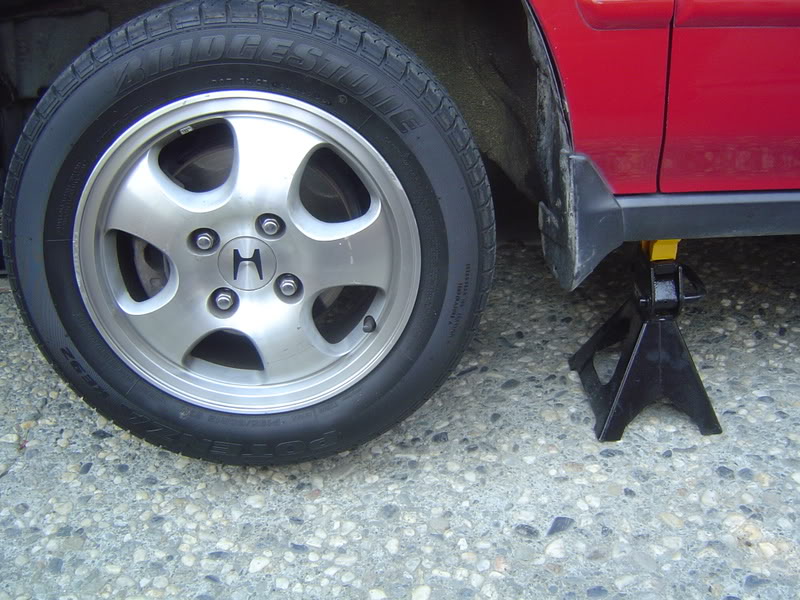
3. Jack up the car using a floor jack at the correct jacking points.
The jacking point is that piece of metal towards the bottom of the picture

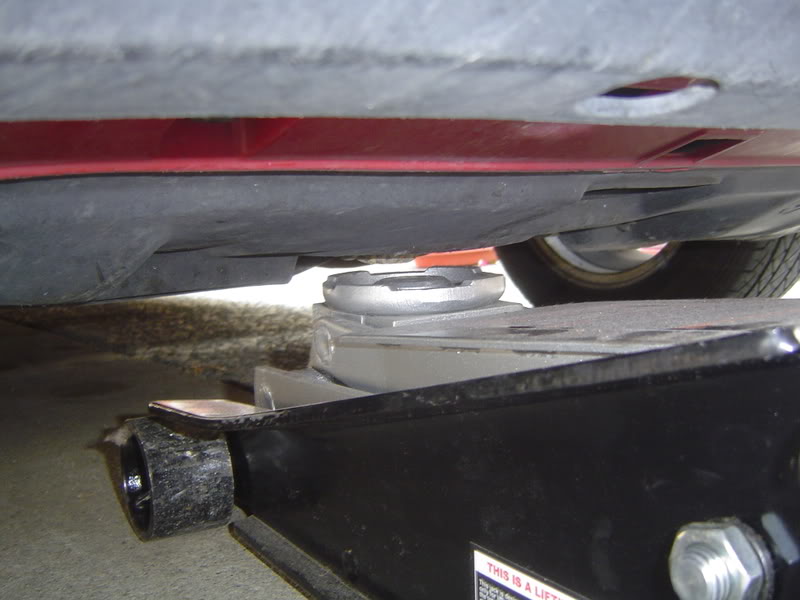
4. Once the car is in the air, place your jack stands in the correct places and lower the floor jack (make sure the jack stands are touching the jacking points before, during, and after lowering the floor jack).
Side jacking points

Take off the lug nuts and place them inside the tire to the side (or in a jar if you want). Apply to both sides.
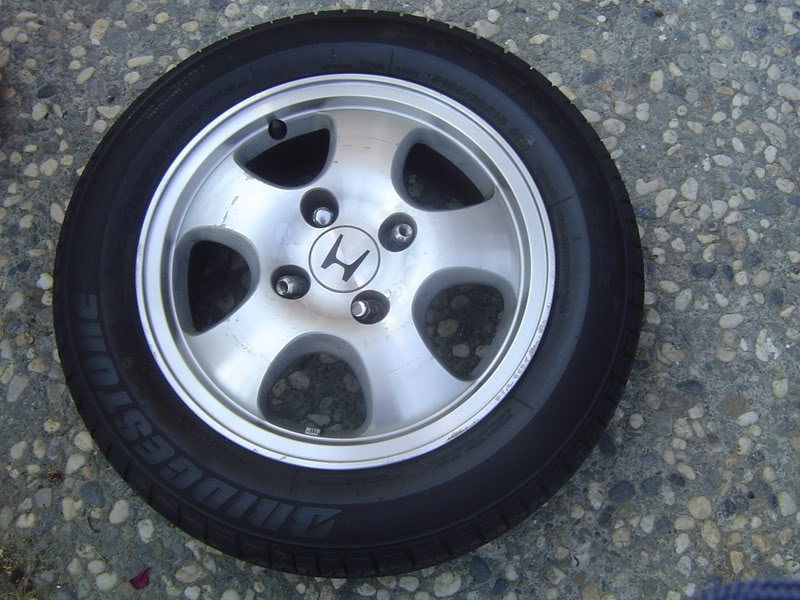
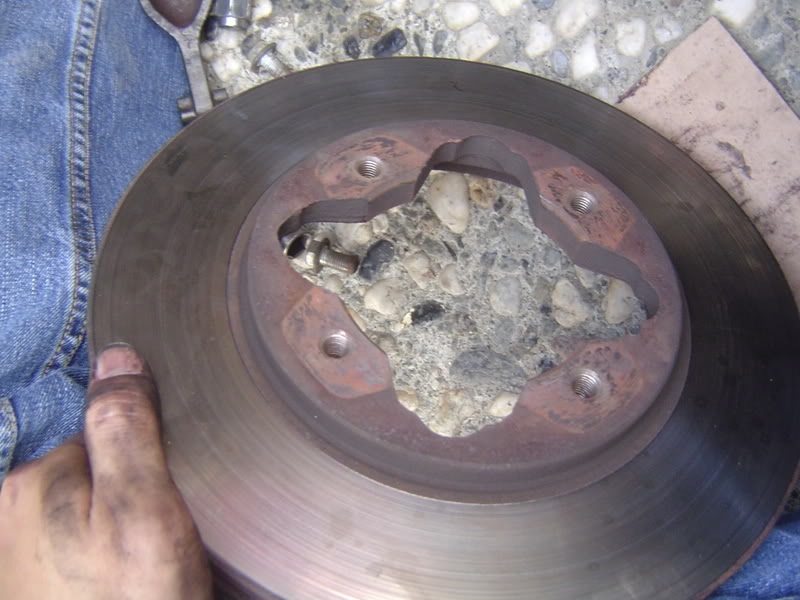
5. Take off the wheel and it might look something like this:
Abstract
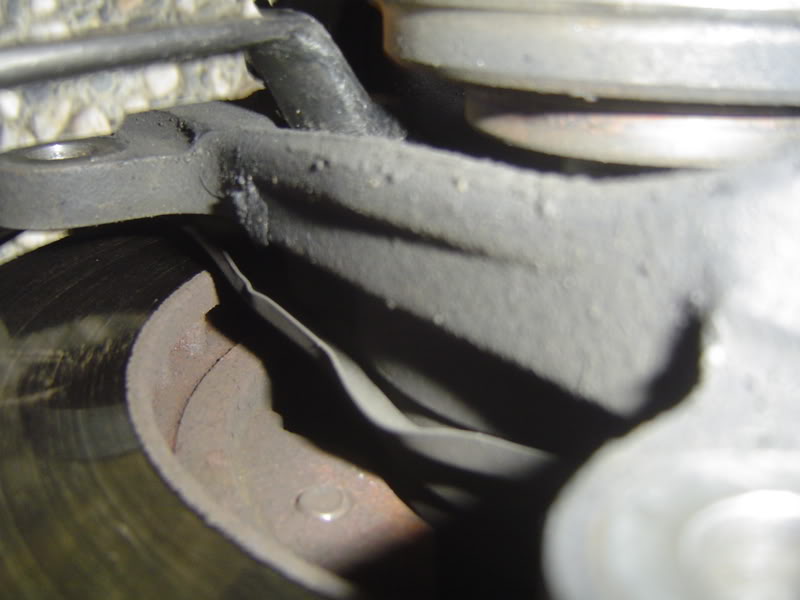
6. Take off the spindle bolt. The metal is bent in that little crook, so you need to get something like a hardened tip nail or screwdriver and hammer it back to form a circle. Stick the nail in and hammer it until it forms back into a circle, don't be afraid to pound it. Apply to both sides.
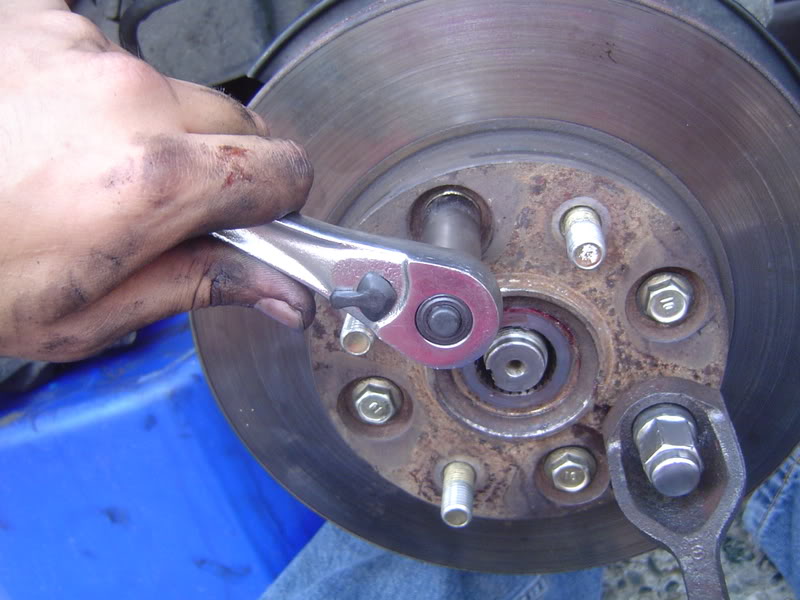
7. We now have to take the spindle nut off and we need a capable socket (this one is from Kragen, which rents them). The 36 mm one will do nicely. The socket was meant for an air tool but, we won't apply massive amounts of torque to the rachet it so we should be fine.
Rachet + socket

If the brakes work, have someone press the brakes (if nobody is around then get a pipe and stick it up against the driver seat to keep the brakes pressed) so the wheel won't spin while you remove the nut. Apply to both sides.
If you want to be a little different take a small 1/4" extension and stick it in the rotor so that it sticks up against the caliper (the extension will stop the wheel from moving but, won't ruin the caliper) then take off the spindle nut. Apply to both sides:
**In that above image the 1/4" extension it the shiny metal thing sticking against the caliper** I prefer to use the 1/4" extension trick myself...
If the bolt still doesn't come off it might be welded on to the axle. Don't worry, you can just take a chizel to the bolt and cut the bolt off, takes a little longer but it works.
8. Next, untorque but don't remove the 4 flange bolts on the front of the hub unit. If the brakes still work have someone press the brakes or use the 1/4" extension trick from step 7. Apply to both sides.
Abstract of wheel layout
9. We next take off the caliper in doing so, we will replace the pads at the same time.
9a. Loosen the 2 caliper bolts. Apply to both sides.
Abstract

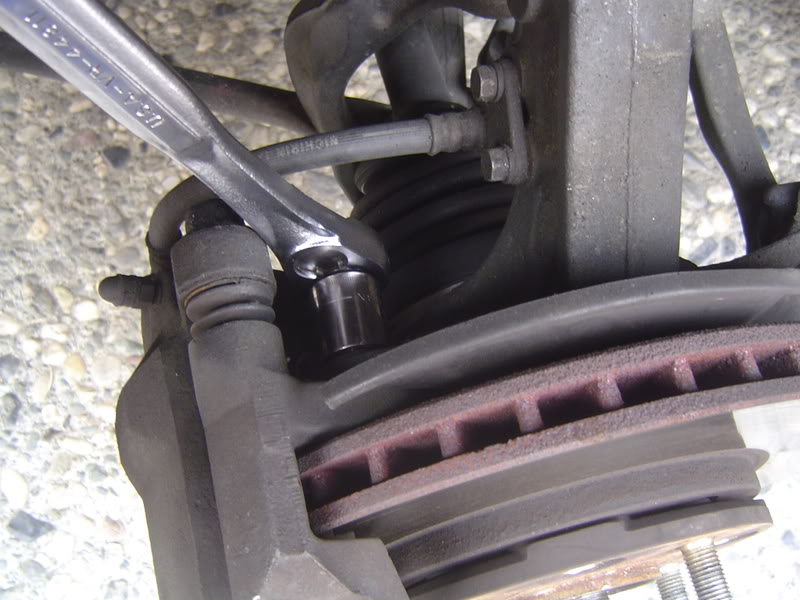
9b. Remove the 2 caliper housing bolts with a deep socket so you can avoid the brake lines (use a pole to get some leverage if you need it). They are on pretty tight so be careful not to strip them. Apply to both sides.


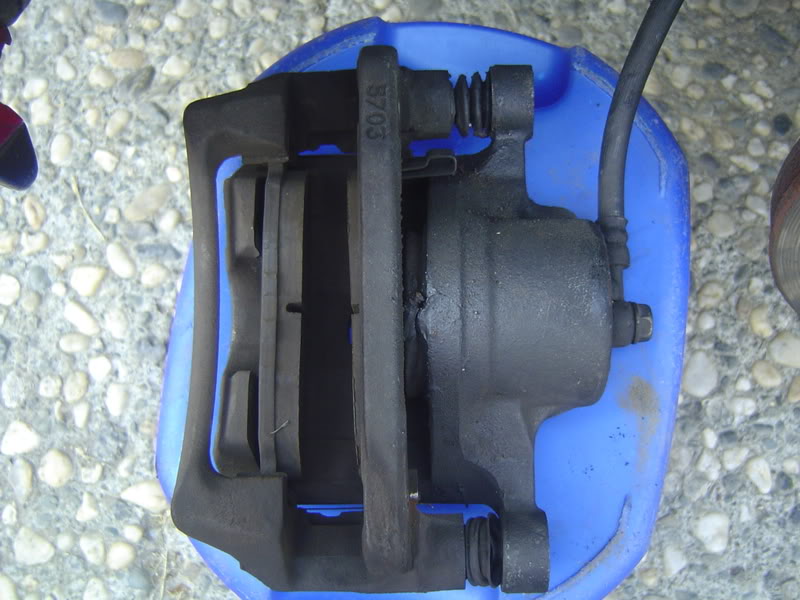
9c. Remove the caliper from the rotor and put it on a stand so you can take it apart more easily. Apply to both sides.
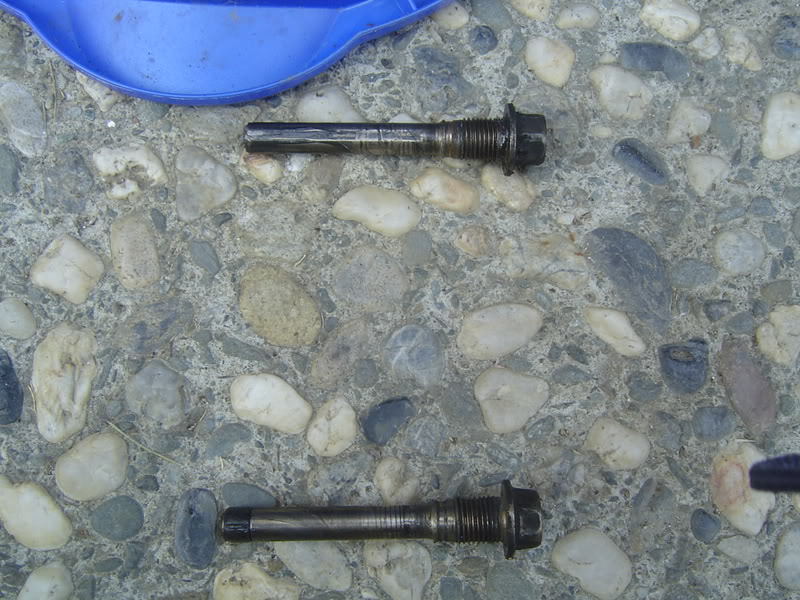
Keep track of the bolts here since the two long ones you removed from the caliper are different. Apply to both sides.
9d. Take out the old pads + shims. The brake pad housing comes right out when you take off the caliper bolts. Notice they are taken off in that picture. Apply to both sides.
Replace them with the new pads (shims will reduce noise, some brake pads have them built on). The new pads pop right in and there is a wear indicator that lets you know which pad goes on the inside and which pad goes on the outside. Apply to both sides.
9e. Get a large C clamp and a piece of wood. Use it to press the piston back in so the caliper will fit. Yes that's a piece of cardboard, but I couldn't fine a thin piece of wood. Apply to both sides.

9f. Clean out the wood/dust and place the caliper back in the housing. Apply to both sides. Be sure to grease the correct points outlined in the abstract.
Make sure the bolt with the rubber end is the top bolt of the caliper when reassembling (Grease correctly as well).
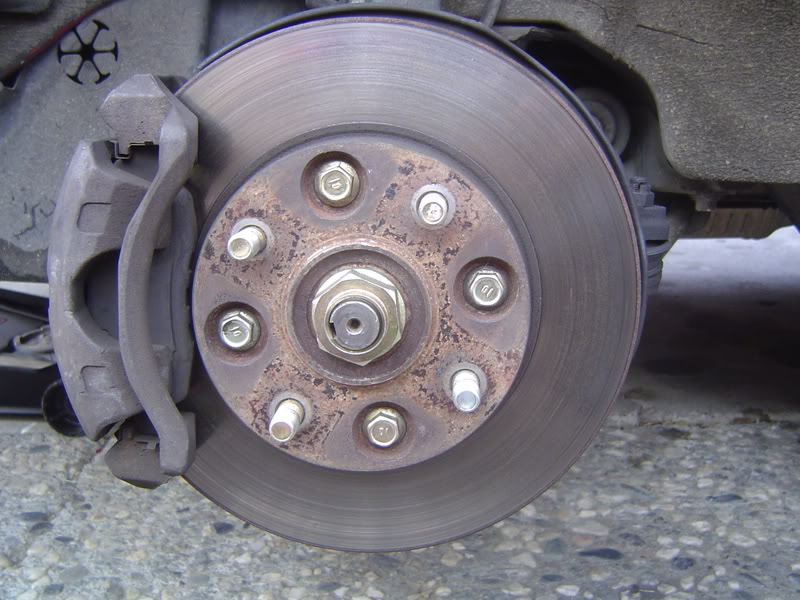
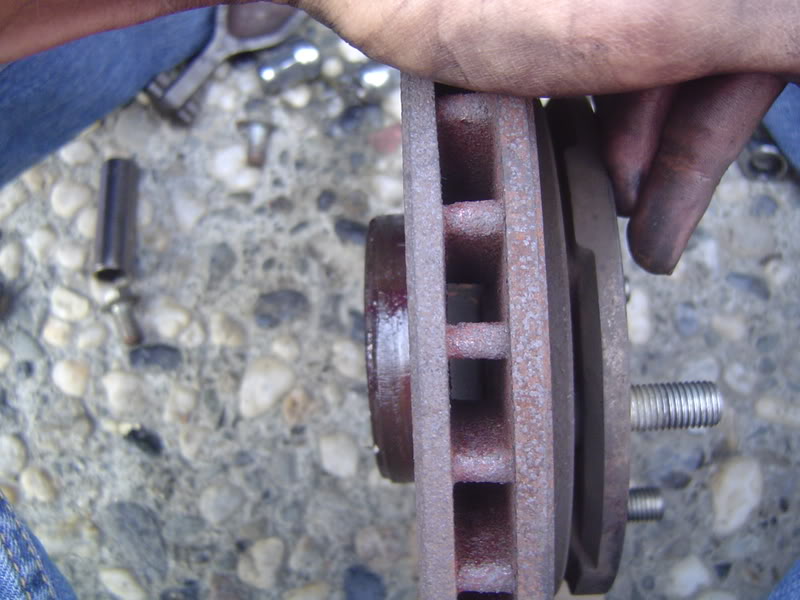
We will now take off the rotor.
10. If you want a little more room you can take a coathanger and hang it from the suspension arm.....not necessary, but you can.
11. Remove the 4 bolts on the backside of the hub unit (you will be removing 4 bolts total but this picture just shows 3 bolts, just to give you and idea where they are. Apply to both sides.

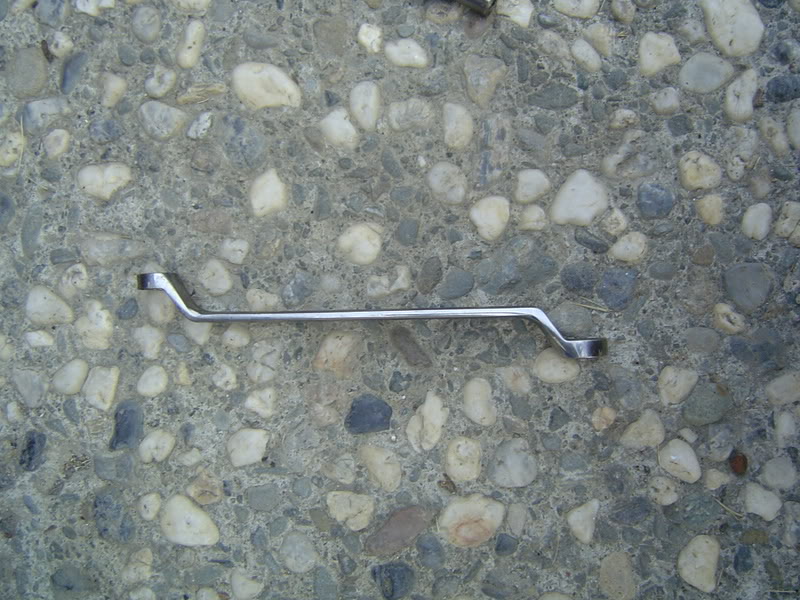
To do this we use the wrench with the offset head because it fits perfectly (12mm, 12 point). Push the driveshaft protector back so you can squeeze in your wrench.
Just get it on there and pull (in the correct direction). Also, get some PB Blaster in there and you'll be surprised how well it loosens the bolt
(use glasses and wear a mask when spraying). Apply to both sides.
11a. Now untorque the 4 flange bolts on the front (they're the gold-ish color ones). Don't take them off, just untorque them
12. Time to remove the rotor. However, the wheel bearing and hub unit are pressed together and the rotor is behind
those two. The manual says to "pull off hub assembly unit." It fails to mention how to actually do that.
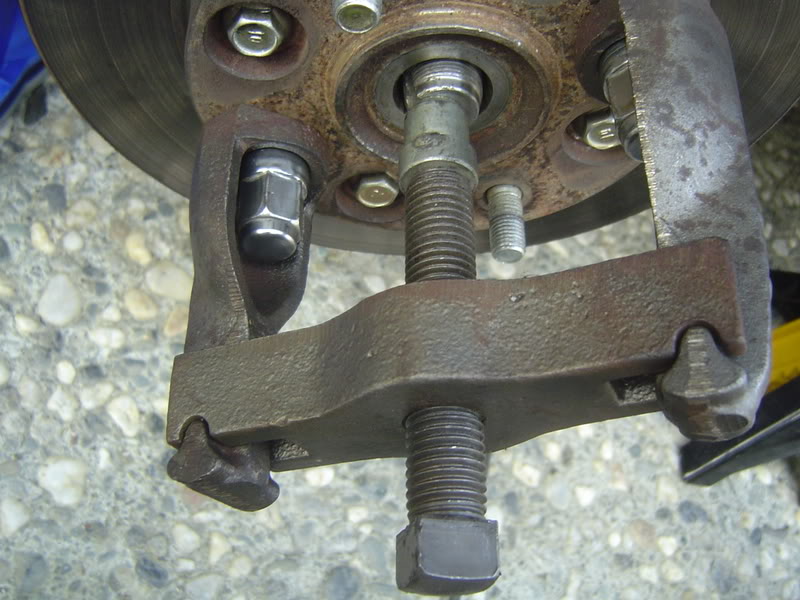
Fortunately, JC Whitney makes a hub puller for $24 + $7 shipping.
http://www.jcwhitney.com/autop...uller
It just attaches to the rotor bolts, screws in, then rips the hub unit right out (similar to a steering wheel puller).
Side Note:Other people had problems taking out the assembly. The wheel bearing can rust into the housing and you might just end up separating the hub unit from the wheel bearing instead of just pulling out the hub + bearing together. In that case you'll need to take apart the knuckle (read responses below from deserthonda, touringaccord, and bushrat for suggestions on how to do that. Also, look at the manual pages in the references portion of this tutorial for the layout).
Just attach your lug bolts to the lug threads and your set (see special note about picture). Apply to both sides.


Notice the little silver part at the end, that nut gave us an extra inch we needed to pull the hub unit off.
The hub puller bolt is only about 5.5" and I'm not sure if JC Whitney will make one for you that's about 7" (you can probably buy a bigger bolt at Lowe's,
just make sure its hardened steel and the correct size). Otherwise, you will need something that'll give you an extra inch.
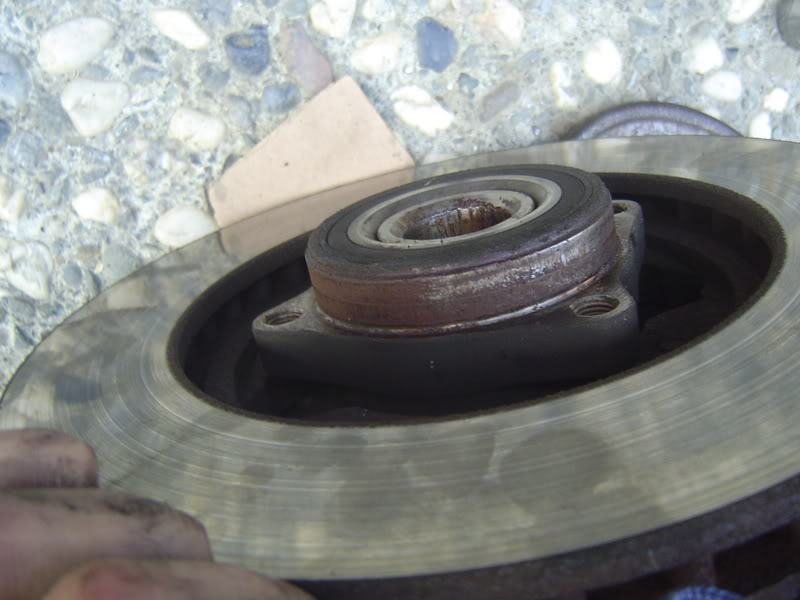
14. Now that everything is off we see there is indeed rust in some places (wheel bearing, driveshaft, etc...)

Not a real issue, just take some 800-1000 grit sand paper and some wd-40 to it.
15. Now one of the harder parts. Prep and assembly.
Get some good grease for this:
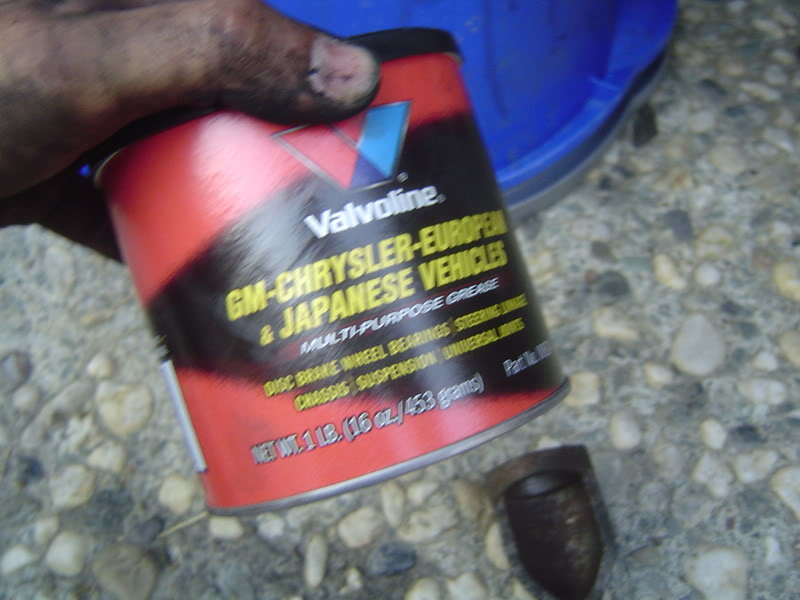
Lube the wheel bearing/axle end and housing so things slide in better

16. Assemble the new rotor + old hub unit. The bolts for this are the stumppy goldish ones, flange bolts. Apply to both sides.
Rotor
Hub
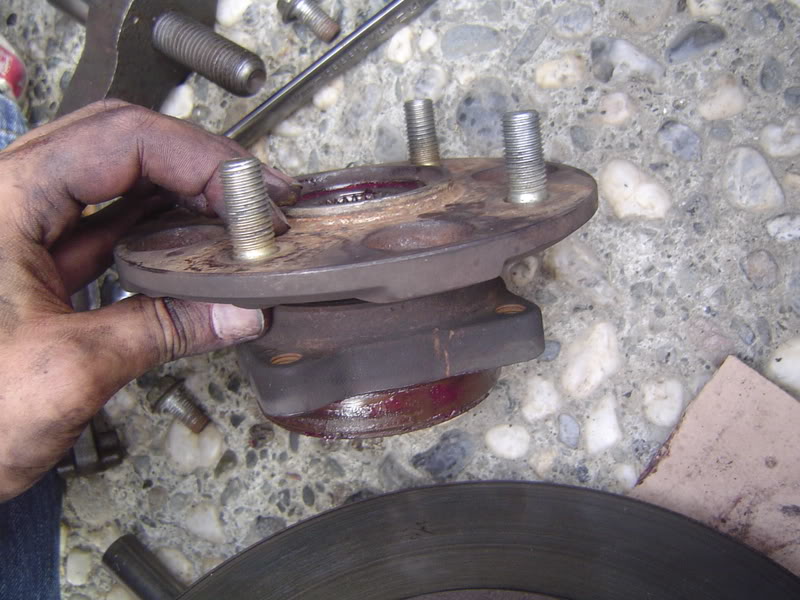
Notice how the rotor sits below the hub unit. Make sure when you attach them, the rotor isn't on backwards
There's no special way to put the wheel bearing and hub unit back on. When you stick the wheel bearing in be sure to grease it and the driveshaft first (if you have a better way to put the wheel bearing in please share). Stick in the 4 back bolts and line up the hub unit so that you can get a bite on the bolts (this part should take you a little while). Wiggle and push the bearing in (don't be afraid to use some force) until the back bolts start biting correctly. Once the bolts start biting get a hammer and 2x4 and pound it in. Apply to both sides.
Notice the 4 bolts already lined up and ready to go
Take a rubber mallet to get it in there solid
Tighten the 4 back bolts on the hub unit then pound the bearing in more. Apply to both sides.
17. Once the bearing appears to be in there (the splash guard should be right up next to the rotor) then use the offset wrench from step to tighten the back bolts down (tighten the back bolts so that they are on, but not too tight). Wipe down the front and back of the rotor. Apply to both sides.
18. Attach the Caliper housing to the rotor. Just get the caliper housing on the rotor and move it up and down until the bolt bites. Apply to both sides.
19. Tighten all caliper/caliper housing bolts and torque them down (all the caliper bolts require an awful amount of torque but, just get them on so they are
nice and tight and you should be fine. If you want to torque then down then be my guest). Apply to both sides.
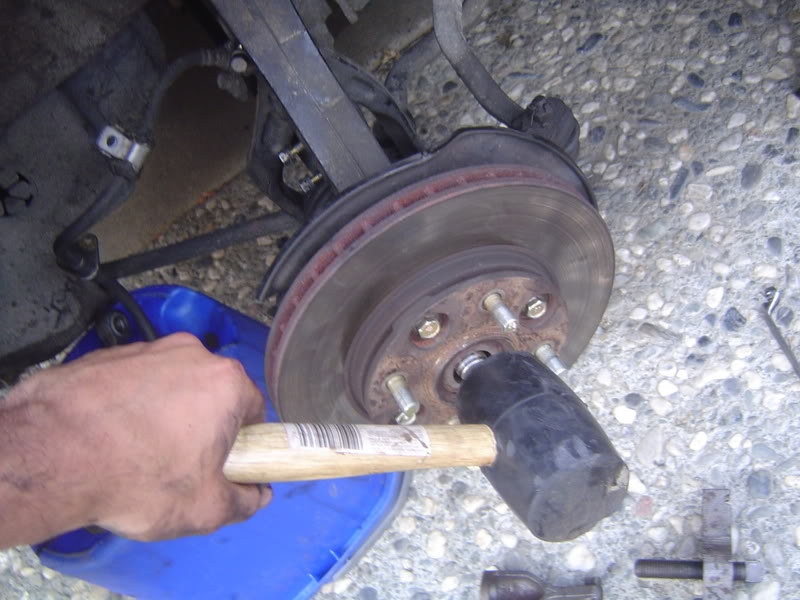
20. Get a screwdriver and deform the spindle nut at the section of metal where the driveshaft is cut out (just pound it in). Apply to both sides.
21. Now tighten the spindle nut. This will require around 181 ft-lbs. If you want to apply that much torque go ahead but, if the end of the driveshaft lines up with the end of the spindle nut, then that should be enough torque. Press the brakes before trying to tighten it or use the trick from step 7. Apply to both sides.
22. Keep the brakes tightened (or use the 1/4" extension trick from step 7) and torque down the flange bolts on the hub unit. Apply to both sides.
23. Check all bolts to make sure you don't have any missing/loose. Apply to both sides.
24. Attach wheels and lug nuts. Just get the lug nuts on hand tight. Apply to both sides.
25. Clear everything out of the way and lower the car off the jack stands.
26. Release brakes and torque down lug nuts (use the star method of torquing....up down left right).
27. Road test. Turn off the radio and listen for rumbblings from the wheel bearing or "strange" sounds from the brakes. If you hear nothing, go to step 28, if you hear something go to step 29.
28. Go home, clean up the garage, and open a bottle of beer for a job well done.
29. Check that all bolts are tightened and that no foreign objects are obstructing anything in/near the brakes. Try putting in shims if you think the brakes squeek to much or you just don't think it sounds right.
If you aren't satisfied after testing agin, then take it to Midas or some local brake shop and have them take a look at it.
Stories/References:
I would read in a lot of places that the hub unit was very hard to pull off. Before I found the part at JC Whitney my dad and I used a different tool to try and pull off the hub unit. Here are the different ones we tried.
Attempt 1:
To make this "puller" we used an old jack + tire iron.
First,We were able to get the crowbar in there and wedge some room so that we could wrap wire around the holes for the rotor and yank it out. To get the wire in there you just need to hook it in, then use pliars to twist it and close it down.
Didn't work out though *shrug*
Attempt 2:
We next tried good yellow rope. Same setup as before only with rope the tension was distributed more evenly this time:
Almost worked, but took a lot of effort and ended up breaking.
This pulled off the passenger side hub unit, but couldn't get the driver's side.
Attempt 3:
We next tried the good white rope. Same setup as attempt 2.
Unfortunately, the white rope snapped as well. That's when we called JC Whitney and ordered the puller.
References:
Let me actually try to find a better camera to upload the manual pics....
In the meantime:
http://i89.photobucket.com/alb...1.jpg
http://i89.photobucket.com/alb...2.jpg
http://i89.photobucket.com/alb...3.jpg
http://i89.photobucket.com/alb...4.jpg
http://i89.photobucket.com/alb...5.jpg
http://i89.photobucket.com/alb...6.jpg
http://i89.photobucket.com/alb...7.jpg
http://i89.photobucket.com/alb...8.jpg
http://i89.photobucket.com/alb...9.jpg
http://i89.photobucket.com/alb...0.jpg
http://i89.photobucket.com/alb...1.jpg
http://i89.photobucket.com/alb...2.jpg
http://i89.photobucket.com/alb...3.jpg
http://i89.photobucket.com/alb...4.jpg
Modified by ramoneguru at 7:49 AM 7/1/2008
Modified by ramoneguru at 7:50 AM 7/1/2008
Modified by ramoneguru at 7:51 AM 7/1/2008
Modified by ramoneguru at 8:53 AM 7/6/2008
After reading about how "simple" brake changes were for my car I decided "what the heck I'll give it a shot and see what happens."
While performing this task I thought it might be helpful to other people to see the mistakes/successes I had in changing my brakes. I'm sure other people
have some different ways/procedures on brake changes and I encourage their feedback or criticism on any part of this tutorial. Please be specific with your criticism.
Special thanks to my dad for helping and coming up with ideas. I also want to thank Ken, Alvin, and Hung at Kragen for the parts. With that, let's get started.
We are replacing the worn out rotors and brake pads for the 1997 Honda Accord in this tutorial (front brakes only).
**All parts were purchased at Kragen (except the custom hub puller)
**Note, do not lift the car on jacks until step 3
**Included are the Honda Abstract pics from the Accord Service Manual (for educational purposes only). Purchasing a Service Manual from Helm Inc. is a great idea/investment.
**When I say "Apply to both sides" that means do whatever step your on to both passenger and driver side.
**I'll be wearing nitrile gloves for most of the procedure since its a bitch to wash off the grease and stuff. My dad (who is a bit hardcore) decided not to wear them.
1. Get your tools ready. Socket set, Hub Puller from JC Whitney, torque wrench, breaker bar, ratchets, C clamp.
Of course a floor jack with jack stands
2. Now let's take a look at the car. Standard 4 bolt alloy wheels.
To take off the wheel get the correct socket, an extension, and some type of pole to get leverage.
I used a regular socket in the picture. Also, note the pole for leverage. Simply untorque the lug nuts to get them loose. Apply to both sides.
3. Jack up the car using a floor jack at the correct jacking points.
The jacking point is that piece of metal towards the bottom of the picture
4. Once the car is in the air, place your jack stands in the correct places and lower the floor jack (make sure the jack stands are touching the jacking points before, during, and after lowering the floor jack).
Side jacking points
Take off the lug nuts and place them inside the tire to the side (or in a jar if you want). Apply to both sides.
5. Take off the wheel and it might look something like this:
Abstract
6. Take off the spindle bolt. The metal is bent in that little crook, so you need to get something like a hardened tip nail or screwdriver and hammer it back to form a circle. Stick the nail in and hammer it until it forms back into a circle, don't be afraid to pound it. Apply to both sides.
7. We now have to take the spindle nut off and we need a capable socket (this one is from Kragen, which rents them). The 36 mm one will do nicely. The socket was meant for an air tool but, we won't apply massive amounts of torque to the rachet it so we should be fine.
Rachet + socket
If the brakes work, have someone press the brakes (if nobody is around then get a pipe and stick it up against the driver seat to keep the brakes pressed) so the wheel won't spin while you remove the nut. Apply to both sides.
If you want to be a little different take a small 1/4" extension and stick it in the rotor so that it sticks up against the caliper (the extension will stop the wheel from moving but, won't ruin the caliper) then take off the spindle nut. Apply to both sides:
**In that above image the 1/4" extension it the shiny metal thing sticking against the caliper** I prefer to use the 1/4" extension trick myself...
If the bolt still doesn't come off it might be welded on to the axle. Don't worry, you can just take a chizel to the bolt and cut the bolt off, takes a little longer but it works.
8. Next, untorque but don't remove the 4 flange bolts on the front of the hub unit. If the brakes still work have someone press the brakes or use the 1/4" extension trick from step 7. Apply to both sides.
Abstract of wheel layout
9. We next take off the caliper in doing so, we will replace the pads at the same time.
9a. Loosen the 2 caliper bolts. Apply to both sides.
Abstract
9b. Remove the 2 caliper housing bolts with a deep socket so you can avoid the brake lines (use a pole to get some leverage if you need it). They are on pretty tight so be careful not to strip them. Apply to both sides.
9c. Remove the caliper from the rotor and put it on a stand so you can take it apart more easily. Apply to both sides.
Keep track of the bolts here since the two long ones you removed from the caliper are different. Apply to both sides.
9d. Take out the old pads + shims. The brake pad housing comes right out when you take off the caliper bolts. Notice they are taken off in that picture. Apply to both sides.
Replace them with the new pads (shims will reduce noise, some brake pads have them built on). The new pads pop right in and there is a wear indicator that lets you know which pad goes on the inside and which pad goes on the outside. Apply to both sides.
9e. Get a large C clamp and a piece of wood. Use it to press the piston back in so the caliper will fit. Yes that's a piece of cardboard, but I couldn't fine a thin piece of wood. Apply to both sides.
9f. Clean out the wood/dust and place the caliper back in the housing. Apply to both sides. Be sure to grease the correct points outlined in the abstract.
Make sure the bolt with the rubber end is the top bolt of the caliper when reassembling (Grease correctly as well).
We will now take off the rotor.
10. If you want a little more room you can take a coathanger and hang it from the suspension arm.....not necessary, but you can.
11. Remove the 4 bolts on the backside of the hub unit (you will be removing 4 bolts total but this picture just shows 3 bolts, just to give you and idea where they are. Apply to both sides.
To do this we use the wrench with the offset head because it fits perfectly (12mm, 12 point). Push the driveshaft protector back so you can squeeze in your wrench.
Just get it on there and pull (in the correct direction). Also, get some PB Blaster in there and you'll be surprised how well it loosens the bolt
(use glasses and wear a mask when spraying). Apply to both sides.
11a. Now untorque the 4 flange bolts on the front (they're the gold-ish color ones). Don't take them off, just untorque them
12. Time to remove the rotor. However, the wheel bearing and hub unit are pressed together and the rotor is behind
those two. The manual says to "pull off hub assembly unit." It fails to mention how to actually do that.
Fortunately, JC Whitney makes a hub puller for $24 + $7 shipping.
http://www.jcwhitney.com/autop...uller
It just attaches to the rotor bolts, screws in, then rips the hub unit right out (similar to a steering wheel puller).
Side Note:Other people had problems taking out the assembly. The wheel bearing can rust into the housing and you might just end up separating the hub unit from the wheel bearing instead of just pulling out the hub + bearing together. In that case you'll need to take apart the knuckle (read responses below from deserthonda, touringaccord, and bushrat for suggestions on how to do that. Also, look at the manual pages in the references portion of this tutorial for the layout).
Just attach your lug bolts to the lug threads and your set (see special note about picture). Apply to both sides.
Notice the little silver part at the end, that nut gave us an extra inch we needed to pull the hub unit off.
The hub puller bolt is only about 5.5" and I'm not sure if JC Whitney will make one for you that's about 7" (you can probably buy a bigger bolt at Lowe's,
just make sure its hardened steel and the correct size). Otherwise, you will need something that'll give you an extra inch.
14. Now that everything is off we see there is indeed rust in some places (wheel bearing, driveshaft, etc...)
Not a real issue, just take some 800-1000 grit sand paper and some wd-40 to it.
15. Now one of the harder parts. Prep and assembly.
Get some good grease for this:
Lube the wheel bearing/axle end and housing so things slide in better
16. Assemble the new rotor + old hub unit. The bolts for this are the stumppy goldish ones, flange bolts. Apply to both sides.
Rotor
Hub
Notice how the rotor sits below the hub unit. Make sure when you attach them, the rotor isn't on backwards
There's no special way to put the wheel bearing and hub unit back on. When you stick the wheel bearing in be sure to grease it and the driveshaft first (if you have a better way to put the wheel bearing in please share). Stick in the 4 back bolts and line up the hub unit so that you can get a bite on the bolts (this part should take you a little while). Wiggle and push the bearing in (don't be afraid to use some force) until the back bolts start biting correctly. Once the bolts start biting get a hammer and 2x4 and pound it in. Apply to both sides.
Notice the 4 bolts already lined up and ready to go
Take a rubber mallet to get it in there solid
Tighten the 4 back bolts on the hub unit then pound the bearing in more. Apply to both sides.
17. Once the bearing appears to be in there (the splash guard should be right up next to the rotor) then use the offset wrench from step to tighten the back bolts down (tighten the back bolts so that they are on, but not too tight). Wipe down the front and back of the rotor. Apply to both sides.
18. Attach the Caliper housing to the rotor. Just get the caliper housing on the rotor and move it up and down until the bolt bites. Apply to both sides.
19. Tighten all caliper/caliper housing bolts and torque them down (all the caliper bolts require an awful amount of torque but, just get them on so they are
nice and tight and you should be fine. If you want to torque then down then be my guest). Apply to both sides.
20. Get a screwdriver and deform the spindle nut at the section of metal where the driveshaft is cut out (just pound it in). Apply to both sides.
21. Now tighten the spindle nut. This will require around 181 ft-lbs. If you want to apply that much torque go ahead but, if the end of the driveshaft lines up with the end of the spindle nut, then that should be enough torque. Press the brakes before trying to tighten it or use the trick from step 7. Apply to both sides.
22. Keep the brakes tightened (or use the 1/4" extension trick from step 7) and torque down the flange bolts on the hub unit. Apply to both sides.
23. Check all bolts to make sure you don't have any missing/loose. Apply to both sides.
24. Attach wheels and lug nuts. Just get the lug nuts on hand tight. Apply to both sides.
25. Clear everything out of the way and lower the car off the jack stands.
26. Release brakes and torque down lug nuts (use the star method of torquing....up down left right).
27. Road test. Turn off the radio and listen for rumbblings from the wheel bearing or "strange" sounds from the brakes. If you hear nothing, go to step 28, if you hear something go to step 29.
28. Go home, clean up the garage, and open a bottle of beer for a job well done.
29. Check that all bolts are tightened and that no foreign objects are obstructing anything in/near the brakes. Try putting in shims if you think the brakes squeek to much or you just don't think it sounds right.
If you aren't satisfied after testing agin, then take it to Midas or some local brake shop and have them take a look at it.
Stories/References:
I would read in a lot of places that the hub unit was very hard to pull off. Before I found the part at JC Whitney my dad and I used a different tool to try and pull off the hub unit. Here are the different ones we tried.
Attempt 1:
To make this "puller" we used an old jack + tire iron.
First,We were able to get the crowbar in there and wedge some room so that we could wrap wire around the holes for the rotor and yank it out. To get the wire in there you just need to hook it in, then use pliars to twist it and close it down.
Didn't work out though *shrug*
Attempt 2:
We next tried good yellow rope. Same setup as before only with rope the tension was distributed more evenly this time:
Almost worked, but took a lot of effort and ended up breaking.
This pulled off the passenger side hub unit, but couldn't get the driver's side.
Attempt 3:
We next tried the good white rope. Same setup as attempt 2.
Unfortunately, the white rope snapped as well. That's when we called JC Whitney and ordered the puller.
References:
Let me actually try to find a better camera to upload the manual pics....
In the meantime:
http://i89.photobucket.com/alb...1.jpg
http://i89.photobucket.com/alb...2.jpg
http://i89.photobucket.com/alb...3.jpg
http://i89.photobucket.com/alb...4.jpg
http://i89.photobucket.com/alb...5.jpg
http://i89.photobucket.com/alb...6.jpg
http://i89.photobucket.com/alb...7.jpg
http://i89.photobucket.com/alb...8.jpg
http://i89.photobucket.com/alb...9.jpg
http://i89.photobucket.com/alb...0.jpg
http://i89.photobucket.com/alb...1.jpg
http://i89.photobucket.com/alb...2.jpg
http://i89.photobucket.com/alb...3.jpg
http://i89.photobucket.com/alb...4.jpg
Modified by ramoneguru at 7:49 AM 7/1/2008
Modified by ramoneguru at 7:50 AM 7/1/2008
Modified by ramoneguru at 7:51 AM 7/1/2008
Modified by ramoneguru at 8:53 AM 7/6/2008

 06-17-2005, 07:29 PM
#3
Join Date: Apr 2005
Location: Newcastle, NSW, Australia
Posts: 71
Likes: 0
Received 0 Likes
on
0 Posts
Great write up man, I wish I found this before I did my EAM big brake install!
The only gripe I have is you didnt show how to apply the hand cleaner
Cheers
The only gripe I have is you didnt show how to apply the hand cleaner
Cheers
06-17-2005, 08:46 PM
#6
Honda-Tech Member
Thread Starter
Join Date: Jun 2002
Location: San Jose, CA, USA
Posts: 153
Likes: 0
Received 0 Likes
on
0 Posts
Cool, glad you guys like it so far. Hopefully this can become a sticky.
I know that the 91-97 Accord front brakes are like this so I would imagine the brake change would be the same.
The manual abstracts are acting up, I'll fix it.
Modified by ramoneguru at 6:29 AM 6/18/2005
I know that the 91-97 Accord front brakes are like this so I would imagine the brake change would be the same.
The manual abstracts are acting up, I'll fix it.
Modified by ramoneguru at 6:29 AM 6/18/2005
Trending Topics
 06-18-2005, 05:38 AM
#10
Honda-Tech Member
Join Date: Apr 2005
Location: sleeping in a cactus, AZ, U.S.A
Posts: 2,191
Likes: 0
Received 3 Likes
on
3 Posts
great job . :-) .the way i do it i separate the lower ball joint and totally remove axle from car by popping out of tranny and slide it off throught the wishbone thus gives me a lot more room to get to the 4 bolts on the back and to clean the hub housing on the knucle ......also if people do not want to use a puller they can hit rotor with a hammer and will come out that way if you do so i advice to put the lower ball joint back in knuckle and put the castle nut finger loose just so it does not pop out .
your way is totally correct mine is just
a matter of preference
as i said earlier great job ...........
your way is totally correct mine is just
a matter of preference
as i said earlier great job ...........
06-18-2005, 10:27 AM
#11
Honda-Tech Member
Thread Starter
Join Date: Jun 2002
Location: San Jose, CA, USA
Posts: 153
Likes: 0
Received 0 Likes
on
0 Posts
Here is the link to the puller (the picture here is of 3 arms, but you know what the 2 arm looks like).
http://www.jcwhitney.com/autop...10101
http://www.jcwhitney.com/autop...10101
06-18-2005, 10:35 AM
#12
Honda-Tech Member
Thread Starter
Join Date: Jun 2002
Location: San Jose, CA, USA
Posts: 153
Likes: 0
Received 0 Likes
on
0 Posts
<TABLE WIDTH="90%" CELLSPACING=0 CELLPADDING=0 ALIGN=CENTER><TR><TD>Quote, originally posted by deserthonda »</TD></TR><TR><TD CLASS="quote">the way i do it i separate the lower ball joint and totally remove axle from car by popping out of tranny and slide it off throught the wishbone thus gives me a lot more room to get to the 4 bolts on the back and to clean the hub housing on the knucle ......</TD></TR></TABLE>
Question:
When taking off the rotor, do you remove the front 4 flange bolts holding the rotor to the hub unit or it is jut the back 4 bolts?
Looking back it didn't seem really necessary since the wheel beraing, hub unit, and rotor we're all going to come out anyways. The front 4 just hold the rotor to the hub unit....
06-18-2005, 11:01 AM
#13
Honda-Tech Member
Join Date: Apr 2005
Location: sleeping in a cactus, AZ, U.S.A
Posts: 2,191
Likes: 0
Received 3 Likes
on
3 Posts
well i use air tools so i remove them when the rotr/bub assembly is off the car but if i were to use hand tools i would loosen them up while assembly is in car and remove those 4 bolts on ground when i am ready to install new rotor
 06-21-2005, 05:31 AM
#19
Join Date: Mar 2004
Location: PHILADELPHIA, PA, US
Posts: 504
Likes: 0
Received 0 Likes
on
0 Posts
<TABLE WIDTH="90%" CELLSPACING=0 CELLPADDING=0 ALIGN=CENTER><TR><TD>Quote, originally posted by deserthonda »</TD></TR><TR><TD CLASS="quote">great job . :-) .the way i do it i separate the lower ball joint and totally remove axle from car by popping out of tranny and slide it off throught the wishbone thus gives me a lot more room to get to the 4 bolts on the back and to clean the hub housing on the knucle ......also if people do not want to use a puller they can hit rotor with a hammer and will come out that way if you do so i advice to put the lower ball joint back in knuckle and put the castle nut finger loose just so it does not pop out .
your way is totally correct mine is just
a matter of preference
as i said earlier great job ...........</TD></TR></TABLE>
same way i do it makes it 10x better to work on
btw nice job on the write up
your way is totally correct mine is just
a matter of preference
as i said earlier great job ...........</TD></TR></TABLE>
same way i do it makes it 10x better to work on
btw nice job on the write up
06-21-2005, 05:44 AM
#20
H-T Order of Merit
good write-up
That should help quite a few people.
I wish mine would have come apart like that. My bearing was so rusted into the kunckle that I ended up pulling the hub out of the bearing. So deffinately make sure you clean up those surfaces and grease them so that it doesn't rust up on you.
For the 4 bolts that hold the bearing in, I usually do it the same way as deserthonda. Remove the axle to give yourself more room to get to them. Less chance of stripping them or damaging the head from not enough room.
<TABLE WIDTH="90%" CELLSPACING=0 CELLPADDING=0 ALIGN=CENTER><TR><TD>Quote, originally posted by ramoneguru »</TD></TR><TR><TD CLASS="quote">To do this we use the wrench with the offset head because it fits perfectly (12mm, 16 point).</TD></TR></TABLE>
Don't you mean 12 point
again, nice write-up. Maybe PM urbanlegend21 and see if he will allow this to be posted in the Guide to Basic Accords so it can always be found.
06-21-2005, 06:28 AM
#21
Junior Member
Join Date: Dec 2004
Location: NC State University
Posts: 333
Likes: 0
Received 0 Likes
on
0 Posts
nice job. you might want to take off some of those diagrams at the end, my computer bogged up when i got to them, or maybe put a 56k warning.
you might want to take off some of those diagrams at the end, my computer bogged up when i got to them, or maybe put a 56k warning.
06-21-2005, 02:01 PM
#23
Honda-Tech Member
Thread Starter
Join Date: Jun 2002
Location: San Jose, CA, USA
Posts: 153
Likes: 0
Received 0 Likes
on
0 Posts
<TABLE WIDTH="90%" CELLSPACING=0 CELLPADDING=0 ALIGN=CENTER><TR><TD>Quote, originally posted by TouringAccord »</TD></TR><TR><TD CLASS="quote">
Don't you mean 12 point
</TD></TR></TABLE>
Yes, I did. Good catch, fixed.
Don't you mean 12 point
</TD></TR></TABLE>
Yes, I did. Good catch, fixed.
06-22-2005, 07:28 AM
#24
Join Date: Jul 2004
Posts: 33
Likes: 0
Received 0 Likes
on
0 Posts
Great post, just a heads up though, like "touraccord" posted, you can have a problem with the bearing being rusted into the suspension peice.
When I did my brakes ( 92 accord ) the driver side bearimg was seized in place and I had to remove the entire suspension peice and try and beat the bearing out from behind. All I managed to do was separate the hub from the bearing.
Note about the above, the bearing has a split inner race which can and did come apart leaving a bunch of ball bearings rolling around the garage floor at 2am in the morning (many choice words spocken).
Talked to a mechanic at a local garage and he said he had good luck using an air chisel to separate the bearing from the suspension. Haven't tried this but sounded interesting.
