
DIY J30A4 Swap into EG Civic race car
 01-10-2015, 11:18 PM
#1
Honda-Tech Member
Thread Starter
Join Date: Jan 2015
Location: Newcastle Australia
Posts: 12
Likes: 0
Received 0 Likes
on
0 Posts
About two years ago I began fitting an Accord V6 into my race car whose development from a humble (yet extremely successful) 1.6 auto to a B20B "Frankenstein" I recorded at:

There's other Civic racing videos there, plus my step by step under A$1,000 2 litre swap for a Civic:

Getting a little bored with the B20 Frankenstein (I know - shame on me)
I was considering a K20 or K24 swap, but when by accident I saw a U-tube vid of one of the first V6 swaps in the USA I just knew I had to try something that outrageous. Australia is generally about 5 years behind what you guys are up to with Hondas most of the time, and the thought of being the first to do this transplant in my country was a particular attraction as I'd learnt that lots of torque and n/a is what produces the best reliability and race wins in my area's competition.
A little research (thank god for Wiki "Engines"!) directed me to avoid the early, cheaper J30A1-3 engines available here in Accords and a few Honda 4wd's and people movers. I began a search for a J30A4, which puts out the highest torque and bhp of any Honda V6's in Oz. Unfortunately there are no J32's here, and all the J35's are very late model (i.e.expensive even as wrecks), plus they have variable cylinder management which I definitely wanted to avoid. I ended up buying this 2004 Accord from a dismantler. It'd just come in, so nothing I wanted would be missing. We soon had a deal that he'd remove everything I didn't want, and I picked up the wreck for A$2,500.

I cannot emphasize enough the many advantages when doing a swap of buying an intact wreck - rather than just the engine on it's own. You get motor, gearbox, driveshafts, wiring loom, dash & instruments, driveshafts, larger brakes, fuse boxes, engine mounts & brackets, gear shift, linkages,stacks of nuts & bolts, and sometimes even a battery and radiator if it's not a front end smash up. In this case I got all the fly-by-wire throttle componentry too.
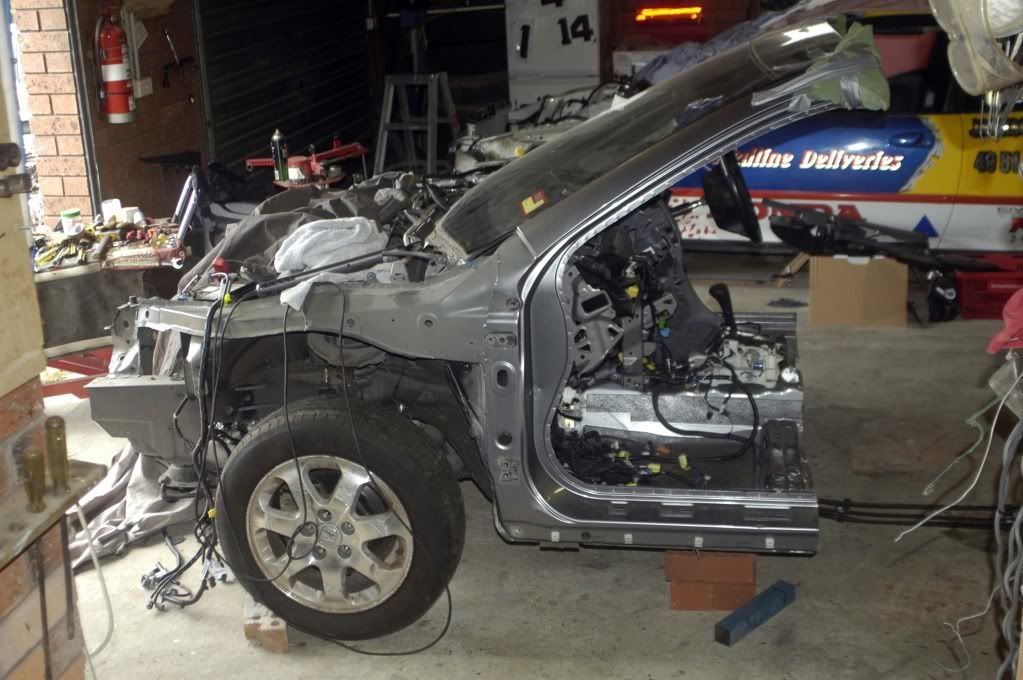
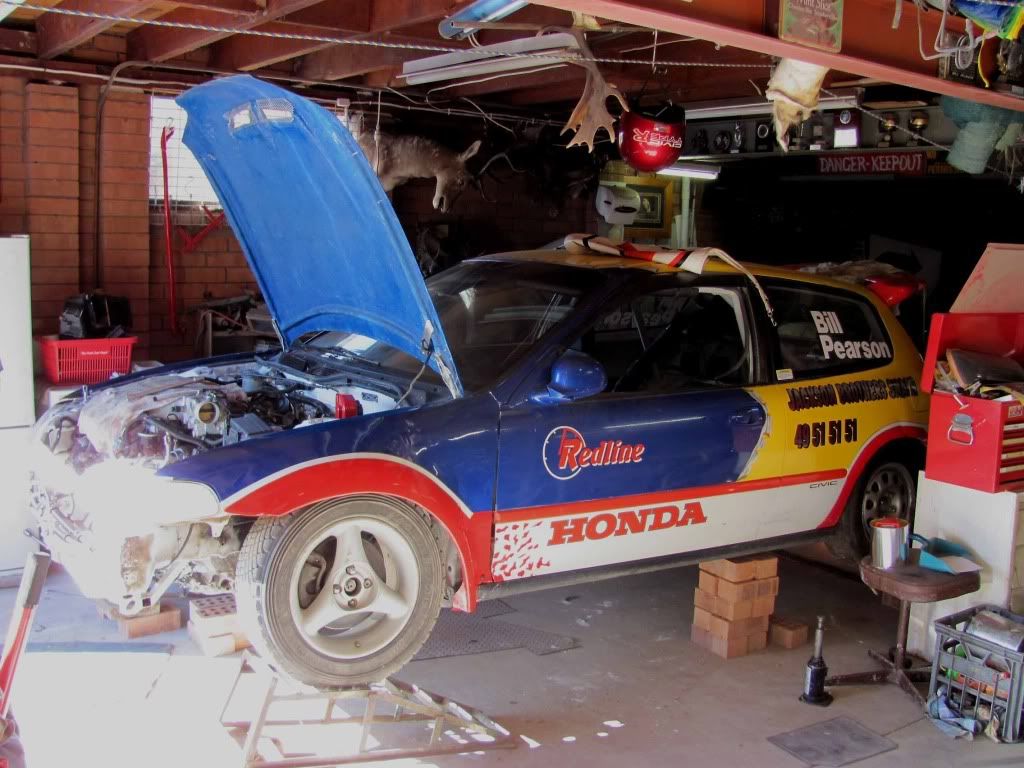
I made sure my gutted EG was sitting dead level and wheeled the engine around in the bay to find precisely where I wanted it to go. At first I had it sitting tight against the firewall, but a check underneath showed there was not enough room for the d/side inner CV to clear I emptied the Civic's engine bay, selling my old powerplant and gearbox for the cost of the Accord. I cut it in half to make room in my garage and started measuring. Having done some earlier A20A6 swaps from scratch beforehand, I'd made up my mind to fabricate the conversion myself rather than use a Hasport or similar kit. Some USA feedback suggested those kits placed the engine a bit higher and further forward than would be best for racing. I didn't want an ugly hole in the bonnet, nor bad handling characteristics.
Instead of trying to splice the Accord's wiring harness into the Civic's I opted to completely swap out the entire loom, dash and instruments as I'd done with the A20A6 conversions. This meant I'd only have to splice the two looms together near the drivers door where (apart from 3 obvious wires going to the fuel pump), there was only non race electrics like trafficators, brake lights, etc which would be easy to sort out. I'd also learnt it's a lot easier to 1) get the engine to start in the donor wreck before you dismantle it and 2) mark EVERY wire before you start removing them or cutting off unneeded ones (like the ABS and air bag circuits). I even tag the loom WHERE it goes as I remove it... eg: "Goes across n/s footwell", "Goes over steering column", "Goes thru firewall", "Engine bay fuse box". Why? Because weeks later there's nothing quite as daunting as being confronted by fifteen feet of a tangled wire spider web you've lost all memory of how to place and connect.
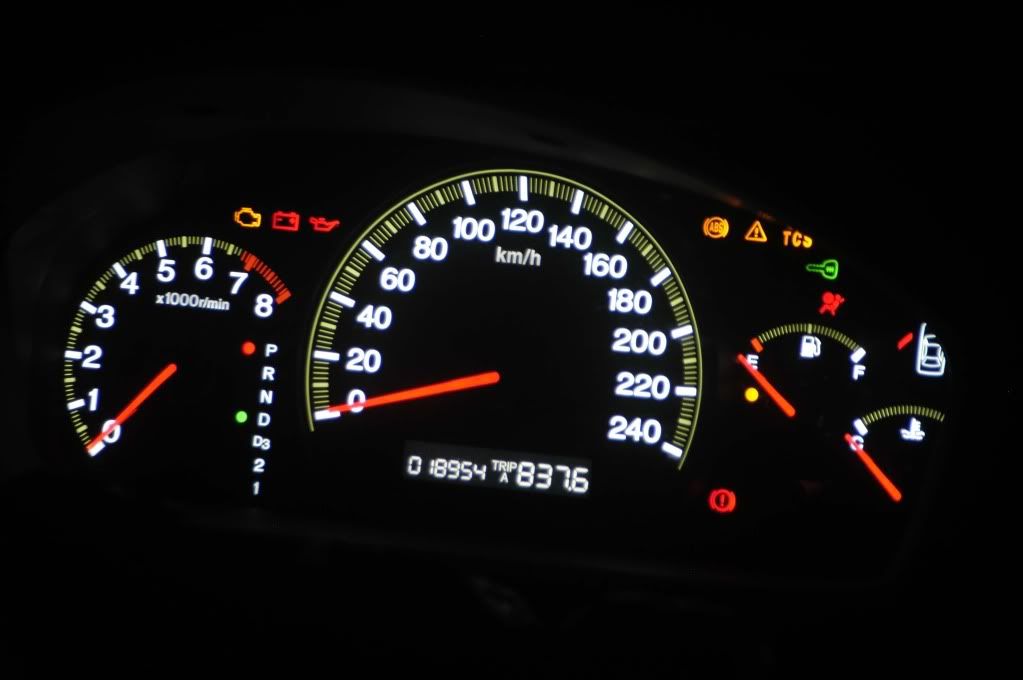
Because the car came without a key I "wheel barrowed" the half cut back up onto my trailer, rigging up a temporary fuel tank, pump and battery hook up. It was quite a bizaar sight at the sparkling Honda dealership where I had to take it to get an ignition key matched to the factory ECU to overcome the built in anti-theft ignition safeguard. I had the "car" tied down onto the trailer, and it started first go and instantly roared into life. No exhaust and a Monster Garage appearance amongst all the prim & proper Honda showroom shiners. When we started the half cut the electronic speedo lit up - showing the car had only done 18,000 kms. That's one oil change!
Then it was back home to pull it out.
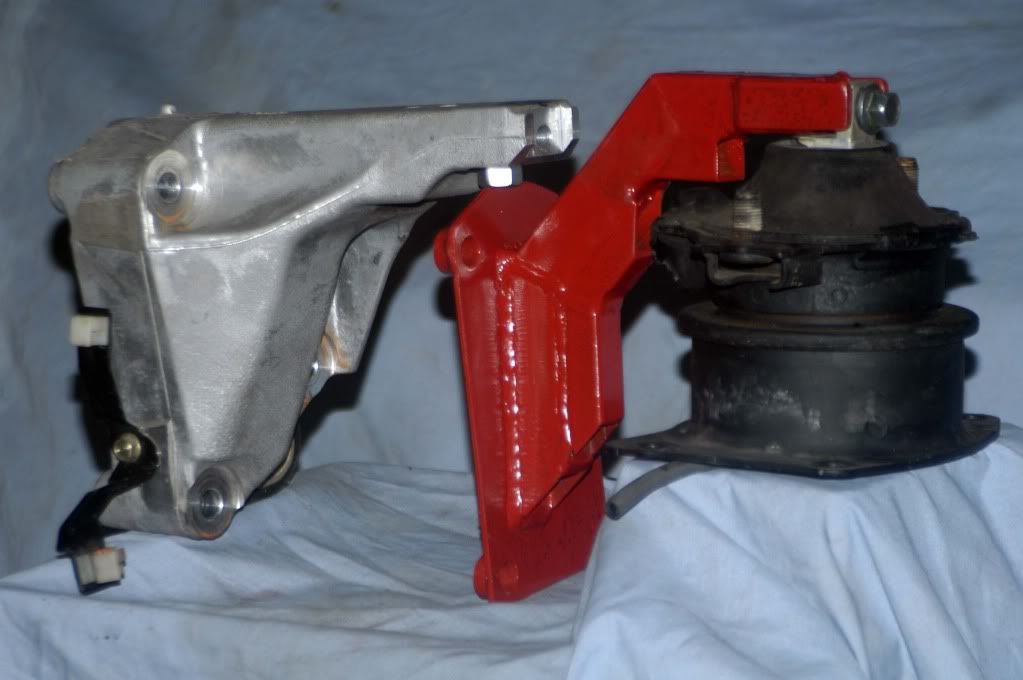
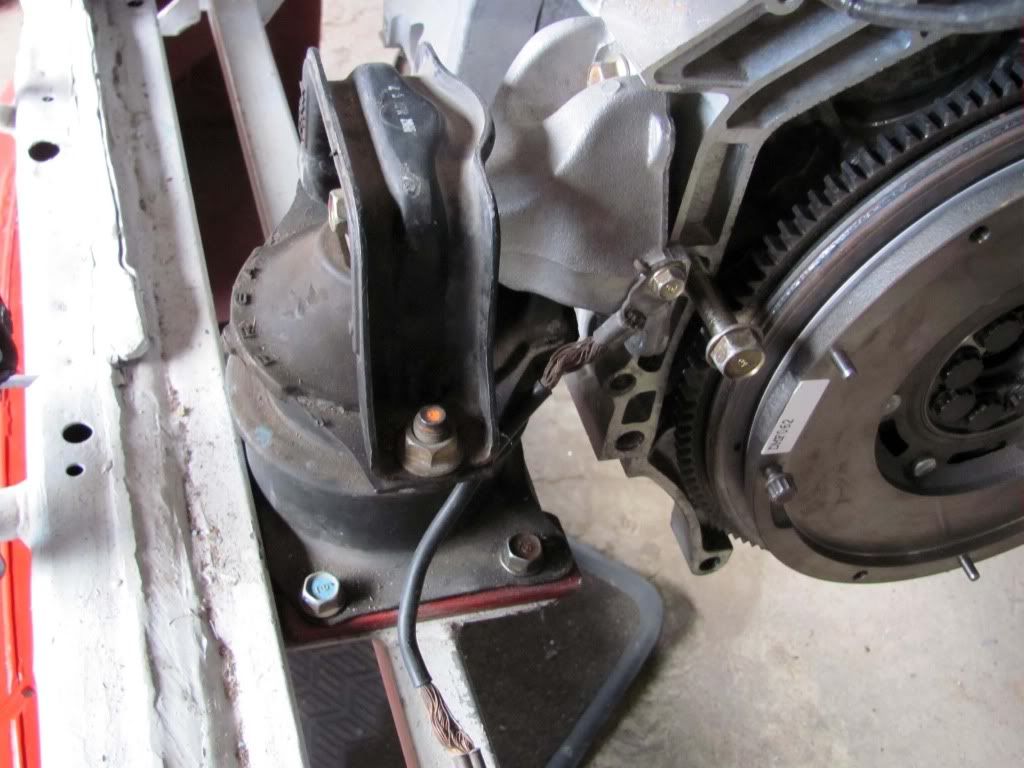
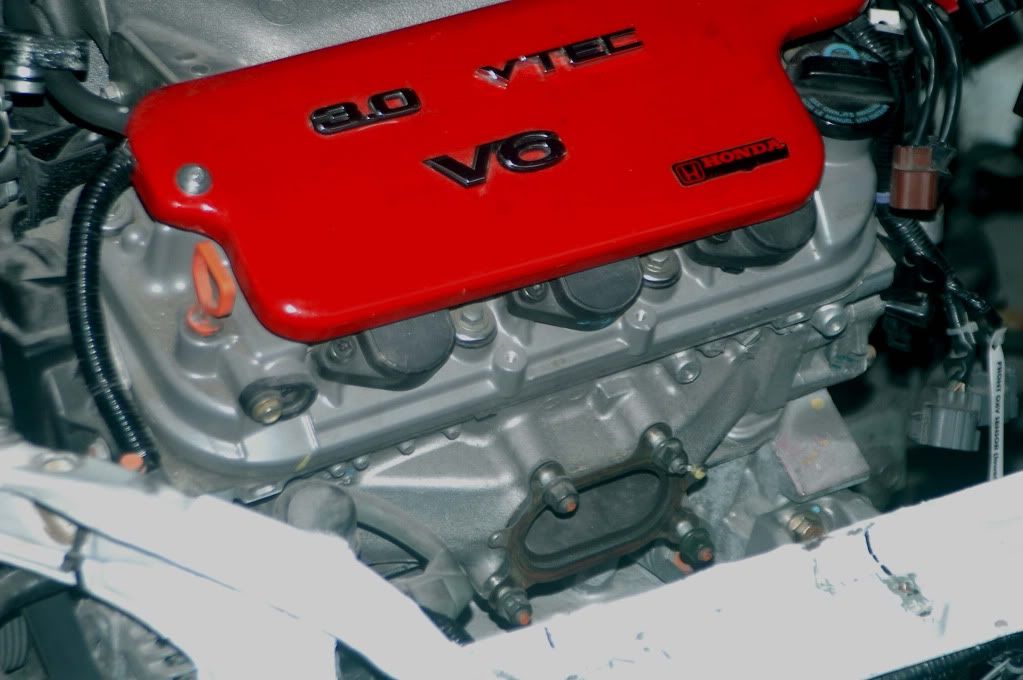
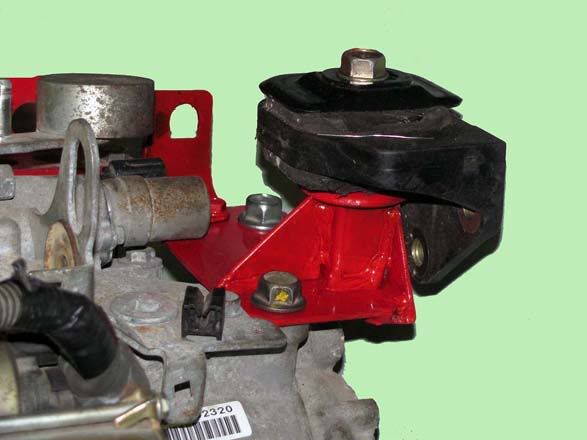
There are no manual V6 Accords in Australia (no Acuras at all either), so I'd had to buy an automatic. My plan was to bolt up a 6 speed manual box out of a 4 cylinder Accord Euro to it. So I unbolted the slush box and returned it to the wrecker as per our deal. I then made up a wheeled timber dolly which positioned the engine 4 inches off the ground & in a level position all round. This would allow me to position the engine precisely where I wanted it and fabricate my own mounts to it. Most V6 Civic swaps only use 3 mounts, doing away with the front one under the radiator. This always struck me as weakening the setup, so I intended using all four Accord mounts that had come with the donor car. You'll notice that (unlike the earlier J30's), that the A4 has the exhaust manifold cast into the head, with just a single Siamese exhaust port. This gives greater torque (saves on headers too).
the front subframe. Getting this right gave me my front to back positioning. I'd measured the gap between the main chassis rails in the engine bay on both cars, and the Civic was actually 15mm wider, so I split the difference and that gave me my left to right locating. Two measurements determined what the height of the engine had to be - sump ground clearance of 4 inches, and hopefully being able to close the hood. Although four inches sump clearance ride height was less than the Accord had run, I knew I could easily add a little extra if needed through my adjustable suspension. Plus this was a race car - few gutter clearance, speed hump or driveway dip issues here!
There's other Civic racing videos there, plus my step by step under A$1,000 2 litre swap for a Civic:
Getting a little bored with the B20 Frankenstein (I know - shame on me)
I was considering a K20 or K24 swap, but when by accident I saw a U-tube vid of one of the first V6 swaps in the USA I just knew I had to try something that outrageous. Australia is generally about 5 years behind what you guys are up to with Hondas most of the time, and the thought of being the first to do this transplant in my country was a particular attraction as I'd learnt that lots of torque and n/a is what produces the best reliability and race wins in my area's competition.
A little research (thank god for Wiki "Engines"!) directed me to avoid the early, cheaper J30A1-3 engines available here in Accords and a few Honda 4wd's and people movers. I began a search for a J30A4, which puts out the highest torque and bhp of any Honda V6's in Oz. Unfortunately there are no J32's here, and all the J35's are very late model (i.e.expensive even as wrecks), plus they have variable cylinder management which I definitely wanted to avoid. I ended up buying this 2004 Accord from a dismantler. It'd just come in, so nothing I wanted would be missing. We soon had a deal that he'd remove everything I didn't want, and I picked up the wreck for A$2,500.
I cannot emphasize enough the many advantages when doing a swap of buying an intact wreck - rather than just the engine on it's own. You get motor, gearbox, driveshafts, wiring loom, dash & instruments, driveshafts, larger brakes, fuse boxes, engine mounts & brackets, gear shift, linkages,stacks of nuts & bolts, and sometimes even a battery and radiator if it's not a front end smash up. In this case I got all the fly-by-wire throttle componentry too.
I made sure my gutted EG was sitting dead level and wheeled the engine around in the bay to find precisely where I wanted it to go. At first I had it sitting tight against the firewall, but a check underneath showed there was not enough room for the d/side inner CV to clear I emptied the Civic's engine bay, selling my old powerplant and gearbox for the cost of the Accord. I cut it in half to make room in my garage and started measuring. Having done some earlier A20A6 swaps from scratch beforehand, I'd made up my mind to fabricate the conversion myself rather than use a Hasport or similar kit. Some USA feedback suggested those kits placed the engine a bit higher and further forward than would be best for racing. I didn't want an ugly hole in the bonnet, nor bad handling characteristics.
Instead of trying to splice the Accord's wiring harness into the Civic's I opted to completely swap out the entire loom, dash and instruments as I'd done with the A20A6 conversions. This meant I'd only have to splice the two looms together near the drivers door where (apart from 3 obvious wires going to the fuel pump), there was only non race electrics like trafficators, brake lights, etc which would be easy to sort out. I'd also learnt it's a lot easier to 1) get the engine to start in the donor wreck before you dismantle it and 2) mark EVERY wire before you start removing them or cutting off unneeded ones (like the ABS and air bag circuits). I even tag the loom WHERE it goes as I remove it... eg: "Goes across n/s footwell", "Goes over steering column", "Goes thru firewall", "Engine bay fuse box". Why? Because weeks later there's nothing quite as daunting as being confronted by fifteen feet of a tangled wire spider web you've lost all memory of how to place and connect.
Because the car came without a key I "wheel barrowed" the half cut back up onto my trailer, rigging up a temporary fuel tank, pump and battery hook up. It was quite a bizaar sight at the sparkling Honda dealership where I had to take it to get an ignition key matched to the factory ECU to overcome the built in anti-theft ignition safeguard. I had the "car" tied down onto the trailer, and it started first go and instantly roared into life. No exhaust and a Monster Garage appearance amongst all the prim & proper Honda showroom shiners. When we started the half cut the electronic speedo lit up - showing the car had only done 18,000 kms. That's one oil change!
Then it was back home to pull it out.
There are no manual V6 Accords in Australia (no Acuras at all either), so I'd had to buy an automatic. My plan was to bolt up a 6 speed manual box out of a 4 cylinder Accord Euro to it. So I unbolted the slush box and returned it to the wrecker as per our deal. I then made up a wheeled timber dolly which positioned the engine 4 inches off the ground & in a level position all round. This would allow me to position the engine precisely where I wanted it and fabricate my own mounts to it. Most V6 Civic swaps only use 3 mounts, doing away with the front one under the radiator. This always struck me as weakening the setup, so I intended using all four Accord mounts that had come with the donor car. You'll notice that (unlike the earlier J30's), that the A4 has the exhaust manifold cast into the head, with just a single Siamese exhaust port. This gives greater torque (saves on headers too).
the front subframe. Getting this right gave me my front to back positioning. I'd measured the gap between the main chassis rails in the engine bay on both cars, and the Civic was actually 15mm wider, so I split the difference and that gave me my left to right locating. Two measurements determined what the height of the engine had to be - sump ground clearance of 4 inches, and hopefully being able to close the hood. Although four inches sump clearance ride height was less than the Accord had run, I knew I could easily add a little extra if needed through my adjustable suspension. Plus this was a race car - few gutter clearance, speed hump or driveway dip issues here!
 01-11-2015, 10:59 PM
#5
Honda-Tech Member
Thread Starter
Join Date: Jan 2015
Location: Newcastle Australia
Posts: 12
Likes: 0
Received 0 Likes
on
0 Posts
Liam it was all captured on film in my second video on this car (above) @ 5:40ff.
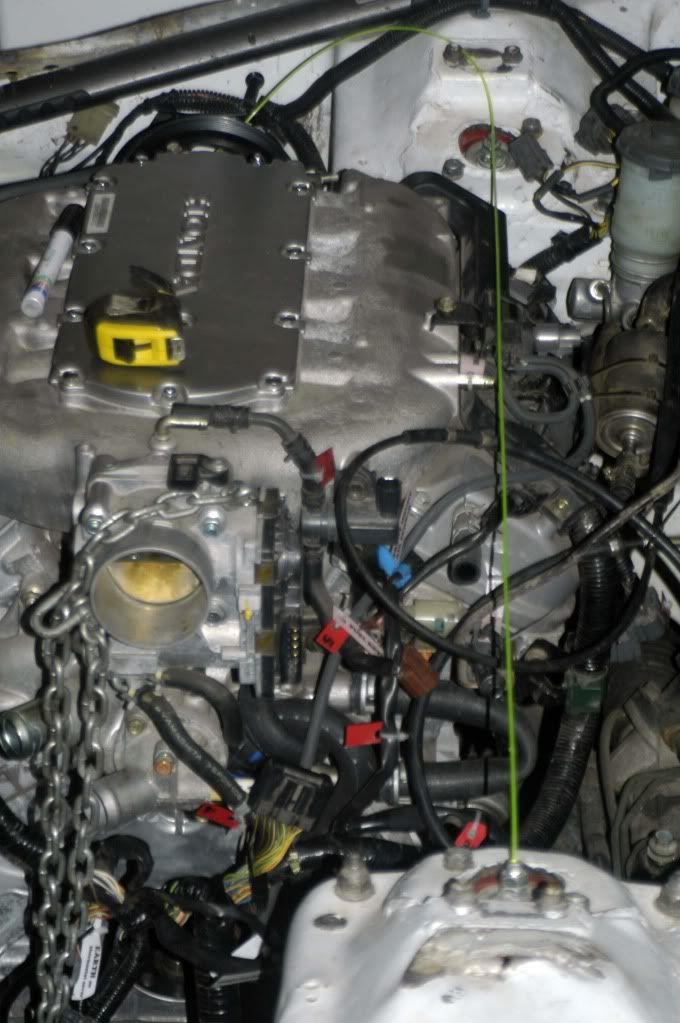
It was also critical that I get the driveshafts correctly lined up with the front hubs. As they went through the hubs on both these fwd cars, I used the strut tops as a measuring point, stringing some bright nylon garden edge trimmer line across both cars and taking a measurement (plus lots of reference photos as I always do on swaps), from this yellow line to the rear top of the engine. I actually got the engine one inch further back than it had been from the front hub centres in the Accord. Comparison with pics of other similar USA V6 Civic conversions (including the other one on this site), showed that I had my motor two inches lower and three inches further back. Less weight forward equals less understeer, plus room for a full width radiator.
No alternator to headlight clearance issues here like with a bought swap kit!
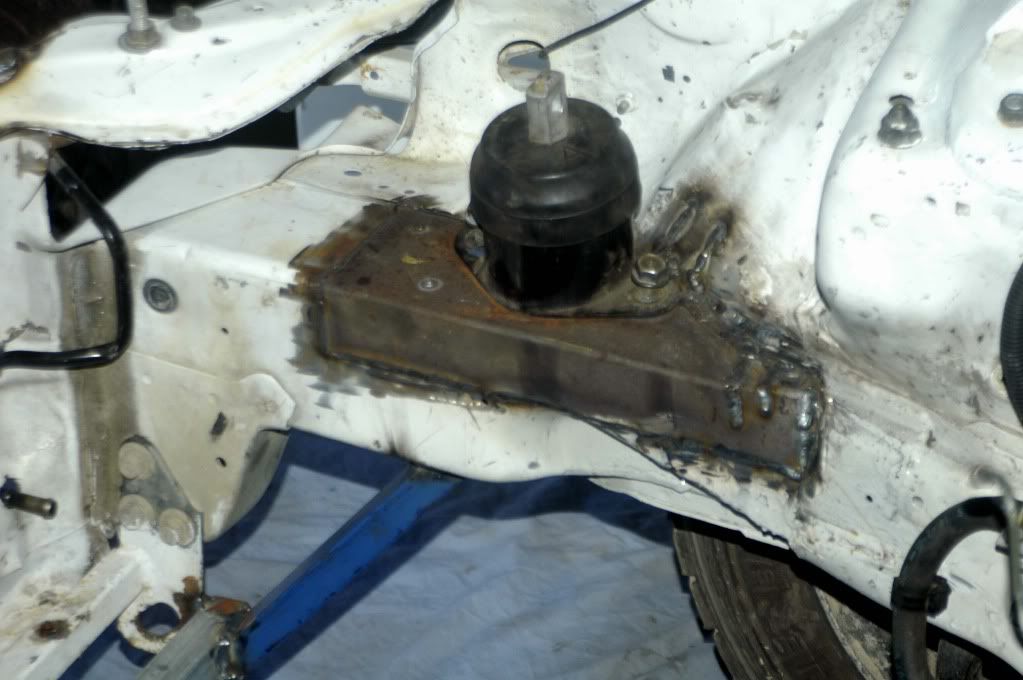
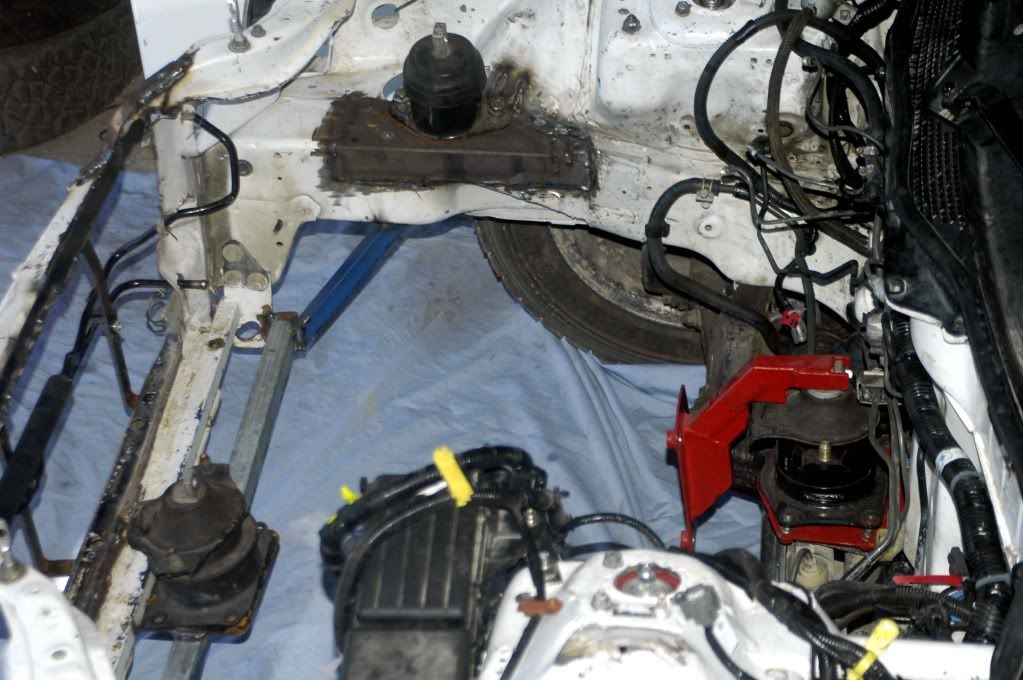
Now I had the engine sitting where it was gonna live in the EG I could begin fabricating my mounts up to it. The easiest one to start with was the drivers side one. I'd cut all the B20 bracketry off the chassis rails, and the huge Accord mount simply sat on top of the d/s rail. I was able to get it's height correct by putting longer bolts and a 30mm square tube spacer where it bolted onto the engine. I cut & tacked a bit of 3x2 inch angle onto the chassis rail and marked where the two mount bolt holes sat on it. The angle was removed; two oversize holes drilled; and large self locking nuts welded to the rear before the piece was then fully welded onto the car.
[IMG]http://i1193.photobucket.com/albums/aa356/0buthonda/April4005.jpg{/IMG]
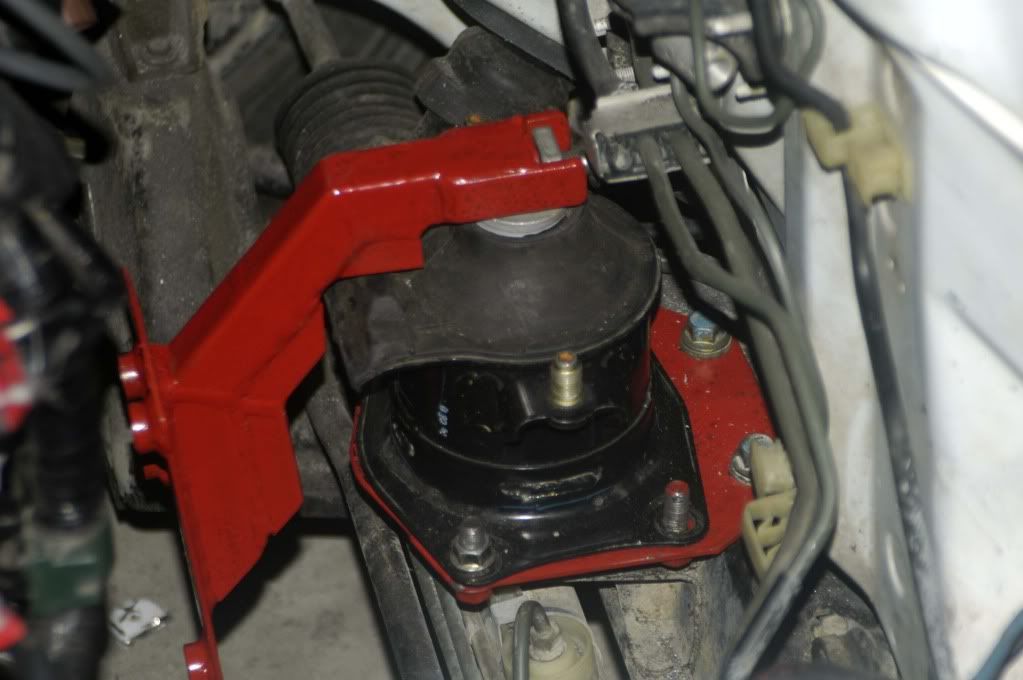
My next job was to fabricate the rear mount, so I made a simple adaptor plate and bolted the Accord mount above the rack. I copied the engine's original cast alloy bracket in steel as best I could, tacking it lightly together. With the engine sitting on the trolley and now tied to the finished d/s mount I used "No More Nails" to partly glue the rear bracket together as I couldn't get the MIG where I needed to. A week later it was set like a rock and I could gingerly unbolt it and fully weld it. Do you know how badly "No More Nails" burns when you weld near it???
With the engine half bolted in place but still on the dolly I added a front cross rail out of thick walled square tubing and easily made a plate to hold the front mount. The great thing about having the engine sitting on the dolly when doing all this mount fabrication work was that I could easily wheel it off to one side in the engine bay out of the way while I made and fitted the mounting hardware.
Three down' and only the gearbox mount to go. That was to turn out to be a l - o - n - g story for reasons that will unfold, but now I could remove the dolly. The engine was now hanging in place on it's new mounts, and I could almost close the bonnet!
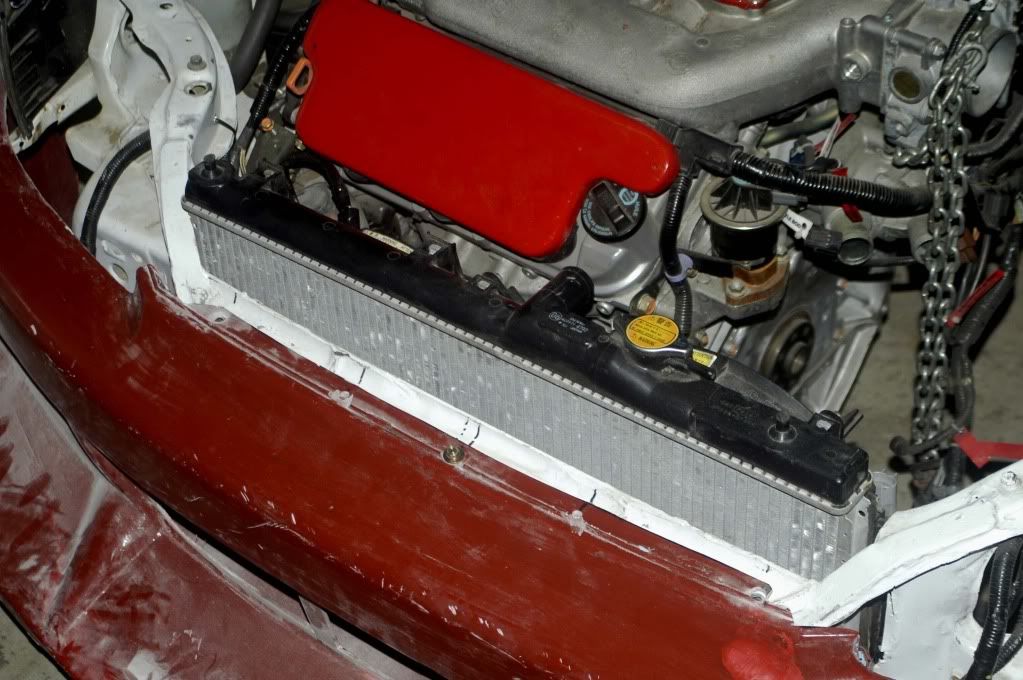
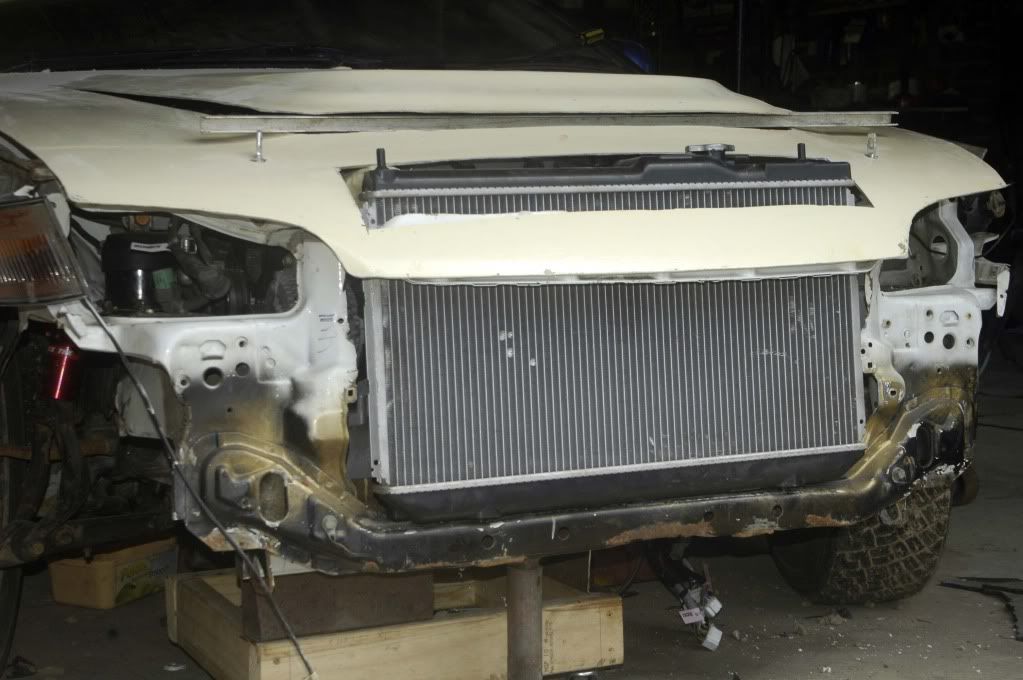
Next I attacked the radiator. It never made sense to me with all the other V6 conversions I'd seen to go from the large radiator originally used with these engines back to the half width 4 cylinger Civic ones. That just looked like creating future over heating problems by design, so I'd made up my mind it was gonna be full width for sure, especially given the workout this donk was gonna get only being used for racing. And if you've watched my videos you'll know I run right on the rev limiter. OK - I admit it. "Hi - my name is Bill and I am a V-Tec addict".
I hunted around wreckers for a radiator of suitable dimensions with inlet and outlet points that would line up with the stock V6 hoses. The ideal candidate turned out to be from a Daihatsu Pizzata - a crappy pretend people mover but with a great aluminium cooler and dual fans! By placing it on TOP of the front lower cross bar(rather than behind it as per the stock Civic location), and cutting the top cross bar I was able to get it safely clear of the engine.
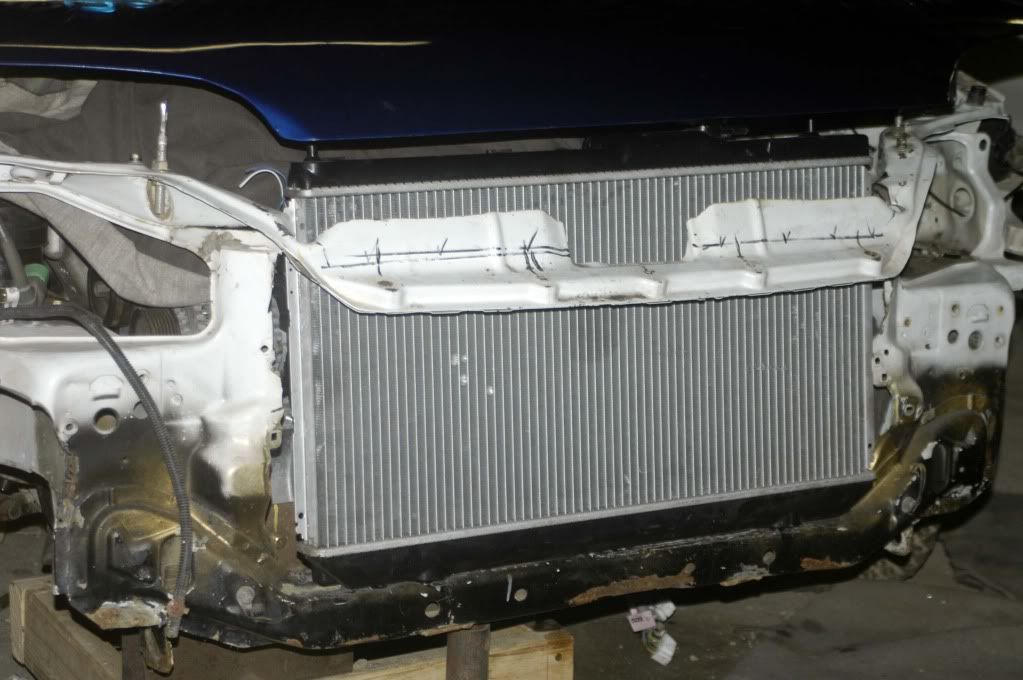
I'd removed the factory bonnet catch long ago and replaced it with two bonnet pins, so I was free to reduce the width of the top cross bar and then weld in flat ribs to make it even stiffer than when Mr. JDM had made it.

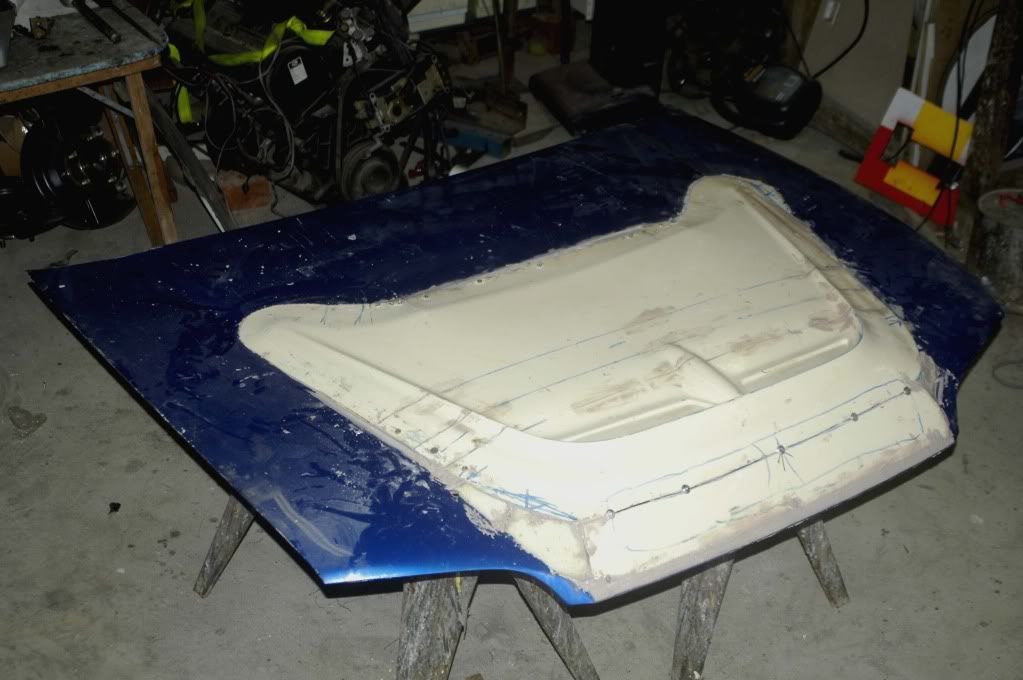
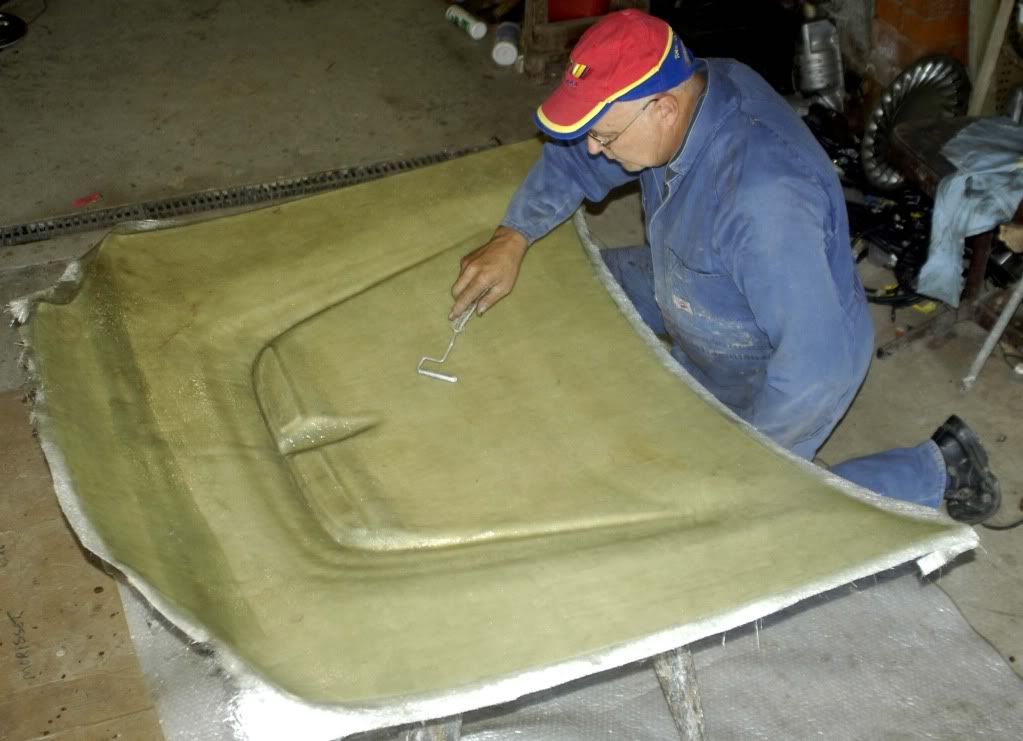
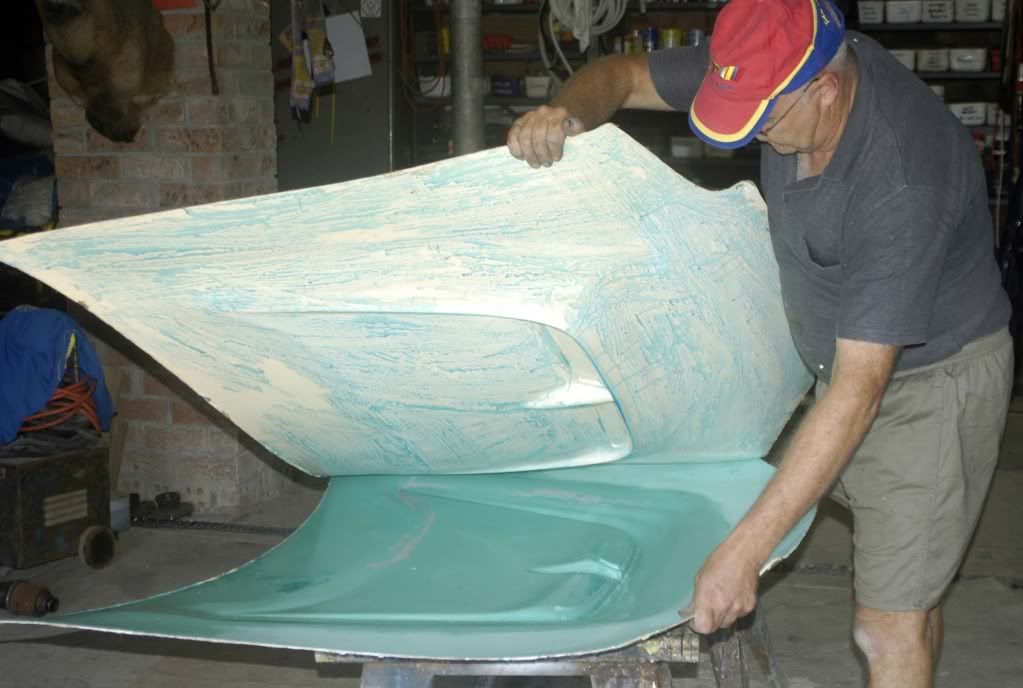
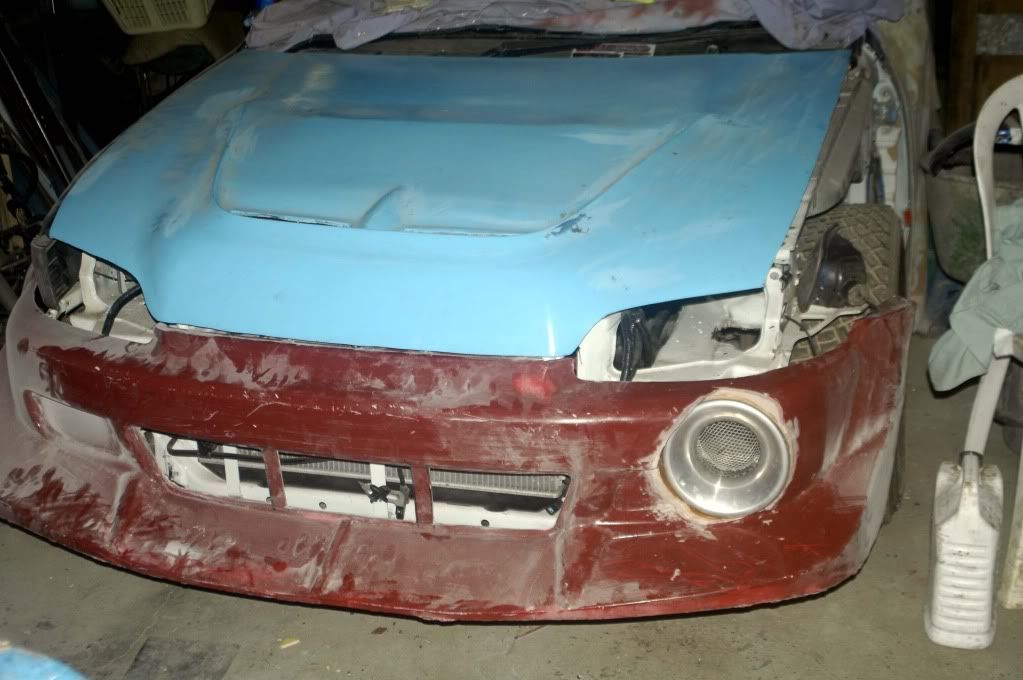
But now it was too high, and I knew this was the lowest height radiator around. No problem. I make my own fibreglass Civic bonnets with an EVO scoop in them, so I quickly sculpted a new one with the bulge right at the front edge and with some extra height in the centre to clear the J30 intake manifold.
I then moulded the finished scuplture out of which I can spit out a bonnet any time I like. Trust me... in racing that's a likely event and a big cost saver. Another advantage of my design was that the EVO vents wouldn't just be cosmetic, but increase the air flow through the radiator and keep some of that hot air away from the engine.
As the V6 throttle body was on the opposite of the engine bay I also made another front bar out of a mould I'd made for my B20 era, adding a large cold air intake trumpet that would connect with the factory air cleaner (something else you get when you buy a donor car cf. just an engine). I am continually amazed at how tyro's fit pod filters INSIDE their engine bay where it'll get nothing but hot air and no air flow. That costs free power! Those filters need to be ENCLOSED and cold air ducted to them. Just stick your hand out the window @ even 30 mph and you'll see how much air pressure you're missing out on. End of sermon.
It was also critical that I get the driveshafts correctly lined up with the front hubs. As they went through the hubs on both these fwd cars, I used the strut tops as a measuring point, stringing some bright nylon garden edge trimmer line across both cars and taking a measurement (plus lots of reference photos as I always do on swaps), from this yellow line to the rear top of the engine. I actually got the engine one inch further back than it had been from the front hub centres in the Accord. Comparison with pics of other similar USA V6 Civic conversions (including the other one on this site), showed that I had my motor two inches lower and three inches further back. Less weight forward equals less understeer, plus room for a full width radiator.
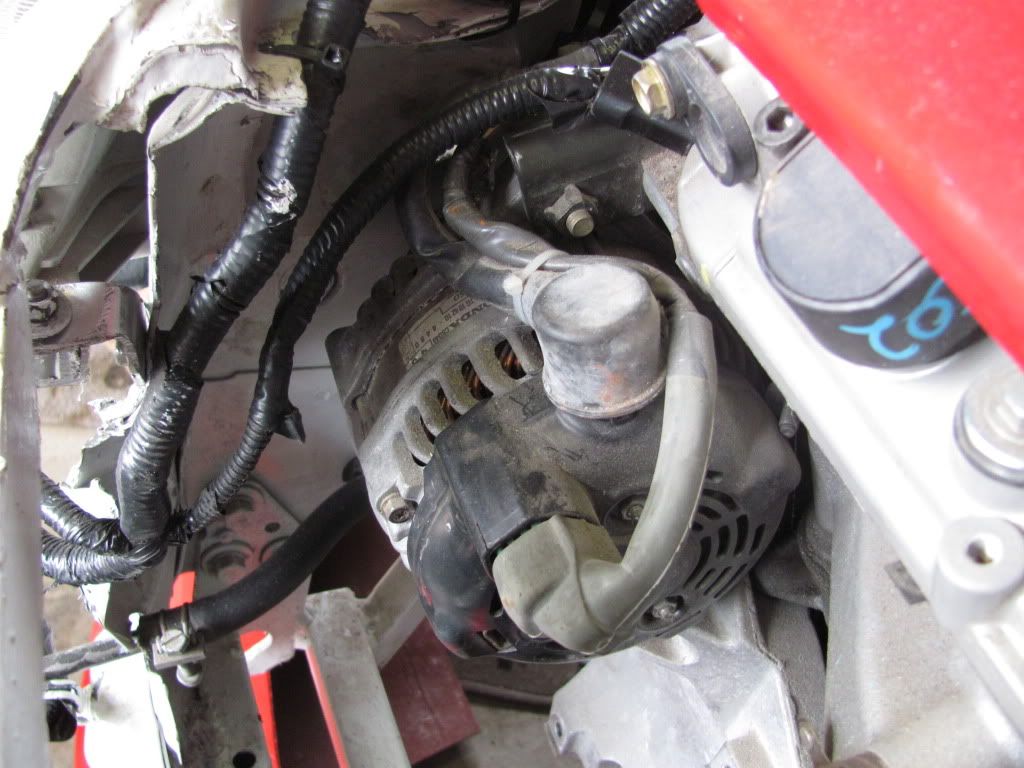
No alternator to headlight clearance issues here like with a bought swap kit!
Now I had the engine sitting where it was gonna live in the EG I could begin fabricating my mounts up to it. The easiest one to start with was the drivers side one. I'd cut all the B20 bracketry off the chassis rails, and the huge Accord mount simply sat on top of the d/s rail. I was able to get it's height correct by putting longer bolts and a 30mm square tube spacer where it bolted onto the engine. I cut & tacked a bit of 3x2 inch angle onto the chassis rail and marked where the two mount bolt holes sat on it. The angle was removed; two oversize holes drilled; and large self locking nuts welded to the rear before the piece was then fully welded onto the car.
[IMG]http://i1193.photobucket.com/albums/aa356/0buthonda/April4005.jpg{/IMG]
My next job was to fabricate the rear mount, so I made a simple adaptor plate and bolted the Accord mount above the rack. I copied the engine's original cast alloy bracket in steel as best I could, tacking it lightly together. With the engine sitting on the trolley and now tied to the finished d/s mount I used "No More Nails" to partly glue the rear bracket together as I couldn't get the MIG where I needed to. A week later it was set like a rock and I could gingerly unbolt it and fully weld it. Do you know how badly "No More Nails" burns when you weld near it???
With the engine half bolted in place but still on the dolly I added a front cross rail out of thick walled square tubing and easily made a plate to hold the front mount. The great thing about having the engine sitting on the dolly when doing all this mount fabrication work was that I could easily wheel it off to one side in the engine bay out of the way while I made and fitted the mounting hardware.
Three down' and only the gearbox mount to go. That was to turn out to be a l - o - n - g story for reasons that will unfold, but now I could remove the dolly. The engine was now hanging in place on it's new mounts, and I could almost close the bonnet!
Next I attacked the radiator. It never made sense to me with all the other V6 conversions I'd seen to go from the large radiator originally used with these engines back to the half width 4 cylinger Civic ones. That just looked like creating future over heating problems by design, so I'd made up my mind it was gonna be full width for sure, especially given the workout this donk was gonna get only being used for racing. And if you've watched my videos you'll know I run right on the rev limiter. OK - I admit it. "Hi - my name is Bill and I am a V-Tec addict".
I hunted around wreckers for a radiator of suitable dimensions with inlet and outlet points that would line up with the stock V6 hoses. The ideal candidate turned out to be from a Daihatsu Pizzata - a crappy pretend people mover but with a great aluminium cooler and dual fans! By placing it on TOP of the front lower cross bar(rather than behind it as per the stock Civic location), and cutting the top cross bar I was able to get it safely clear of the engine.
I'd removed the factory bonnet catch long ago and replaced it with two bonnet pins, so I was free to reduce the width of the top cross bar and then weld in flat ribs to make it even stiffer than when Mr. JDM had made it.
But now it was too high, and I knew this was the lowest height radiator around. No problem. I make my own fibreglass Civic bonnets with an EVO scoop in them, so I quickly sculpted a new one with the bulge right at the front edge and with some extra height in the centre to clear the J30 intake manifold.
I then moulded the finished scuplture out of which I can spit out a bonnet any time I like. Trust me... in racing that's a likely event and a big cost saver. Another advantage of my design was that the EVO vents wouldn't just be cosmetic, but increase the air flow through the radiator and keep some of that hot air away from the engine.
As the V6 throttle body was on the opposite of the engine bay I also made another front bar out of a mould I'd made for my B20 era, adding a large cold air intake trumpet that would connect with the factory air cleaner (something else you get when you buy a donor car cf. just an engine). I am continually amazed at how tyro's fit pod filters INSIDE their engine bay where it'll get nothing but hot air and no air flow. That costs free power! Those filters need to be ENCLOSED and cold air ducted to them. Just stick your hand out the window @ even 30 mph and you'll see how much air pressure you're missing out on. End of sermon.
01-13-2015, 12:23 PM
#6
Honda-Tech Member
Thread Starter
Join Date: Jan 2015
Location: Newcastle Australia
Posts: 12
Likes: 0
Received 0 Likes
on
0 Posts
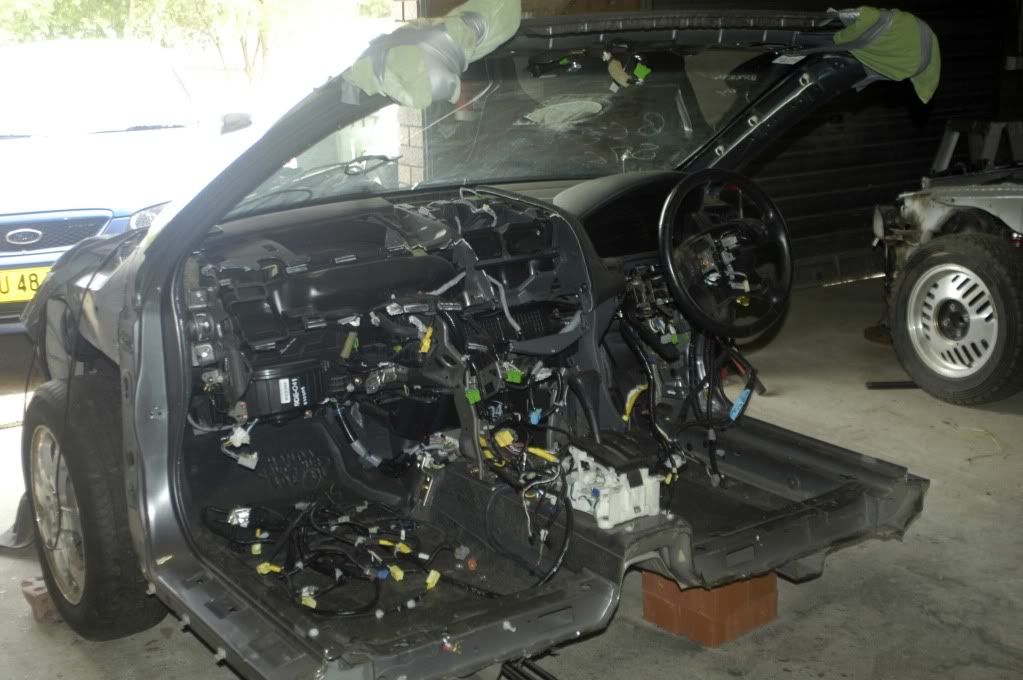
One great thing about a race car is you don't have to spend time, money and faithfullness to JDM discipleship on the interior. My car's inside was pretty spartan and VERY dirty after years of rally work, so it took very little time to remove the dash - which had only been held in with thick cable ties anyway. Increasing the number of cylinders under the hood from Civic specs meant I'd be moving up to the Sports Sedan class, which allowed more lightening inside the car. So out came the heater, it's fan box and all ducting.
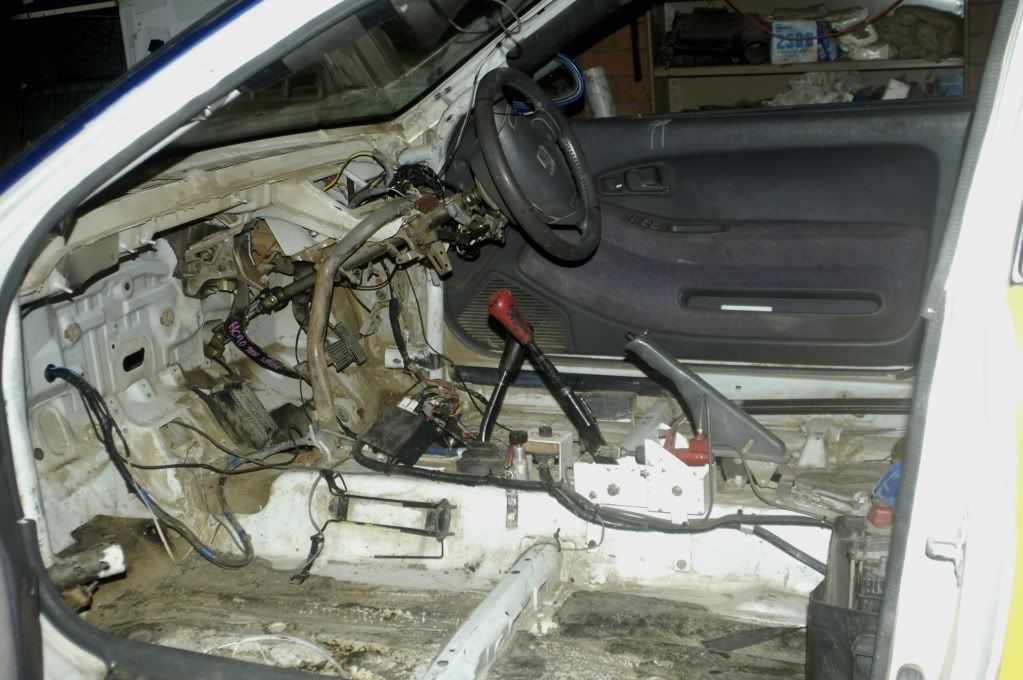
I was going to swap over to the Accord instruments as this would simply mean a plug in and go job. You gotta love the way every Honda electrical plug is different, making it hard to connect things incorrectly. I ran the Accord interior loom where it needed to go and cable tied it in place. I say "loom" - but there was actually THREE of them! This was a simple job thanks to my previous labelling of it's route within the car. Because the Accord was obviously bigger everywhere than the Civic there was also no case where the wires were too short.
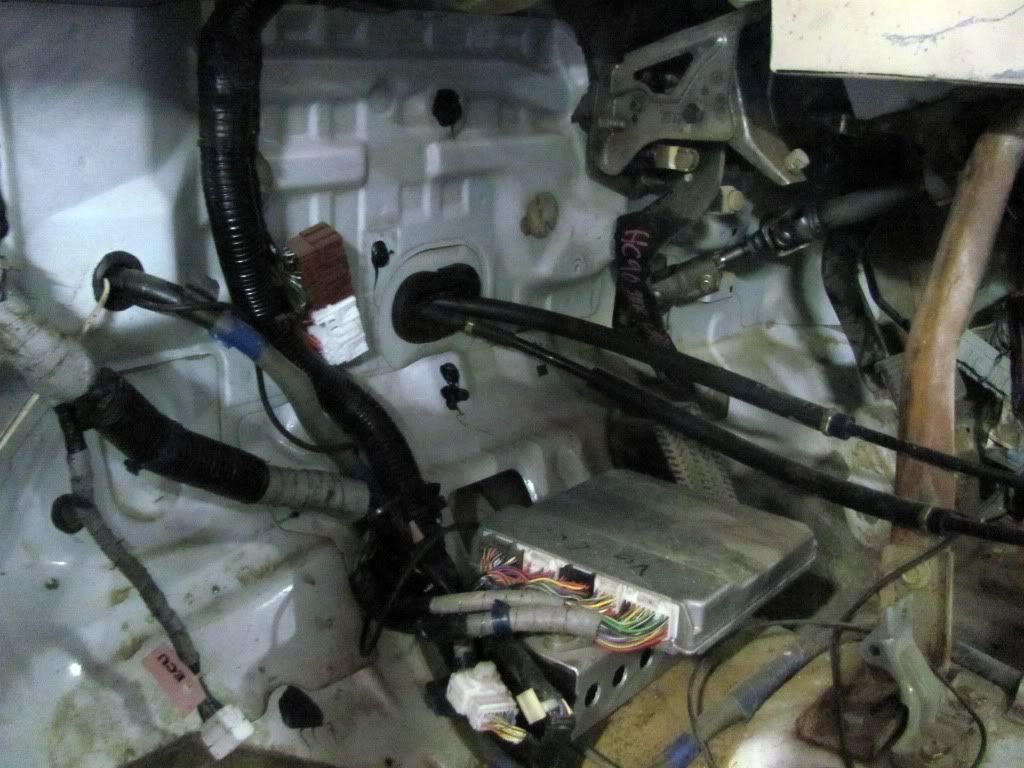
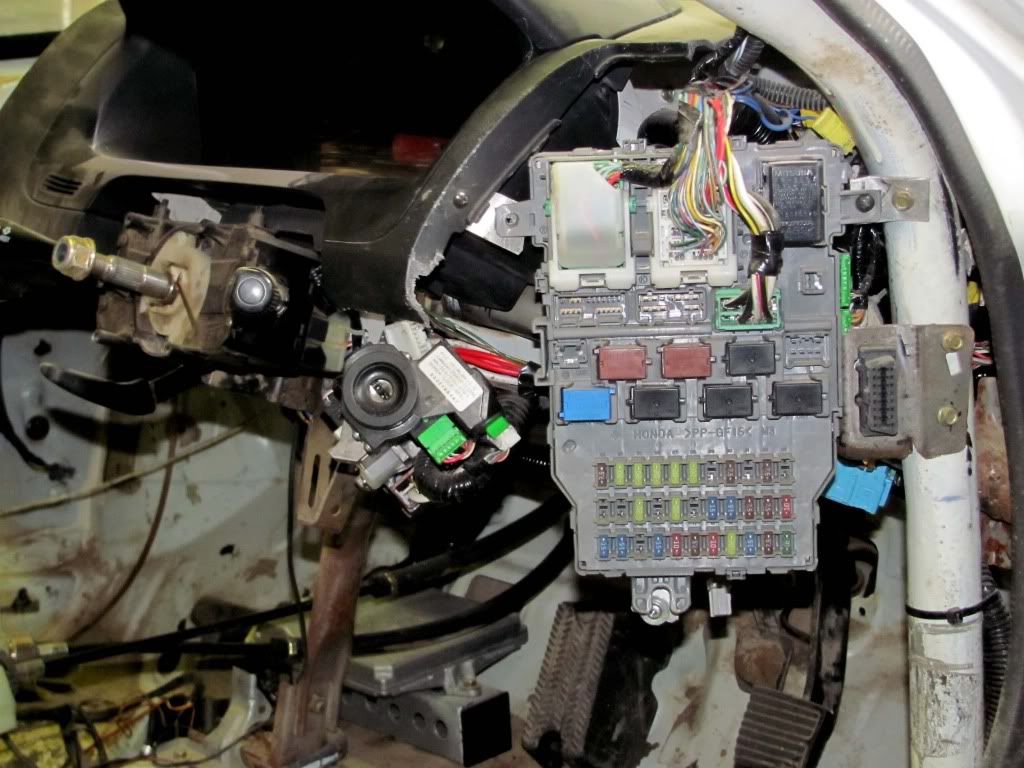
I cut the Accord dash right down to just the immediate instrument surround, and easily fitted it in place. Instead of putting the interior fuse & relay box in the usual place up under the dash in the drivers footwell (where it's a pain to access), I turned it round and mounted it near the drivers door facing outwards - along with the engine diagnostic plug.
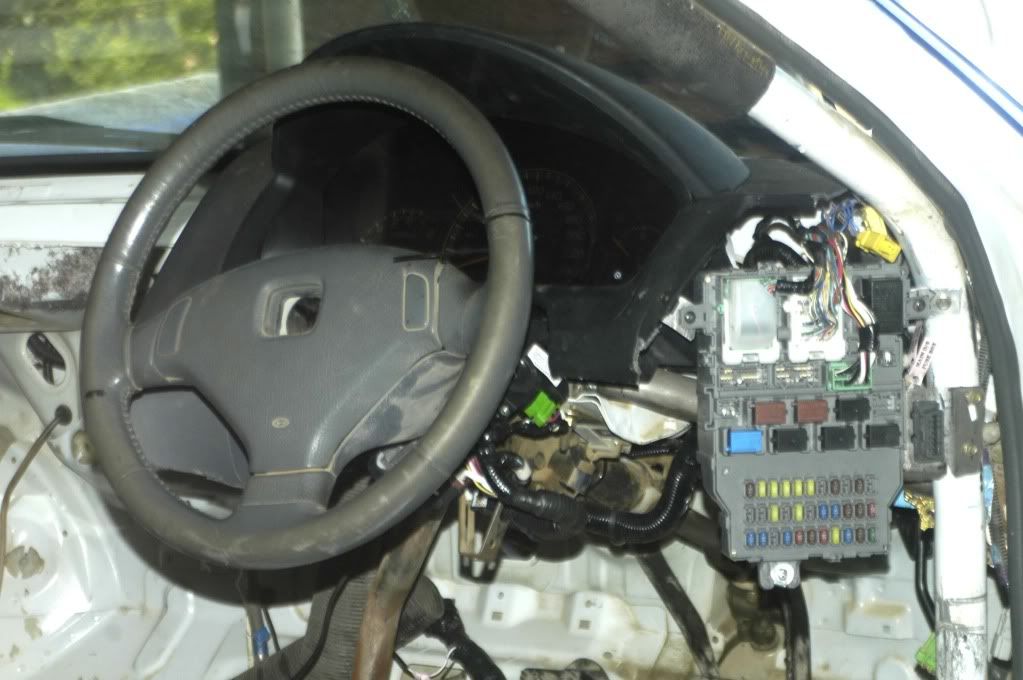
I also fitted the fly-by-wire throttle unit near the firewall (determined by the wiring loom and throttle cable.)

Although all of the V6 conversions I've seen on the net either replace the throttle body or fit a direct cable adaptor to it, I think this is mostly done because project builders have just bought the engine without what's needed to fit it. At first I was worried a remote controlled throttle might have just been a stupid economy gadget. Then I realised that as Formula 1 cars and WRC cars all use fly-by-wire throttles they have to be a better setup and one which does NOT cost you power. The advantages are that the throttle is linked to the ECU, so when you press the go fast pedal it takes a whole complex of settings into account to maximise engine response. For example when you floor the pedal the throttle does not open fully and momentarily lean out the engine(like on a direct cable setup). Rather - the remote control-opens it gradually... something you can actually SEE it doing.
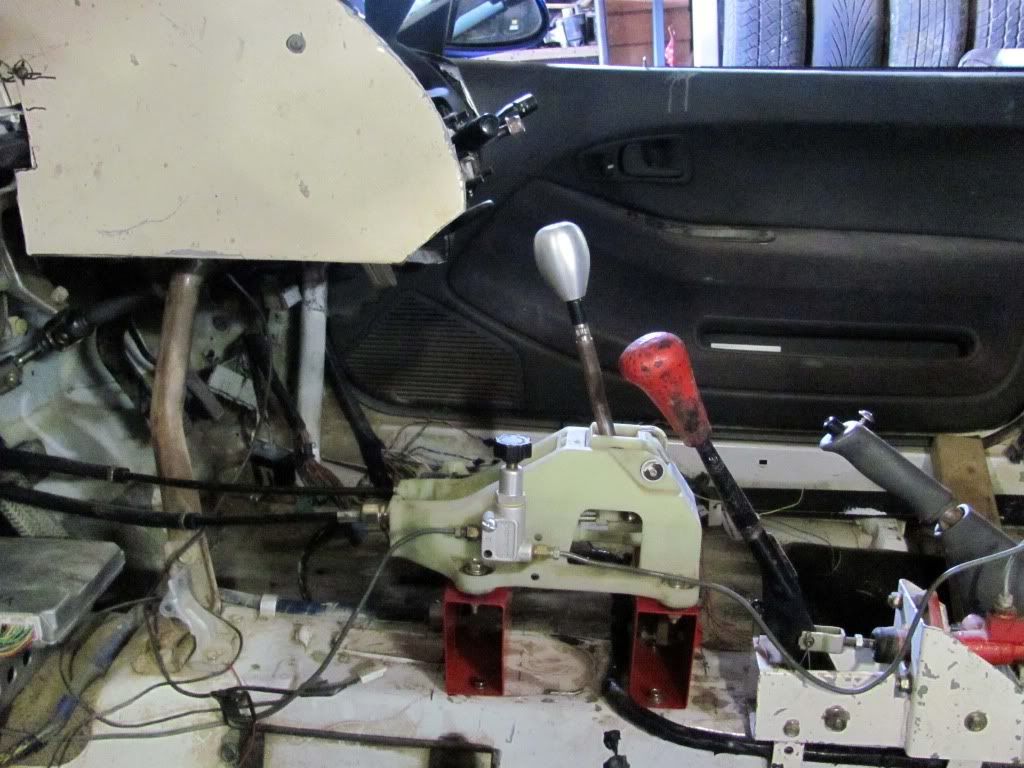
The V6 box is a cable shift, so I bought a gear stick setup and cables from a 4 cylinder Accord Euro, easily fitting the stick up high within closer reach of the steering wheel after I blanked off the original setup's hole in the floor and ran the new selector cables straight out through to firewall.
Then I made a bracket to hold the ECU where the Accord's loom said it wanted to be - right up the front of the centre tunnel under where the heater box had been.
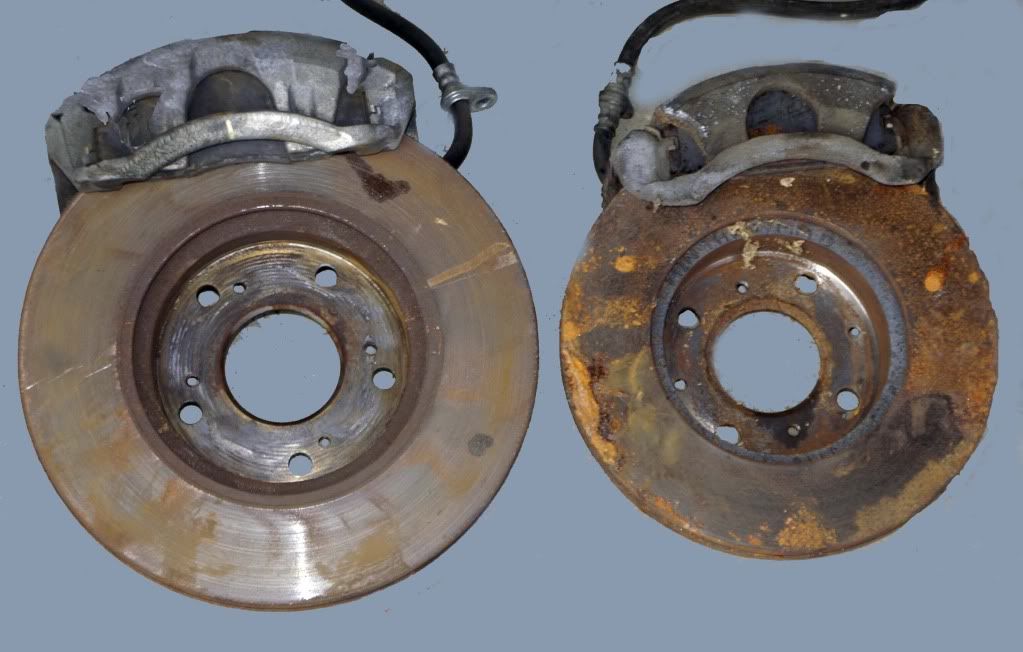
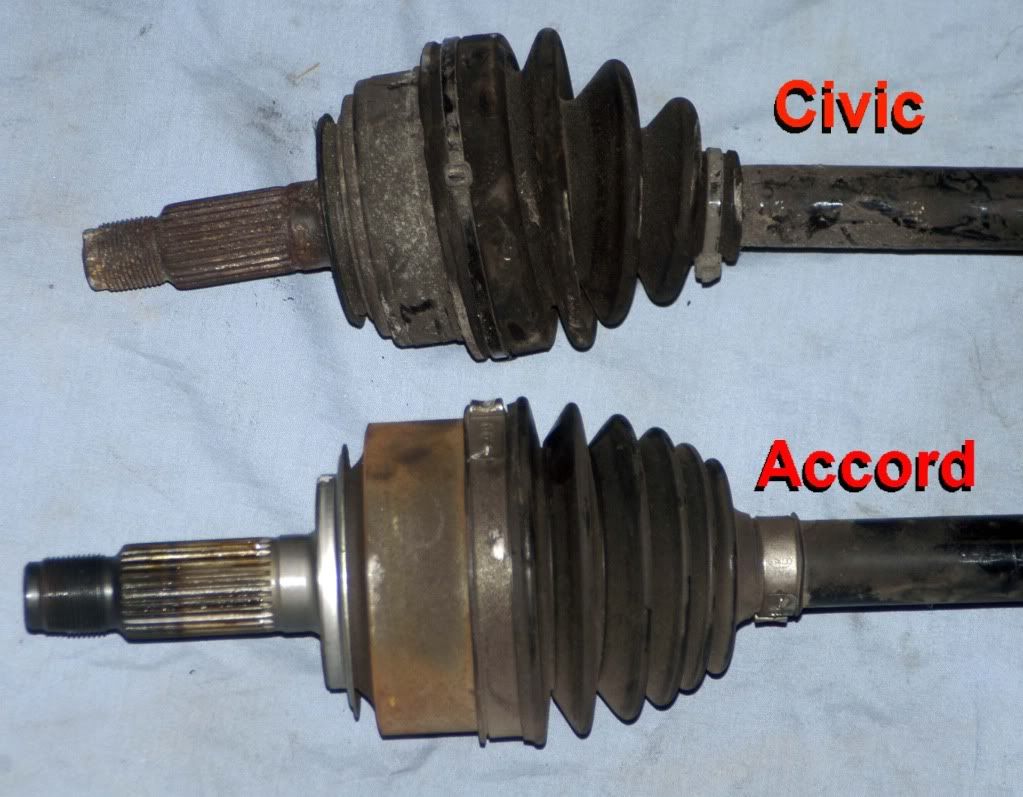
I looked at the front brakes to see what upgrade might be possible, starting with the gigantic dics and huge calipers off the donor Accord. In this comparison shot the smaller disc isn't a standard Civic one - it's the larger one that comes on '94 Integras and that was original to my V-TiR. I say this so you'll appreciate just how much bigger the Accord units were. Look how much bigger the pads are too!
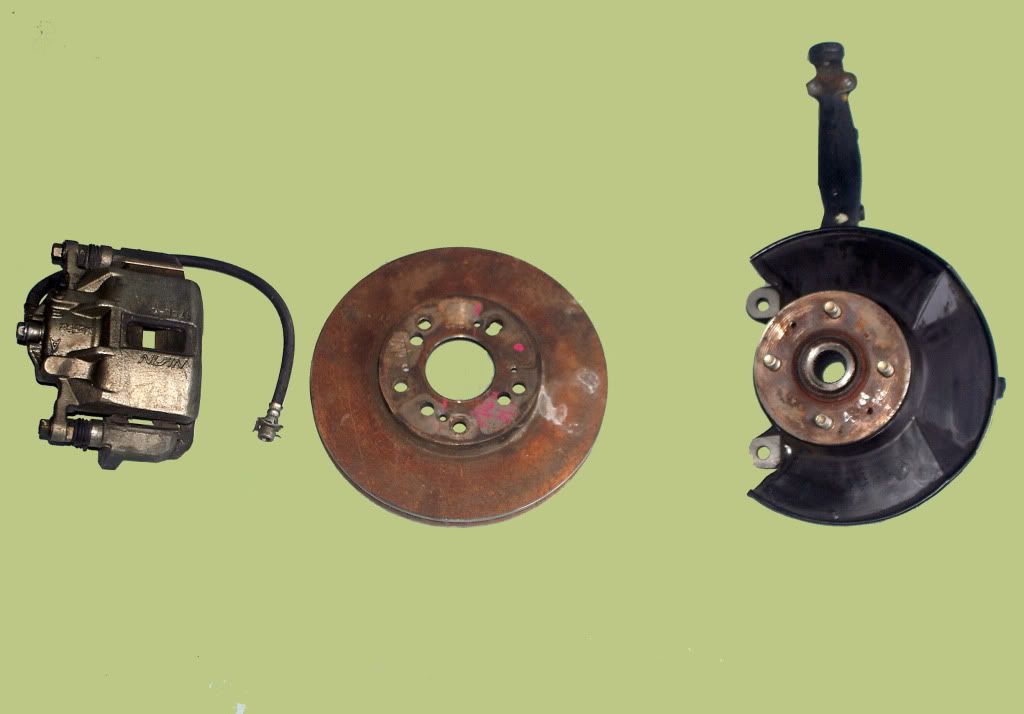
To my delight the Accord calipers just bolted straight onto the Civic uprights! The only downside is you can't run 14inch wheels with them - but I run fifteens anyway so no problemo. All I had to do was get the discs re-drilled to four stud. The hub shown here that I'm gonna use is 1991 gen III 4WSteer Prelude. It's 10mm shorter in height than a Civic (of virtually no consequence other than a MINOR reduction in anti-dive geometry), and bolts straight in too. The reason I'm using this particular hub will be explained later when I cover the driveshaft and CV componentry I will use made up from various stock Honda bits fitted together.
There is no brake proportioning valve in a Honda. I say this because when changing brakes you need to realise that the way Hondas do in fact get their front to back brake portioning balance is not hydraulically but by the factory matching the size of discs, caliper piston sizes and pads.Those double V blocks are just joiner blocks with a fail safe system in them in case you get a fluid leak. They keep one half of the diagonal system still working. So when you change brake parts you change that braking balance. What I've done on my race car is to swap over the brake lines at that double V block in the engine bay, changing it from a diagonally linked setup to a front to back one. I connect both front brake lines to the same V block outlet, and run ONE rear brake line directly from one master cylinder exit port. There's no bias balancing coming out of that either on Hondas - both exits send out the same amount of brake fluid. I run that rear line through the firewall to a Willwood adjuster which you can see in the shot of the gearstick it's mounted next to. From there the line goes through a hydraulic handbrake (adapted early model Toyota Corolla clutch master cylinder), and from there to a Tee block where the back seat used to be and then out to each rear wheel. I can adjust my brake bias from my seat for dirt or tar - the latter using a little more fluid to the rear.
To get more fluid pumping into the brake system overall I swap out the 13/16ths of an inch diameter Civic brake master cylinder for a 15/16ths one off gen III Preludes - which bolt straight on. You can also see the reservoir is much bigger too, and the low level light wires even connnect up. Too easy!
I immersed myself in joining the Civic and Accord wiring looms for everything behind the drivers seat. Fuel pump wires were the same colour coding, but everything else was different. It’s quicker to join the two looms than replace all the plugs at the lights, pump, rear wiper, etc. A battery soon told me which wire was which in the Civic. I also made a bracket for mounting the CPU, wired in the plugs for the new radiator into the system, and a few other little jobs. Whenever I do a conversion I always right down the color coding of how the two cars looms join up at the door. It makes sense to only have to do this once, and I’ve already got the benefit of it when doing the same conversion again for someone else. The easiest way for me to fit the new throttle cable to the Civic pedal was to replace it’s end with the Accord one.
I was going to swap over to the Accord instruments as this would simply mean a plug in and go job. You gotta love the way every Honda electrical plug is different, making it hard to connect things incorrectly. I ran the Accord interior loom where it needed to go and cable tied it in place. I say "loom" - but there was actually THREE of them! This was a simple job thanks to my previous labelling of it's route within the car. Because the Accord was obviously bigger everywhere than the Civic there was also no case where the wires were too short.
I cut the Accord dash right down to just the immediate instrument surround, and easily fitted it in place. Instead of putting the interior fuse & relay box in the usual place up under the dash in the drivers footwell (where it's a pain to access), I turned it round and mounted it near the drivers door facing outwards - along with the engine diagnostic plug.
I also fitted the fly-by-wire throttle unit near the firewall (determined by the wiring loom and throttle cable.)
Although all of the V6 conversions I've seen on the net either replace the throttle body or fit a direct cable adaptor to it, I think this is mostly done because project builders have just bought the engine without what's needed to fit it. At first I was worried a remote controlled throttle might have just been a stupid economy gadget. Then I realised that as Formula 1 cars and WRC cars all use fly-by-wire throttles they have to be a better setup and one which does NOT cost you power. The advantages are that the throttle is linked to the ECU, so when you press the go fast pedal it takes a whole complex of settings into account to maximise engine response. For example when you floor the pedal the throttle does not open fully and momentarily lean out the engine(like on a direct cable setup). Rather - the remote control-opens it gradually... something you can actually SEE it doing.
The V6 box is a cable shift, so I bought a gear stick setup and cables from a 4 cylinder Accord Euro, easily fitting the stick up high within closer reach of the steering wheel after I blanked off the original setup's hole in the floor and ran the new selector cables straight out through to firewall.
Then I made a bracket to hold the ECU where the Accord's loom said it wanted to be - right up the front of the centre tunnel under where the heater box had been.
I looked at the front brakes to see what upgrade might be possible, starting with the gigantic dics and huge calipers off the donor Accord. In this comparison shot the smaller disc isn't a standard Civic one - it's the larger one that comes on '94 Integras and that was original to my V-TiR. I say this so you'll appreciate just how much bigger the Accord units were. Look how much bigger the pads are too!
To my delight the Accord calipers just bolted straight onto the Civic uprights! The only downside is you can't run 14inch wheels with them - but I run fifteens anyway so no problemo. All I had to do was get the discs re-drilled to four stud. The hub shown here that I'm gonna use is 1991 gen III 4WSteer Prelude. It's 10mm shorter in height than a Civic (of virtually no consequence other than a MINOR reduction in anti-dive geometry), and bolts straight in too. The reason I'm using this particular hub will be explained later when I cover the driveshaft and CV componentry I will use made up from various stock Honda bits fitted together.
There is no brake proportioning valve in a Honda. I say this because when changing brakes you need to realise that the way Hondas do in fact get their front to back brake portioning balance is not hydraulically but by the factory matching the size of discs, caliper piston sizes and pads.Those double V blocks are just joiner blocks with a fail safe system in them in case you get a fluid leak. They keep one half of the diagonal system still working. So when you change brake parts you change that braking balance. What I've done on my race car is to swap over the brake lines at that double V block in the engine bay, changing it from a diagonally linked setup to a front to back one. I connect both front brake lines to the same V block outlet, and run ONE rear brake line directly from one master cylinder exit port. There's no bias balancing coming out of that either on Hondas - both exits send out the same amount of brake fluid. I run that rear line through the firewall to a Willwood adjuster which you can see in the shot of the gearstick it's mounted next to. From there the line goes through a hydraulic handbrake (adapted early model Toyota Corolla clutch master cylinder), and from there to a Tee block where the back seat used to be and then out to each rear wheel. I can adjust my brake bias from my seat for dirt or tar - the latter using a little more fluid to the rear.
To get more fluid pumping into the brake system overall I swap out the 13/16ths of an inch diameter Civic brake master cylinder for a 15/16ths one off gen III Preludes - which bolt straight on. You can also see the reservoir is much bigger too, and the low level light wires even connnect up. Too easy!
I immersed myself in joining the Civic and Accord wiring looms for everything behind the drivers seat. Fuel pump wires were the same colour coding, but everything else was different. It’s quicker to join the two looms than replace all the plugs at the lights, pump, rear wiper, etc. A battery soon told me which wire was which in the Civic. I also made a bracket for mounting the CPU, wired in the plugs for the new radiator into the system, and a few other little jobs. Whenever I do a conversion I always right down the color coding of how the two cars looms join up at the door. It makes sense to only have to do this once, and I’ve already got the benefit of it when doing the same conversion again for someone else. The easiest way for me to fit the new throttle cable to the Civic pedal was to replace it’s end with the Accord one.

Trending Topics
01-20-2015, 04:22 PM
#8
Honda-Tech Member
Thread Starter
Join Date: Jan 2015
Location: Newcastle Australia
Posts: 12
Likes: 0
Received 0 Likes
on
0 Posts
My project now hit a MAJOR PROBLEM. I’d bought an automatic wreck presuming I’d just be able to buy a manual box to bolt up to it.
*_Wake up call #1_* From exhaustive research involving many trips to Honda specialist wreckers in a number of states, plus many, many hours surfing on the web, I discovered there were in fact no manual Honda V6’s ever imported into Australia.
_*Wake up call #2: *_Then I bought a 6 speed box off a 4 cylinder Accord Euro, presuming it would fit. Wrong! The bolt patterns were close - but incompatible. Then I thought I’d get a new adapting bell housing made, but when we looked at it we realized the starter motor bolted onto the engine side of the flywheel on the Euro box (instead of on the gearbox side), and that it couldn’t be made to fit there. By the time I knew the Euro box was useless the wrecker I’d bought it off wouldn’t take it back. I won’t say what nationality he was – but in Oz they’re notoriously aggressive with English only speaking people. He ripped $600 of the $1500 I’d paid off me – despite me returning it within the two week warranty period stamped on my bill of sale. But what else was I gonna do with it?
So my project sat in the garage with a sheet over it for 12 months stuck in an automotive Ground Hog day while I tried to save for and find the right box to import from overseas. Include a month or two at the start of that year’s delay researching on the net to work out exactly what I needed and where I could source it from. During that period my courier business also lost it’s major client, gradually folded up, and I found myself unemployed and broke.
I found good online car parts search engines in America (Car-Part.com) and found boxes on a regular basis - but never got a email reply from any of the US wreckers... apart from the one who told me she had just the automatic I needed! So I just kept looking and emailing my interest every month to yards that had the box on their inventories, and last month I actually got a reply. He sent me the attached picture that I requested, which I printed to the same size as a similar one of my engine. I then punched holes where the bolts went on each, lined the prints up against one another, and bingo - they matched.
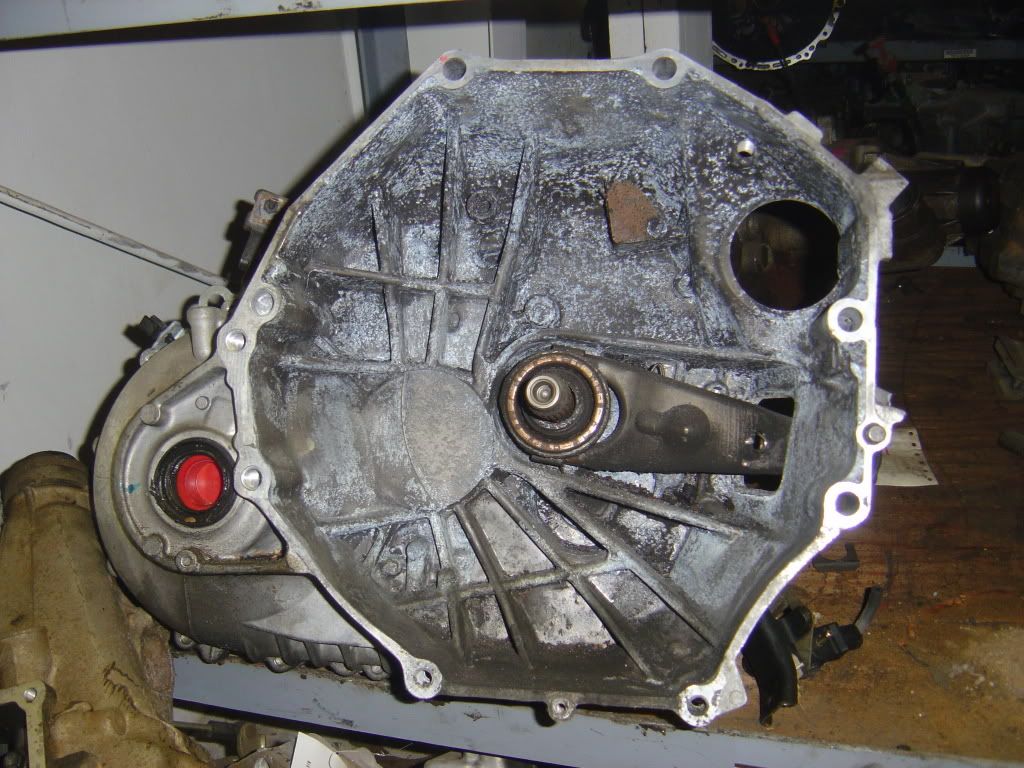
The box I bought was from a 2005 Acura V6 TL. I'd worked out to avoid the earlier, cheaper V6 boxes as they don't have lsd. Of course every car wrecking yard will tell you there's has it, but here's how you really know. Look through the driveshaft holes in the diff. If it's an uninterrupted smooth hole it's an lsd box. If there's a rod going through the middle of that hole it isn't lsd... and how you gonna get more than 200bhp to the ground in a fwd without it?
I was willing to pay air freight to get it here in a few days, until I was quoted the same as a return air fare to the States for the freight costs, so it was gonna have to come by ship and ended up taking 8 weeks.
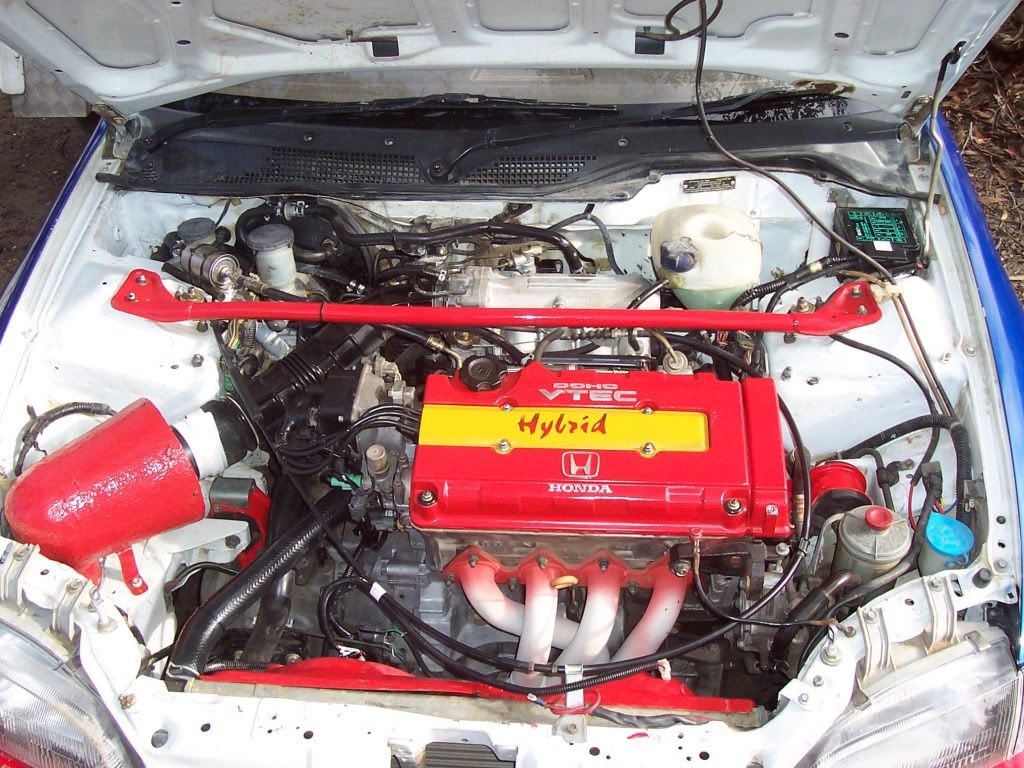
The factory cover for my new engine was damaged in the donor car's crash, so I've just sculpted and reproduced one that fits my layout even better than the original would've. I priced a genuine replacement and you can only buy it with the tappet cover, etc. $700 from Honda - so the decision to make one myself for next to nothing was a fairly easy decision! Some $4 chrome badges from a Chinese e-bay store compliment the new cover's Monza red finish.
I've altered the Accord airbox. It needed a new main intake pipe, some bits cut off it and then blanked off with fibreglass so it now fits the Civic, adding a real factory look. My cold air ducting work will ensure it performs far better than stock.
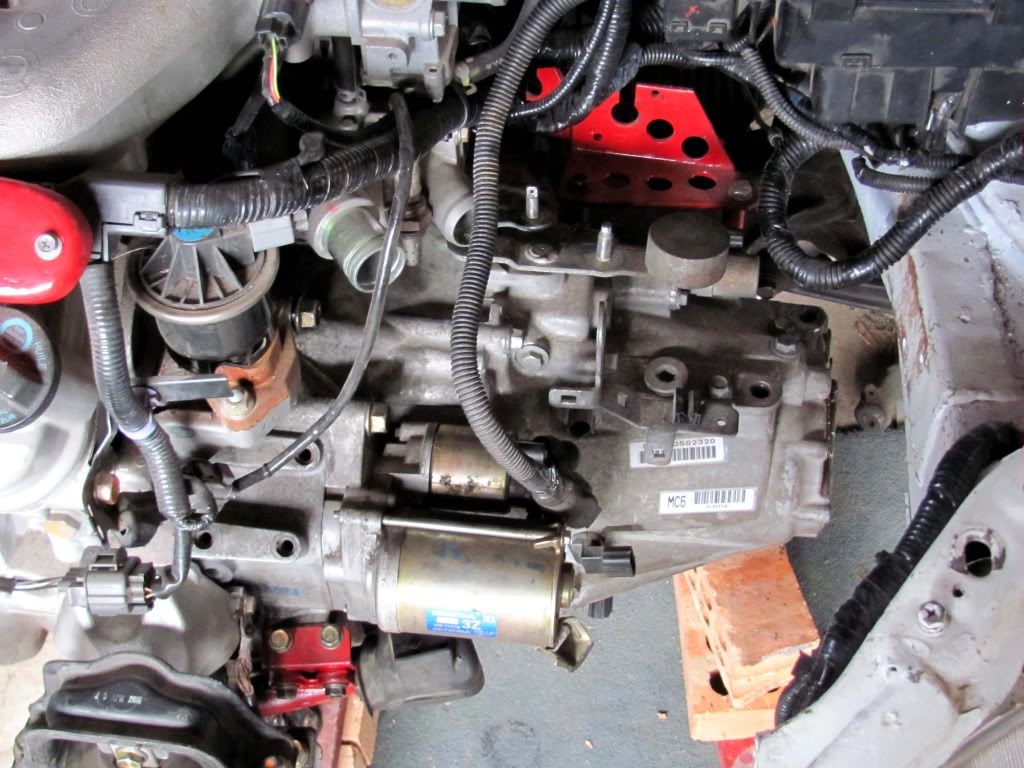
This week I went to Sydney (100+ miles away) & picked up my gearbox from the USA. It cost me $750 just in #*&^%#@ port fees! I'd kept the starter motor from the automatic transmission that was on the wreck I bought, thinking it well might fit. Just as well I decided to play safe and buy one when I purchased the manual gearbox as although the auto starter mount holes lined up it wouldn't fit in the 6 speed's casing hole.
It was also a relief to check the box I'd been sent to find it did indeed have factory lsd. Earlier transmissions are about half the price - but you can't put 265 fwbhp onto the ground in a fwd without one. Unless donuts are all you're into. Total cost to get the box on my bench: A$3,500!

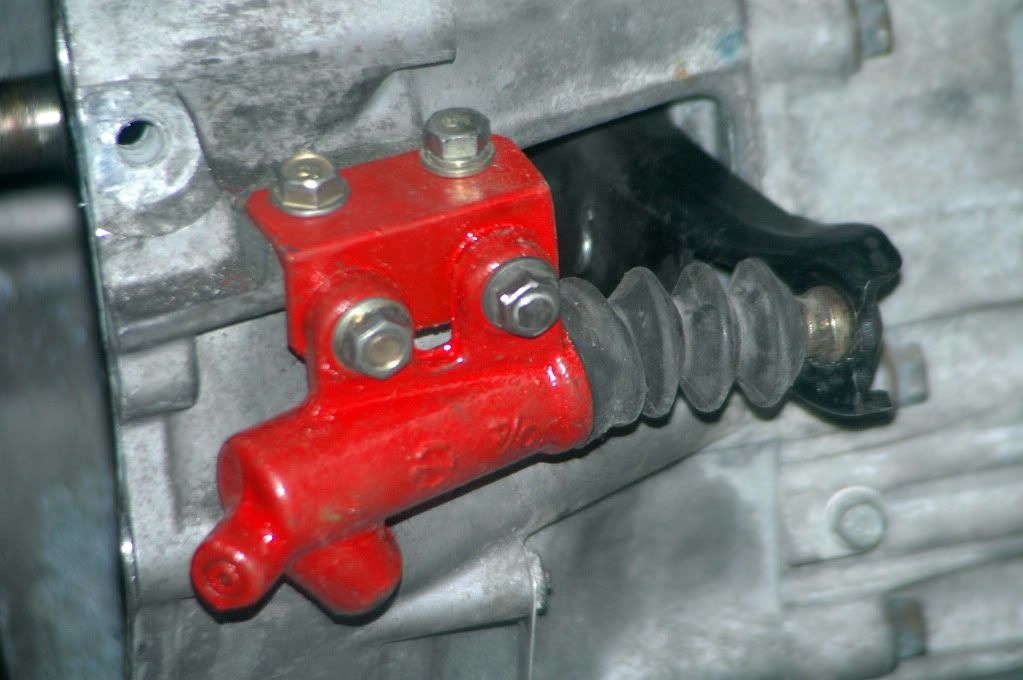
There was no clutch slave cylinder on the new box, and none of the countless Ozzie Honda models I checked matched. I found the right one in the USA (gotta luv Google), but when I saw a pic of one I realized I could easily adapt a Civic or Prelude one by just attaching it via an offcut of one inch angle iron – so that was soon done. The bleed screw head fouled the Accord front engine mount bracket, so I tightened it right up and cut the tip off. I’ll bleed the hydraulics by cracking the line mounting point – that being a job you rarely have to do again.
The only American I could contact who’d done this conversion wouldn’t tell me what driveshaft components would work. I discovered later that they were now selling them as kits – but even an appeal based on my being on the other side of the world and no marketing threat to them failed to illicit the information despite promises to not reveal it.
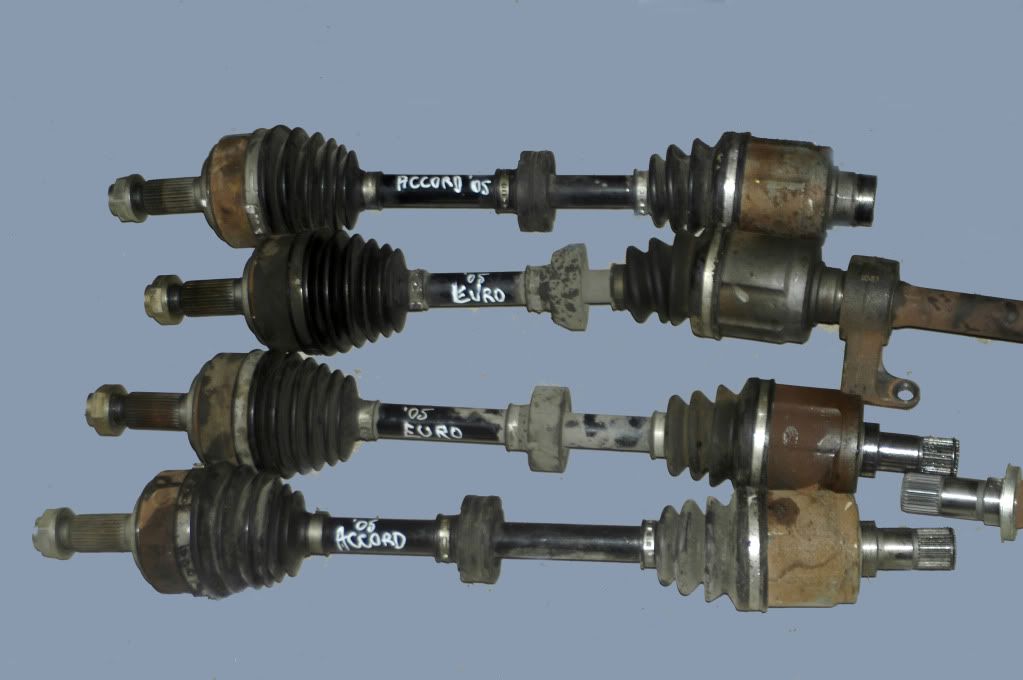
So I had to just work out for myself exactly how all my seven driveshaft pieces from different model Hondas would go together.
I’d collected inner CV's, outer CV's and the shafts themselves from Euro, Integra, Civic and the ones which came with the Accord auto. It turned out quite a jigsaw puzzle... but not rocket surgery. My starting point was the intermediatory shaft that goes across the back of the engine. That obviously had to be from the 2005 Accord so it’s fit the V6 block, and I (correctly) figured there’d be no differences between the auto and a manual at that point.
I also knew I did NOT want to use the Civic outer CV joints if at all possible. I cannot see the sense in similar overseas conversions that put an amount of V6 power through a 4 cylinder Civic CV never designed to transmit it. Just making a weak point if you ask me. Honda’s larger outer drive joints are obviously much stronger. I knew they’d handle the V6 power as they’d been designed by the factory to transmit it. Notice the splined shaft that goes through the hub is bigger too. There had to be a way of incorporating them!
That aim raised the issue of finding front suspension uprights that would take the bigger joint. I’d retained the solid Accord V6 ones, but they had too much curve in the arm up to the top ball joint hole and would never clear the front springs. They ended up going back to my Honda wrecker to exchange for other parts.
Next I'll go to Sydney to browse through Honbits Wreckers to see if I can find front suspension uprights that'll allow me to retain the much larger Accord outer C.V.'s and wheel bearings. If nothing swaps in I'll need to get the driveshafts themselves re-splined to fit the smaller Civic joints as my fall back option. I want the drivetrain to be as strong as I can make it
All the new fibreglass panels I made and the old ones I repaired have come back from the paint shop. I am always amazed at the fantastic finish achievable on bodywork you can make from scratch in your own garage.
Yesterday I made brackets to hold the gear shift cables in position on the gearbox. By the end of the day I could change gears remotely ... even without the gearstick, which I'll put in over the weekend. It'll really feel like the finish line is achievable when I can sit in my bucket seat and shift through 6 speeds!
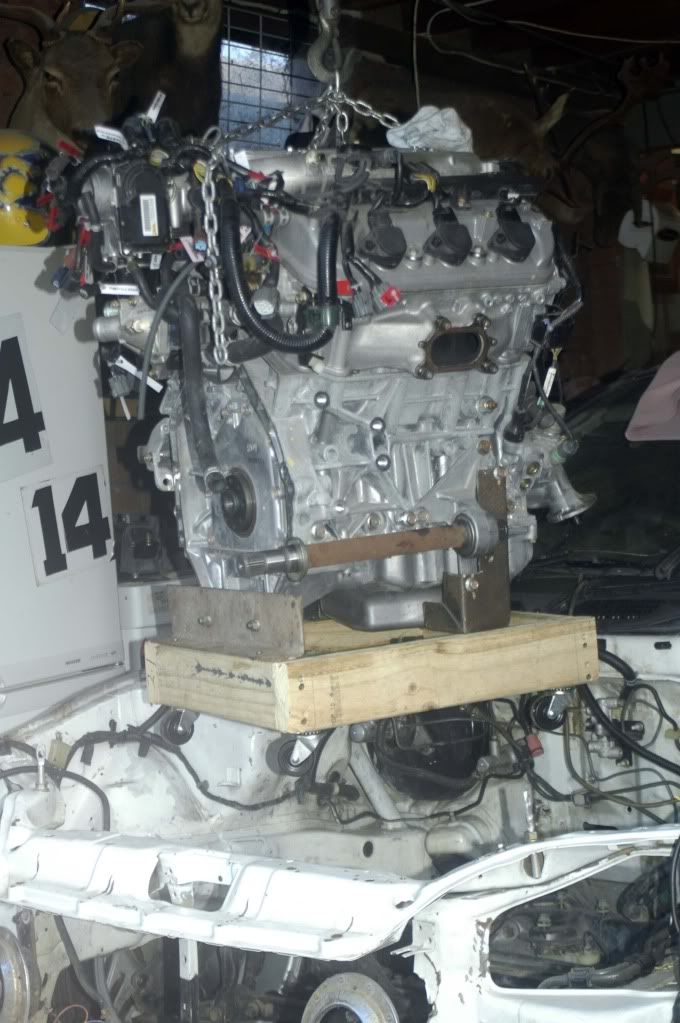
The fourth and final engine mount actually hangs off the top of the gearbox. I'd kept the factory mount from the 2005 Accord auto I wrecked, and have just about got the bracketry finished that I had to make to bolt it in place.

As this engine is physically quite a lot bigger than anything honda puts in a Civic I've designed all the engine mounting brackets to unbolt so there's nothing protruding from the main chassis rails when the powerplant is going in and out of the bay.
*_Wake up call #1_* From exhaustive research involving many trips to Honda specialist wreckers in a number of states, plus many, many hours surfing on the web, I discovered there were in fact no manual Honda V6’s ever imported into Australia.
_*Wake up call #2: *_Then I bought a 6 speed box off a 4 cylinder Accord Euro, presuming it would fit. Wrong! The bolt patterns were close - but incompatible. Then I thought I’d get a new adapting bell housing made, but when we looked at it we realized the starter motor bolted onto the engine side of the flywheel on the Euro box (instead of on the gearbox side), and that it couldn’t be made to fit there. By the time I knew the Euro box was useless the wrecker I’d bought it off wouldn’t take it back. I won’t say what nationality he was – but in Oz they’re notoriously aggressive with English only speaking people. He ripped $600 of the $1500 I’d paid off me – despite me returning it within the two week warranty period stamped on my bill of sale. But what else was I gonna do with it?
So my project sat in the garage with a sheet over it for 12 months stuck in an automotive Ground Hog day while I tried to save for and find the right box to import from overseas. Include a month or two at the start of that year’s delay researching on the net to work out exactly what I needed and where I could source it from. During that period my courier business also lost it’s major client, gradually folded up, and I found myself unemployed and broke.
I found good online car parts search engines in America (Car-Part.com) and found boxes on a regular basis - but never got a email reply from any of the US wreckers... apart from the one who told me she had just the automatic I needed! So I just kept looking and emailing my interest every month to yards that had the box on their inventories, and last month I actually got a reply. He sent me the attached picture that I requested, which I printed to the same size as a similar one of my engine. I then punched holes where the bolts went on each, lined the prints up against one another, and bingo - they matched.
The box I bought was from a 2005 Acura V6 TL. I'd worked out to avoid the earlier, cheaper V6 boxes as they don't have lsd. Of course every car wrecking yard will tell you there's has it, but here's how you really know. Look through the driveshaft holes in the diff. If it's an uninterrupted smooth hole it's an lsd box. If there's a rod going through the middle of that hole it isn't lsd... and how you gonna get more than 200bhp to the ground in a fwd without it?
I was willing to pay air freight to get it here in a few days, until I was quoted the same as a return air fare to the States for the freight costs, so it was gonna have to come by ship and ended up taking 8 weeks.
The factory cover for my new engine was damaged in the donor car's crash, so I've just sculpted and reproduced one that fits my layout even better than the original would've. I priced a genuine replacement and you can only buy it with the tappet cover, etc. $700 from Honda - so the decision to make one myself for next to nothing was a fairly easy decision! Some $4 chrome badges from a Chinese e-bay store compliment the new cover's Monza red finish.
I've altered the Accord airbox. It needed a new main intake pipe, some bits cut off it and then blanked off with fibreglass so it now fits the Civic, adding a real factory look. My cold air ducting work will ensure it performs far better than stock.
This week I went to Sydney (100+ miles away) & picked up my gearbox from the USA. It cost me $750 just in #*&^%#@ port fees! I'd kept the starter motor from the automatic transmission that was on the wreck I bought, thinking it well might fit. Just as well I decided to play safe and buy one when I purchased the manual gearbox as although the auto starter mount holes lined up it wouldn't fit in the 6 speed's casing hole.
It was also a relief to check the box I'd been sent to find it did indeed have factory lsd. Earlier transmissions are about half the price - but you can't put 265 fwbhp onto the ground in a fwd without one. Unless donuts are all you're into. Total cost to get the box on my bench: A$3,500!
There was no clutch slave cylinder on the new box, and none of the countless Ozzie Honda models I checked matched. I found the right one in the USA (gotta luv Google), but when I saw a pic of one I realized I could easily adapt a Civic or Prelude one by just attaching it via an offcut of one inch angle iron – so that was soon done. The bleed screw head fouled the Accord front engine mount bracket, so I tightened it right up and cut the tip off. I’ll bleed the hydraulics by cracking the line mounting point – that being a job you rarely have to do again.
The only American I could contact who’d done this conversion wouldn’t tell me what driveshaft components would work. I discovered later that they were now selling them as kits – but even an appeal based on my being on the other side of the world and no marketing threat to them failed to illicit the information despite promises to not reveal it.
So I had to just work out for myself exactly how all my seven driveshaft pieces from different model Hondas would go together.
I’d collected inner CV's, outer CV's and the shafts themselves from Euro, Integra, Civic and the ones which came with the Accord auto. It turned out quite a jigsaw puzzle... but not rocket surgery. My starting point was the intermediatory shaft that goes across the back of the engine. That obviously had to be from the 2005 Accord so it’s fit the V6 block, and I (correctly) figured there’d be no differences between the auto and a manual at that point.
I also knew I did NOT want to use the Civic outer CV joints if at all possible. I cannot see the sense in similar overseas conversions that put an amount of V6 power through a 4 cylinder Civic CV never designed to transmit it. Just making a weak point if you ask me. Honda’s larger outer drive joints are obviously much stronger. I knew they’d handle the V6 power as they’d been designed by the factory to transmit it. Notice the splined shaft that goes through the hub is bigger too. There had to be a way of incorporating them!
That aim raised the issue of finding front suspension uprights that would take the bigger joint. I’d retained the solid Accord V6 ones, but they had too much curve in the arm up to the top ball joint hole and would never clear the front springs. They ended up going back to my Honda wrecker to exchange for other parts.
Next I'll go to Sydney to browse through Honbits Wreckers to see if I can find front suspension uprights that'll allow me to retain the much larger Accord outer C.V.'s and wheel bearings. If nothing swaps in I'll need to get the driveshafts themselves re-splined to fit the smaller Civic joints as my fall back option. I want the drivetrain to be as strong as I can make it
All the new fibreglass panels I made and the old ones I repaired have come back from the paint shop. I am always amazed at the fantastic finish achievable on bodywork you can make from scratch in your own garage.
Yesterday I made brackets to hold the gear shift cables in position on the gearbox. By the end of the day I could change gears remotely ... even without the gearstick, which I'll put in over the weekend. It'll really feel like the finish line is achievable when I can sit in my bucket seat and shift through 6 speeds!
The fourth and final engine mount actually hangs off the top of the gearbox. I'd kept the factory mount from the 2005 Accord auto I wrecked, and have just about got the bracketry finished that I had to make to bolt it in place.
As this engine is physically quite a lot bigger than anything honda puts in a Civic I've designed all the engine mounting brackets to unbolt so there's nothing protruding from the main chassis rails when the powerplant is going in and out of the bay.
01-22-2015, 03:16 AM
#10
Honda-Tech Member
Thread Starter
Join Date: Jan 2015
Location: Newcastle Australia
Posts: 12
Likes: 0
Received 0 Likes
on
0 Posts
Aaah if only life was that simple. That gearbox is unlisted in Australian Honda parts, and the cost to import a new box from overseas would've been even way more expensive than the route I took.
01-25-2015, 04:51 PM
#12
Honda-Tech Member
Thread Starter
Join Date: Jan 2015
Location: Newcastle Australia
Posts: 12
Likes: 0
Received 0 Likes
on
0 Posts
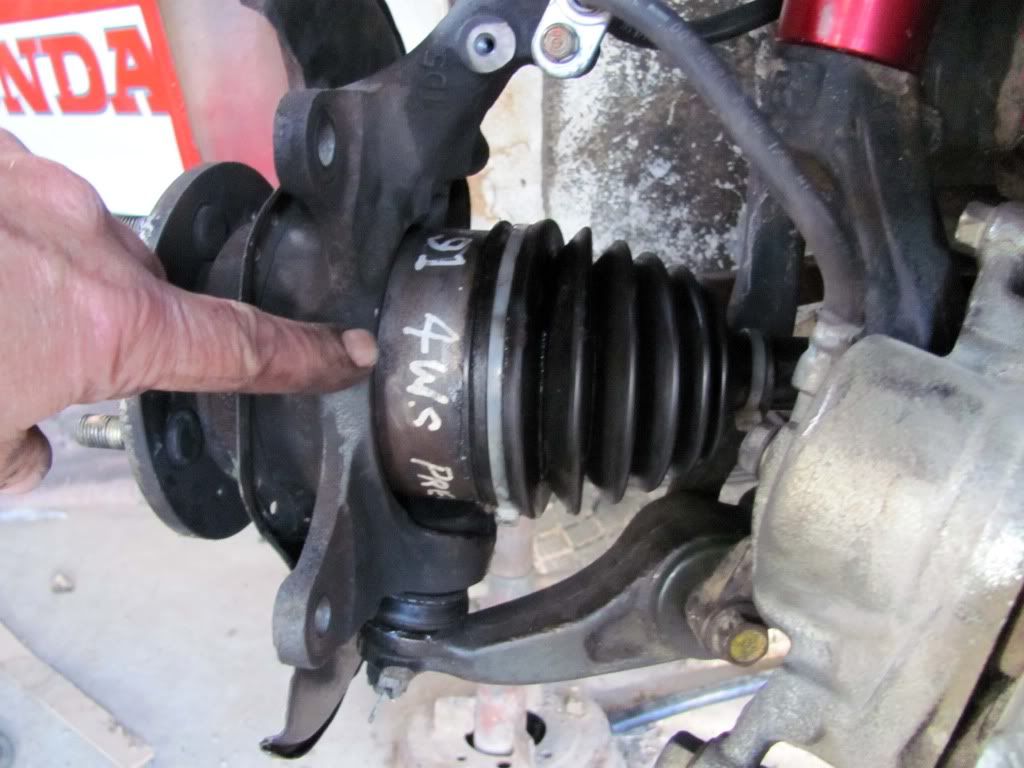
Before going to rummage at Sydney’s main Honda wreckers I searched my own stack of parts, and quickly settled on changing over to front suspension uprights in lmy large spare parts bin from a 1991 Prelude I'd wrecked for a 2 litre motor swap into an EG Civic. I discovered Honda had upgraded the outer CV's in this the last year of their 4WSteer model to their larger size – the same as used in my 2005 V6 donor Accord wreck.
I knew I had to use the inner CV's and intermediate shaft (that mounts across the back of the motor) from the Accord. Question now was - could I find actual drive shafts of the right length and splining each end that would fit, and was my motor correctly positioned left and right?
So I spent a day dismantling a stack of different Honda driveshafts and CV's to try and find a combination that would fit my setup and allow me to use stronger CV's than the stock Civic ones. The newer Accord CV grease was light caramel , but had the consistency of water and splashed everywhere. By day's end I'd impregnated three sets of garage clothes with sticky black Molybidenum grease. I do not exaggerate!
By late afternoon I had finally assembled a complete near side drive shaft and test fitted it - but I could not find the right length shaft for the drivers side, despite all my experimentation. MAJOR PROBLEM No.1: It looked like I'd have to get one specifically made for around $300... which I didn't have. Only good news was that all these driveshaft test fits had confirmed I had mounted the new motor exactly where it needed to be.
Just before tea I bolted the gearbox up to my Civic for what I thought was the last time. But when I checked the operation of the clutch fork I found the release bearing wasn't touching the pressure plate - even with the arm fully depressed. There must be some difference between the Accord Euro clutch and flywheel I'm using compared with what mates up to the six speed lsd box in the America Hondas from which it's sourced. MAJOR WAKE UP CALL # 3: No drive! Just when I thought I might be racing this beast within a few weeks I realized I was still a long way from the finish line. I went up for tea depressed and frustrated.
Next day I completely dismantled the drive shaft component combinations I'd worked out to use, and re-packed everything in fresh molybidenum grease.
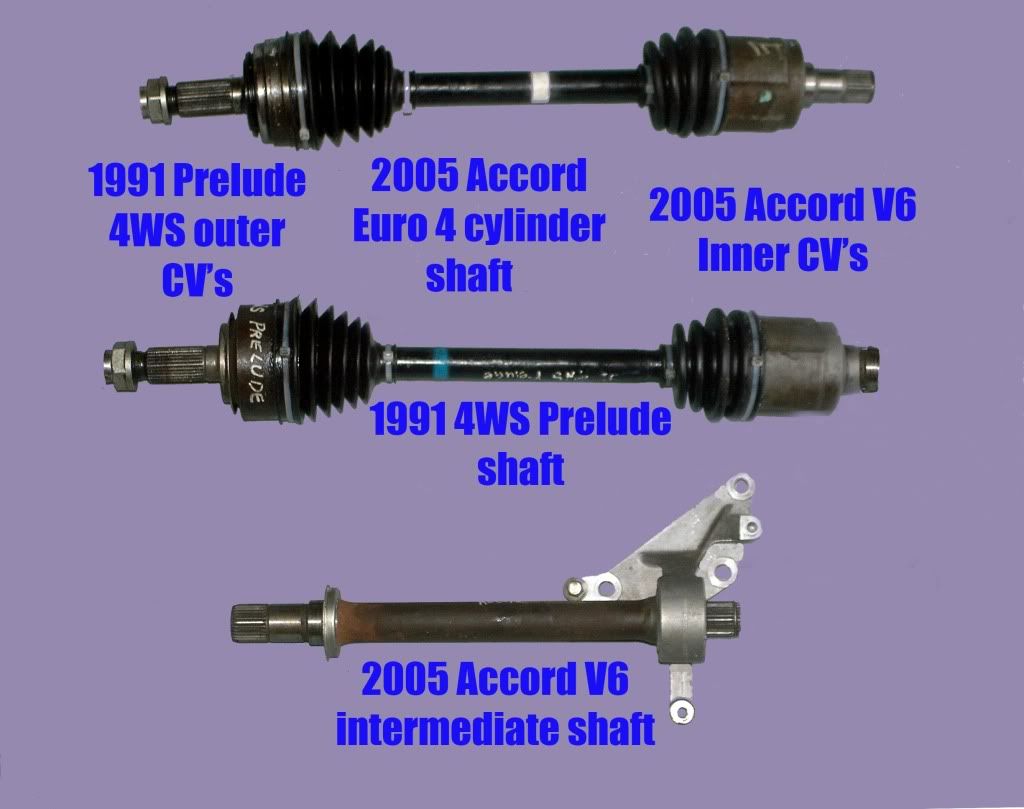
This shot shows the exact stock driveshaft components I put together that will better cope with the power doubling from the 2 litre - the reason why I changed front uprights on the Civic. No machining here!
The reasons I decided to use the 1991 Prelude outer CV’s and front suspension uprights were 1) They were the larger, stronger size that Honda makes.
2) I couldn’t use the “as new” V6 Accord ones as the splining on the Prelude hubs was minutely different. Although they appear identical at first the Prelude splining is a wee bit flat on the top edges – so the two won’t go together.
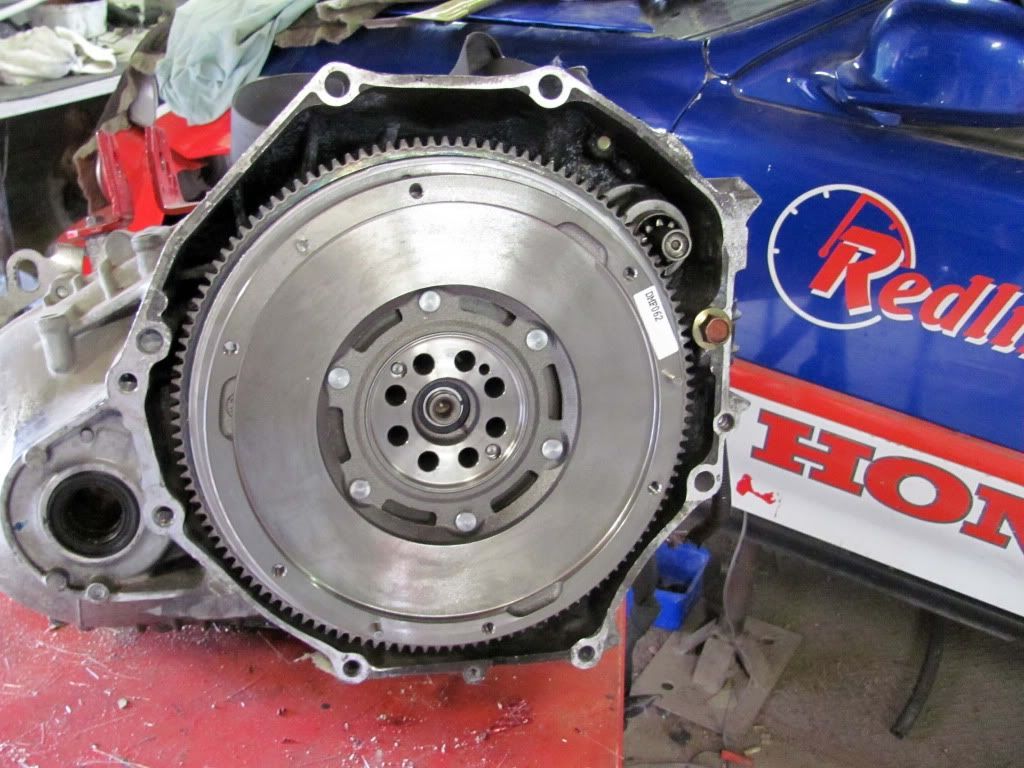
Now I focussed on trying to find the right flywheel for my conversion. I went to Sydney today and waded through every type of Australian Honda flywheel there is at Honbits. I was hoping to find one with 12mm more offset, and took the gearbox with the starter mounted in it along for that wonderful ride into traffic mayhem, truck chequer-board lane hogging, and multicultural political "driving" school correctness.
After an hour and a half of test fitting I discovered there are NO Honda flywheels in this country that are large enough in diameter to engage the starter motor teeth - let alone with the correct offset. So having a spacer made for the Euro one I thought might work would've been a waste of time and $$$$.
I have no choice now but to import one from the USA where I got the manual transmission from. This shouldn't be too expensive (PLEASE!), but it'll take another couple of months. So it's back on with the dust sheets again, and take my frustration out on my 1.6 Civic "spare" car.
Why did my wife say,"Did anyone expect you to NOT have to import one?"
Having emailed ten USA wreckers who show the flywheel I need on their inventories I have received just one reply after a week's waiting. And this guy won't sell it to me as he doesn't even freight in the USA - let alone overseas!
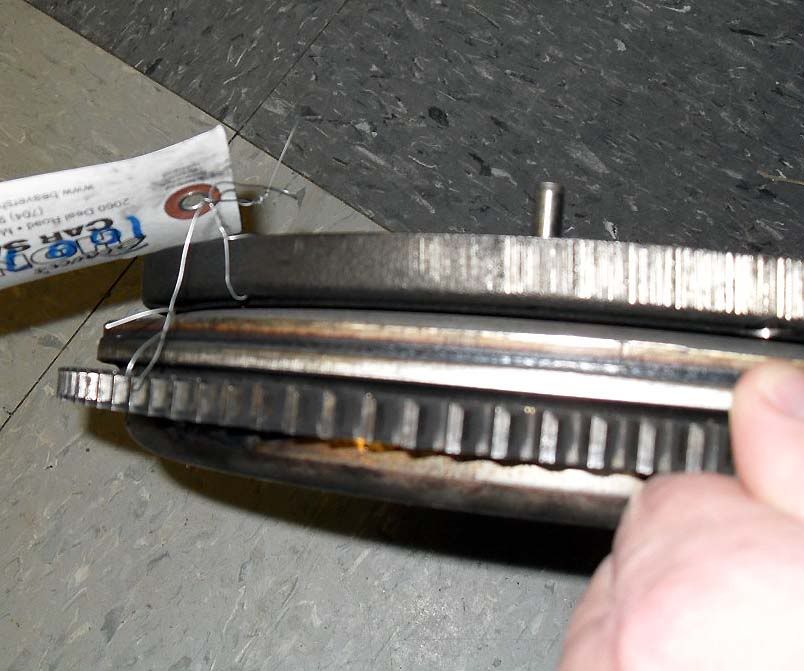
However he did respond to my request for the photos below - which shows it carries a large central bearing (which I'll now have to chase as well). It's also two pieces bolted together and MUCH thicker than anything I've seen out here, with a "pilot" bearing between the two pieces. You can also see in the last pic how "thin" the Australian 4 cylinder Honda flywheel I'd tried to use is by comparison.
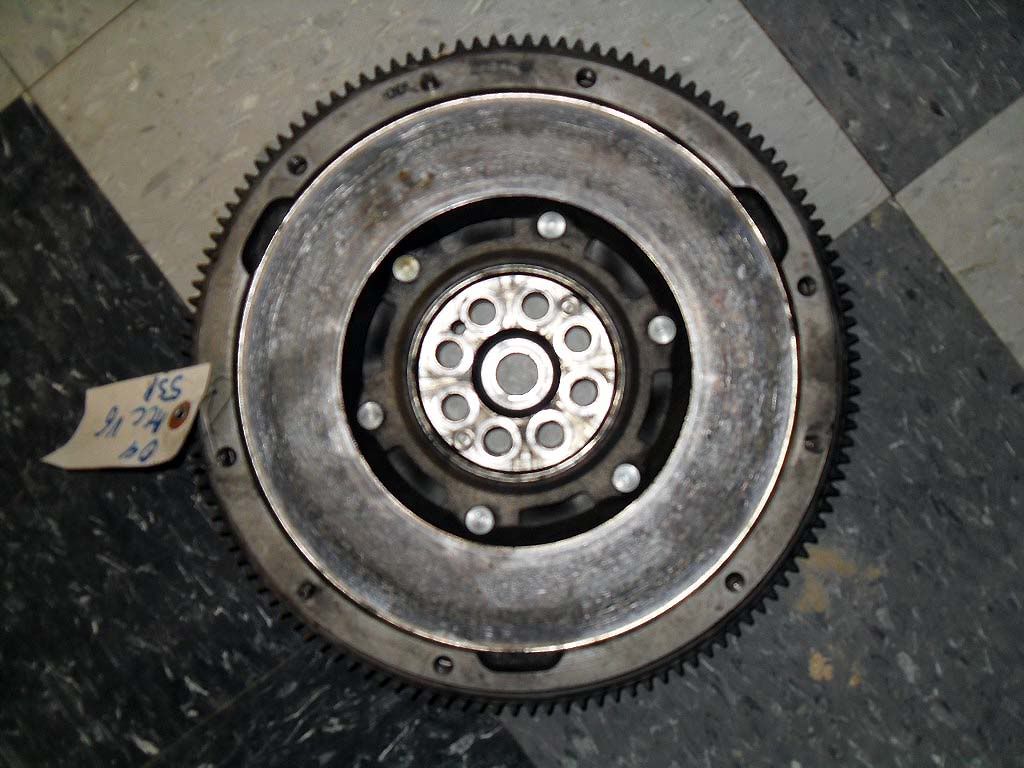

So at least I know what I want does exist and what it looks like. Now I've just got to get my disgustingly clean hands on one!
Every night for the last three weeks I have been searching for a couple of hours on the internet via Google and E-bay for the right clutch kit and flywheel for my Honda conversion. Last night I found a supplier for the flywheel, and this time sellers of both the clutch kit and flywheel freight overseas, so I don't have to work through a forwarding agent.
The clutch kit is a stage 3 specifically designed for track work. A 6 puck high torque ceramic plate with 41% more grip and yet still with road feel (note the springs in the clutch diaphram), so it won't be harsh to engage or savage on the splines. They also show an optional 3 puck plate in this pic, but I want the one with more surface area.
This brand new steel flywheel in America was listed for the first time last evening, and will cost me about the same as getting a second hand one out here - and it won't need re-machining. It's called a "dual mass" flywheel because it's made of two parts joined together, and this one's 6lb lighter than the factory one.
I hope to order both parts in a couple of days when I get $$$$ from stuff I've sold on e-bay. Not sure yet how long it'll take to get them here, but it looks like I finally have the last pieces of the jigsaw.
I knew I had to use the inner CV's and intermediate shaft (that mounts across the back of the motor) from the Accord. Question now was - could I find actual drive shafts of the right length and splining each end that would fit, and was my motor correctly positioned left and right?
So I spent a day dismantling a stack of different Honda driveshafts and CV's to try and find a combination that would fit my setup and allow me to use stronger CV's than the stock Civic ones. The newer Accord CV grease was light caramel , but had the consistency of water and splashed everywhere. By day's end I'd impregnated three sets of garage clothes with sticky black Molybidenum grease. I do not exaggerate!
By late afternoon I had finally assembled a complete near side drive shaft and test fitted it - but I could not find the right length shaft for the drivers side, despite all my experimentation. MAJOR PROBLEM No.1: It looked like I'd have to get one specifically made for around $300... which I didn't have. Only good news was that all these driveshaft test fits had confirmed I had mounted the new motor exactly where it needed to be.
Just before tea I bolted the gearbox up to my Civic for what I thought was the last time. But when I checked the operation of the clutch fork I found the release bearing wasn't touching the pressure plate - even with the arm fully depressed. There must be some difference between the Accord Euro clutch and flywheel I'm using compared with what mates up to the six speed lsd box in the America Hondas from which it's sourced. MAJOR WAKE UP CALL # 3: No drive! Just when I thought I might be racing this beast within a few weeks I realized I was still a long way from the finish line. I went up for tea depressed and frustrated.
Next day I completely dismantled the drive shaft component combinations I'd worked out to use, and re-packed everything in fresh molybidenum grease.
This shot shows the exact stock driveshaft components I put together that will better cope with the power doubling from the 2 litre - the reason why I changed front uprights on the Civic. No machining here!
The reasons I decided to use the 1991 Prelude outer CV’s and front suspension uprights were 1) They were the larger, stronger size that Honda makes.
2) I couldn’t use the “as new” V6 Accord ones as the splining on the Prelude hubs was minutely different. Although they appear identical at first the Prelude splining is a wee bit flat on the top edges – so the two won’t go together.
Now I focussed on trying to find the right flywheel for my conversion. I went to Sydney today and waded through every type of Australian Honda flywheel there is at Honbits. I was hoping to find one with 12mm more offset, and took the gearbox with the starter mounted in it along for that wonderful ride into traffic mayhem, truck chequer-board lane hogging, and multicultural political "driving" school correctness.
After an hour and a half of test fitting I discovered there are NO Honda flywheels in this country that are large enough in diameter to engage the starter motor teeth - let alone with the correct offset. So having a spacer made for the Euro one I thought might work would've been a waste of time and $$$$.
I have no choice now but to import one from the USA where I got the manual transmission from. This shouldn't be too expensive (PLEASE!), but it'll take another couple of months. So it's back on with the dust sheets again, and take my frustration out on my 1.6 Civic "spare" car.
Why did my wife say,"Did anyone expect you to NOT have to import one?"
Having emailed ten USA wreckers who show the flywheel I need on their inventories I have received just one reply after a week's waiting. And this guy won't sell it to me as he doesn't even freight in the USA - let alone overseas!
However he did respond to my request for the photos below - which shows it carries a large central bearing (which I'll now have to chase as well). It's also two pieces bolted together and MUCH thicker than anything I've seen out here, with a "pilot" bearing between the two pieces. You can also see in the last pic how "thin" the Australian 4 cylinder Honda flywheel I'd tried to use is by comparison.
So at least I know what I want does exist and what it looks like. Now I've just got to get my disgustingly clean hands on one!
Every night for the last three weeks I have been searching for a couple of hours on the internet via Google and E-bay for the right clutch kit and flywheel for my Honda conversion. Last night I found a supplier for the flywheel, and this time sellers of both the clutch kit and flywheel freight overseas, so I don't have to work through a forwarding agent.
The clutch kit is a stage 3 specifically designed for track work. A 6 puck high torque ceramic plate with 41% more grip and yet still with road feel (note the springs in the clutch diaphram), so it won't be harsh to engage or savage on the splines. They also show an optional 3 puck plate in this pic, but I want the one with more surface area.
This brand new steel flywheel in America was listed for the first time last evening, and will cost me about the same as getting a second hand one out here - and it won't need re-machining. It's called a "dual mass" flywheel because it's made of two parts joined together, and this one's 6lb lighter than the factory one.
I hope to order both parts in a couple of days when I get $$$$ from stuff I've sold on e-bay. Not sure yet how long it'll take to get them here, but it looks like I finally have the last pieces of the jigsaw.
01-30-2015, 12:57 AM
#14
Honda-Tech Member
Thread Starter
Join Date: Jan 2015
Location: Newcastle Australia
Posts: 12
Likes: 0
Received 0 Likes
on
0 Posts
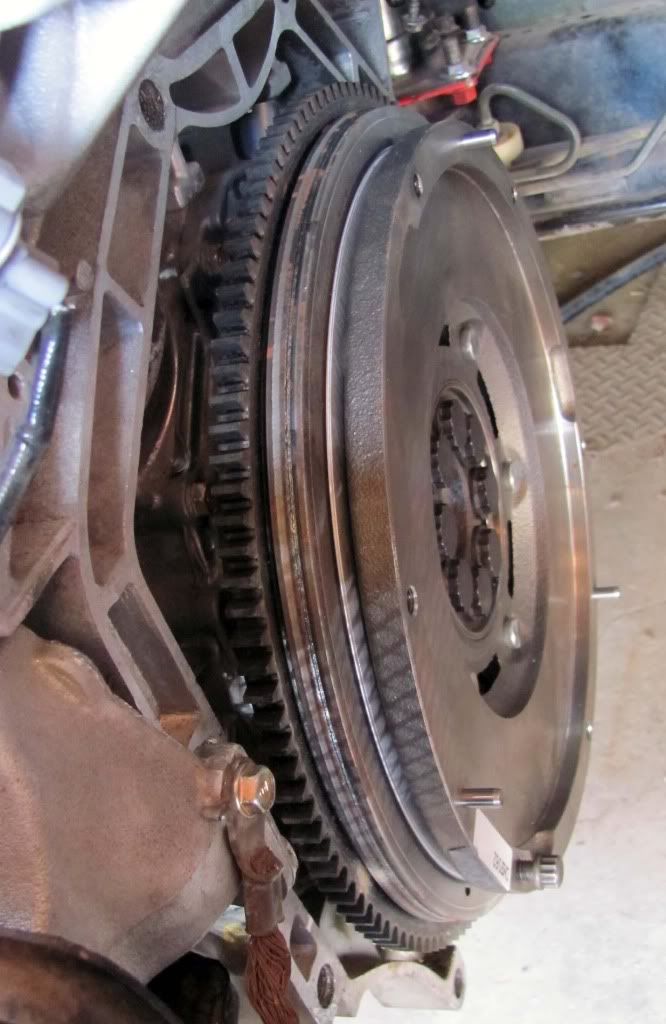
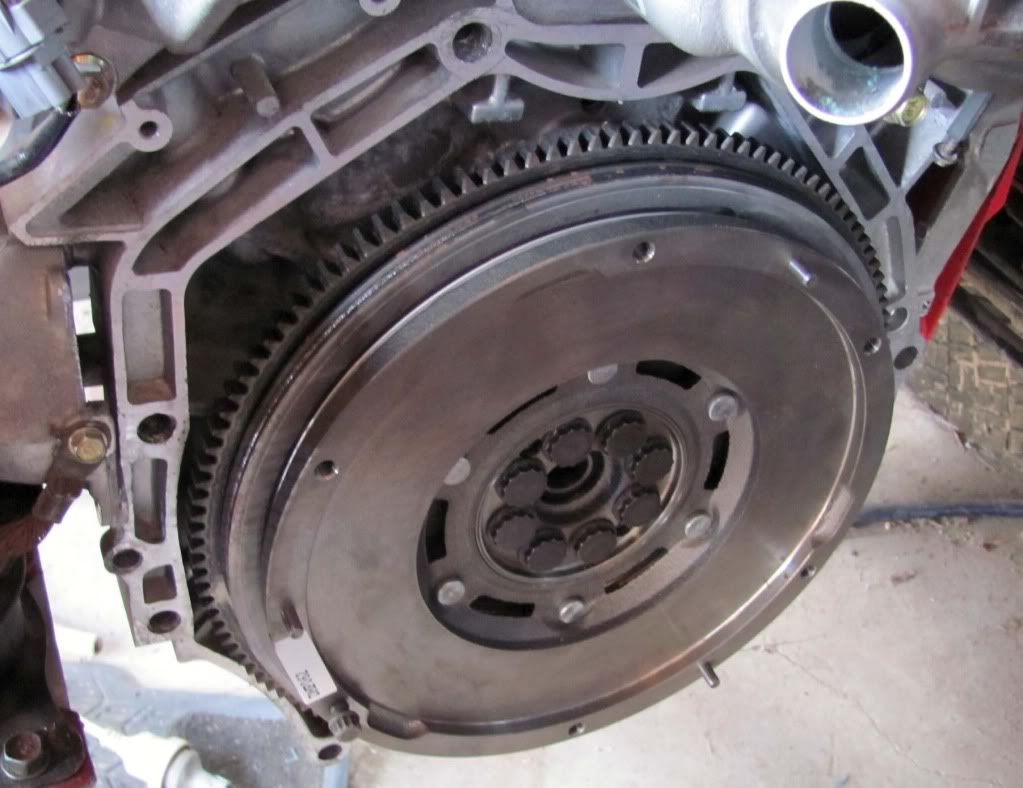
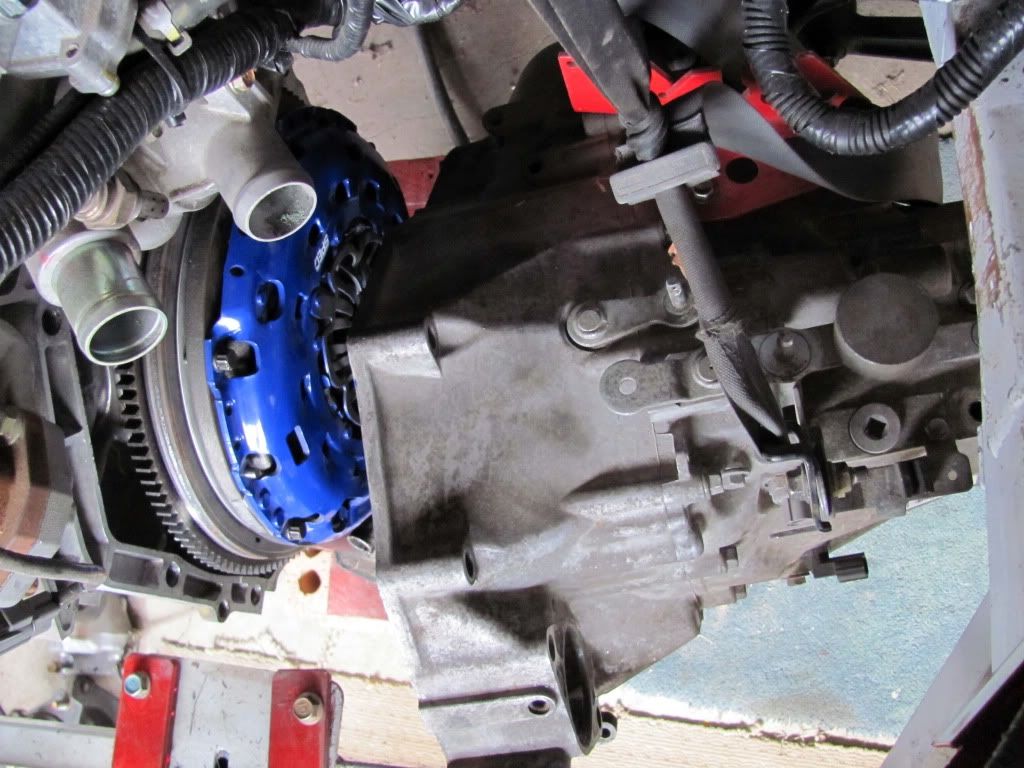
To quote Dirty Harry (gen X & Y ask Baby Boomers), "Go ahead - make my day" Well the day after a club motorsport double header of a night of deleriously enjoyable seriously sideways action at my local dirt circuit – followed by a hillclimb on Sunday in a borrowed 2 litre fwd Renault pocket rocket, the Fedex man certainly topped off this weekend for me when he knocked on my door with a flywheel for my conversion. It weighs 35lbs/15 kilos (more than twice the weight of all other Honda flwheels) - cost me $325 + $259 air freight - but as you can see it fits and the starter engages it perfectly.
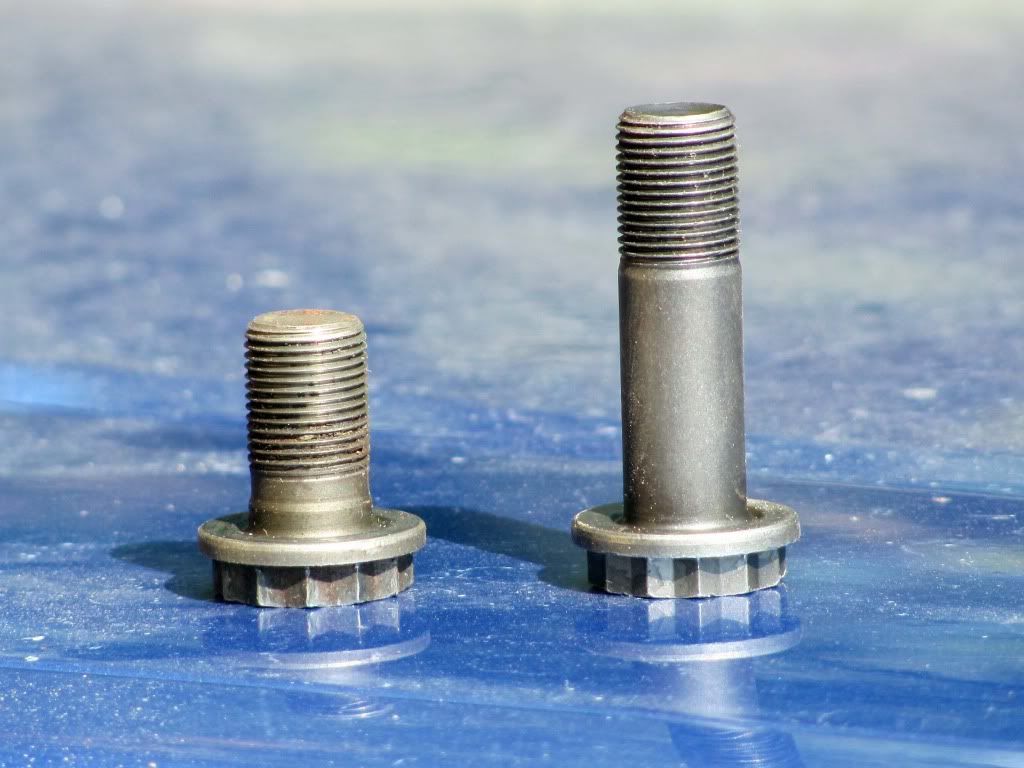
After a lot of surfing I think I've tracked down the unusually long bolts required to attach it to the crank. They should arrive this week, then it's just a matter of selling my last remaining e-bay items so I can hopefully get the clutch kit here before the end of this month. I've just about had to empty my garage of saleable items as I've been unemployed and broke for 6 months... but my hopes are rising again that this project is now likely to be mobile before too long.
My extra long flywheel bolts just arrived - and they're the RIGHT ones with a 35mm reach! Almost twice the length of the Aussie ones on the left.
The Dual Mass Flywheel is now Locktite'd in place. You can see how thick it is.
This week I hope to have the $$$$$$$ from e-bay to order what I expect to be the car's final component - the competition clutch kit.
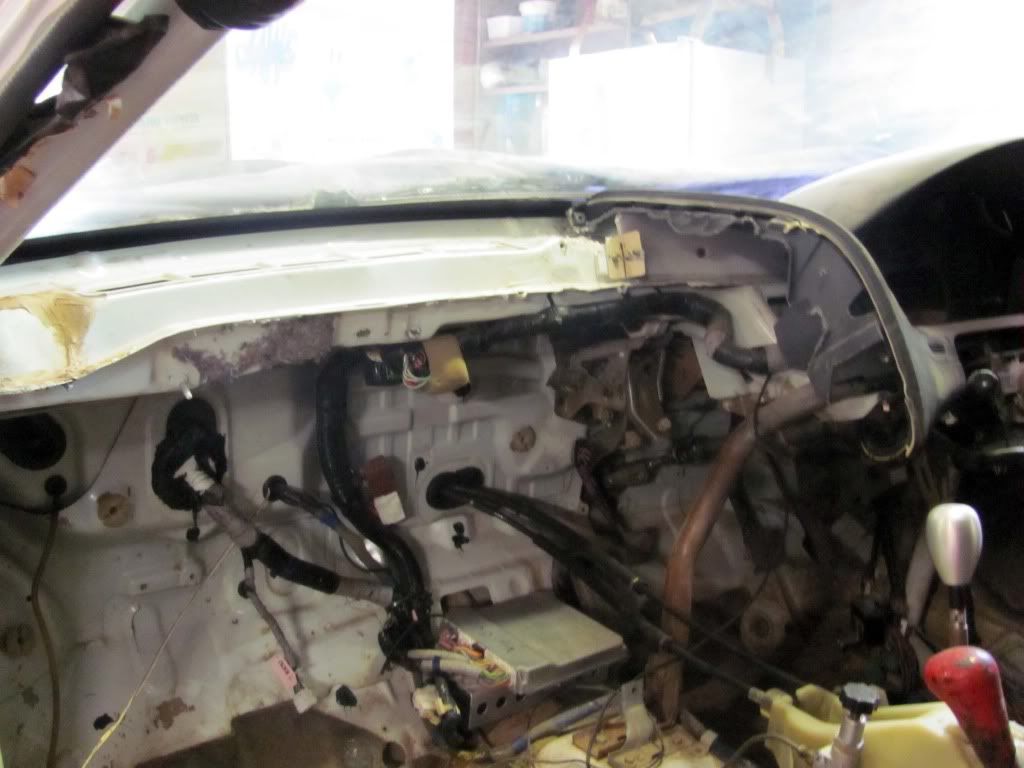
Even though my Civic Muscle Hatch is a race car not a show pony I thought I'd tidy up the interior a bit. With the whole dash, heater box & air con removed what was left certainly wasn't pretty, especially where I'd cut the end of the Accord's instrument pod
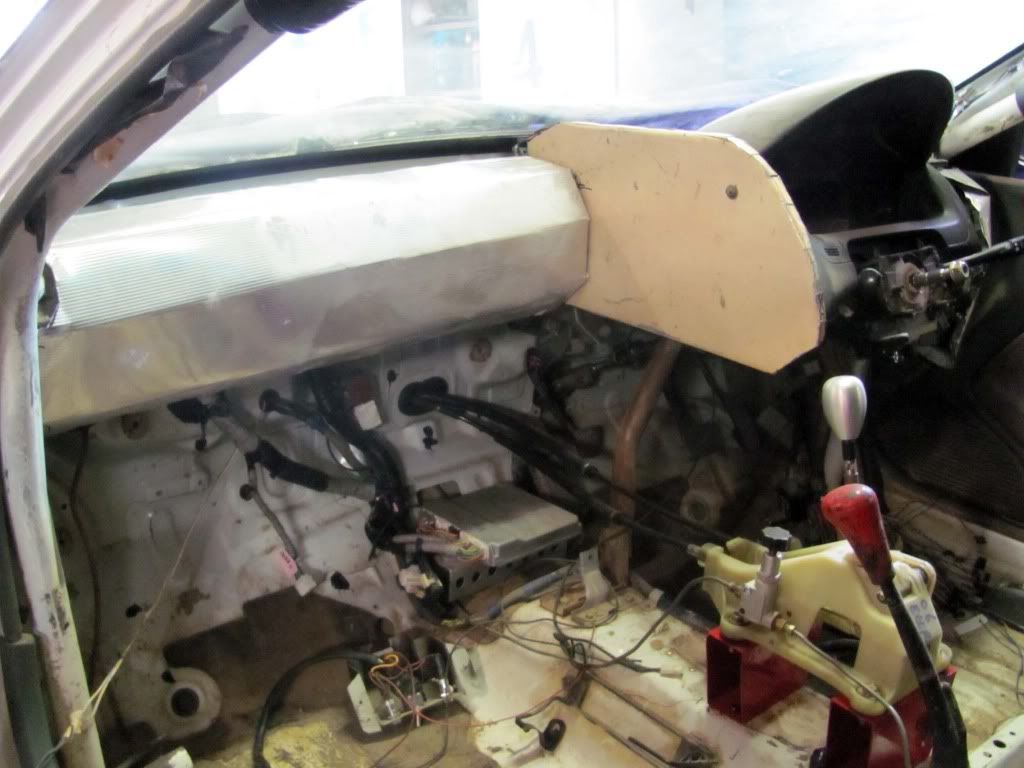
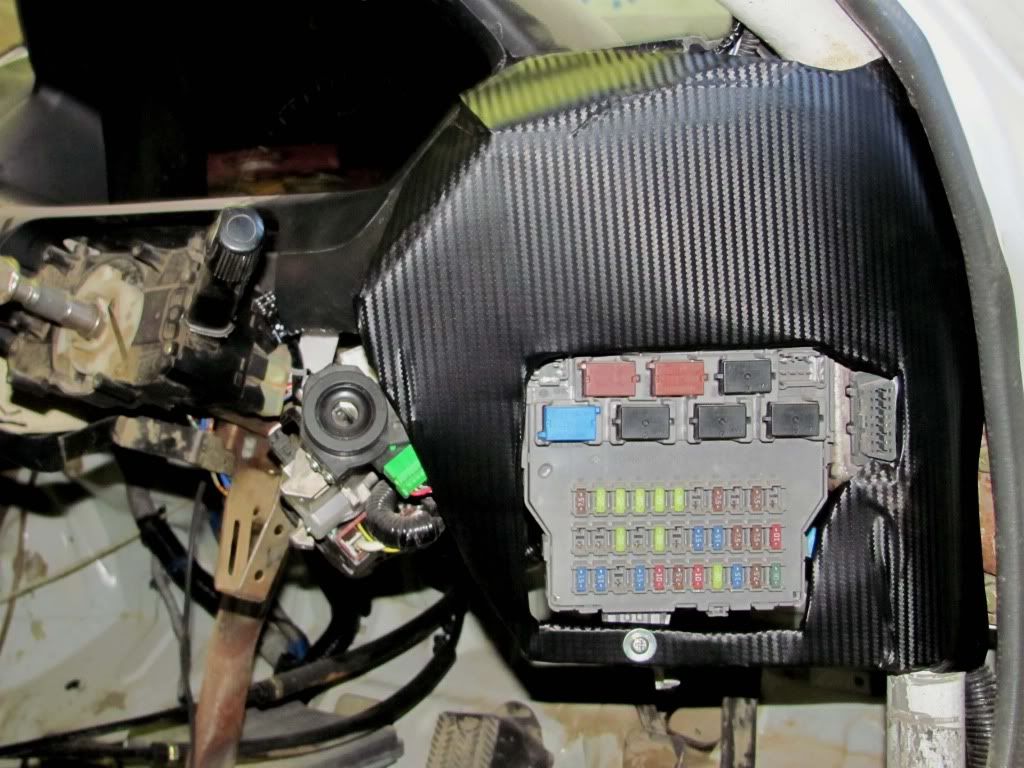
So I made up some covers out of sheet aluminium I'd kept when I replaced my solar hot water service
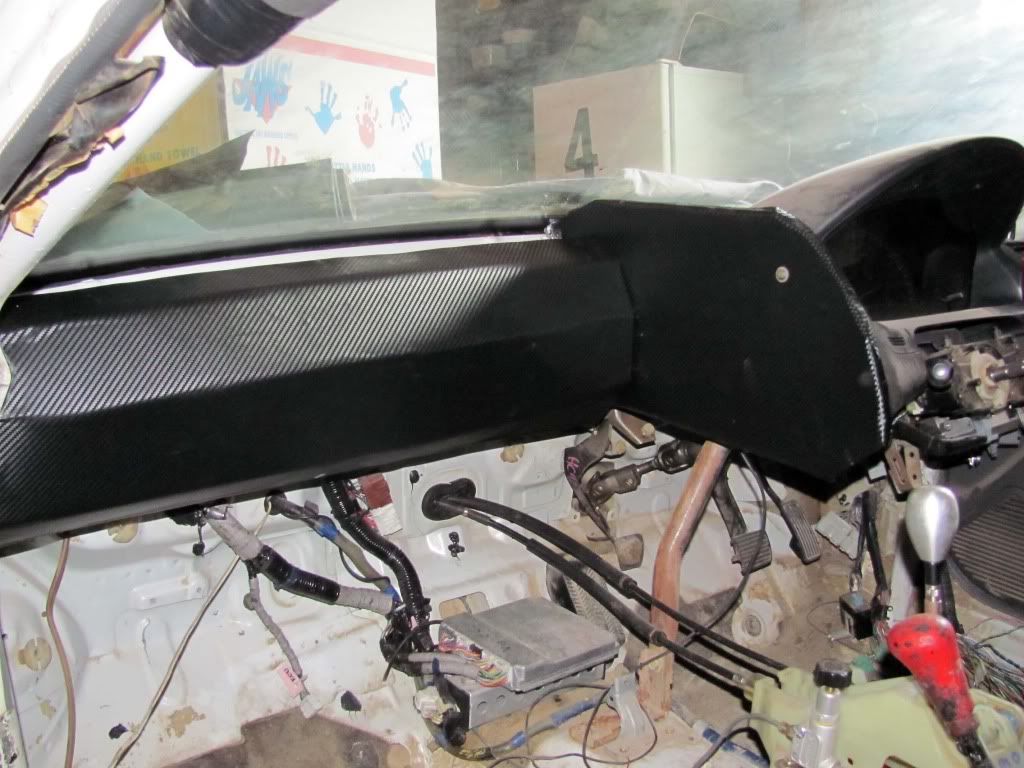
Then I ordered some carbon fibre vinyl wrap from China through E-bay for $25
and gave them a racing look
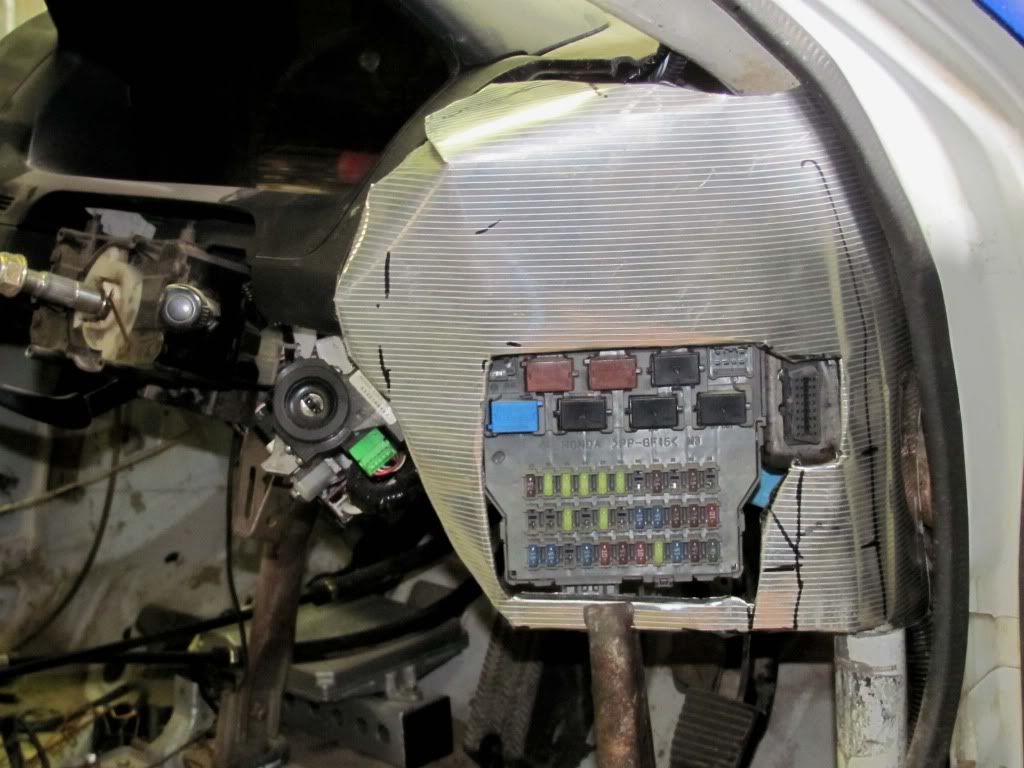
Then I moved to the Accord fusebox which I'd positioned near the driver's door. That was functional but seriously ugly
That looks a bit better!
It's ALIVE !!!
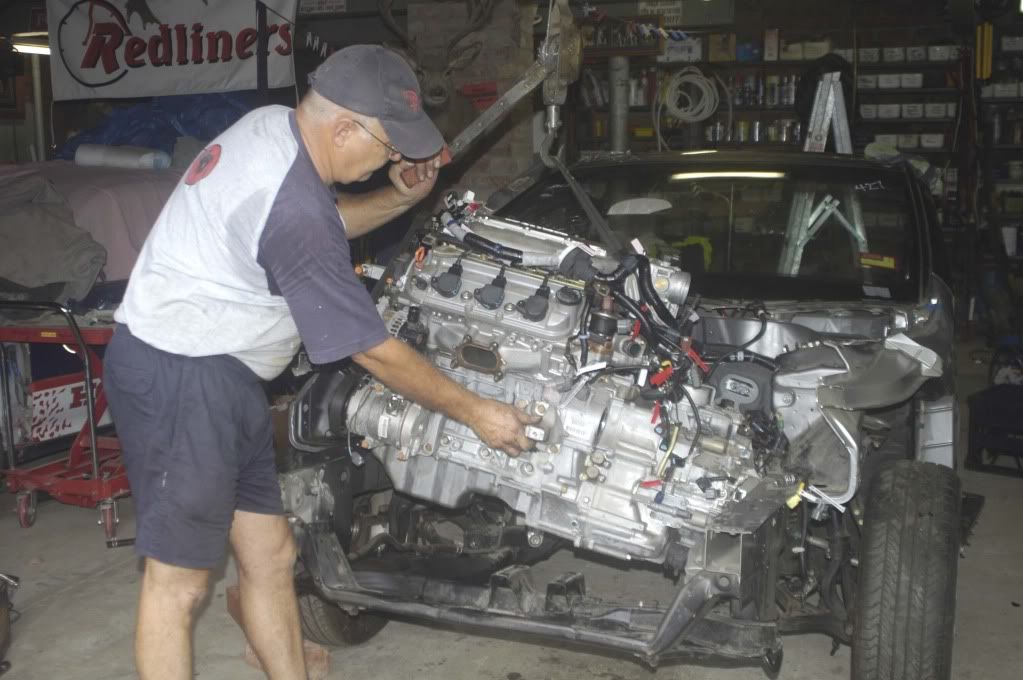
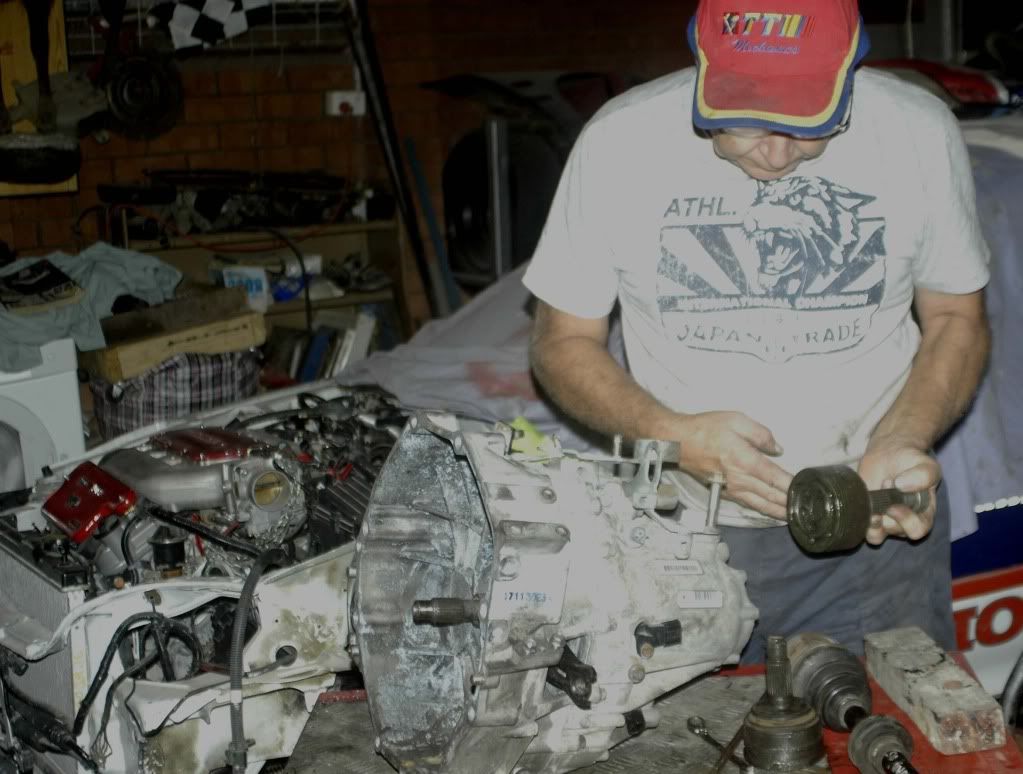
Yesterday I'd done all I needed to on my new red Civic dirt car and my motorkhana special, so today I thought I'd just start fitting the clutch, pressure plate and gearbox to my Civic Muscle Hatch. I'd test fitted the box around ten times, working out the right way to introduce it to the motor.

All this previous work now paid off as by lunchtime I had the box & starter motor all torqued up.
Some shift cable work and time connecting up the loom, and by 4.00pm with everything going better than I'd expected I suddenly realised the next thing was to kick it in the gut.
I let the 355 lph fuel pump pressure up, then it started first go. I could only let it idle for a coupla seconds as the exhaust hasn't been fitted yet. Poor neighbours.
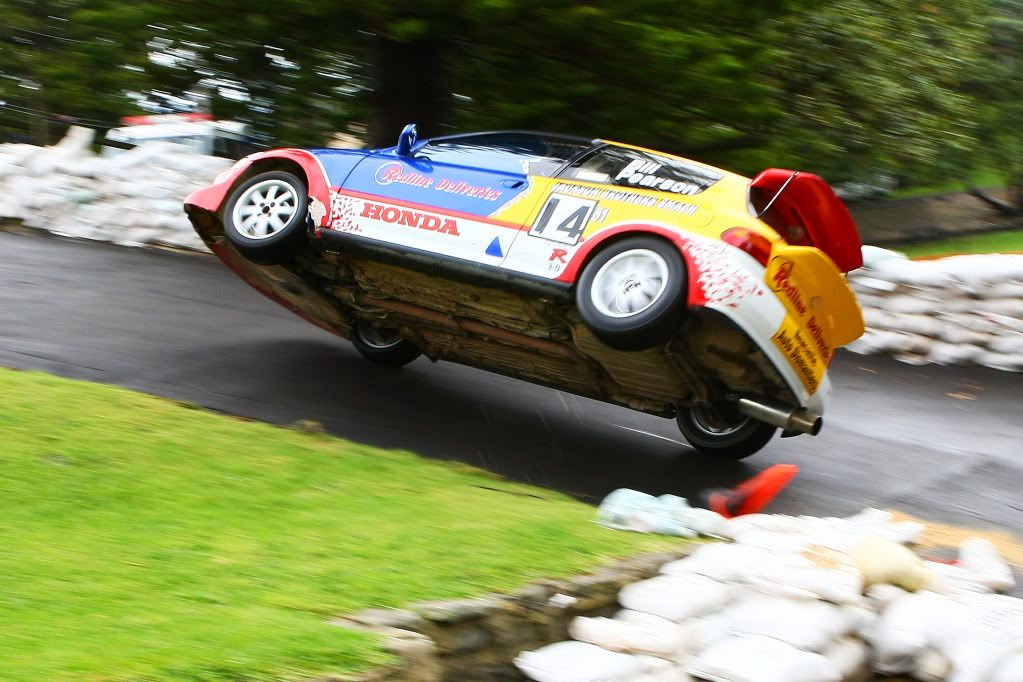
Tomorrow I'll fit all the driveshafts, front hubs, brakes, etc. Now - after 2 1/2 years building & waiting for parts - the car is at last only a matter of weeks away from being a goer. So I can publicly announce that it is NOT a 2.4 Accord 4 cylinder swap. It is in fact a 3.0 litre V-Tec V6... the first and only one in Australia or New Zealand!
I cannot express the relief I felt after all I've been through building this project when that baby fired.
After the high of yesterday I got back to the remaining tasks needed to be done to get this baby outdoors. Although a mate & I easily bled the brakes (I can do the rears from the driver's seat at the bias valve), we couldn't get a pedal. A check at the front discs showed both wheels had locked solid. I thought this might be a caliper clearance problem, but even with them removed I couldn't turn the discs.
Undoing the half tightened hub nuts got free rotation back, but then I thought "Oh hell - don't tell me I've got a driveshaft length problem[". However when I tried just the driveshaft end in the hub with no connection to the gearbox the problem remained.... much to my relief! I thought it might be some incompatability between the outer CV's and the hubs - but then I remembered everything behind the wheels was 1991 Prelude 4WS. Haven't worked it out yet. Tomorrow's another day. I've come down with lousy flu (thank you darlin who works in childcare), so my thinking is slow and fuzzy. No rude comments please! The finger shows where I think the trouble is:
We also bled the clutch, but couldn't get a pedal on that either. Air bubbles coming up into the reservoir when the pedal was depressed indicated the rubber seals in the master cylinder were gone. Two years just sitting has causerd perishing I'd say. So I spend an hour rummaging through all my Civic parts bins to find I actually haven't got a spare m/c. Gave them to others I think. So it's up to my local brake parts distributor, but he's got no kits listed for EG's. What's the world coming to? Don't these guys realise the EG is just coming into it's prime???
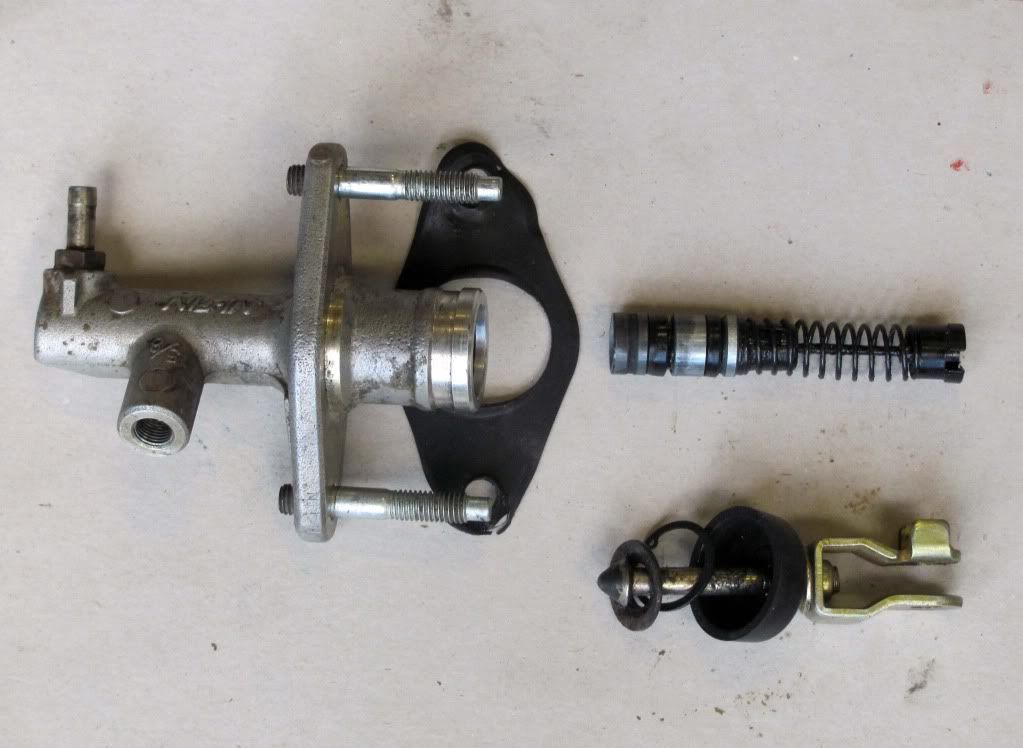
So I drive into Newcastle itself to THE brake parts distributor. Not only has he no kits either - he can't even supply me with the two new seals from the 800 he's got in stock. He has no new master cylinders in stock, and at $175 each I'm not interested. So I'll be ringing my mate Dave for the cylinder off the red EG he just wrecked last week.
Oh well, at least I was able to cut and file a large washer to hold a gear cable onto the shift mechanism inside. One small step for mankind - and two steps backward.
When I removed a front wheel a couple of days after I got the car home from the exhaust shop I found one reason why the car was impossible to push by hand. The tyre was dead flat, but being a rally tyre with a mega stiff sidewall it still looked like it was inflated. But when I pulled it off it was a "D" shape. One binding wheel cause fixed. One to go.
More experimenting with with a number of washers revealed I needed to push the front calipers a total of 5mm out on the Prelude hubs to line up with the Accord discs... more than I'd had with just one washer. I then made two spacer plates - bolted it all up - and there we have how to easily do that brake fit. I painted them orange so you can see them easily.
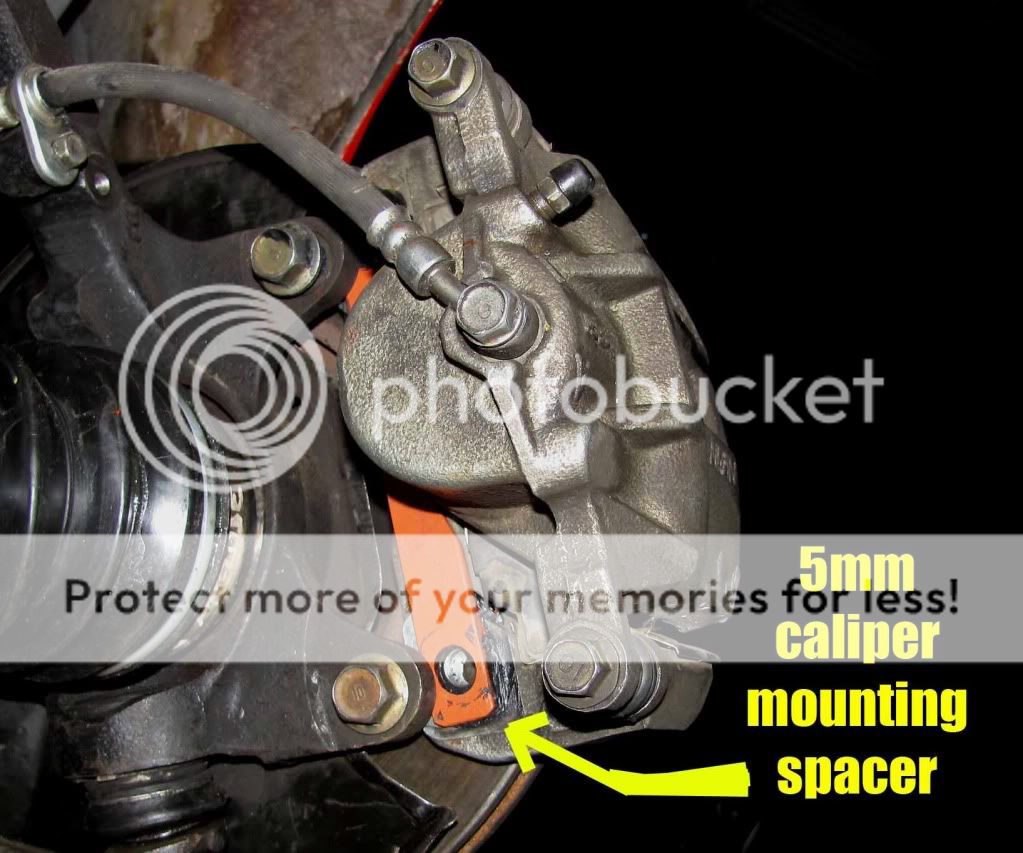
I think it's safe to say the same spacing would work if anyone decides to fit these 290mm monster brakes onto a Civic upright as I doubt those hubs would be any different in this respect to the 1981 4WS Prelude ones I'm using.
Over the weekend I've got to remove the exhaust to fit the two threaded lower oxy sensor plugs and get them welded in, plus examine my clutch hydraulic issues. I'll check the FPR or something else isn't the reason why the remote throttle is on "limp home" mode - but won't be able to really narrow things down until the exhaust is back on, all 4 oxy sensors in place, and the radiator fitted and filled. The more I think about it the more likely those latter things are likely to be my throttle problem as any engine with a "brain" would certainly protect itself when it had no water.
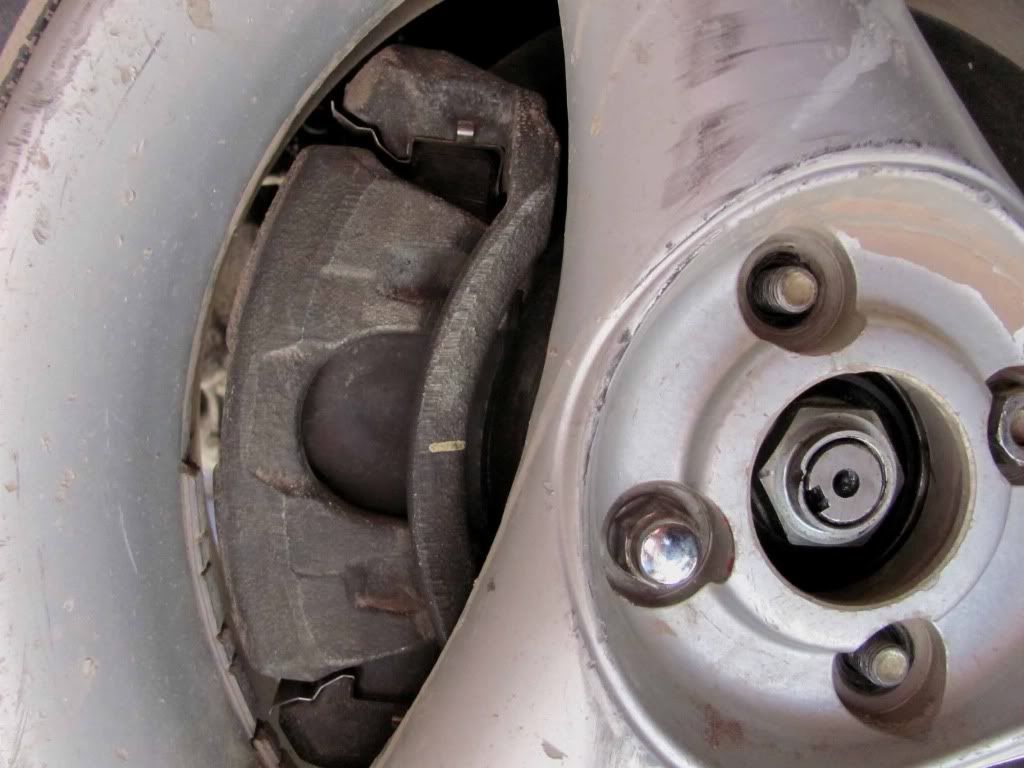
The front brakes are finished, but get a load of the clearance of the fifteen inch wheel. Just enough for the mag wheel balance weights to clear.
I put the car up high on blocks today to remove the front exhaust system for tidying up and painting.
After a lot of surfing I think I've tracked down the unusually long bolts required to attach it to the crank. They should arrive this week, then it's just a matter of selling my last remaining e-bay items so I can hopefully get the clutch kit here before the end of this month. I've just about had to empty my garage of saleable items as I've been unemployed and broke for 6 months... but my hopes are rising again that this project is now likely to be mobile before too long.
My extra long flywheel bolts just arrived - and they're the RIGHT ones with a 35mm reach! Almost twice the length of the Aussie ones on the left.
The Dual Mass Flywheel is now Locktite'd in place. You can see how thick it is.
This week I hope to have the $$$$$$$ from e-bay to order what I expect to be the car's final component - the competition clutch kit.
Even though my Civic Muscle Hatch is a race car not a show pony I thought I'd tidy up the interior a bit. With the whole dash, heater box & air con removed what was left certainly wasn't pretty, especially where I'd cut the end of the Accord's instrument pod
So I made up some covers out of sheet aluminium I'd kept when I replaced my solar hot water service
Then I ordered some carbon fibre vinyl wrap from China through E-bay for $25
and gave them a racing look
Then I moved to the Accord fusebox which I'd positioned near the driver's door. That was functional but seriously ugly
That looks a bit better!
It's ALIVE !!!
Yesterday I'd done all I needed to on my new red Civic dirt car and my motorkhana special, so today I thought I'd just start fitting the clutch, pressure plate and gearbox to my Civic Muscle Hatch. I'd test fitted the box around ten times, working out the right way to introduce it to the motor.
All this previous work now paid off as by lunchtime I had the box & starter motor all torqued up.
Some shift cable work and time connecting up the loom, and by 4.00pm with everything going better than I'd expected I suddenly realised the next thing was to kick it in the gut.
I let the 355 lph fuel pump pressure up, then it started first go. I could only let it idle for a coupla seconds as the exhaust hasn't been fitted yet. Poor neighbours.
Tomorrow I'll fit all the driveshafts, front hubs, brakes, etc. Now - after 2 1/2 years building & waiting for parts - the car is at last only a matter of weeks away from being a goer. So I can publicly announce that it is NOT a 2.4 Accord 4 cylinder swap. It is in fact a 3.0 litre V-Tec V6... the first and only one in Australia or New Zealand!
I cannot express the relief I felt after all I've been through building this project when that baby fired.
After the high of yesterday I got back to the remaining tasks needed to be done to get this baby outdoors. Although a mate & I easily bled the brakes (I can do the rears from the driver's seat at the bias valve), we couldn't get a pedal. A check at the front discs showed both wheels had locked solid. I thought this might be a caliper clearance problem, but even with them removed I couldn't turn the discs.
Undoing the half tightened hub nuts got free rotation back, but then I thought "Oh hell - don't tell me I've got a driveshaft length problem[". However when I tried just the driveshaft end in the hub with no connection to the gearbox the problem remained.... much to my relief! I thought it might be some incompatability between the outer CV's and the hubs - but then I remembered everything behind the wheels was 1991 Prelude 4WS. Haven't worked it out yet. Tomorrow's another day. I've come down with lousy flu (thank you darlin who works in childcare), so my thinking is slow and fuzzy. No rude comments please! The finger shows where I think the trouble is:
We also bled the clutch, but couldn't get a pedal on that either. Air bubbles coming up into the reservoir when the pedal was depressed indicated the rubber seals in the master cylinder were gone. Two years just sitting has causerd perishing I'd say. So I spend an hour rummaging through all my Civic parts bins to find I actually haven't got a spare m/c. Gave them to others I think. So it's up to my local brake parts distributor, but he's got no kits listed for EG's. What's the world coming to? Don't these guys realise the EG is just coming into it's prime???
So I drive into Newcastle itself to THE brake parts distributor. Not only has he no kits either - he can't even supply me with the two new seals from the 800 he's got in stock. He has no new master cylinders in stock, and at $175 each I'm not interested. So I'll be ringing my mate Dave for the cylinder off the red EG he just wrecked last week.
Oh well, at least I was able to cut and file a large washer to hold a gear cable onto the shift mechanism inside. One small step for mankind - and two steps backward.
When I removed a front wheel a couple of days after I got the car home from the exhaust shop I found one reason why the car was impossible to push by hand. The tyre was dead flat, but being a rally tyre with a mega stiff sidewall it still looked like it was inflated. But when I pulled it off it was a "D" shape. One binding wheel cause fixed. One to go.
More experimenting with with a number of washers revealed I needed to push the front calipers a total of 5mm out on the Prelude hubs to line up with the Accord discs... more than I'd had with just one washer. I then made two spacer plates - bolted it all up - and there we have how to easily do that brake fit. I painted them orange so you can see them easily.
I think it's safe to say the same spacing would work if anyone decides to fit these 290mm monster brakes onto a Civic upright as I doubt those hubs would be any different in this respect to the 1981 4WS Prelude ones I'm using.
Over the weekend I've got to remove the exhaust to fit the two threaded lower oxy sensor plugs and get them welded in, plus examine my clutch hydraulic issues. I'll check the FPR or something else isn't the reason why the remote throttle is on "limp home" mode - but won't be able to really narrow things down until the exhaust is back on, all 4 oxy sensors in place, and the radiator fitted and filled. The more I think about it the more likely those latter things are likely to be my throttle problem as any engine with a "brain" would certainly protect itself when it had no water.
The front brakes are finished, but get a load of the clearance of the fifteen inch wheel. Just enough for the mag wheel balance weights to clear.
I put the car up high on blocks today to remove the front exhaust system for tidying up and painting.
02-03-2015, 12:20 AM
#16
Honda-Tech Member
Thread Starter
Join Date: Jan 2015
Location: Newcastle Australia
Posts: 12
Likes: 0
Received 0 Likes
on
0 Posts
We left our intrepid EG builder with a V6 only running in "limp home" mode because the donor car's computer was still looking for it's long gone automatic transmission, and with advice from car electrical experts that he needed to get an ECU from a manual car to fix his problem. So two months ago my search began.
I spent a month chasing ECU's in America where most of the Honda/Acura V6 manuals were sold. My chief difficulty was that the wreckers and after market suppliers all wanted the factory id numbers - which no-one could supply me with. Whenever a wrecker identified their ECU listed on car-parts.com or E-bay as coming from an auto I'd try to get the bar code number. This enabled me to build my own list of what I WASN'T looking for, so I worked through a wide range of cars, narrowing my search by a long process of elimination. Eventually two contacts gave me half a dozen numbers of what they thought I might need. Two turned out to be autos yet again - but I pressed on.
I had worked out the exact car with the right ECU. Since 2000 Honda had sold an automatic 2 door coupe Accord with a 3.0 litre V6. By 2002 all American Honda Accord/Acura V6's came with either 3.2 or 3.5 litre engines. The 2 door coupe remained the only 3.0 litre model, and in 2004 (and that year ONLY), they released a 6 speed manual version. Reaching a point of feeling like I was driving into a dead end, I decided to change my approach. I swapped my starting point from ECU's listed for sale to those who said they had the 6 speed manual gearbox from that car available, asking them if they had the ECU from the car they'd wrecked. By this point I had sent over fifty email enquiries, but almost at once my new tactics paid off. Although the majority of my emails still brought no response at all, a guy in Canada replied positively.
I asked him to send me a photo of the computer’s input sockets for three reasons. The first was so I could check that my loom connectors would plug into it. Secondly I wanted proof that the item existed and that I wasn’t gonna get ripped off. Thirdly, his effort in doing this would build his personal credibility with me. I taped the five plugs in my car together, photographed them, then reverse flipped them in Photoshop for an easy comparison. When I got the pictures from Canada things were an exact match!
At this point I wondered WHICH 3.0 litre V6 engine the coupe had used. Typically for Honda, they developed this motor each year, producing it as a J30A1, J30A2, J30A3, and the J30A4. Mine was the last – the only one with 10:1 compression, the exhaust manifold built into the head, and with fly-by-wire throttle. When I researched the 2004 coupe on Wiki I found this was not the only manual model produced – it was also the only one with the J30A4. Bingo!
But there was more to discover. Close examination of the overseas snap showed the socket for the middle plug had no pins in it. It was just a blank – but this looked like good news. My guess was that this would be where the plug from the automatic connected on the ECU I was wanting to replace. I wrote down the colours of the wires on all of the unused plugs for the automatic – and then checked them against those on the central ECU plug on my loom. They matched… which proved I’d found precisely what I needed!
Well today was definitely another day of big ups and downs on this project. Having wired money last week for a 2004 manual V6 Accord coupe ECU to the overseas dismantler I tracked down on the net I was keenly tracking it's movements through Canadian Post. Yesterday it showed it had left Montreal two days ago, but to my delight it came to my front door today.
Typically with this build I had mixed emotions as I started to swap the plugs over to wire it into place. Would my key and it's ignition lock talk to it and the engine start? Would the V6 rev past 2,500rpm? Did I stand a chance of having the car ready to race in our citiy's big annual hillclimb by the sea at King Edward Park?
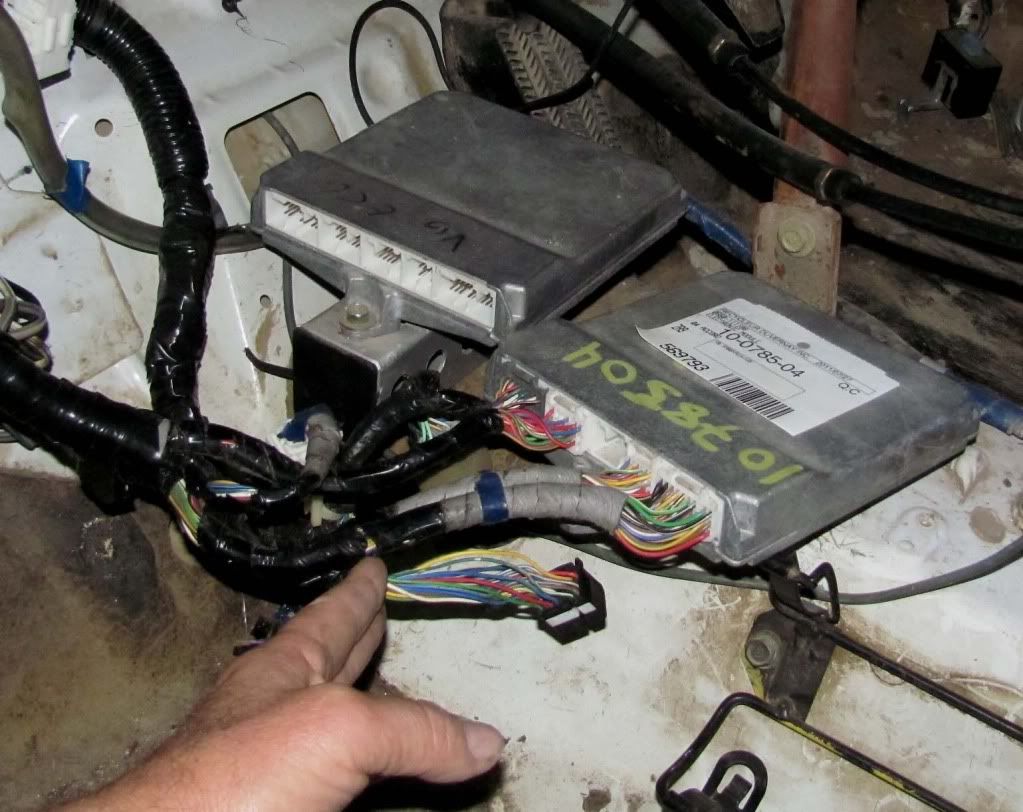
With the 2 ECU's side by side you can see where there's pins on the central original ECU plug and none on the Canadian one. The black plug is now redundant.
I turned the key. Everything lit up. The motor fired. Excellent!
But the bloody thing is STILL stuck in "limp home" mode and won't rev out. Aaaarrrggghhhhh!!
One thing's for sure it's not chasing sensors from the now non-existent automatic transmission anymore. (I am telling myself this repeatedly to convince myself that I haven't just wasted $400 and two and a half months o the ECU swap).
I don't think it's a fly by wire throttle fault. When I manually open the butterfly the engine stutters and doesn't increase revs. Plus this new Canadian ECU came off a car with fly by wire throttle anyway.
I'm thinking one of two causes:
1) There were a couple of wires on that central plug going into the ECU from the auto that were NOT colour matched to any on the auto plug, so they probably went elsewhere out into the loom. Maybe they are an open circuit that keeps the engine in limp home until they are closed?
2) Perhaps I've connected up something incorrectly in the fuel circuit. There seemed to be excessive pressure where the main line goes into the engine - kept blowing new high pressure fuel line there until I put in braided line.
I'll now have to get a read-out from the dashboard diagnostic port to hopefully find out what the remaining problem is.
On the weekend Dylan & I got a diagnostic reader attached to my V6 electrics. It confirmed all the search faults related to the ECU looking for the removed automatic gearbox had been solved by swapping in the imported one from a manual Canadian Accord coupe. Instead of over seven faults we now had only three, two of which were of no consequence. There appeared to now be just a single obstacle to overcome "Lost communication with Accelerator Control Actuator Module". Wonder what the hell that is, and where it is!
The only electrical piece I'd not connected from the donor car was something no-one could identify - a module that had been in the passenger foot well. I dug it out, found the taped up connector plug, and put it back into the system. No change. Maybe it was the timer for the intermittent wipers afterall?
I spent a month chasing ECU's in America where most of the Honda/Acura V6 manuals were sold. My chief difficulty was that the wreckers and after market suppliers all wanted the factory id numbers - which no-one could supply me with. Whenever a wrecker identified their ECU listed on car-parts.com or E-bay as coming from an auto I'd try to get the bar code number. This enabled me to build my own list of what I WASN'T looking for, so I worked through a wide range of cars, narrowing my search by a long process of elimination. Eventually two contacts gave me half a dozen numbers of what they thought I might need. Two turned out to be autos yet again - but I pressed on.
I had worked out the exact car with the right ECU. Since 2000 Honda had sold an automatic 2 door coupe Accord with a 3.0 litre V6. By 2002 all American Honda Accord/Acura V6's came with either 3.2 or 3.5 litre engines. The 2 door coupe remained the only 3.0 litre model, and in 2004 (and that year ONLY), they released a 6 speed manual version. Reaching a point of feeling like I was driving into a dead end, I decided to change my approach. I swapped my starting point from ECU's listed for sale to those who said they had the 6 speed manual gearbox from that car available, asking them if they had the ECU from the car they'd wrecked. By this point I had sent over fifty email enquiries, but almost at once my new tactics paid off. Although the majority of my emails still brought no response at all, a guy in Canada replied positively.
I asked him to send me a photo of the computer’s input sockets for three reasons. The first was so I could check that my loom connectors would plug into it. Secondly I wanted proof that the item existed and that I wasn’t gonna get ripped off. Thirdly, his effort in doing this would build his personal credibility with me. I taped the five plugs in my car together, photographed them, then reverse flipped them in Photoshop for an easy comparison. When I got the pictures from Canada things were an exact match!
At this point I wondered WHICH 3.0 litre V6 engine the coupe had used. Typically for Honda, they developed this motor each year, producing it as a J30A1, J30A2, J30A3, and the J30A4. Mine was the last – the only one with 10:1 compression, the exhaust manifold built into the head, and with fly-by-wire throttle. When I researched the 2004 coupe on Wiki I found this was not the only manual model produced – it was also the only one with the J30A4. Bingo!
But there was more to discover. Close examination of the overseas snap showed the socket for the middle plug had no pins in it. It was just a blank – but this looked like good news. My guess was that this would be where the plug from the automatic connected on the ECU I was wanting to replace. I wrote down the colours of the wires on all of the unused plugs for the automatic – and then checked them against those on the central ECU plug on my loom. They matched… which proved I’d found precisely what I needed!
Well today was definitely another day of big ups and downs on this project. Having wired money last week for a 2004 manual V6 Accord coupe ECU to the overseas dismantler I tracked down on the net I was keenly tracking it's movements through Canadian Post. Yesterday it showed it had left Montreal two days ago, but to my delight it came to my front door today.
Typically with this build I had mixed emotions as I started to swap the plugs over to wire it into place. Would my key and it's ignition lock talk to it and the engine start? Would the V6 rev past 2,500rpm? Did I stand a chance of having the car ready to race in our citiy's big annual hillclimb by the sea at King Edward Park?
With the 2 ECU's side by side you can see where there's pins on the central original ECU plug and none on the Canadian one. The black plug is now redundant.
I turned the key. Everything lit up. The motor fired. Excellent!
But the bloody thing is STILL stuck in "limp home" mode and won't rev out. Aaaarrrggghhhhh!!
One thing's for sure it's not chasing sensors from the now non-existent automatic transmission anymore. (I am telling myself this repeatedly to convince myself that I haven't just wasted $400 and two and a half months o the ECU swap).
I don't think it's a fly by wire throttle fault. When I manually open the butterfly the engine stutters and doesn't increase revs. Plus this new Canadian ECU came off a car with fly by wire throttle anyway.
I'm thinking one of two causes:
1) There were a couple of wires on that central plug going into the ECU from the auto that were NOT colour matched to any on the auto plug, so they probably went elsewhere out into the loom. Maybe they are an open circuit that keeps the engine in limp home until they are closed?
2) Perhaps I've connected up something incorrectly in the fuel circuit. There seemed to be excessive pressure where the main line goes into the engine - kept blowing new high pressure fuel line there until I put in braided line.
I'll now have to get a read-out from the dashboard diagnostic port to hopefully find out what the remaining problem is.
On the weekend Dylan & I got a diagnostic reader attached to my V6 electrics. It confirmed all the search faults related to the ECU looking for the removed automatic gearbox had been solved by swapping in the imported one from a manual Canadian Accord coupe. Instead of over seven faults we now had only three, two of which were of no consequence. There appeared to now be just a single obstacle to overcome "Lost communication with Accelerator Control Actuator Module". Wonder what the hell that is, and where it is!
The only electrical piece I'd not connected from the donor car was something no-one could identify - a module that had been in the passenger foot well. I dug it out, found the taped up connector plug, and put it back into the system. No change. Maybe it was the timer for the intermittent wipers afterall?
02-08-2015, 02:50 AM
#17
Honda-Tech Member
Thread Starter
Join Date: Jan 2015
Location: Newcastle Australia
Posts: 12
Likes: 0
Received 0 Likes
on
0 Posts
Today I took the car to David Brown - our local Honda ace mechanic and fellow petrol head. At least I can drive the car onto the trailer - even with only 2,500 rpm. The same lone fault came up on his wiz bang diagnostic reader as we'd got on Sunday. Gladly he was able to identify the mystery module by it's factory part number as being a piece of the fly-by-wire control system. Glad I didn't bin it!
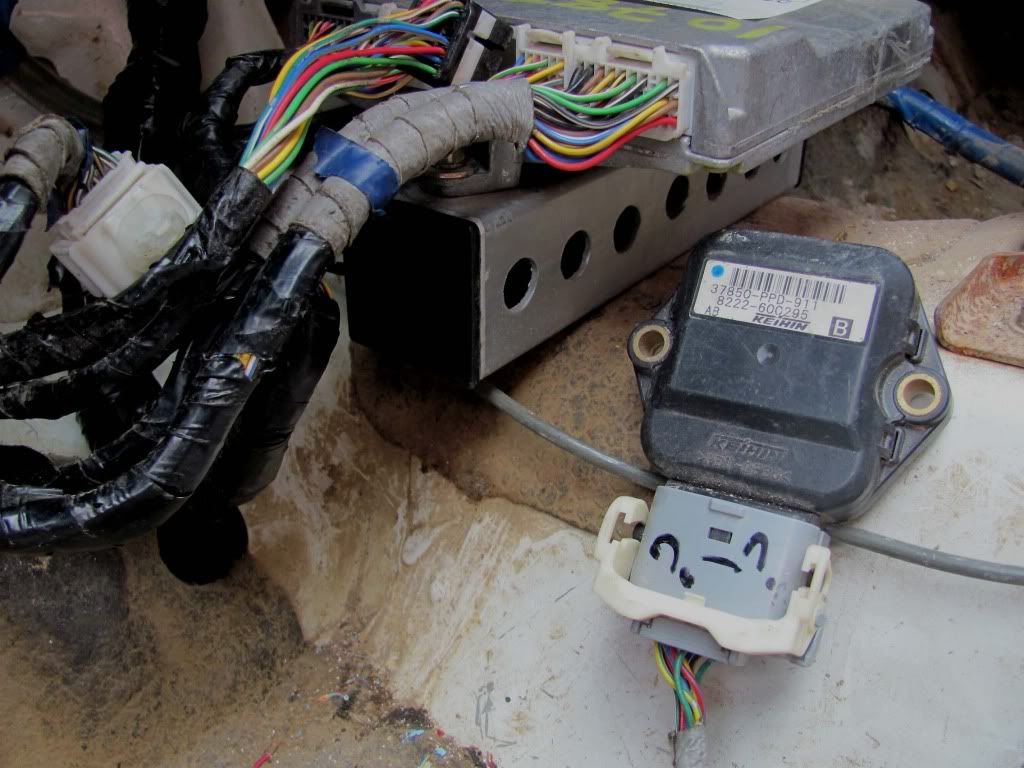
But the revs didn't increase. We checked all the throttle system electrical plugs and found no bent pins or broken wires. Then Brownie had a Eureka moment.
"These late model Accords have an anti over-rev protection mechanism," he said, "that limits the rpm unless the car is in gear." I showed him the unconnected gearbox plug I'd played with linked to the dash board "Park" & "Drive" lights. He rummaged in his workshop, and came out with a switch off the side of an early model Accord - which plugged straight into my loom. By turning the switch we could change the dashboard lights.
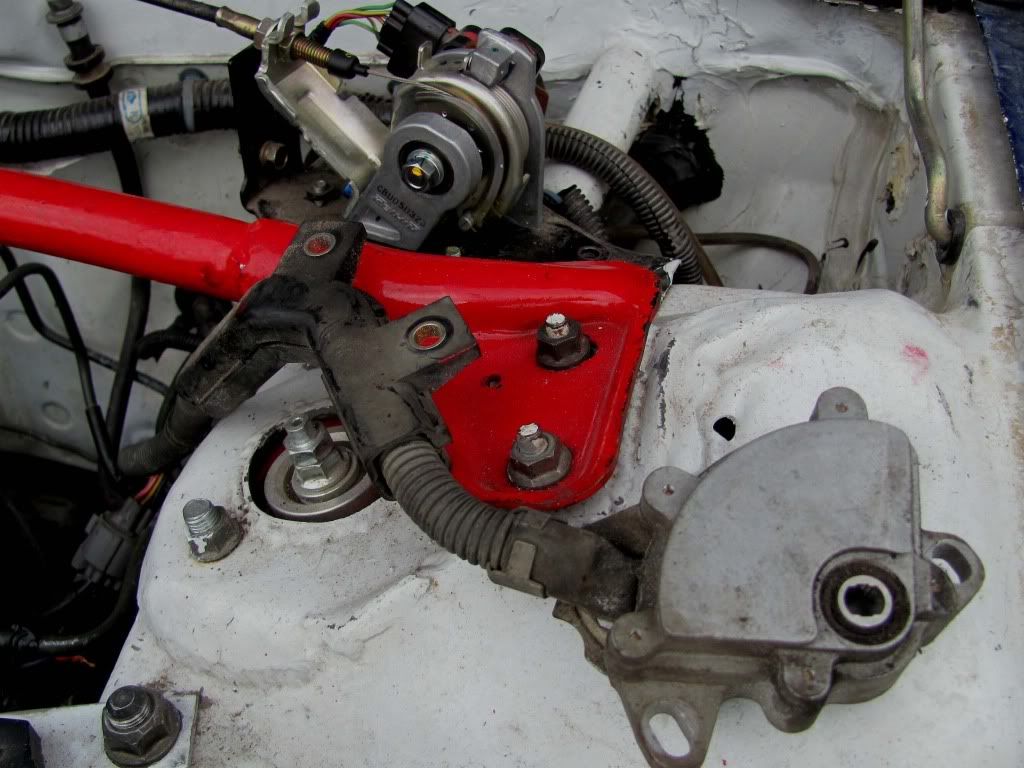
"All you need now is to find which one of your unused gearbox connectors needs bridging to complete the circuit" he said. So with my factory CD workshop manual with wiring diagrams & trouble shooting sections on the way from o/s we left things there until it arrives shortly. I am starting to feel like I might be getting out of this project "tunnel" and onto a race track grid soon.
Over Christmas the car stayed idle – literally… idling in limp home mode. I’d had a number of car club electrical boffins look at my wiring diagrams to see what the cause of the remaining fault was – but they either lost interest or couldn’t work it out. Then my son-in-law shared that his neighbor was building wiring looms for WRX conversions into VW kit cars, by passing the ECU anti-theft and body control anti-theft immobilizing modules. He was keen to look at the car, and two days after leaving it with him he’d found why the car wasn’t going to full revs. Some idiot had cut the relay that powers the fly-by-wire throttle off the Accord loom! Dddooohhh stupid me. He unravelled the loom, spliced in a relay and we had a working throttle. It was the only gadget I’d cut off the loom & couldn’t even recall doing it.
So now this swap is finished; I’m racing the Muscle Hatch & coming to grips with endless power & torque:
But the revs didn't increase. We checked all the throttle system electrical plugs and found no bent pins or broken wires. Then Brownie had a Eureka moment.
"These late model Accords have an anti over-rev protection mechanism," he said, "that limits the rpm unless the car is in gear." I showed him the unconnected gearbox plug I'd played with linked to the dash board "Park" & "Drive" lights. He rummaged in his workshop, and came out with a switch off the side of an early model Accord - which plugged straight into my loom. By turning the switch we could change the dashboard lights.
"All you need now is to find which one of your unused gearbox connectors needs bridging to complete the circuit" he said. So with my factory CD workshop manual with wiring diagrams & trouble shooting sections on the way from o/s we left things there until it arrives shortly. I am starting to feel like I might be getting out of this project "tunnel" and onto a race track grid soon.
Over Christmas the car stayed idle – literally… idling in limp home mode. I’d had a number of car club electrical boffins look at my wiring diagrams to see what the cause of the remaining fault was – but they either lost interest or couldn’t work it out. Then my son-in-law shared that his neighbor was building wiring looms for WRX conversions into VW kit cars, by passing the ECU anti-theft and body control anti-theft immobilizing modules. He was keen to look at the car, and two days after leaving it with him he’d found why the car wasn’t going to full revs. Some idiot had cut the relay that powers the fly-by-wire throttle off the Accord loom! Dddooohhh stupid me. He unravelled the loom, spliced in a relay and we had a working throttle. It was the only gadget I’d cut off the loom & couldn’t even recall doing it.
So now this swap is finished; I’m racing the Muscle Hatch & coming to grips with endless power & torque:
02-08-2015, 01:08 PM
#18
Honda-Tech Member

Join Date: Aug 2014
Posts: 391
Likes: 0
Received 0 Likes
on
0 Posts
Hello I just want to personally thank you for all the inspiration you have given me. I have watched your videos and learned so much craftiness through your experience. Thank you.
Dallas.
Dallas.

Thread
Thread Starter
Forum
Replies
Last Post
djnikko
Honda Civic / Del Sol (1992 - 2000)
9
09-02-2007 10:52 PM
meagainsttheworld
Honda Civic / Del Sol (1992 - 2000)
6
04-02-2006 11:06 PM

