
DC2 brake ducts, solid design – not all zip ties and duct tape
 10-09-2009, 06:24 PM
#1
Honda-Tech Member
Thread Starter
Join Date: Mar 2007
Location: Iowa
Posts: 248
Likes: 0
Received 0 Likes
on
0 Posts
Hello everyone. This is a little DIY for front brake ducts on a DC2 Integra. There aren't any "kits" available for a DC2 as far as I know, and I've seen other postings for DC2 brake duct ideas as well. I decided to post our version because I consider it a solid design. My old man, in terms of being ****, didn't want any type of brake ducts that were hanging loosely by zip ties, held together with duct tape, hanging lower than the bumper, or ready to fall off the car. It's by far the best design, but for the sole purpose of getting air to the front rotors it works pretty good. This method takes some fab work and is longer to assemble than some other brake duct ideas, but once you install it you can pretty much forget about it...
Unfortunately this isn't a good DIY. By my standards I'd even call it a complete failure. Maybe the best way to describe it is as a SHOW AND TELL. We were rushed to get these ducts installed before an event so I didn't get many pictures, or any measurements or total material count. But through the pictures you can get the general idea. We're very happy with the final outcome though.

Before anything else, here's a picture of them in use so you can see the end result. So you can determine whether you want to read on or not.
Items required, how we made them...
1. Brake duct inlets with off-center holes, 3x7.75" (we got ours from Howe Racing) x2
2. Approx 8' of 2.5" ShopVac hose (standard purchase length, we did had leftovers)
3. ShopVac crevice tools, 2.5 inch x2
4. Silicone intake pipe reducers 3" to 2.25" (I'll explain 2.25" later) x2
5. Strip of one inch steel flat stock
6. Short section of 2.5" exhaust pipe, cut off a van muffler at a salvage yard
7. Oxy-Acetylene torch for bending steel and some brazing
8. Jigsaw or reciprocating saw
9. Numerous machine screws
10. Wing nuts x2
11. Some more nuts and bolts
12. Aluminum mesh screen that goes on top of rain gutter
13. 14" zip ties x4
14. Utility knife
15. Water-based personal lubricant (i.e. KY Jelly, yes you may chuckle right away)
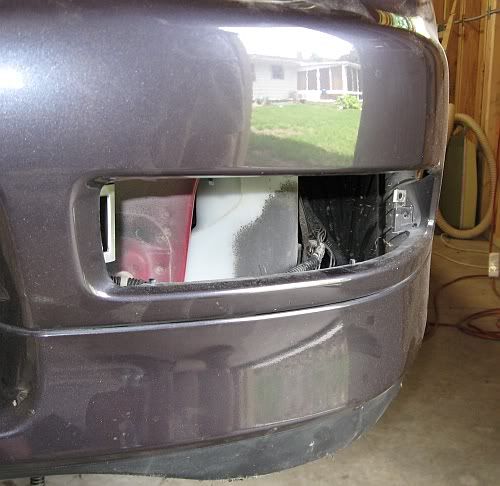
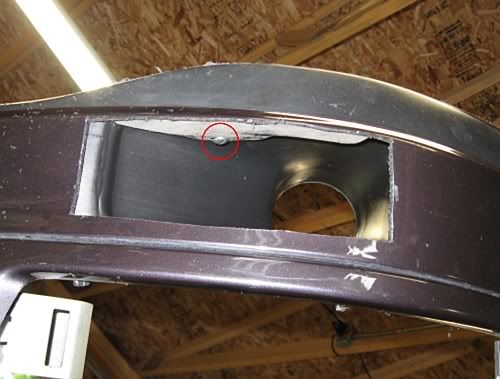
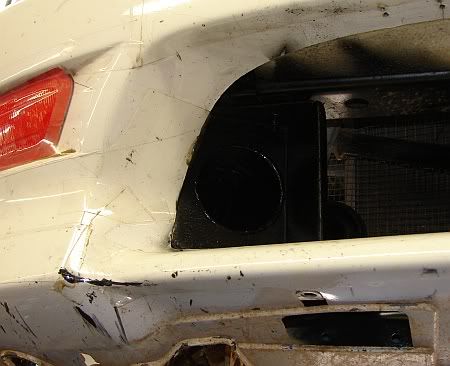
Rear clearance view looking through the turn signals / park lights. The wiper bottle is not a problem for our install location.
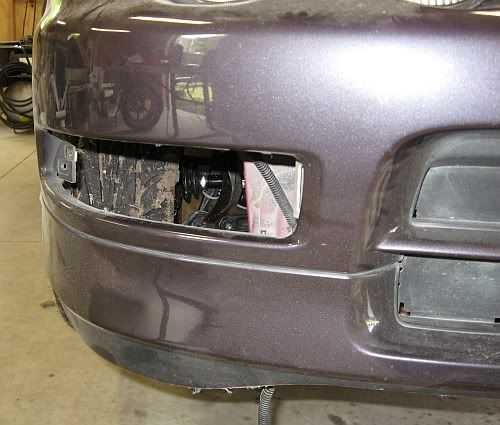
First thing is to decide where the air ducts should go. In this case we chose the area right below the turn signals / park lights. This spot has several advantages.
1. Directly aft there are hardly any obstructions (I don't remember how far the resonating chamber in the right fender hangs down, but we removed ours)
2. It's the shortest and straightest distance to the brake rotors.
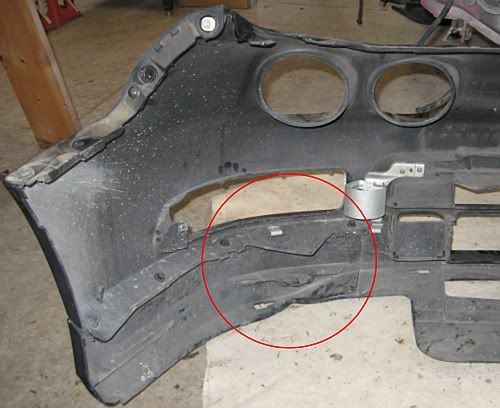
3. Most importantly, there are two protrusions sticking out behind the bumper at that location to secure the ducts, pics below.
For the brake ducts themselves, we needed to trim the bottom and top flanges (or lips) off so they would fit in this location, the side flanges are fine. Because these ducts also fit in at an angle, there was a lot of fitment, cut, fitment, cut, etc. until we got it correct.
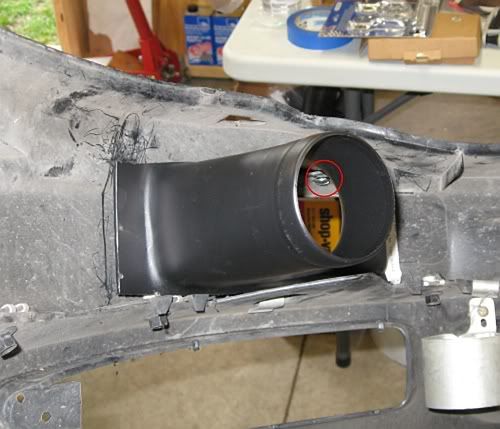
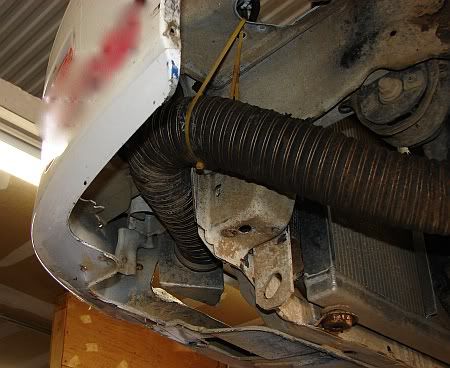
Each duct is secured to the bumper by two bolts. One of which you can see here. You can also see that the bottom protrusion is actually inside the duct inlet. It fit better this way, and we had to angle the duct slightly downward so the hose would gently clear the windshield wiper bottle.
Okay, here's where the pictures start jumping rapidly. Here's a preliminary fitment for the passenger side hose. The silicone adapter is being used to make the transition from the duct to the hose. In this case a 3" to 2.25" adapter is used because 2.5" ShopVac hose is approximately 2 1/4" in diameter. ShopVac hose is measured by the outer diameter of the attachments, not the hose itself. We also have one of the crevice tools with a preliminary cut, shortening the length. Although you can't see it in this picture, we did cut four 1/2" long notches down the length of the crevice tool attachment end so it was easier to squeeze the hose in. This is where the KY Jelly is needed. We didn't want to the use the hose adapters because they'd add more weight and make the hose sag, so we shoved the hose directly into the crevice tool and the silicone adapter. And the hose was slightly larger in diameter, so twisting in an expandable hose was a real pain in this case. The hose just compresses when you try to push it in, and even after greasing it up we still had to use a screwdriver to help it along. KY Jelly is nice for fitting any type of tubing on your car because it's water soluble and doesn't stick when it dries – air intakes, vacuum hose, coolant lines, etc.
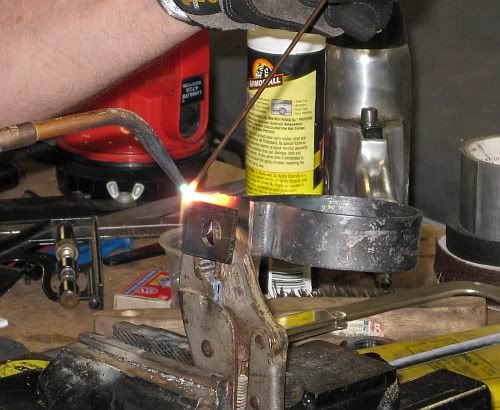
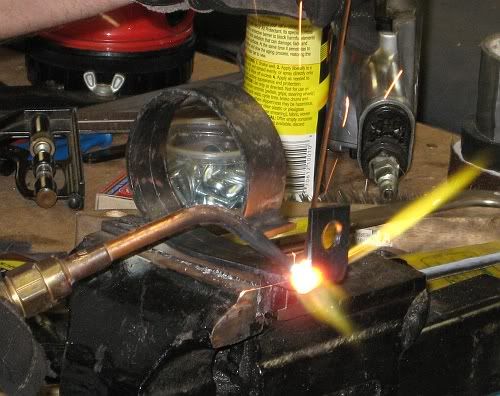
Another jump. I didn't get a picture of us forming the brackets that attach to the lower arms. Since the crevice tool is 2.5" in diameter, we used the exhaust piping to bend the flat stock around. Of course this required the use of an oxy-acetylene torch. We found that angling the crevice tool towards the rotor provided better clearance and didn't crink the hose as much as making a full 90 degree turn. Because of this angled approach we had to braze on the section of the bracket that attaches to the arm. You can see that the bolt hole is already drilled.
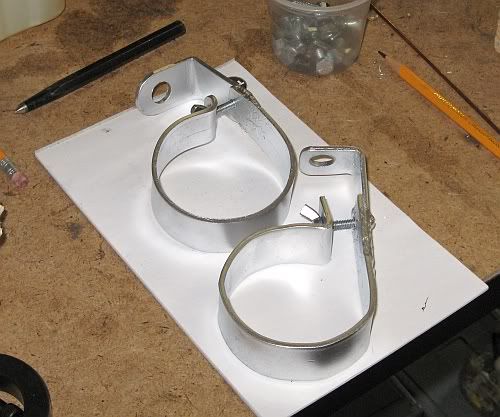
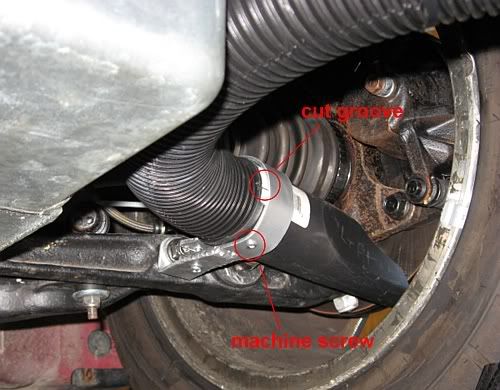
Here's a finished picture of the brackets. The screw and wing nut is used to clamp the crevice tool ends in place. Because the wing nuts are right next to the brackets, you can tighten and loosen the screw without the nut turning as well. As a final touch, we eventually ended up drilling and punching a machine screw through the bracket, crevice tool, and underlying hose. So now it definitely wouldn't come loose. This is shown in pictures below.
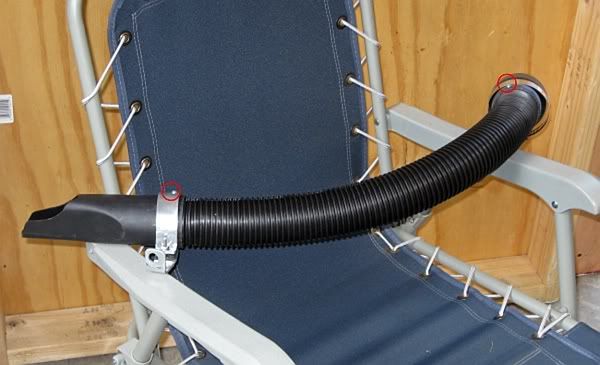
This is the driver side hose all ready to go. You can see the machine screws we added so the hose wouldn't fall out of the bracket or the silicone adapter. We're securing the silicone adapter to the duct with a hose clamp. I'll explain the weird shape of the crevice tool in a little bit.
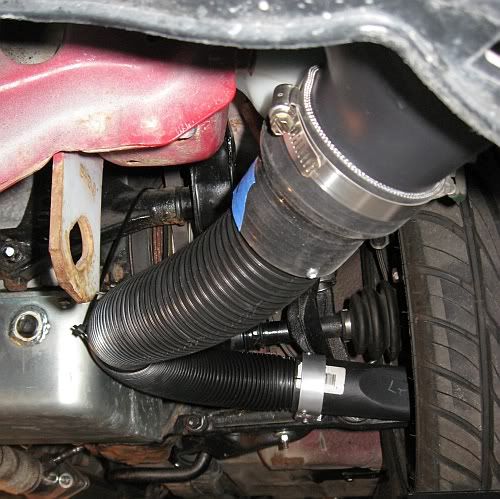
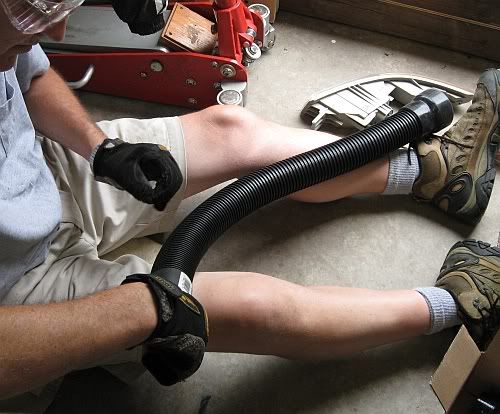
Here's both the driver and passenger side hoses in place. You can see the zip ties used on each side that supports the center section of the hose, which we hung around the motor mounts. The hose makes a nice smooth transition from the duct to the rotors, no sharp turns or bends. Of course we took several times fitting in these sections to check the length of the hose, the angle the crevice tool points at the rotor, the distance from the LCAs, distance from the rotors, etc., before everything was secured and screwed/bolted together.

Here are close-ups of the brake rotors. The reason the crevice tools were trimmed is because the front knuckles comes in contact with them before full lock. The nozzle still touches the knuckle slightly at full lock even after we trimmed them, but not enough to push it out of the way or possibly rotate the bracket over time. You can also see that the lengths of the brackets make it a little hard to torque that LCA nut, which was an oversight in our rush. You can still easily tighten it enough by hand that you don't have to worry about it coming loose. And because the brackets are attached to the LCA, they'll follow the suspension travel wherever it goes. The ShopVac hose should withstand what little travel the front suspension has fine.
Those are stock wheels on the car, but I did try a set of Kosei K1s at 15x7 with +38 offset and no part of the nozzle or hose comes in contact with actual wheel lock to lock. The front knuckle bumps into the nozzle end a touch as mentioned above, but again nothing that will bother it. And while racing you shouldn't need to go to full lock anyway (unless you're stuck off course). With the wheels strait ahead, the end of the crevice tool is about 2" away from the brake rotor. So it's definitely close enough. And because it doesn't "feed" the inside of the brake rotors via the dust shield, you don't need to worry about covering the inlets when it rains.
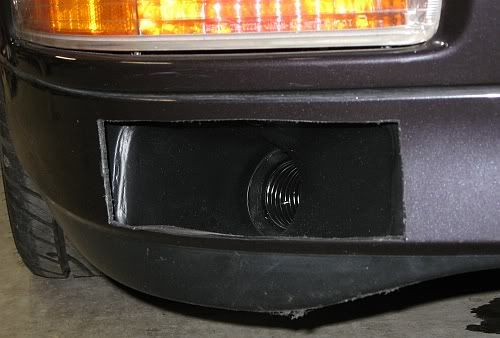
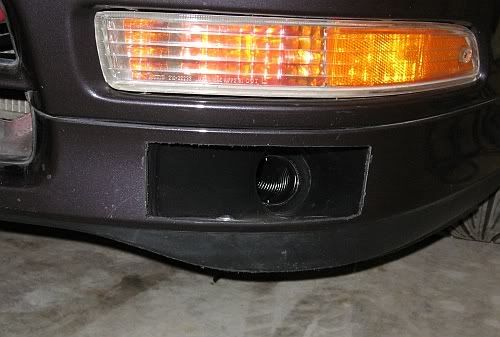
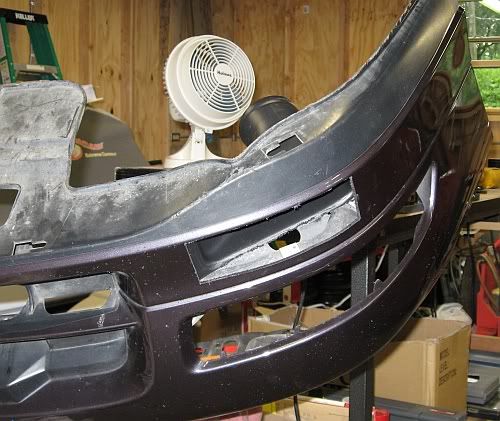
Here are front views of the two ducts. You can see the machine screws poking through the hose. You can also see the downward angle we put on the ducts so that the hose / windshield wiper bottle would clear okay. We angled the passenger side as well just so they'd look the same.
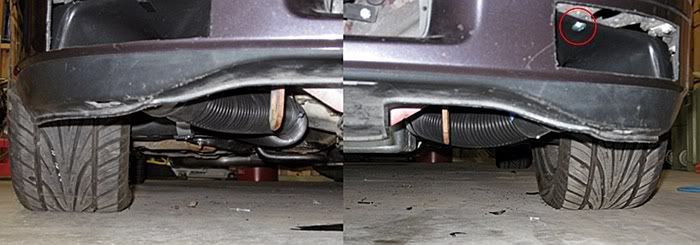
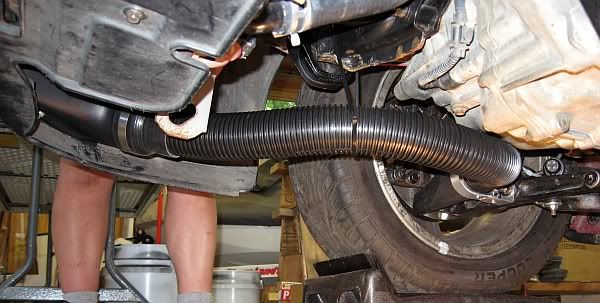
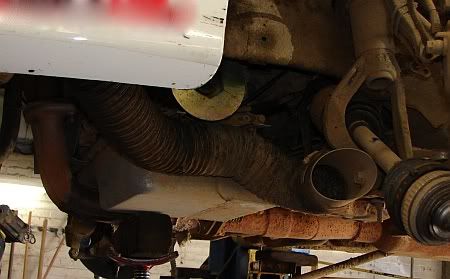
Here's a clearance view underneath the car. None of the hose protrudes below the front bumper at all. So it's of little concern in terms of a snag hazard or getting ripped out. On the driver side you can see the second bolt that holds the brake duct in place on the bumper.
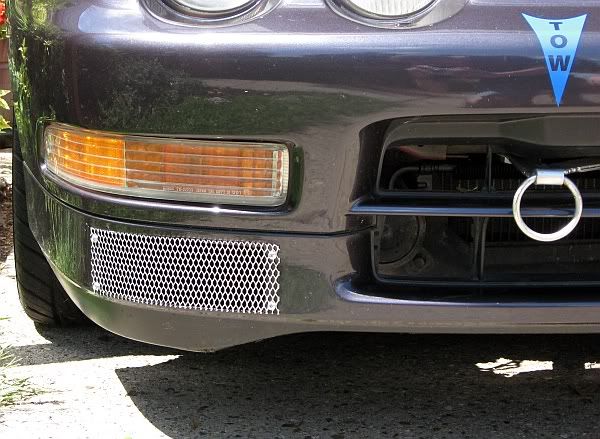
To prevent the ingestion of tire rubber, rock, leaves, birds, and family pets we simply cut out some aluminum gutter screen and secured it to the front of the bumper with machine screws.
In case anyone is wondering we made the tow hook ourselves, and the PS cooler is out of an '89 Legacy w/auto trans (it's wider than the radiator and finned top and bottom).
Hope someone finds this install useful...
Unfortunately this isn't a good DIY. By my standards I'd even call it a complete failure. Maybe the best way to describe it is as a SHOW AND TELL. We were rushed to get these ducts installed before an event so I didn't get many pictures, or any measurements or total material count. But through the pictures you can get the general idea. We're very happy with the final outcome though.
Before anything else, here's a picture of them in use so you can see the end result. So you can determine whether you want to read on or not.
Items required, how we made them...
1. Brake duct inlets with off-center holes, 3x7.75" (we got ours from Howe Racing) x2
2. Approx 8' of 2.5" ShopVac hose (standard purchase length, we did had leftovers)
3. ShopVac crevice tools, 2.5 inch x2
4. Silicone intake pipe reducers 3" to 2.25" (I'll explain 2.25" later) x2
5. Strip of one inch steel flat stock
6. Short section of 2.5" exhaust pipe, cut off a van muffler at a salvage yard
7. Oxy-Acetylene torch for bending steel and some brazing
8. Jigsaw or reciprocating saw
9. Numerous machine screws
10. Wing nuts x2
11. Some more nuts and bolts
12. Aluminum mesh screen that goes on top of rain gutter
13. 14" zip ties x4
14. Utility knife
15. Water-based personal lubricant (i.e. KY Jelly, yes you may chuckle right away)
Rear clearance view looking through the turn signals / park lights. The wiper bottle is not a problem for our install location.
First thing is to decide where the air ducts should go. In this case we chose the area right below the turn signals / park lights. This spot has several advantages.
1. Directly aft there are hardly any obstructions (I don't remember how far the resonating chamber in the right fender hangs down, but we removed ours)
2. It's the shortest and straightest distance to the brake rotors.
3. Most importantly, there are two protrusions sticking out behind the bumper at that location to secure the ducts, pics below.
For the brake ducts themselves, we needed to trim the bottom and top flanges (or lips) off so they would fit in this location, the side flanges are fine. Because these ducts also fit in at an angle, there was a lot of fitment, cut, fitment, cut, etc. until we got it correct.
Each duct is secured to the bumper by two bolts. One of which you can see here. You can also see that the bottom protrusion is actually inside the duct inlet. It fit better this way, and we had to angle the duct slightly downward so the hose would gently clear the windshield wiper bottle.
Okay, here's where the pictures start jumping rapidly. Here's a preliminary fitment for the passenger side hose. The silicone adapter is being used to make the transition from the duct to the hose. In this case a 3" to 2.25" adapter is used because 2.5" ShopVac hose is approximately 2 1/4" in diameter. ShopVac hose is measured by the outer diameter of the attachments, not the hose itself. We also have one of the crevice tools with a preliminary cut, shortening the length. Although you can't see it in this picture, we did cut four 1/2" long notches down the length of the crevice tool attachment end so it was easier to squeeze the hose in. This is where the KY Jelly is needed. We didn't want to the use the hose adapters because they'd add more weight and make the hose sag, so we shoved the hose directly into the crevice tool and the silicone adapter. And the hose was slightly larger in diameter, so twisting in an expandable hose was a real pain in this case. The hose just compresses when you try to push it in, and even after greasing it up we still had to use a screwdriver to help it along. KY Jelly is nice for fitting any type of tubing on your car because it's water soluble and doesn't stick when it dries – air intakes, vacuum hose, coolant lines, etc.
Another jump. I didn't get a picture of us forming the brackets that attach to the lower arms. Since the crevice tool is 2.5" in diameter, we used the exhaust piping to bend the flat stock around. Of course this required the use of an oxy-acetylene torch. We found that angling the crevice tool towards the rotor provided better clearance and didn't crink the hose as much as making a full 90 degree turn. Because of this angled approach we had to braze on the section of the bracket that attaches to the arm. You can see that the bolt hole is already drilled.
Here's a finished picture of the brackets. The screw and wing nut is used to clamp the crevice tool ends in place. Because the wing nuts are right next to the brackets, you can tighten and loosen the screw without the nut turning as well. As a final touch, we eventually ended up drilling and punching a machine screw through the bracket, crevice tool, and underlying hose. So now it definitely wouldn't come loose. This is shown in pictures below.
This is the driver side hose all ready to go. You can see the machine screws we added so the hose wouldn't fall out of the bracket or the silicone adapter. We're securing the silicone adapter to the duct with a hose clamp. I'll explain the weird shape of the crevice tool in a little bit.
Here's both the driver and passenger side hoses in place. You can see the zip ties used on each side that supports the center section of the hose, which we hung around the motor mounts. The hose makes a nice smooth transition from the duct to the rotors, no sharp turns or bends. Of course we took several times fitting in these sections to check the length of the hose, the angle the crevice tool points at the rotor, the distance from the LCAs, distance from the rotors, etc., before everything was secured and screwed/bolted together.
Here are close-ups of the brake rotors. The reason the crevice tools were trimmed is because the front knuckles comes in contact with them before full lock. The nozzle still touches the knuckle slightly at full lock even after we trimmed them, but not enough to push it out of the way or possibly rotate the bracket over time. You can also see that the lengths of the brackets make it a little hard to torque that LCA nut, which was an oversight in our rush. You can still easily tighten it enough by hand that you don't have to worry about it coming loose. And because the brackets are attached to the LCA, they'll follow the suspension travel wherever it goes. The ShopVac hose should withstand what little travel the front suspension has fine.
Those are stock wheels on the car, but I did try a set of Kosei K1s at 15x7 with +38 offset and no part of the nozzle or hose comes in contact with actual wheel lock to lock. The front knuckle bumps into the nozzle end a touch as mentioned above, but again nothing that will bother it. And while racing you shouldn't need to go to full lock anyway (unless you're stuck off course). With the wheels strait ahead, the end of the crevice tool is about 2" away from the brake rotor. So it's definitely close enough. And because it doesn't "feed" the inside of the brake rotors via the dust shield, you don't need to worry about covering the inlets when it rains.
Here are front views of the two ducts. You can see the machine screws poking through the hose. You can also see the downward angle we put on the ducts so that the hose / windshield wiper bottle would clear okay. We angled the passenger side as well just so they'd look the same.
Here's a clearance view underneath the car. None of the hose protrudes below the front bumper at all. So it's of little concern in terms of a snag hazard or getting ripped out. On the driver side you can see the second bolt that holds the brake duct in place on the bumper.
To prevent the ingestion of tire rubber, rock, leaves, birds, and family pets we simply cut out some aluminum gutter screen and secured it to the front of the bumper with machine screws.
In case anyone is wondering we made the tow hook ourselves, and the PS cooler is out of an '89 Legacy w/auto trans (it's wider than the radiator and finned top and bottom).
Hope someone finds this install useful...
Last edited by court76wi; 10-09-2009 at 07:39 PM.
 10-09-2009, 06:53 PM
#3
Suspetise...
Join Date: Nov 2002
Location: Burninating the peasants yo
Posts: 12,287
Likes: 0
Received 1 Like
on
1 Post
Have you tested this yet? Wondering about how the shop vac hose and nozzle doodle hold up to the heat in that area.
No matter what, I really like the bumper ducts and the brackets. They are a much improved design over most everything else I've seen.
No matter what, I really like the bumper ducts and the brackets. They are a much improved design over most everything else I've seen.
10-09-2009, 07:07 PM
#4
Honda-Tech Member
Thread Starter
Join Date: Mar 2007
Location: Iowa
Posts: 248
Likes: 0
Received 0 Likes
on
0 Posts
Nozzles and hoses. Nozzles are fine, they don't show any type of heat deformation or anything. Same thing for the hose running next to the oil pan. Rotors were hot enough that I accidentally left some pad deposits on them when I stopped the car, front and rear - whatever temp that may be.
I wouldn't foresee any issues, but time will tell...
P.S. I've seen/heard other people using ShopVac hose and nozzles for brake ducting. None of those people or postings have reported or mentioned any problems.
Last edited by court76wi; 10-09-2009 at 07:28 PM.
10-09-2009, 08:11 PM
#5
Honda-Tech Member
Join Date: Apr 2008
Location: San Mateo/Los Altos, CA, USA
Posts: 592
Likes: 0
Received 1 Like
on
1 Post
I would maybe rethink the use of that grille material in front of the ducts, that sort of tight mesh can actually deter cooling air much more than you'd probably realize. I've actually seen engine cooling problems being fixed by removing the protective grille in front of the radiator duct. Most people don't even use grille on their brake ducts-- usually not much reason to. Also, if you're using vented rotors, it is much more efficient to somehow blow air down the center opening of them. If there's any way to do this, it will likely work a lot better. With the air blowing on one part of the rotor, most of the air flow is just bouncing off and around the hot metal instead of being forced to pass over it.
 10-09-2009, 08:24 PM
#7
Honda-Tech Member

Join Date: Dec 2000
Location: Atlanta, GA
Posts: 2,802
Likes: 0
Received 0 Likes
on
0 Posts
I have also been using shop vac tubing for my brake ducts for the past five years. It works well and can withstand most normal use, but heat from the oil pan and the brakes can cook it.
this is really tricky to do on the fwd hondas, but I agree it is ideal.
if you're using vented rotors, it is much more efficient to somehow blow air down the center opening of them. If there's any way to do this, it will likely work a lot better. With the air blowing on one part of the rotor, most of the air flow is just bouncing off and around the hot metal instead of being forced to pass over it.
Trending Topics
10-09-2009, 08:30 PM
#8
Honda-Tech Member
Join Date: Sep 2008
Location: Alhambra, ca, us
Posts: 370
Likes: 0
Received 0 Likes
on
0 Posts
nice
but if it was me, i would've pipe the duct from the corners of the center grill part (the part where the sirg fogs goes) to the brakes, so i dont have to cut into the lower part of my bumper... and also i think that way the pipe would have a better straight air flow to the brakes rather then having to bend
but if it was me, i would've pipe the duct from the corners of the center grill part (the part where the sirg fogs goes) to the brakes, so i dont have to cut into the lower part of my bumper... and also i think that way the pipe would have a better straight air flow to the brakes rather then having to bend
Last edited by rngo219; 10-09-2009 at 08:42 PM.
10-09-2009, 08:57 PM
#9
Honda-Tech Member
Thread Starter
Join Date: Mar 2007
Location: Iowa
Posts: 248
Likes: 0
Received 0 Likes
on
0 Posts
It's more effective though with a large opening in the bumper rather than a smaller opening in the grill anyway (limited by the turn you have to make), and looks aren't that important to me. Who knows what happens to my car at the next race??
I also agree with the statement above regarding rotor cooling. The brake caliper is on the front of the knuckle though, so it's virtually impossible to get anything in there with the axles and everything else. You might be able to snake something in there if you use the dust shield, but by then the hose would be so small or jagged it probably wouldn't be of much benefit. And I've seen a lot of those designs have problems with hitting the inside of the wheel, even with moderate steering. Myself, I personally think dust shields get in the way service/maintenance wise more than anything. So I personally wouldn't pursue that route.
Regarding the mesh, you're probably right. But I'll leave it on until I encounter any fade problems.
Again, the way we did it is far from great or optimum. But I think it's an improvement over most setups I've seen, using what was available to us. But as long as any setup works for the user, great...
Last edited by court76wi; 10-09-2009 at 09:08 PM.
10-09-2009, 09:56 PM
#10
Honda-Tech Member
Join Date: Sep 2008
Location: Alhambra, ca, us
Posts: 370
Likes: 0
Received 0 Likes
on
0 Posts
^^
ohhh icicc
cool thanks for the clarification, just wanted to see if you thought about it =P
i did see that you cut out the corner grill part, just thought you were going to put on some fogs or something haha
but overall, very nice sir
ohhh icicc
cool thanks for the clarification, just wanted to see if you thought about it =P
i did see that you cut out the corner grill part, just thought you were going to put on some fogs or something haha
but overall, very nice sir
10-10-2009, 06:07 AM
#11
Honda-Tech Member
Thread Starter
Join Date: Mar 2007
Location: Iowa
Posts: 248
Likes: 0
Received 0 Likes
on
0 Posts

Here's a friend's ITR that pulls air from the front grill like you mentioned. Now they purchased the vehicle with this already installed from the previous owner. I do have to admit the tubing isn't nearly as corrugated as ShopVac tubing. But with all the bends, twists, and turns I don't know how well it really works.
The inlet is fairly small on it, less than 3" diagonal because of the angle it's at, and the air duct doesn't really taper at all into the hose. It just holds the hose in place more than anything else. The outlet also stops at the forks, which with all the turbulence under the car you wonder how much of that ducted air gets to the rotors.
With 3" hose, that limits how close you can actually get to the rotors. Also with 3" hose you have to twist and turn it more to get it where you want to without running into anything. So in some cases smaller tubing might work better.
This might work fairly well though, but I couldn't say. They run it with Cobalt Friction pads though, so the brake ducting might not affect much...
Last edited by court76wi; 10-10-2009 at 06:24 AM.
 10-10-2009, 08:17 AM
#13
Honda-Tech Member
Join Date: Sep 2002
Location: Belle Mead, NJ, USA
Posts: 780
Likes: 0
Received 0 Likes
on
0 Posts
if heat is a concern, get some high temp engine or caliper paint and spray the parts that are close to the heat source. ^_^
this is a awesome write up. you guys are awesome!
this is a awesome write up. you guys are awesome!
10-10-2009, 09:31 AM
#14
Honda-Tech Member
Thread Starter
Join Date: Mar 2007
Location: Iowa
Posts: 248
Likes: 0
Received 0 Likes
on
0 Posts
I have a touch of header wrap and/or heat tape remaining if it's needed.
I'm going to install a used 94-95 GSR/ITR oil cooler this winter, so I doubt if the oil pan will be an issue...
I'm going to install a used 94-95 GSR/ITR oil cooler this winter, so I doubt if the oil pan will be an issue...
10-11-2009, 01:35 PM
#15
Honda-Tech Member
Join Date: Mar 2002
Location: Some Where, TX, USA
Posts: 1,650
Likes: 0
Received 0 Likes
on
0 Posts
Love it! This looks to be the best one yet.
I thought about going to an LED set up for blinkers and running the ducts from the the blinker locations. But that would be for a track car only.
I thought about going to an LED set up for blinkers and running the ducts from the the blinker locations. But that would be for a track car only.
10-11-2009, 01:44 PM
#16
Honda-Tech Member
Join Date: Sep 2002
Location: Orange County, CA, USA
Posts: 12,758
Likes: 0
Received 0 Likes
on
0 Posts
Dali Racing actually makes a carbon brake duct for the turn signal. Its a bit pricey though.
Im currently working on something cheaper in fiber glass. Feel free to shoot me a PM.
http://daliracing.com/v666-5/catalog...cfm?focus=1441

Im currently working on something cheaper in fiber glass. Feel free to shoot me a PM.
http://daliracing.com/v666-5/catalog...cfm?focus=1441
10-12-2009, 06:21 AM
#17
Honda-Tech Member
Join Date: Jun 2002
Location: Northern Virginia
Posts: 211
Likes: 0
Received 0 Likes
on
0 Posts
Dali Racing actually makes a carbon brake duct for the turn signal. Its a bit pricey though.
Im currently working on something cheaper in fiber glass. Feel free to shoot me a PM.
http://daliracing.com/v666-5/catalog...cfm?focus=1441
Im currently working on something cheaper in fiber glass. Feel free to shoot me a PM.
http://daliracing.com/v666-5/catalog...cfm?focus=1441
10-12-2009, 06:59 AM
#18
Honda-Tech Member
Thread Starter
Join Date: Mar 2007
Location: Iowa
Posts: 248
Likes: 0
Received 0 Likes
on
0 Posts
Dali Racing actually makes a carbon brake duct for the turn signal. Its a bit pricey though.
Im currently working on something cheaper in fiber glass. Feel free to shoot me a PM.
http://daliracing.com/v666-5/catalog...cfm?focus=1441
Im currently working on something cheaper in fiber glass. Feel free to shoot me a PM.
http://daliracing.com/v666-5/catalog...cfm?focus=1441
That opening isn't that big though once you look at the plastic that incorporates the lens. Front view looks decent, but it's smaller than it appears. It might provide enough air though. Plus you're not blasting any more holes in your bumper, so that's a plus.
Once we decided to commit, we thought we might as well make the hole as big as possible. ;-)

Here are those ducts we got from Howe before we butchered them. With shipping I think it was around $35 or so. Several places sell them, these were just a little wider than most...
Last edited by court76wi; 01-27-2010 at 04:58 AM.
01-26-2010, 11:19 AM
#20
Honda-Tech Member
Join Date: May 2004
Location: Middlesex, NJ, United States
Posts: 324
Likes: 0
Received 0 Likes
on
0 Posts
You may want to steer clear of using sheet metal screws as they WILL work their way out. Flat tires suck especially when it is caused by a screw you've picked up on track.
01-27-2010, 04:57 AM
#21
Honda-Tech Member
Thread Starter
Join Date: Mar 2007
Location: Iowa
Posts: 248
Likes: 0
Received 0 Likes
on
0 Posts
 These screws are driven through thick plastic though, so essentially their own form of a nylon lock nut.
Sheet metal screws through sheet metal though – definitely wouldn't think of it...
01-28-2010, 12:40 PM
#22
Honda-Tech Member
Yes indeed Court...great write-up.
I've seen these in person...and Court and his dad do awesome fab/diy work. A+
I've seen these in person...and Court and his dad do awesome fab/diy work. A+
01-29-2010, 07:31 AM
#24
Honda-Tech Member
Join Date: Feb 2002
Location: Orange, CALIFORNIA, USA
Posts: 1,642
Likes: 0
Received 0 Likes
on
0 Posts
Great writeup, and very nice fabrication Court. Everything you have done is perfect! And I hate to put a damper on everyones praise of what you have done. You will get cold air to the brakes no doubt...
However, the way you have the air blowing directly onto that small portion of the side of the Rotor face is going to cause all sorts of Rotor distortion problems. Believe me we've tried and proved this many times.
Vented Rotors are designed to allow the heat from the Rotor to disipate from the center out through the vents. Not suck air from the outside in. So the ideal setup is to fabricate some type of inlet around the area where the axel goes into the center of the Hub and duct the incoming air to it. Then the cooling air can exit from the center of the rotor out through the vents and will not cause distortion by over cooling on an isolated spot.
Please don't take this as a criticism of your work, the ducting and intakes and brackets are perfect! and you are about 85% there.
Good luck,
Kiwi
01-29-2010, 08:10 AM
#25
Suspetise...
Join Date: Nov 2002
Location: Burninating the peasants yo
Posts: 12,287
Likes: 0
Received 1 Like
on
1 Post
Kiwi, can you elaborate on the rotor distortion? Is it something to do with uneven cooling?