
9 second B13 Sentra Se-r Build, Paint,Tuck, VE-T
 03-14-2010, 08:31 PM
#1
Honda-Tech Member
Thread Starter
Join Date: Oct 2005
Location: Ft. Hood, Texas
Posts: 752
Likes: 0
Received 0 Likes
on
0 Posts
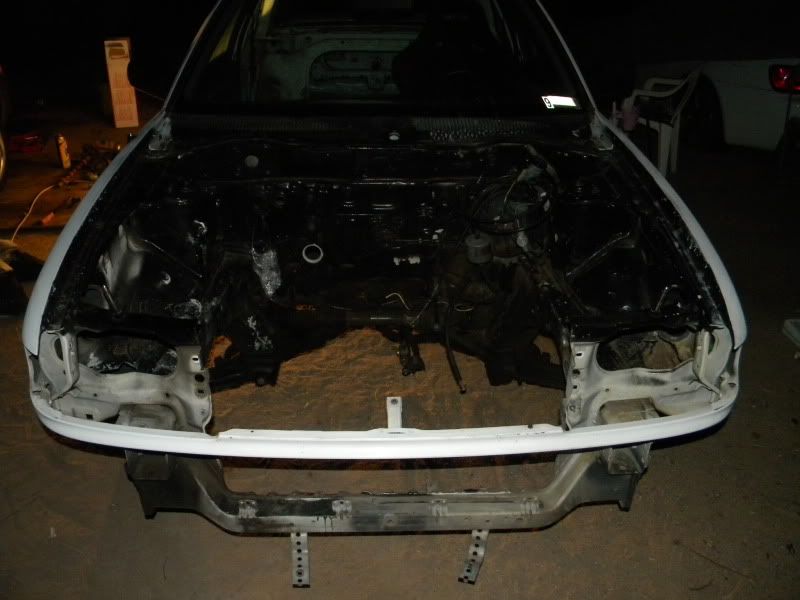
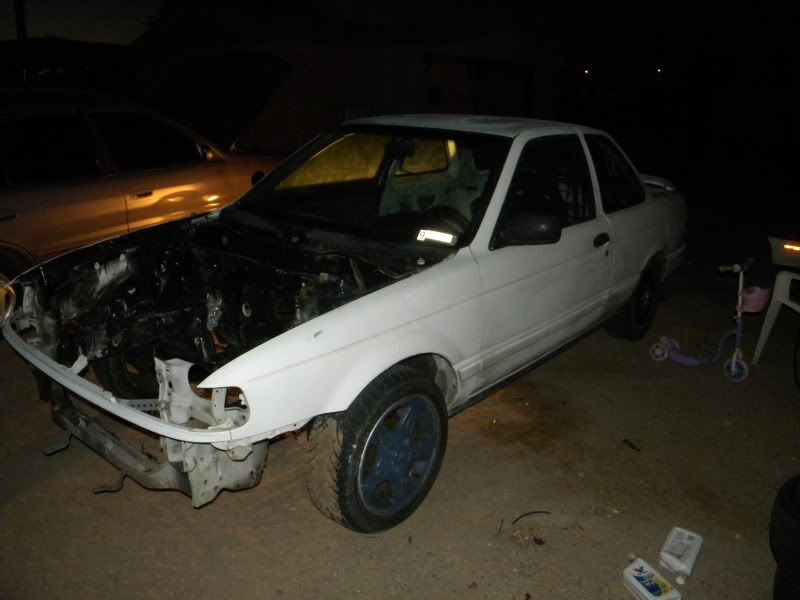
Well i finally got some time to start working on my car getting it prepped for paint and the build. Got the car stripped down and wet sanded today getting ready for the Abyss Blue Pearl from 04-05 Acura TL to be sprayed inside, outside and engine bay.
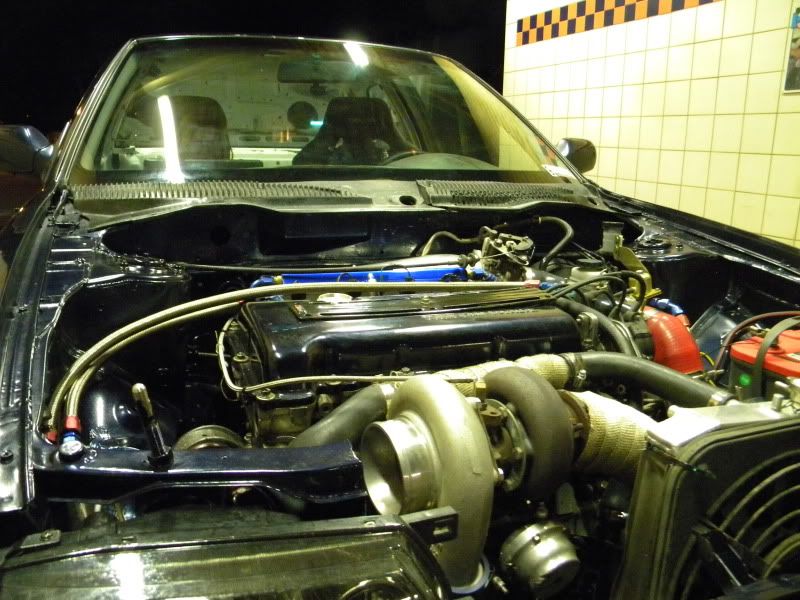
Bay will consist of full wire tuck.
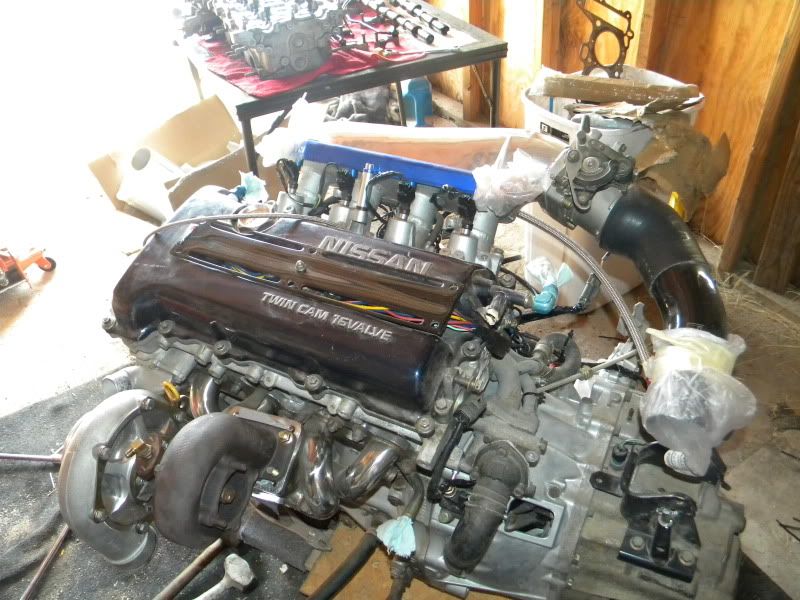
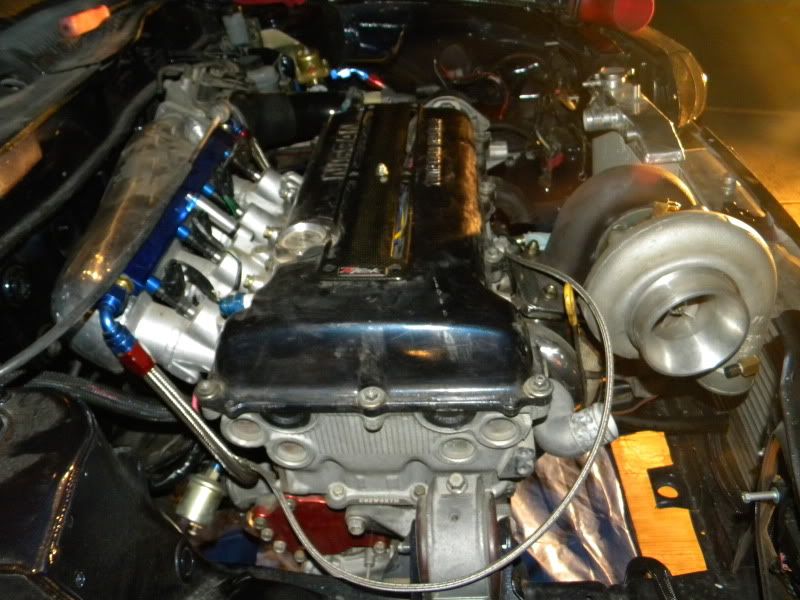
Keeping my current Built VE block w/ 8cw de crank, Eagle rods w/ARP 2000 bolts, CP det pistons, GTIR main bolts, VET headgasket, VE head with Supertech S&R's and stock cams revving to 9500 rpms, Golden Eagle head studs, custom intake manifold w/Q45 TB, mild port and polish work mainly focusing on the Exhaust ports. Compression should come out to around 9.2:1 or so.
Drivetrain will consist of QR25 04+ 6 speed transmission, P12 bellhousing, Mazworx mount kit, Competition Twin disk w/s15 disks. B15 spindles.
Custom turbo manifold mocked up by me and professionally welded by local shop. T4 open housing flange and 46mm v-band wastegate flange. PTE 46mm wastegate, Precision 6765 w/.96 T4 open housing.
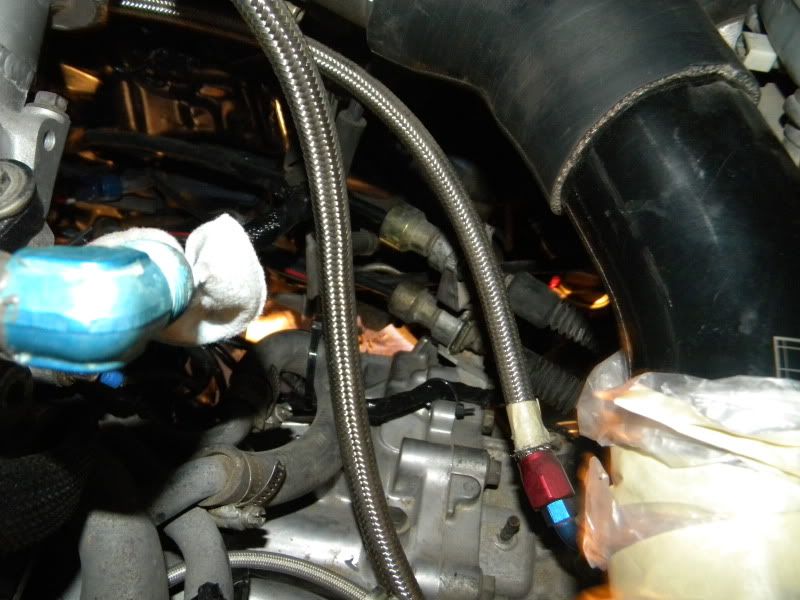
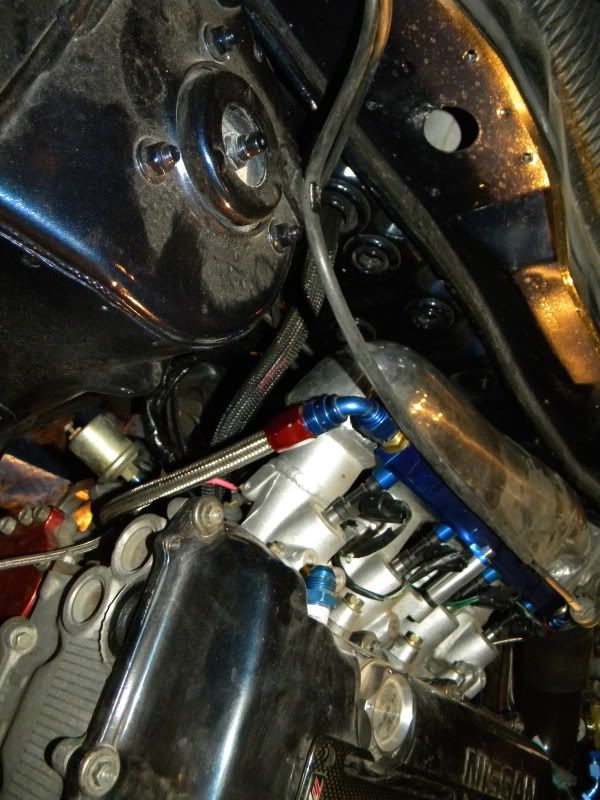
Fuel setup, ID2000 injectors, topfeed rail w/ aeromotive adjustable fuel pressure regulator. Walbro 255lph intank pump feeding a Bosch 044 inline with -6an line to the rail.
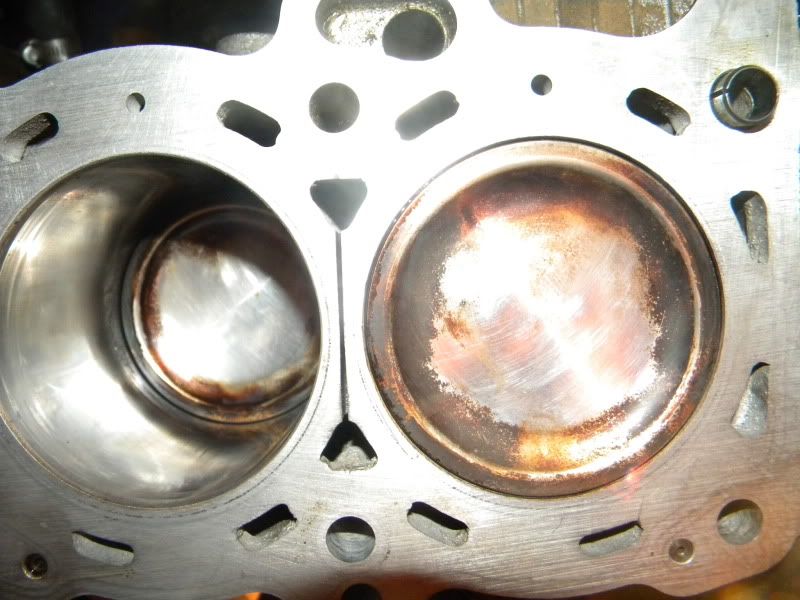
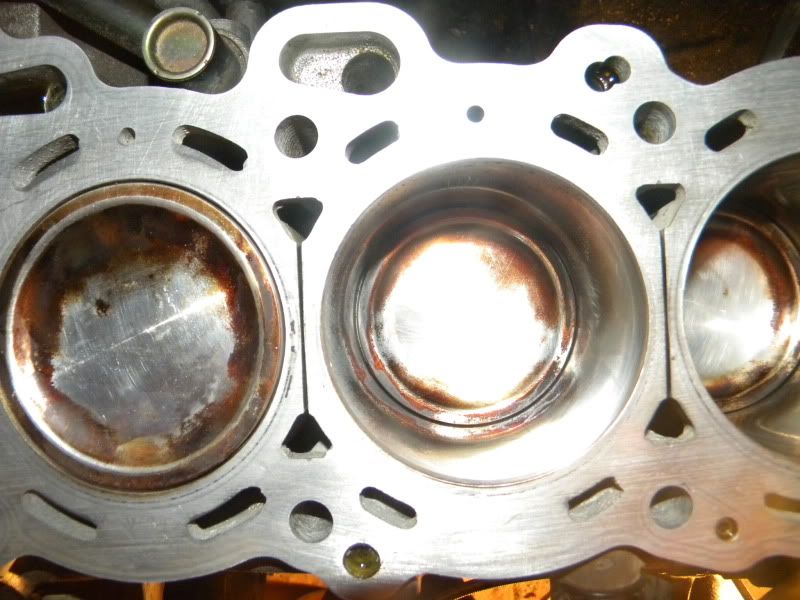
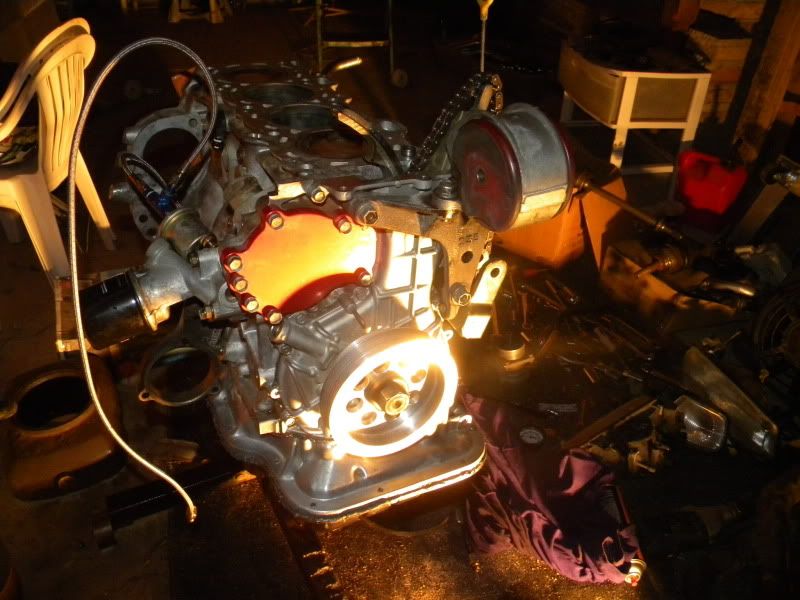
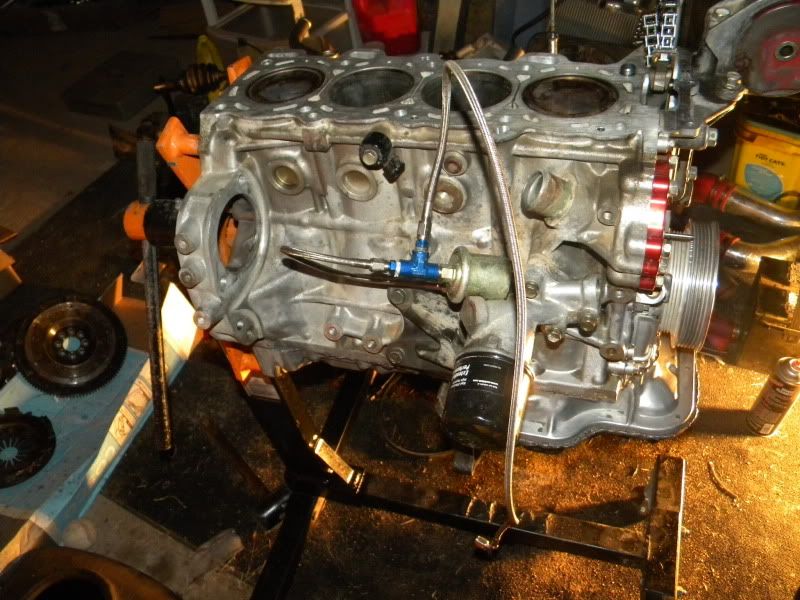
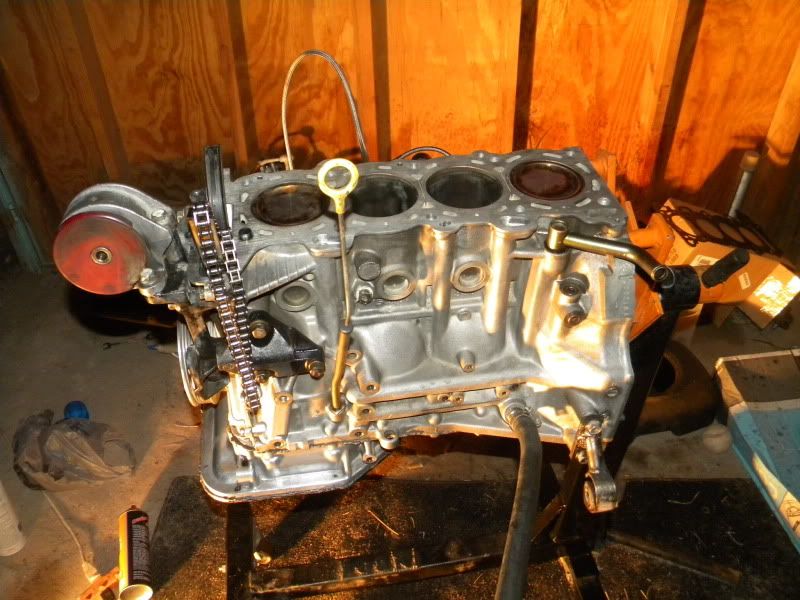
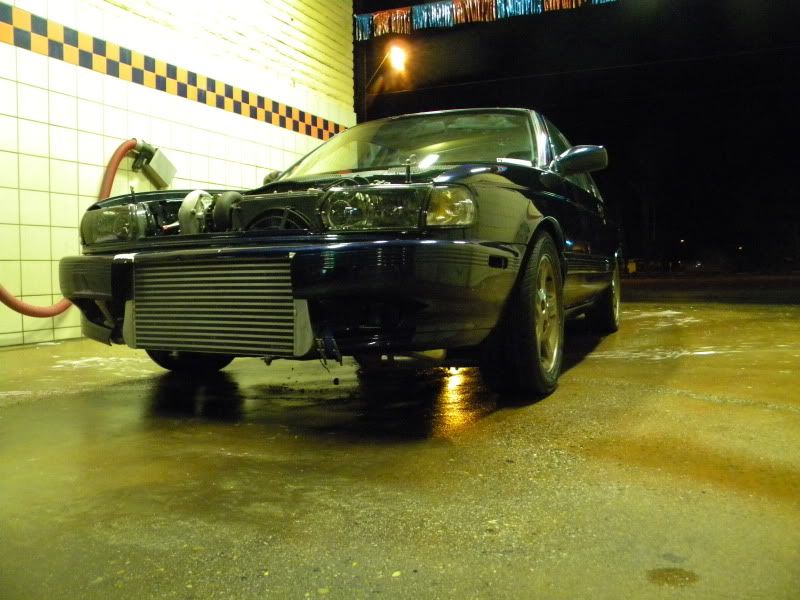
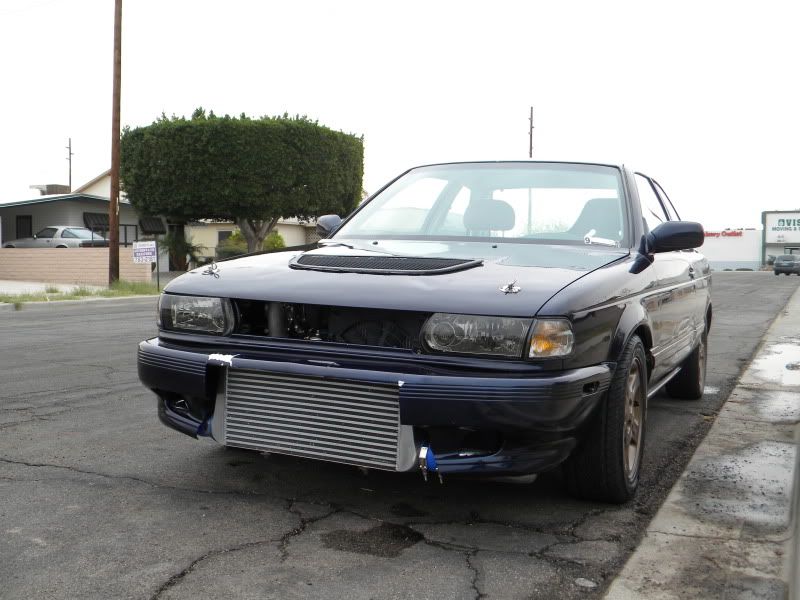
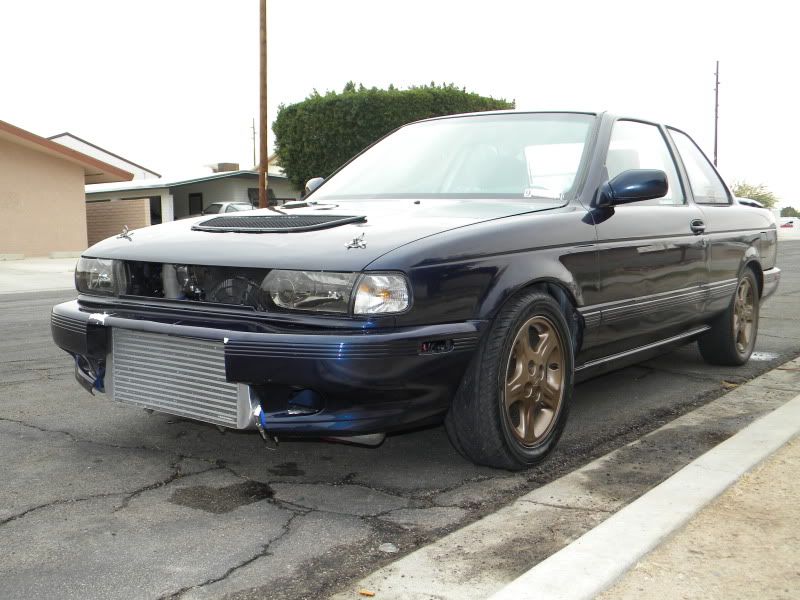
Here are some pics of the work done soo far. Just need to sand down a couple dented areas and do some bondo/finish work and then it will be ready for paint. Got the block all cleaned up. Not bad for 1 year/10k miles on it. Cylinder walls still look great.
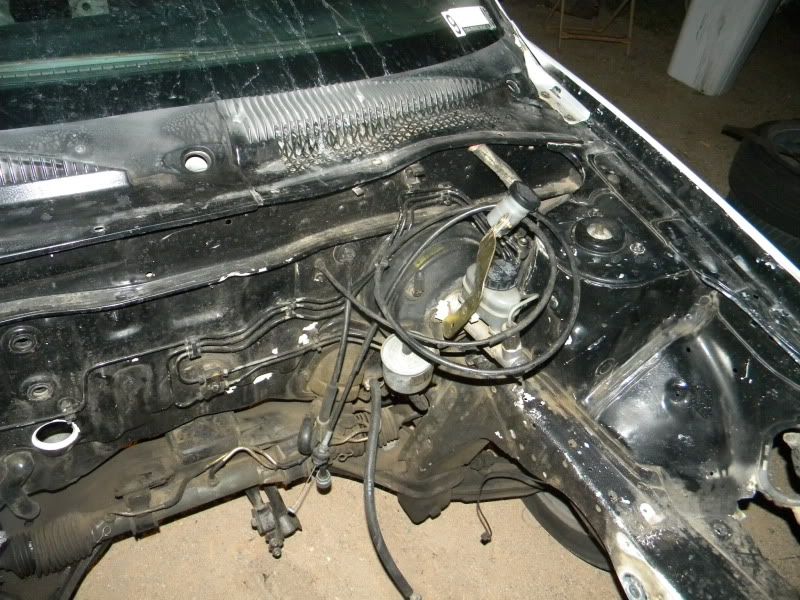
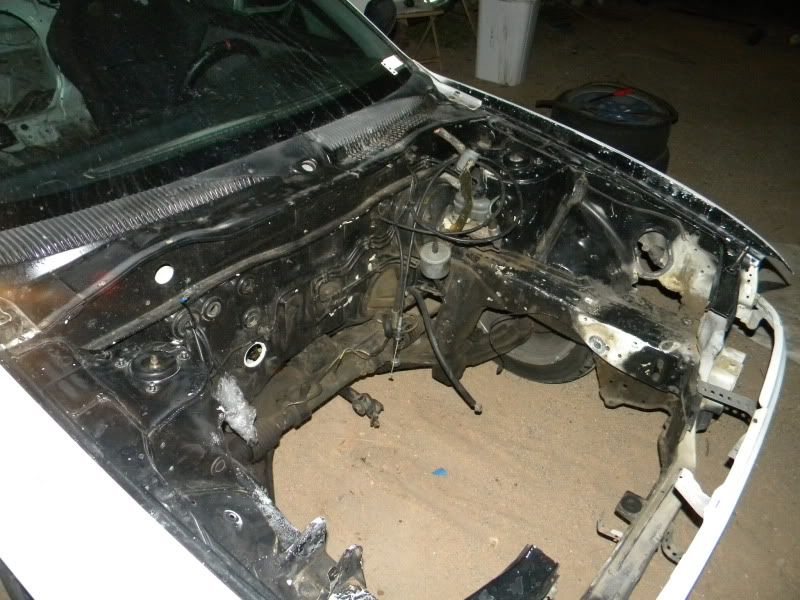
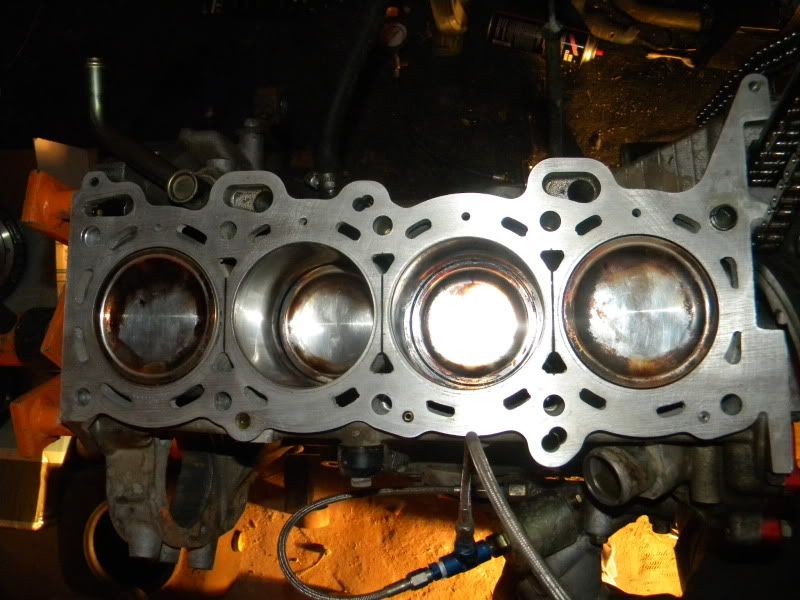
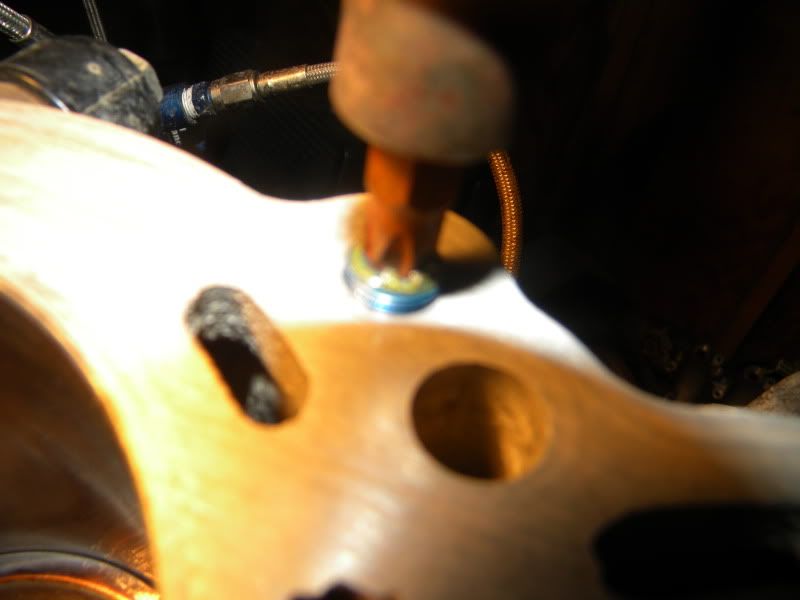
here is a pic of the plug i installed in the oil port for the VVL solenoids to use the de head previously.
Enjoy and keep a look out, i will be taking pics of the entire process.
The Ve block with De head went 11.1@132mph on 446whp 24psi of boost on the 60 trim w/.82 turbine housing. I then put an intake manifold and Q45 throttle body and went to 30psi but never got a solid pass. Blew a coupler off right after the 1/8 and coasted to 11.9@102, My 1/8 with a bogged launch was 7.1@108mph sputtering a bit due to the boost leak past the coupler that blew off. That was around 550whp. Im looking to make in the 750whp range with this setup.
Bay will consist of full wire tuck.
Keeping my current Built VE block w/ 8cw de crank, Eagle rods w/ARP 2000 bolts, CP det pistons, GTIR main bolts, VET headgasket, VE head with Supertech S&R's and stock cams revving to 9500 rpms, Golden Eagle head studs, custom intake manifold w/Q45 TB, mild port and polish work mainly focusing on the Exhaust ports. Compression should come out to around 9.2:1 or so.
Drivetrain will consist of QR25 04+ 6 speed transmission, P12 bellhousing, Mazworx mount kit, Competition Twin disk w/s15 disks. B15 spindles.
Custom turbo manifold mocked up by me and professionally welded by local shop. T4 open housing flange and 46mm v-band wastegate flange. PTE 46mm wastegate, Precision 6765 w/.96 T4 open housing.
Fuel setup, ID2000 injectors, topfeed rail w/ aeromotive adjustable fuel pressure regulator. Walbro 255lph intank pump feeding a Bosch 044 inline with -6an line to the rail.
Here are some pics of the work done soo far. Just need to sand down a couple dented areas and do some bondo/finish work and then it will be ready for paint. Got the block all cleaned up. Not bad for 1 year/10k miles on it. Cylinder walls still look great.
here is a pic of the plug i installed in the oil port for the VVL solenoids to use the de head previously.
Enjoy and keep a look out, i will be taking pics of the entire process.
The Ve block with De head went 11.1@132mph on 446whp 24psi of boost on the 60 trim w/.82 turbine housing. I then put an intake manifold and Q45 throttle body and went to 30psi but never got a solid pass. Blew a coupler off right after the 1/8 and coasted to 11.9@102, My 1/8 with a bogged launch was 7.1@108mph sputtering a bit due to the boost leak past the coupler that blew off. That was around 550whp. Im looking to make in the 750whp range with this setup.
 03-15-2010, 08:12 AM
#3
Honda-Tech Member

Join Date: Jan 2009
Posts: 46
Likes: 0
Received 0 Likes
on
0 Posts
cool, can you detail the tranny install, im looking to put a 6spd into my b14 but i was seeing if there was a nice bolt in kit out there cause i didnt want to do any welding
03-15-2010, 08:35 AM
#4
Honda-Tech Member
Thread Starter
Join Date: Oct 2005
Location: Ft. Hood, Texas
Posts: 752
Likes: 0
Received 0 Likes
on
0 Posts
Mazworx has a mount kit out for it using the p12 bellhousing. Just swap it over and you will need a custom clutch setup which mazworx has also. Very easy swap.
03-28-2010, 03:46 PM
#5
Honda-Tech Member
Join Date: Jan 2009
Posts: 46
Likes: 0
Received 0 Likes
on
0 Posts
yeah, it gets kinda pricey there i just want an na ve with the 6spd, the se-r i picked up for 500 runs great cept no 5th gear, but anyways bump for some progress, im interested.........

Trending Topics
 03-29-2010, 08:20 PM
#11
Honda-Tech Member
Thread Starter
Join Date: Oct 2005
Location: Ft. Hood, Texas
Posts: 752
Likes: 0
Received 0 Likes
on
0 Posts
lol, yeah the old sr20forum sucks, I spend most of my time on sr20-forum, its the newer forum that was formed after the split of sr20forum happened. Too many ads and crap on there, Its slow as hell.
Anyways ill update with some pics after this weekend, not much has happened soo far since i was on vacation for the last week and a half. I did order my new rings and a new set of ACL rod bearings. I figured i might as well freshen up the rings since they didnt break in and seat properly the first time causing my excessive blowby and slightly low compression.
The car is getting painted this weekend and i painted 2 of my wheels that are going along with the Abyss blue pearl.
Here is how the two ive done soo far came out. Dont mind the tires as they are the old ones. 225 bfg's going on these for street use. I have a set of other wheels with 25"X8.7X13 m&h's for the strip.

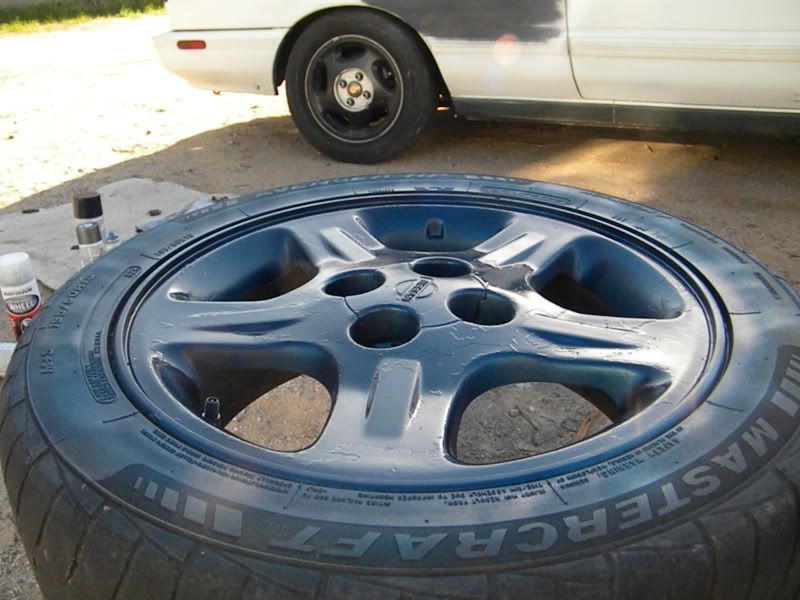
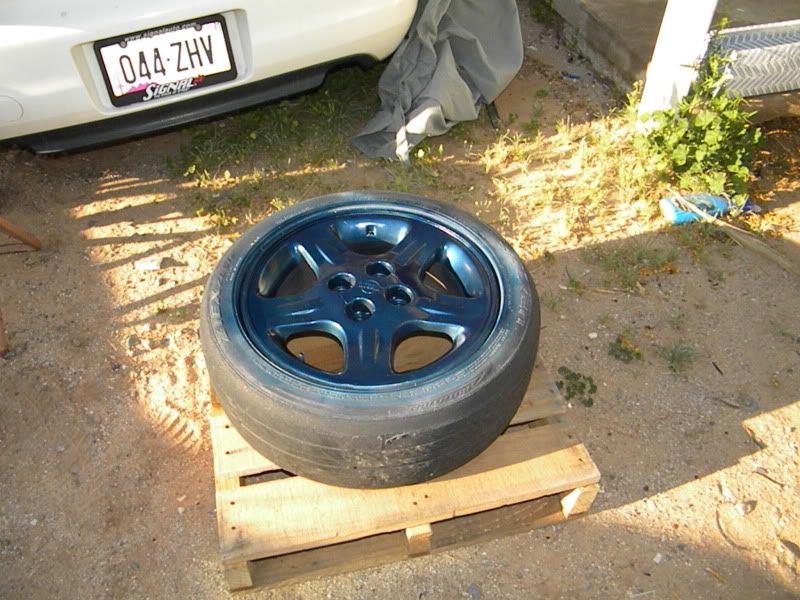
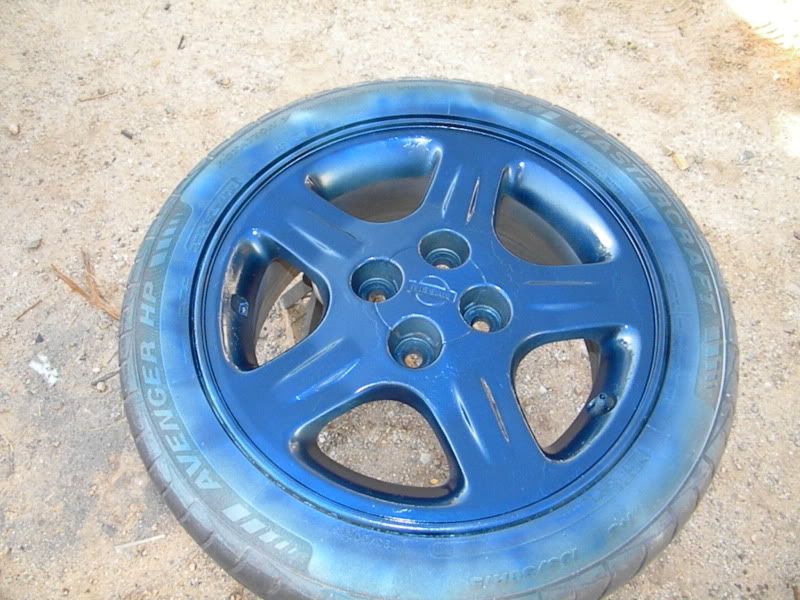
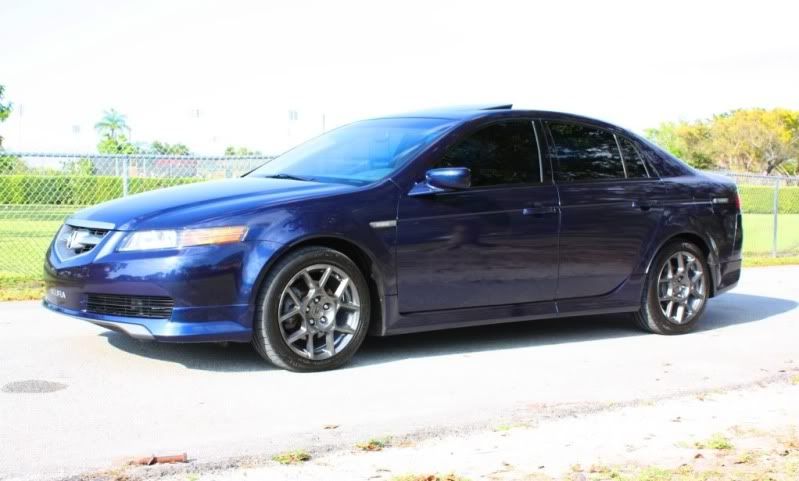
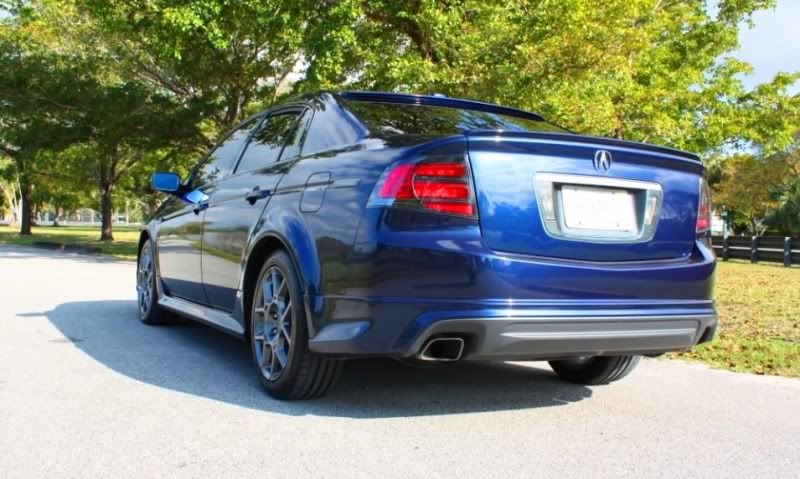
and for those that dont know what abyss blue pearl looks like, here is some pics: The wheels should go pretty good with it.
Anyways ill update with some pics after this weekend, not much has happened soo far since i was on vacation for the last week and a half. I did order my new rings and a new set of ACL rod bearings. I figured i might as well freshen up the rings since they didnt break in and seat properly the first time causing my excessive blowby and slightly low compression.
The car is getting painted this weekend and i painted 2 of my wheels that are going along with the Abyss blue pearl.
Here is how the two ive done soo far came out. Dont mind the tires as they are the old ones. 225 bfg's going on these for street use. I have a set of other wheels with 25"X8.7X13 m&h's for the strip.
and for those that dont know what abyss blue pearl looks like, here is some pics: The wheels should go pretty good with it.
03-30-2010, 03:03 PM
#12
Honda-Tech Member
Join Date: Jan 2009
Posts: 46
Likes: 0
Received 0 Likes
on
0 Posts
i would strip the wheels and redo them, looks alil funky but maybe its the pics, if they are messed up i got some se-r wheels ill sell ya if your ever in the nc area
04-05-2010, 01:20 PM
#13
Honda-Tech Member
Join Date: Feb 2005
Location: Darkside San Jose DSR DSR DSR DSR DSR DSR DSR DSR, CAAAAAAA, usa
Posts: 2,486
Likes: 0
Received 0 Likes
on
0 Posts
looking forward to this build....a 9 second time slip will be very impressive
04-09-2010, 03:01 PM
#15
Honda-Tech Member
Thread Starter
Join Date: Oct 2005
Location: Ft. Hood, Texas
Posts: 752
Likes: 0
Received 0 Likes
on
0 Posts
Water pump on a stock sr20 is where the red blockoff plate is at. Im running a mezier electric waterpump with no t-stat. I have daily driven the car in 125 deg heat stop and go and never had a problem and was even running a civic half width but dual core radiator with that pump and a single flexalite 1250cfm fan. never even hit 200 deg on the water temp. haha
01-11-2011, 05:25 PM
#16
Honda-Tech Member
Thread Starter
Join Date: Oct 2005
Location: Ft. Hood, Texas
Posts: 752
Likes: 0
Received 0 Likes
on
0 Posts
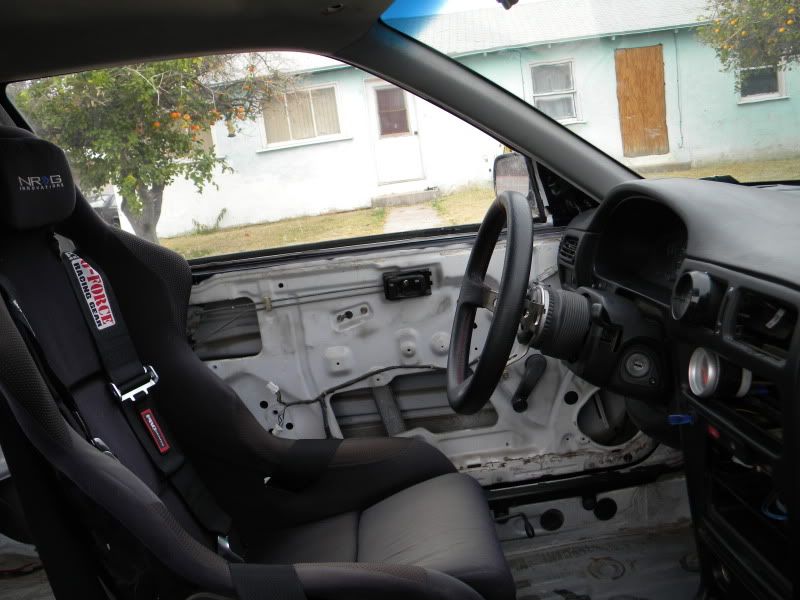
Alright, Competition Clutch finally came through with the flywheel. I bolted it up and it fits perfectly. Final specs were .485" thicker than a normal stock sr20 flywheel and with the tob they gave me which i pressed into the TOB sleeve i had worked great. The trans bolted right up, The TOB has just a tad bit of free play so its not bound up against the Pressure plate fingers. Sits nicely by the Slave cylinder where it should be and should work like a charm.
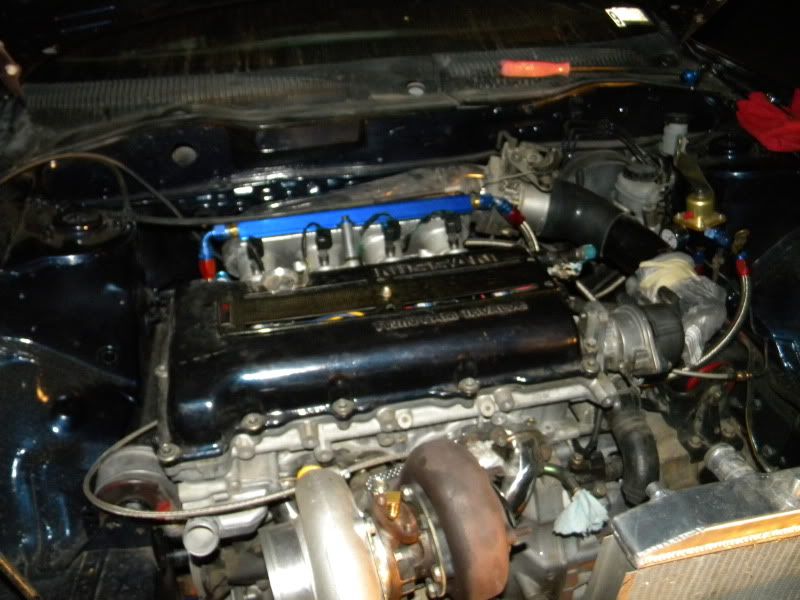
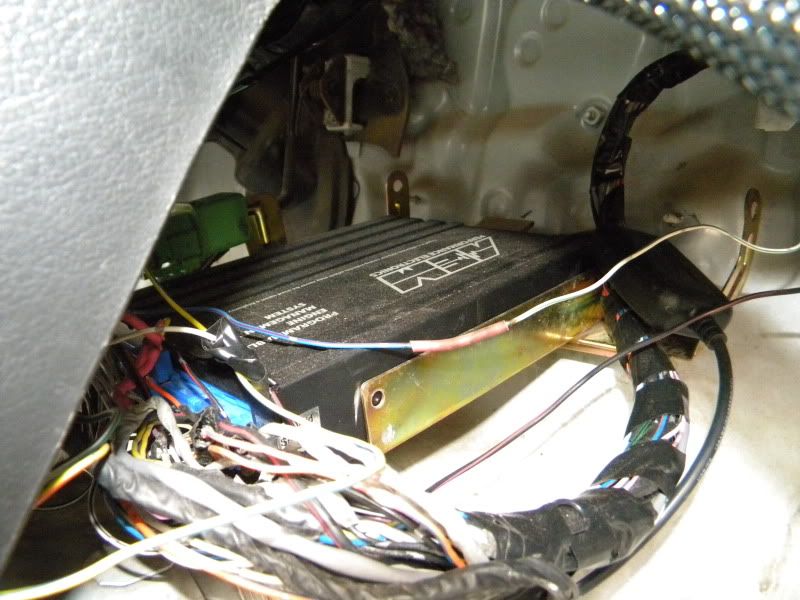
Put my nice tucked harness on and secured it to the motor. Only wires you will be able to see are the injector clips and the TPS wire. I took some advice from many people and redid the harness a bit separating my 540V primaries and signal wires for the COP's from the rest of the harness so no interferance will take place at all between the shielded signal wires. The COP harness tucked right up under the intake manifold on top of the coolant pipes and the rest of the harness about 10" lower. Came out really nice and should keep the engine bay very very clean looking.
Here are some pics:
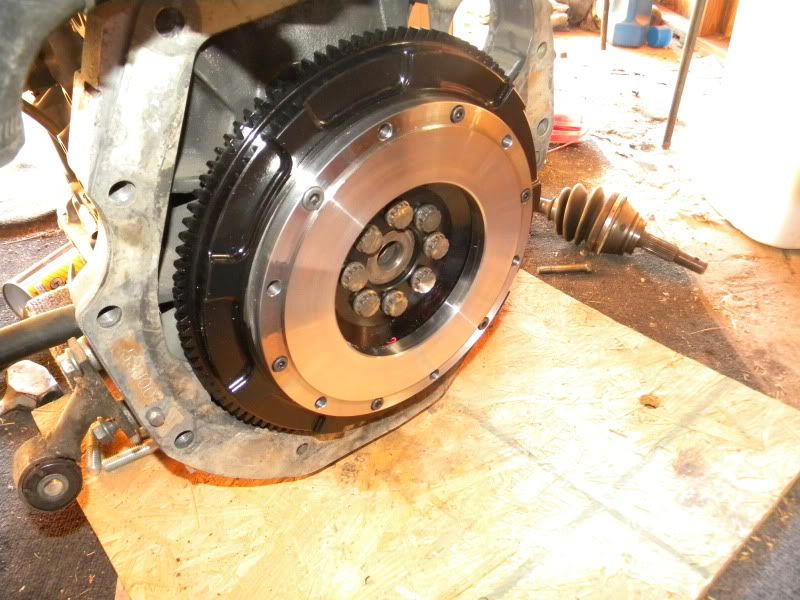
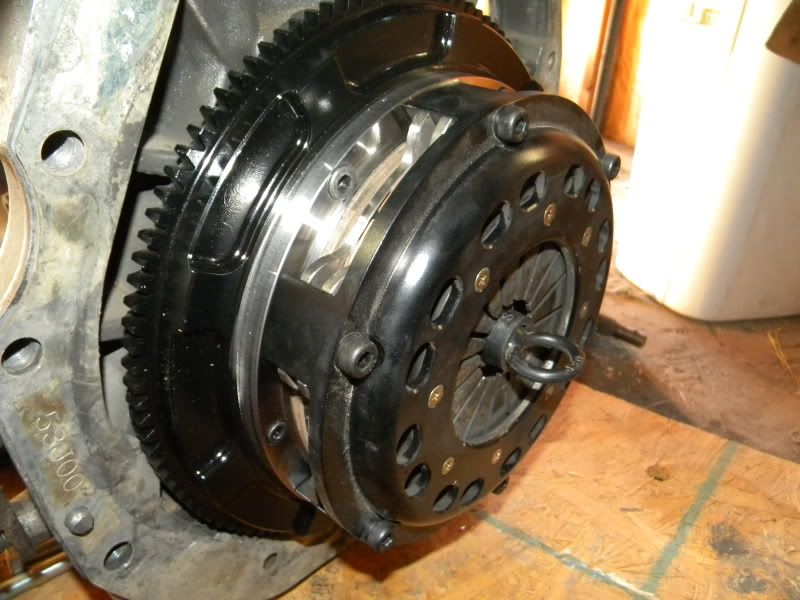
smaller tob for the twin disk

harness all in place
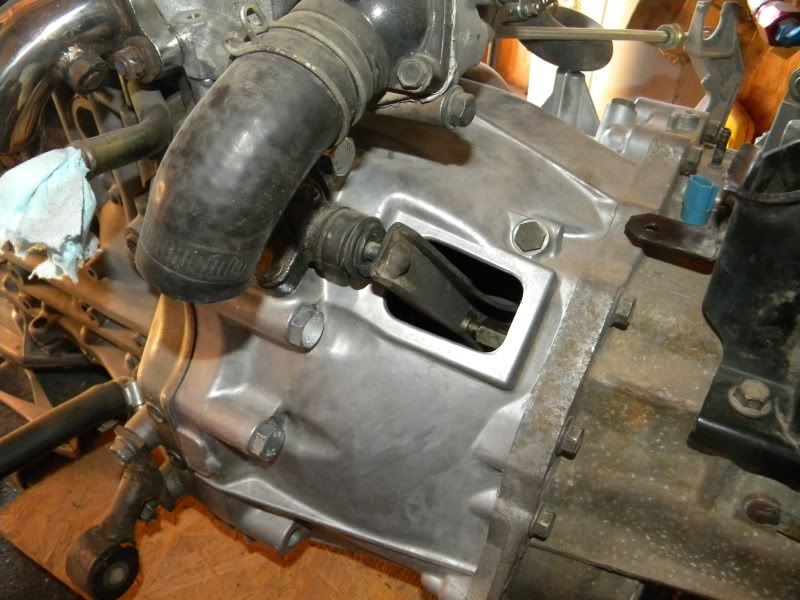
Nobody will see anything back here


More to come later today. Motor is going into the car for the final time and will be waiting on the EMS.
Got the motor and trans in, everything bolted up great without issues. Instead of hoping to find a Spec V trans side mount I used the Altima one i got and just trimmed it up and drilled new holes about 1 1/4" lower than the original holes. This is where it sat when the crossmember and passenger side mount were bolted up. Installation went great.
Only one hitch along the way. The speed sensor. If you are not careful and dont look down into the trans to see where the speedo drive gear on the diff is you will get this wrong. The speed sensor from a b13 or b14 does not bolt back in the same location. If you try to put it in with the tab lined up with the hole you will forcefully have to get it in and you will damage teeth on the gear of the speed sensor. (I found out the hard way luckily it was not anything to worry about. Im pretty sure with these you will have to cut the tab off and the sensor will rotate clockwise about 1/4 turn or about 90 to 110 deg for the gear to be on the diff properly. The speed sensor if you have it in the right position will go in perfectly easy with no forcing at all. You will have to use a bolt with a larger washer to hold the speed sensor in place. The washer is to catch on the side of the sensor applying downward force.
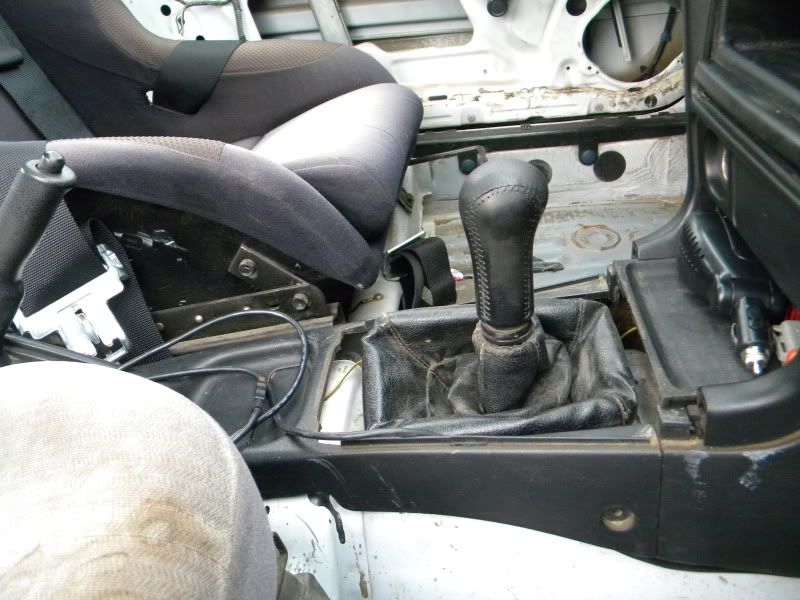
Other than that nothing too hard about the install. Here are some pics. Off the top of my head, if i have to find 5th gear quick from 4th or any other, its a pain, if you go even slightly too far to the right no go. haha. Ill get used to it. The shifter feels great all hooked up. The fuel lines are hooked up The harness is all in place and ready to be hooked up to the EMS
Here are some pics. sorry for the night pics but its better than nothing, haha
Shifter cables all hooked up and secured
Here you can see the coil on plug harness separated from the rest of the harness.
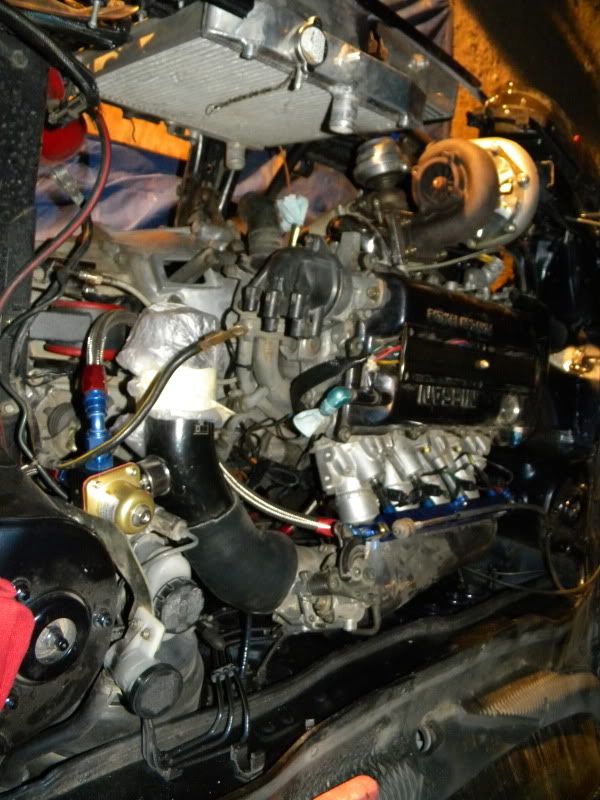
Tomorrow im gonna install the electric water pump back in, make a bracket for the top of the radiator that looks nicer than my last bracket, have the downpipe cut off and rewelded to rotate it a bit and move it downward a tad more, get the bov welded onto a piece of straight pipe thats going to go from the driver bottom corner of the bay to the OEM black pipe you see in the pics. Finish the rest of the intercooler pipes which is just one other one after that and then swap the outer joint of the driver side axle onto the spec v one i received today and install the hubs and stuff and get the car back on the ground on all 4 ready for an ECU.
Put my nice tucked harness on and secured it to the motor. Only wires you will be able to see are the injector clips and the TPS wire. I took some advice from many people and redid the harness a bit separating my 540V primaries and signal wires for the COP's from the rest of the harness so no interferance will take place at all between the shielded signal wires. The COP harness tucked right up under the intake manifold on top of the coolant pipes and the rest of the harness about 10" lower. Came out really nice and should keep the engine bay very very clean looking.
Here are some pics:
smaller tob for the twin disk
harness all in place
Nobody will see anything back here
More to come later today. Motor is going into the car for the final time and will be waiting on the EMS.
Got the motor and trans in, everything bolted up great without issues. Instead of hoping to find a Spec V trans side mount I used the Altima one i got and just trimmed it up and drilled new holes about 1 1/4" lower than the original holes. This is where it sat when the crossmember and passenger side mount were bolted up. Installation went great.
Only one hitch along the way. The speed sensor. If you are not careful and dont look down into the trans to see where the speedo drive gear on the diff is you will get this wrong. The speed sensor from a b13 or b14 does not bolt back in the same location. If you try to put it in with the tab lined up with the hole you will forcefully have to get it in and you will damage teeth on the gear of the speed sensor. (I found out the hard way luckily it was not anything to worry about. Im pretty sure with these you will have to cut the tab off and the sensor will rotate clockwise about 1/4 turn or about 90 to 110 deg for the gear to be on the diff properly. The speed sensor if you have it in the right position will go in perfectly easy with no forcing at all. You will have to use a bolt with a larger washer to hold the speed sensor in place. The washer is to catch on the side of the sensor applying downward force.
Other than that nothing too hard about the install. Here are some pics. Off the top of my head, if i have to find 5th gear quick from 4th or any other, its a pain, if you go even slightly too far to the right no go. haha. Ill get used to it. The shifter feels great all hooked up. The fuel lines are hooked up The harness is all in place and ready to be hooked up to the EMS
Here are some pics. sorry for the night pics but its better than nothing, haha
Shifter cables all hooked up and secured
Here you can see the coil on plug harness separated from the rest of the harness.
Tomorrow im gonna install the electric water pump back in, make a bracket for the top of the radiator that looks nicer than my last bracket, have the downpipe cut off and rewelded to rotate it a bit and move it downward a tad more, get the bov welded onto a piece of straight pipe thats going to go from the driver bottom corner of the bay to the OEM black pipe you see in the pics. Finish the rest of the intercooler pipes which is just one other one after that and then swap the outer joint of the driver side axle onto the spec v one i received today and install the hubs and stuff and get the car back on the ground on all 4 ready for an ECU.
 01-14-2011, 05:36 AM
#18
Honda-Tech Member
Join Date: Jul 2010
Location: TN
Posts: 43
Likes: 0
Received 0 Likes
on
0 Posts
My dad many many many moons ago put a sr20det avaner motor in one of these cars. I can personally say that they are fast. With a motor that only put down 300hp he could take and sti in an 1/8th a mile. There fun cars and i miss his. Good luck with your build.
01-14-2011, 06:41 PM
#20
Honda-Tech Member
Thread Starter
Join Date: Oct 2005
Location: Ft. Hood, Texas
Posts: 752
Likes: 0
Received 0 Likes
on
0 Posts
The SR20 motor is a great platform again the thing that killed us back in the day was transmissions. We had several low low 10.0-10.3 second b13's and b14s back in 2000-2005 but the cost of replacing trannies and finding them was hard. So now that we got a new trans option that should hold up awesome, you will start seeing a lot more of the fwd sr20's out there again. Especially in the all motor crowd. We are finally starting to get more aftermarket support.
01-21-2011, 02:51 PM
#21
Honda-Tech Member
Join Date: Dec 2006
Location: RI
Posts: 507
Likes: 0
Received 0 Likes
on
0 Posts
My friend in Ut is has built something very similar but using a 99 sentra. He's in the proccess of makeing his a 6sp aswell. He put down 550 whp not sure of the turbo he's using though. Good luck
01-21-2011, 07:48 PM
#22
Honda-Tech Member
Thread Starter
Join Date: Oct 2005
Location: Ft. Hood, Texas
Posts: 752
Likes: 0
Received 0 Likes
on
0 Posts
Would that be Coheed, well at least that is his user name on SR20-forum. Cant recall his real name. But yeah we have talked a lot about this 6 speed swap and both of us have come posted a ton of useful info on the swap and benifits. His 99 SE-L is very nice. I believe he was using a 30r and is switching to a gtx turbo.
01-30-2011, 02:32 PM
#23
Honda-Tech Member
Thread Starter
Join Date: Oct 2005
Location: Ft. Hood, Texas
Posts: 752
Likes: 0
Received 0 Likes
on
0 Posts
Well its running pretty good, just spent 3 hours tuning it. Its running way better. The car absolutely pulls rediculous all the way to 8700 rpm rev limiter. I mainly messed with the fuel maps today. I will focus on the timing map and then back to the fuel map as a final cleanup. but im impressed. At 15psi its running close to like it did at 20psi before and its not anywhere near completely tuned.
Here are some vids and pics:
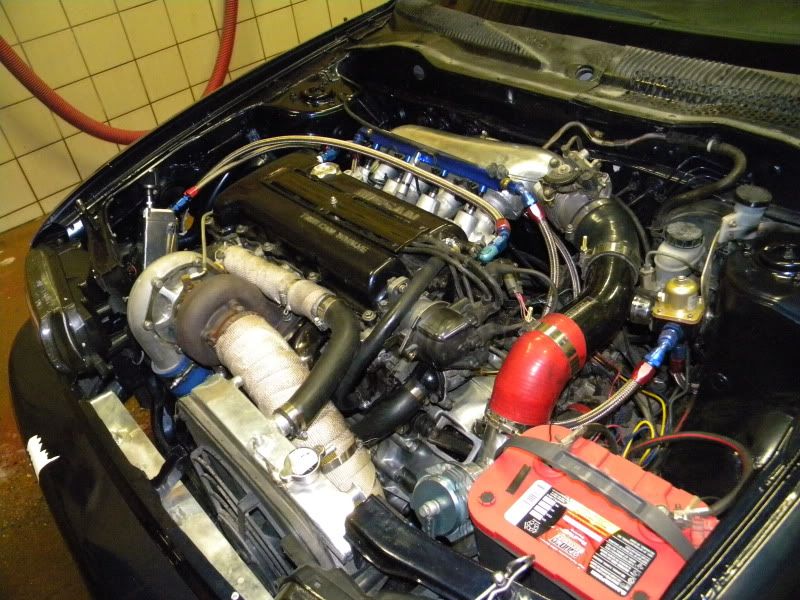
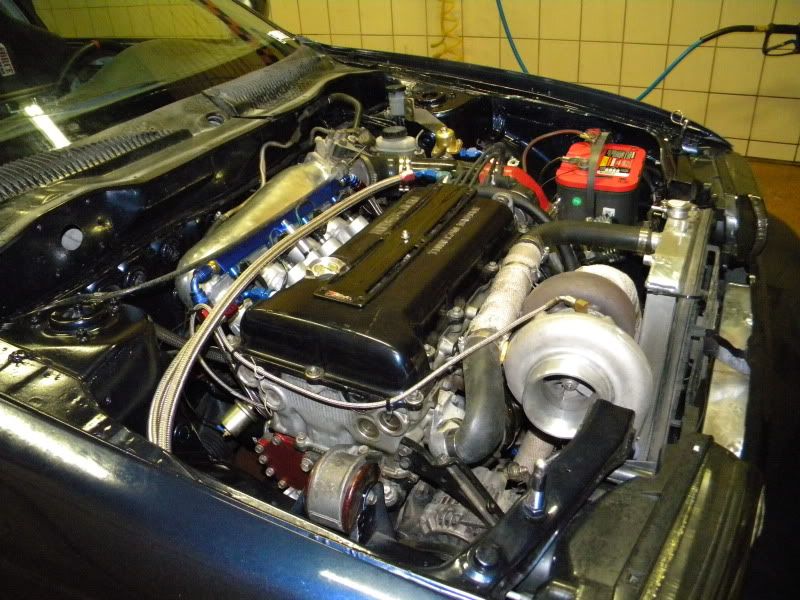
YouTube - Turbo 6 speed Sentra SE-R 2-4 8500 rpms T67 H.O. 15psi
YouTube - T67 H.O. Turbo sentra se-r idling and 5800 rpms 2-step launch control
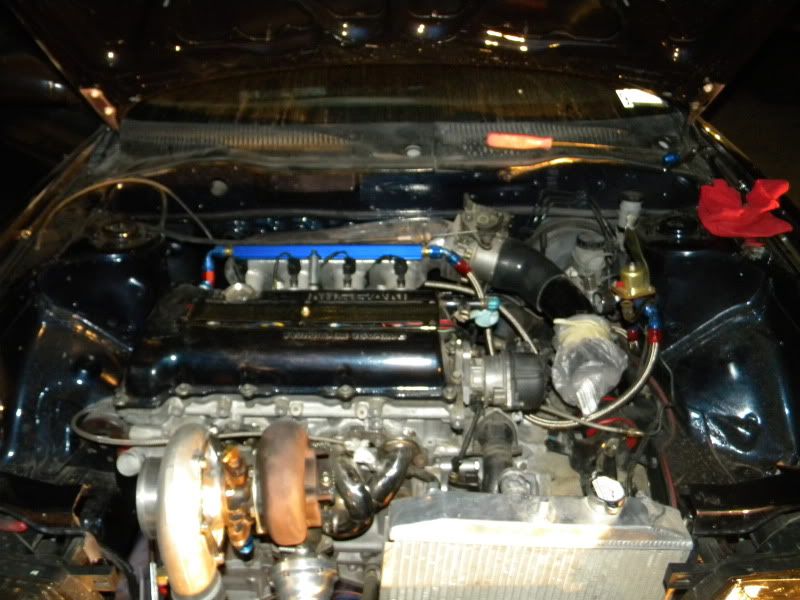
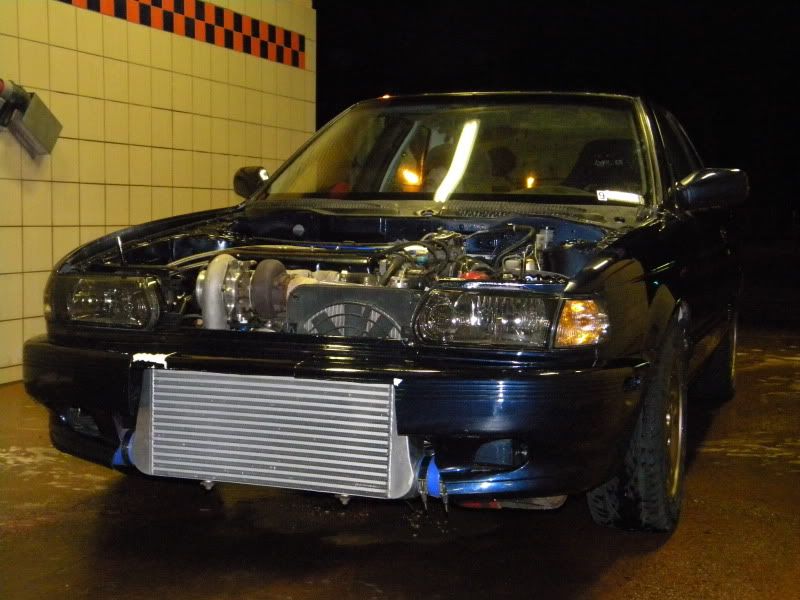
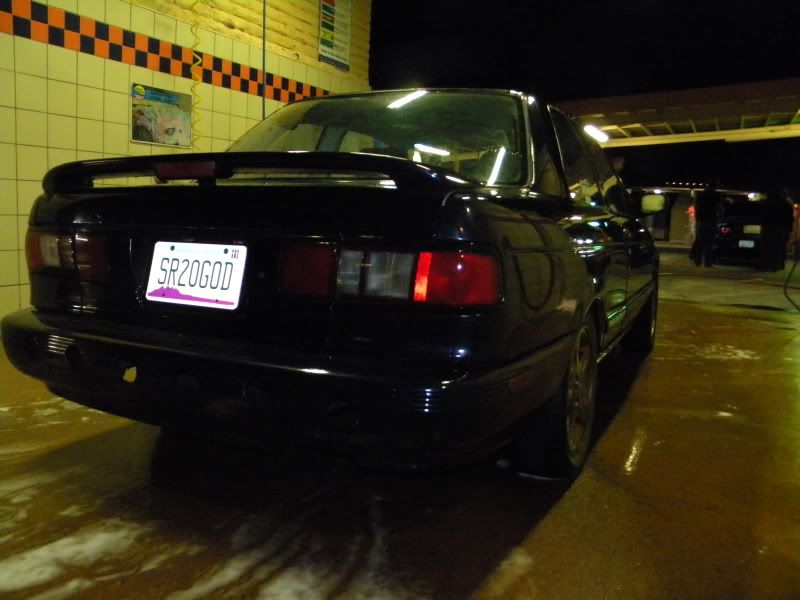
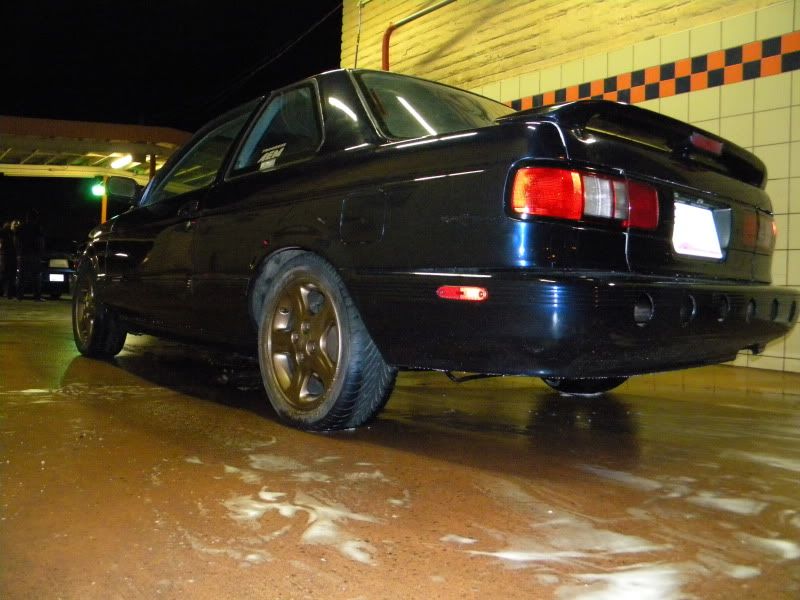
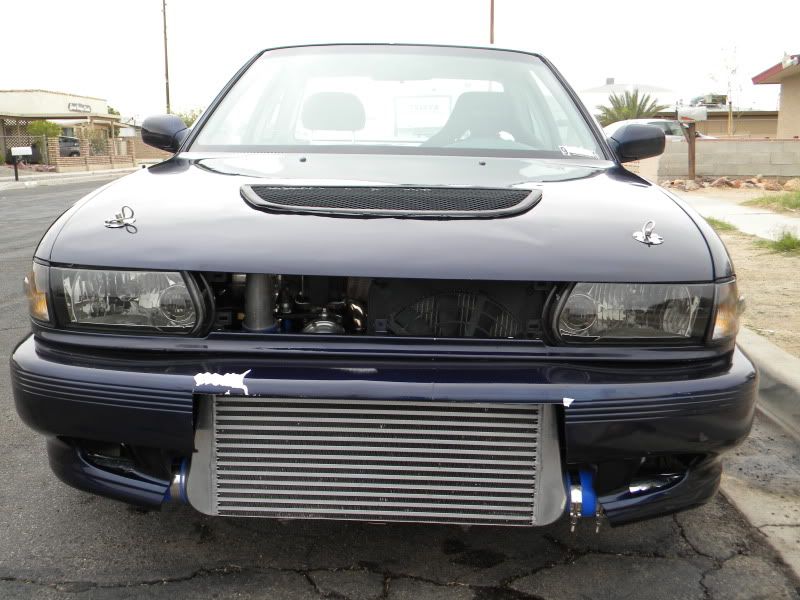
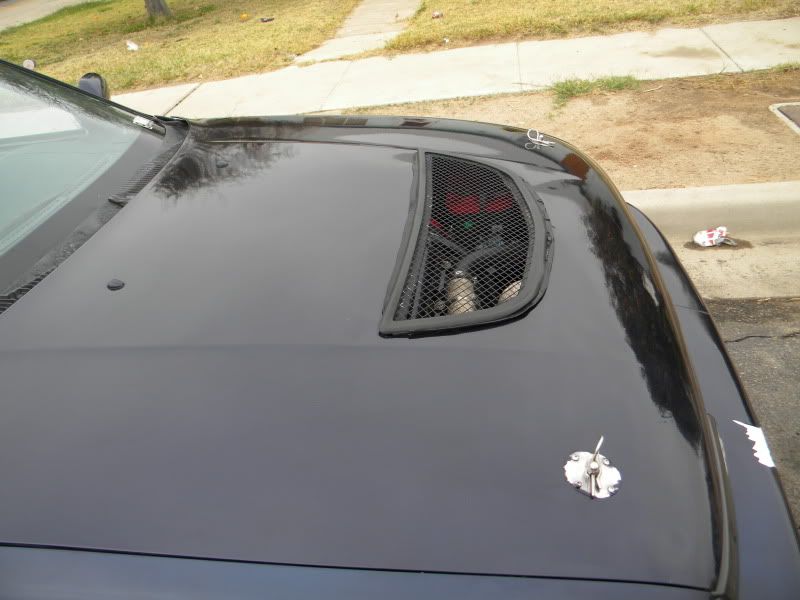
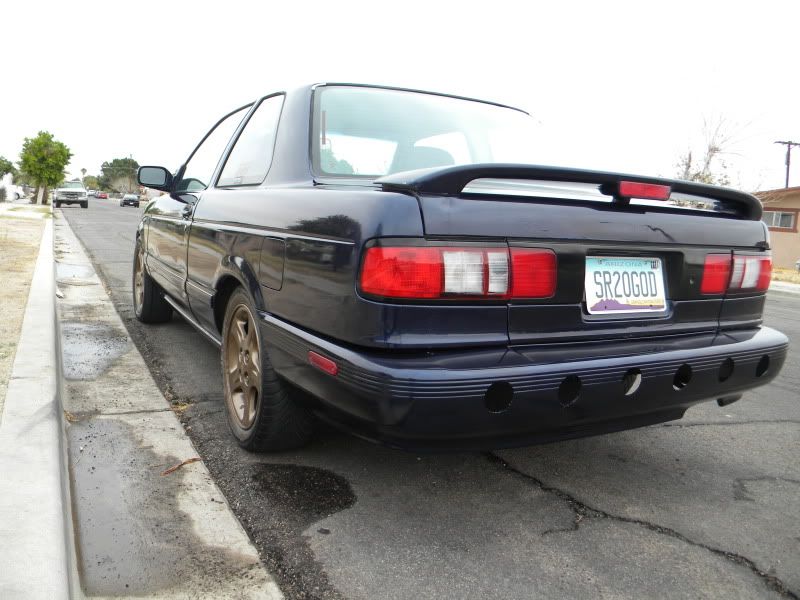
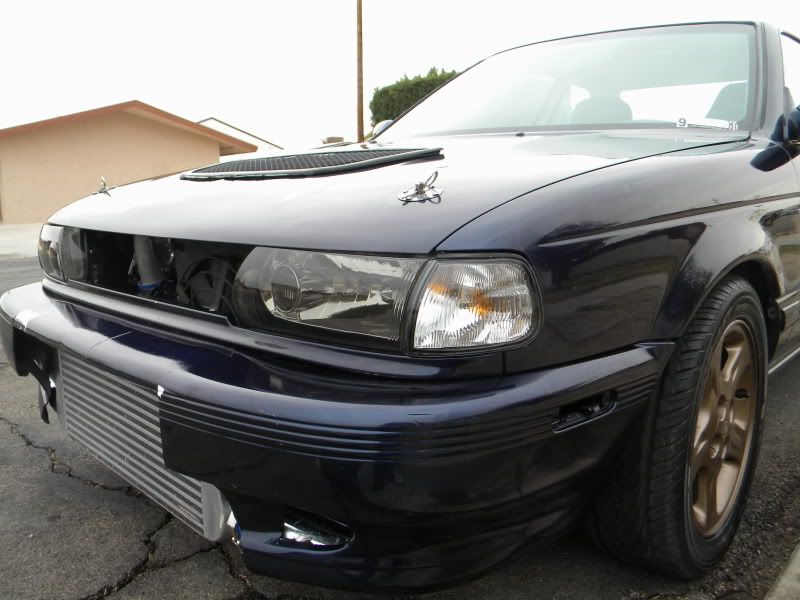
Here is some pics all cleaned up and waxed, hood on, evo 8 hood vent mounted.
Here are some vids and pics:
YouTube - Turbo 6 speed Sentra SE-R 2-4 8500 rpms T67 H.O. 15psi
YouTube - T67 H.O. Turbo sentra se-r idling and 5800 rpms 2-step launch control
Here is some pics all cleaned up and waxed, hood on, evo 8 hood vent mounted.
01-31-2011, 06:45 AM
#24
Honda-Tech Member
Join Date: Sep 2003
Posts: 1,109
Likes: 0
Received 0 Likes
on
0 Posts
Everything looks thrown together imo
Why not flip the turbo, and mount the rad on the passenger side and not have to worry about cooking the rad hose?
Why not flip the turbo, and mount the rad on the passenger side and not have to worry about cooking the rad hose?
01-31-2011, 07:27 AM
#25
Honda-Tech Member
Join Date: Nov 2010
Location: chucktown, sc
Posts: 50
Likes: 0
Received 0 Likes
on
0 Posts
I do agree with placement of that radiator hose but other than that for what you are doing with it its pretty damn good! its nice to see an older sentra with some *****. I am very surprised with that tranny being able to hold up on a good amount of power. I work for a nissan dealership here in charleston and they usually come in blown up from these navy nuke student tools that drive the **** out of them and couldn't shift their way out of wet paper bag.