
DIY LED Interior Lighting Pt1
 01-29-2008, 10:47 AM
#1
Honda-Tech Member
Thread Starter
Join Date: Nov 2007
Location: Jersey
Posts: 2,740
Likes: 0
Received 0 Likes
on
0 Posts
My first DIY write-up. Enjoy!
Here are the items/tools you will need to complete this project;
Purchase at any auto parts store-
- Two LED pods (Purchased mine at Advanced Auto {$12 ea}, they have 6 LEDs in each pod.)
- Two LED strips (Also purchased at Advanced Auto{$10 ea}, they have 3 LEDs in each strip.)
- Two 2-way switches ($1.50 ea)
These are all tools and items I have in my toolbox-
- 20 ft black 18 ga. wire
- 15 ft red 18 ga. wire
- 1 ft yellow 18 ga. wire
- Wire cutters/strippers
- 6 female 18 ga. wire terminals
- Electrical tape or heat shrink (I prefer heat shrink)
- Mini-torch or lighter (for heat shrink)
- Drill and drill bits
- Zip ties
- T10 Torx key
- Philips screwdriver
- Flathead screwdriver
- Nutdriver with 5/16" socket
- 14mm wrench
- 10mm wrench
- Coffee can
- 3M velcro strips
- Radio code for your stereo
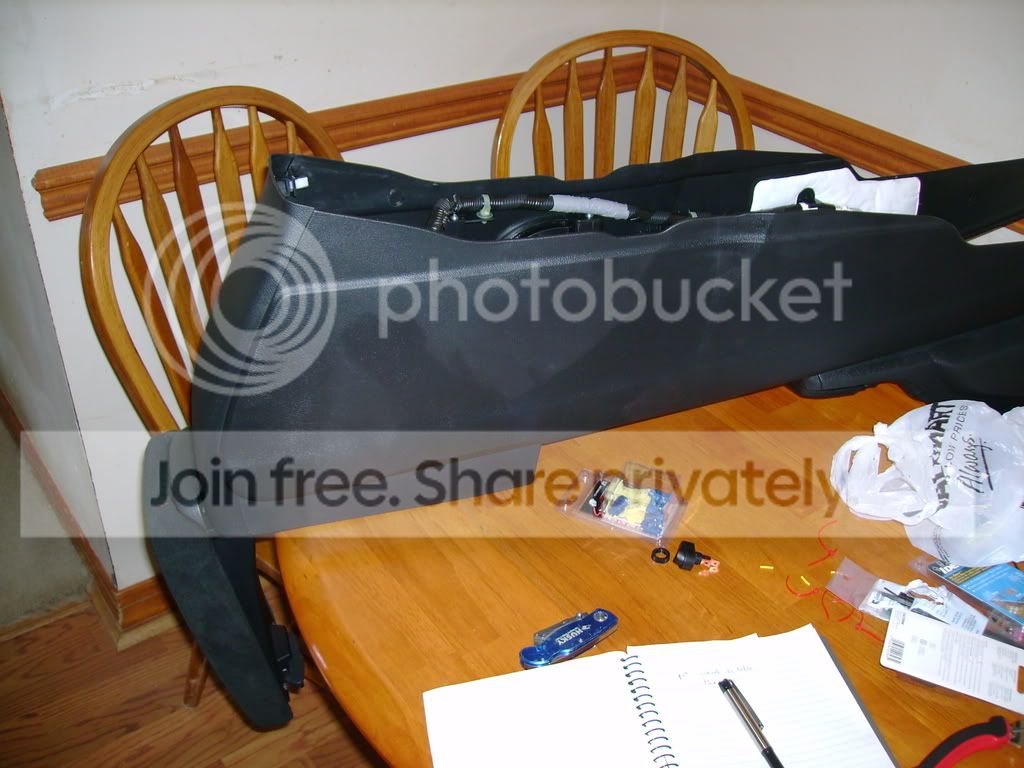
Begin by clearing a large, clean, and flat workspace. I used my kitchen table, because it was 20� outside when I did this. I left all of the tools in my work area until I needed them, because my car gets crowded very quickly. Grab the socket driver (with socket), torx key, flatblade screwdriver, 14 mm wrench and coffee can. Head out to your car.
Pop the hood. Unhook the positive (red) terminal front your battery with the 10mm wrench. Go back in your car and make sure your car is in gear. Open your center console box.
Take out the piece of carpet at the bottom.
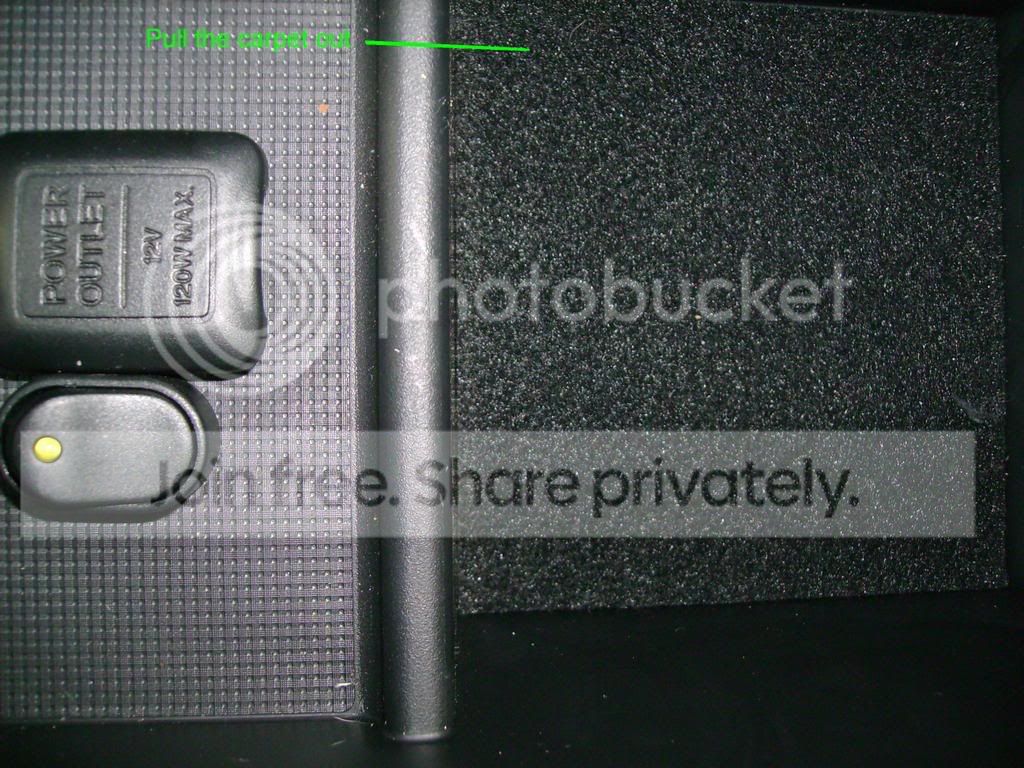
Remove the two 5/16" bolts that you will see. You can use a Phillips screwdriver, but I felt more comfortable using the nutdriver.
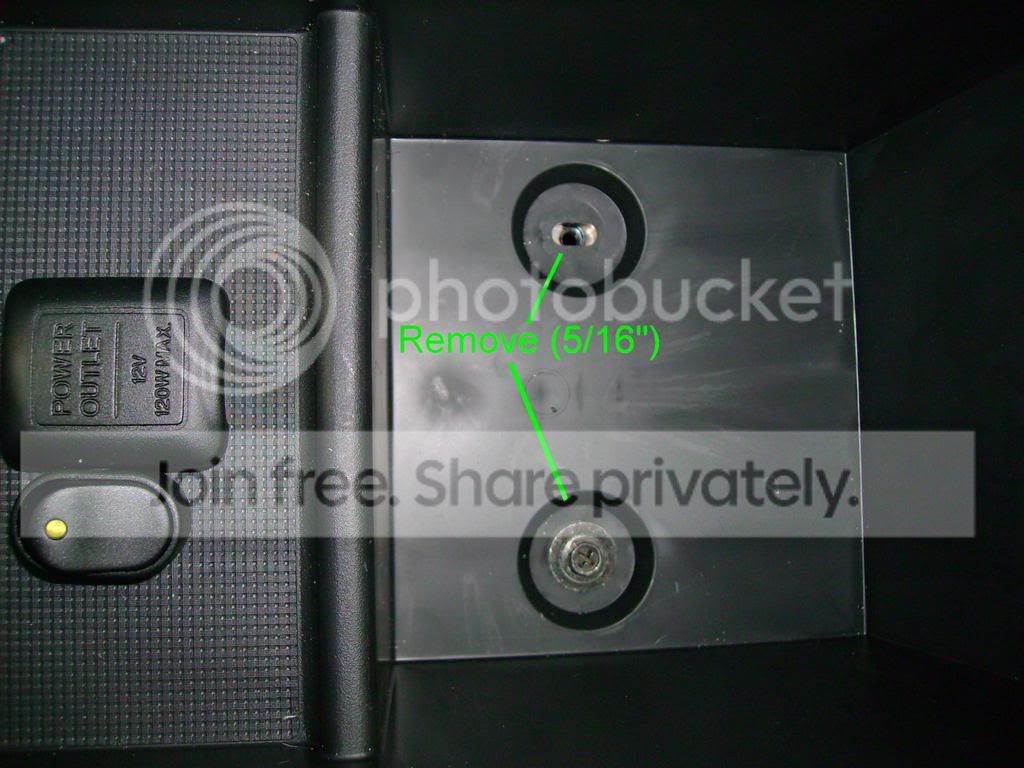
I use the coffee can to store all the nuts and bolts I remove, so that I don�t misplace them. You can put them anywhere you want, but its just a safety precaution I take.
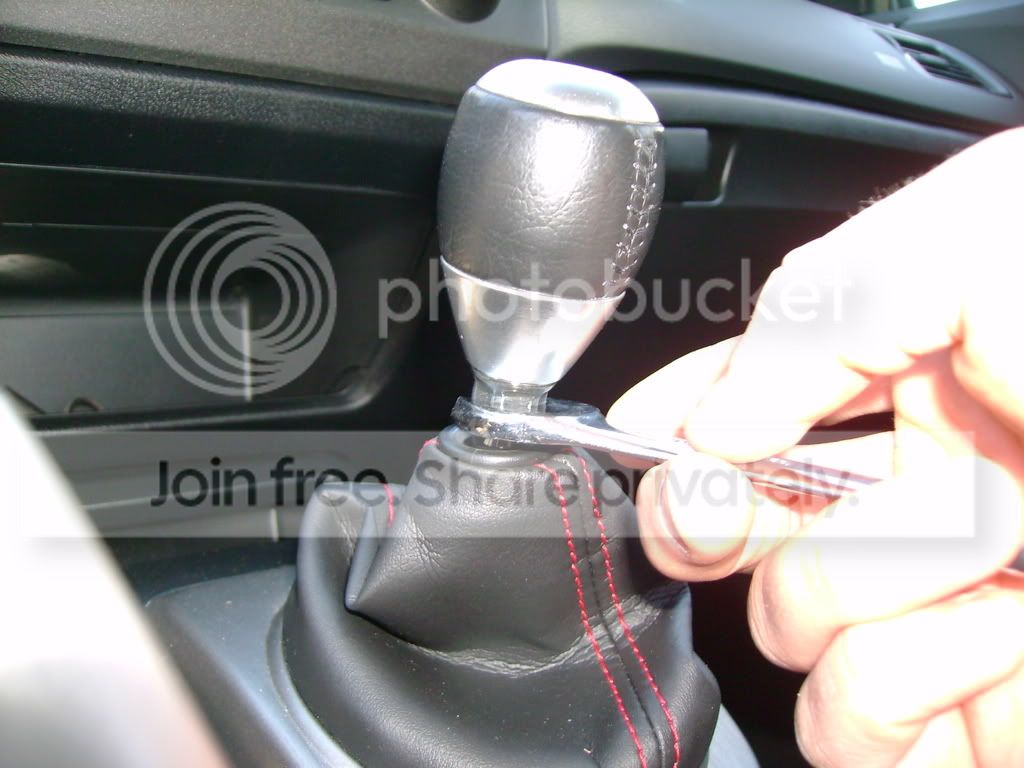
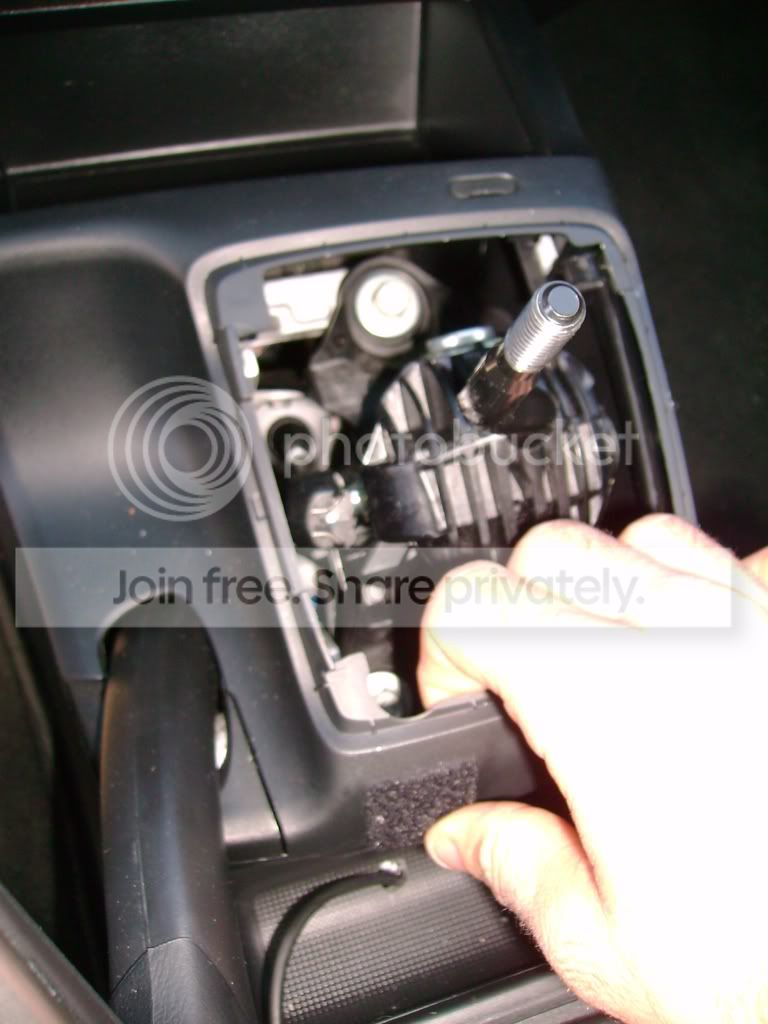
Use the 14mm wrench to loosen the nut for the shifter ****. Turn it clockwise until it is loose. Once it is loose, just spin the **** then the nut off and put them in the coffee can.
Next, put your fingers inside the shift boot and pull up. The brushed aluminum-look piece surrounding the shift boot should pop out. If it doesn�t come up you can put the flatblade underneath it to pop it up. Be very careful and do not pry hard, as you could deform the plastic. Place the shift boot in a safe area.
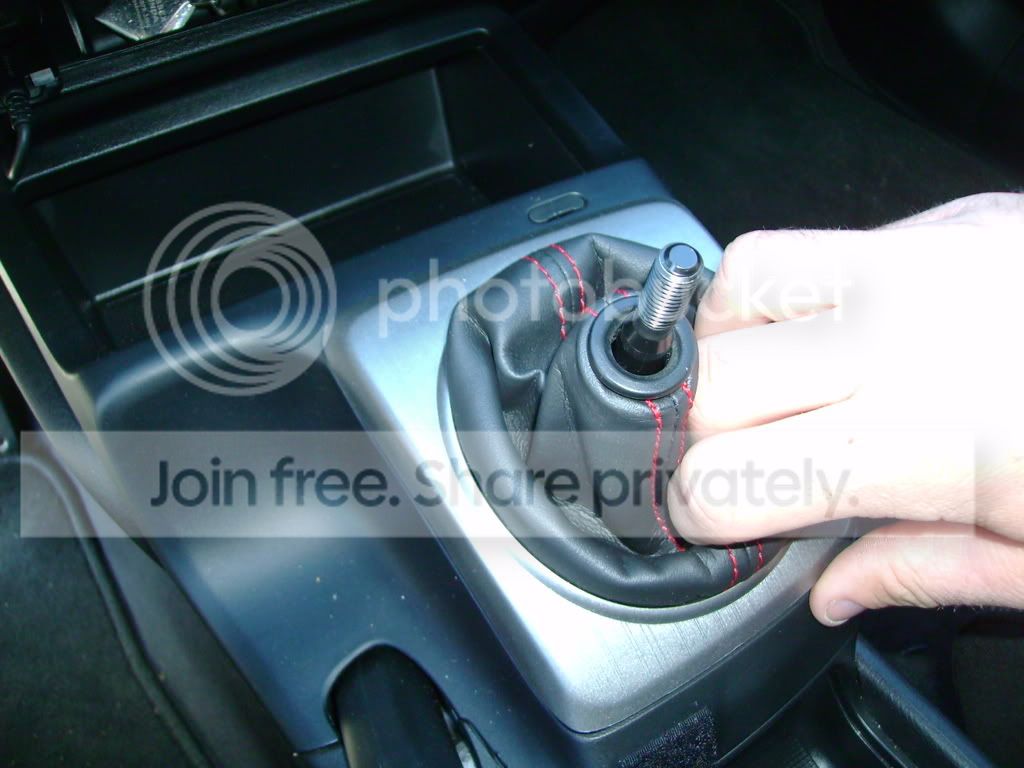
Reach in where the shift boot was and pull up and back. The entire thing should pop out.
If it doesn't you can VERY GENTLY pry where the tabs are located.
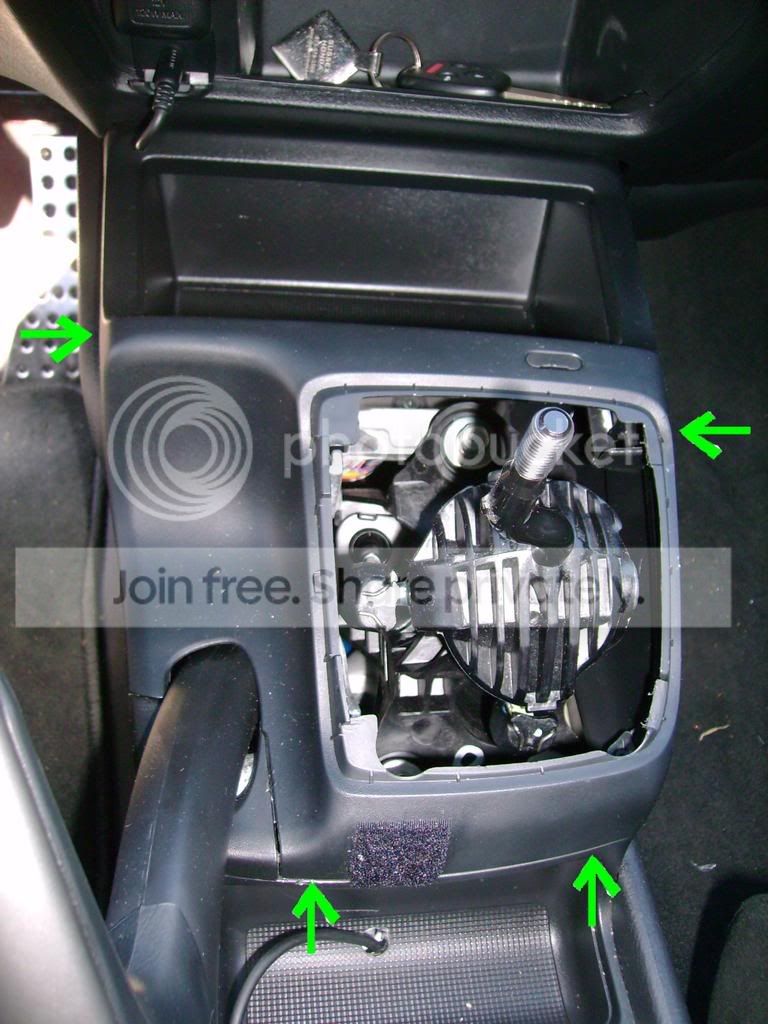
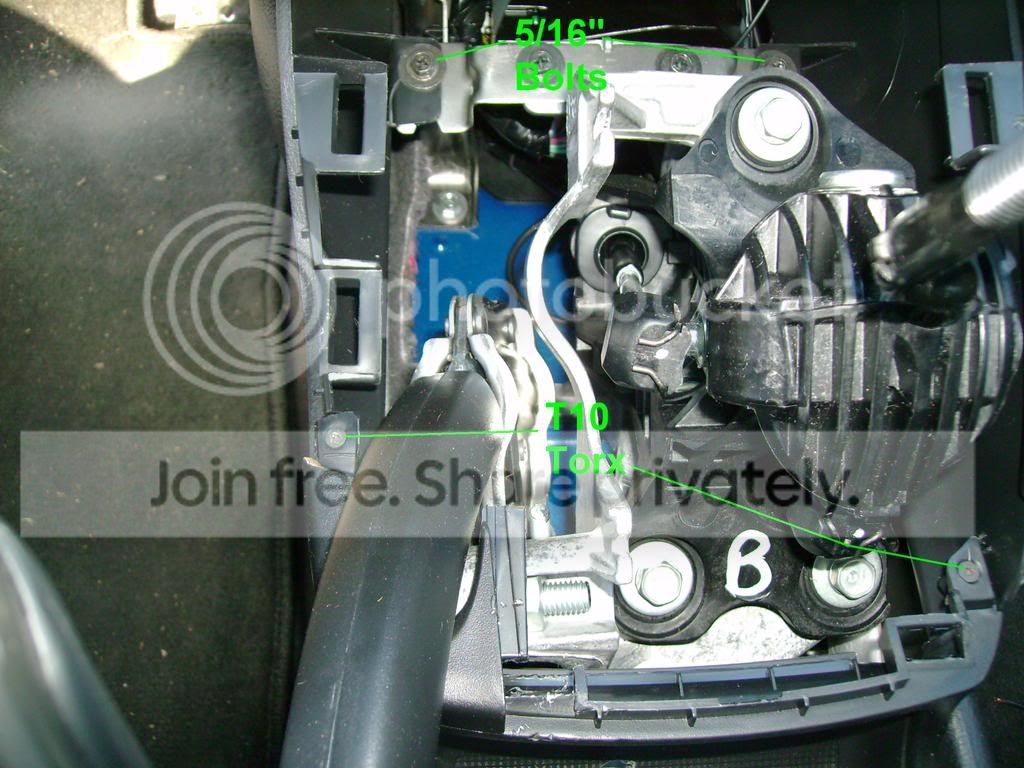
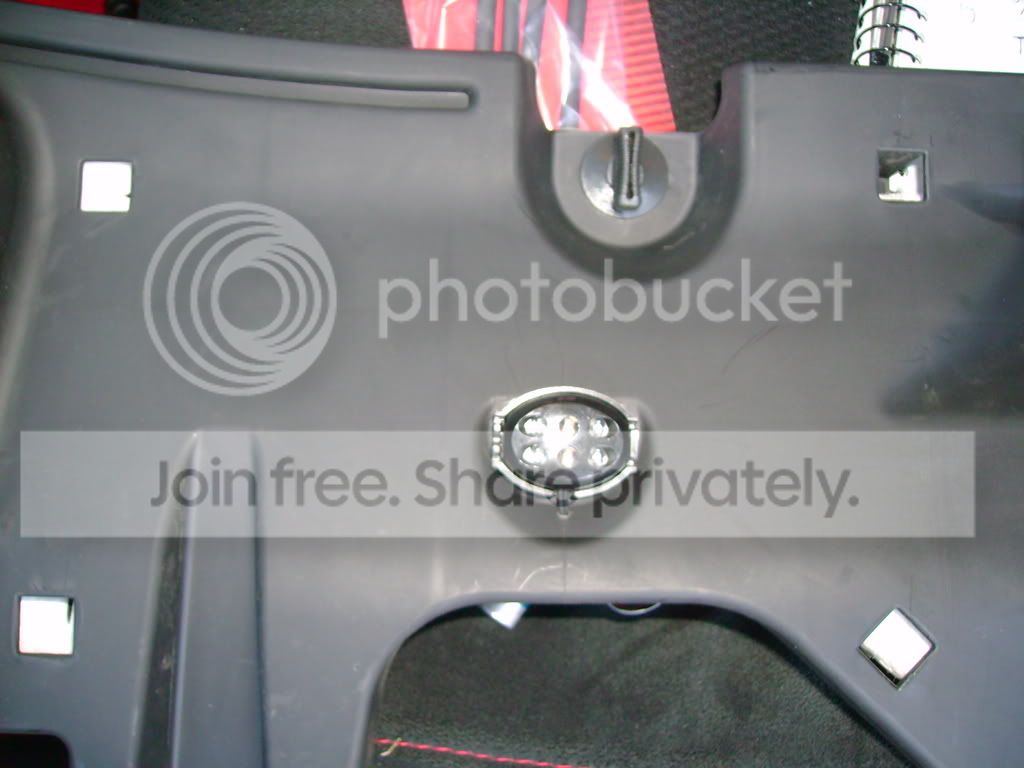
With the piece out of the way, you should be able to see two more 5/16" bolts and two T10 Torx screws. Remove them. *my aux cable went back, so I had to remove the console...the T10 torx do not need to be removed*
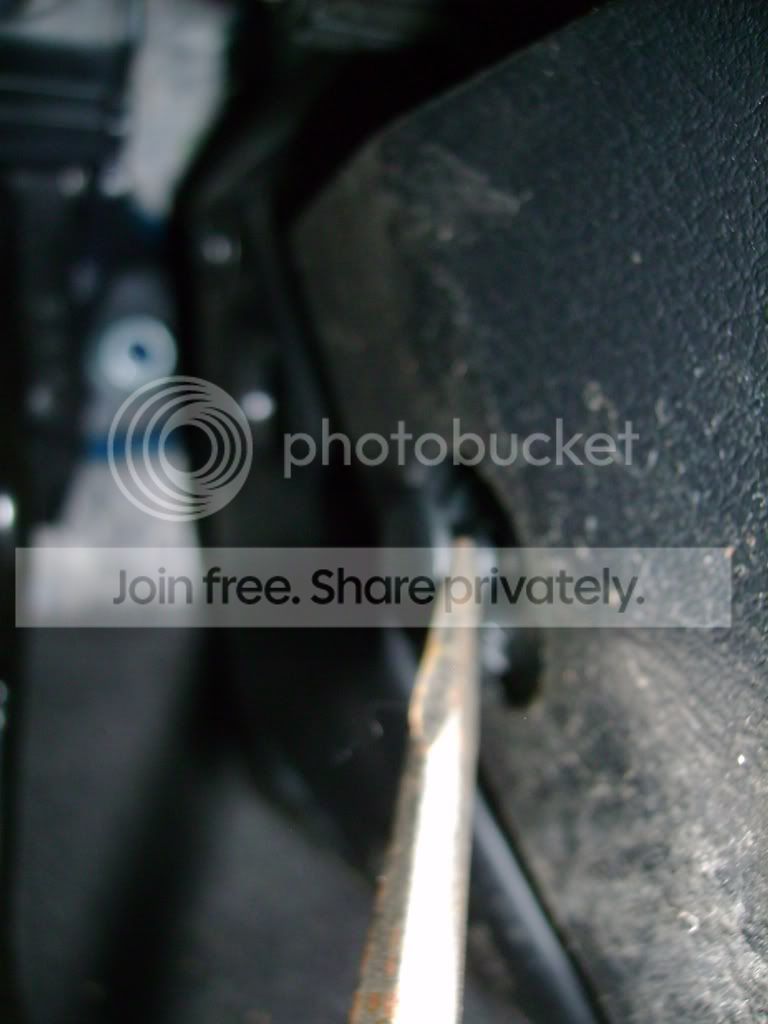
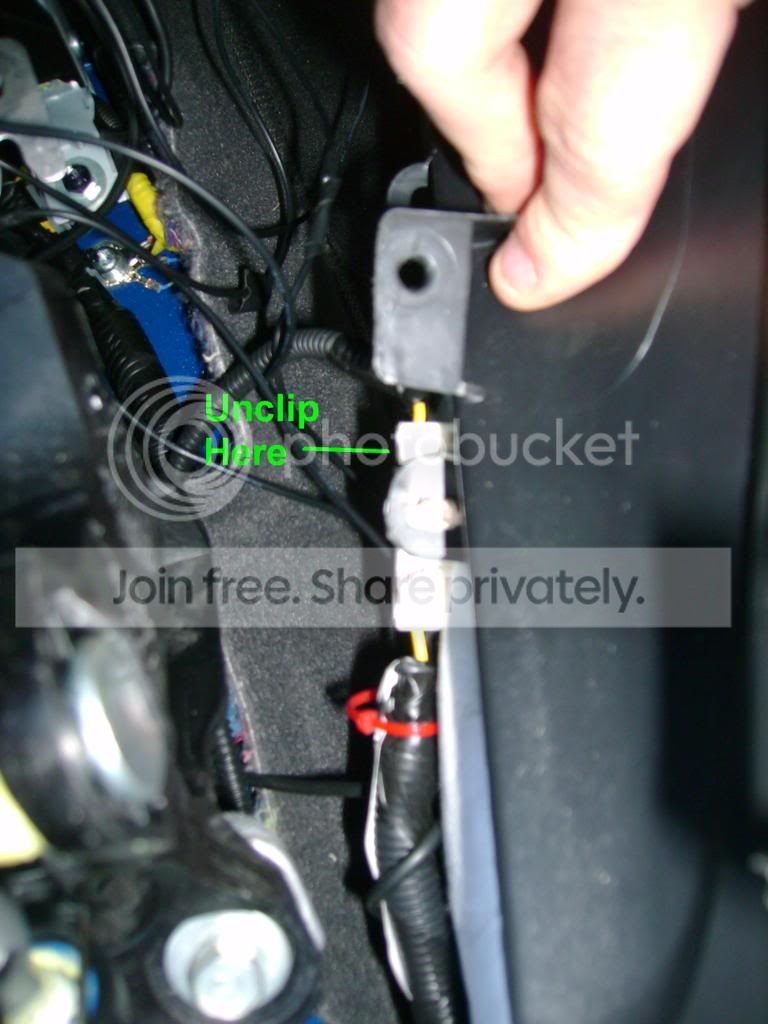
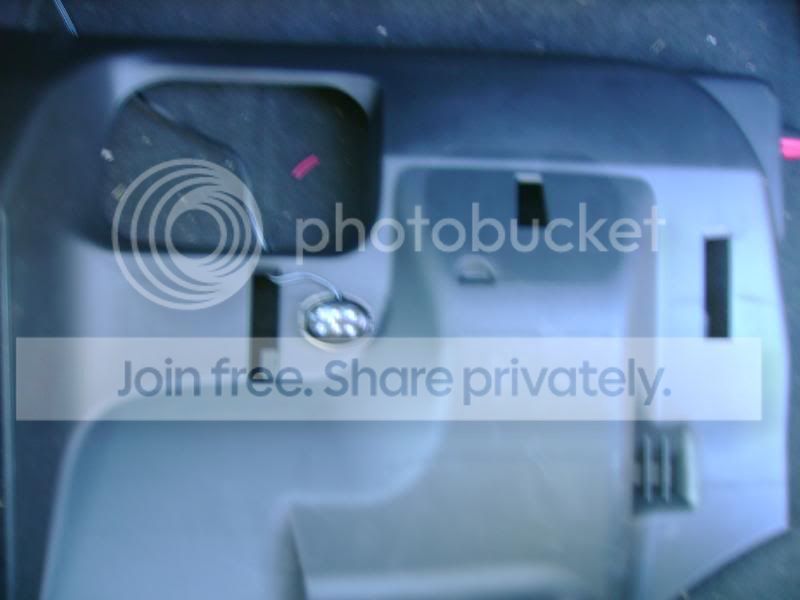
Look down at the console near the pedals and you should see this clip.
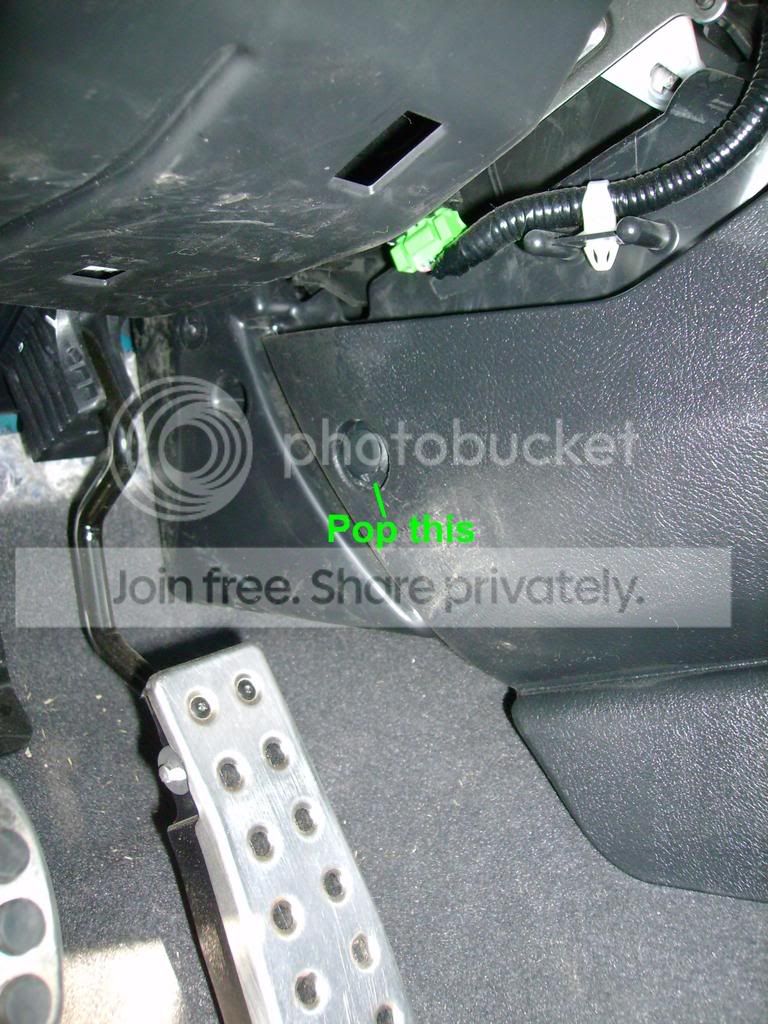
Pop out the center with a flatblade screwdriver and then pull the whole clip out.
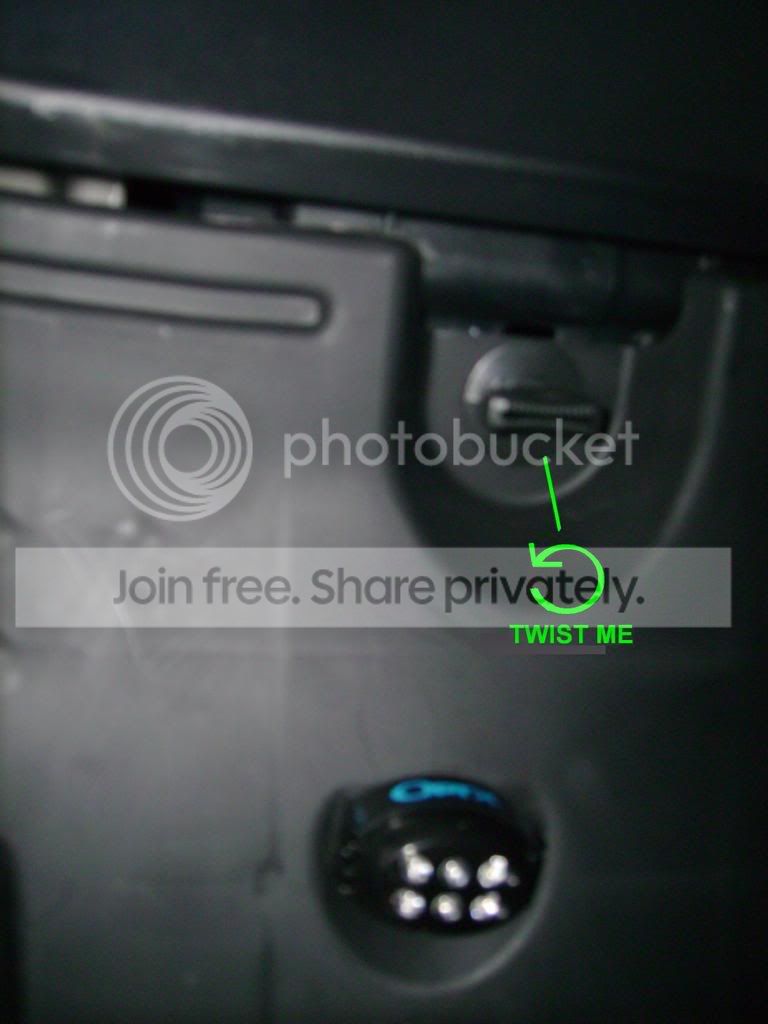
While you're down there, pull the cover above the pedals off, by turning the screw, and then pulling down and out on the panel. Put it somewhere out of the way.
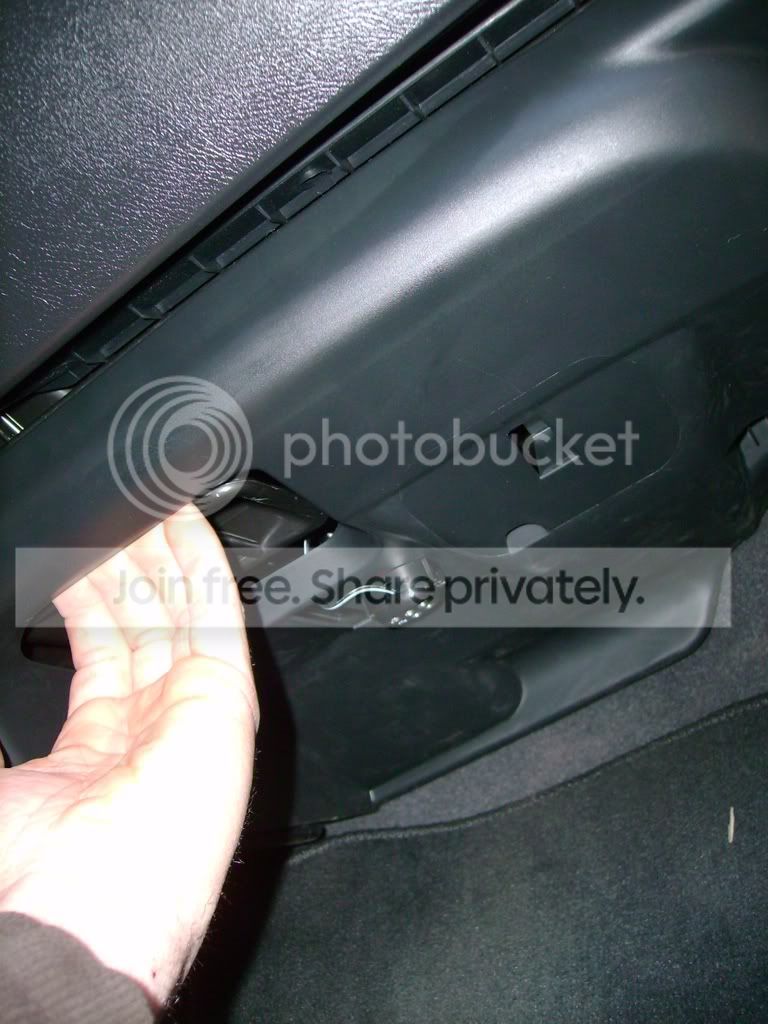
On the passenger side, pull down on the cover that is right under the glovebox.
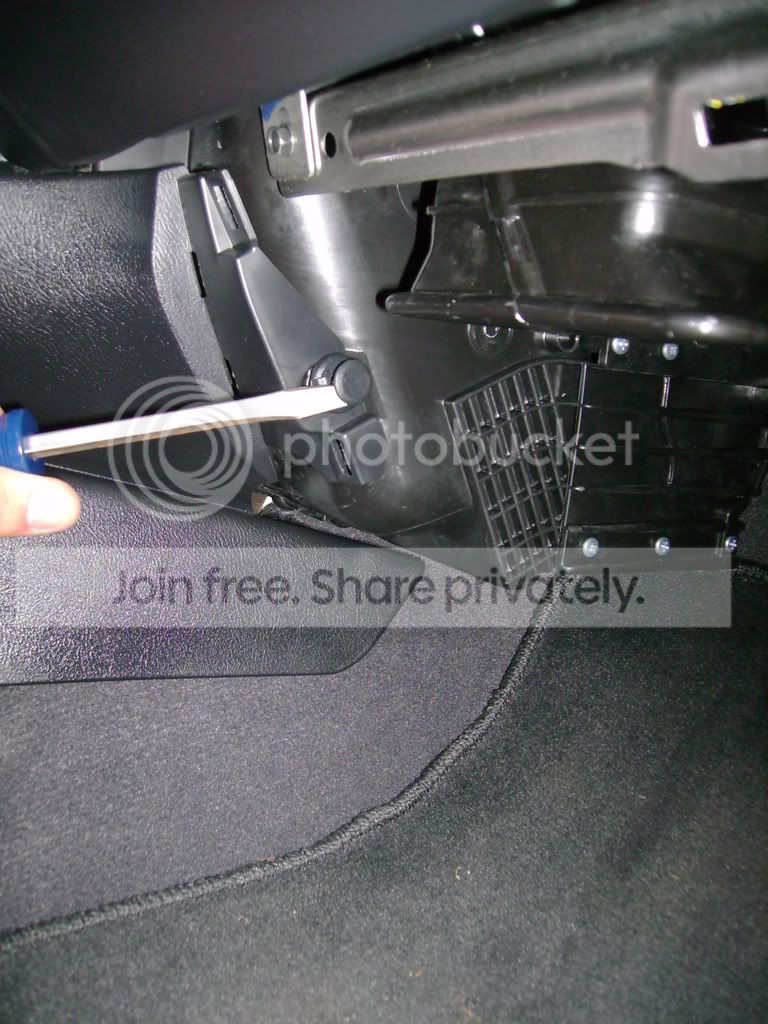
With it out of the way, pop the clip holding the console.
Very carefully, pull the entire center console toward the back of the car, lifting upward at the same time. Pull it back above 6 inches and unplug the cigarette lighter wires.
It is a tight fit. I had to move the seats back and forth, and release/set the parking brake a couple times, but it is worth taking your times, so that you don�t scratch anything. Make sure your car is in gear and on flat ground, if you release the parking brake. Once you have the console out of your car, take it in to your work area. All of the tools you used, can stay near the car, as they won't be needed again, until reassembly.
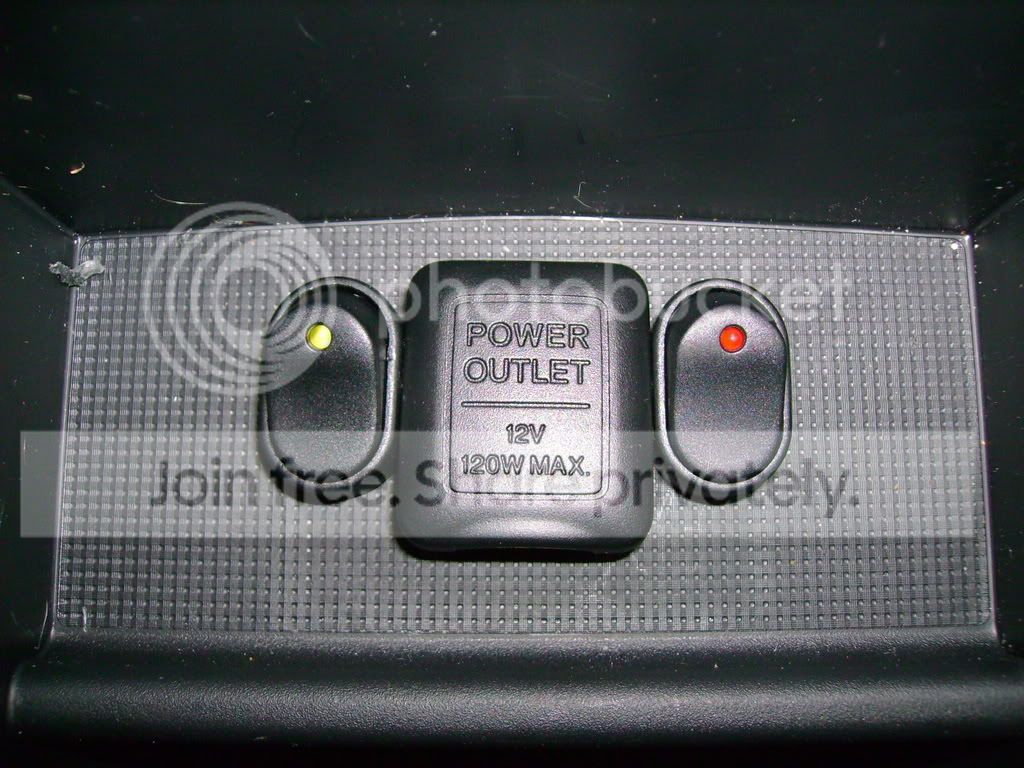
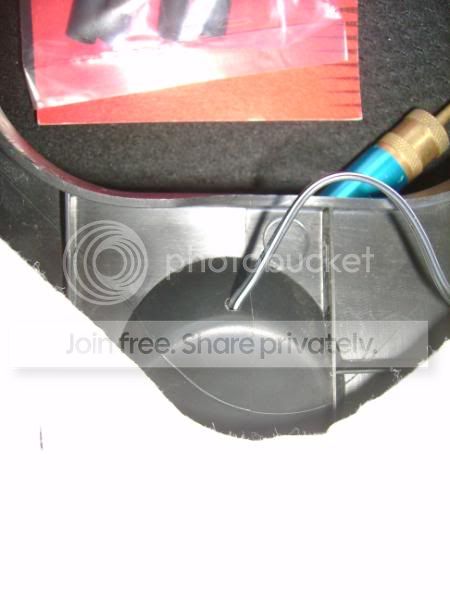
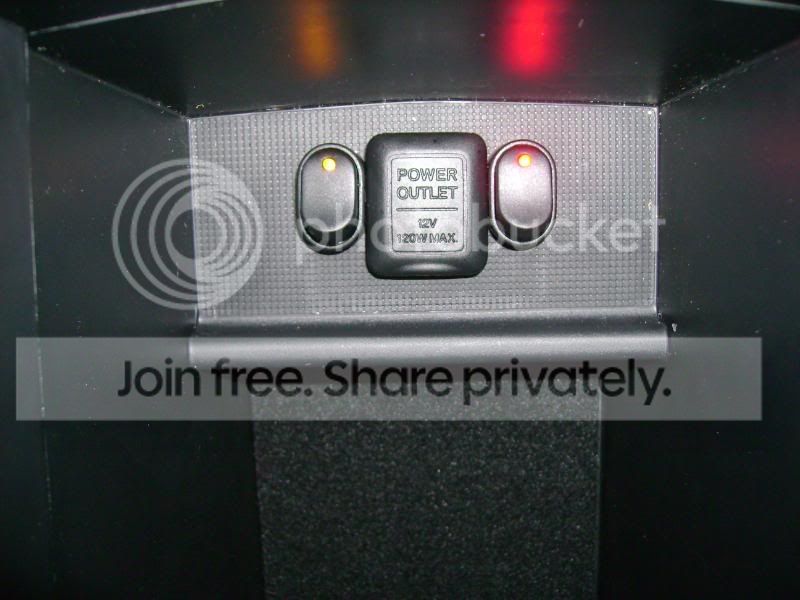
Place the console on your work area. Decide where you are going to put your switch. I liked mine in its location because it is close to the 12v source and it looks clean there. If you put yours in the same place as mine, make sure you put it enough to the left of the 12v plug, so that you can open its cover and close it without interference.
Look at both the top and bottom of the area you are going to put the switch, to determine that there is plastic, wire, etc. that will get in the way of the drill. The box that your switch came in should tell what size drill bit you will need, in order to flush mount the switch. Mine was a ��. Grab your drill and make your hole, drilling from the top of the console, so that the shavings, and burrs will not be on top. Slide your switch into the hole to see if it fits. If it is tight, or doesn�t fit, go up the next size, until it goes in tightly, and all of the way.
Flip the console over onto its top. I did this and left the box open so it would sit flat.
The box for the switch should have a diagram on it, telling which post is which (ground, load, power). Keep it handy so you know where to put the terminals.
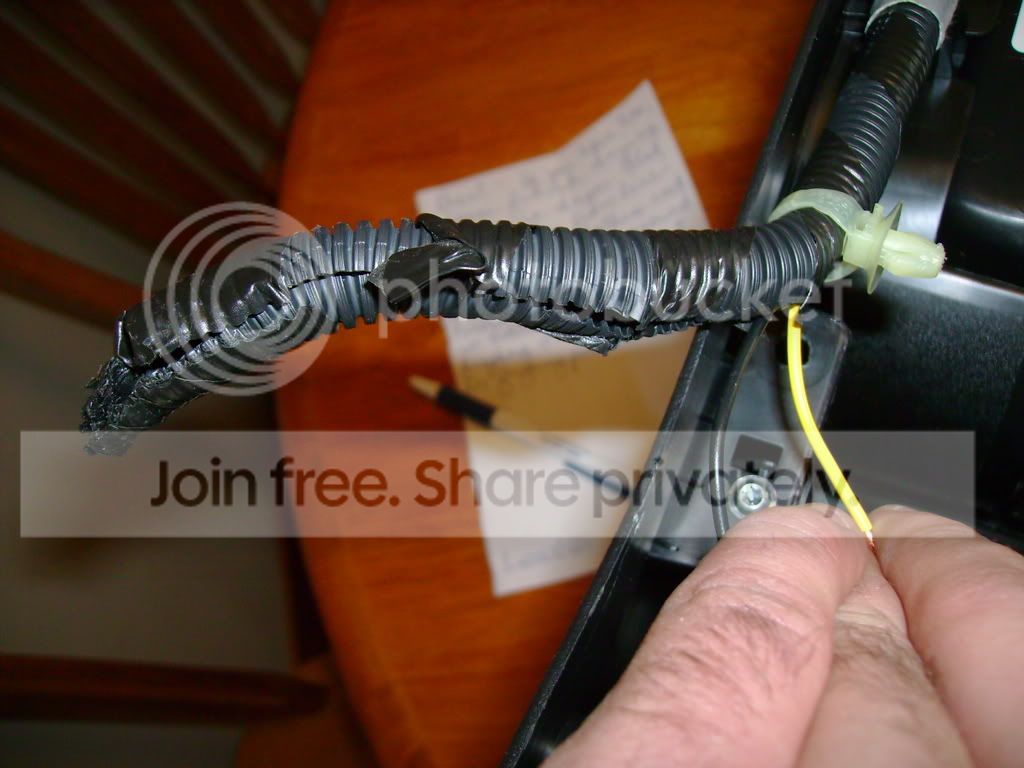
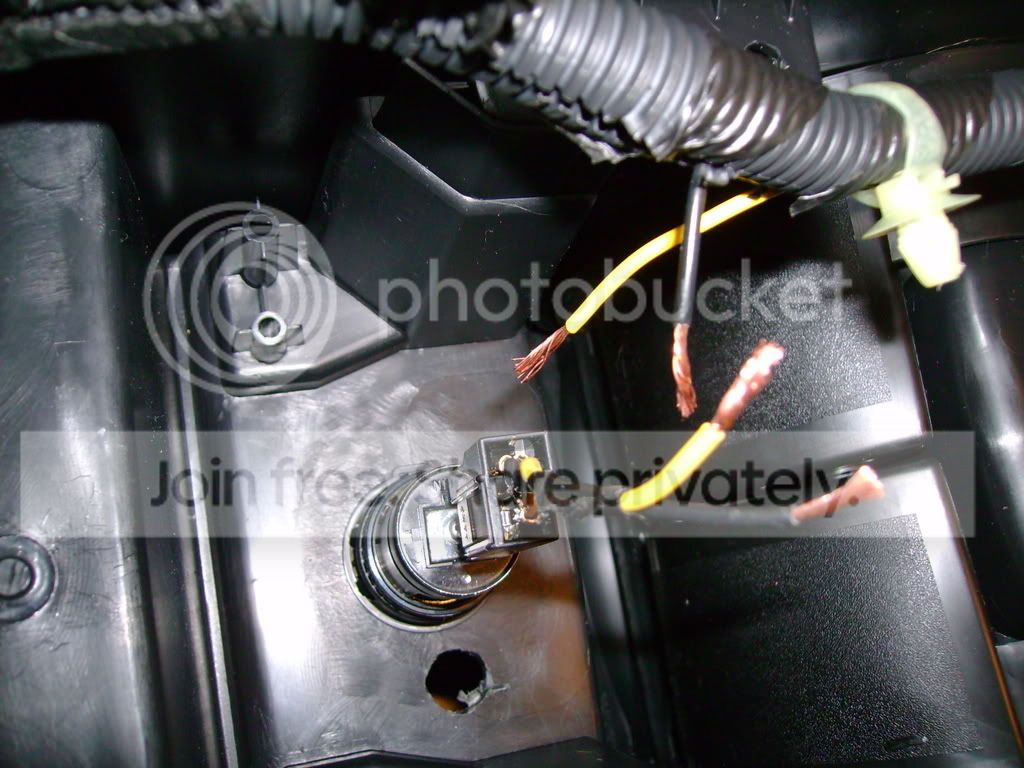
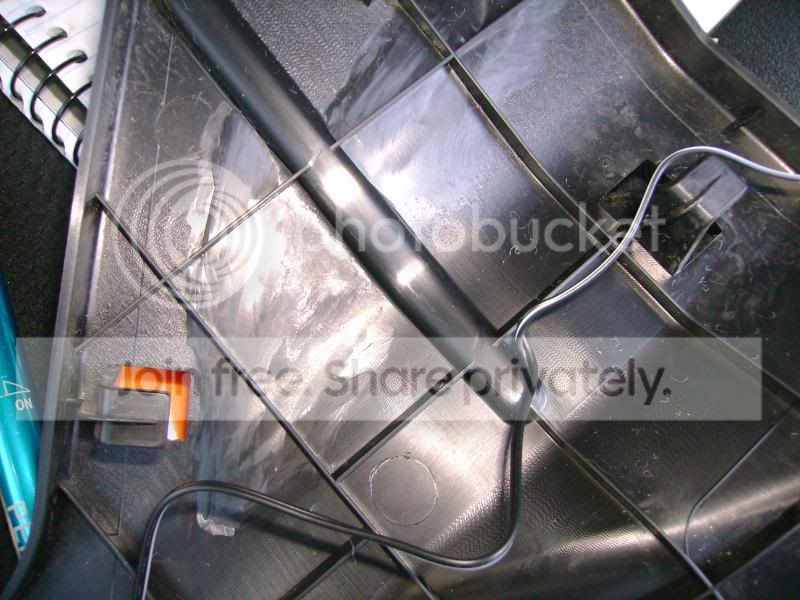
Cut the electrical tape and peel back the wire loom for the cigarette lighter, then cut and strip the wires like so...
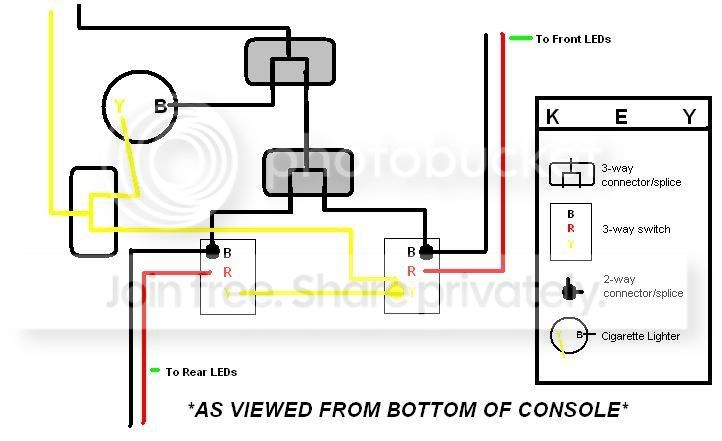
Here is a diagram of the wiring for my dual-switch setup. It looks a little intimating but it's not that bad.
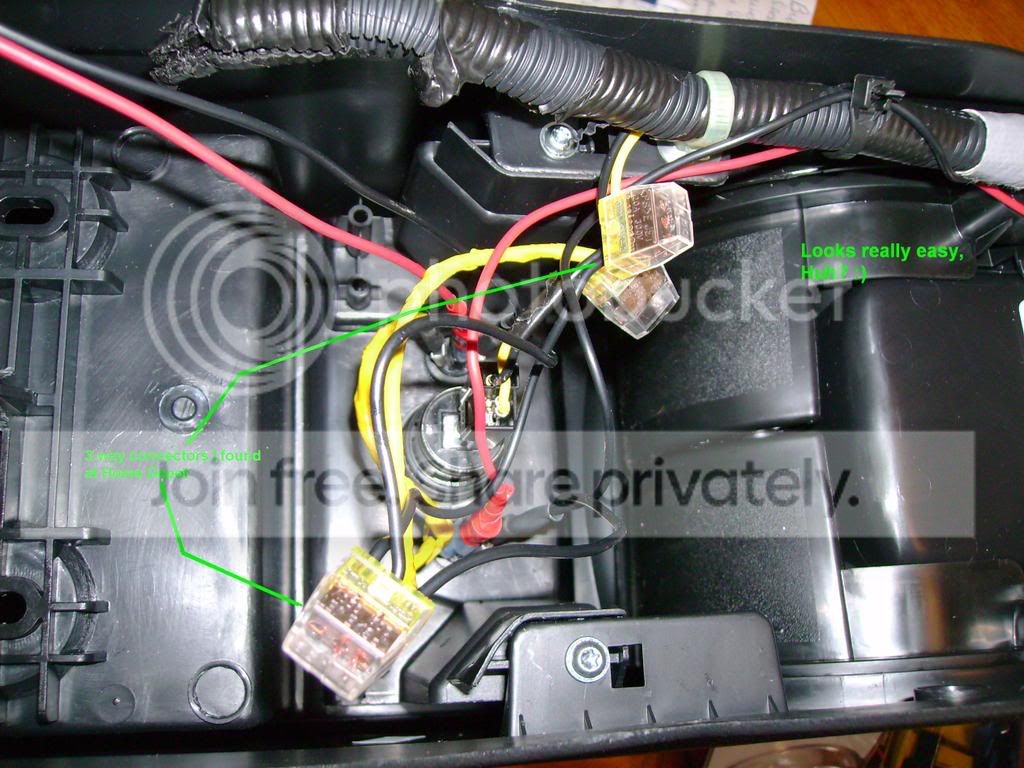
Here is what the wiring should look like.
Make sure you run enough wire up the console, so that you can connect to your LEDs wires in the front. Also, leave enough wire for the rear LEDs. I was unsure where I was going to mount my rear LEDs at this particular point so I made them extra long.
Zip-tie all of your wires up out of the way and head outside.
Now is a good time to ArmorAll the plastic that is normally hard to get.

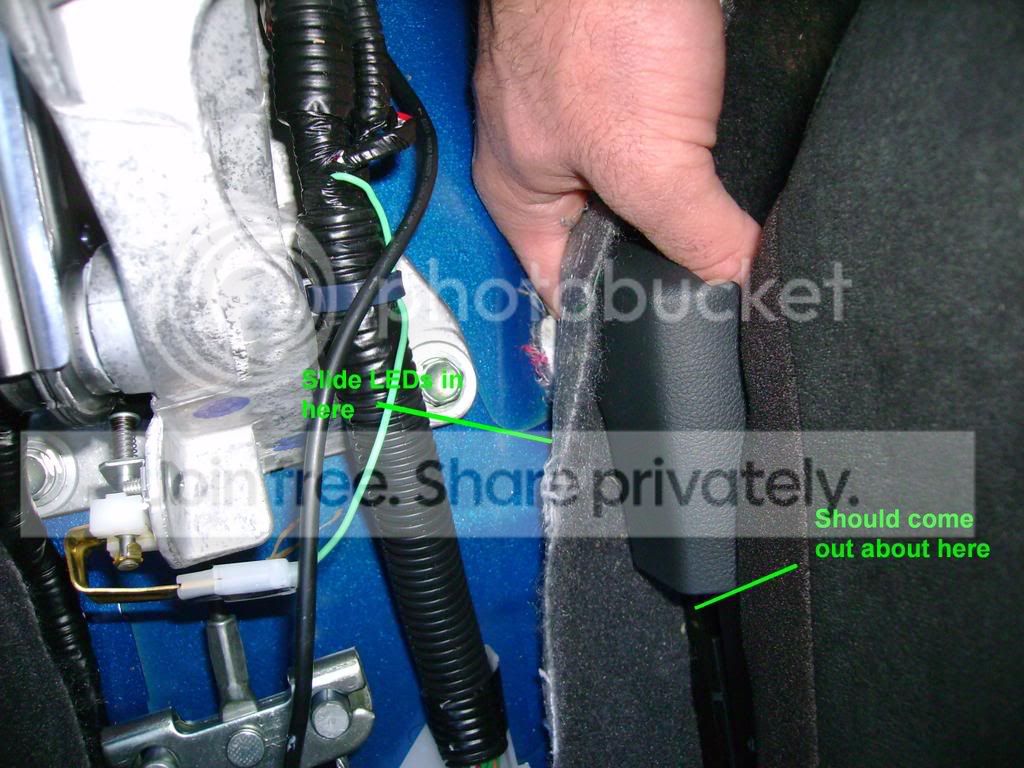
First, run the LEDs to your desired location. Here is a perfect spot to run the rear ones under each seat, and they'll never be seen or in the way. Run them under the carpet from where the console was, and you should be able to find a spot where you can bring it back on top of the carpet. Its by the seat slider brackets, and it takes some patience, but you can get it.
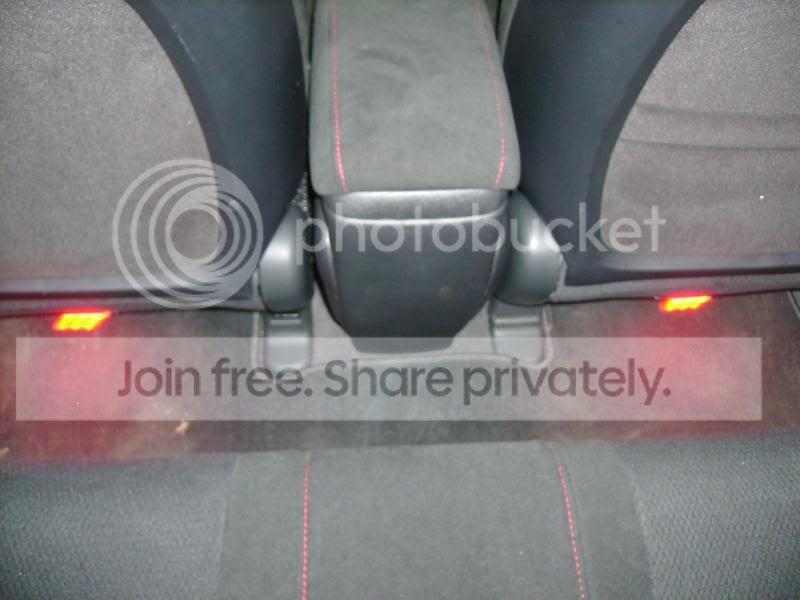
I chose to put my LEDs on the bottom rear of each front seat, so that they would light up the floor area, just like in the front. At first, I tried sticking them to the plastic trim, but the double stick tape that came on the LEDs did not stick to the rounded surface well at all. So I got an idea. I ran in my house and got the velcro strip that I had left over from mounting my Ipod.
Cut a strip the same size as the LED strip and just use the stiff part. Velcro is a hook and loop system. You want to be using the hook part.

Adhere the velcro to the strip and press the two together firmly. Then just place LED strip wherever you prefer. I started with it right up against the plastic peice I first attempted to stick it to. But when I came out to my car, to take night pictures, that location revealed the LED too much and also would have lit up someone's ankles, rather than the toe-kick area I was going for.
So I moved the strip all of the way to the bottom of the carpet flap at the bottom of the seat. It is a perfect location. It is pretty well out of sight, and it lights up the area perfectly.
Carefully, start to put the console back in. Slide it about halfway forward. Re-connect the cigarette lighter connector. Leave the console here for a little bit while you hook up the rear LEDs.
Connect the rear LEDs together. You may need to extend each set so they meet in the middle. Then connect them to the wires, coming from the rear switch.
Here is the wiring diagram for the rear LEDs.
*On most LEDs there are two wire; one black, and one black with a white stripe. The black is ground, and therefore, connects to the black (ground) from your switch. The black with white stripe, is your power or load, and connects to the red wire from the switch. *
Make sure all of your connections are secure and have heat shrink/solder/tape (or all three) on them. I don't use solder, because frankly I am not good with it, LOL.
Move to the front LEDs. Find the panel you pulled down from above the pedals, and decide where you would like to put your LED pod. I found a perfect spot right behind the twist clip.
Drill a tiny hole where your wires line up with the plastic. Try to make it only big enough for the wires to go through, no larger.
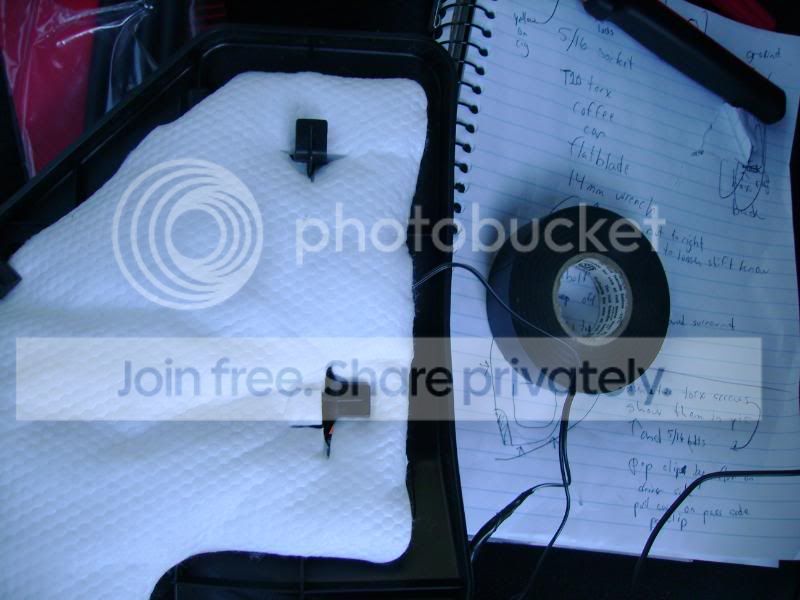
Pull the white foamy padding off of the back of the panel and run the wires in the direction the console would be.
Replace the padding on top of the wires and you can replace the panel. Make sure you have access to the LED wires.
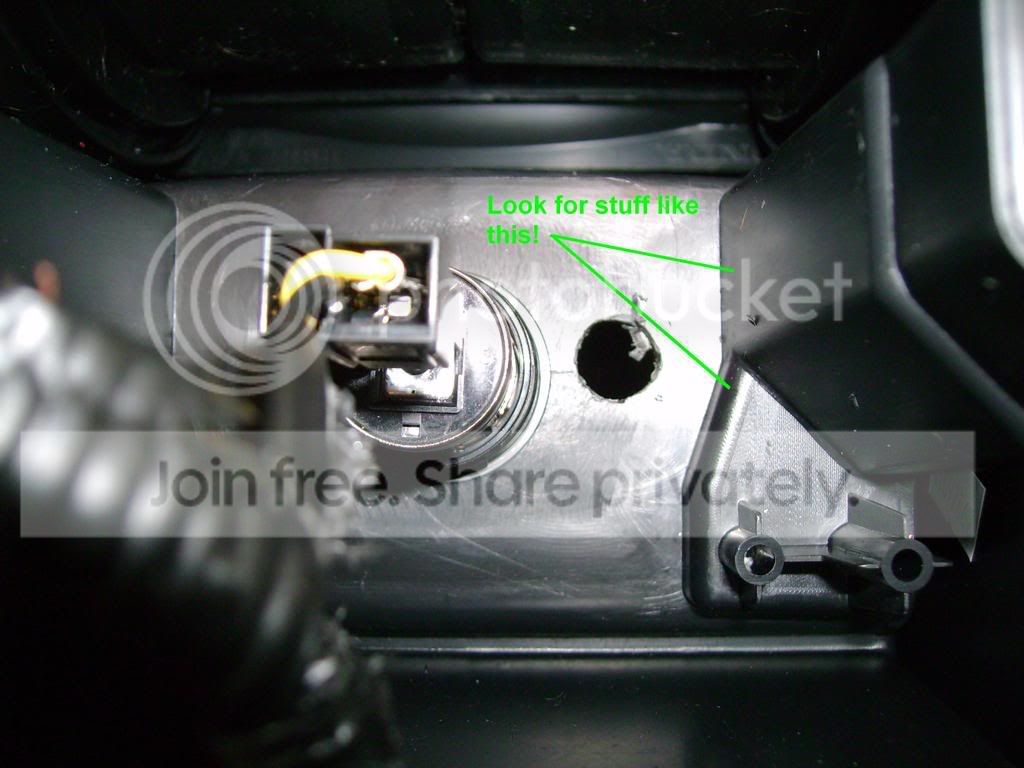
Grab the passenger side panel and decide where you want to put the LED pod. The spot I found centered the light beam in the food area and there was a hole right next to it, so I didn't need to drill anything. Do not replace this panel yet.
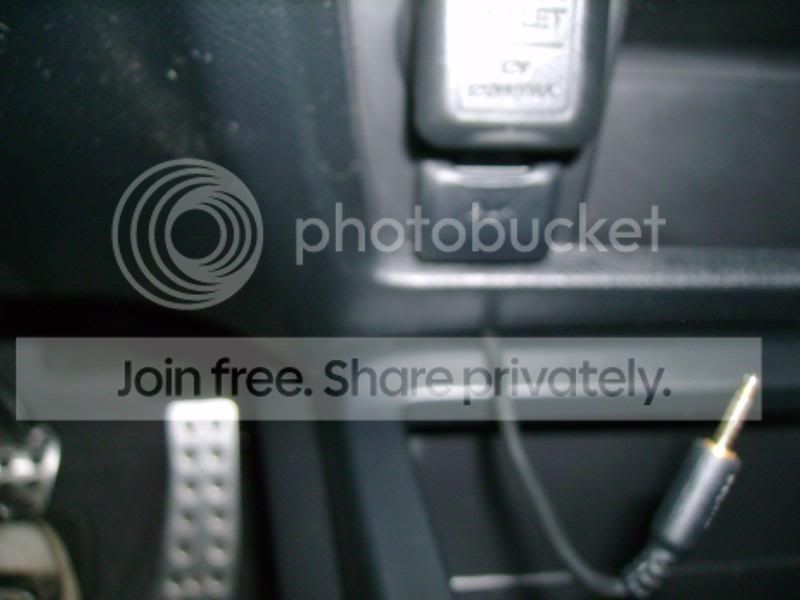
Run the wires from the front LED switch up into the dash. Make sure to keep them tight and zip-tie wherever possible. Cut the wires to a length where they don't hang down, but so that you have enough slack to connect them to the LED wires. Splice them all together, and make sure everything is secure and has heat shrink, etc. Here is a wiring diagram for the front LED pods.
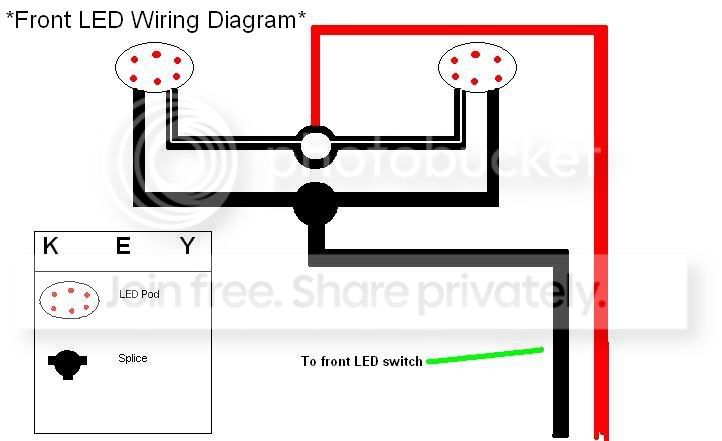
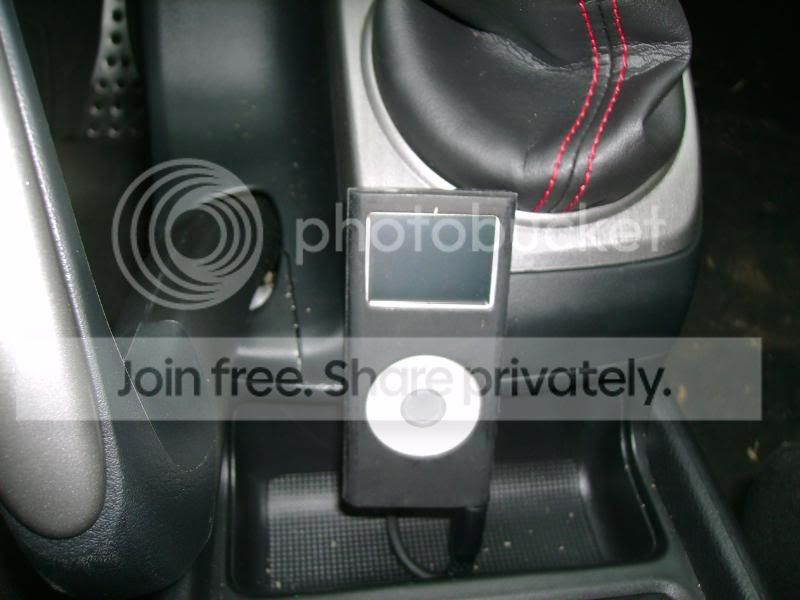
*Now is a good time to hide your aux cable if you haven't already. Run the wire between the dash and console and zip-tie it to the cigarette lighter wires. If you are like me, and have a long cable, then wrap the excess up and zip-tie that out of the way.*
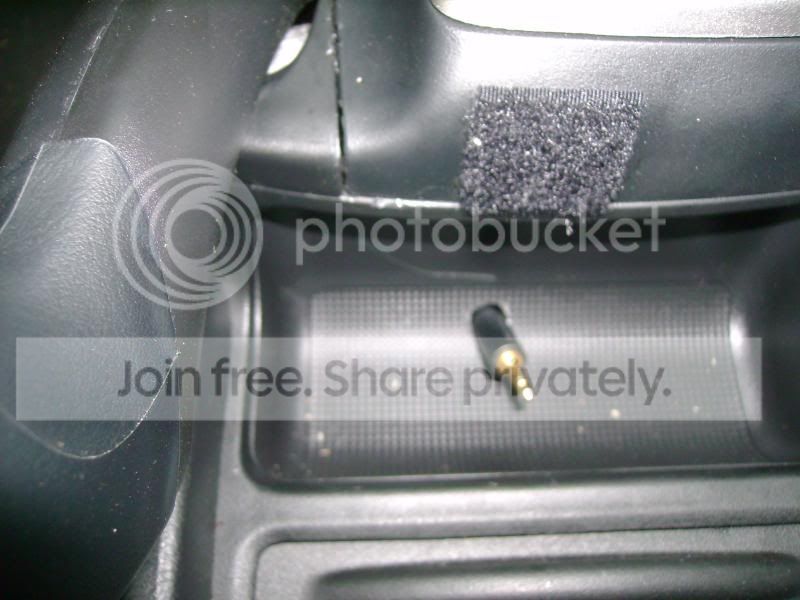
*Drill a hole in the change bin that is just big enough to fit the wire through and there you have it*
Now that everything is hooked up, hook your battery back up and turn the car to accesory. Flick your switches and make sure that both the switches and LEDs work. Also, make sure the switches work indepedently of each other. I.E.- you can turn the back on by itself, or just the front, or both at the same time. If they work, but not indepedently, you have a crossed wire.
Re-assemble everything in the opposite order.
Make sure all wires are up out of the way.
Enter your radio code. And you should be good to go.
Modified by 2008fijibluesi at 12:01 PM 1/29/2008
Modified by 2008fijibluesi at 12:22 PM 1/29/2008
Modified by 2008fijibluesi at 6:18 AM 1/31/2008
Modified by 2008fijibluesi at 6:01 AM 3/18/2008
Here are the items/tools you will need to complete this project;
Purchase at any auto parts store-
- Two LED pods (Purchased mine at Advanced Auto {$12 ea}, they have 6 LEDs in each pod.)
- Two LED strips (Also purchased at Advanced Auto{$10 ea}, they have 3 LEDs in each strip.)
- Two 2-way switches ($1.50 ea)
These are all tools and items I have in my toolbox-
- 20 ft black 18 ga. wire
- 15 ft red 18 ga. wire
- 1 ft yellow 18 ga. wire
- Wire cutters/strippers
- 6 female 18 ga. wire terminals
- Electrical tape or heat shrink (I prefer heat shrink)
- Mini-torch or lighter (for heat shrink)
- Drill and drill bits
- Zip ties
- T10 Torx key
- Philips screwdriver
- Flathead screwdriver
- Nutdriver with 5/16" socket
- 14mm wrench
- 10mm wrench
- Coffee can
- 3M velcro strips
- Radio code for your stereo
Begin by clearing a large, clean, and flat workspace. I used my kitchen table, because it was 20� outside when I did this. I left all of the tools in my work area until I needed them, because my car gets crowded very quickly. Grab the socket driver (with socket), torx key, flatblade screwdriver, 14 mm wrench and coffee can. Head out to your car.
Pop the hood. Unhook the positive (red) terminal front your battery with the 10mm wrench. Go back in your car and make sure your car is in gear. Open your center console box.
Take out the piece of carpet at the bottom.

Remove the two 5/16" bolts that you will see. You can use a Phillips screwdriver, but I felt more comfortable using the nutdriver.

I use the coffee can to store all the nuts and bolts I remove, so that I don�t misplace them. You can put them anywhere you want, but its just a safety precaution I take.
Use the 14mm wrench to loosen the nut for the shifter ****. Turn it clockwise until it is loose. Once it is loose, just spin the **** then the nut off and put them in the coffee can.

Next, put your fingers inside the shift boot and pull up. The brushed aluminum-look piece surrounding the shift boot should pop out. If it doesn�t come up you can put the flatblade underneath it to pop it up. Be very careful and do not pry hard, as you could deform the plastic. Place the shift boot in a safe area.

Reach in where the shift boot was and pull up and back. The entire thing should pop out.

If it doesn't you can VERY GENTLY pry where the tabs are located.

With the piece out of the way, you should be able to see two more 5/16" bolts and two T10 Torx screws. Remove them. *my aux cable went back, so I had to remove the console...the T10 torx do not need to be removed*

Look down at the console near the pedals and you should see this clip.

Pop out the center with a flatblade screwdriver and then pull the whole clip out.

While you're down there, pull the cover above the pedals off, by turning the screw, and then pulling down and out on the panel. Put it somewhere out of the way.

On the passenger side, pull down on the cover that is right under the glovebox.

With it out of the way, pop the clip holding the console.

Very carefully, pull the entire center console toward the back of the car, lifting upward at the same time. Pull it back above 6 inches and unplug the cigarette lighter wires.

It is a tight fit. I had to move the seats back and forth, and release/set the parking brake a couple times, but it is worth taking your times, so that you don�t scratch anything. Make sure your car is in gear and on flat ground, if you release the parking brake. Once you have the console out of your car, take it in to your work area. All of the tools you used, can stay near the car, as they won't be needed again, until reassembly.
Place the console on your work area. Decide where you are going to put your switch. I liked mine in its location because it is close to the 12v source and it looks clean there. If you put yours in the same place as mine, make sure you put it enough to the left of the 12v plug, so that you can open its cover and close it without interference.

Look at both the top and bottom of the area you are going to put the switch, to determine that there is plastic, wire, etc. that will get in the way of the drill. The box that your switch came in should tell what size drill bit you will need, in order to flush mount the switch. Mine was a ��. Grab your drill and make your hole, drilling from the top of the console, so that the shavings, and burrs will not be on top. Slide your switch into the hole to see if it fits. If it is tight, or doesn�t fit, go up the next size, until it goes in tightly, and all of the way.

Flip the console over onto its top. I did this and left the box open so it would sit flat.

The box for the switch should have a diagram on it, telling which post is which (ground, load, power). Keep it handy so you know where to put the terminals.
Cut the electrical tape and peel back the wire loom for the cigarette lighter, then cut and strip the wires like so...


Here is a diagram of the wiring for my dual-switch setup. It looks a little intimating but it's not that bad.

Here is what the wiring should look like.

Make sure you run enough wire up the console, so that you can connect to your LEDs wires in the front. Also, leave enough wire for the rear LEDs. I was unsure where I was going to mount my rear LEDs at this particular point so I made them extra long.
Zip-tie all of your wires up out of the way and head outside.
Now is a good time to ArmorAll the plastic that is normally hard to get.

First, run the LEDs to your desired location. Here is a perfect spot to run the rear ones under each seat, and they'll never be seen or in the way. Run them under the carpet from where the console was, and you should be able to find a spot where you can bring it back on top of the carpet. Its by the seat slider brackets, and it takes some patience, but you can get it.

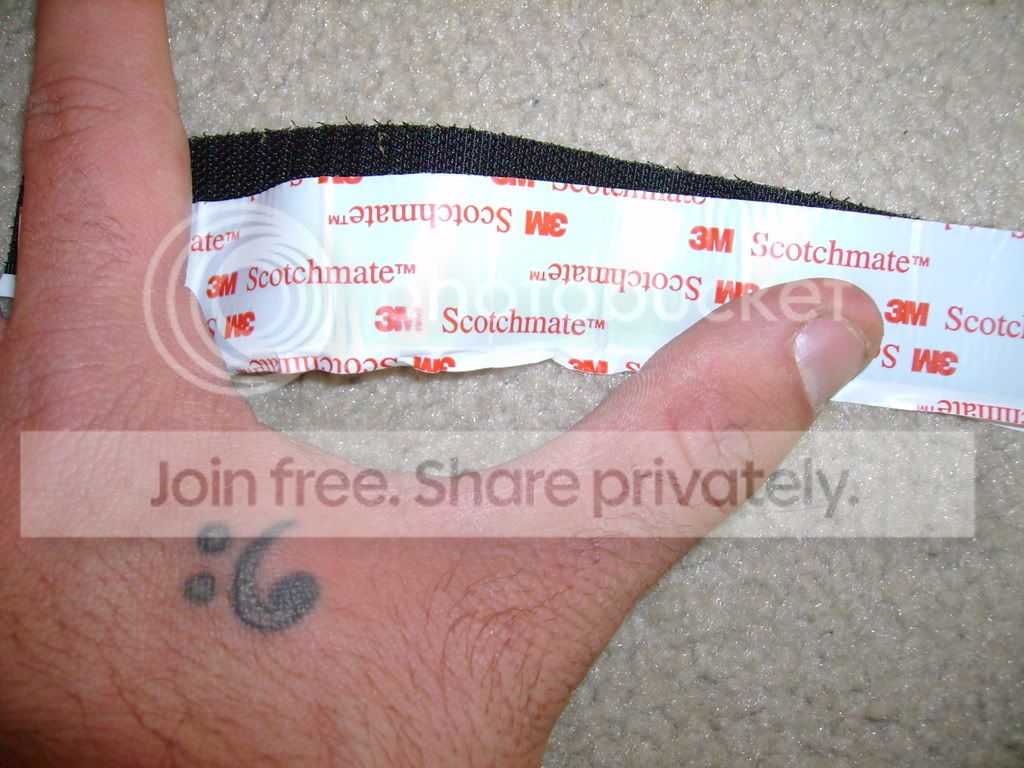
I chose to put my LEDs on the bottom rear of each front seat, so that they would light up the floor area, just like in the front. At first, I tried sticking them to the plastic trim, but the double stick tape that came on the LEDs did not stick to the rounded surface well at all. So I got an idea. I ran in my house and got the velcro strip that I had left over from mounting my Ipod.

Cut a strip the same size as the LED strip and just use the stiff part. Velcro is a hook and loop system. You want to be using the hook part.

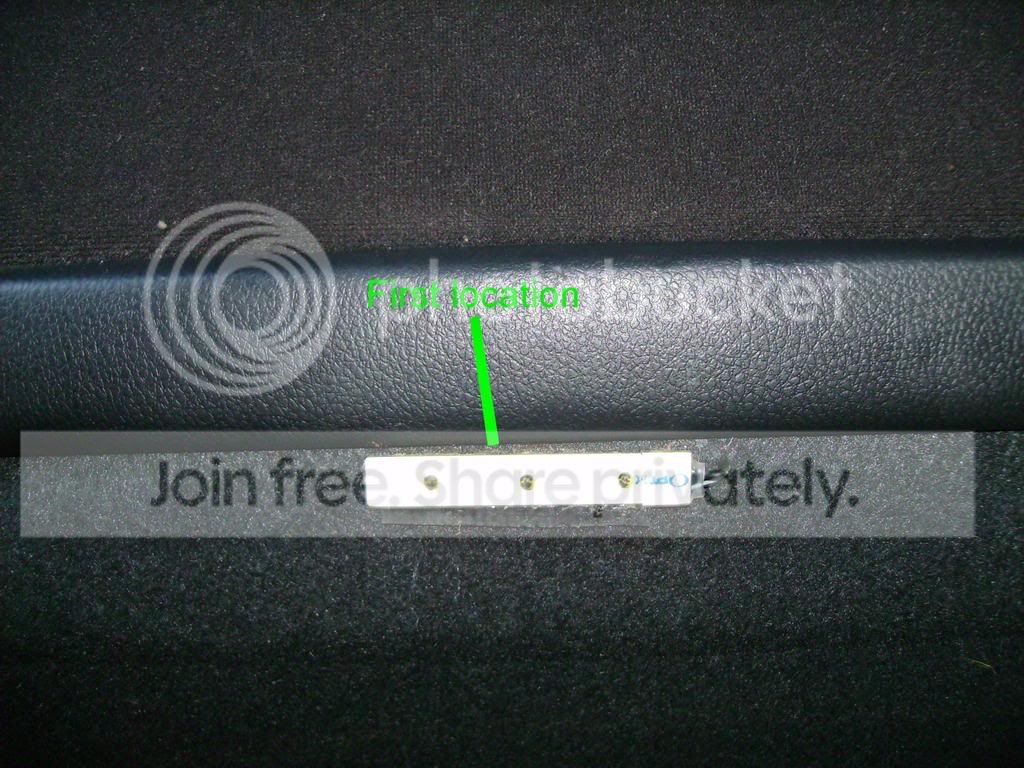
Adhere the velcro to the strip and press the two together firmly. Then just place LED strip wherever you prefer. I started with it right up against the plastic peice I first attempted to stick it to. But when I came out to my car, to take night pictures, that location revealed the LED too much and also would have lit up someone's ankles, rather than the toe-kick area I was going for.

So I moved the strip all of the way to the bottom of the carpet flap at the bottom of the seat. It is a perfect location. It is pretty well out of sight, and it lights up the area perfectly.
Carefully, start to put the console back in. Slide it about halfway forward. Re-connect the cigarette lighter connector. Leave the console here for a little bit while you hook up the rear LEDs.
Connect the rear LEDs together. You may need to extend each set so they meet in the middle. Then connect them to the wires, coming from the rear switch.
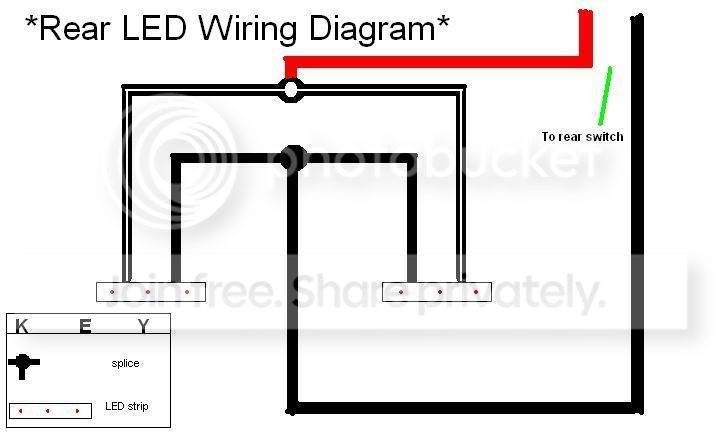
Here is the wiring diagram for the rear LEDs.

*On most LEDs there are two wire; one black, and one black with a white stripe. The black is ground, and therefore, connects to the black (ground) from your switch. The black with white stripe, is your power or load, and connects to the red wire from the switch. *
Make sure all of your connections are secure and have heat shrink/solder/tape (or all three) on them. I don't use solder, because frankly I am not good with it, LOL.
Move to the front LEDs. Find the panel you pulled down from above the pedals, and decide where you would like to put your LED pod. I found a perfect spot right behind the twist clip.

Drill a tiny hole where your wires line up with the plastic. Try to make it only big enough for the wires to go through, no larger.

Pull the white foamy padding off of the back of the panel and run the wires in the direction the console would be.

Replace the padding on top of the wires and you can replace the panel. Make sure you have access to the LED wires.

Grab the passenger side panel and decide where you want to put the LED pod. The spot I found centered the light beam in the food area and there was a hole right next to it, so I didn't need to drill anything. Do not replace this panel yet.

Run the wires from the front LED switch up into the dash. Make sure to keep them tight and zip-tie wherever possible. Cut the wires to a length where they don't hang down, but so that you have enough slack to connect them to the LED wires. Splice them all together, and make sure everything is secure and has heat shrink, etc. Here is a wiring diagram for the front LED pods.

*Now is a good time to hide your aux cable if you haven't already. Run the wire between the dash and console and zip-tie it to the cigarette lighter wires. If you are like me, and have a long cable, then wrap the excess up and zip-tie that out of the way.*

*Drill a hole in the change bin that is just big enough to fit the wire through and there you have it*


Now that everything is hooked up, hook your battery back up and turn the car to accesory. Flick your switches and make sure that both the switches and LEDs work. Also, make sure the switches work indepedently of each other. I.E.- you can turn the back on by itself, or just the front, or both at the same time. If they work, but not indepedently, you have a crossed wire.

Re-assemble everything in the opposite order.
Make sure all wires are up out of the way.
Enter your radio code. And you should be good to go.
Modified by 2008fijibluesi at 12:01 PM 1/29/2008
Modified by 2008fijibluesi at 12:22 PM 1/29/2008
Modified by 2008fijibluesi at 6:18 AM 1/31/2008
Modified by 2008fijibluesi at 6:01 AM 3/18/2008
 01-29-2008, 11:10 AM
#2
Honda-Tech Member
Thread Starter
Join Date: Nov 2007
Location: Jersey
Posts: 2,740
Likes: 0
Received 0 Likes
on
0 Posts
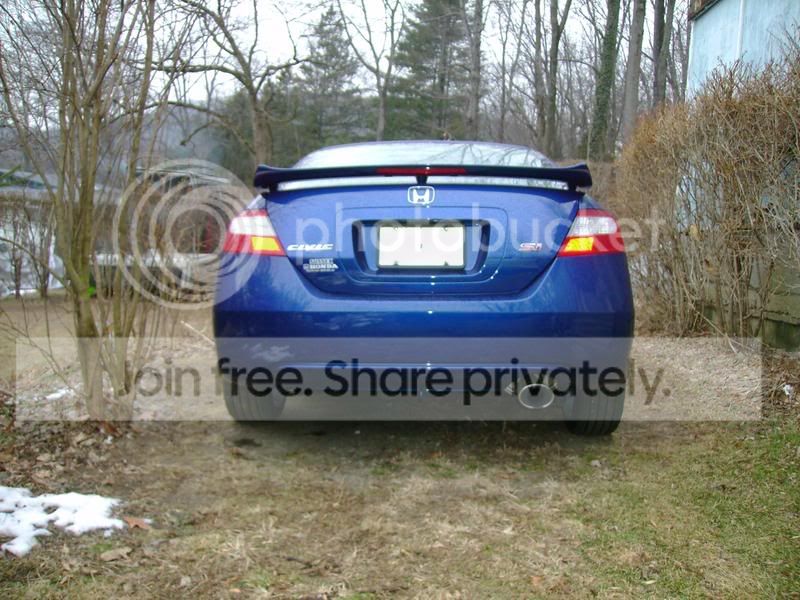
Here is the completed project. Tell me what you think!


On another note, I recently swapped the orange blinker bulbs in my taillights for clear ones. I know it is "illegal" but I like how it looks a lot better. I also know about the chrome bulbs that blink orange, but I don't like how you can see them, even when they aren't blinking. You can't see the clear ones, except for when they are blinking. Man are they bright! I wish they came like this stock. I just thought I'd post a couple pictures for anyone who is interested.

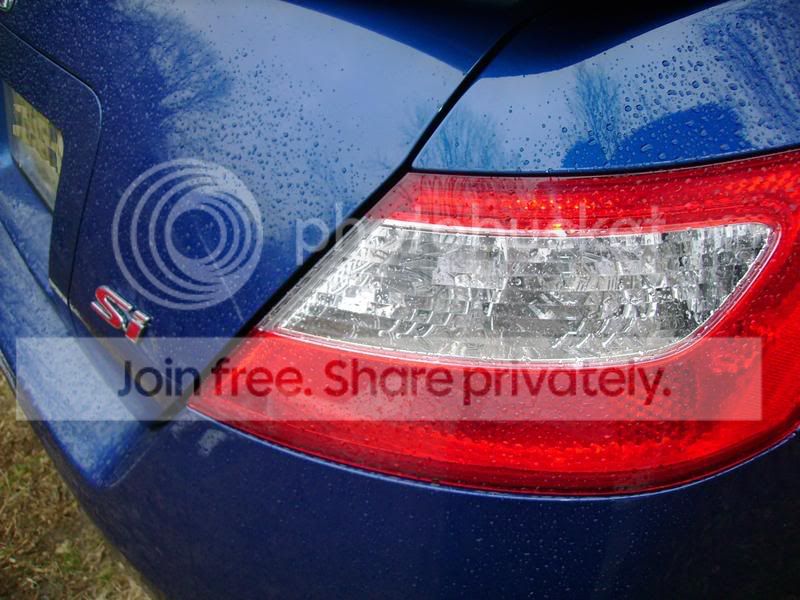


On another note, I recently swapped the orange blinker bulbs in my taillights for clear ones. I know it is "illegal" but I like how it looks a lot better. I also know about the chrome bulbs that blink orange, but I don't like how you can see them, even when they aren't blinking. You can't see the clear ones, except for when they are blinking. Man are they bright! I wish they came like this stock. I just thought I'd post a couple pictures for anyone who is interested.


 01-29-2008, 01:13 PM
#3
Member
Join Date: Dec 2005
Location: NY, USA
Posts: 1,137
Likes: 0
Received 0 Likes
on
0 Posts
not bad... as long as you can't see the actual units... just the glow.. i think it looks pretty good..
What i would've done tho.. is a little more complicated..
I would've wired it so that the led on the passenger and in the rear turn on when you open the passenger door, and the driver led turn on when you open the driver's door..
this is so when you passenger enters the car, they will go "oooooooooOOOOOOOooo"
then also have them turn on when your other interior lights are on... (1st position (park) on the light stalk)
also i dunno if i would've hid the aux cable.... just get a shorter cable, or one of those retractable cables... no drilling, no weird holes ^^
01-31-2008, 05:16 AM
#4
Honda-Tech Member
Thread Starter
Join Date: Nov 2007
Location: Jersey
Posts: 2,740
Likes: 0
Received 0 Likes
on
0 Posts
Yea but hidden aux cable = no ugly cable draped across your car. I didnt hide it because it was too long, I hid it because it is ugly when it is visible.

Trending Topics
02-19-2008, 02:33 PM
#9
Honda-Tech Member
Join Date: May 2005
Location: Land of the Hillbillies and Shotguns, Ontario, Canada
Posts: 1,505
Likes: 0
Received 0 Likes
on
0 Posts
Wow I'm amazed with the in-depth, descriptive write-up. Very nice write up, great attention to detail, and great effort for a clean installation which should be always.
Keep it up man
Keep it up man
02-19-2008, 03:18 PM
#10
Honda-Tech Member
Thread Starter
Join Date: Nov 2007
Location: Jersey
Posts: 2,740
Likes: 0
Received 0 Likes
on
0 Posts
<TABLE WIDTH="90%" CELLSPACING=0 CELLPADDING=0 ALIGN=CENTER><TR><TD>Quote, originally posted by Rayz_Si »</TD></TR><TR><TD CLASS="quote">Wow I'm amazed with the in-depth, descriptive write-up. Very nice write up, great attention to detail, and great effort for a clean installation which should be always.
Keep it up man
</TD></TR></TABLE>Thank you!
 I'm a dork, but that actually made me smile
02-20-2008, 09:23 PM
I'm a dork, but that actually made me smile
02-20-2008, 09:23 PM
#11
Honda-Tech Member
Join Date: Feb 2007
Location: Connecticut
Posts: 4,259
Likes: 0
Received 0 Likes
on
0 Posts
I just did something like this a couple days ago. I had a few wide angle LED's lying around and decided to go for it. Just simply wired it up to a switch to my center console where the eBrake is.


Believe it or not, I only used 2 LED's per side, for a total of 4 LED's. I'm going to see if I can figure out how to wire them so that they turn on when the doors open as well...
Believe it or not, I only used 2 LED's per side, for a total of 4 LED's. I'm going to see if I can figure out how to wire them so that they turn on when the doors open as well...
02-21-2008, 07:08 AM
#13
Honda-Tech Member
Join Date: Feb 2007
Location: Connecticut
Posts: 4,259
Likes: 0
Received 0 Likes
on
0 Posts
^^
Yeah, i hear ya. Toook a fw shots to get a good picture. First time I shot LED's at night.
I'm gonna try to wire some up that'll shine to the back seats, similiar to what you have done.
Yeah, i hear ya. Toook a fw shots to get a good picture. First time I shot LED's at night.
I'm gonna try to wire some up that'll shine to the back seats, similiar to what you have done.
02-27-2008, 04:57 AM
#15
Honda-Tech Member
Thread Starter
Join Date: Nov 2007
Location: Jersey
Posts: 2,740
Likes: 0
Received 0 Likes
on
0 Posts
<TABLE WIDTH="90%" CELLSPACING=0 CELLPADDING=0 ALIGN=CENTER><TR><TD>Quote, originally posted by ej6hatchie »</TD></TR><TR><TD CLASS="quote">clean
</TD></TR></TABLE>If that was directed at me, thank you.
04-04-2008, 01:00 PM
#20

Join Date: Jan 2004
Location: MA, USA
Posts: 4,371
Likes: 0
Received 0 Likes
on
0 Posts
<TABLE WIDTH="90%" CELLSPACING=0 CELLPADDING=0 ALIGN=CENTER><TR><TD>Quote, originally posted by Genuine Rolla »</TD></TR><TR><TD CLASS="quote">Believe it or not, I only used 2 LED's per side, for a total of 4 LED's. I'm going to see if I can figure out how to wire them so that they turn on when the doors open as well...</TD></TR></TABLE>
There is a fuse inside your car on the fuse panel that is for the dome / courtesy light. If you put a fuse jumper on there and wire up your LEDs to that your LEDs will turn on when you open the door.
There is a fuse inside your car on the fuse panel that is for the dome / courtesy light. If you put a fuse jumper on there and wire up your LEDs to that your LEDs will turn on when you open the door.
04-05-2008, 03:25 PM
#21
Honda-Tech Member
Join Date: Feb 2007
Location: Boston, MA, US
Posts: 203
Likes: 0
Received 0 Likes
on
0 Posts
I did this in my old car and just did similar in my EK. I love it. There are three LED's on each side wired to a switch in my center console.
http://a304.ac-images.myspacec...7.jpg
http://a304.ac-images.myspacec...7.jpg
04-07-2008, 04:58 AM
#23
Honda-Tech Member
Thread Starter
Join Date: Nov 2007
Location: Jersey
Posts: 2,740
Likes: 0
Received 0 Likes
on
0 Posts
<TABLE WIDTH="90%" CELLSPACING=0 CELLPADDING=0 ALIGN=CENTER><TR><TD>Quote, originally posted by -stiffler- »</TD></TR><TR><TD CLASS="quote">
WOW! nice DIY,now i'm gonna have to
bookmark this,i'm not really good with
electricals that's why.
</TD></TR></TABLE>
It can be overwhelming (especially when you look at the wiring diagram). If you need any help with it, just send me a message and I'll help you out.
WOW! nice DIY,now i'm gonna have to
bookmark this,i'm not really good with
electricals that's why.
</TD></TR></TABLE>
It can be overwhelming (especially when you look at the wiring diagram). If you need any help with it, just send me a message and I'll help you out.
05-05-2008, 07:22 PM
#24
Join Date: Apr 2008
Location: Naperville, IL
Posts: 8
Likes: 0
Received 0 Likes
on
0 Posts
06-12-2008, 11:34 PM
#25
Honda-Tech Member
Join Date: Jul 2007
Location: LA/SD, SoCal
Posts: 171
Likes: 0
Received 0 Likes
on
0 Posts
<TABLE WIDTH="90%" CELLSPACING=0 CELLPADDING=0 ALIGN=CENTER><TR><TD>Quote, originally posted by 2008fijibluesi »</TD></TR><TR><TD CLASS="quote">
It can be overwhelming (especially when you look at the wiring diagram). If you need any help with it, just send me a message and I'll help you out. </TD></TR></TABLE>
the thing is,how long does these LEDs
last? i mean,if they do go out,i can just
purchase after market ones as well right?
i can just unplug the old one and put the
new ones in right?

