Honda: How to Reset the Check Engine Light
A number of things can cause the check engine light to turn on. Sometimes it is not caused by a serious problem with your car. Continue reading to learn how to reset this light and save yourself the dealership cost.
This article applies to the Honda Civic (1992-2000), and Accord (1990-2002).
The check engine light in your Honda offers important diagnostic information, which will alert you of a serious problem like a bad catalytic converter. However, the check engine light also appears when the fuel tank cap is loose, or a change in humidity has occurred. Because this signal is transmitted via the electrical system in your car, you don't have to drive to a mechanic to reset it. You also don't need to buy parts or materials for this task, and the process takes just minutes to complete. But if the light comes on again, visit your local Honda's dealership service department to have it taken care of.

Materials Needed
- Short speaker wire or paper clip
- Wire stripper
- Fuse puller (or needle nose pliers)
Step 1 – Examine the check engine light on the dash
Turn on the ignition, and then check if the check engine light (CEL) is steady or flashing. A steady light typically indicates a problem with the vehicle's computer system, such as a sensor that is not delivering or receiving the correct data needed. On the other hand, a flashing light typically indicates a misfire in the ignition system. Turn the key into the "off" position if either of these occurs.

(Related Article: Warning Lights - Honda-Tech.com)
Step 2 – Locate the check engine light jumper plug
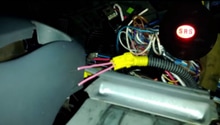
In the passenger's side foot well, remove the kick panel by the side door. This will allow you access to the Engine Control Unit (ECU) and jumper plug (service connector). Depending on your Honda's model, the jumper plug is either a blue or gray colored two-pin wire plug. A blue plug has one brown and one black wire, whereas the gray plug has one brown and one green/white striped wire.
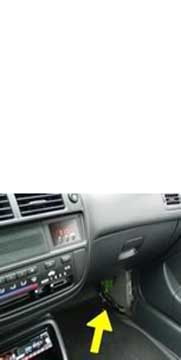
Figure 2. Remove the passenger's side kick panel. 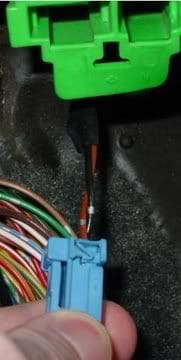
Figure 3. Blue jumper plug with brown and black wires.
Pro Tip
While it is possible to reset the CEL light at this time, your best option is to decipher the trouble codes provided by the system. Doing so will help you to determine if further diagnostics are needed.
Step 3 – Engage the jumper plug
Strip two ends of a short speaker wire. insert each end of the wire (or paperclip) into each terminal of the jumper plug.

Step 4 – Turn on ignition switch
Turn on the ignition switch without starting the engine. The check engine light will flash as normal. Count the number of flashes to determine the applicable CEL code (trouble code).
- A long flash (or approximately one second) equals 10.
- A short code (or approximately half a second) equals one.
For example, two long flashes followed by two short flashes will equal to the code 22. Any subsequent codes will follow in 2.5 second intervals.
Feature Video: How to Pull Honda Codes Without a Scanner
Step 5 – Reset the check engine light
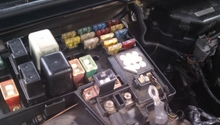
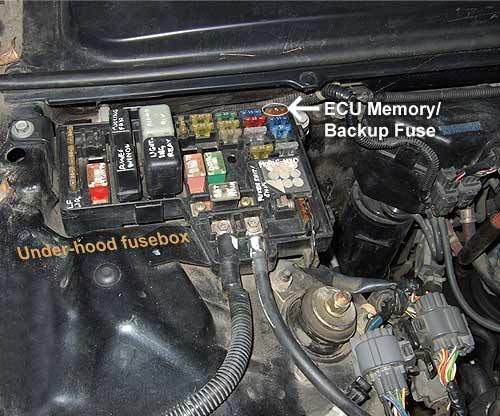
Now you can clear the ECL codes by resetting the ECU. Gain access the interior fuse box, which is located to the left of driver's side dash. Remove the panel cover to access your vehicle's fuses. Use the fuse panel diagram on the inside cover to determine the location of each individual fuse. Using the fuse puller (or needle nose pliers), remove fuse 7.5A. Wait three minutes, then re-attach the fuse. This should reset the CEL.
Pro Tip
The owner's manual also indicates where individual fuses are located in the fuse box.
Related Discussions
- How to Pull ECL Codes - Honda-Tech.com
- CEL Diagnostic Trouble Codes - Honda-Tech.com