Replacing your fuel filter is a simple procedure that renews operating efficiency, and helps to restore fuel economy. Learn how you can replace the fuel filter on your Honda Civic.
By Brian Merrill - March 12, 2015
Contributors: joigold7, HondaPartsHero
This article applies to the non-VTEC engine Honda Civic (1992-2000).
Cheap fuel is full of contaminants that stream through your fuel lines. Even if you always buy the best quality gasoline available, a bad batch can still introduce water and debris. To make matters worse, when your fuel pump starts to fail, it can send metal fragments from the lines to your injectors. Your fuel filter catches all of this gunk, and protects your other expensive components from damage. Over time, the filter in your Honda Civic needs to be replaced. A fresh filter opens up the flow of fuel to your injectors, and helps to keep your engine running at optimal levels.
Materials Needed
10 mm socket and ratchet
Open end wrenches (14, 17, and 19 mm)
Shop rags
Fuse puller or needle nose pliers
Owner's manual
Warning
Because gasoline is highly flammable and potentially explosive, be sure to observe all safety procedures to limit the risk of a fire or injury.
Step 1 – Depressurize your fuel system
Before you open your fuel system, you need to relieve the residual pressure in your fuel lines. Look in your owner's manual for the location of your fuel pump fuse. Using your fuse puller or a pair of needle nose pliers, remove this fuse while your car is off. Start the car, and let it run until it dies on its own.
Figure 1. Locate and remove your fuel pump fuse.
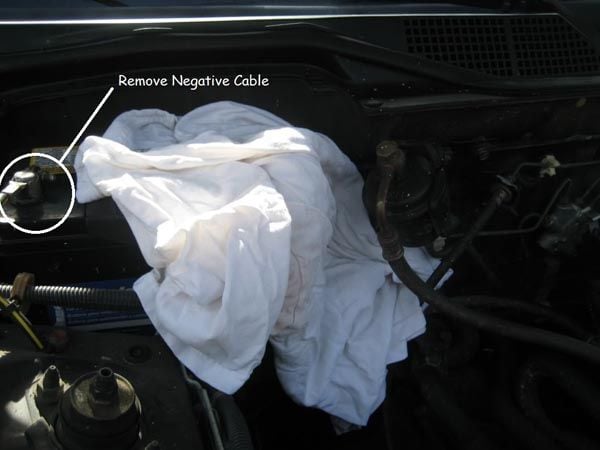
Step 2 – Disconnect battery and lay a cloth
The filter is located right next to the positive battery terminal. If metal tools accidentally contact the hot side of your battery, it will cause sparks and an open fuel line next to an ignition source is potentially hazardous. Remove the negative (black) cable to disconnect the battery. Then, cover the area beneath the filter with a cloth to catch any fuel that will spill when the filter is removed.
Figure 2. Disconnect the battery.
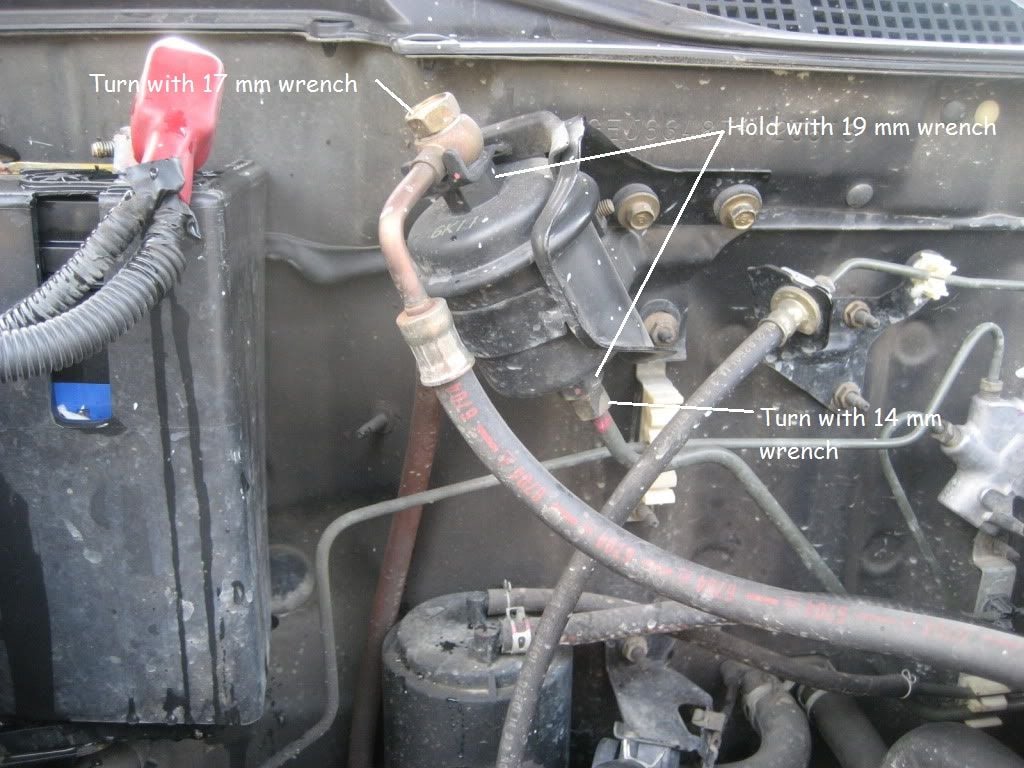
Step 3 – Disconnect fuel lines and mounting bracket to remove filter
Use your open end wrenches to disconnect the fuel lines. Hold the filter with one wrench, while loosening the banjo bolt with the other. Use the same technique to loosen the line below the filter. Once your fuel lines are free, move them to the side.
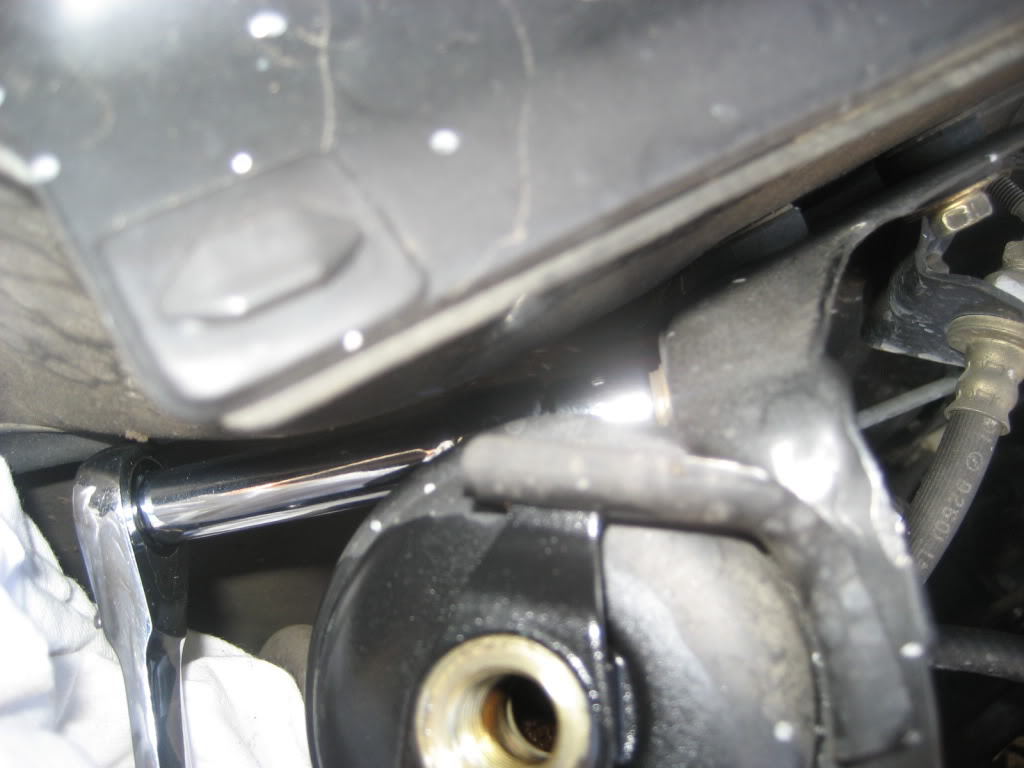
Using your 10 mm socket and ratchet, remove the mounting bracket bolt. The bracket and old filter will easily slide out.
Figure 3. Remove fuel lines from your filter
Figure 4. Access the bracket bolt behind the filter.
Pro Tips
Expect some fuel to leak out at this point. Even with the system depressurized, it is common to spill a little gasoline.
Your old filter may still be full of gas, so be ready to contain it. The old fuel can be poured into a gas can.
Step 4 – Install your new filter and re-install
Place a new crush washer on either side of the banjo bolt and fuel fitting. Install the upper and lower fuel lines. Turn the banjo bolt and the threaded fitting as far as you can with your hand. While the lines are still loose, set your filter in place and secure the mounting bracket to hold it down. Tighten your fuel lines the rest of the way.
Wipe down any spilled fuel, and reconnect your battery cable. Insert the fuel pump fuse back in its place, and start your car.
Figure 5. Make sure to use new washers with your banjo bolt.
Pro Tip
Avoid over tightening your fuel lines. Stripped threads lead to fuel leaks.
Featured Video: How to Replace Fuel Filter on Honda Civic
How to Replace the Fuel Filter
Driving your Accord shouldn't be an uphill battle. If it is, you may need to replace your fuel filter -- a cheap and easy repair that will save you from more costly damage further up ...
How to Tune Up Your Car
If you are unsure what a "tune up" is, your vehicle likely needs one.
This applies to the Honda Civic/Del Sol (1992-2000).
Some manufacturers recommend "tuning up" or replacing parts at ...
How to Install Supercharger Kit
ct-engineering, v6performance
You've been planning on upgrading your engine for more power. So why not take the unique route, and install a supercharger? Learn how to do just that ...
5 Symptoms of a Bad Fuel System
Fuel system diagnostics made simple for the DIY-er.
This article applies to the Honda Accord (1990-2002), and Civic (1992-2000).
The fuel system in your Honda Accord and Civic ...
How to Install A Turbocharger Kit
EMSHHH
Are you tired of getting smoked at stop lights? Then add some power to your Honda Accord!
This article applies to the Honda Accord (1990-2002).
Are you looking to bring new ...
Why is There a Gas Smell Coming from My Car?
Learn which problems can cause gasoline vapors to escape from your car's fuel tank and fuel system.
This article applies to the Honda Accord (1990-2002).
You've started ...