Honda Accord: How to Use a Scan Tool
Car OBD scan tools can be expensive, but these simple devices help you diagnose complex automotive problems in minutes. Continue reading to learn how to properly use a scan tool on your Honda Accord.
This article applies to the Honda Accord (1990-2002).
Having a car diagnostic scanner at home—or safeguarded inside your vehicle's glove compartment—could save you from spending hundreds of dollars at a local auto shop or Honda dealership. Scanners deliver expensive diagnostic reports every time the check engine light turns on, and lets you monitor the health of your car from the comfort of your own garage. These simple tools allow you to diagnose a problem as it arises. That way, you can decide whether to fix the problem yourself by using a little DIY know-how, or have a professional make the repair.

Materials Needed
- OBD-i or OBD-II scanner tool
- Phillips screwdriver
- Honda Accord's automotive repair manual
Step 1 – Determine the appropriate scan tool
The 1990 to 1995 Honda Accords will require an OBD-II (On-Board Diagnostics) scanner. It will feature a pin-out design, which allows the device to connect to your car's computer via a large socket. For Honda Accords manufactured between 1996 to 2000, an OBD-I scanner will be required.
Step 2 – Locate the OBD socket
For the 1990 to 1995 Honda Accords, the diagnostic port is located by the passenger's side kick panel. To access the connector, remove the panel using a Phillips screwdriver.
For the 1996 to 2002 Honda Accords, the diagnostic port is located just bellow the bottom edge of the driver's side dash. It should be sticking out from underneath.
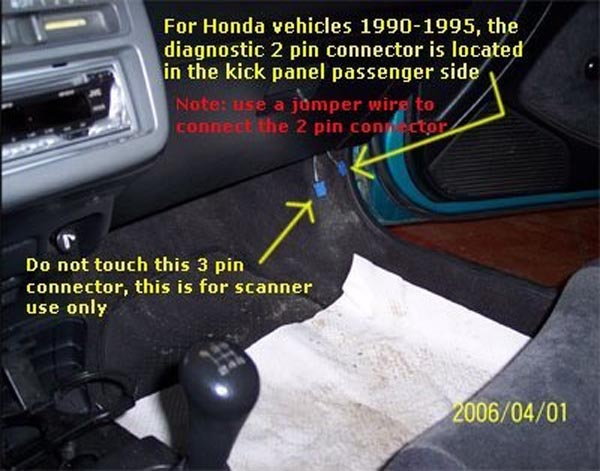
Figure 2. Location of OBD-I port for the early year model Accords. 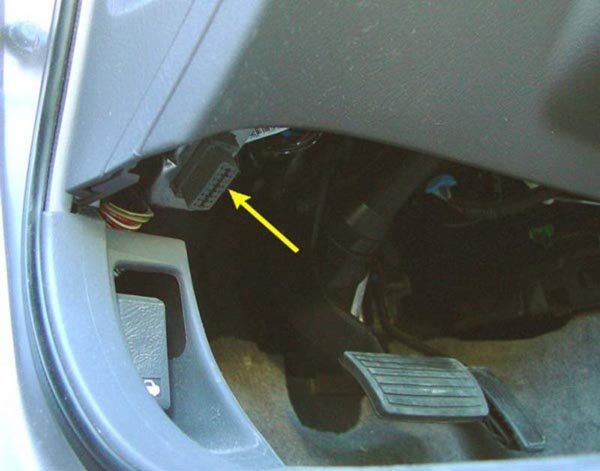
Figure 3. Location of OBD-II scanner port for a 1999 Honda Accord.
Pro Tip
In most cars manufactured between 1990 to 1996 the cover simply slides down, so it doesn't require tools.
Step 3 – Plug in the scanner
Turn on the OBD-II diagnostic scanner, and wait for the main menu to appear on the screen. Each scanner has a different setup, so follow the directions according to the manufacturer's manual.

Step 4 – Search and translate the trouble codes
Unless your car's battery has been recently removed, the OBD-ii scanner will detect any Diagnostic Trouble Codes (DTC) that are currently stored within the car's computer memory. Navigate through your device's menu to retrieve the DTC. These codes will display an alphabetical letter followed by a dash and several numbers. On an OBD-I scanner, you will be able to retrieve codes through a series of flashes.
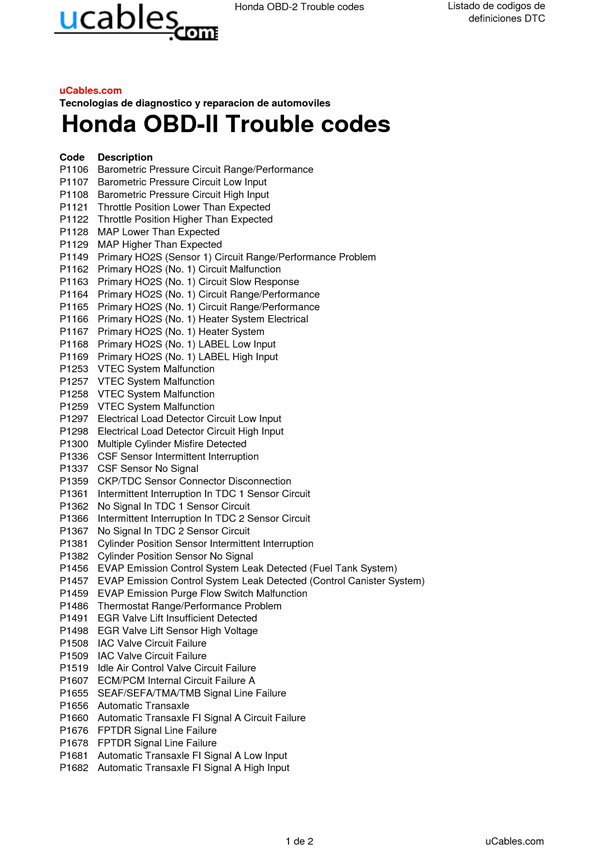
Each DTC corresponds to a different problem in your vehicle. Search through the Honda Accord's automotive repair manual or search online for the DTC to diagnose the exact problem, and then decide how to repair it.
Related Discussion, Site, and Video
- Honda Accord Diagnostic Plug Location - Honda-Tech.com
- Full list of Accord OBD Trouble Codes - Engine-Light-Help.com
- How to Use OBD-I Scan Tool for Accords - YouTube.com