
4th Gen Prelude Custom Tail Light Tutorial
 04-27-2006, 11:02 PM
#1
Thread Starter
Join Date: Apr 2006
Location: Columbus, Ohio, USA
Posts: 326
Likes: 0
Received 0 Likes
on
0 Posts
I am posting this because I just did this quick and easy mod and it looks great! I got 99% of the content from the tutorial on 92lude.com. I give all the credit to whomever posted that article on there, but I want to add a few steps and changes to make this great mod even quicker and easier. My girlfriend also had the camera at the time, so I am just going to reuse his pictures and add some tips.
1. Pop the open truck and remove the floor molding (loose) and side molding (clipped). You can leave the side molding in the truck, but with limited room and the lack of a deep socket set, I pulled it out of the way.
2. Unscrew the entire taillight from the car. There are 4 bolts that have 8mm (5/16) hex nuts on them. As mentioned above the bolts on my car where pretty long and I didn�t have that deep of a socket so I had to use a wrench. A deep socket set would save you some time. Remove the 4 bolts on each side and pull the taillight straight out the back.
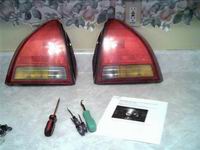
3. Next is to remove the bulb housing from the back of the lights. This white piece is held on by 2 Phillips screws. Unscrew and pull the piece straight out.
4. Now comes the fun part. First off turn your oven on and set it at 250*F. Prep the lights by cleaning up all surfaces with some window cleaner, baking dirt smells. Once the lights are clean and the oven is ready, put one light on a baking sheet (face up) and cook her for 5-6 minutes. This is where 92ludes.com tutorial was a little off. We tried 3-5 minutes several times and it just did not get the glue pliable enough for comfort. We ended up having the put too much pressure on the light and cracked it a little.
5. Pull the light out of the oven and use a flathead screwdriver to pry the very top open just big enough to slip something better in. We tried using just a screwdriver as directed but ended up scratching and almost chipping some of the light. Once the gap is big enough, try something like a stiff spatula or we even used a small but wide wood chisel. This put pressure over a bigger area and made things easier to do and less risky of damage.
6. Repeat this process, shrinking the time in the oven by a minute of so each time. Prying and working your way down until you can fully remove the red cover from the black housing.

7. Take your pointer finger or the handle of a screwdriver, poke thru the holes on the back of the housing, and push out the white/amber insert. It is hard plastic and clipped in so give it a little force. It will come out before it breaks.


8. Clean the inside of the housing and the inside of the removed red cover with some window cleaner.
9. This part is completely up to you. You can leave it as is or you can paint the 2 lower bulbs areas of the housing with any color you like (chrome/car color) etc. Or you can insert some pieces of fluorescent lighting covers (clear ceiling tiles) for a textured look like the rest of the light. I ended up painting both the bottom areas and the big brake light area black. It matches up with JDM one-piece headlights perfectly. Once done, it actually made the red cover a little bit darker, which will look even better with my new paint job that is coming soon.

10. Once done with step 9, line the red cover back up with the housing at the bottom. There are 3 tiny little clips that should be easy to line up. Put it back on just a little bit but don�t force anything. We need to stick the assembly back into the oven for another 5 minutes to get the factory glue hot and workable again.
11. Pull the light out of the oven and start pushing it back into place, starting from the bottom up. It should be a lot easier to put back on then it was to get off. If it gives you too much resistance, put it back in the oven for a couple minutes.
12. Once you have it set and in place, put it back in the oven for 1-2 minutes. Pull it out and squeeze it together for a couple minutes until it has cooled down a bit. This is just an extra step to make sure it is tight and has a good seal.

13. When I got to this step I decided to go ahead and replace all 3 bulbs in both lights. I wasn�t sure if Ohio required your turn signal lights to be amber or not so I went ahead and bought a set of amber bulbs since we removed the amber insert. I bought all 3 sets of bulbs for about $13.
14. Reinstall the bulb housing to the back of the light.
15. Repeat for the 2nd light. Reinstall back into car, replace molding and the truck floor matt and you are done!

I would say this is an extremely easy mod to do. It is a little scary putting your lights into the oven but it was well worth it in the end. You will have a completely custom set of taillights for free (minus paint/new bulbs/tiles). I will be posting pictures of my final product tomorrow night.
Thanks to 92lude.com for the article and demtrix for the help. Good luck!
Edit:
Couple more tips that I forgot at 3am lol.
1. DO NOT FORCE IT! You will break it as shown below if the glue is not hot enough. Just put it in the oven for a little while longer and you shouldn't break anything.
2. I would suggest not running anything down the light to get it apart. Cutting the glue once it is visible and stretched out is fine but do not run a knife along the inseam to get it apart, you will end up scratching or shaving the lights.
Modified by Maharajamd at 1:56 PM 4/28/2006
1. Pop the open truck and remove the floor molding (loose) and side molding (clipped). You can leave the side molding in the truck, but with limited room and the lack of a deep socket set, I pulled it out of the way.
2. Unscrew the entire taillight from the car. There are 4 bolts that have 8mm (5/16) hex nuts on them. As mentioned above the bolts on my car where pretty long and I didn�t have that deep of a socket so I had to use a wrench. A deep socket set would save you some time. Remove the 4 bolts on each side and pull the taillight straight out the back.
3. Next is to remove the bulb housing from the back of the lights. This white piece is held on by 2 Phillips screws. Unscrew and pull the piece straight out.
4. Now comes the fun part. First off turn your oven on and set it at 250*F. Prep the lights by cleaning up all surfaces with some window cleaner, baking dirt smells. Once the lights are clean and the oven is ready, put one light on a baking sheet (face up) and cook her for 5-6 minutes. This is where 92ludes.com tutorial was a little off. We tried 3-5 minutes several times and it just did not get the glue pliable enough for comfort. We ended up having the put too much pressure on the light and cracked it a little.
5. Pull the light out of the oven and use a flathead screwdriver to pry the very top open just big enough to slip something better in. We tried using just a screwdriver as directed but ended up scratching and almost chipping some of the light. Once the gap is big enough, try something like a stiff spatula or we even used a small but wide wood chisel. This put pressure over a bigger area and made things easier to do and less risky of damage.
6. Repeat this process, shrinking the time in the oven by a minute of so each time. Prying and working your way down until you can fully remove the red cover from the black housing.
7. Take your pointer finger or the handle of a screwdriver, poke thru the holes on the back of the housing, and push out the white/amber insert. It is hard plastic and clipped in so give it a little force. It will come out before it breaks.
8. Clean the inside of the housing and the inside of the removed red cover with some window cleaner.
9. This part is completely up to you. You can leave it as is or you can paint the 2 lower bulbs areas of the housing with any color you like (chrome/car color) etc. Or you can insert some pieces of fluorescent lighting covers (clear ceiling tiles) for a textured look like the rest of the light. I ended up painting both the bottom areas and the big brake light area black. It matches up with JDM one-piece headlights perfectly. Once done, it actually made the red cover a little bit darker, which will look even better with my new paint job that is coming soon.
10. Once done with step 9, line the red cover back up with the housing at the bottom. There are 3 tiny little clips that should be easy to line up. Put it back on just a little bit but don�t force anything. We need to stick the assembly back into the oven for another 5 minutes to get the factory glue hot and workable again.
11. Pull the light out of the oven and start pushing it back into place, starting from the bottom up. It should be a lot easier to put back on then it was to get off. If it gives you too much resistance, put it back in the oven for a couple minutes.
12. Once you have it set and in place, put it back in the oven for 1-2 minutes. Pull it out and squeeze it together for a couple minutes until it has cooled down a bit. This is just an extra step to make sure it is tight and has a good seal.
13. When I got to this step I decided to go ahead and replace all 3 bulbs in both lights. I wasn�t sure if Ohio required your turn signal lights to be amber or not so I went ahead and bought a set of amber bulbs since we removed the amber insert. I bought all 3 sets of bulbs for about $13.
14. Reinstall the bulb housing to the back of the light.
15. Repeat for the 2nd light. Reinstall back into car, replace molding and the truck floor matt and you are done!
I would say this is an extremely easy mod to do. It is a little scary putting your lights into the oven but it was well worth it in the end. You will have a completely custom set of taillights for free (minus paint/new bulbs/tiles). I will be posting pictures of my final product tomorrow night.
Thanks to 92lude.com for the article and demtrix for the help. Good luck!
Edit:
Couple more tips that I forgot at 3am lol.
1. DO NOT FORCE IT! You will break it as shown below if the glue is not hot enough. Just put it in the oven for a little while longer and you shouldn't break anything.
2. I would suggest not running anything down the light to get it apart. Cutting the glue once it is visible and stretched out is fine but do not run a knife along the inseam to get it apart, you will end up scratching or shaving the lights.
Modified by Maharajamd at 1:56 PM 4/28/2006
 04-28-2006, 03:21 AM
#2
Honda-Tech Member
Join Date: Nov 2004
Location: Boston, MA, USA
Posts: 396
Likes: 0
Received 0 Likes
on
0 Posts
and this is what happens when u dont melt the glue well enough or its hardening while it drys.

Cracked at the red part and the clear part.

This Glue was no fun to pry.
TIP: TAKING OFF THE ENTIRE RED COVER IS HARD AS HELL, JUST OPEN IT ENOUGH SO U CAN GRAB THE ORANGE/SMOKED PIECE OUT.
Cracked at the red part and the clear part.
This Glue was no fun to pry.
TIP: TAKING OFF THE ENTIRE RED COVER IS HARD AS HELL, JUST OPEN IT ENOUGH SO U CAN GRAB THE ORANGE/SMOKED PIECE OUT.
04-28-2006, 07:16 AM
#3
Honda-Tech Member
Join Date: Apr 2005
Posts: 764
Likes: 0
Received 0 Likes
on
0 Posts
from my post on 92lude.com
<TABLE WIDTH="90%" CELLSPACING=0 CELLPADDING=0 ALIGN=CENTER><TR><TD>Quote »</TD></TR><TR><TD CLASS="quote"> i don't know if anyone found amber bulbs to replace the clear bulb for the signal but today i did the conversion and went to walmart to try to find an amber bulb.........
The GE 1156NA amber signal bulb fits perfectly into the socket and housing......so if you are looking for something to make your signal yellow like before give that a try </TD></TR></TABLE>
04-28-2006, 10:03 AM
#4
Join Date: Feb 2005
Location: newport news, va, usa
Posts: 757
Likes: 0
Received 0 Likes
on
0 Posts
another nice tip i found easier (ive done 2 sets of jdm 1 piece headlights and a set of tails) is to use a nice sharp razor to cut the glue as you go around. cuts the time in half.
i put clear flourescent light cover in there and painted over the lense, everything but the reverse light with translucent red paint i got at a hobby store.
heres a pic of mine:
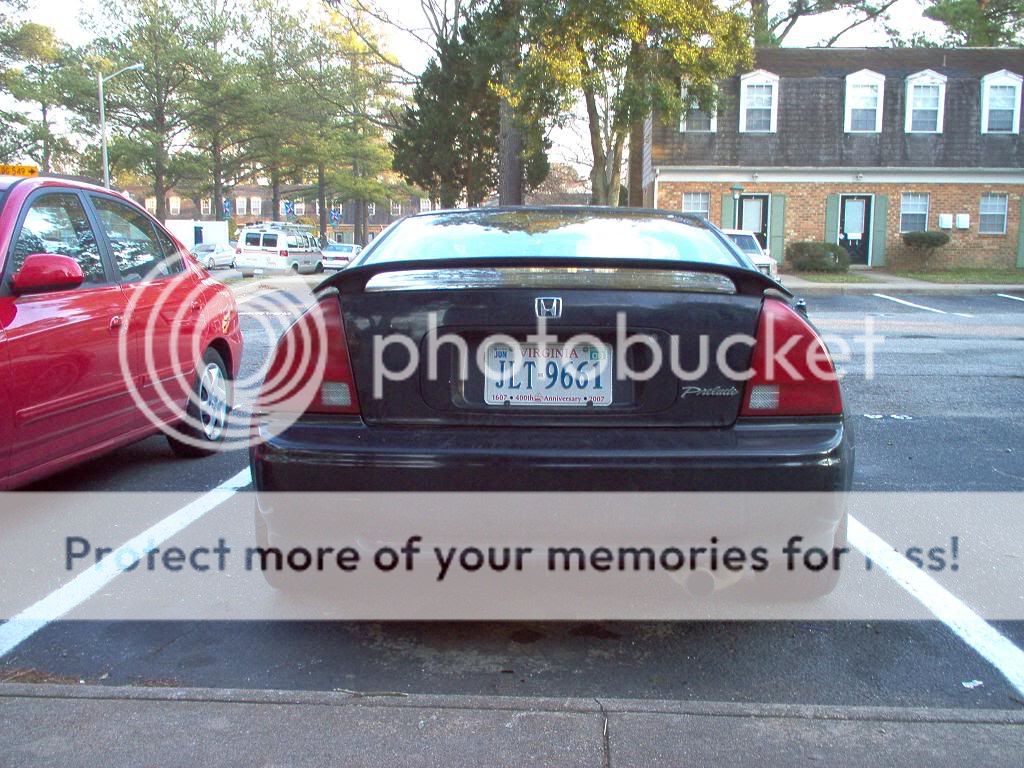
im acutally going to go back over them with some translucent black and a layer or 2 of clear coat just to make them blend better with the car
i put clear flourescent light cover in there and painted over the lense, everything but the reverse light with translucent red paint i got at a hobby store.
heres a pic of mine:
im acutally going to go back over them with some translucent black and a layer or 2 of clear coat just to make them blend better with the car
04-28-2006, 10:32 AM
#5
Honda-Tech Member
Join Date: Aug 2003
Location: Gainesville, FL, United States
Posts: 730
Likes: 0
Received 0 Likes
on
0 Posts
<TABLE WIDTH="90%" CELLSPACING=0 CELLPADDING=0 ALIGN=CENTER><TR><TD>Quote, originally posted by Maharajamd »</TD></TR><TR><TD CLASS="quote">When I got to this step I decided to go ahead and replace all 3 bulbs in both lights. I wasn�t sure if Ohio required your reverse light to be amber or not so I went ahead and bought a set of amber bulbs since we removed the amber insert.</TD></TR></TABLE>
The amber insert is for the turn signals, the clear part of that insert is the reverse lights. reverse lights are white, not amber, everywhere in the country.
The amber insert is for the turn signals, the clear part of that insert is the reverse lights. reverse lights are white, not amber, everywhere in the country.
04-28-2006, 11:51 AM
#6
Honda-Tech Member
Join Date: Jan 2006
Location: West Coast
Posts: 223
Likes: 0
Received 0 Likes
on
0 Posts
<TABLE WIDTH="90%" CELLSPACING=0 CELLPADDING=0 ALIGN=CENTER><TR><TD>Quote, originally posted by hp92lude »</TD></TR><TR><TD CLASS="quote"></TD></TR></TABLE>
Sooooo clean dude, that is the way they should come stock
btw what color red paint did you use, the number code of the paint?
I would like to do the exact same thing.
Modified by helicopter201 at 7:10 PM 4/28/2006
</TD></TR></TABLE>Sooooo clean dude, that is the way they should come stock
btw what color red paint did you use, the number code of the paint?
I would like to do the exact same thing.
Modified by helicopter201 at 7:10 PM 4/28/2006
Trending Topics

 04-30-2006, 02:37 AM
#11
Join Date: Oct 2005
Location: Nr Carlisle / UK, England
Posts: 26
Likes: 0
Received 0 Likes
on
0 Posts
Looks good with the black.
When I did my rears I melted a practice light so used loads of boilng water instead.
And when putting them back together I used a hot air gun to soften the sealent up, way easier IMO.
When I did my rears I melted a practice light so used loads of boilng water instead.
And when putting them back together I used a hot air gun to soften the sealent up, way easier IMO.
04-30-2006, 09:52 AM
#12
Honda-Tech Member
Join Date: Apr 2006
Posts: 3
Likes: 0
Received 0 Likes
on
0 Posts
i like my tail lights better
http://spaces.msn.com/nitron20...ner=1
http://spaces.msn.com/nitron20...ner=1
05-01-2006, 06:09 AM
#13
Join Date: Feb 2005
Location: newport news, va, usa
Posts: 757
Likes: 0
Received 0 Likes
on
0 Posts
<TABLE WIDTH="90%" CELLSPACING=0 CELLPADDING=0 ALIGN=CENTER><TR><TD>Quote, originally posted by helicopter201 »</TD></TR><TR><TD CLASS="quote">Sooooo clean dude, that is the way they should come stock
btw what color red paint did you use, the number code of the paint?
I would like to do the exact same thing.
Modified by helicopter201 at 7:10 PM 4/28/2006</TD></TR></TABLE>
i dont know the paint code but its called Testor's Translucent Red i think (i dont have it anymore i gave it to my friend when i was done) and i found it at an arts and crafts store near me...
05-01-2006, 01:00 PM
#14
Honda-Tech Member
Join Date: Oct 2005
Location: Prague, Czech rep.
Posts: 69
Likes: 0
Received 0 Likes
on
0 Posts
<TABLE WIDTH="90%" CELLSPACING=0 CELLPADDING=0 ALIGN=CENTER><TR><TD>Quote, originally posted by gospeedracerh23 »</TD></TR><TR><TD CLASS="quote">since everyone is posting there's...</TD></TR></TABLE>
This is EXACTLY Im about to make on my red lude!!! Best taillights Ive ever seen...
This is EXACTLY Im about to make
on my red lude!!! Best taillights Ive ever seen...


 05-01-2006, 04:10 PM
#20
Junior Member
Join Date: Jun 2005
Posts: 18
Likes: 0
Received 0 Likes
on
0 Posts
<TABLE WIDTH="90%" CELLSPACING=0 CELLPADDING=0 ALIGN=CENTER><TR><TD>Quote, originally posted by GtechPro »</TD></TR><TR><TD CLASS="quote">
The best looking 4th gen Tail-light. </TD></TR></TABLE>
+1
The best looking 4th gen Tail-light. </TD></TR></TABLE>
+1
05-01-2006, 04:42 PM
#21
Join Date: Oct 2002
Location: Madison, AL, USA
Posts: 183
Likes: 0
Received 0 Likes
on
0 Posts
<TABLE WIDTH="90%" CELLSPACING=0 CELLPADDING=0 ALIGN=CENTER><TR><TD>Quote, originally posted by lude-tec »</TD></TR><TR><TD CLASS="quote">how did you guys make the lens look smoked? did you guys paint the inside of the clear lense black? thanks</TD></TR></TABLE>
I took the clear lenses from my old pos alteezas and I was gonna tint the lenses but at the last second decided to paint the inner housing black instead. Then I used amber bulbs...
I took the clear lenses from my old pos alteezas and I was gonna tint the lenses but at the last second decided to paint the inner housing black instead. Then I used amber bulbs...
05-01-2006, 04:45 PM
#22
Join Date: Oct 2002
Location: Madison, AL, USA
Posts: 183
Likes: 0
Received 0 Likes
on
0 Posts
<TABLE WIDTH="90%" CELLSPACING=0 CELLPADDING=0 ALIGN=CENTER><TR><TD>Quote, originally posted by GtechPro »</TD></TR><TR><TD CLASS="quote">
The best looking 4th gen Tail-light. </TD></TR></TABLE>
You should be very happy then! 99.999999999% of them look that way!
The best looking 4th gen Tail-light. </TD></TR></TABLE>
You should be very happy then! 99.999999999% of them look that way!
05-01-2006, 05:53 PM
#23
Thread Starter
Join Date: Apr 2006
Location: Columbus, Ohio, USA
Posts: 326
Likes: 0
Received 0 Likes
on
0 Posts
Wow, haven't checked the replies for a day or so lol.. I painted everything black, and left the plastic clear. It looks alot like the ones above but a little darker. I went that route because of the color of paint I am going to go with...
You all keep talking about cracking the lights...if its hot enough, you almost don't even have to pry it, just grab hard and pull...
I dunno about boiling them, sounds a little odd to me. Baking works just fine but you gotta keep it hot....I can't say it enough, if its hot enough, this is extremely low risk to your lights, and a great mod!
05-02-2006, 09:57 AM
#24
Junior Member
Join Date: Aug 2005
Location: San Pedro, Ca, USA
Posts: 615
Likes: 0
Received 0 Likes
on
0 Posts
<TABLE WIDTH="90%" CELLSPACING=0 CELLPADDING=0 ALIGN=CENTER><TR><TD>Quote, originally posted by mdjplay »</TD></TR><TR><TD CLASS="quote">You should be very happy then! 99.999999999% of them look that way! </TD></TR></TABLE>
I am very happy, thank you. I'm sure you're proud to be one of those 0.00000001 that are different
</TD></TR></TABLE>I am very happy, thank you. I'm sure you're proud to be one of those 0.00000001 that are different
05-02-2006, 11:49 AM
#25
Join Date: Oct 2002
Location: Madison, AL, USA
Posts: 183
Likes: 0
Received 0 Likes
on
0 Posts
<TABLE WIDTH="90%" CELLSPACING=0 CELLPADDING=0 ALIGN=CENTER><TR><TD>Quote, originally posted by GtechPro »</TD></TR><TR><TD CLASS="quote">
I am very happy, thank you. I'm sure you're proud to be one of those 0.00000001 that are different </TD></TR></TABLE>
exactly! lol
I am very happy, thank you. I'm sure you're proud to be one of those 0.00000001 that are different
</TD></TR></TABLE>exactly! lol

