
D15b1 timing issue on my 89 STD Hatch
 06-06-2012, 07:15 PM
#1
Honda-Tech Member
Thread Starter

Join Date: Jun 2012
Posts: 13
Likes: 0
Received 0 Likes
on
0 Posts
need help, im new to fixing Honda's and also new to HT.
ohkai so heres my story of the 89 std hatch D15b1 dpfi, i picked it up from my aunt for cheap only has 103k original miles and she said all i need to do is a head gasket replacement. so i went on and replace the head gasket and replaced other stuff like Water pump and timing belt. did all that im pretty sure i lined up the marks on the timing belt and gears. but the thing is when i put everything together and gave it a oil change, radiator flush, spark plugs/wires, battery. i started her up she sounds fixed but the timing sounds off a lil sputters here and ther but its fix jus timing really sounds off(i had help from my uncles fixing my EF, and they are verterans on fixings old school chevys, had the timing gun and all the tools i need for the job). so did i mess up the timing??
if so what do i need to do to fix the timing?
is ther a way were i can make my dizi to read 0?
or a diagram you all can give me to show me the proper way to pu the timing belt marks and wher to line it up??
i really need help from you EF Guru's. thank you much appreciated
 06-06-2012, 07:19 PM
#2
Honda-Tech Member
Thread Starter
Join Date: Jun 2012
Posts: 13
Likes: 0
Received 0 Likes
on
0 Posts
what i mean by a way to make my distributer read 0 is make it read 0 so i can adjust the timing by that? i dont know that what my uncles say must be a chevy thing that they do

 06-07-2012, 07:02 AM
#4
PHANTOM MENACE
iTrader: (2)
Join Date: May 2005
Location: SYCUAN NINE, CA, USA
Posts: 6,042
Likes: 0
Received 3 Likes
on
3 Posts
Set your crank to TDC. Not sure if you just put it at TDC visually with the head off but if you did look at the crank pulley from the top. The timing covers have notches to line up on the timing marks. There should be three notches together with a single notch about an inch to the right. The single notch is 0 degrees or TDC.
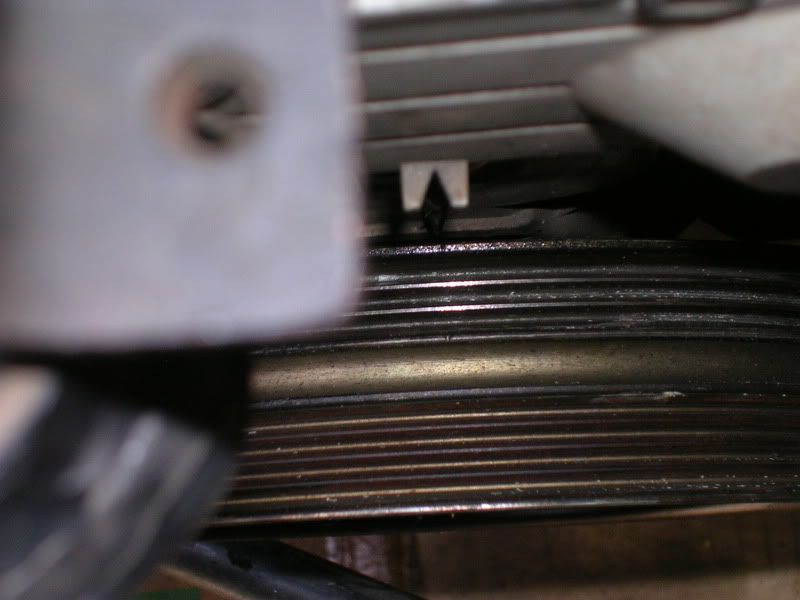
Line up on the single mark to the right first. In the picture below I have it lined up on the the white mark (not sure why some of the crank pulleys have two notches for TDC but just in case you have the same one look for the one marked white).
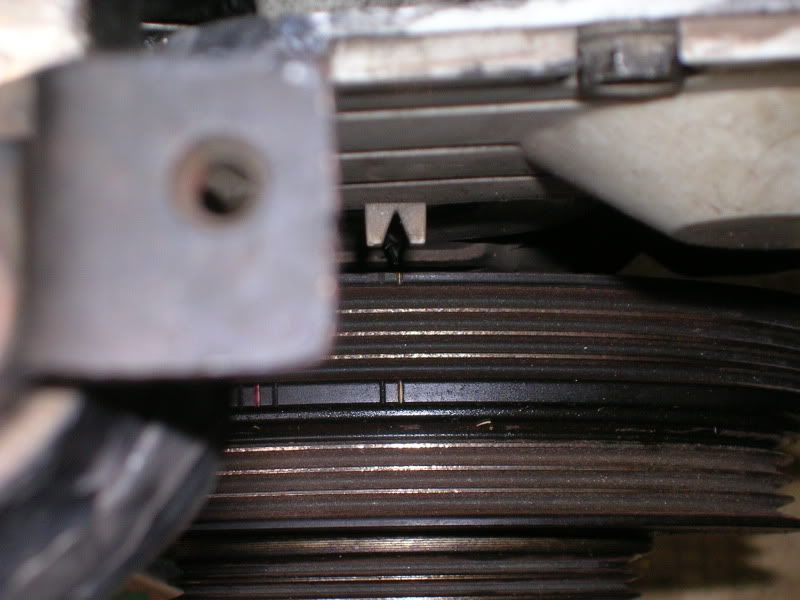
In the picture above you can see the three notches together with the middle one marked. That is the one for ignition timing. But before you do that, take a look at your cam gear. There should be two lines level with the head and the word "UP" should be right side up. If the two lines are not level with the head, your mechanical timing is off (willing to bet you're off just a tooth, maybe two). Release tension and redo the timing belt. Once your mechanical timing is done then you can move on to ignition timing.
If you have a timing gun that's adjustable, set it to 0 degrees. When you do the timing, loosen the distributor and twist as needed to line up the middle mark. FYI that should be +16 degrees with the other notches being +/-2 degrees.
Hope that helps.
Line up on the single mark to the right first. In the picture below I have it lined up on the the white mark (not sure why some of the crank pulleys have two notches for TDC but just in case you have the same one look for the one marked white).
In the picture above you can see the three notches together with the middle one marked. That is the one for ignition timing. But before you do that, take a look at your cam gear. There should be two lines level with the head and the word "UP" should be right side up. If the two lines are not level with the head, your mechanical timing is off (willing to bet you're off just a tooth, maybe two). Release tension and redo the timing belt. Once your mechanical timing is done then you can move on to ignition timing.
If you have a timing gun that's adjustable, set it to 0 degrees. When you do the timing, loosen the distributor and twist as needed to line up the middle mark. FYI that should be +16 degrees with the other notches being +/-2 degrees.
Hope that helps.
06-07-2012, 11:10 AM
#5
Honda-Tech Member
Thread Starter
Join Date: Jun 2012
Posts: 13
Likes: 0
Received 0 Likes
on
0 Posts
Set your crank to TDC. Not sure if you just put it at TDC visually with the head off but if you did look at the crank pulley from the top. The timing covers have notches to line up on the timing marks. There should be three notches together with a single notch about an inch to the right. The single notch is 0 degrees or TDC.
Line up on the single mark to the right first. In the picture below I have it lined up on the the white mark (not sure why some of the crank pulleys have two notches for TDC but just in case you have the same one look for the one marked white).
In the picture above you can see the three notches together with the middle one marked. That is the one for ignition timing. But before you do that, take a look at your cam gear. There should be two lines level with the head and the word "UP" should be right side up. If the two lines are not level with the head, your mechanical timing is off (willing to bet you're off just a tooth, maybe two). Release tension and redo the timing belt. Once your mechanical timing is done then you can move on to ignition timing.
If you have a timing gun that's adjustable, set it to 0 degrees. When you do the timing, loosen the distributor and twist as needed to line up the middle mark. FYI that should be +16 degrees with the other notches being +/-2 degrees.
Hope that helps.
 06-07-2012, 12:10 PM
#7
Honda-Tech Member
Thread Starter
Join Date: Jun 2012
Posts: 13
Likes: 0
Received 0 Likes
on
0 Posts
Trending Topics
06-07-2012, 12:42 PM
#8
PHANTOM MENACE
iTrader: (2)
Join Date: May 2005
Location: SYCUAN NINE, CA, USA
Posts: 6,042
Likes: 0
Received 3 Likes
on
3 Posts
This is specific for non Si/EX d-series engines 88-91 (and non-VTEC 92-95). The procedure is basically the same for all Honda engines in general that use a distributor (there are exceptions but don't worry about them). Some have different timing marks on the crank and camgear but if it's the original crank pulley then you don't even have to worry about what degrees are what, just aim for the middle mark. You'll notice that your camgear has a third mark pointing roughly at the 7 o'clock position, that is used for the 1.6 engines (Si/EX) because they share the same gear but the cam is indexed slightly differently.
06-07-2012, 02:37 PM
#9
Honda-Tech Member
Thread Starter
Join Date: Jun 2012
Posts: 13
Likes: 0
Received 0 Likes
on
0 Posts
This is specific for non Si/EX d-series engines 88-91 (and non-VTEC 92-95). The procedure is basically the same for all Honda engines in general that use a distributor (there are exceptions but don't worry about them). Some have different timing marks on the crank and camgear but if it's the original crank pulley then you don't even have to worry about what degrees are what, just aim for the middle mark. You'll notice that your camgear has a third mark pointing roughly at the 7 o'clock position, that is used for the 1.6 engines (Si/EX) because they share the same gear but the cam is indexed slightly differently.
06-07-2012, 07:26 PM
#10
Honda-Tech Member
Another thing to add make sure the engine is at operating temp when you go to adjust timing. Make sure coolant is topped off and all accesories off.
08-10-2012, 03:25 PM
#11
Honda-Tech Member

im havin the same problem in my 91 hatch, should i loosen the belt and re adjust or just replace the belt, tensioner, and water pump and be done with it?
08-10-2012, 04:43 PM
#12
Honda-Tech Member
Join Date: Oct 2011
Location: Va
Posts: 626
Likes: 0
Received 0 Likes
on
0 Posts
Do what you feel like man, it's your money.....your car. Personally if I take the tension off of a old belt, I replace it regardless unless it's brand spanking new and i for some reason got the timing off. Also, if you're gonna open it all up, it wouldn't hurt to replace the water pump, new seals, and timing belt kit.........unless you know they're new. But that's just how my thinking is and how I do things.
08-10-2012, 08:01 PM
#13
Honda-Tech Member
yeah thats what i was thinking to do, i guess i was hoping for some sort of honda magic to prevent me from spending a nice chunk of money haha.
08-12-2012, 10:56 AM
#14


Thread
Thread Starter
Forum
Replies
Last Post