
View Poll Results: For other Del Sol owners, your car has:


Voters: 13. You may not vote on this poll
X E's 93 Del Sol S Thread
 07-20-2013, 08:20 AM
#1
Honda-Tech Member
Thread Starter

Join Date: Jul 2013
Location: Northern California
Posts: 98
Likes: 0
Received 0 Likes
on
0 Posts
Introduction
This thread tracks my work and I hope it helps other Del Sol owners. I was looking for a good commuter car for the 21-mile run up the mountain to the power plant I work at, but I did not expect to find my '93 Civic Del Sol S. The odometer read 160,000+ with a price of $2750 and it needed a fair amount of TLC. When I looked at it, I thought it was very odd the speedometer went to 220, until I saw the Km/H indication – foreign car? The car’s actual mileage was 99,500 miles, and I could not find any indication anyone had ever tampered with it, so I was sold. Not sure if it is a Canadian or Euro car but it's a left drive import of some sort, the VIN says it was made in Suzuka.
What I did not anticipate was how much I would enjoy this car, and fit well into it besides, at 6'4" (I owned a CRX once and same deal - was surprised big people fit well into the 2 seats so I thought I would check it out). It has a D15B7, 5-speed manual, no AC, no PS, no cruise. It is a nice, light, and simple platform to work with.
The car needed some work and I have been busily chipping away at the odds and ends each month. This forum has been very helpful and I thought I would show what I have been doing. I found a FSM and I’m actually having a lot of fun wrenching on this car. Let me say a few words about how this car is used and why I will make certain choices.
The winding road to work is bumpy and notoriously dotted with huge trees right on the white lines, deer, cliffs, rocks, skunks, up to 17% grades, stupid people that can’t stay in their lane, and ridiculous weather both 110o F +, and snow or ice in the winter. Each drive to or from work is like a rally run up or down the mountain! Minus the obstacles, it’s a pretty fun drive and this car is well suited to the task.
My plan is to make the car as good as it can be for this job, while still retaining the 34 mpg I have been getting on this drive. Also, the stock appearance is a bit simple, so I will do a few things to the appearance. Finally, a Thank You to all the contributors here on Honda-Tech. You really can find just about anything you need to know here with some searching, and when that fails, posting up a question.
The day I bought the car - pizza cutter 13"s!

Do they all have busted antennas? Fixed now though.

Interior is decent but needs some work.

Starting to clean up the motor - there's corrosion here - coastal car?

Fluids and all looked good, so I drove the 150 miles home, ran a little poorly but nothing show stopping.
This thread tracks my work and I hope it helps other Del Sol owners. I was looking for a good commuter car for the 21-mile run up the mountain to the power plant I work at, but I did not expect to find my '93 Civic Del Sol S. The odometer read 160,000+ with a price of $2750 and it needed a fair amount of TLC. When I looked at it, I thought it was very odd the speedometer went to 220, until I saw the Km/H indication – foreign car? The car’s actual mileage was 99,500 miles, and I could not find any indication anyone had ever tampered with it, so I was sold. Not sure if it is a Canadian or Euro car but it's a left drive import of some sort, the VIN says it was made in Suzuka.
What I did not anticipate was how much I would enjoy this car, and fit well into it besides, at 6'4" (I owned a CRX once and same deal - was surprised big people fit well into the 2 seats so I thought I would check it out). It has a D15B7, 5-speed manual, no AC, no PS, no cruise. It is a nice, light, and simple platform to work with.
The car needed some work and I have been busily chipping away at the odds and ends each month. This forum has been very helpful and I thought I would show what I have been doing. I found a FSM and I’m actually having a lot of fun wrenching on this car. Let me say a few words about how this car is used and why I will make certain choices.
The winding road to work is bumpy and notoriously dotted with huge trees right on the white lines, deer, cliffs, rocks, skunks, up to 17% grades, stupid people that can’t stay in their lane, and ridiculous weather both 110o F +, and snow or ice in the winter. Each drive to or from work is like a rally run up or down the mountain! Minus the obstacles, it’s a pretty fun drive and this car is well suited to the task.
My plan is to make the car as good as it can be for this job, while still retaining the 34 mpg I have been getting on this drive. Also, the stock appearance is a bit simple, so I will do a few things to the appearance. Finally, a Thank You to all the contributors here on Honda-Tech. You really can find just about anything you need to know here with some searching, and when that fails, posting up a question.
The day I bought the car - pizza cutter 13"s!
Do they all have busted antennas? Fixed now though.
Interior is decent but needs some work.
Starting to clean up the motor - there's corrosion here - coastal car?
Fluids and all looked good, so I drove the 150 miles home, ran a little poorly but nothing show stopping.
Last edited by X E Ryder; 07-21-2013 at 07:25 AM.
 07-20-2013, 08:37 AM
#2
Honda-Tech Member
Thread Starter
Join Date: Jul 2013
Location: Northern California
Posts: 98
Likes: 0
Received 0 Likes
on
0 Posts
The interior was a little tired, and needed a few things. I replaced the driver side inside door latch – it was cracked in half from someone who did not know how to remove it I guess. There where a number of plugs that go in that roof lip / visor bar missing, the ash tray was broken, the foot pedals were worn through, owner’s manual missing, and no stereo. Majestic Honda to the rescue on all that oem stuff. The seat covers are about worn through but still comfortable, I tried out the Coverking custom covers and so far like them.
I require tunes when I drive, but I’m past the days when I liked to blow my head off with a pair of 12”s. A Pioneer CD / FM / Pandora / iPod deck and 2 pair of Pioneer 4-way 6 �” speakers is enough and the back ones are right by your head! Also, found a black replacement antenna for the busted stump that was left of the old one.
Seems like most aftermarket decks have trouble sitting back far enough for the DIN cage to bite, and the door to close without bumping the control ****, I found this older Metra 99-7891 kit which allows the deck to drop back another inch, but still requires a little mod to get it back far enough for the console to sit correctly.

Pioneer found a way to stuff a 6 3/4" spear into a 6 1/2" footprint, they are turned to best fit the wire taps and get the tweeters as high off the ground as possible. These will still fit under the stock cover without mods so you are not advertising them.

Blue seemed a good color for accenting, so I put blue lamps in all the dash back lighting, ashtray, dome and trunk lights. The trunk was filthy; cleaned that up and replaced the sagging lift supports.
These Coverking custom made covers fit pretty well for a seat cover, and the fabric is quite stout - the seats are comfortable so I did not feel like swapping them at this time.

I require tunes when I drive, but I’m past the days when I liked to blow my head off with a pair of 12”s. A Pioneer CD / FM / Pandora / iPod deck and 2 pair of Pioneer 4-way 6 �” speakers is enough and the back ones are right by your head! Also, found a black replacement antenna for the busted stump that was left of the old one.
Seems like most aftermarket decks have trouble sitting back far enough for the DIN cage to bite, and the door to close without bumping the control ****, I found this older Metra 99-7891 kit which allows the deck to drop back another inch, but still requires a little mod to get it back far enough for the console to sit correctly.
Pioneer found a way to stuff a 6 3/4" spear into a 6 1/2" footprint, they are turned to best fit the wire taps and get the tweeters as high off the ground as possible. These will still fit under the stock cover without mods so you are not advertising them.
Blue seemed a good color for accenting, so I put blue lamps in all the dash back lighting, ashtray, dome and trunk lights. The trunk was filthy; cleaned that up and replaced the sagging lift supports.
These Coverking custom made covers fit pretty well for a seat cover, and the fabric is quite stout - the seats are comfortable so I did not feel like swapping them at this time.
Last edited by X E Ryder; 07-20-2013 at 10:34 AM. Reason: added pics
07-20-2013, 09:17 AM
#4
Honda-Tech Member
Thread Starter
Join Date: Jul 2013
Location: Northern California
Posts: 98
Likes: 0
Received 0 Likes
on
0 Posts
07-20-2013, 09:29 AM
#5
Honda-Tech Member
thats a good looking sol.you got a good deal on it.mine has aftermarket wheels and the seats have been reupholstered as the drivers seat had lots of wear.i had it reupholstered in hot rod tweed(which is a single color but very wear resistant).the seats look stock ,they are black with a red stripe as per original.i installed a sony radio when the old one died and replaced the stock speakers but thats about it as far as mods go.
07-20-2013, 10:16 AM
#6
Honda-Tech Member
Thread Starter
Join Date: Jul 2013
Location: Northern California
Posts: 98
Likes: 0
Received 0 Likes
on
0 Posts
The road to work has two sections that are horrendous, one is so covered in asphalt patching, it’s like a frilling pavement-quilt, and the other is a winding grade with “smeared” pavement lips up to 4 inches high from semi trucks in 100+ weather, and is steep; up to 17% in a few spots. The middle part of the drive is faster, with lots of tight turns, but narrow and big trees or rocks on the white line.
Stock suspension was pretty sacked out, and very harsh over the rough stuff, and I did not care for the nose high stance. Lowering is out of the question for my usage though. The 13” steelies and 175/70-13 tires had a ton of sidewall wash around corners and obvious lack of footprint. I called a friend at KW automotive to see what he thought a best compromise between ride quality and handling would be.
I bought a new pair of 19mm swaybars with poly bushings from him, new gas charged struts, H&R OE sport springs, new bump stops, top bushing sets and associated hardware. In order to retain some sidewall and avoid bending wheels, I chose a 15” Sparco with 195/50-15 tires. I wanted to fill the fenders a bit more, but a taller tire would hurt me on that really steep grade.
Most of the oem rubber bushings on the car look pretty good actually, but I have my eye on a couple that will need to be swapped in a year or two. The H&R springs ride great which a simple premium oe gas charged strut replacement - it is a good mix with a performance spring, yet softer damper.

The front KW swaybar mounts under the pipe - when I put the free flow cat on I had the shop throw an offset in to make sure it didn't rattle - it was tight. The improvement from no bar to stiff bar was great. Hmm fuzzy pic - oh well.

The rear bar slipped in nice but I needed to massage the larger exhaust pipe on my bench with a ball peen to provide a clearance - patience and tapping yielded a smooth transition. Again the handling is great - it's like driving a roller skate!

The car sat pretty level after I got all that stuff on, and looks sort of Rally-ish, which I don’t mind, the drive in is a near perfect rally course anyway, right? I should video that. Also added, a 3 point aluminum front upper tower brace, and a cheapy front lower brace, that won't hurt my feelings if it eats a rock. But forget about the looks, the handling is excellent, and the ride immensely improved, even over all that chop in the bad spots. I'm pleased with the ride and handling, and I can still straddle rocks in the road, a common obstacle up here, they fall into the road all the time.
My other car is a Roller - j/k but I thought it was a funny pic.

Stock suspension was pretty sacked out, and very harsh over the rough stuff, and I did not care for the nose high stance. Lowering is out of the question for my usage though. The 13” steelies and 175/70-13 tires had a ton of sidewall wash around corners and obvious lack of footprint. I called a friend at KW automotive to see what he thought a best compromise between ride quality and handling would be.
I bought a new pair of 19mm swaybars with poly bushings from him, new gas charged struts, H&R OE sport springs, new bump stops, top bushing sets and associated hardware. In order to retain some sidewall and avoid bending wheels, I chose a 15” Sparco with 195/50-15 tires. I wanted to fill the fenders a bit more, but a taller tire would hurt me on that really steep grade.
Most of the oem rubber bushings on the car look pretty good actually, but I have my eye on a couple that will need to be swapped in a year or two. The H&R springs ride great which a simple premium oe gas charged strut replacement - it is a good mix with a performance spring, yet softer damper.
The front KW swaybar mounts under the pipe - when I put the free flow cat on I had the shop throw an offset in to make sure it didn't rattle - it was tight. The improvement from no bar to stiff bar was great. Hmm fuzzy pic - oh well.
The rear bar slipped in nice but I needed to massage the larger exhaust pipe on my bench with a ball peen to provide a clearance - patience and tapping yielded a smooth transition. Again the handling is great - it's like driving a roller skate!
The car sat pretty level after I got all that stuff on, and looks sort of Rally-ish, which I don’t mind, the drive in is a near perfect rally course anyway, right? I should video that. Also added, a 3 point aluminum front upper tower brace, and a cheapy front lower brace, that won't hurt my feelings if it eats a rock. But forget about the looks, the handling is excellent, and the ride immensely improved, even over all that chop in the bad spots. I'm pleased with the ride and handling, and I can still straddle rocks in the road, a common obstacle up here, they fall into the road all the time.
My other car is a Roller - j/k but I thought it was a funny pic.
Last edited by X E Ryder; 07-29-2013 at 06:13 PM.
07-21-2013, 08:32 PM
#7
Honda-Tech Member
Thread Starter
Join Date: Jul 2013
Location: Northern California
Posts: 98
Likes: 0
Received 0 Likes
on
0 Posts
I guess we may as well move on to the part of my project called �Ruh Roh!�
Take a look at this timing belt; the whole thing looks like this, end-to-end. The Honda service department said it showed no evidence of wear when I first bought the car a couple months ago. I was going to change it anyway but my previous attempt at the crank bolt spun a strap wrench on the crank pulley.

There is a left turn from one blind mountain road onto the windy highway that no matter how long you look, listen wait or time it, when you decide to turn left someone is going to pop up over the hill at 60. That is pretty much what happened (for about the 10th time) so I stomped it in 1st, 2nd and then Oh that sounds bad, clutch in, a dud-dud-dud. Metal hitting metal has a specific sound which once you have heard it, you know it, and it is a bad thing! Mentally about the same time you hear a �Chuh-ching� sound of the quick calculation you have made of both getting your car home and getting it on the road again.
Looks like I won�t have to wait to tear into this motor to freshen it up after all! Got the car back into the garage courtesy of AAA and the next morning after some drinking decided to tear it down.
Well as suspected it had wadded up the timing belt around the crank pulley. What a stinky mess. The crank bolt was the usual fun, but a couple 2x2�s in number 1 and 4 for backup and a 6 foot cheaper pipe broke it loose (exploded a �� extension on the first go).

Well the head did not look too bad! Having a hard time finding the destruction actually. As soon as the motor sound changed I knew there was a problem and stabbed the clutch � Saved it?

Pistons don�t look too bad either, actually all I can see is some carbon chipped off a couple of them. Going to have to dig a little deeper.

After dropping the pan and pulling the pistons, then cleaning them up, I finally found my tapper. It was this little mark on number 3 exhaust � dodged a bullet on this one I think.

Time to clean and inspect everything, and decide where to go from here. I expect to find bent valves on number 3 at minimum. Moral of the story: If you do not know the age of your timing belt, do whatever it takes to change it, or avoid driving it like you stole it!
Take a look at this timing belt; the whole thing looks like this, end-to-end. The Honda service department said it showed no evidence of wear when I first bought the car a couple months ago. I was going to change it anyway but my previous attempt at the crank bolt spun a strap wrench on the crank pulley.
There is a left turn from one blind mountain road onto the windy highway that no matter how long you look, listen wait or time it, when you decide to turn left someone is going to pop up over the hill at 60. That is pretty much what happened (for about the 10th time) so I stomped it in 1st, 2nd and then Oh that sounds bad, clutch in, a dud-dud-dud. Metal hitting metal has a specific sound which once you have heard it, you know it, and it is a bad thing! Mentally about the same time you hear a �Chuh-ching� sound of the quick calculation you have made of both getting your car home and getting it on the road again.
Looks like I won�t have to wait to tear into this motor to freshen it up after all! Got the car back into the garage courtesy of AAA and the next morning after some drinking decided to tear it down.
Well as suspected it had wadded up the timing belt around the crank pulley. What a stinky mess. The crank bolt was the usual fun, but a couple 2x2�s in number 1 and 4 for backup and a 6 foot cheaper pipe broke it loose (exploded a �� extension on the first go).
Well the head did not look too bad! Having a hard time finding the destruction actually. As soon as the motor sound changed I knew there was a problem and stabbed the clutch � Saved it?
Pistons don�t look too bad either, actually all I can see is some carbon chipped off a couple of them. Going to have to dig a little deeper.
After dropping the pan and pulling the pistons, then cleaning them up, I finally found my tapper. It was this little mark on number 3 exhaust � dodged a bullet on this one I think.
Time to clean and inspect everything, and decide where to go from here. I expect to find bent valves on number 3 at minimum. Moral of the story: If you do not know the age of your timing belt, do whatever it takes to change it, or avoid driving it like you stole it!
Trending Topics
07-22-2013, 02:47 AM
#8
O.G. triple O.G.
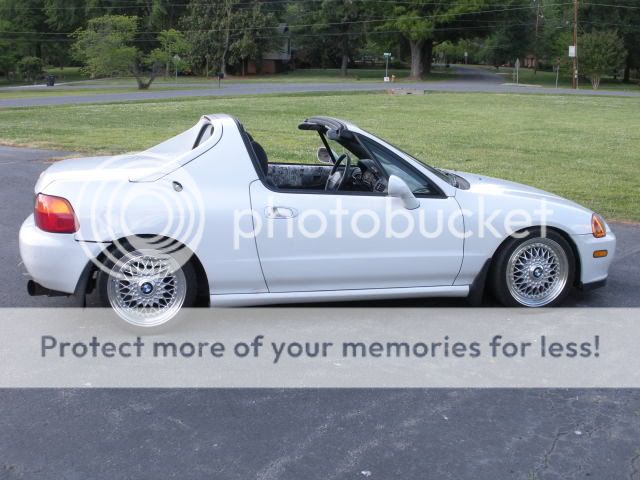
I would ditch the "blacked out" look. Here's a pic of my old Del Sol I had a few years back. There's nothing wrong with staying classy.
07-23-2013, 02:30 PM
#9
Honda-Tech Member
Thread Starter
Join Date: Jul 2013
Location: Northern California
Posts: 98
Likes: 0
Received 0 Likes
on
0 Posts
Hey nice Del Sol! I decided to do the White w/Black accents and little Blue, mainly because they use red sand on the roads all winter here in the mountains for ice traction. It practically "sand blasts" your wheels.
07-25-2013, 08:12 PM
#10
Honda-Tech Member
Thread Starter
Join Date: Jul 2013
Location: Northern California
Posts: 98
Likes: 0
Received 0 Likes
on
0 Posts
Well I got everything cleaned up and inspected, and the butcher’s bill was not bad at all! Turned out a little tap on number 3 piston and 2 bent exhaust valves. Now that it is apart, it would be silly not to freshen up a few things while I'm in here. I have a long-term plan for the car, but until the other motor is ready I would like to drive it to work, which is its (del) sol purpose after all.
I polished up the oem rail while it was out, and a high heat black wrinkle coat finish to restore the valve cover, the pistons are about carbon fee.

The crank journals look good, pistons, pins, cylinders, and rods all met the FSM specs. Got the requested 60o crosshatched honing done, and then a Lot of cleaning.

A quick shout to the old hands here, thanks, I did find I had 1 green, and 3 yellow rod bearings, they were ok, but had signs of wear, replaced them. Then plasti-gauged, measured end gap and installed new rings, lubed and painted a good coat of engine oil on the cylinders, dropped in the pistons and carefully brought them up to torque.
Just tap it in, just give it a little tappy! If you do this be real easy; the hammer is just to "sneak" the rings past the gap in the compressor to the cylinder, NOT to drive them in!

A final check in the pan and wiping with lint free rags and I buttoned it up as well. The head should be machined in a few more days and I can begin to put things back together. I suppose this is my chance to really do some cleaning in the engine compartment, WD-40 on a rag is great for dissolving 20 years of nasty!

I polished up the oem rail while it was out, and a high heat black wrinkle coat finish to restore the valve cover, the pistons are about carbon fee.
The crank journals look good, pistons, pins, cylinders, and rods all met the FSM specs. Got the requested 60o crosshatched honing done, and then a Lot of cleaning.
A quick shout to the old hands here, thanks, I did find I had 1 green, and 3 yellow rod bearings, they were ok, but had signs of wear, replaced them. Then plasti-gauged, measured end gap and installed new rings, lubed and painted a good coat of engine oil on the cylinders, dropped in the pistons and carefully brought them up to torque.
Just tap it in, just give it a little tappy! If you do this be real easy; the hammer is just to "sneak" the rings past the gap in the compressor to the cylinder, NOT to drive them in!
A final check in the pan and wiping with lint free rags and I buttoned it up as well. The head should be machined in a few more days and I can begin to put things back together. I suppose this is my chance to really do some cleaning in the engine compartment, WD-40 on a rag is great for dissolving 20 years of nasty!
Last edited by X E Ryder; 07-28-2013 at 07:19 AM.
07-25-2013, 08:22 PM
#11
Honda-Tech Member
Join Date: Jul 2010
Posts: 10
Likes: 0
Received 0 Likes
on
0 Posts
Keep up the good work. This car is being built with a purpose of enjoying an aggressive drive to a place of necessity. It some what reminds me Initial D. 
 07-26-2013, 08:47 PM
#14
Honda-Tech Member
Thread Starter
Join Date: Jul 2013
Location: Northern California
Posts: 98
Likes: 0
Received 0 Likes
on
0 Posts

Hmm, pardon me for not paying tribute to the Del Sol's Homeage; CRX!
Currently I plan to put what I have back together and beat it up and down the mountain for awhile until I have finished researching my options!
") 07-28-2013, 07:53 AM
07-28-2013, 07:53 AM
#16
Honda-Tech Member
Thread Starter
Join Date: Jul 2013
Location: Northern California
Posts: 98
Likes: 0
Received 0 Likes
on
0 Posts
Assembling The Top End
Despite being packed well, UPS managed to abuse the box my parts were in pretty good, but everything survived! This weekend I hope to get it all back together so I can drive it again.
While the work was done on the head I had them clean up the ports as well, The cam and rocker assemblies are just set in place, I will pull everything apart for one final look and cleaning before assembling.

The intake was step matched to the head and cleaned up a little bit also, everything was so dirty it was annoying me � it�s going to be nice to have a clean motor.

Got the intake mounted on the head (so much easier off the car), and carefully set the head, and buttoned up it and the cam, rocker assembly, then started plugging things back in. So far so good!

OK time for coffee and back to work! It's been really hot the last couple days but I'm not letting that slow my progress; these are my only days off!
 07-28-2013, 08:07 PM
#17
Honda-Tech Member
Thread Starter
Join Date: Jul 2013
Location: Northern California
Posts: 98
Likes: 0
Received 0 Likes
on
0 Posts
Got her all back together and after a double, triple recheck it was time for a crank – left the plugs out and poured some Lucas oil stabilizer over the cam lobes (this is awesome snotty, no friction stuff!), then landed the valve cover and cranked until the oil pressure light went off. Gapped and installed plugs then fired off and varied RPM around for a few minutes – everything seems OK. Started right up. Next I checked/adjusted fuel pressure, connected the timing light and set OEM spec as a baseline.
It was great to lower my car off the jack stands and go drive it again! Didn’t have any issues and spent a bit more time cleaning up under hood. After a couple drives I decided to bump the timing a bit and it pulls a bit better from 2,000 in 2nd all the way on a hill with no ping - think I will leave it here until I get to the tuner so we can make informed adjustments with a wideband and dyno.

It was great to lower my car off the jack stands and go drive it again! Didn’t have any issues and spent a bit more time cleaning up under hood. After a couple drives I decided to bump the timing a bit and it pulls a bit better from 2,000 in 2nd all the way on a hill with no ping - think I will leave it here until I get to the tuner so we can make informed adjustments with a wideband and dyno.
Last edited by X E Ryder; 07-29-2013 at 06:09 PM. Reason: Pic fix
08-08-2013, 05:48 PM
#18
Honda-Tech Member
Thread Starter
Join Date: Jul 2013
Location: Northern California
Posts: 98
Likes: 0
Received 0 Likes
on
0 Posts
Today I wanted to talk about the exterior modifications I made to my Del Sol and what influenced my choices. No matter what you do to the running gear of your car, everyone has to find his or her own expression in the outward appearance. I�m routinely impressed with the number of pleasant and sometimes-shocking results people come up with!
Starting with the lights, my oem headlights and turn signals had busted up tabs and opaque lenses that did not allow the headlamps to work well. Those had to go first because the road I drive is dangerous enough when you can see! I went ahead and replaced them with one-piece units with black backing and the auxiliary lights as well. I put in Sylvania Silverstar headlamps and new turn and aux lamps as well. The orange reflectors stood out like a sore thumb so I put in the clear ones. The taillights had been backed into something, so I went with single round tail lamp style in black background, and the small clear turn and backing lights. I used some 5-watt LEDs for the backups and they work great. To finish it off I used white LEDs in the license plate lamps.
Due to the horrid heat in the summer and snow in winter, I went with a VIS carbon fiber hood that had functional vents. The nice thing is there are threaded inserts under the hood and an included �drip pan� I can put in during the winter months, and run without in the heat of summer. I did not want the giant black gratings to show up in the white hood, so I put a swath of black up the middle. I have been using blue for accents so I broke up the white to black with Electron Blue about �� wide.
The last person on this planet that would want factory mud flaps is yours truly, but this time it made sense. They dump loads of red volcanic gravel on the roads in the winter for ice traction. Putting on a set of Honda mud flaps allows me to drive at speed with immunity from sand blasting the paint off behind the wheels.
In an effort to push some more air into the radiator and get rid of that �nose high� look of the front end, I added a Mugen style bumper lip to the front which I will not be bothering to paint � if I wipe it out with a rock this winter I�ll just get another.
Looking at that rear deck lid bothered me. It was just too much real estate to leave alone, but I did not want something obnoxious back there. I decided if it was good enough for Honda it was good enough for me and started searching for an oem Si wing. I never did find one but the best replica I came up with was from Wings West. It was very light but needed some body work to clean it up.

You can�t see it in this picture, but the center of the hood, the mirrors and the wing have a little blue pearl in the clearcoat. It is quite subtle but looks great in the right light.
Anyhoo, it runs up the grades whatever speed I like now, and is getting even better mileage than when I tore it down. Next I will be taking a drive to Driving Ambitions for a couple dyno pulls and the wideband to make sure all is well.
Starting with the lights, my oem headlights and turn signals had busted up tabs and opaque lenses that did not allow the headlamps to work well. Those had to go first because the road I drive is dangerous enough when you can see! I went ahead and replaced them with one-piece units with black backing and the auxiliary lights as well. I put in Sylvania Silverstar headlamps and new turn and aux lamps as well. The orange reflectors stood out like a sore thumb so I put in the clear ones. The taillights had been backed into something, so I went with single round tail lamp style in black background, and the small clear turn and backing lights. I used some 5-watt LEDs for the backups and they work great. To finish it off I used white LEDs in the license plate lamps.
Due to the horrid heat in the summer and snow in winter, I went with a VIS carbon fiber hood that had functional vents. The nice thing is there are threaded inserts under the hood and an included �drip pan� I can put in during the winter months, and run without in the heat of summer. I did not want the giant black gratings to show up in the white hood, so I put a swath of black up the middle. I have been using blue for accents so I broke up the white to black with Electron Blue about �� wide.
The last person on this planet that would want factory mud flaps is yours truly, but this time it made sense. They dump loads of red volcanic gravel on the roads in the winter for ice traction. Putting on a set of Honda mud flaps allows me to drive at speed with immunity from sand blasting the paint off behind the wheels.
In an effort to push some more air into the radiator and get rid of that �nose high� look of the front end, I added a Mugen style bumper lip to the front which I will not be bothering to paint � if I wipe it out with a rock this winter I�ll just get another.
Looking at that rear deck lid bothered me. It was just too much real estate to leave alone, but I did not want something obnoxious back there. I decided if it was good enough for Honda it was good enough for me and started searching for an oem Si wing. I never did find one but the best replica I came up with was from Wings West. It was very light but needed some body work to clean it up.
You can�t see it in this picture, but the center of the hood, the mirrors and the wing have a little blue pearl in the clearcoat. It is quite subtle but looks great in the right light.
Anyhoo, it runs up the grades whatever speed I like now, and is getting even better mileage than when I tore it down. Next I will be taking a drive to Driving Ambitions for a couple dyno pulls and the wideband to make sure all is well.
Last edited by X E Ryder; 08-09-2013 at 04:46 AM.
08-18-2013, 07:07 PM
#19
Honda-Tech Member
Thread Starter
Join Date: Jul 2013
Location: Northern California
Posts: 98
Likes: 0
Received 0 Likes
on
0 Posts
Today I finally got around to adding the Outside Temp gauge I picked up. The roads here are not forgiving if we have a freeze and you are not aware of it. Because the car has a metric cluster, I went with a display in Celsius. It works on 8-28vdc and has about a 3-foot temp lead. The sensor is in the fender well area near the door hinges, shielded from engine compartment heat. It is powered off the yellow power window feed with a 1-amp fuse.
Installation is quite straightforward. Pull the door panel, cut out the hole for the display, run the sensor, tied in the fused power wire and provide a ground. The best part is these gauges are available for about $10 and it takes less than an hour to install some ice-free peace of mind. I went with a blue display to match the rest of the dash back lighting.

Installation is quite straightforward. Pull the door panel, cut out the hole for the display, run the sensor, tied in the fused power wire and provide a ground. The best part is these gauges are available for about $10 and it takes less than an hour to install some ice-free peace of mind. I went with a blue display to match the rest of the dash back lighting.

Thread
Thread Starter
Forum
Replies
Last Post