
D15B7 and the adventure of valve seals.
 02-24-2015, 06:06 PM
#1
Hysterically Calm
Thread Starter
Tips and Tidbits I learned through this process that I hope one day may help someone else on down the road:
1) 1/2" rope is way to big to go through the spark plug hole. 3/8" may fit to do the rope trick (google it if you don't know what the rope trick is).
2) Lisle 36200 is the most practical spring compressor as it has a design to include keeper install. All others from what I've seen don't have anything specifically for install.
3) Before pulling off any springs and/or seals, double and triple check you have the piston at the top of the cylinder you are working on.
4) Torching the seals makes removal easier - a LOT easier. Use of valve seal pliers help too.
5) Use a straw (included with the felpro seal kit) to safely pass the seal past the keeper groove.
6) Lubricate the seal before install so it won't rip on install.
7) A 10mm 6 point socket fits perfectly over the seal for install. A deep well socket is the preferred socket to use.
8) A soft tap of a rubber mallet on the socket will seat the seal to the second click with little to no effort.
9) A 1/4" female to 1/8" male NPT adapter will let you transform most compression testers into a valve holder as long as you remember to remove the check valve core from the spark plug end.
10) Last tip (that I'm learning now).. If you pull the head off to do the valve seals or anything else, if you can pull the timing belt off the car, DO SO (no bullshit). You can protect the timing belt from everything when it's off the car. Protecting the timing belt might not be as easy to do with it on the car. It really is worth the hassle of getting that crank pulley bolt off being if the belt breaks you will likely be replacing more than just a belt.
Hope these tips are helpful to someone somewhere at some point.
Cheers.
My original post is below in quote for your reading pleasure.
Okay, I got my seals in and am picking up about 3 feet of 1/2 inch rope for the rope trick on my 95 civic cdm cx.
I've been planning my attack on the job and something occurred to me.
I wasn't planning on yanking my crank pulley but thinking about turning the the crank without the cam and cam gear installed made me wonder.... Is it going to be an issue turning the crank CCW with the belt in place around the water pump and crank gear but no cam gear to raise each piston up? Or is the best course of action to pull the crank pulley off so as to be able to remove the timing belt from the equation?
Last edited by TomCat39; 03-13-2015 at 08:20 PM.
 02-25-2015, 06:30 AM
#2
I like the tuna here
I don't see what the timing belt could do that isn't already being done by turning the crankshaft...it sounds like you're thinking the water pump needs to be in time or something, which, since I know you're a pretty knowledgeable guy, makes me think I'm misunderstanding the question. The only thing I can think of is that it will likely be harder to turn the crank without the valves opened by the camshaft, but other than that, I don't see any issues.
02-25-2015, 07:55 AM
#3
Honda-Tech Member

Join Date: Jul 2014
Location: Texas
Posts: 18
Likes: 0
Received 0 Likes
on
0 Posts
Follow how these guys do it. They do it with the rope and the head on the car. The tool they have it worth the 30 doll hairs. And taking the head off if you have time makes life way more easy changing valve seals
02-25-2015, 08:24 AM
#4
Hysterically Calm
Thread Starter
I don't see what the timing belt could do that isn't already being done by turning the crankshaft...it sounds like you're thinking the water pump needs to be in time or something, which, since I know you're a pretty knowledgeable guy, makes me think I'm misunderstanding the question. The only thing I can think of is that it will likely be harder to turn the crank without the valves opened by the camshaft, but other than that, I don't see any issues.
I mean the belt goes around the crank gear, the water pump and serpentines around the tensioner on up to the cam gear then back down to the crank gear.
Without the cam gear there will be serious slack in the belt so hopefully the belt won't be touched by the crank gear, but say it does grab a tooth and starts moving the belt some.... Is there any binding possibilities? Will it be more difficult to get the belt back in place as you can't see the water pump teeth, or the crank teeth with the cover and pulley still on?
Or am I just being overly cautious in my thinking and it won't be an issue at all?
@94_EG_Sedan I will watch the video when I get home. I suspect I've may have already seen it. I know it's easier to do seals with the head off, but I am strapped for cash so 100 bucks for another head gasket just isn't in the budget right now. But the oil consumption and smoking in engine braking (I live in a mountainous region of the NW) needs to be fixed on my super tight budget.
02-25-2015, 09:26 AM
#5
PHANTOM MENACE
iTrader: (2)
Join Date: May 2005
Location: SYCUAN NINE, CA, USA
Posts: 6,042
Likes: 0
Received 3 Likes
on
3 Posts
Overly cautious. If your intention is to remove the camshaft completely, the only possible thing the belt can grab onto teeth wise is the water pump gear and crank gear which are not clocked at all relative to one another. Safe practice is to remove at TDC, after you remove the camshaft all valves are closed and there's no potential to bend anything so spin the crank as needed. It might be wise to keep rotating in the correct direction but I'll be honest and say I've rotated as needed, which ever way was easier.
TIP: If you're still concerned, just pull up on the belt as you rotate the crank by hand. It'll keep tension on everything.
TIP: If you're still concerned, just pull up on the belt as you rotate the crank by hand. It'll keep tension on everything.
02-25-2015, 10:04 AM
#6
Hysterically Calm
Thread Starter
Overly cautious. If your intention is to remove the camshaft completely, the only possible thing the belt can grab onto teeth wise is the water pump gear and crank gear which are not clocked at all relative to one another. Safe practice is to remove at TDC, after you remove the camshaft all valves are closed and there's no potential to bend anything so spin the crank as needed. It might be wise to keep rotating in the correct direction but I'll be honest and say I've rotated as needed, which ever way was easier.
TIP: If you're still concerned, just pull up on the belt as you rotate the crank by hand. It'll keep tension on everything.
TIP: If you're still concerned, just pull up on the belt as you rotate the crank by hand. It'll keep tension on everything.
I was going to loosen the valve lash pegs before hand and then pull out the rocker assembly and camshaft (after loosening the belt tensioner). Without the rocker arm assembly all the valves should be closed anyway so I wasn't too concerned about piston to valve clearance. And I had already thought I would set the motor TDC as a starting point before loosening/removing anything. Also plan on plugging the oil return holes with paper towel so no keepers can go floating down to the oil pan.
Was just wondering if there was any concern about the belt moving loosely through the water pump/tensioner pathway.
By the responses I'd say it's good to know that I was on the side of over thinking it. This is my first trip around this block, not to sure who the neighbors are and if they are friendly.


Trending Topics
02-25-2015, 01:59 PM
#8
How to replace valve stem seals with head on - YouTube
Follow how these guys do it. They do it with the rope and the head on the car. The tool they have it worth the 30 doll hairs. And taking the head off if you have time makes life way more easy changing valve seals
Follow how these guys do it. They do it with the rope and the head on the car. The tool they have it worth the 30 doll hairs. And taking the head off if you have time makes life way more easy changing valve seals
02-25-2015, 03:12 PM
#9
Hysterically Calm
Thread Starter
LoL, probably for the hammer and socket trick to remove the valve springs. I'd personally recommend a rubber mallet over the hammer though just in case you miss strike the deep well socket.
I plan on using a fast set and release over head valve spring compressor tool myself.
I plan on using a fast set and release over head valve spring compressor tool myself.

 02-25-2015, 06:52 PM
#11
Hysterically Calm
Thread Starter
I see your hate of Honda's is evident... D series non "vtak" economy motor SOHC.
This is what I'll be using:

This is what I'll be using:
 02-28-2015, 09:28 PM
#13
Hysterically Calm
Thread Starter
Was going to do this job this weekend but found out with a quickness that 1/2 inch rope is WAAAAY too thick to squeeze through the spark plug hole. The hole is a 14mm spark plug size.
Anyways, for just under 5 bucks after tax, I picked up a 1/4 inch to 1/8 inch brass adapter. Screwed an air hose quick release adapter into the 1/4 inch side, and the 1/8 inch screwed into where the gauge was screwed into on my compression tester. So for less than 4 bucks I turned my compression tester into a valve holder air hose.
Maybe this tip or trick might help someone else in the future. For me, now I look forward to the next fine weather weekend to torch my old valve seals off.
That's another tip for folks in the future, torching the seals makes the old seals come off sooooo much easier. As was proven with my old junker head that was a real pita getting the seals off even with pliers, until I broke out the torch that is.
Cheers.
03-07-2015, 06:19 PM
#14
Hysterically Calm
Thread Starter
Well I fucked up something fierce.
I got through 1 then 4 then did 3 and when I dropped my 3/8" extension into 2, it must have caught the lip so I thought it was TDC. I plug in the compressor, take all 4 valve springs off. Turn off my noisy *** little compressor and proceeded to torch the first valve seal. Pulled off the seal and watched the valve drop into the cylinder.
FML.......
I found out the my extendable magnet is smaller than the valve stem so I am going to try like hell to see if I can't just somehow get that valve back up into it's guide.
I managed to get the 3 other springs back on enough to hold the valves in place so they won't drop in.
After I saw the valve drop in, I took out the compressor hose and drop the extension into the plug hole only to see it fall in to it's head.
Anyways, that's the end of my rant. And here is a pre-warning to any other newbs like me, don't get distracted and triple check that your piston is TDC before you go and pull them valve springs and seals.
I'm hoping beyond hope I can pull off some sort of miracle and not have to pull the ******* head for one lousy valve.
It was going perfectly too up to that point. Got 4 lousy seals to go and it's too dark to work and I'm too frustrated and pissed at myself to continue today.
03-08-2015, 07:22 AM
#15
GDD's Resident Derp
 03-09-2015, 08:44 AM
#16
Hysterically Calm
Thread Starter
Well, a simple job turned into a massive undertaking.
Got the head pulled, and two hours of plastic razor blade, 1000 grit wet sanding and a whole lot of elbow grease, got the graphite crap gasket residue off the block.
Pulled my old head out of storage, did the valve seals on it (tighter valve guides). And I tell ya, I can definitely attest to the tighter springs on the 95 head over the 93 head. My thumbs really payed dearly on keeper install.
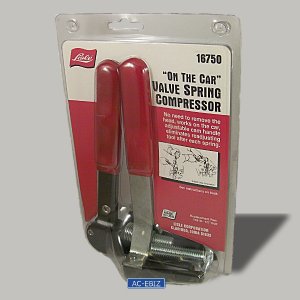
The spring compressor I bought:

Sucked ***** to do the install. Worked fine to get the keepers out and springs off, but was **** to put them back on.
I am going to get and will follow suit of everyone else and recommend this one for all future jobs:
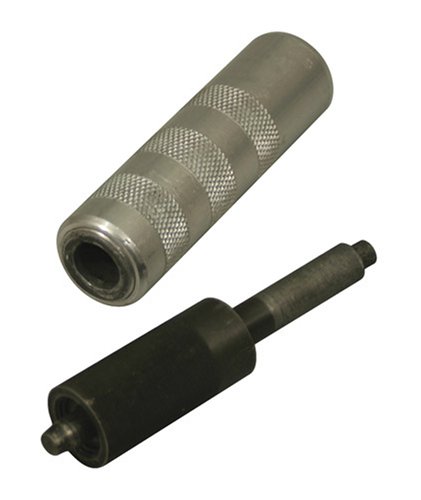
This one will work on even be series heads and makes life soooooo much simpler. If I had titanium springs and retainers, I would never have gotten them installed as I was having to push the springs down with my thumbs to get the keepers to catch in place.
Anyways, new D16Y8 felpro MLS head gasket in place. A couple of bolts popped when I was double checking the torque with a second torque wrench so today when it warms a bit I will back off each bolt a quarter turn and retorque to 53 ft lbs which is spec for the D16Z6 (used an MLS). I will do this one at a time in the proper crisscross pattern.
After that I get to put on the new intake gasket, torque up the manifold, put on the reused exhaust gasket, torque up those nuts, do the two bolts under the car for the intake brace, set tension on the timing belt, torque the tensioner. Fill up the coolant, check the oil level (also pour some oil over the head as it's a bit dryer than the recently used head), do up the valver cover and then I can start her up and burp her. This should allow at least another hour or two (with valve lash adjustment thrown in) for the MLS to settle into the last retorque.
A one day job turned into 3 days of misery.
Probably is a good thing though because I believe the exhaust valve guides on #4 are beyond spec and is why it was sucking so much oil as my #4 spark plug was fouled again.
Late this afternoon will be the moment of truth.
Got the head pulled, and two hours of plastic razor blade, 1000 grit wet sanding and a whole lot of elbow grease, got the graphite crap gasket residue off the block.
Pulled my old head out of storage, did the valve seals on it (tighter valve guides). And I tell ya, I can definitely attest to the tighter springs on the 95 head over the 93 head. My thumbs really payed dearly on keeper install.
The spring compressor I bought:
Sucked ***** to do the install. Worked fine to get the keepers out and springs off, but was **** to put them back on.
I am going to get and will follow suit of everyone else and recommend this one for all future jobs:
This one will work on even be series heads and makes life soooooo much simpler. If I had titanium springs and retainers, I would never have gotten them installed as I was having to push the springs down with my thumbs to get the keepers to catch in place.
Anyways, new D16Y8 felpro MLS head gasket in place. A couple of bolts popped when I was double checking the torque with a second torque wrench so today when it warms a bit I will back off each bolt a quarter turn and retorque to 53 ft lbs which is spec for the D16Z6 (used an MLS). I will do this one at a time in the proper crisscross pattern.
After that I get to put on the new intake gasket, torque up the manifold, put on the reused exhaust gasket, torque up those nuts, do the two bolts under the car for the intake brace, set tension on the timing belt, torque the tensioner. Fill up the coolant, check the oil level (also pour some oil over the head as it's a bit dryer than the recently used head), do up the valver cover and then I can start her up and burp her. This should allow at least another hour or two (with valve lash adjustment thrown in) for the MLS to settle into the last retorque.
A one day job turned into 3 days of misery.
Probably is a good thing though because I believe the exhaust valve guides on #4 are beyond spec and is why it was sucking so much oil as my #4 spark plug was fouled again.
Late this afternoon will be the moment of truth.
03-09-2015, 04:59 PM
#17
Hysterically Calm
Thread Starter
Original post in quote, skip past quote if it's TL don't wanna read.
Scratch that. A good nights sleep and a clear head makes so much difference.
I think the head gasket is fine. After doing a 5 minute drive (3-5 kilometers) in my subaru sounding civic. Parked it and retraced my steps. And googled subaru sounding civic with results of misfires and a few other things.
Thinking back, 3 days of warm weather and cold nights, the dew was dripping off the car every morning. That explains all the spittle from the exhaust. Never got hot eneough to burn it off as I haven't gotten a solid drive in.
The funny running was me thinking I could take a short cut on the valve lash adjustment. #4 and #2 are maladjusted. I did my wife's car one at a time and it sounds and runs fine. On mine, I thought since the pistion is TDC on 4 at teh same time 1 is set TDC I could do the adjustment. Then rotated the crank 180 degrees and adjusted 3 and 2. So 4 and 2 were adjusted on the wrong cycle and I believe that's why it's improper. Idles okay, revs okay, but under load not so well.
I will be doing the adjustment properly tonight the proper way. And I'm confident I will have my car back to normal and a sturdier head gasket to boot and hopefully less oil consumption now that there is new viton valve seals installed.
I really didn't think it would matter which part of the cycle as long as the piston was TDC to do the valve lash. It seems it's critical. I will confirm after tonight and edit my post with the results. But I'm pretty sure we all know what they will be.
Ciao.
Addendum: Success, I now have a normal sounding civic that has it's power back and purrs like a kitten on steroids. Timed her tonight and put her to bed. From what I've been able to find, the Felpro 9915PT head gasket has a compressed thickness of 0.027" and with the calculator at zealworks, my compression ratio has gone from 9.25 to 9.73 and I know my head gasket will outlast the graphite one it had for unknown kilometers.
Glad that fiasco is over with. Way too many hours put in on this but it has been a great experience builder.
Fubar, 5 hours of putting it back together and burping her and it looks like shows spitting coolant and a **** ton of carbon. She's been ran but not driven for about 30 minutes or so. Shut off two or three time in between. Realized I didn't put alternator belt on first time after first start. Then had to shut her off cuz I forgot the valve cover ground cable. Then just let her do her thing for about 20 minutes after that.
Head sounds extra chattery. I did the valve lash adjustment to the middle ground, might be a little towards the loose end of the spec but should be within spec 0.009" max intake and 0.011" max for exhaust.
If the valve lash is on the loose side is it noisier?
As for the head gasket, before I even did anything, this afternoon, I loosened each head bolt 1/8th a turn and retorqued to the 53 ft-lbs called for in the FSM for a D16Z6. I did this one at a time, loosened a touch, and torqued, moved to second bolt, loosened a touch then retorqued. I then spent 3+ hours getting everything else back on before starting her.
I'm thinking maybe I should have sprayed the head gasket down with permatex high tack spray. It looks like what the previous mechanic did on the old engine. Always read you aren't supposed to use anything on a head gasket but considering the circumstances of not having the ability to have the block taken to a machine shop and hand cleaning it as best as possible and switching to the ultra fine MLS gasket for a D16Y8.....
Anyways, gonna drive her a little tonight and check the oil and make sure it's not mixing. And I guess I will be doing the head gasket job again next weekend. This time with the D15B7 leak MLS gasket from Honda.
Was hoping to get the slight compression ratio increase of using the D16Y8 gasket.
I really don't have the ability to take the block in for refinishing. I know it's flat just maybe not as smooth as it needs to be for the Y8 MLS gasket.
Car was running fine prior to dropping the valve into the cylinder with the exception of fouling plug #4 due to worn out exhaust valve seals and likely guides.
Anyone got some good tips? This is the first time I've done a re and re of a head? She's running just prolly not as well as she should be.
I think the head gasket is fine. After doing a 5 minute drive (3-5 kilometers) in my subaru sounding civic. Parked it and retraced my steps. And googled subaru sounding civic with results of misfires and a few other things.
Thinking back, 3 days of warm weather and cold nights, the dew was dripping off the car every morning. That explains all the spittle from the exhaust. Never got hot eneough to burn it off as I haven't gotten a solid drive in.
The funny running was me thinking I could take a short cut on the valve lash adjustment. #4 and #2 are maladjusted. I did my wife's car one at a time and it sounds and runs fine. On mine, I thought since the pistion is TDC on 4 at teh same time 1 is set TDC I could do the adjustment. Then rotated the crank 180 degrees and adjusted 3 and 2. So 4 and 2 were adjusted on the wrong cycle and I believe that's why it's improper. Idles okay, revs okay, but under load not so well.
I will be doing the adjustment properly tonight the proper way. And I'm confident I will have my car back to normal and a sturdier head gasket to boot and hopefully less oil consumption now that there is new viton valve seals installed.
I really didn't think it would matter which part of the cycle as long as the piston was TDC to do the valve lash. It seems it's critical. I will confirm after tonight and edit my post with the results. But I'm pretty sure we all know what they will be.
Ciao.
Addendum: Success, I now have a normal sounding civic that has it's power back and purrs like a kitten on steroids. Timed her tonight and put her to bed. From what I've been able to find, the Felpro 9915PT head gasket has a compressed thickness of 0.027" and with the calculator at zealworks, my compression ratio has gone from 9.25 to 9.73 and I know my head gasket will outlast the graphite one it had for unknown kilometers.
Glad that fiasco is over with. Way too many hours put in on this but it has been a great experience builder.
Last edited by TomCat39; 03-12-2015 at 01:27 PM. Reason: formatting
03-11-2015, 06:41 PM
#18
Hysterically Calm
Thread Starter
Just when I thought the saga was over and planning on doing a summary post with just small highlights to help out others.
Coming home from work and the car just quits on me. Tried starting her back up and sounds like no compression. Just sounds flat. First thought is the new head gasket blew. No oil or coolant mix, no cloud of smoke and the car just died, no sputter nothing. Just running perfect and instant nothing.
BCAA driver was a mechanic for many years and he says head gasket wouldn't act like that when it blew and asked if I replaced the timing belt when I did the head gasket. I told him no as the belt isn't that old and I don't have even close to the mileage on it.
But here is the kicker. When I was putting the car back together on Monday when I was spinning the crank I found a portion of the belt about equal in length to the curve of the bottom of the timing belt cover, that was soaked in oil. It sat in the oil over night.
I washed the oil off with brake clean and had a bad feeling about it but dismissed it as I was dealing with my first head gasket job and hoped that cleaning it up as soon as I discovered it would be fine. It seems now the bad ominous feeling I had was warranted.
I haven't confirmed but I suspect the belt did snap and now I have to see if any of the valves are bent and it's raining out so will have to wait a day or two before I can start poking around.
Now for the new questions... I have oil leaking down by my front crank seal area (as was indicated by the oil soaked portion of the timing belt). I will be pulling off my crank pulley by the looks so will be looking to take care of that while it's already apart.
Question..., Is it possible for the oil pump to be leaking in that crank seal area while the front crank seal be sealed and fine? Or should I assume it all needs to be done and do the oil pump o-ring, pan gasket and front crank seal?
03-11-2015, 08:46 PM
#19
Hysterically Calm
Thread Starter
This many views and no one willing to speak to me..... 
Now isn't that just a pile of
Now isn't that just a pile of
Last edited by TomCat39; 03-12-2015 at 01:28 PM.
03-12-2015, 08:15 PM
#20
Hysterically Calm
Thread Starter
Confirmed, belt snapped. Valve clearances seem fine when I put the cam gear in each of the 4 quadrants.
Going to pump air into each cylinder and listen for air in the intake or exhaust.
#3 may have a slight issue with the intake valves, they seemed a touch loose but not as loose as I would suspect if I had bent them. Either way need to know if all the valves still seal.
Here is to hoping I get away with just a new timing belt (and front main seal etc) and not have to pull the head again.
I can only hope someone with experience will actually answer me a question.
What is the best position for the cam shaft/gear when taking off the crank pulley belt? Is there a safe position in the event the crank spins when attempting to under the crank pulley bolt?
03-13-2015, 02:20 PM
#21
Hysterically Calm
Thread Starter
Well, I'll post what I found as it might be useful to someone. And this might not be 100% accurate but as far as I could tell, as long as the cam is in one of the TDC positions for one of the cylinders, spinning the crank all the pistons seem to miss all the valves.
I suspect the cam has to be half way in between one of the TDC positions for the valves not to clear the pistons.
And fortunately for me, when belt broke and it left the cam TDC for number one if you can believe that. All 4 cylinders sealed up just fine to push the piston down with only 20 psi of air pressure.
Last edited by TomCat39; 03-13-2015 at 08:15 PM. Reason: mental dyslexia on part terminology
03-14-2015, 10:25 AM
#22
I like the tuna here
I hate to hear about all your hassles with this car, I know sometimes it's just one thing after another, and I empathize. Usually when the timing belt snaps the cams will spin to their most "natural" location, which is where the valves are most closed. Sometimes this doesn't happen fast enough to stop the piston from hitting one, but after it's done, you almost certainly won't hit the valves when rotating the crank. If you cranked it over after it stopped running (and let's face it, everyone, including me, does) then if the pistons were going to hit the valves they would have already.
03-14-2015, 05:50 PM
#23
Hysterically Calm
Thread Starter
I hate to hear about all your hassles with this car, I know sometimes it's just one thing after another, and I empathize. Usually when the timing belt snaps the cams will spin to their most "natural" location, which is where the valves are most closed. Sometimes this doesn't happen fast enough to stop the piston from hitting one, but after it's done, you almost certainly won't hit the valves when rotating the crank. If you cranked it over after it stopped running (and let's face it, everyone, including me, does) then if the pistons were going to hit the valves they would have already.
Wasn't until later I learned even if the gasket blew it would still been running just not well. Timing belt on the other hand kills the car instantly.
Got lucky, no bent valves and new timing belt on the car and she runs like a champ again.
Did notice the brand new #4 spark plug was significantly darker than the other 3. It was the cylinder sucking in all the oil for the last couple of years. Will have to keep an eye on it and think I will do Forte Prelube engine cleaner a few times to be sure the rings aren't sticking. Should also do a current compression test as it was last year I did one and then the compression was still high on all 4.
Thanks for the empathy and the info about the valves. That seems to ring true with what I just experienced including when I was testing the cylinders with air for seal.

Thread
Thread Starter
Forum
Replies
Last Post
importboi22
All Motor / Naturally Aspirated
10
03-05-2004 11:19 PM