

 03-25-2015, 09:20 AM
Last edit by: IB Advertising
See related guides and technical advice from our community experts:
Browse all: Engine and Powertrain
- Honda Accord: How to Adjust Valves
Step by step instructions for do-it-yourself repairs.
Browse all: Engine and Powertrain

Tech Article: Valve Lash Adjustment
07-11-2005, 01:53 PM
#1
Honda-Tech Member
Thread Starter
Join Date: Aug 2002
Location: Westslope, CO, United States
Posts: 3,048
Likes: 0
Received 0 Likes
on
0 Posts
I AM NOT RESPONSIBLE FOR ANY DAMAGE DONE TO YOUR VEHICLE. THIS IS ONLY A GUIDE TO SHOW YOU HOW I WOULD PERFORM A VALVE ADJUSTMENT ALONG WITH FACTORY SPECIFICATIONS
Specs:
Exhaust: .009-.011"
Intake: .007-.009"
These specs are with the engine completely cool. This takes several hours after achieving standard operating temp. It is best to let the car sit overnight and do this.
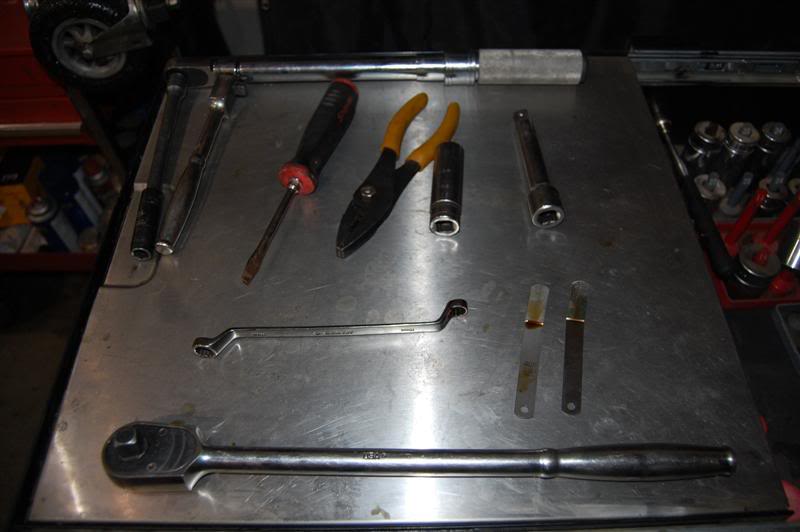
Tools Needed:
1/2" Ratchet
6" 1/2" Drive extension
Pliers
10mm Socket 3/8" Drive
17mm Socket 1/2" Drive
Torque Wrench
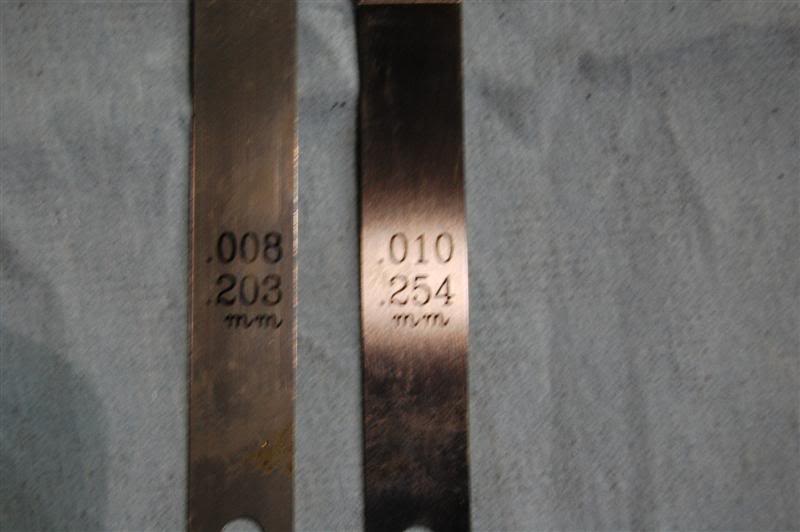
Feeler Gauges .008" and .010"
10mm end wrench
Pic of tools I used.
First thing I did was jack up the front of my car on the driver side tow hook and turn the wheels all the way to the left
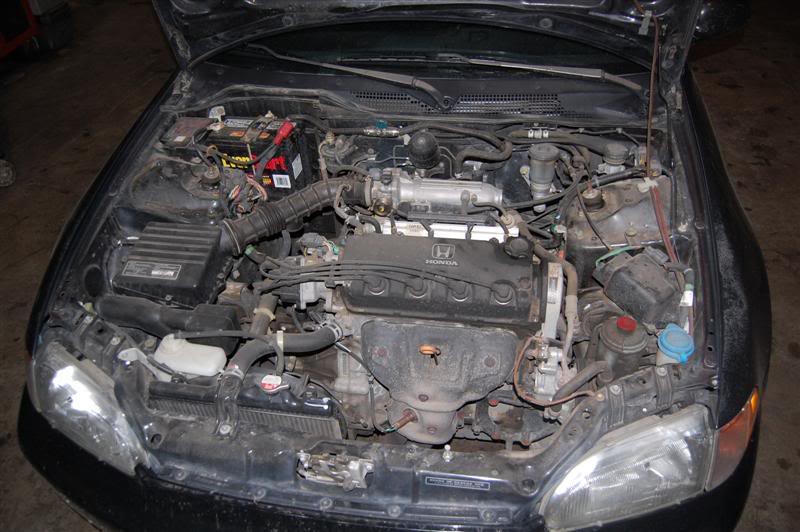
Next the hood is popped. You should see something like this
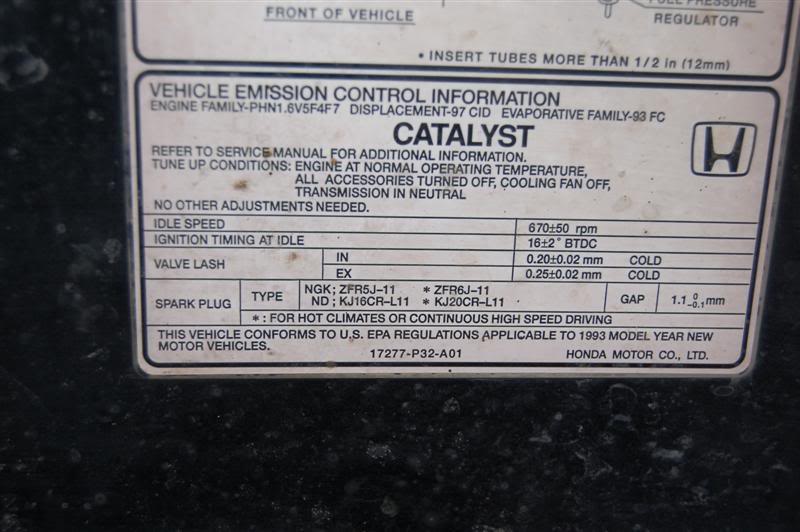
I got the specs from the tag on the underside of the hood. Here is a pic of what it looks like.
Remove all plug wires. If they are not numbered...keep track of them. Mine were numbered so its not really too hard to keep track of them
Next is to remove 5 10mm bolts. They are circled in red in the pic
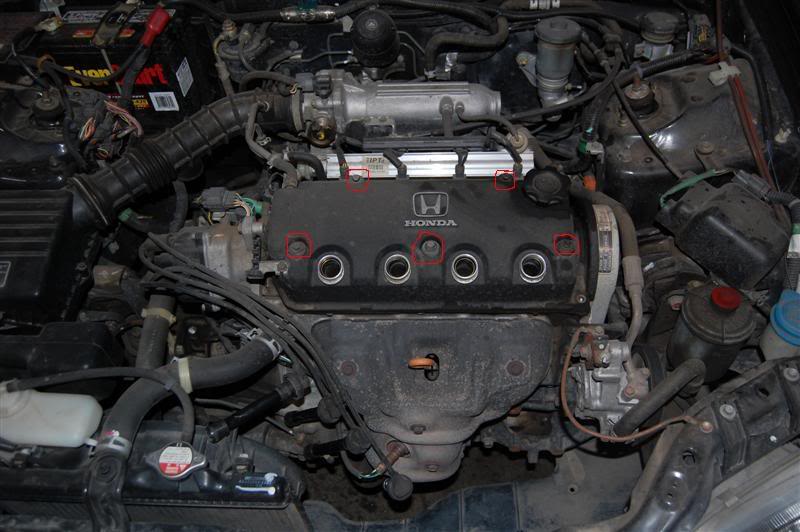
After removing the 5 bolts, only other thing holding the valve cover on is the breather tube that connects the crankcase to the intake. Use pliers to remove this by squeezing the tabs on the clamp together making it larger than normal. Side it back on the hose and remove the hose.

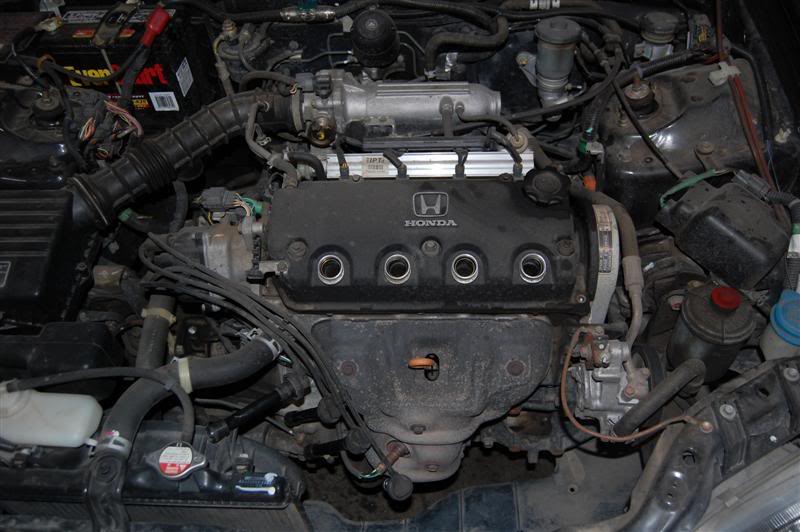
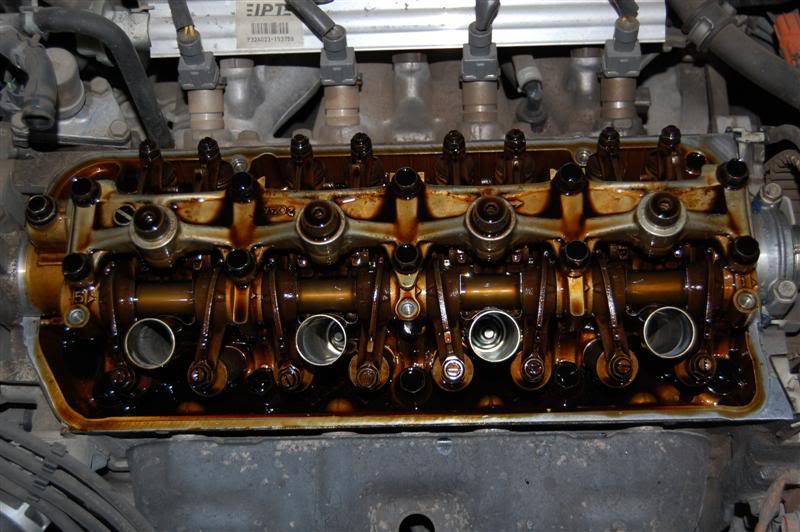
After removing the vent, the valve cover comes right off. You should see this after removing valve cover
Here comes the hardest part. Honda suggests that every cylinder have the valves checked with it at TDC (Top Dead Center) of the compression stroke. With all of the engines that I have built I set all valves for the cylinder at TDC and then do the intake valves for the next cylinder and then the exhaust. Now you must either set #4 to TDC or #1 to TDC. The easiest way I've found to find this is to watch for valve overlap of the sister cylinder. When the sister cylinder is in valve overlap (the intake valves start to open while the exhaust valves are still closing) the sister cylinder is just getting ready to fire. I understand that at valve overlap that the cylinder is not at true TDC, but it is very close. To do this use your 17mm socket and the 6" extension to turn the crank pulley counterclockwise from the front of the engine. Make sure your car is in neutral...it will make turning it much easier

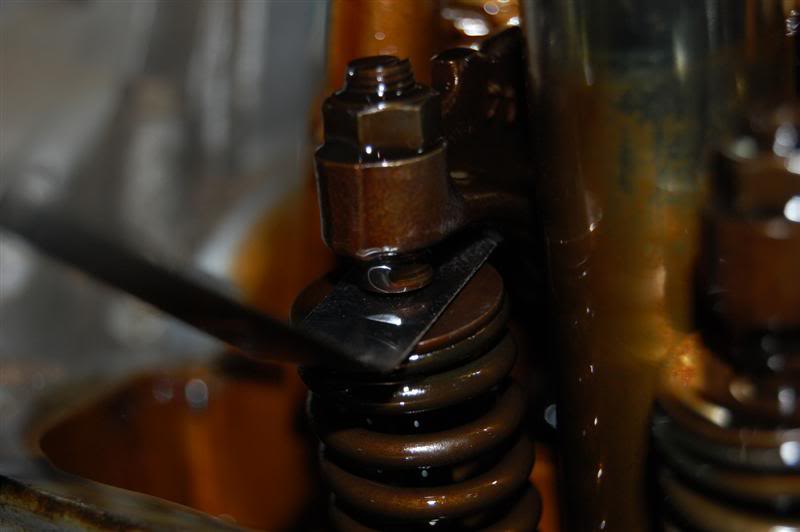
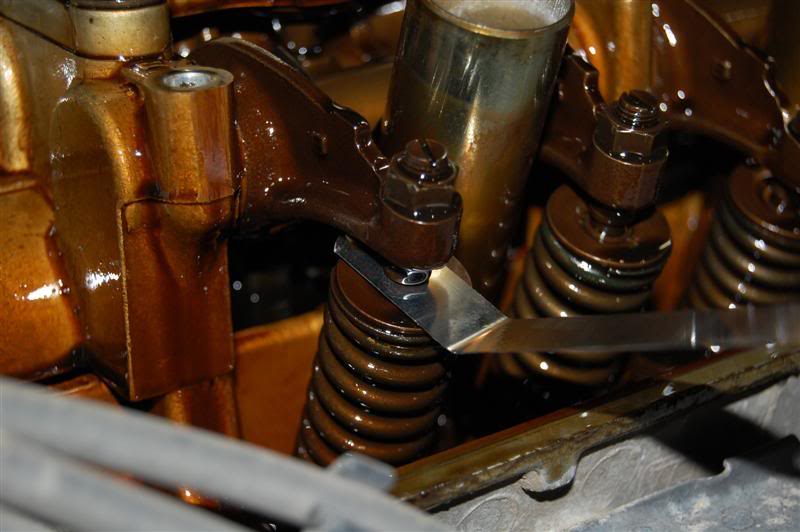
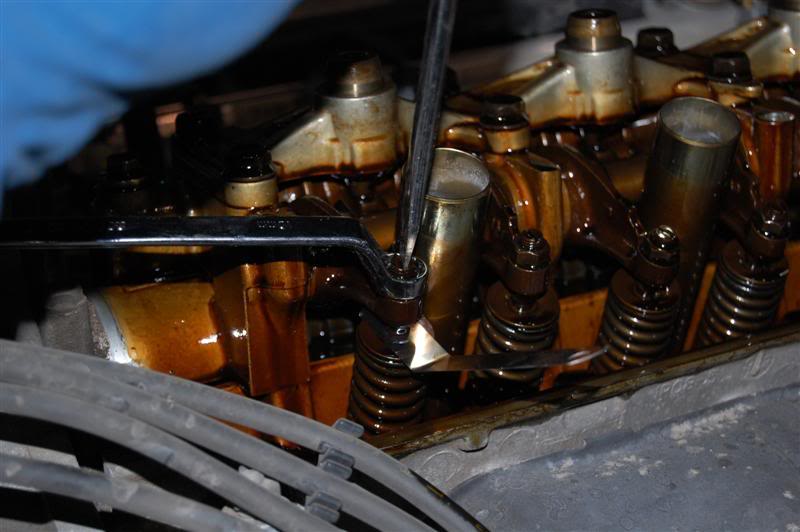
After finding TDC use your feeler gauge to inspect the tolerances. Measure this between the rocker arm and the tip of the valve assembly. Check the top of this page for the tolerances
For those of you that haven't been around feeler gauges this is what they look like. I use angled ones to make the job a little easier but any will do. I just simply get the feeler gauges that correspond with the specs it calls for. They are engraved with mm and inch settings
If the tolerance is out of spec, you simply need to break loose the 10mm nut on the rocker assembly and use a flat blade screwdriver to either loosen or tighten the space between the two items. Some people prefer to move the feeler gauge in and out and feel for a slight drag. I personally just leave the feeler in position, tighten it down, and if it snaps out I have it tight enough. After doing it by hand, I check all nuts that I loosened with a torque wench to 14ft/lbs on the D16Z6 and D15Z1 motors (10ft/lbs on the D15B7 and D15B8 motors). I then check all adjustments again and move on
When #1 cylinder is on TDC, this would be the closest to the driver side, I set all 4 valves for that cylinder, the intake valves on #2, and the exhaust valves on #3. After this you rotate the engine 360* and put #4 cylinder on TDC with #1 cylinder on overlap. Once again overlap is when exhaust valves are closing with intake still opening. You can make sure of this by grabbing the rocker arm with your fingers and try and move it up and down. It should have no play on either intake or exhaust. With #4 on TDC I set all 4 valves for #4 cylinder, intake valves on #3 cylinder and exhaust valves on #2. Check all with a torque wrench and after wards check to make sure clearance hasn't changed
After done, replace the valve cover and tighten all 5 bolts to 7ft/lbs and re-connect the breather to the valve cover. Put all spark plug wires back in proper place. Lower car to ground and check for anything that looks out of place. That's it.....took me probably 30 minutes taking pictures and all, its really not that bad. Hopefully I took some good pics for you guys and again I apologize for taking so long. If there is anything else you would like see done let me know and I'll do my best to do it for you
-Kris
Modified by HeikDiesel at 10:36 PM 10/22/2008
Specs:
Exhaust: .009-.011"
Intake: .007-.009"
These specs are with the engine completely cool. This takes several hours after achieving standard operating temp. It is best to let the car sit overnight and do this.
Tools Needed:
1/2" Ratchet
6" 1/2" Drive extension
Pliers
10mm Socket 3/8" Drive
17mm Socket 1/2" Drive
Torque Wrench
Feeler Gauges .008" and .010"
10mm end wrench
Pic of tools I used.
First thing I did was jack up the front of my car on the driver side tow hook and turn the wheels all the way to the left
Next the hood is popped. You should see something like this
I got the specs from the tag on the underside of the hood. Here is a pic of what it looks like.
Remove all plug wires. If they are not numbered...keep track of them. Mine were numbered so its not really too hard to keep track of them
Next is to remove 5 10mm bolts. They are circled in red in the pic
After removing the 5 bolts, only other thing holding the valve cover on is the breather tube that connects the crankcase to the intake. Use pliers to remove this by squeezing the tabs on the clamp together making it larger than normal. Side it back on the hose and remove the hose.
After removing the vent, the valve cover comes right off. You should see this after removing valve cover
Here comes the hardest part. Honda suggests that every cylinder have the valves checked with it at TDC (Top Dead Center) of the compression stroke. With all of the engines that I have built I set all valves for the cylinder at TDC and then do the intake valves for the next cylinder and then the exhaust. Now you must either set #4 to TDC or #1 to TDC. The easiest way I've found to find this is to watch for valve overlap of the sister cylinder. When the sister cylinder is in valve overlap (the intake valves start to open while the exhaust valves are still closing) the sister cylinder is just getting ready to fire. I understand that at valve overlap that the cylinder is not at true TDC, but it is very close. To do this use your 17mm socket and the 6" extension to turn the crank pulley counterclockwise from the front of the engine. Make sure your car is in neutral...it will make turning it much easier
After finding TDC use your feeler gauge to inspect the tolerances. Measure this between the rocker arm and the tip of the valve assembly. Check the top of this page for the tolerances
For those of you that haven't been around feeler gauges this is what they look like. I use angled ones to make the job a little easier but any will do. I just simply get the feeler gauges that correspond with the specs it calls for. They are engraved with mm and inch settings
If the tolerance is out of spec, you simply need to break loose the 10mm nut on the rocker assembly and use a flat blade screwdriver to either loosen or tighten the space between the two items. Some people prefer to move the feeler gauge in and out and feel for a slight drag. I personally just leave the feeler in position, tighten it down, and if it snaps out I have it tight enough. After doing it by hand, I check all nuts that I loosened with a torque wench to 14ft/lbs on the D16Z6 and D15Z1 motors (10ft/lbs on the D15B7 and D15B8 motors). I then check all adjustments again and move on
When #1 cylinder is on TDC, this would be the closest to the driver side, I set all 4 valves for that cylinder, the intake valves on #2, and the exhaust valves on #3. After this you rotate the engine 360* and put #4 cylinder on TDC with #1 cylinder on overlap. Once again overlap is when exhaust valves are closing with intake still opening. You can make sure of this by grabbing the rocker arm with your fingers and try and move it up and down. It should have no play on either intake or exhaust. With #4 on TDC I set all 4 valves for #4 cylinder, intake valves on #3 cylinder and exhaust valves on #2. Check all with a torque wrench and after wards check to make sure clearance hasn't changed
After done, replace the valve cover and tighten all 5 bolts to 7ft/lbs and re-connect the breather to the valve cover. Put all spark plug wires back in proper place. Lower car to ground and check for anything that looks out of place. That's it.....took me probably 30 minutes taking pictures and all, its really not that bad. Hopefully I took some good pics for you guys and again I apologize for taking so long. If there is anything else you would like see done let me know and I'll do my best to do it for you
-Kris
Modified by HeikDiesel at 10:36 PM 10/22/2008
Last edited by TomCat39; 03-22-2015 at 05:01 PM. Reason: Clarifying lash lock nut torques for all 92-95 USDM motors.
 07-11-2005, 02:14 PM
#5
Honda-Tech Member
<TABLE WIDTH="90%" CELLSPACING=0 CELLPADDING=0 ALIGN=CENTER><TR><TD>Quote, originally posted by Pioneer162 »</TD></TR><TR><TD CLASS="quote">how much is the feeler tool and where can I get it?</TD></TR></TABLE>
Try sears. Can't be more than $10 for a set of different sizes.
Try sears. Can't be more than $10 for a set of different sizes.
07-11-2005, 02:15 PM
#6
Join Date: Sep 2004
Location: Cleveland, OH, USA
Posts: 771
Likes: 0
Received 0 Likes
on
0 Posts
07-11-2005, 02:19 PM
#7
Honda-Tech Member
Good first-time article. 
Things to add:
The motor needs to be completely cool when performing this. Not 1 hour after driving it around - just let it sit overnight to be sure.
There is an UP mark on the stock cam gear along with notch marks that are opposite one another, that are used to set the cylinders to TDC. When doing #1, the notch marks are even with the block deck. When doing #3, UP is on the exhaust side. When doing #4, the notch marks are again even with the block deck. And when doing #2, the UP mark is now on the intake side.
Make sure to use HondaBond in the corners of the gaskets when re-assembling.
FYI though: This information along with a step-by-step, pictures, and specs can be found in the Helms manual.
Trending Topics
07-11-2005, 02:20 PM
#8
Honda-Tech Member
Join Date: May 2003
Location: Portland, Oregon
Posts: 5,735
Likes: 0
Received 0 Likes
on
0 Posts
<TABLE WIDTH="90%" CELLSPACING=0 CELLPADDING=0 ALIGN=CENTER><TR><TD>Quote, originally posted by Pioneer162 »</TD></TR><TR><TD CLASS="quote">how much is the feeler tool and where can I get it?</TD></TR></TABLE>
Any auto parts store carries them, maybe $5 or so...
Nice write up! I will just add a few things...
1. If you take the plugs out it's a little easier to turn the engine by hand
2. You don't have to take your driver's side wheel off, I never do at least, just saves a little time
Any auto parts store carries them, maybe $5 or so...
Nice write up! I will just add a few things...
1. If you take the plugs out it's a little easier to turn the engine by hand
2. You don't have to take your driver's side wheel off, I never do at least, just saves a little time
07-11-2005, 02:29 PM
#10
Junior Member
Join Date: Jul 2004
Location: Rochester, NY, United States
Posts: 134
Likes: 0
Received 0 Likes
on
0 Posts
very good write up. thanks, the other valve lash write up didn't have pics up anymore.
07-11-2005, 02:56 PM
#11
Honda-Tech Member
Thread Starter
Join Date: Aug 2002
Location: Westslope, CO, United States
Posts: 3,048
Likes: 0
Received 0 Likes
on
0 Posts
<TABLE WIDTH="90%" CELLSPACING=0 CELLPADDING=0 ALIGN=CENTER><TR><TD>Quote, originally posted by EE_Chris »</TD></TR><TR><TD CLASS="quote">Good first-time article.
Things to add:
The motor needs to be completely cool when performing this. Not 1 hour after driving it around - just let it sit overnight to be sure.
There is an UP mark on the stock cam gear along with notch marks that are opposite one another, that are used to set the cylinders to TDC. When doing #1, the notch marks are even with the block deck. When doing #3, UP is on the exhaust side. When doing #4, the notch marks are again even with the block deck. And when doing #2, the UP mark is now on the intake side.
Make sure to use HondaBond in the corners of the gaskets when re-assembling.
FYI though: This information along with a step-by-step, pictures, and specs can be found in the Helms manual. </TD></TR></TABLE>
Yes thanks for the temp...I forgot about that one. As for the cam gear....for people like me with a competely stock car, there is a cover covering this cam gear so we are unable to see it. But yes that is another way to do it. You can also just stick somethind down the spark plug hole to get tdc too
Things to add:
The motor needs to be completely cool when performing this. Not 1 hour after driving it around - just let it sit overnight to be sure.
There is an UP mark on the stock cam gear along with notch marks that are opposite one another, that are used to set the cylinders to TDC. When doing #1, the notch marks are even with the block deck. When doing #3, UP is on the exhaust side. When doing #4, the notch marks are again even with the block deck. And when doing #2, the UP mark is now on the intake side.
Make sure to use HondaBond in the corners of the gaskets when re-assembling.
FYI though: This information along with a step-by-step, pictures, and specs can be found in the Helms manual.
</TD></TR></TABLE>Yes thanks for the temp...I forgot about that one. As for the cam gear....for people like me with a competely stock car, there is a cover covering this cam gear so we are unable to see it. But yes that is another way to do it. You can also just stick somethind down the spark plug hole to get tdc too
07-11-2005, 02:59 PM
#12
Honda-Tech Member
<TABLE WIDTH="90%" CELLSPACING=0 CELLPADDING=0 ALIGN=CENTER><TR><TD>Quote, originally posted by PhatAcuraIntegra »</TD></TR><TR><TD CLASS="quote">
Yes thanks for the temp...I forgot about that one. As for the cam gear....for people like me with a competely stock car, there is a cover covering this cam gear so we are unable to see it. But yes that is another way to do it. You can also just stick somethind down the spark plug hole to get tdc too </TD></TR></TABLE>
It takes a few seconds to take the upper timing cover off
Yes thanks for the temp...I forgot about that one. As for the cam gear....for people like me with a competely stock car, there is a cover covering this cam gear so we are unable to see it. But yes that is another way to do it. You can also just stick somethind down the spark plug hole to get tdc too
</TD></TR></TABLE>It takes a few seconds to take the upper timing cover off
07-11-2005, 04:41 PM
#15
Honda-Tech Member
Thread Starter
Join Date: Aug 2002
Location: Westslope, CO, United States
Posts: 3,048
Likes: 0
Received 0 Likes
on
0 Posts
Im pretty sure there is but I dont do them. I should probably look em up for you guys huh?
edit....I added it for ya
edit....I added it for ya
07-11-2005, 05:12 PM
#17
Electrician
Join Date: May 2004
Location: Astoria, Queens,, Zoo York City, U.S.A.
Posts: 4,709
Likes: 0
Received 0 Likes
on
0 Posts
<TABLE WIDTH="90%" CELLSPACING=0 CELLPADDING=0 ALIGN=CENTER><TR><TD>Quote, originally posted by mct121 »</TD></TR><TR><TD CLASS="quote">Are there torque specs and tightening order requirements for the valve cover?</TD></TR></TABLE>
7 ft. lbs.
Not really any sequence. But practice criss-cross pattern so everything you tighten is this way, unless otherwise noted.
7 ft. lbs.
Not really any sequence. But practice criss-cross pattern so everything you tighten is this way, unless otherwise noted.
07-11-2005, 06:03 PM
#19
Good write up!
My addition would be that it might take you awhile to figure out what the proper drag of the feeler guage is like. I know it took me 3-4 tries to get it just right, I was doing them too tight and it would idle like poo.
Also I dont remove my wheels, if you turn the steering wheel all the way to the left, there is enough room to turn the crank thru the little hole.
One more thing I like to do is hit the spark plugs with a wire brush to clean them while they are out, and check the overall condition. I know this has nothing to do with the valve adjust, but might as well while they are out.
07-11-2005, 06:12 PM
#20
Honda-Tech Member
Thread Starter
Join Date: Aug 2002
Location: Westslope, CO, United States
Posts: 3,048
Likes: 0
Received 0 Likes
on
0 Posts
<TABLE WIDTH="90%" CELLSPACING=0 CELLPADDING=0 ALIGN=CENTER><TR><TD>Quote, originally posted by smokee »</TD></TR><TR><TD CLASS="quote">Good write up!
My addition would be that it might take you awhile to figure out what the proper drag of the feeler guage is like. I know it took me 3-4 tries to get it just right, I was doing them too tight and it would idle like poo.
Also I dont remove my wheels, if you turn the steering wheel all the way to the left, there is enough room to turn the crank thru the little hole.
One more thing I like to do is hit the spark plugs with a wire brush to clean them while they are out, and check the overall condition. I know this has nothing to do with the valve adjust, but might as well while they are out.</TD></TR></TABLE>
Yeah good point about the plugs. I learned the feeler gauge thing at Wyotech. So many damn PMI comps I could shoot myself
07-11-2005, 09:37 PM
#22
Join Date: Dec 2002
Location: Nashville, Tn
Posts: 146
Likes: 0
Received 0 Likes
on
0 Posts
The crankshaft pully bolt on a d-series is a 17mm, I had the pleasure of findng a snap-on 18mm socket jammed on a car's crank pully bolt that was very dificult to remove due to the damage caused. An 18mm socket will work for turning the engine by hand, however is not the correct size and could cause damage such as the crank pully bolt rounding off and trust me, it is hard enough to remove the bolt when it is in good condition....
I'm not hating, just lookin' out for ya, this is a good write up good job guy 
Modified by Hondasareus at 8:44 PM 7/15/2005
An 18mm socket will work for turning the engine by hand, however is not the correct size and could cause damage such as the crank pully bolt rounding off and trust me, it is hard enough to remove the bolt when it is in good condition.... I'm not hating, just lookin' out for ya, this is a good write up
good job guy Modified by Hondasareus at 8:44 PM 7/15/2005
07-12-2005, 11:02 AM
#24
Honda-Tech Member
Thread Starter
Join Date: Aug 2002
Location: Westslope, CO, United States
Posts: 3,048
Likes: 0
Received 0 Likes
on
0 Posts
<TABLE WIDTH="90%" CELLSPACING=0 CELLPADDING=0 ALIGN=CENTER><TR><TD>Quote, originally posted by Hondasareus »</TD></TR><TR><TD CLASS="quote">The crankshaft pully bolt on a d-series is a 17mm, I had the pleasure of findng a snap-on 18mm socket jammed on a car's crank pully bolt that was very dificult to remove due to the damage caused. An 18mm socket will work for turning the engine by hand, however is not the correct size and could cause damage such as the crank pully bolt rounding off and trust me, it is hard enough to remove the bolt when it is in good condition....
I'm not hating, just lookin' out for ya, this is a good write up good job guy </TD></TR></TABLE>
Thanks for the heads up. I tried using a 19 which was too big and the 18 felt good, but I guess I was wrong. Changed it for ya
An 18mm socket will work for turning the engine by hand, however is not the correct size and could cause damage such as the crank pully bolt rounding off and trust me, it is hard enough to remove the bolt when it is in good condition.... I'm not hating, just lookin' out for ya, this is a good write up
good job guy </TD></TR></TABLE>Thanks for the heads up. I tried using a 19 which was too big and the 18 felt good, but I guess I was wrong. Changed it for ya