
DIY : Walbro fuel pump install
 03-26-2006, 03:08 AM
#1
Honda-Tech Member
Thread Starter
iTrader: (5)
Join Date: Jul 2005
Location: Cali
Posts: 2,791
Likes: 0
Received 0 Likes
on
0 Posts
First off, i want to thank <FONT COLOR="red">Redman223</FONT> who had the last write-up. I just wanted to add pics because, as any noob can tell you, working on your car is 10000x less tense if you have pictures. It feels like your going to make something explode if your going off just words 
<FONT SIZE="10"><FONT COLOR="blue">Tools Needed:</FONT></FONT>
- #2 phillips screwdriver
- 10mm socket & extended socket
- a rag or paper towels
- Pliers
- a flathead screwdriver
<FONT SIZE="10"><FONT COLOR="blue">Step 1:</FONT></FONT>
- <FONT COLOR="red">Disconnect the battery</FONT>
- <FONT COLOR="red">Don't smoke, or keep smoking and die</FONT>
- let out fuel pressure by either unscrewing the gas cap or loosening the 10 mm screw on top of the banjo fitting for the fuel filter
<FONT SIZE="10"><FONT COLOR="blue">Step 2:</FONT></FONT>
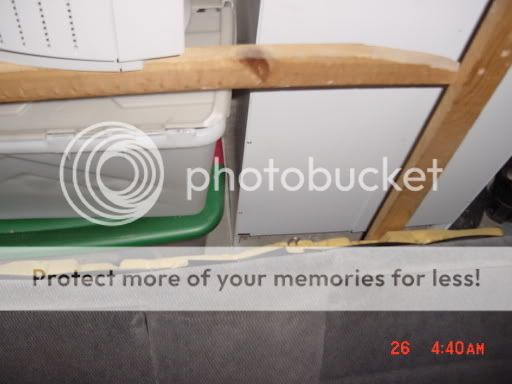
- take off the bottom part of the back seat by unscrewing the bolt. It's screwed into the small metal loop sticking out from the seats in the pic. Lift the back part up first then lift the front up/back to take them out completely
<FONT SIZE="10"><FONT COLOR="blue">Step 3:</FONT></FONT>
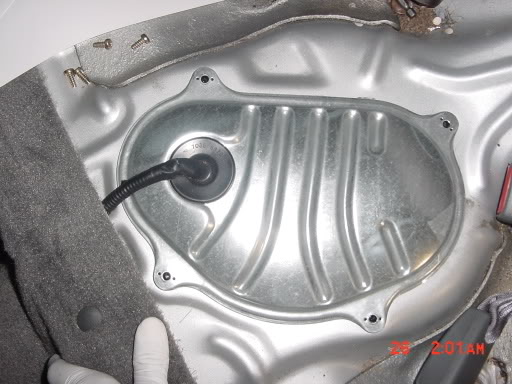
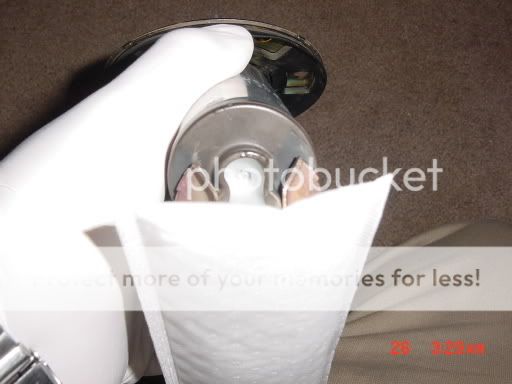
- Unscrew the metal cover and put it to the side
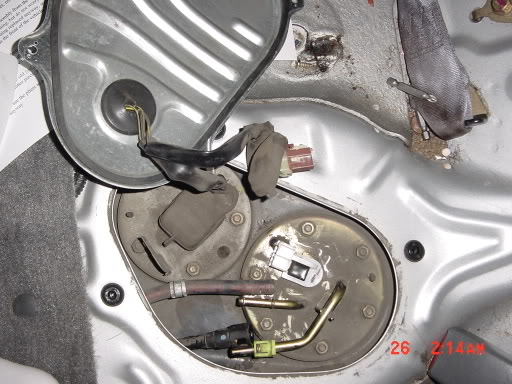
- Remove the fuel return line. It's the one with the simple clamp on it
- Remove the fuel line. You can do this by pressing in on the green clips and then separating.<FONT COLOR="red">*gas will come out*</FONT>
- Unplug the electrical connector
- Take off the 6 bolts and pull out the fuel pump. It will come out horizontally. It will take a little bit of muscle since the fuel filter tends to get caught but the walbro comes with another one anyways.<FONT COLOR="red">*gas will come out*</FONT>
<FONT SIZE="10"><FONT COLOR="blue">Step 4:</FONT></FONT>
- Take special care to pull off the green plastic piece in front of the electrical connector. It will come off by punching in the tabs that stick into the black part.
- Pull off the electrical connector and disconnect the hoses.
- Pull off the fuel pump. It will take a little bit of muscle. Save the rubber piece on the bottom It will be used on the new unit. To do that, you will need to use the flathead screwdriver to take off the small washer off of the small protruding plastic tip.
<FONT SIZE="10"><FONT COLOR="blue">Step 5:</FONT></FONT>
- Put the rubber piece over the new fuel filter. Put the washer to the side for right now
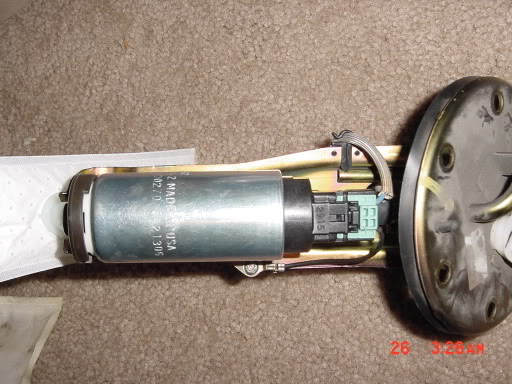
- Plug the electrical connectors back up, connect the hose and put the green piece back on the connector. The hose that came with the fuel pump will have to be cut ( well, it was in my case ). This is how it should look:
- Once you've pushed the fuel pump back into the assembly, then you'll want to take the washer and put it on to keep it in place. I did this before I pushed the pump into the assembly and the plastic tip broke off, forcing me to superglue the filter
-Throw it back in the gas tank, bolt the assembly back on, connect the 2 fuel lines and the electrical connector to the assembly from the car and screw the cover back on. Tighten the fuel filter connections back up.
-Start your car up and immediately hit WOT to break in your fuel pump.....<FONT COLOR="red">JUST KIDDING</FONT>
- Put the key in the <FONT COLOR="green">ON</FONT> position to make sure the pump is priming itself
- If you have it, use a fuel pressure gauge to make sure that the fuel pump is working
Yay, your done. Hopefully the pics and the more organized outline helps. I always know a cluster[freak] of words makes me just say 'screw this project, i'm going to go play half-life2'.
*Note:* Solster would like me to tell you all that:
**update**: Does superglue interact with gas? I don't know, i haven't had any issues with the pump but the car is with my mom now and she hasn't said anything to me. Gasoline is non-chemically reactive with almost everything so i figured it wouldnt have the same issues as water and super glue.
Modified by FuNkDrSpOt at 12:40 AM 3/12/2008
<FONT SIZE="10"><FONT COLOR="blue">Tools Needed:</FONT></FONT>
- #2 phillips screwdriver
- 10mm socket & extended socket
- a rag or paper towels
- Pliers
- a flathead screwdriver
<FONT SIZE="10"><FONT COLOR="blue">Step 1:</FONT></FONT>
- <FONT COLOR="red">Disconnect the battery</FONT>
- <FONT COLOR="red">Don't smoke, or keep smoking and die</FONT>
- let out fuel pressure by either unscrewing the gas cap or loosening the 10 mm screw on top of the banjo fitting for the fuel filter
<FONT SIZE="10"><FONT COLOR="blue">Step 2:</FONT></FONT>
- take off the bottom part of the back seat by unscrewing the bolt. It's screwed into the small metal loop sticking out from the seats in the pic. Lift the back part up first then lift the front up/back to take them out completely
<FONT SIZE="10"><FONT COLOR="blue">Step 3:</FONT></FONT>
- Unscrew the metal cover and put it to the side
- Remove the fuel return line. It's the one with the simple clamp on it
- Remove the fuel line. You can do this by pressing in on the green clips and then separating.<FONT COLOR="red">*gas will come out*</FONT>
- Unplug the electrical connector
- Take off the 6 bolts and pull out the fuel pump. It will come out horizontally. It will take a little bit of muscle since the fuel filter tends to get caught but the walbro comes with another one anyways.<FONT COLOR="red">*gas will come out*</FONT>
<FONT SIZE="10"><FONT COLOR="blue">Step 4:</FONT></FONT>
- Take special care to pull off the green plastic piece in front of the electrical connector. It will come off by punching in the tabs that stick into the black part.
- Pull off the electrical connector and disconnect the hoses.
- Pull off the fuel pump. It will take a little bit of muscle. Save the rubber piece on the bottom It will be used on the new unit. To do that, you will need to use the flathead screwdriver to take off the small washer off of the small protruding plastic tip.
<FONT SIZE="10"><FONT COLOR="blue">Step 5:</FONT></FONT>
- Put the rubber piece over the new fuel filter. Put the washer to the side for right now
- Plug the electrical connectors back up, connect the hose and put the green piece back on the connector. The hose that came with the fuel pump will have to be cut ( well, it was in my case ). This is how it should look:
- Once you've pushed the fuel pump back into the assembly, then you'll want to take the washer and put it on to keep it in place. I did this before I pushed the pump into the assembly and the plastic tip broke off, forcing me to superglue the filter
-Throw it back in the gas tank, bolt the assembly back on, connect the 2 fuel lines and the electrical connector to the assembly from the car and screw the cover back on. Tighten the fuel filter connections back up.
-Start your car up and immediately hit WOT to break in your fuel pump.....<FONT COLOR="red">JUST KIDDING</FONT>
- Put the key in the <FONT COLOR="green">ON</FONT> position to make sure the pump is priming itself
- If you have it, use a fuel pressure gauge to make sure that the fuel pump is working
Yay, your done. Hopefully the pics and the more organized outline helps. I always know a cluster[freak] of words makes me just say 'screw this project, i'm going to go play half-life2'.
*Note:* Solster would like me to tell you all that:
Originally Posted by Solster
would also be nice to see a note added as to the xenocron fuel pum that is just like the walbro but has 2 contacts on top where you can solder wires to it for othe app.'s so ppl know you don't need to seal them as they won't cuase a fire even when left uncovered.
**update**: Does superglue interact with gas? I don't know, i haven't had any issues with the pump but the car is with my mom now and she hasn't said anything to me. Gasoline is non-chemically reactive with almost everything so i figured it wouldnt have the same issues as water and super glue.
Modified by FuNkDrSpOt at 12:40 AM 3/12/2008
 08-26-2006, 09:28 AM
#4
Honda-Tech Member
Join Date: Jun 2002
Location: Destroying turbo ITR motors in Minneapolis, MN, U.S.A.
Posts: 7,942
Likes: 0
Received 0 Likes
on
0 Posts
Good ****. 
I assume that 94-01 Integras have the same fuel pump/bracket assembly as Civics? My buddy sold me his Walbro pump with the whole assembly as pictured attached to it. I think I'm going to simply swap my stock one out for it.
I assume that 94-01 Integras have the same fuel pump/bracket assembly as Civics? My buddy sold me his Walbro pump with the whole assembly as pictured attached to it. I think I'm going to simply swap my stock one out for it.
08-26-2006, 09:38 AM
#5
Honda-Tech Member
Join Date: Jul 2006
Location: Shelton, CT, USA
Posts: 201
Likes: 0
Received 0 Likes
on
0 Posts
wait im confused..how come this fuel pump goes near the gas tank under the seat and in the turbo write-up https://honda-tech.com/zerothread?id=635014 it goes near the fuel filter?
08-26-2006, 10:39 AM
#6
Honda-Tech Member
Join Date: Aug 2004
Location: Nah man, Yemen
Posts: 4,197
Likes: 0
Received 0 Likes
on
0 Posts
<TABLE WIDTH="90%" CELLSPACING=0 CELLPADDING=0 ALIGN=CENTER><TR><TD>Quote, originally posted by GutS96EJ »</TD></TR><TR><TD CLASS="quote">wait im confused..how come this fuel pump goes near the gas tank under the seat and in the turbo write-up https://honda-tech.com/zerothread?id=635014 it goes near the fuel filter? </TD></TR></TABLE>
one's in-tank and one's in-line.
one's in-tank and one's in-line.
Trending Topics
09-16-2006, 10:57 AM
#11
B*a*n*n*e*d

Join Date: May 2002
Location: Denver, CO
Posts: 4,718
Likes: 0
Received 0 Likes
on
0 Posts
<TABLE WIDTH="90%" CELLSPACING=0 CELLPADDING=0 ALIGN=CENTER><TR><TD>Quote, originally posted by GutS96EJ »</TD></TR><TR><TD CLASS="quote">ooh..im guessing it depends on the turbo kit which kind of pump is used then?? thanks man</TD></TR></TABLE>
Pretty much the only time an inline pump is used is with an FMU. So don't worry about that guy's write up, that's old technology
Pretty much the only time an inline pump is used is with an FMU. So don't worry about that guy's write up, that's old technology
04-29-2007, 10:04 PM
#14
Junior Member
Join Date: Mar 2004
Location: tx, usa
Posts: 822
Likes: 0
Received 0 Likes
on
0 Posts
<TABLE WIDTH="90%" CELLSPACING=0 CELLPADDING=0 ALIGN=CENTER><TR><TD>Quote, originally posted by tn »</TD></TR><TR><TD CLASS="quote">very nice write up </TD></TR></TABLE>
x2
</TD></TR></TABLE>x2
10-06-2007, 04:07 PM
#18
Honda-Tech Member
Thread Starter
iTrader: (5)
Join Date: Jul 2005
Location: Cali
Posts: 2,791
Likes: 0
Received 0 Likes
on
0 Posts
Good to see this thread is still helping people. TOo bad HT isn't as organized as team-integra.net when it comes to DIY's
10-06-2007, 04:12 PM
#19
Honda-Tech Member
Join Date: Aug 2007
Location: chehalis, wa, usa
Posts: 816
Likes: 0
Received 0 Likes
on
0 Posts
would also be nice to see a note added as to the xenocron fuel pum that is just like the walbro but has 2 contacts on top where you can solder wires to it for othe app.'s so ppl know you don't need to seal them as they won't cuase a fire even when left uncovered.
10-06-2007, 04:34 PM
#21
Honda-Tech Member
iTrader: (1)
Join Date: Feb 2007
Location: Snohomish County, WA
Posts: 3,683
Likes: 0
Received 0 Likes
on
0 Posts
Looks good, I'm going to have to do this in a few months, so thanks!
One small thing: Tighten up the nut/gas cap before starting car.
It would really be nice if H-T.com had a DIY section filled with different categories for different generations/cars, current ones with pix and what-not..
One small thing: Tighten up the nut/gas cap before starting car.
It would really be nice if H-T.com had a DIY section filled with different categories for different generations/cars, current ones with pix and what-not..
12-10-2007, 07:58 PM
#22
Junior Member
Join Date: Jul 2003
Location: spring hill, fl, usa
Posts: 67
Likes: 0
Received 0 Likes
on
0 Posts
just did this and brokethe tip off of mine crazy glue? will be okay in the gasoline? wont break it down? let me know! thanx
roland
crazy glue? will be okay in the gasoline? wont break it down? let me know! thanxroland
03-05-2008, 06:02 AM
#24
Junior Member
Join Date: Jan 2008
Location: FL
Posts: 290
Likes: 0
Received 0 Likes
on
0 Posts
i installed my walbro pump yesterday and hooked up everything flawlessly. primed it several times. only ran for about 10 min before it died on me. it kept shutting off when it idled below 1000rpm so i gave it light throttle for a while. after about 10 min the pump got considerably louder and then died. car wouldn't start. wouldn't prime at all. so i took it out and put back in the old one. started up like a champ. the walbro was burning hot to the touch. i think it just went out
03-11-2008, 11:34 PM
#25
Honda-Tech Member
Thread Starter
iTrader: (5)
Join Date: Jul 2005
Location: Cali
Posts: 2,791
Likes: 0
Received 0 Likes
on
0 Posts
<TABLE WIDTH="90%" CELLSPACING=0 CELLPADDING=0 ALIGN=CENTER><TR><TD>Quote, originally posted by ke98248 »</TD></TR><TR><TD CLASS="quote">Good writeup but one already exists in the Turbo FAQ.  </TD></TR></TABLE>
Gee, thanks for telling me 18 months after the fact that this DIY was created
Besides, the Turbo FAQ isn't for everyone and it's also in a state of disarray. It's not organized in any way, shape or form.
</TD></TR></TABLE>Gee, thanks for telling me 18 months after the fact that this DIY was created
Besides, the Turbo FAQ isn't for everyone and it's also in a state of disarray. It's not organized in any way, shape or form.