
DIY Replacement of Climate Controls and Bezel in 96-98 Civic
 01-13-2011, 11:58 AM
#1
Honda-Tech Member
Thread Starter
iTrader: (1)
Join Date: Sep 2009
Location: Mountain Time =P bleh
Posts: 469
Likes: 0
Received 0 Likes
on
0 Posts
So my friend needed help on how to replace his climate control bezel and i searched for a link but the only thing i found was how to put 99-00 climate controls into 96-98 which showed some good steps but ended up with a different result.
so i did this to help him but im posting it to help everyone.
NOT MY FAULT IF U BREAK SOMETHING OR MESS UP UR CAR. TRY AT UR OWN RISK
you will need a medium sized phillips screwdriver
small and medium sized flat head screwdrivers
a good magnet pen
since we will be working with electronics, its best u disconnect ur negative battery wire
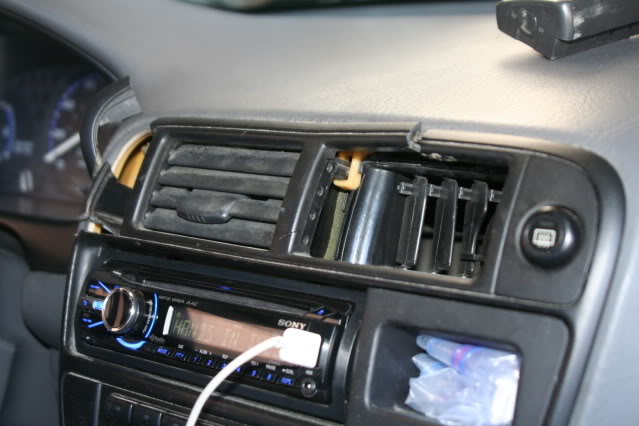
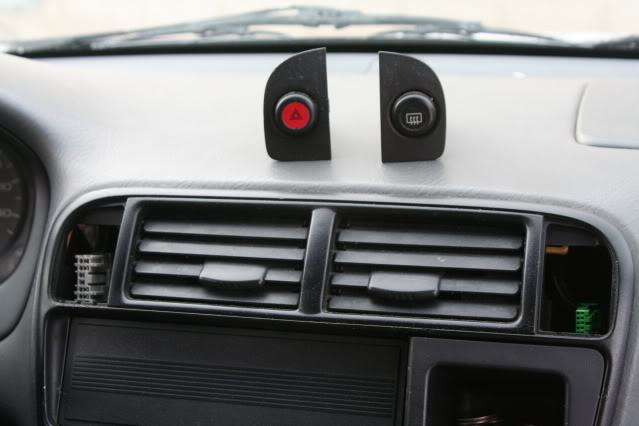
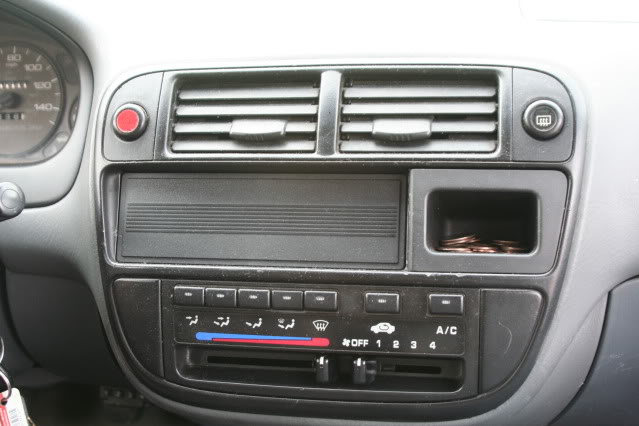
first off we start with what is very common on our civics, a raped out climate control bezel. this is how it was on my car before i replaced it and now i have a good one.
i started by removing my center consoles to make it easier to manuver around. 6 screws if u have a flat/no armrest or 8 if u have an armrest, half on either side. also remove the shift ****(for MT).
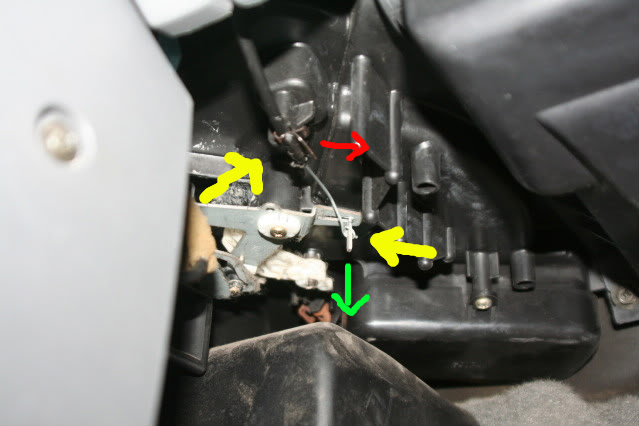
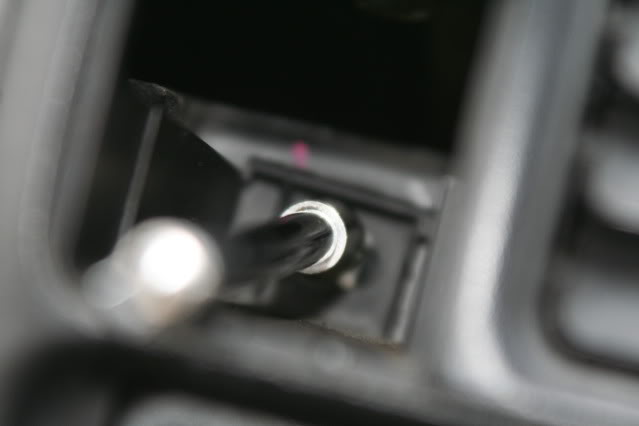
i followed by removing the slider cable. its attached to a clip and a pole(yellow arrows). i slid the loop off the pole(green arrow) and pulled the cable off the clip(red arrow)
next remove the whole knee bolster, 3 srews, one in each corner except the top right. give it a firm tug on all corners and it comes out.
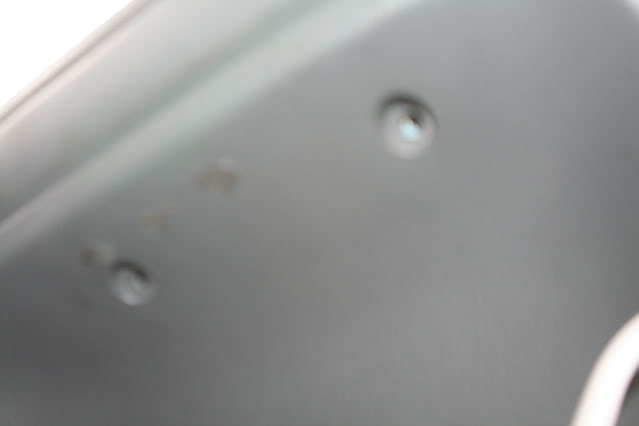
now to remove the cig lighter panel. there are 6 screws, one in each corner and two on bottom. location of bottom screws.
position the glove box in a fashion that makes unscrewing easier for that side. also dont just yank the panel out, wouldnt want to rip any wires. instead slowly pull it out and disconnect the cig lighter connector.
then you may yank it after that.
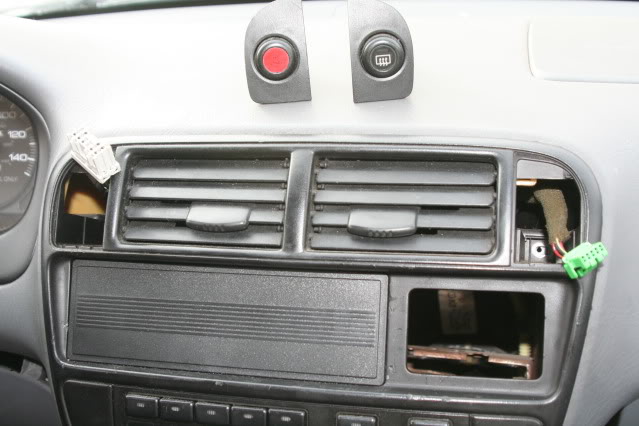
from here take ur small flat head and pry out the hazard and defrost switches and place them in a convinient location.
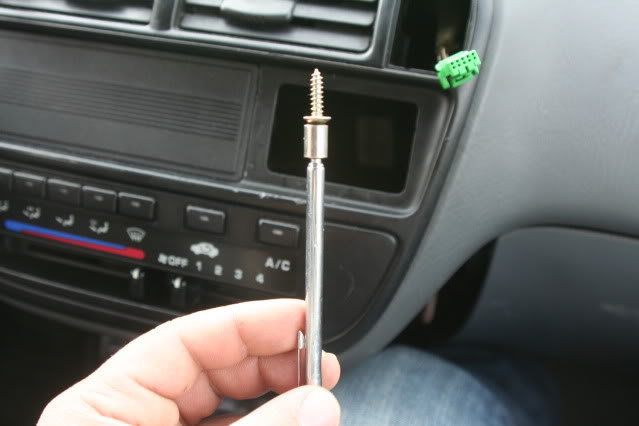
now you can do battle with the little bastards that hide inside each hole. take ur phillips and undo the screws in each hole. see it shinning in there? you may then take ur magnet and take them out so that u dont lose them

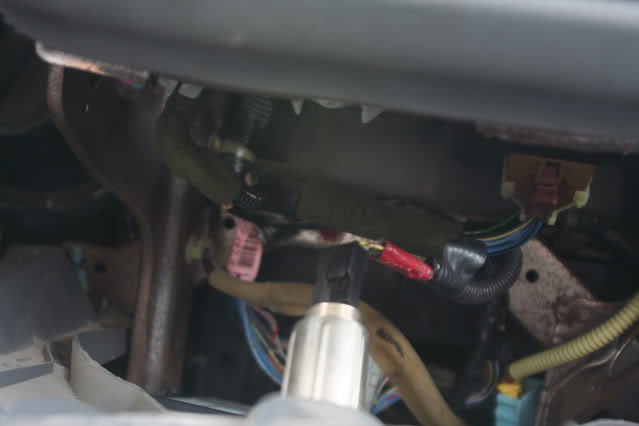
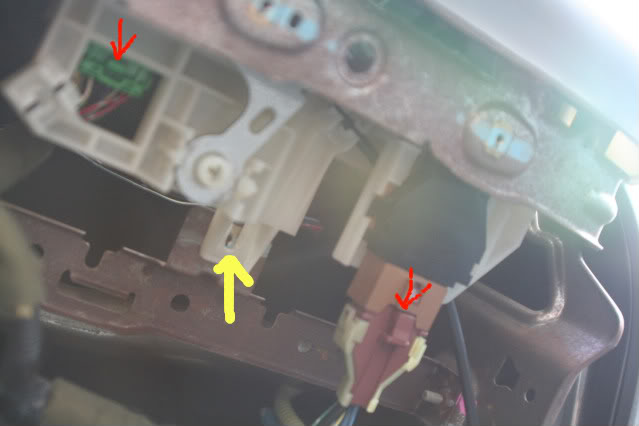
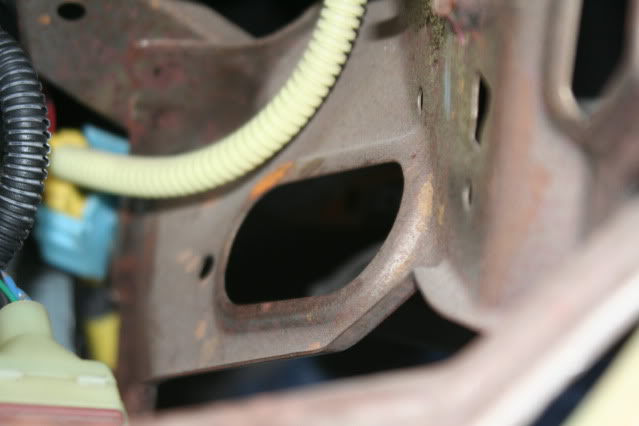
next we go down under and remove the last screw(yellow arrow). since i had gone through this already i didnt put the screw back in because i had forgot to do so. then we take a mediumm flathead and pry out the two connectors(red arrows). i pushed the panel from behind to make it easier for the next step and not to break it.
if you have a radio then disconnect it at this point. if stock then u should have the code for it for later use, if aftermarket and is hard wired then you'll have to cut wires or if ur lucky like me disconnect its personal wire harness. since my radio isnt there i didnt have to worry about this step. now the whole thing can come out, if it doesnt then u forgot something or the slider cable got caught on something
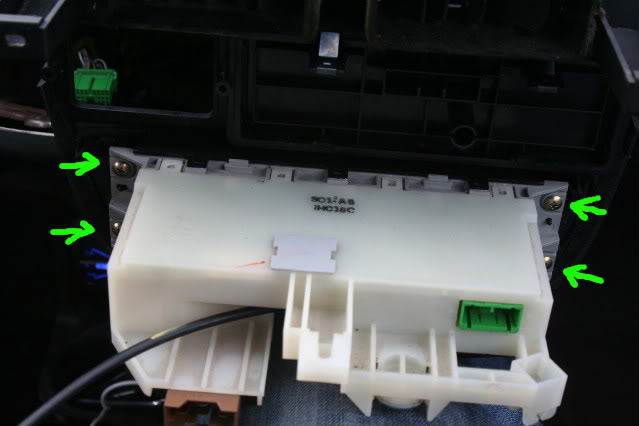
now we continue to taking off the slider box. it is held by 4 screws two on each side(green arrows). now u can put on a new one or pass it over to ur new bezel.
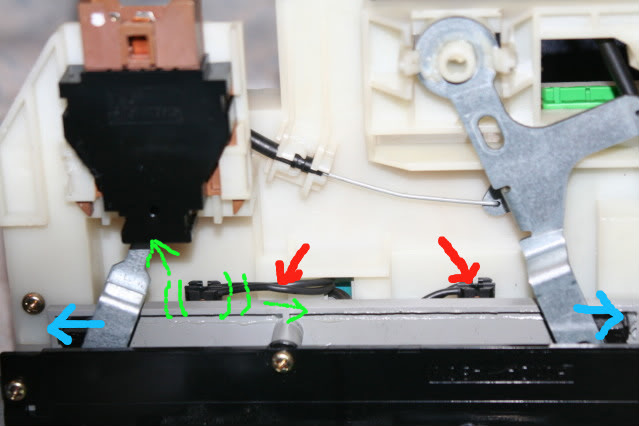
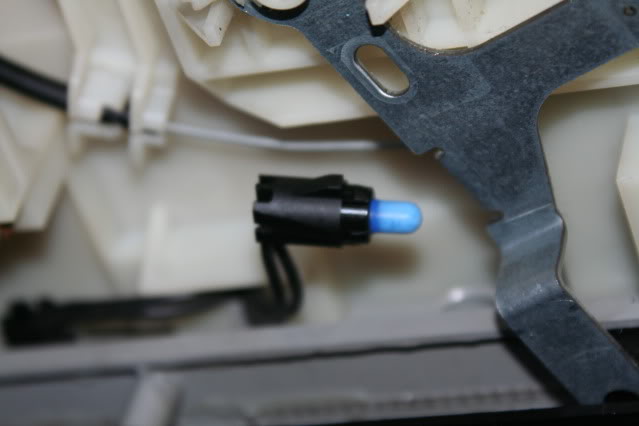
if ur doing this to replace blown bulbs just look on the back side and you will see black wires leading to the bulb bases(red arrows). these can be wiggled then gently pryed out by the wires(green arrows), i used my fingers so its not that hard. to make this easier slide the sliders to the outsides(blue arrows) to make clearance for whatever method u use. inside will be 2 blue condomed bulbs size #24, they have the same wedge base as the smaller ones in the cluster. from there just pop them back in .
from here u can start putting everything back in the reverse order then feed the slider cable through the oval, otherwise it wont reach
make sure that when putting everything back in, the climate harnesses are fully connected and in. make sure to pull out the hazard/defrost plugs out because they may go back into the bezel and it will be a pain to get them back out again. remember u will have a plug left over on the bottom side for the cig lighter.
now comes the fun part. get ur magnet pen, put a screw on the end and feed the screw hole beans. jiggle it around till the screw gets stuck and doesnt get pulled back with the magnet. i did it like this because i dont have a magnetic phillips.
now that that screws are tightened put in the bottom screw(the one that goes on the white tab) and ur switches and ur done with that. enjoy ur new clean bezel.
now assemble everything back in the reverse order, cig lighter panel, knee bolster and center consoles. the last thing to do is to hook up the slider cable. it will only go on one way, since it will either be too short or long depending on hot or cold position. slide it over the pole and set to full hot position(that way u get full hot when all the way right and full cold when to the left). from there just put the cable back in the clip that holds it
pat ur self for a very well done job, have a beer or in my case , a 64 OZ. sprite
so i did this to help him but im posting it to help everyone.
NOT MY FAULT IF U BREAK SOMETHING OR MESS UP UR CAR. TRY AT UR OWN RISK
you will need a medium sized phillips screwdriver
small and medium sized flat head screwdrivers
a good magnet pen
since we will be working with electronics, its best u disconnect ur negative battery wire
first off we start with what is very common on our civics, a raped out climate control bezel. this is how it was on my car before i replaced it and now i have a good one.
i started by removing my center consoles to make it easier to manuver around. 6 screws if u have a flat/no armrest or 8 if u have an armrest, half on either side. also remove the shift ****(for MT).
i followed by removing the slider cable. its attached to a clip and a pole(yellow arrows). i slid the loop off the pole(green arrow) and pulled the cable off the clip(red arrow)
next remove the whole knee bolster, 3 srews, one in each corner except the top right. give it a firm tug on all corners and it comes out.
now to remove the cig lighter panel. there are 6 screws, one in each corner and two on bottom. location of bottom screws.
position the glove box in a fashion that makes unscrewing easier for that side. also dont just yank the panel out, wouldnt want to rip any wires. instead slowly pull it out and disconnect the cig lighter connector.
then you may yank it after that.
from here take ur small flat head and pry out the hazard and defrost switches and place them in a convinient location.
now you can do battle with the little bastards that hide inside each hole. take ur phillips and undo the screws in each hole. see it shinning in there? you may then take ur magnet and take them out so that u dont lose them
next we go down under and remove the last screw(yellow arrow). since i had gone through this already i didnt put the screw back in because i had forgot to do so. then we take a mediumm flathead and pry out the two connectors(red arrows). i pushed the panel from behind to make it easier for the next step and not to break it.
if you have a radio then disconnect it at this point. if stock then u should have the code for it for later use, if aftermarket and is hard wired then you'll have to cut wires
or if ur lucky like me disconnect its personal wire harness. since my radio isnt there i didnt have to worry about this step. now the whole thing can come out, if it doesnt then u forgot something or the slider cable got caught on somethingnow we continue to taking off the slider box. it is held by 4 screws two on each side(green arrows). now u can put on a new one or pass it over to ur new bezel.
if ur doing this to replace blown bulbs just look on the back side and you will see black wires leading to the bulb bases(red arrows). these can be wiggled then gently pryed out by the wires(green arrows), i used my fingers so its not that hard. to make this easier slide the sliders to the outsides(blue arrows) to make clearance for whatever method u use. inside will be 2 blue condomed bulbs size #24, they have the same wedge base as the smaller ones in the cluster. from there just pop them back in .
from here u can start putting everything back in the reverse order then feed the slider cable through the oval, otherwise it wont reach
make sure that when putting everything back in, the climate harnesses are fully connected and in. make sure to pull out the hazard/defrost plugs out because they may go back into the bezel and it will be a pain to get them back out again. remember u will have a plug left over on the bottom side for the cig lighter.
now comes the fun part. get ur magnet pen, put a screw on the end and feed the screw hole beans. jiggle it around till the screw gets stuck and doesnt get pulled back with the magnet. i did it like this because i dont have a magnetic phillips.
now that that screws are tightened put in the bottom screw(the one that goes on the white tab) and ur switches and ur done with that. enjoy ur new clean bezel.
now assemble everything back in the reverse order, cig lighter panel, knee bolster and center consoles. the last thing to do is to hook up the slider cable. it will only go on one way, since it will either be too short or long depending on hot or cold position. slide it over the pole and set to full hot position(that way u get full hot when all the way right and full cold when to the left). from there just put the cable back in the clip that holds it
pat ur self for a very well done job, have a beer or in my case , a 64 OZ. sprite
Last edited by V.MoMO; 01-20-2011 at 08:17 PM. Reason: editing
 01-13-2011, 03:36 PM
#2
Honda-Tech Member
Join Date: Sep 2010
Location: MA
Posts: 246
Likes: 0
Received 0 Likes
on
0 Posts
Oh thank god for this thread. My car was broken into not too long ago and the thief broke my bezel. I purchased a new one not too long after that and now I can finally install it.  for you sir!
for you sir!
01-13-2011, 04:21 PM
#3
Good right up.
The 2 times that I have done it, I just unscrewed the 4 screws holding the climate control to the bezel and then just pull it right off.
The 2 times that I have done it, I just unscrewed the 4 screws holding the climate control to the bezel and then just pull it right off.
01-13-2011, 04:43 PM
#4
Honda-Tech Member

Join Date: Apr 2010
Location: Washington
Posts: 176
Likes: 0
Received 0 Likes
on
0 Posts
^^ Ya. Also I dont think you have to take off the hazard and rear defrost button just disconnect when you have pulled the bezel out as far as the wires will let you then disconnect. Just saying to save you some time. But good right up.
01-13-2011, 07:18 PM
#5
No, you have to, there are 2 screws behind it, and the defrost bottons.
01-14-2011, 06:51 AM
#7
Honda-Tech Member
Thread Starter
iTrader: (1)
Join Date: Sep 2009
Location: Mountain Time =P bleh
Posts: 469
Likes: 0
Received 0 Likes
on
0 Posts
thanks. my friend was in the same position and he asked for help so i went to work and decided not to be selfish with the info
Trending Topics
01-14-2011, 10:07 AM
#9
Honda-Tech Member
Join Date: Apr 2010
Location: Washington
Posts: 176
Likes: 0
Received 0 Likes
on
0 Posts
01-20-2011, 01:39 PM
#11
Honda-Tech Member
Thread Starter
iTrader: (1)
Join Date: Sep 2009
Location: Mountain Time =P bleh
Posts: 469
Likes: 0
Received 0 Likes
on
0 Posts
so after revising it, it seemed that i missed an aspect of it and now i added how to replace the bulbs.
oh and can someone clarify the size of the bulbs, i forgot
oh and can someone clarify the size of the bulbs, i forgot
01-20-2011, 11:09 PM
#14
No problem. Yea, they will fit.
When I bought my new #24's I had to make the socket a little wider. Just stock a small flat head in, and wiggled it a bit. After that, fit, and worked like a charm.
Just in case any one is wondering the cluster use #74's and for manual's 1#194 for autos 2#194's.
When I bought my new #24's I had to make the socket a little wider. Just stock a small flat head in, and wiggled it a bit. After that, fit, and worked like a charm.
Just in case any one is wondering the cluster use #74's and for manual's 1#194 for autos 2#194's.
01-22-2011, 03:00 PM
#16
Honda-Tech Member
Thread Starter
iTrader: (1)
Join Date: Sep 2009
Location: Mountain Time =P bleh
Posts: 469
Likes: 0
Received 0 Likes
on
0 Posts
you kinda do...
the main thing about doing this is to get access from the bottom, and not removing things make it harder to do. the knee bolster doesnt have to come off, just have enough play that it will let out the cig lighter panel. same thing wtih the center consoles. doing it the way i have described makes it so that you have less of a pain getting around. undoing the glove box makes it even easier but its possible to work with it in place.
seems like a lot of work but its only unscewing things, get a power tool and you will be golden.
01-22-2011, 03:30 PM
#17
You'll need to do everything, except for removing the CC.
The 4 screws he has marked by green arrows are accessable by just pull the bezel out a little.
I've done it 3 times this way and feel its easier
The 4 screws he has marked by green arrows are accessable by just pull the bezel out a little.
I've done it 3 times this way and feel its easier
01-22-2011, 10:54 PM
#19
Honda-Tech Member
Thread Starter
iTrader: (1)
Join Date: Sep 2009
Location: Mountain Time =P bleh
Posts: 469
Likes: 0
Received 0 Likes
on
0 Posts
and now i get you by the 4 screws thing, again my bigass hands/arms probably wont fit like yours do
but getting the ugly out and good in is the point, so however way can be used.
01-22-2011, 11:37 PM
#20
I've got big hands too, It is a pain to do it, however I prefer it over messing with the CC any day.
My first time was a major pain in the ***, second not so bad, 3rd, cake walk.
I'm 6' 190, I'm not too small
My first time was a major pain in the ***, second not so bad, 3rd, cake walk.
I'm 6' 190, I'm not too small

Thread
Thread Starter
Forum
Replies
Last Post
310HPS2k
Honda Civic / Del Sol (1992 - 2000)
2
05-12-2006 11:30 AM
1 speedstar
Honda Civic / Del Sol (1992 - 2000)
4
02-19-2005 03:28 PM
whitemike1644
Honda Civic / Del Sol (1992 - 2000)
6
04-18-2003 10:01 PM