DIY: Civic/del Sol/Integra distributor O ring replacement
 10-14-2011, 02:53 PM
#1
*** When I was looking for a part number for the O ring for my del Sol, I came across the thread in the FAQ, but the pictures don't show up. So here's another write up with part numbers/pics that can be used in place of the old/non pic working thread.
:D***
Distributor O ring replacement
You may ask yourself: Mac, how do I know if I need to replace my dizzy O ring? If your engine has more oil outside than it does inside and its leaking on the tranny, it probably needs replaced.
After driving 80 MPH on the interstate, when I would get to my destination smoke would be coming from the hood as the oil was ending up on the exhaust. NO bueno. One woman said my car was on fire. Funny story as she was pretty stupid and was convinced my car was going to catch on fire. But anyway... It was leaking. Feast your eyes upon thy picture!

Tools needed:
- 12 mm Socket/extension/ratchet
- 12mm wrench (optional if you don't have a ratchet)
- Small flat head screw driver/small knife or pick to get O ring off/on.
- Nerves of steel and wits like razor blades.
Time needed:
- 20 mins or so
Parts needed:
- Distributor O ring
- Rags (for greasy hands)
- Honda part # 30110-PA1-732 Size: 26.4x3.1mm
- Napa part #/size 25.2x8
Cost:
- OEM $14.24 shipped from Majestic Honda (may be cheaper at your local stealership)
- $10.00 from eBay
- $1.25 from Napa.
** Note** I used an O ring from Napa. It was slightly smaller than the OEM but seems to work just fine. Not to mention it was much cheaper.
From Majestic Honda's website.

-----------------------------------
Time to get dirty!
Step 1: Find your car and gather your tools/parts. Don't do like I did and not let your car cool off before you do this. The engine is rather hot :and flesh burns easily.
le tools

le engine... Shes dirty, I know. But no dirtier than your mom so its ok 252,000 miles and still going strong!

Step 2: Scribe a mark on the dizzy so you know where your timing needs to be set. Make it look like so. Use a screwdriver or teeth if you must, as long as its sharp and can make a mark in the metal.

Step 3: Remove the (3) 12mm bolts holding the distributor on. **Note** You can use a wrench, but a ratchet/extension is much easier.
I removed the bolts already in this pic, but they are each on one of the three ears. If you can't find the bolts, you probably don't need to attempt replacing the O ring in the first place.

Step 4: Gently pull on the distributor and it'll pop out of place. Ta daa!!

**Note** I didnt have enough room to remove the O ring with the spark plug wires still connected, so I just pulled em off the spark plugs. My wires are staggered in length so I didnt have to worry abotu marking them. If yours aren't, then be sure to mark the wires and be careful pulling them out as they can get stuck and you can pull the wire out of the boot.
Its magic!!

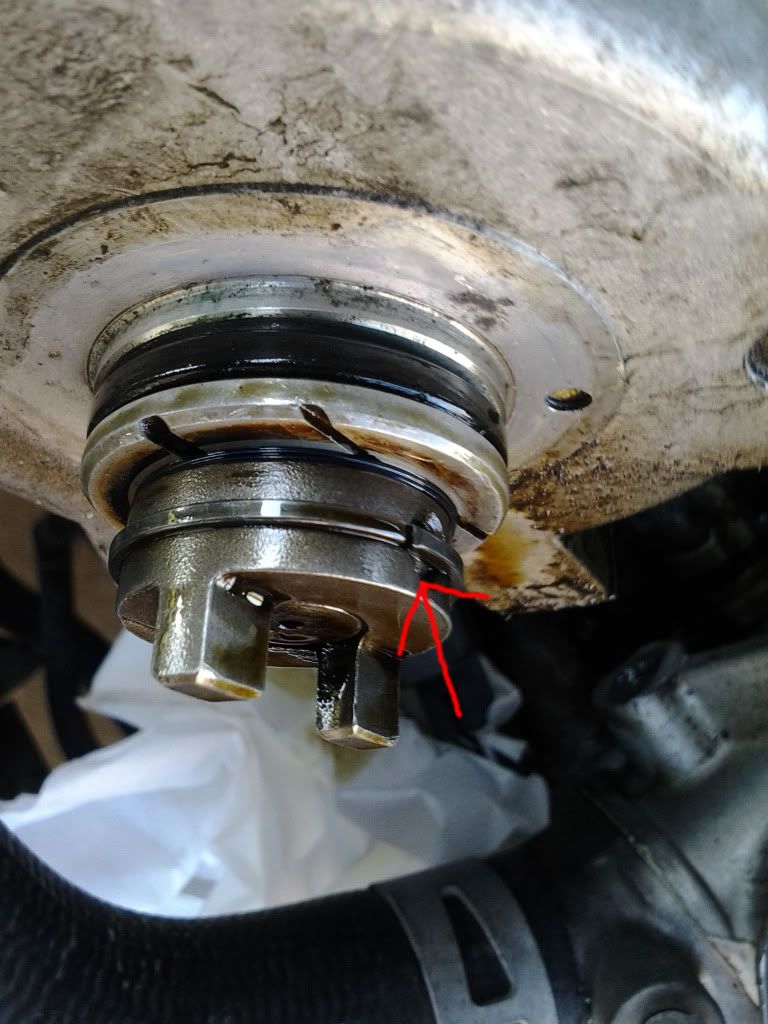
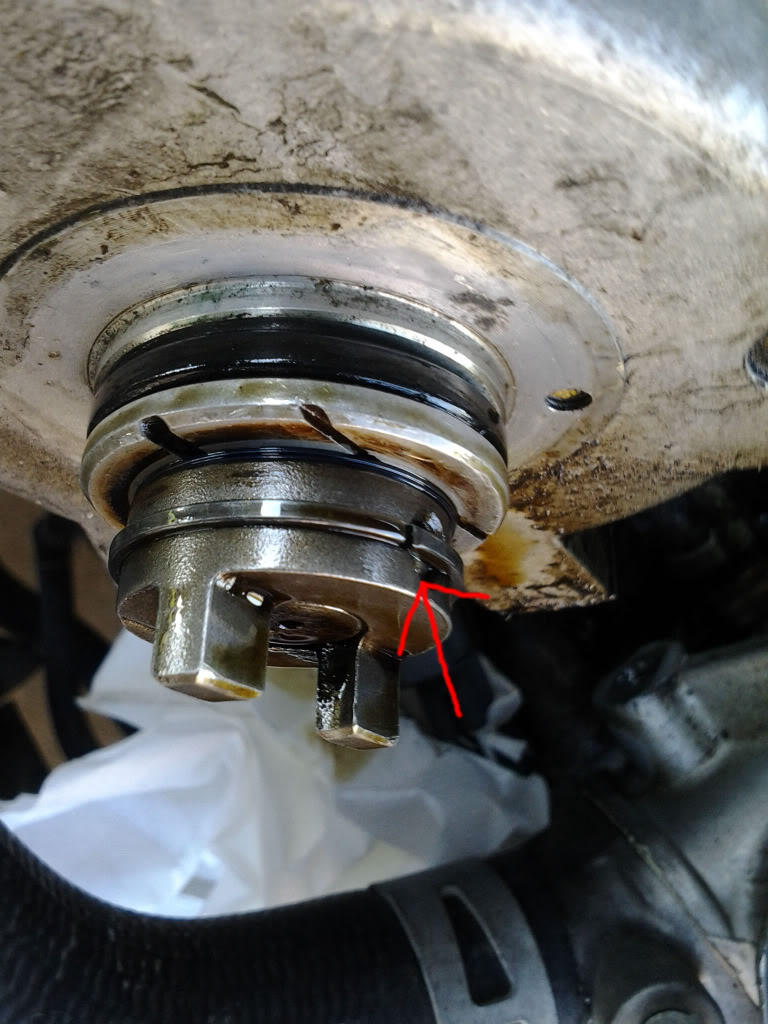
Yep, the O ring was leaking. **Note** As you can see in the pic, there are two little ears that stick into the camshaft. They are slightly offset so if you move the dizzy 180 degrees, it wont go back into the camshaft straight, itll be crooked.

Step 5: Take yoru knife/screwdriver/pick and pry the ring out of the lil slot its in. Since youre replacing the O ring, dont worry if it breaks: Its not a condom and your car wont get pregnant. If it does, thats weird. Sell the car immediately.

I purchased two O rings just to be sure, different sizes. The one of the LEFT is what I used as the one on the right was too fat. Fat O rings just won't cut it.

Step 6: Stick the dizzy back in, bolt it up and put the plugs wire back on. Just the reverse of what you did. Again, be careful putting the wires back in as you dont wanna cross em up. Your car will run slightly bad if you do
Step 7: Double check everything and crank her up! **Note** When I cranked my car, it ran rough. I shut it off immediately and double checked my stuff. I actually pulled the dizzy off and made sure I had it in correctly and double checked my wires. All was well.
So, I cranked her up again and after I let it run for a couple seconds, she smoothed out and all seems to be fine and well in the world, angels descending from heaven holding one long note and whatnot, it was pretty groovy. :D
I have yet to take her out on the road and test drive her. Also have to clean the bay so I can check and see if shes still leaking or not.
If there needs to be any changes or would like me to add anything, lemme know and I shall do so.
Enj0y!
Teh 3nd
:D***
Distributor O ring replacement
You may ask yourself: Mac, how do I know if I need to replace my dizzy O ring? If your engine has more oil outside than it does inside and its leaking on the tranny, it probably needs replaced.
After driving 80 MPH on the interstate, when I would get to my destination smoke would be coming from the hood as the oil was ending up on the exhaust. NO bueno. One woman said my car was on fire. Funny story as she was pretty stupid and was convinced my car was going to catch on fire. But anyway... It was leaking. Feast your eyes upon thy picture!
Tools needed:
- 12 mm Socket/extension/ratchet
- 12mm wrench (optional if you don't have a ratchet)
- Small flat head screw driver/small knife or pick to get O ring off/on.
- Nerves of steel and wits like razor blades.
Time needed:
- 20 mins or so
Parts needed:
- Distributor O ring
- Rags (for greasy hands)
- Honda part # 30110-PA1-732 Size: 26.4x3.1mm
- Napa part #/size 25.2x8
Cost:
- OEM $14.24 shipped from Majestic Honda (may be cheaper at your local stealership)
- $10.00 from eBay
- $1.25 from Napa.
** Note** I used an O ring from Napa. It was slightly smaller than the OEM but seems to work just fine. Not to mention it was much cheaper.
From Majestic Honda's website.
-----------------------------------
Time to get dirty!
Step 1: Find your car and gather your tools/parts. Don't do like I did and not let your car cool off before you do this. The engine is rather hot :and flesh burns easily.
le tools
le engine... Shes dirty, I know. But no dirtier than your mom so its ok
252,000 miles and still going strong!Step 2: Scribe a mark on the dizzy so you know where your timing needs to be set. Make it look like so. Use a screwdriver or teeth if you must, as long as its sharp and can make a mark in the metal.
Step 3: Remove the (3) 12mm bolts holding the distributor on. **Note** You can use a wrench, but a ratchet/extension is much easier.
I removed the bolts already in this pic, but they are each on one of the three ears. If you can't find the bolts, you probably don't need to attempt replacing the O ring in the first place.
Step 4: Gently pull on the distributor and it'll pop out of place. Ta daa!!
**Note** I didnt have enough room to remove the O ring with the spark plug wires still connected, so I just pulled em off the spark plugs. My wires are staggered in length so I didnt have to worry abotu marking them. If yours aren't, then be sure to mark the wires and be careful pulling them out as they can get stuck and you can pull the wire out of the boot.
Its magic!!
Yep, the O ring was leaking. **Note** As you can see in the pic, there are two little ears that stick into the camshaft. They are slightly offset so if you move the dizzy 180 degrees, it wont go back into the camshaft straight, itll be crooked.
Step 5: Take yoru knife/screwdriver/pick and pry the ring out of the lil slot its in. Since youre replacing the O ring, dont worry if it breaks: Its not a condom and your car wont get pregnant. If it does, thats weird. Sell the car immediately.
I purchased two O rings just to be sure, different sizes. The one of the LEFT is what I used as the one on the right was too fat. Fat O rings just won't cut it.
Step 6: Stick the dizzy back in, bolt it up and put the plugs wire back on. Just the reverse of what you did. Again, be careful putting the wires back in as you dont wanna cross em up. Your car will run slightly bad if you do
Step 7: Double check everything and crank her up! **Note** When I cranked my car, it ran rough. I shut it off immediately and double checked my stuff. I actually pulled the dizzy off and made sure I had it in correctly and double checked my wires. All was well.
So, I cranked her up again and after I let it run for a couple seconds, she smoothed out and all seems to be fine and well in the world, angels descending from heaven holding one long note and whatnot, it was pretty groovy. :D
I have yet to take her out on the road and test drive her. Also have to clean the bay so I can check and see if shes still leaking or not.
If there needs to be any changes or would like me to add anything, lemme know and I shall do so.
Enj0y!
Teh 3nd
 10-14-2011, 03:19 PM
#4

People like you who take the time to take pictures is what diy is about, thank you for the effort.
By the way was that the original o ring?
FYI: the stock o ring from honda retails for about 2 bucks, I am not sure what you were pricing from majestic?
By the way was that the original o ring?
FYI: the stock o ring from honda retails for about 2 bucks, I am not sure what you were pricing from majestic?
10-14-2011, 03:42 PM
#5
Honda-Tech Member
Join Date: May 2009
Location: Lincoln, RI
Posts: 1,390
Likes: 0
Received 0 Likes
on
0 Posts
i take pictures and videos too, when i'm doing a complicated job. check out my youtube. its getting full of them.
10-17-2011, 04:06 AM
#6
Thats uber super simple, but I get stuff all the time over it and thats fine. Everybody is at diff levels of mechanical ability.
If nothing else, the part numbers are listed for anybody to quickly reference
10-17-2011, 06:05 AM
#7
Man, I've done I dunno how many DIY's I've done over the years (check my Integra build thread) and the one that I have had the most questions over, even up until this day ( I have a message in my in box) is about replacing LED's in the gauge cluster.
Thats uber super simple, but I get stuff all the time over it and thats fine. Everybody is at diff levels of mechanical ability.
If nothing else, the part numbers are listed for anybody to quickly reference
Thats uber super simple, but I get stuff all the time over it and thats fine. Everybody is at diff levels of mechanical ability.
If nothing else, the part numbers are listed for anybody to quickly reference
Trending Topics
01-30-2012, 09:42 AM
#8
Honda-Tech Member
Join Date: Aug 2005
Location: San Diego
Posts: 165
Likes: 0
Received 0 Likes
on
0 Posts
For what it's worth, I found this DIY very helpful. I've had a nagging oil leak for a while and assumed it was either the RMS or oil pan gasket. After searching a little on oil leaks, I learned A) Look top-to-bottom when searching for oil leaks, and B) the Dizzy o-ring is a common oil leak. A quick look definitely showed oil stains below the dizzy, easy diagnostic. After a trip to the local Honda dealer for the all-standard Honda dizzy o-ring (apparently 100% of Honda engines use the same o-ring), I was ready to go. I found that a previous mechanic had already marked the dizzy for me, which made that part easier (I was going to use white-out). Job was way easy... I was expecting a couple hours of pain and angst, but it turned out to be a quick 20 min job (felt that way at least). Dizzy pops straight off once the bolts are off and the old o-ring came off easily after I cut it/punctured it w/a flat-head screwdriver. It wasn't broken but extremely brittle, felt more like plastic than rubber. I had no problems using the standard Honda o-ring... fits easily and the dizzy popped right back in. Helms Manual said to put motor oil on the o-ring, which I did, so maybe that helped. Anyway, did a test drive, all was well, and car is running as smooth or smoother than before. Thanks for the confidence building DIY!
02-19-2012, 10:05 PM
#11
Honda-Tech Member

Join Date: Feb 2012
Posts: 12
Likes: 0
Received 0 Likes
on
0 Posts
Thanks, this helped me out as well. After looking at the photos I'm pretty sure I see the same oil leak happening in my car (stains on the tranny, also the crud on the distributor below the o-ring.) At first I was thinking it might be from the valve cover, but now I'm pretty sure it's the same distributor o-ring problem so I'll tackle that first.
03-31-2012, 10:34 AM
#13
Honda-Tech Member
Join Date: Jun 2004
Location: Oklahoma City, Oklahoma, USA
Posts: 283
Likes: 0
Received 0 Likes
on
0 Posts
Awesome, thanks for this. For me at least these DIYs really help. I am a shade tree mechanic, this part costs $2 and a mechanic would charge $100 plus the hassle of taking it over there etc. etc. It is just nice to see someone else do it so I don't make a simple mistake. And the boards don't get cluttered with duplicate threads.
 08-09-2012, 11:50 PM
#15
Trial User

Join Date: Aug 2012
Posts: 1
Likes: 0
Received 0 Likes
on
0 Posts
thank you for this guide it solved my problem. i have one question, when u replace the o ring did u have 2 washers behind those 2 "little ears" that go in the crankshaft because my one is very lose
 08-10-2012, 06:41 AM
#17
Honda-Tech Member
Hah! A big writeup for a simple job, but I'm sure many a beginner will be helped by this. Funny too... I like the part about your car getting pregnant. 
I'd also like to add that the Fel-Pro distributor o-rings seem to work well too. One came with my Fel-Pro head gasket set. They are orange in color instead of black. 6000 miles later and it hasn't leaked yet.
I'd also like to add that the Fel-Pro distributor o-rings seem to work well too. One came with my Fel-Pro head gasket set. They are orange in color instead of black. 6000 miles later and it hasn't leaked yet.
09-08-2012, 07:59 AM
#18
Trial User

Join Date: Sep 2012
Posts: 1
Likes: 0
Received 0 Likes
on
0 Posts
I have a Problem. I went to the dealership, and they said that the o ring was broken. Well I went, and got the part just to find out that its the wrong o ring (I think). Can you guys tell me what to do with this little metal ring?
Last edited by deschlong; 11-21-2012 at 07:15 AM. Reason: Embedded pic.
 01-03-2013, 11:37 AM
#21
B*a*n*n*e*d

Join Date: Aug 2012
Posts: 7
Likes: 0
Received 0 Likes
on
0 Posts
Just another person who at first assumed it was the head cover gasket and then came across this thread.
Many thanks for the illustrated walk through. Pictures are always helpful.
Everything worked exactly as planned.
Many thanks for the illustrated walk through. Pictures are always helpful.
Everything worked exactly as planned.
01-28-2013, 01:54 PM
#23
Honda-Tech Member
Join Date: May 2007
Location: Collinsville, IL, USA
Posts: 24
Likes: 0
Received 0 Likes
on
0 Posts
I have the same problem but I have internal and external leakage on my Z6. I found the oil seals on ebay. Should I buy the ones on ebay or go oem from a honda dealership? The one on ebay interchanges with the dealership.
01-28-2013, 04:08 PM
#24

even with shipping I can't drive to the Honda dealer and get it for that price. And since I have 3 cars that use that seal I just bought a few which cut down on the shipping per piece.
04-06-2013, 02:01 PM
#25
Honda-Tech Member
Join Date: Mar 2008
Location: Atlanta, GA, United States
Posts: 2
Likes: 0
Received 0 Likes
on
0 Posts