

 03-31-2015, 10:26 AM
Last edit by: IB Advertising
See related guides and technical advice from our community experts:
Browse all: Honda Accord Brake Guides
- Honda Accord: How to Replace Brake Pads, Calipers and Rotors
Step by step instructions for do-it-yourself repairs
Browse all: Honda Accord Brake Guides

DIY brake and rotor repalcement
03-29-2007, 06:43 PM
#1
Honda-Tech Member
Thread Starter
Join Date: Oct 2004
Location: All over ATL
Posts: 2,088
Likes: 0
Received 0 Likes
on
0 Posts
I thought I would update a DIY for rotor and brake jobs. The last one done was conducted quite some time ago and has since had the pictures deleted. Well…
Here’s my first DIY.
The car used was a 2000 Civic Si. Most cars, especially Hondas, use similar setups. Consult your specific model for correct torque settings.
Things needed:
10 mm, 12 mm, 14 mm, 17 mm wrenches and socket wrenches.
Foot-Pound torque wrench
Jack and stands
Pads and Rotors
Brake clean
Shop towels or low lint paper towels
Water
Patience
Optional, but highly recommended:
Impact gun
Impact driver
Let’s start.
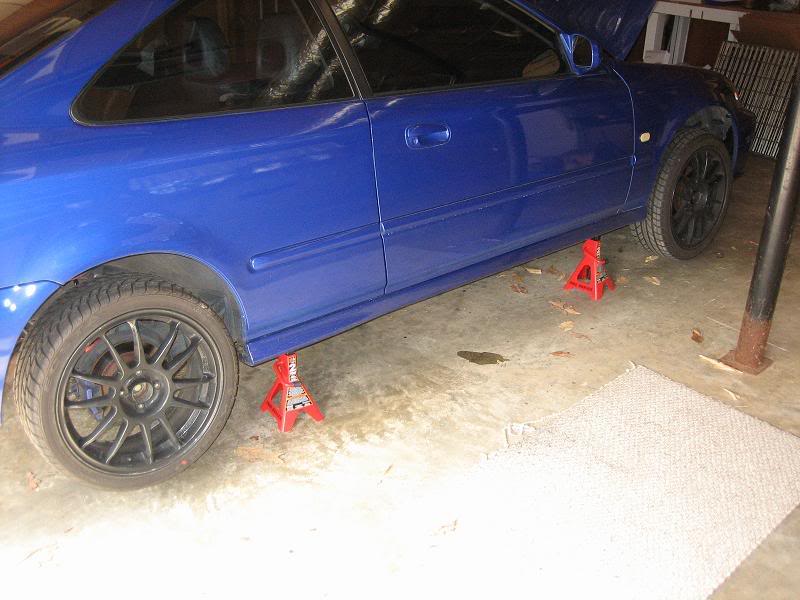
Get your stands and jack situated correctly to raise the vehicle. You can either work the front and the rear separately, or you can work each side separately.
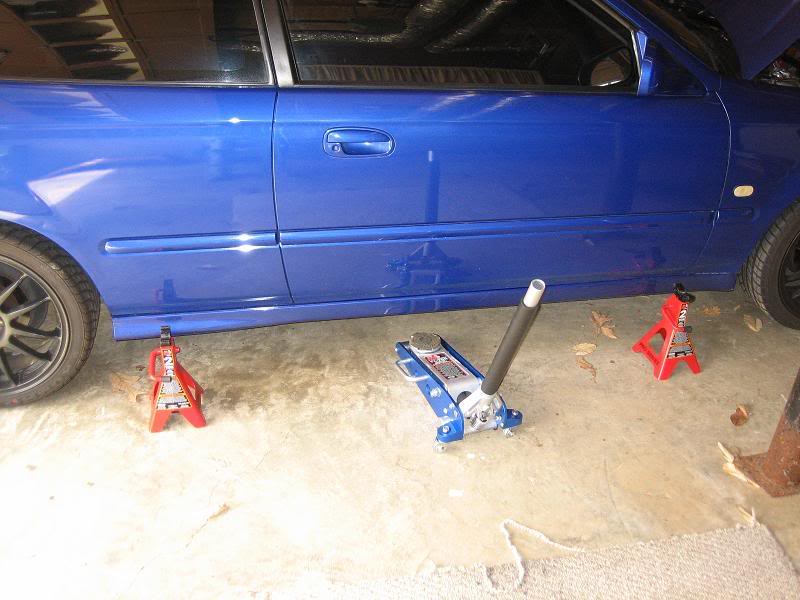
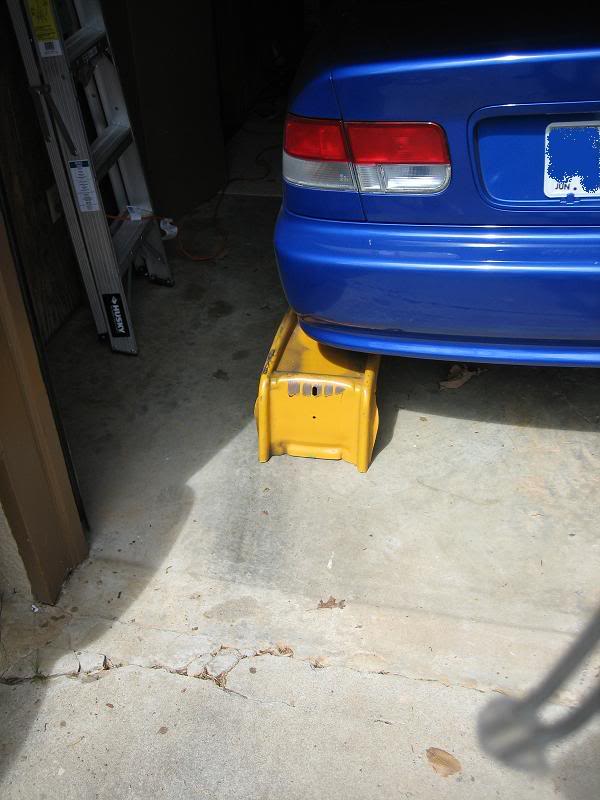
Raise the vehicle and support the car from the correct positions. Be sure to add something to both the front and rear tires on the opposite side to keep the car extra stable. You do not want the car on top of you.
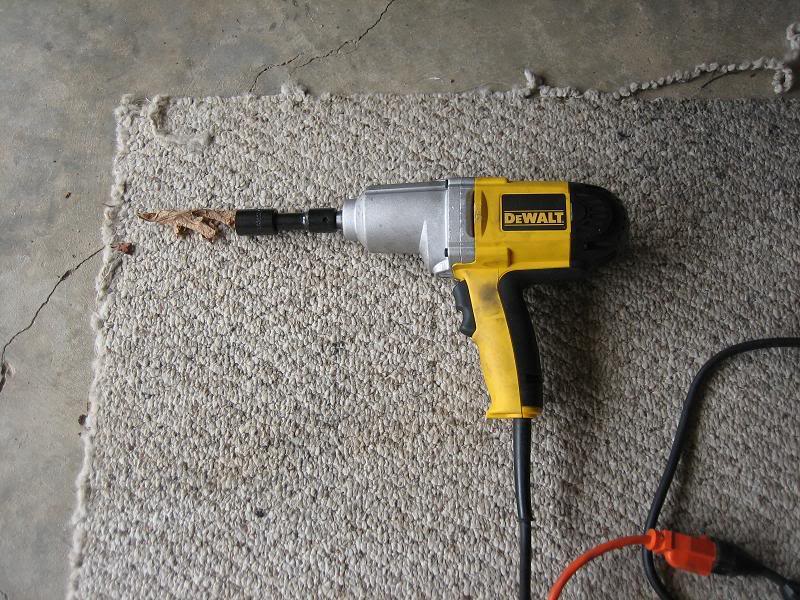
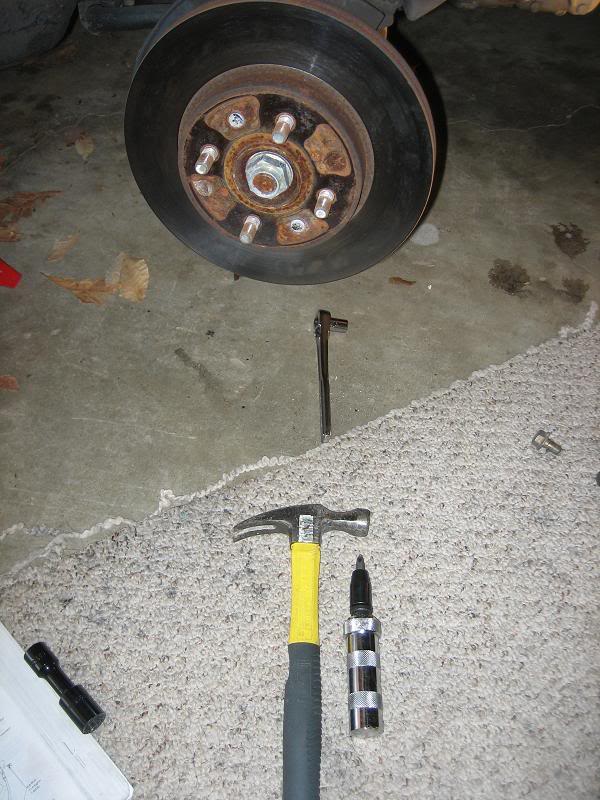
I have an impact gun. Dewalt 345 ft-lbs of sheer madness to get those pesky lug nuts off. A breaker bar or something should be sufficient to break them loose, but since they should be torqued to 80 ft-lbs, you shouldn’t need a breaker bar too much.
Now that you have your wheel off, first take the brake line support bolts off. They should be a 10 mm. (8.7 ft-lbs)
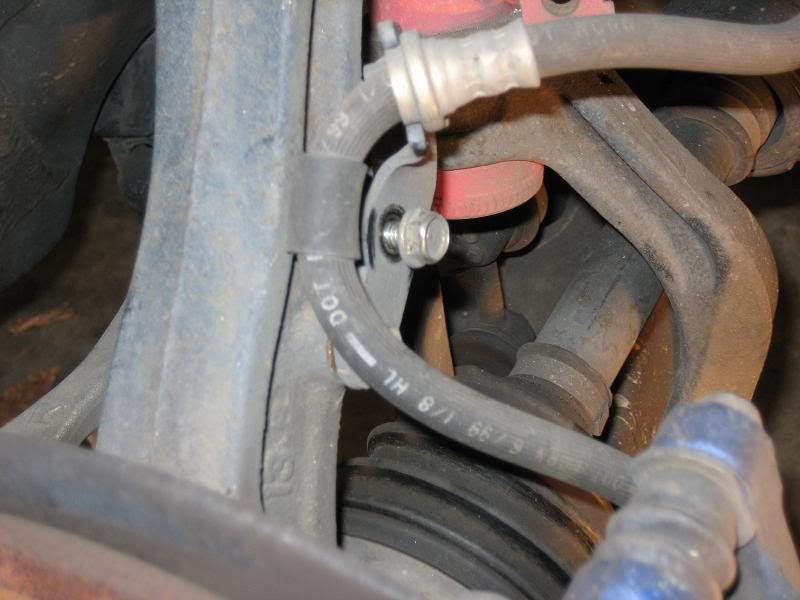
If possible I always try and keep the bolts/nuts in place after I remove the item so I don’t have extra parts hanging around after a job. Put those two bolts back in position.
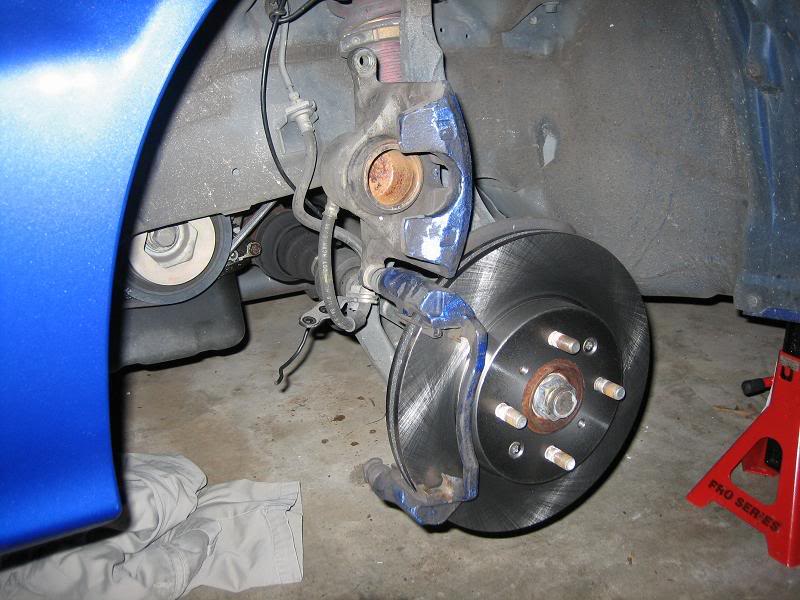
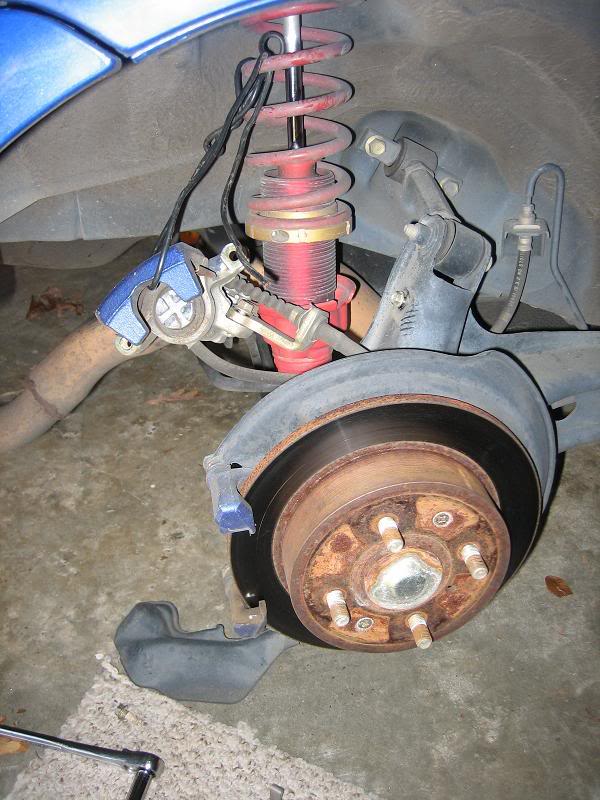
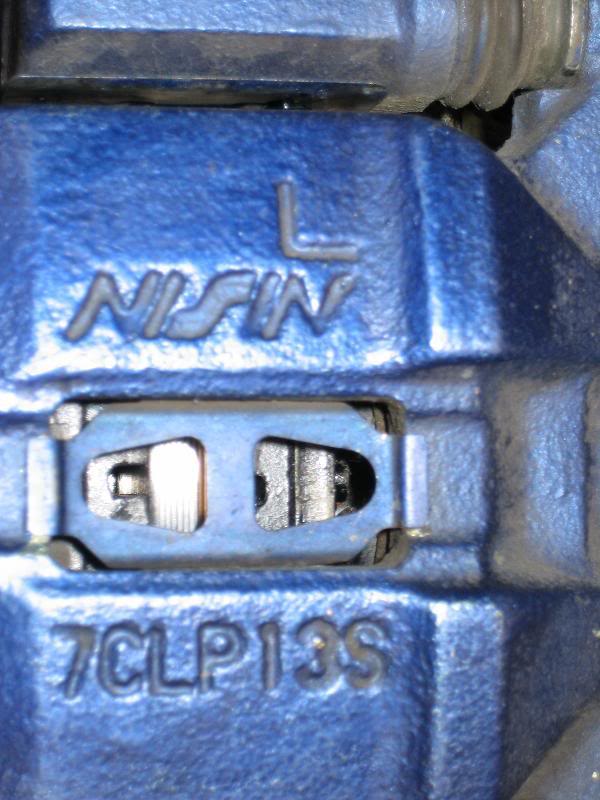
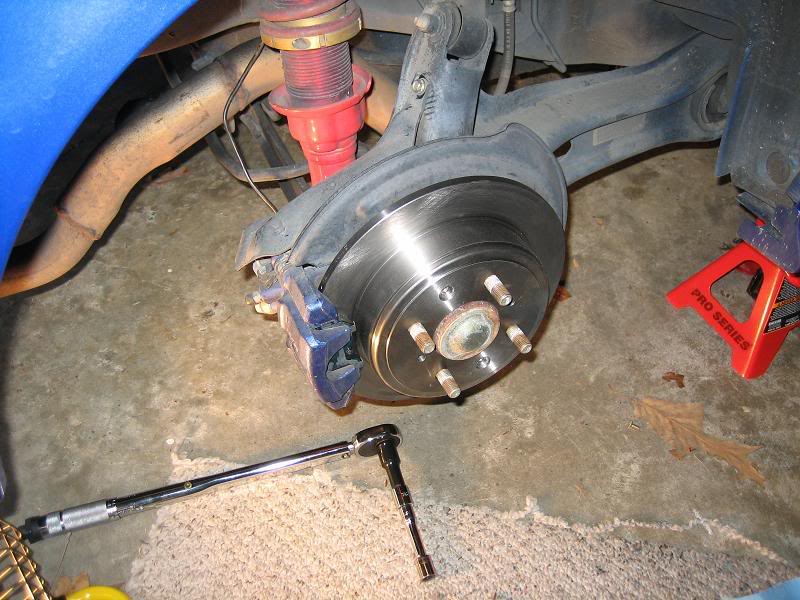
Take off the lower caliper bolt (24 ft-lbs). This provides access to the pads.

Flip the caliper up and take off the old pads. If you are just inspecting the pads then note that they should have 9.5 – 10.5 mm of pad thickness. The minimum limit is 1.6 mm.

Mine were very low and since I was about to track my car, I knew I should replace them.
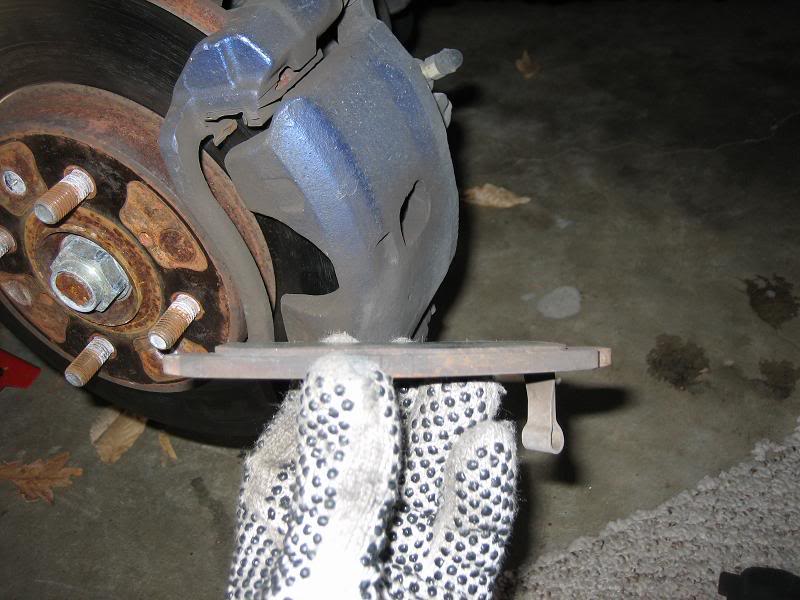
:note: the wear indicator sticking down, this should be installed on the front pads on the top side facing in toward the motor.
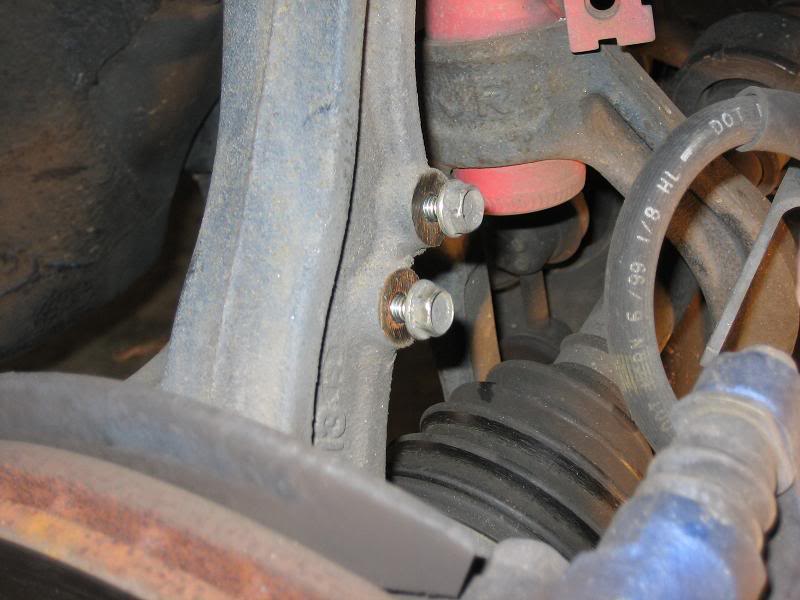
Take the caliper mounting bolts off. These are a bit tougher to get since they are (80 ft-lbs)
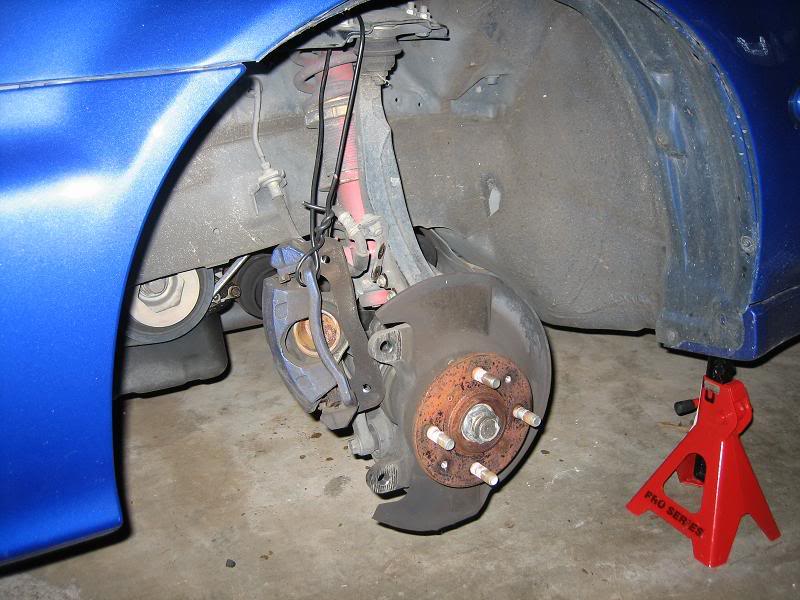
Support the caliper with wire to prevent damage to your brake lines.

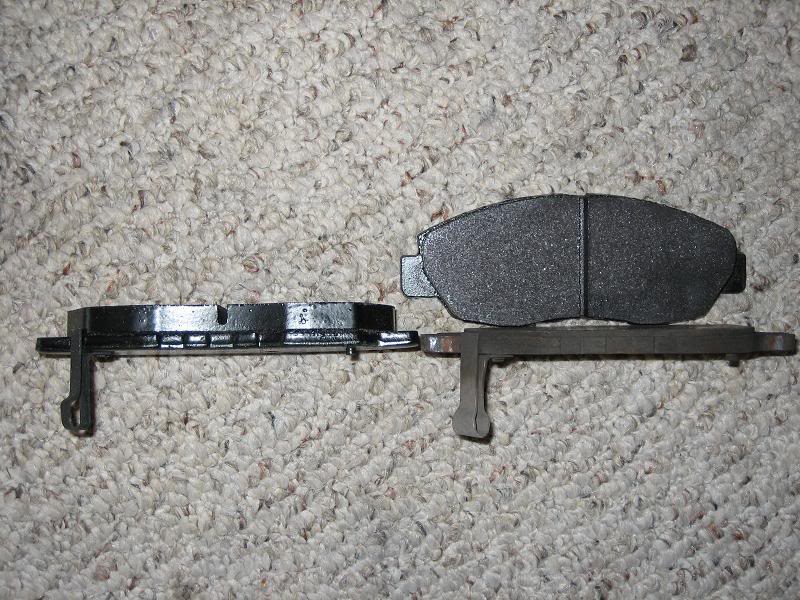
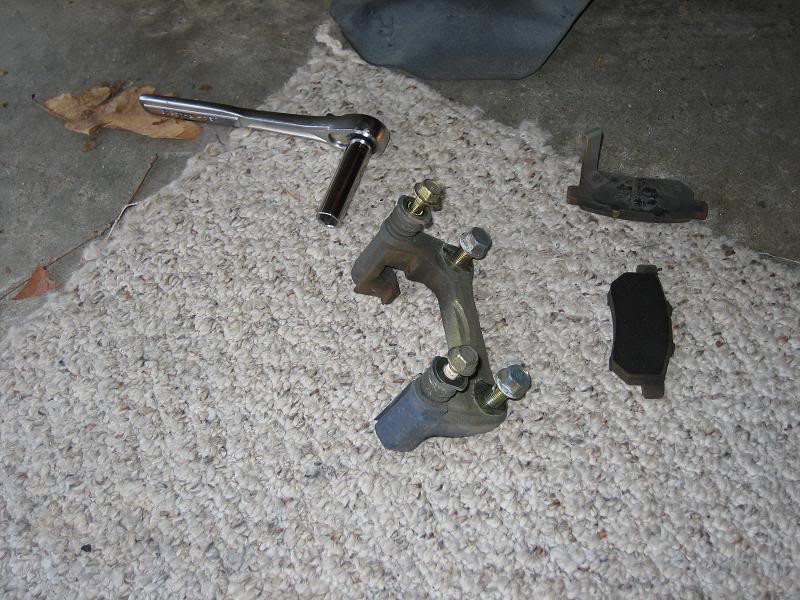
A pic of my new pads on the left (Hawk HP+) and OEM on the right
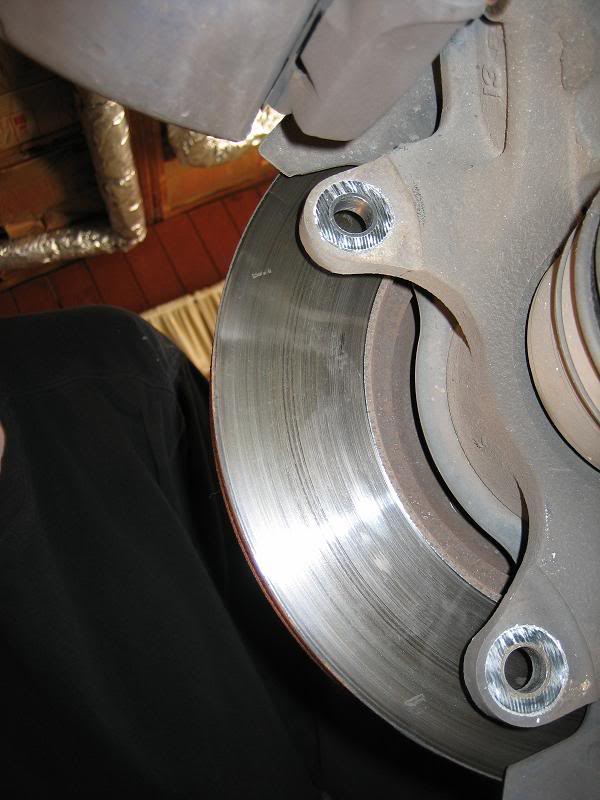
Now you are ready to take the rotor off. Here is where that impact driver comes to play. There are two retaining screw that hold the rotor to the hub. These things are heated to very high temperature when you brake and have a tendancy to rust freeze in place if anti-sieze was not used. I think the last person who did this job used loctite. Get an impact driver and a hammer. This will release those screws easily.
I wanted to salvage my rotors because I measured them and they were well within spec. The Helms stated that 8x1.25mm bolt could be screwed into the other 2 holes to push the rotor away from the hub. I found a bolt from the upper support bolt holding in my power steering. So I used it.
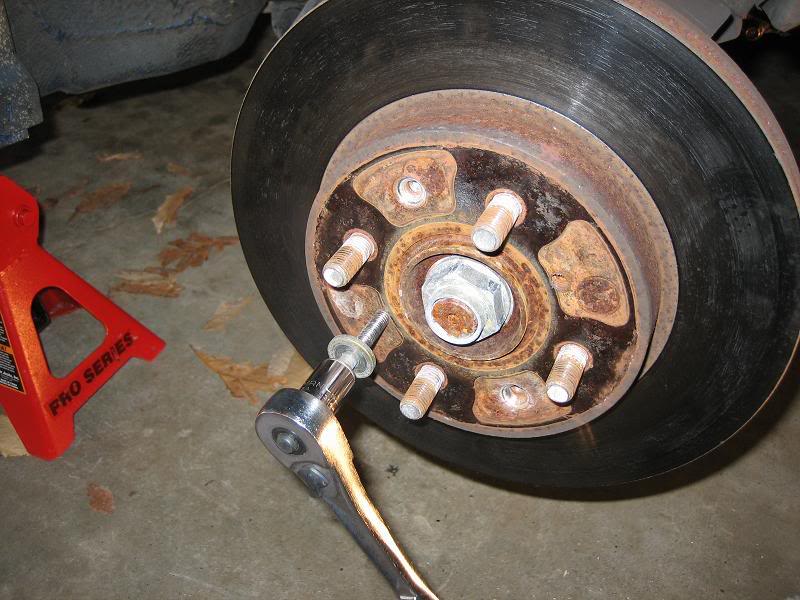
:note: don’t screw too much on each bolt without turning the other, or else damage to the rotor can happen. Twist each bolt about a turn then turn the other. The rotor will come off shortly.
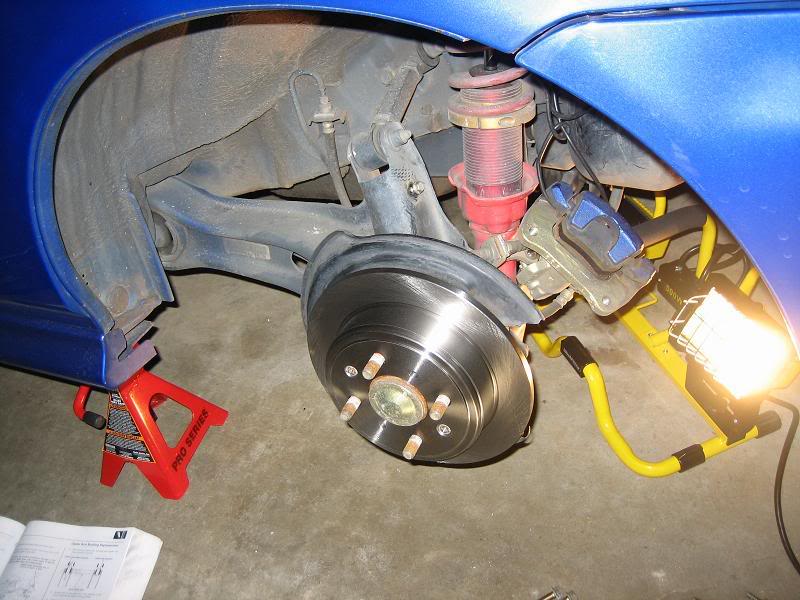
Put the new rotor on :bling:

I put those damn screws back in just to hold the rotor on. Once I completed the job for each pad/rotor I took them off.
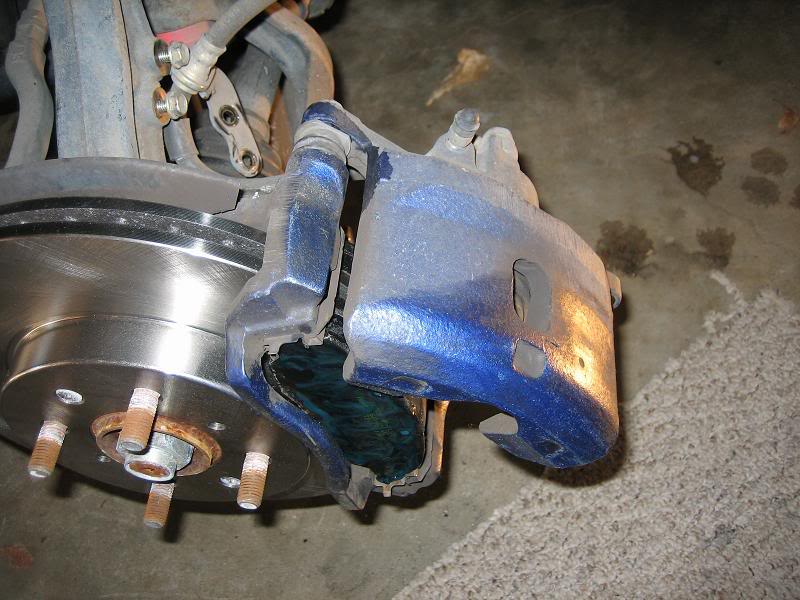
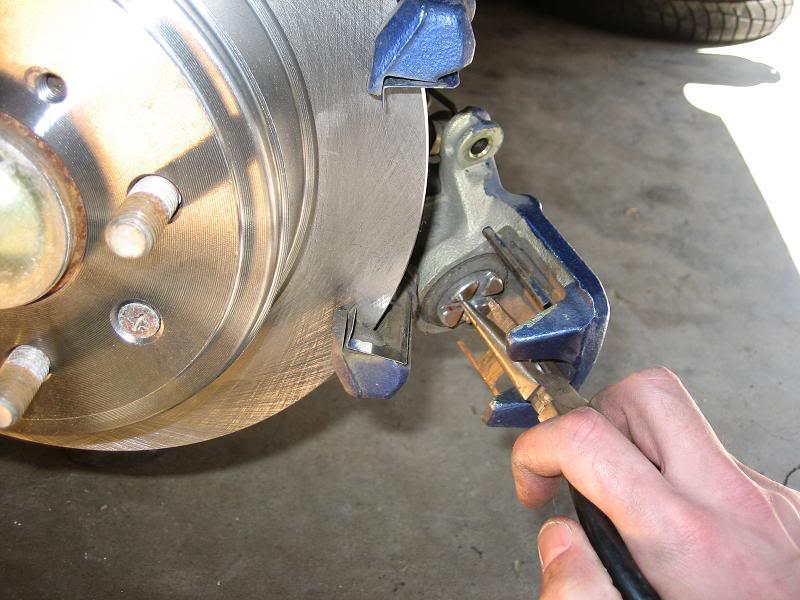
Put the caliper back on so the new pads can be placed in the caliper. Be sure to use pad grease. DO NOT PUT PAD GREASE ON THE ROTORS OR PADS

Slowly roll the caliper over the pads. You may need to push the piston back in order to place the caliper over the new pads. I pushed the piston in with a dowel and opened the bake bleed screw (6.5 ft-lbs) Be sure to bleed the brakes after the job is done to ensure no air is trapped.
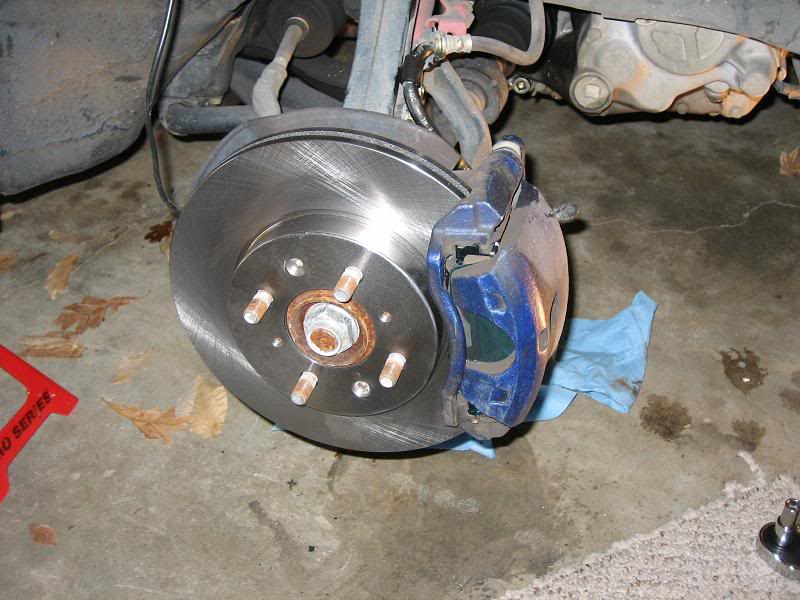
Installed! Now use that brake cleans and sprtiz down the pads and rotors to get rid of fingerprints, oil, dirt, anything to contaminate the brakes.

On to the rear!
Take off the caliper shield (on floor 7 ft-lbs) and take brake hose mounting bolts (16 ft-lbs)
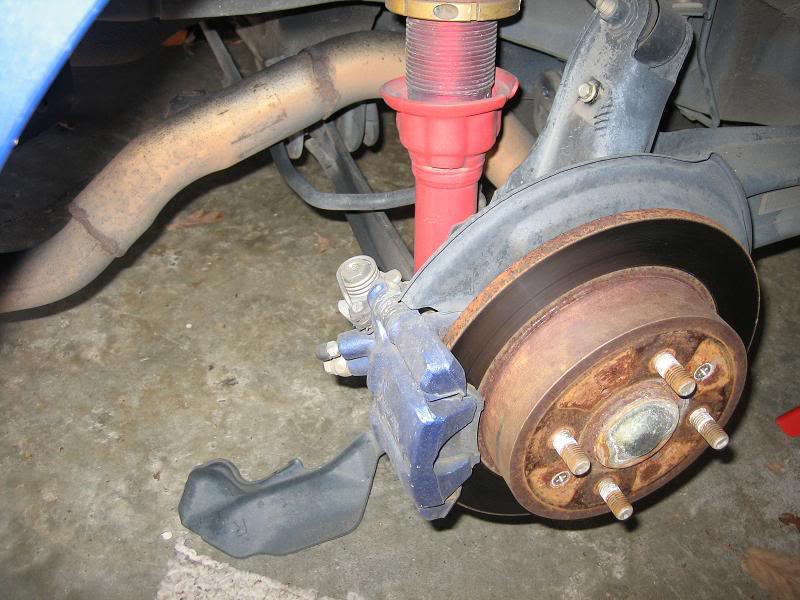
Then take the caliper bolts off (17 ft-lbs) and support the caliper.
Take the caliper bracket off. These bolts are ( 28 ft-lbs)

Again…those damn screws.
I didn’t have wood or a plastic mallet and was replacing the rotor anyway. So I took a hammer to the backside and the rotor flew off. Oh well…New one on there now.
The rear caliper piston is much easier to get in. Simply take a pair of needle nose pliers and screw the piston in clockwise.
Line up the notch of the inside rear pads to fit inside the “cross” in the piston.
Torque everything to spec
Beer time!
I broke in my pads by first driving around my neighborhood at 30 mph and slamming the brakes to 20 mph. Do not drag the brakes at this time. Then I went out to the major street and ripped it. 80 mph down to 60 mph a few times and then back to the house to let them cool off. Be sure to keep the car level and do not have the emergency brake on at all. Leave them alone for an hour or so. They should be broken in. Mine officially set in a few laps at Talledega Gran Prix. I never knew I could make brakes smoke like crazy.
Modified by blaze the chemi at 8:05 AM 3/30/2007
Modified by blaze the chemi at 3:27 PM 5/16/2007
Here’s my first DIY.
The car used was a 2000 Civic Si. Most cars, especially Hondas, use similar setups. Consult your specific model for correct torque settings.
Things needed:
10 mm, 12 mm, 14 mm, 17 mm wrenches and socket wrenches.
Foot-Pound torque wrench
Jack and stands
Pads and Rotors
Brake clean
Shop towels or low lint paper towels
Water
Patience
Optional, but highly recommended:
Impact gun
Impact driver
Let’s start.
Get your stands and jack situated correctly to raise the vehicle. You can either work the front and the rear separately, or you can work each side separately.
Raise the vehicle and support the car from the correct positions. Be sure to add something to both the front and rear tires on the opposite side to keep the car extra stable. You do not want the car on top of you.
I have an impact gun. Dewalt 345 ft-lbs of sheer madness to get those pesky lug nuts off. A breaker bar or something should be sufficient to break them loose, but since they should be torqued to 80 ft-lbs, you shouldn’t need a breaker bar too much.
Now that you have your wheel off, first take the brake line support bolts off. They should be a 10 mm. (8.7 ft-lbs)
If possible I always try and keep the bolts/nuts in place after I remove the item so I don’t have extra parts hanging around after a job. Put those two bolts back in position.
Take off the lower caliper bolt (24 ft-lbs). This provides access to the pads.
Flip the caliper up and take off the old pads. If you are just inspecting the pads then note that they should have 9.5 – 10.5 mm of pad thickness. The minimum limit is 1.6 mm.
Mine were very low and since I was about to track my car, I knew I should replace them.
:note: the wear indicator sticking down, this should be installed on the front pads on the top side facing in toward the motor.
Take the caliper mounting bolts off. These are a bit tougher to get since they are (80 ft-lbs)
Support the caliper with wire to prevent damage to your brake lines.
A pic of my new pads on the left (Hawk HP+) and OEM on the right
Now you are ready to take the rotor off. Here is where that impact driver comes to play. There are two retaining screw that hold the rotor to the hub. These things are heated to very high temperature when you brake and have a tendancy to rust freeze in place if anti-sieze was not used. I think the last person who did this job used loctite. Get an impact driver and a hammer. This will release those screws easily.
I wanted to salvage my rotors because I measured them and they were well within spec. The Helms stated that 8x1.25mm bolt could be screwed into the other 2 holes to push the rotor away from the hub. I found a bolt from the upper support bolt holding in my power steering. So I used it.
:note: don’t screw too much on each bolt without turning the other, or else damage to the rotor can happen. Twist each bolt about a turn then turn the other. The rotor will come off shortly.
Put the new rotor on :bling:
I put those damn screws back in just to hold the rotor on. Once I completed the job for each pad/rotor I took them off.
Put the caliper back on so the new pads can be placed in the caliper. Be sure to use pad grease. DO NOT PUT PAD GREASE ON THE ROTORS OR PADS
Slowly roll the caliper over the pads. You may need to push the piston back in order to place the caliper over the new pads. I pushed the piston in with a dowel and opened the bake bleed screw (6.5 ft-lbs) Be sure to bleed the brakes after the job is done to ensure no air is trapped.
Installed! Now use that brake cleans and sprtiz down the pads and rotors to get rid of fingerprints, oil, dirt, anything to contaminate the brakes.
On to the rear!
Take off the caliper shield (on floor 7 ft-lbs) and take brake hose mounting bolts (16 ft-lbs)
Then take the caliper bolts off (17 ft-lbs) and support the caliper.
Take the caliper bracket off. These bolts are ( 28 ft-lbs)
Again…those damn screws.
I didn’t have wood or a plastic mallet and was replacing the rotor anyway. So I took a hammer to the backside and the rotor flew off. Oh well…New one on there now.
The rear caliper piston is much easier to get in. Simply take a pair of needle nose pliers and screw the piston in clockwise.
Line up the notch of the inside rear pads to fit inside the “cross” in the piston.
Torque everything to spec
Beer time!
I broke in my pads by first driving around my neighborhood at 30 mph and slamming the brakes to 20 mph. Do not drag the brakes at this time. Then I went out to the major street and ripped it. 80 mph down to 60 mph a few times and then back to the house to let them cool off. Be sure to keep the car level and do not have the emergency brake on at all. Leave them alone for an hour or so. They should be broken in. Mine officially set in a few laps at Talledega Gran Prix. I never knew I could make brakes smoke like crazy.
Modified by blaze the chemi at 8:05 AM 3/30/2007
Modified by blaze the chemi at 3:27 PM 5/16/2007
 03-29-2007, 07:17 PM
#3
Honda-Tech Member
Join Date: Sep 2001
Location: socal usa
Posts: 4,491
Likes: 0
Received 0 Likes
on
0 Posts
<TABLE WIDTH="90%" CELLSPACING=0 CELLPADDING=0 ALIGN=CENTER><TR><TD>Quote, originally posted by ek forever guy »</TD></TR><TR><TD CLASS="quote">Nice writeup, get it stickied in the "post links to helpful FAQs" Thread. This belongs there.  </TD></TR></TABLE>
agree... just finished doing this and i had to come here couple of times to do a search... this pretty much has all the the details...
</TD></TR></TABLE>agree... just finished doing this and i had to come here couple of times to do a search... this pretty much has all the the details...
03-29-2007, 07:29 PM
#5
Honda-Tech Member
I dont know bout anyone else, but when i do a break job, i take the brake MC cap off first. And when i go to push the caliper piston back in, i break the bleeder lose, then push in the caliper and close it back off. do it correctly and no air gets back into the system. then just top it off.
Just the way i do it when the piston wont go in so easily. guess i just dont like fiting something and i take the easy way even if it means longer.
But nice write up
Just the way i do it when the piston wont go in so easily. guess i just dont like fiting something and i take the easy way even if it means longer.
But nice write up
03-29-2007, 07:42 PM
#7
Join Date: Jul 2006
Location: Hillbilly deluxe, nj, america fuk yea
Posts: 864
Likes: 0
Received 0 Likes
on
0 Posts
vedy nice how much??
and an A+++ for a perfect DIY write up 
P.S. nice drill wish i had the 400 bones to dish out for one lol
and an A+++ for a perfect DIY write up P.S. nice drill wish i had the 400 bones to dish out for one lol
Trending Topics
03-29-2007, 09:06 PM
#8
Junior Member
<TABLE WIDTH="90%" CELLSPACING=0 CELLPADDING=0 ALIGN=CENTER><TR><TD>Quote, originally posted by dohcdelsol »</TD></TR><TR><TD CLASS="quote">I dont know bout anyone else, but when i do a break job, i take the brake MC cap off first. And when i go to push the caliper piston back in, i break the bleeder lose, then push in the caliper and close it back off. do it correctly and no air gets back into the system. then just top it off.
Just the way i do it when the piston wont go in so easily. guess i just dont like fiting something and i take the easy way even if it means longer.
But nice write up </TD></TR></TABLE>
I do that as well. Also I'd suggest a can of brake clean, it's good to spray down the rotors in preparation for install as well as a sure fire way to guarantee a clean rotor and pad surface after install (never know what might have gotten on the rotor or fingerprints...).
Just the way i do it when the piston wont go in so easily. guess i just dont like fiting something and i take the easy way even if it means longer.
But nice write up
</TD></TR></TABLE>I do that as well. Also I'd suggest a can of brake clean, it's good to spray down the rotors in preparation for install as well as a sure fire way to guarantee a clean rotor and pad surface after install (never know what might have gotten on the rotor or fingerprints...).
03-29-2007, 09:07 PM
#9
Honda-Tech Member
Join Date: Aug 2003
Location: P0rnfield, Iowa, USA
Posts: 1,372
Likes: 0
Received 0 Likes
on
0 Posts
Nice write up.
Word of advice, especially on cars with abs is that you should open the bleeder before you press the piston in to avoid pushing dirty fluid up into the abs unit.
An easy way to press the piston in on the front is to stick a screw driver in that little inspection window on the front of the caliper with the blade on the near edge of the rotor and pull towards you.
03-30-2007, 04:04 AM
#10
Honda-Tech Member
Thread Starter
Join Date: Oct 2004
Location: All over ATL
Posts: 2,088
Likes: 0
Received 0 Likes
on
0 Posts
<TABLE WIDTH="90%" CELLSPACING=0 CELLPADDING=0 ALIGN=CENTER><TR><TD>Quote, originally posted by CarbonizedDX »</TD></TR><TR><TD CLASS="quote">
I do that as well. Also I'd suggest a can of brake clean, it's good to spray down the rotors in preparation for install as well as a sure fire way to guarantee a clean rotor and pad surface after install (never know what might have gotten on the rotor or fingerprints...).</TD></TR></TABLE>
DOH! I knew I would forget something. Yeah I had a bottle of brake clean. I sprayed the pads and rotors after the job before going to the next one. Thanks and I'll edit my write up to include it.
04-09-2010, 08:32 AM
#12
Honda-Tech Member

Join Date: Sep 2008
Location: nowhere ville.
Posts: 2,039
Likes: 0
Received 0 Likes
on
0 Posts
nice writeup. little worried that someone may need a writeup for disc brakes though...
a measly 345? got 700 ft lbs to show those bolts whose boss. 150 bucks. 400 is a ripoff for a gun.
i would never do only one side of my car lifted...front or back ok but sideways? no sir.
and it is much easier to just hit it with a hammer to get it off then use a screw.
a measly 345? got 700 ft lbs to show those bolts whose boss. 150 bucks. 400 is a ripoff for a gun.
i would never do only one side of my car lifted...front or back ok but sideways? no sir.
and it is much easier to just hit it with a hammer to get it off then use a screw.
04-09-2010, 09:48 AM
#13
Honda-Tech Member
Join Date: Mar 2010
Posts: 8
Likes: 0
Received 0 Likes
on
0 Posts
nice write up. my brakes started making noise a couple days ago, so time for some new brakes. haven't had the car for too long, so this is my first time doing the brakes. nice to have a reference to check. thanks
 05-13-2010, 10:18 AM
#16
Honda-Tech Member
Join Date: Jul 2006
Location: Stockton, Ca
Posts: 418
Likes: 0
Received 0 Likes
on
0 Posts
Can I use an impact gun instead to take those rotor screws off? I don't want to strip mine it's only a month old. Don't want to buy another one. I tried using a screwdriver but it seems that it wants to strip it.
05-13-2010, 10:28 AM
#17
Honda-Tech Member
UHmm, i think the screw are difficult to come out sometimes.. I have try using an impact gun and it didn't work... ANyone here try drilling the screw to get it out??
05-13-2010, 11:00 AM
#18
impact screw driver has always worked for me. or there are screw drivers with a squared part on the end, grab with adjustable wrench and smack with a hammer while turning, a little pb could help as well. My uncle drilled his out a while back, they were totaly seized and rounded.


Thread
Thread Starter
Forum
Replies
Last Post
NegativeLift
Road Racing / Autocross & Time Attack
12
03-23-2011 04:40 AM
TiggsCRX
Honda CRX / EF Civic (1988 - 1991)
5
05-01-2004 12:42 PM
