Better How-To for Del Sol Aux. Lights Re-Wire
 03-30-2004, 08:13 PM
#1
Thread Starter
Join Date: Mar 2004
Location: Quad Cities, IL/IA, USA
Posts: 139
Likes: 0
Received 0 Likes
on
0 Posts
Hey all-
I'm new, and was recently searching for how-to's on re-wiring aux. lights so you can have them on without gay headlights. I saw a few that just said to tap off the fusebox power, etc. But to me, these ways are ghetto. I hate routing to the fusebox (what if you need that fusebox space for something more important? For instance: Apex'i SAFC, Turbo timers, Boost controllers, etc), and having your aux lights be able to come on without the key even being in the switch is just begging for battery drainage. Here's what I did, and it seems to be the cleanest, most sensible way. Doing it the way I did, you can have the aux. lights on with the key on or car running, and you don't need an in-line fuse like some of the other how-to's require.
Tools needed: Phillips screwdriver, flathead screwdriver, wire cutters, wire strippers, electrical crimpers, 3 18-22 gauge pink butt connectors, 2 feet of wire.
Step 1: Remove the 2 screws holding the switch cluster in place. Use a flathead screwdriver or some other device (fingers work too) and pry the assembly out of the dash.
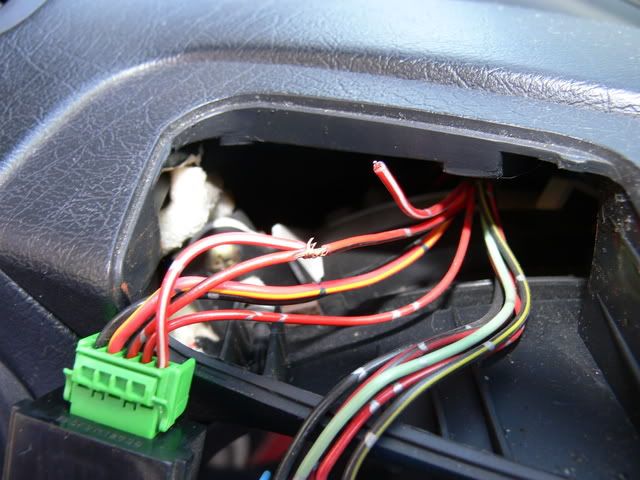
Step 2: Check out the wires on the Aux. light switch. There should be a wire all the way to the right that is red with a white stripe. Clip it about 1.5-2 inches away from the switch. strip the stub coming out of the switch and crimp a butt connector to it. Crimp a butt connector on to the other part of the wire that goes into the dash (just to cap it off so it doesn't come into contact with other parts and cause a short)
Step 3: Find the rear defrost switch on the right side of the switch cluster. There is a wire, the far left one. It is black with an yellowish sort of colored stripe. Clip it 1.5-2 inches away from the switch. Strip both ends.
Step 4: Strip both ends of your 2 foot piece of wire (I'm not sure how long mine was, but use your judgement) and crimp one side to the butt connector coming out of the aux. light switch.
Step 5: At the right side of the switch cluster, you have 3 stripped ends: One is your 2 foot wire, one is the black with olive stripe wire coming out of the switch, and the other is the black with olive stripe wire going into the dash. Twist the 2 foot wire's end together with the black/olive stripe wire going into the dash and crimp them into one side of a butt connector. Crimp the black/olive stripe wire coming out of the switch into the other side of the butt connector.
You're done! Just remember a couple of things: the factory wiring is small, so be sure to get good, tight crimps. Tug lightly on the wires to make sure they were crimped tight enough. Also, when routing your 2 foot wire from the left side of the switch cluster to the right side, there is a small piece in the middle connecting the gauge cluster to the underside of the top of the dash. Be sure to run your wire BEHIND this piece, otherwise you have to take stuff apart or clip and crimp the wire back together on the other side...no fun. Also, it is good to have a circuit tester on hand (pokey thing with a light bulb in it) to make sure that the right wires are hot when the key is on.
Turn the key on and test the system. Make sure the aux lights work only when the key is on and when the car is running.
Re-install the dash in the opposite order of un-install, and have fun with your new cool wiring shiznit
Modified by Del_Slo_1 at 3:10 PM 4/10/2004
I'm new, and was recently searching for how-to's on re-wiring aux. lights so you can have them on without gay headlights. I saw a few that just said to tap off the fusebox power, etc. But to me, these ways are ghetto. I hate routing to the fusebox (what if you need that fusebox space for something more important? For instance: Apex'i SAFC, Turbo timers, Boost controllers, etc), and having your aux lights be able to come on without the key even being in the switch is just begging for battery drainage. Here's what I did, and it seems to be the cleanest, most sensible way. Doing it the way I did, you can have the aux. lights on with the key on or car running, and you don't need an in-line fuse like some of the other how-to's require.
Tools needed: Phillips screwdriver, flathead screwdriver, wire cutters, wire strippers, electrical crimpers, 3 18-22 gauge pink butt connectors, 2 feet of wire.
Step 1: Remove the 2 screws holding the switch cluster in place. Use a flathead screwdriver or some other device (fingers work too) and pry the assembly out of the dash.
Step 2: Check out the wires on the Aux. light switch. There should be a wire all the way to the right that is red with a white stripe. Clip it about 1.5-2 inches away from the switch. strip the stub coming out of the switch and crimp a butt connector to it. Crimp a butt connector on to the other part of the wire that goes into the dash (just to cap it off so it doesn't come into contact with other parts and cause a short)
Step 3: Find the rear defrost switch on the right side of the switch cluster. There is a wire, the far left one. It is black with an yellowish sort of colored stripe. Clip it 1.5-2 inches away from the switch. Strip both ends.
Step 4: Strip both ends of your 2 foot piece of wire (I'm not sure how long mine was, but use your judgement) and crimp one side to the butt connector coming out of the aux. light switch.
Step 5: At the right side of the switch cluster, you have 3 stripped ends: One is your 2 foot wire, one is the black with olive stripe wire coming out of the switch, and the other is the black with olive stripe wire going into the dash. Twist the 2 foot wire's end together with the black/olive stripe wire going into the dash and crimp them into one side of a butt connector. Crimp the black/olive stripe wire coming out of the switch into the other side of the butt connector.
You're done! Just remember a couple of things: the factory wiring is small, so be sure to get good, tight crimps. Tug lightly on the wires to make sure they were crimped tight enough. Also, when routing your 2 foot wire from the left side of the switch cluster to the right side, there is a small piece in the middle connecting the gauge cluster to the underside of the top of the dash. Be sure to run your wire BEHIND this piece, otherwise you have to take stuff apart or clip and crimp the wire back together on the other side...no fun. Also, it is good to have a circuit tester on hand (pokey thing with a light bulb in it) to make sure that the right wires are hot when the key is on.
Turn the key on and test the system. Make sure the aux lights work only when the key is on and when the car is running.
Re-install the dash in the opposite order of un-install, and have fun with your new cool wiring shiznit
Modified by Del_Slo_1 at 3:10 PM 4/10/2004
 04-04-2004, 10:47 PM
#7

Join Date: Mar 2003
Posts: 2,679
Likes: 0
Received 0 Likes
on
0 Posts
<TABLE WIDTH="90%" CELLSPACING=0 CELLPADDING=0 ALIGN=CENTER><TR><TD>Quote, originally posted by pakman2002 »</TD></TR><TR><TD CLASS="quote">nice write up. You got pics?</TD></TR></TABLE>
Pictures will help a bit more.
Pictures will help a bit more.
Trending Topics
04-05-2004, 02:54 AM
#8
Join Date: Mar 2003
Posts: 2,679
Likes: 0
Received 0 Likes
on
0 Posts
I tried it tonight and it totally fried my defroster switch--I cannot get it to switch on anymore. I accidentally touched wires between the cut in-dash Aux. light wire with my custom (2 feet of wire) attached to the defroster wires (both cut in-dash & cut switch wires).
I think I might've shorted a fuse but I've checked and replaced the 15amp fuse in under the hood--but nothing.
Heres my problem so far:
https://honda-tech.com/zerothread?id=822620
I think I might've shorted a fuse but I've checked and replaced the 15amp fuse in under the hood--but nothing.
Heres my problem so far:
https://honda-tech.com/zerothread?id=822620
04-05-2004, 08:17 PM
#9
Thread Starter
Join Date: Mar 2004
Location: Quad Cities, IL/IA, USA
Posts: 139
Likes: 0
Received 0 Likes
on
0 Posts
I'm not sure what happened...did you use a circuit tester to check for hotness, etc? I didn't make an error on my write-up, you must have connected something to something wrong....I would suggest clipping all connections made and re-checking everything before coming to any conclusion. If anyone else has any problems, I will physically take apart what I have done and will edit my original post.
04-05-2004, 08:28 PM
#10
Join Date: Mar 2003
Posts: 2,679
Likes: 0
Received 0 Likes
on
0 Posts
<TABLE WIDTH="90%" CELLSPACING=0 CELLPADDING=0 ALIGN=CENTER><TR><TD>Quote, originally posted by Del_Slo_1 »</TD></TR><TR><TD CLASS="quote">Step 3: Find the rear defrost switch on the right side of the switch cluster. There is a wire, I think 2 wires in from the left. It is black with an olive green sort of colored stripe. Clip it 1.5-2 inches away from the switch. Strip both ends.</TD></TR></TABLE>
I checked the wiring and found a blue wire with a beige stripe instead of the olive green wire stated in your write-up. I clipped that and wired everything the way your write-up describes. I accidentally touched wires between the cut in-dash Aux. light wire with my custom (2 feet of wire) attached to the defroster wires (both cut in-dash & cut switch wires).
It was totally my mistake
04-07-2004, 10:57 AM
#11
Thread Starter
Join Date: Mar 2004
Location: Quad Cities, IL/IA, USA
Posts: 139
Likes: 0
Received 0 Likes
on
0 Posts
Sorry to hear about your unfortunate issue. I think that I'm gonna go out to the garage now and check the wire colors, I don't want my write-up to have any BS in it...no one likes that I'll edit my original post as required.
I'll edit my original post as required.
04-10-2004, 12:12 PM
#12
Thread Starter
Join Date: Mar 2004
Location: Quad Cities, IL/IA, USA
Posts: 139
Likes: 0
Received 0 Likes
on
0 Posts
Yeah, I found my problem with the original write-up. The wire color on the rear defrost switch is correct, but the position was not. It is not the second one in from the left, it is the far left one. Sorry to those who fried something or were confused, I just took mine apart and checked it out. However, I can't figure out how to insert photos into a post or my sig. Can anyone help me with that?
04-10-2004, 11:13 PM
#14
Honda-Tech Member
Join Date: Jan 2002
Location: Raleigh, NC
Posts: 15,334
Likes: 0
Received 0 Likes
on
0 Posts
<TABLE WIDTH="90%" CELLSPACING=0 CELLPADDING=0 ALIGN=CENTER><TR><TD>Quote, originally posted by Del_Slo_1 »</TD></TR><TR><TD CLASS="quote">photos in the sig. still not working...horses*** </TD></TR></TABLE>
j00 can't put photos in your sig guy.
</TD></TR></TABLE>j00 can't put photos in your sig guy.
 11-02-2006, 11:56 PM
#17
Honda-Tech Member
Join Date: Oct 2006
Location: Madison, WI
Posts: 590
Likes: 0
Received 0 Likes
on
0 Posts
i don't want to prove you wrong or anything but you can also just splice the Red/White wire, plug side, into the Red/Black wire all on the aux light switch, and you'll get the same effect
06-25-2007, 01:19 PM
#18
Honda-Tech Member
Join Date: Apr 2007
Location: Being A Stallion in, Maine, USA
Posts: 3,156
Likes: 0
Received 0 Likes
on
0 Posts
hey i have the complete photos for this write up if i am taught how to put them on
06-26-2007, 08:29 PM
#19
Honda-Tech Member
host em on photobucket or somewhwere for free, then use the IMG button up there so it ends up looking like 


 11-04-2011, 11:59 AM
#24
Trial User

Join Date: Nov 2011
Posts: 1
Likes: 0
Received 0 Likes
on
0 Posts
Does anyone have pictures of how the wiring is supposed to look at the end all connected? If you could please send them to me oaraica24@gmail.com thank you