When you click on links to various merchants on this site and make a purchase, this can result in this site earning a commission. Affiliate programs and affiliations include, but are not limited to, the eBay Partner Network.
looks good. but it looks like you missed a few things. you didnt add in a strain relief or proper boot at the end of the bulk head connector. and the clear heat shrink to protect the labels. other than that looks good.
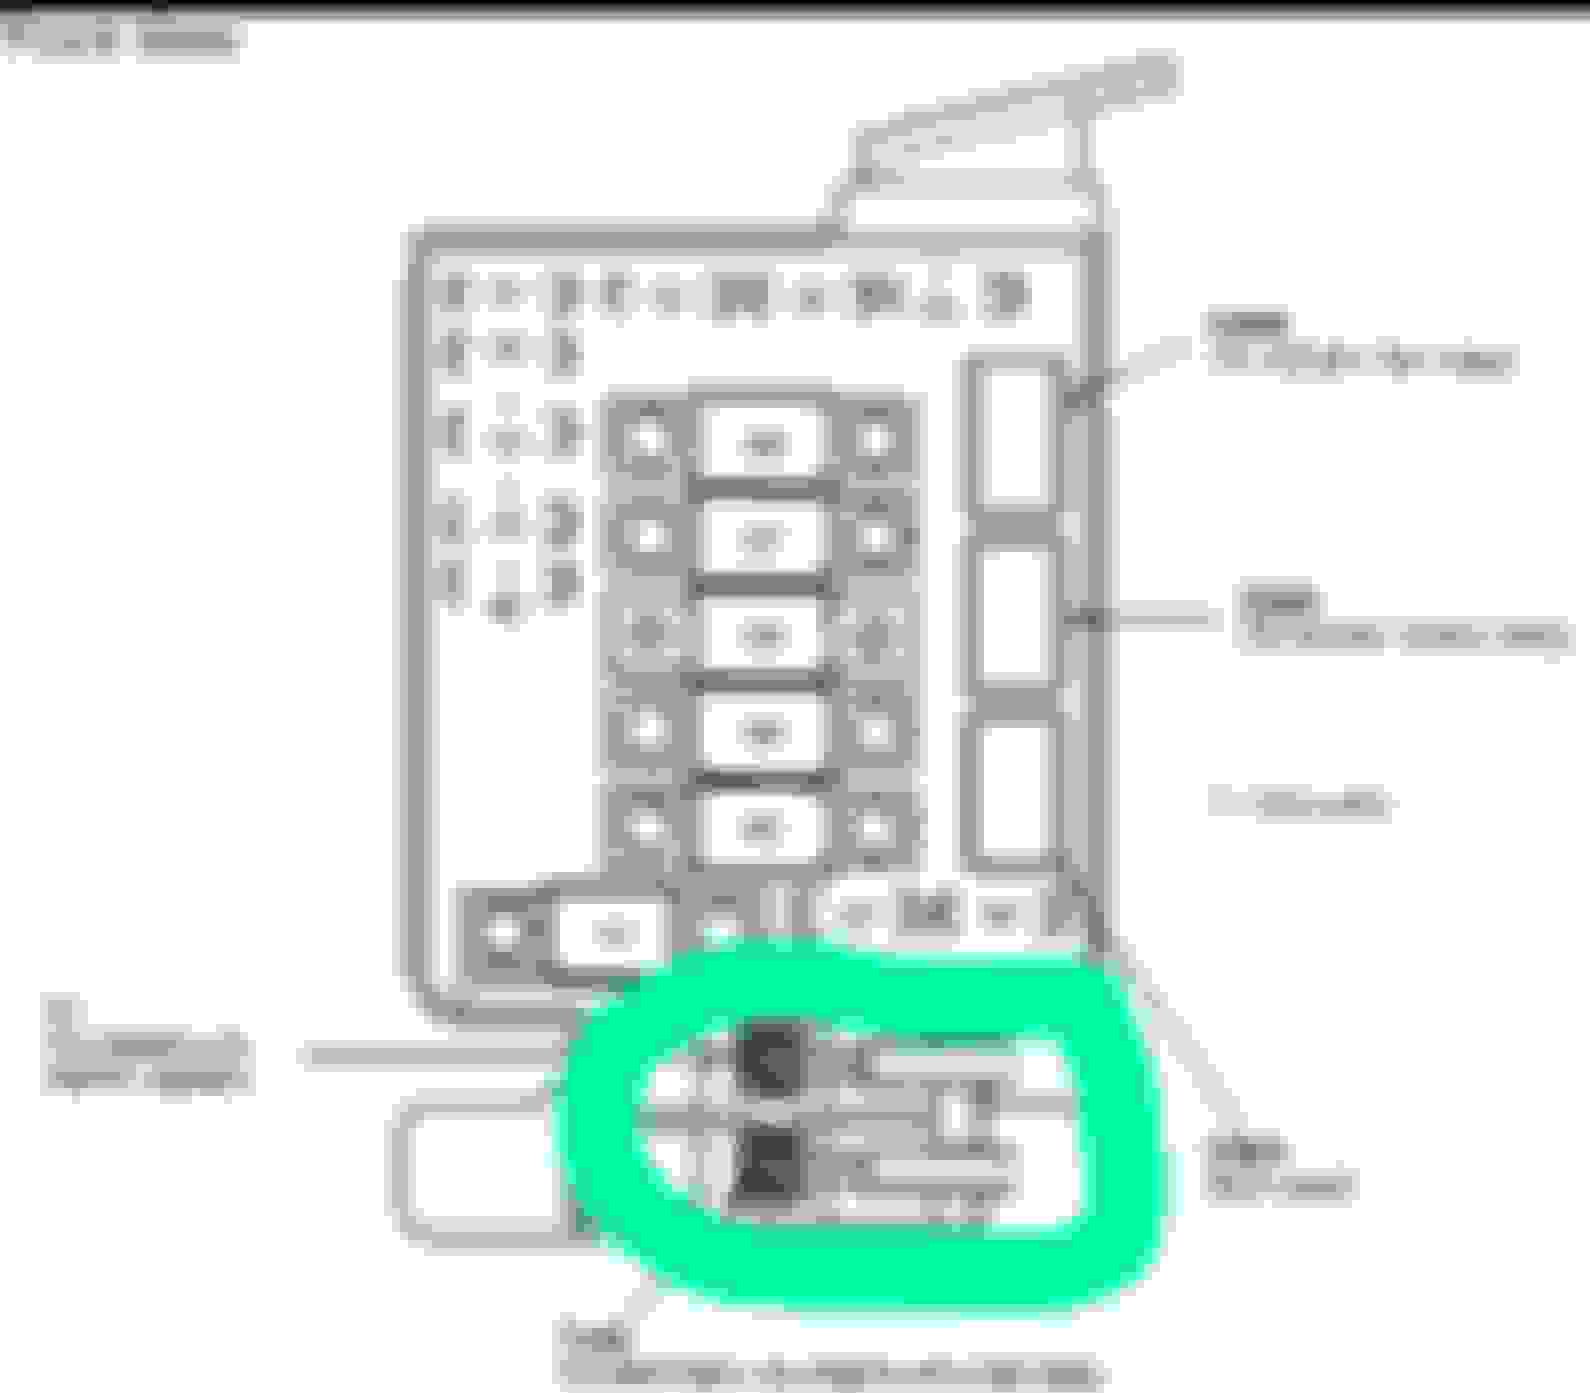
So a buddy of mine bought a 94 integra she'll and he I'm helping him with his tuck. We are both first timers on tucks. We already removed the dash and mounted the prop valve and routed the brake lines. The headlights already done as well hids hooked up as well. We are going to relocate the battery behind the front bumper and put the fuse for under the dash by where ecu is located. My question is where does the 2 wires from the fuse box go to??
All know is that it's from battery altenator and starter but don't know exactly where they go or where get hooked up to or if they are both power or at least a ground wire?
Last edited by estefi357; 10-25-2015 at 11:40 PM.
Reason: Did a mistake
Almost forgot we putting braided steel fuel lines and aftermarket fuel pressure regulator we are also lost on how to route them. It goes from feed line to the fuel filter to fuel rail through the pressure regulator to return line correct?? In this pic why is there 3 lines that go through the pressures regulator? What goes where?
been following this thread for a while, since I last posted here is what I been up to on my current project
<a href="http://s21.photobucket.com/user/rimz77/media/IMG_3234.jpg.html" target="_blank"><img src="http://i21.photobucket.com/albums/b270/rimz77/IMG_3234.jpg" border="0" alt=" photo IMG_3234.jpg"/></a>
<a href="http://s21.photobucket.com/user/rimz77/media/IMG_3296.jpg.html" target="_blank"><img src="http://i21.photobucket.com/albums/b270/rimz77/IMG_3296.jpg" border="0" alt=" photo IMG_3296.jpg"/></a>
<a href="http://s21.photobucket.com/user/rimz77/media/D9E37B01-E5FA-44C4-85D0-F6E0F9337D01.jpg.html" target="_blank"><img src="http://i21.photobucket.com/albums/b270/rimz77/D9E37B01-E5FA-44C4-85D0-F6E0F9337D01.jpg" border="0" alt=" photo D9E37B01-E5FA-44C4-85D0-F6E0F9337D01.jpg"/></a>
<a href="http://s21.photobucket.com/user/rimz77/media/IMG_4068.jpg.html" target="_blank"><img src="http://i21.photobucket.com/albums/b270/rimz77/IMG_4068.jpg" border="0" alt=" photo IMG_4068.jpg"/></a>
<a href="http://s21.photobucket.com/user/rimz77/media/f4b80f1a-9c68-4523-b7ec-aee977a9c428.png.html" target="_blank"><img src="http://i21.photobucket.com/albums/b270/rimz77/f4b80f1a-9c68-4523-b7ec-aee977a9c428.png" border="0" alt=" photo f4b80f1a-9c68-4523-b7ec-aee977a9c428.png"/></a>
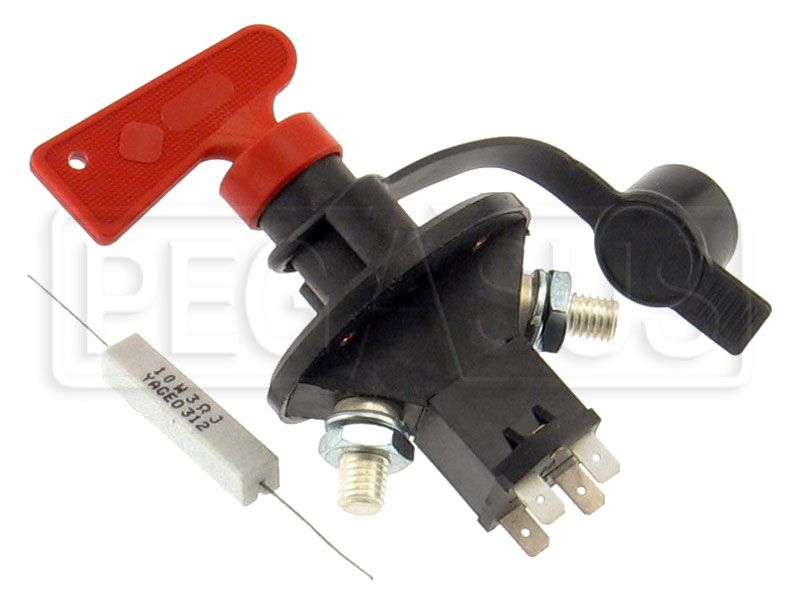
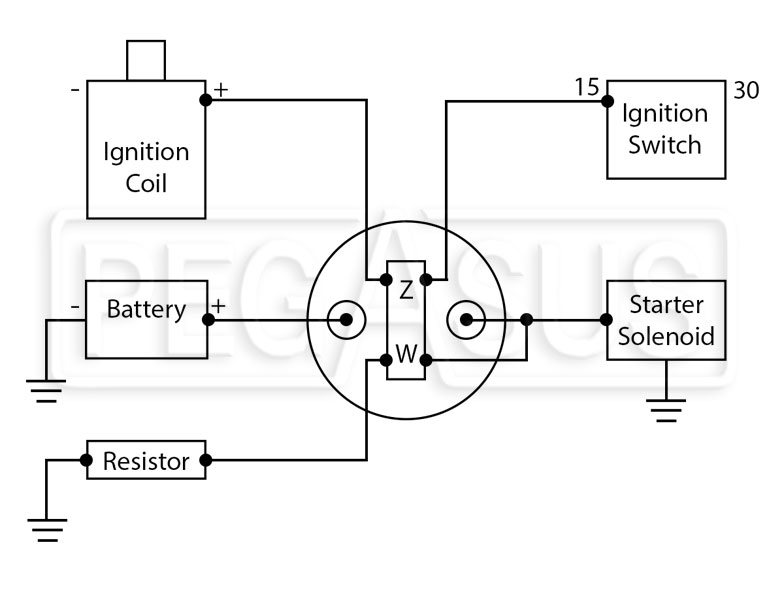
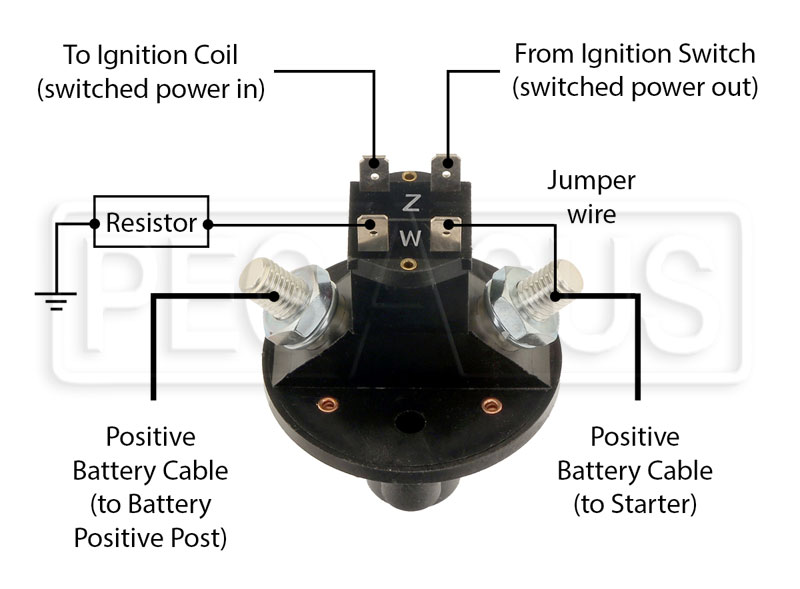
Now I am not having trouble with wiring that porting up as the instructions are pretty clear but I am having trouble wiring up the rest of the stuff. I plan on using bulkhead connectors on the firewall to connect my alternator and starter to a distribution block that would connect them to the kill switch and fuse box. the kill switch will be connected like diagram above and to the battery. I plan to use 0 or 2 gauge wire from battery to kill switch and from kill switch to distribution block then 2 or 4 gauge wire for connecting the fuse box, alternator and started.
here's a rough visual of what I mean:
does this set up work? I don't see an issue with it but I would like to run it by other people who might be more knowledgeable about this stuff.
Looks about right otherwise. Is this a race car or street car? If it's a race car you need to be able to satisfy the rule book before anything else, reference that.
Looks about right otherwise. Is this a race car or street car? If it's a race car you need to be able to satisfy the rule book before anything else, reference that.
Thanks, yes I looked at the classes I would most likely fit in and its street prepared or prepared and they both state:
"If the battery is relocated and the original battery
tray can be removed by simply unbolting it, the tray may be removed
or relocated with the battery. Holes may be drilled for mounting or passage
of cables. Longer or shorter cables may be substituted to permit
relocation. The number of battery or batteries may not be changed
from standard. The area behind the rearmost seat is not considered to
be within the passenger compartment. The area under the rearmost
seat is considered to be within the passenger compartment."
I'm not sure if anyone covered this before... But anyways lol
Just a thing I do when the harness zip tie rivets break, or as in this case I had to take the harness apart. Just thought I'd share..
<a href="http://s21.photobucket.com/user/rimz77/media/85A11671-F9D0-4909-B9B9-BAC246DD8C83.jpg.html" target="_blank"><img src="http://i21.photobucket.com/albums/b270/rimz77/85A11671-F9D0-4909-B9B9-BAC246DD8C83.jpg" border="0" alt=" photo 85A11671-F9D0-4909-B9B9-BAC246DD8C83.jpg"/></a>
<a href="http://s21.photobucket.com/user/rimz77/media/536F933B-17E1-428F-985F-1B81A7C3C91C.jpg.html" target="_blank"><img src="http://i21.photobucket.com/albums/b270/rimz77/536F933B-17E1-428F-985F-1B81A7C3C91C.jpg" border="0" alt=" photo 536F933B-17E1-428F-985F-1B81A7C3C91C.jpg"/></a>
Yeah that trick is awesome! especially when you want to bundle many harnesses together most of the stock ones do not have enough tie down length, which was my problem in this case, so i just used black zip ties and boom works great
Yeah that trick is awesome! especially when you want to bundle many harnesses together most of the stock ones do not have enough tie down length, which was my problem in this case, so i just used black zip ties and boom works great
Just recently did a wire tuck on the passenger & driver headlight harness and the fuse box. Im trying to find a definitive answer as to the part numbers I need for the firewall plugs? I have seen a few out there but nothing that confirms an EK chassis.

 10-15-2015, 09:57 AM