
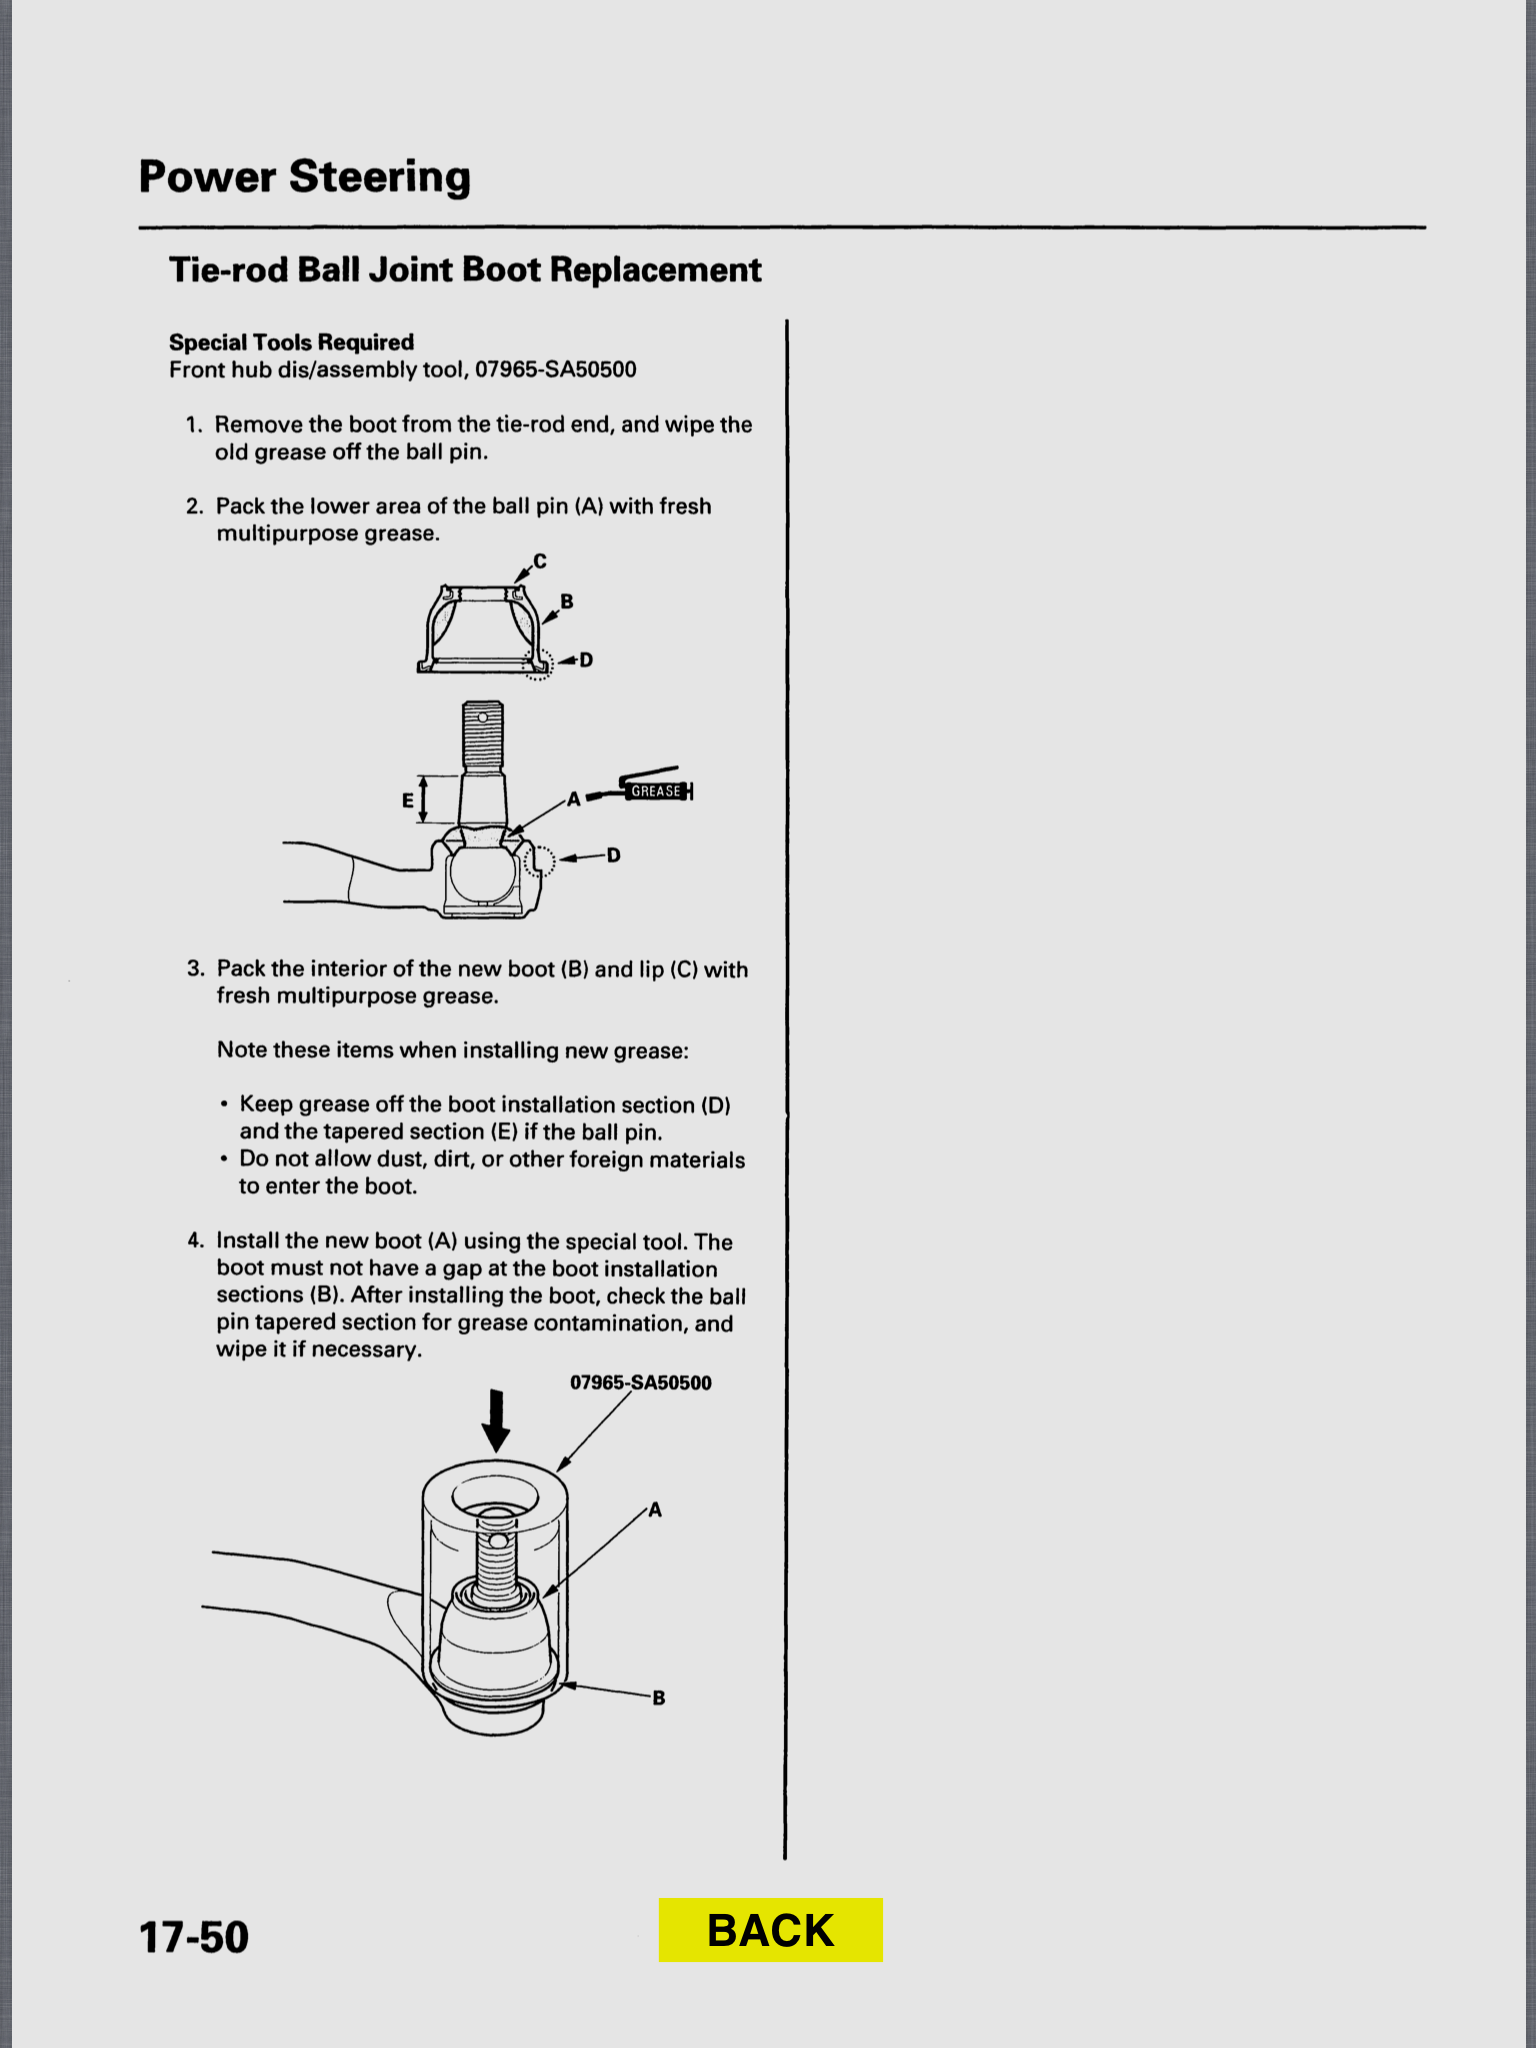
OEM ball joint boot replacement
 05-09-2013, 08:01 PM
#1
Honda-Tech Member
Thread Starter

Join Date: Apr 2013
Location: Grand Forks, ND
Posts: 26
Likes: 0
Received 0 Likes
on
0 Posts
So heres the deal-
I'm doing some maintenance to clean up some things on my car and i'm replacing the lower ball joints in front as well as inspecting the pads, rotors, upper ball joint, bearings, etc. So I noticed that the boots on the outer tie rod ball joints are starting to break and I was hoping to just replace the boots since they still seem to be good and no goo has leaked out. I don't want to use those crappy universal boots and I found the OEM boots online for $2 each (a lot better than new rod ends for almost $40 each). Unfortunately, the boots have to be driven on with a special tool. I guess my question here is has anyone had any experience with that and would a properly sized socket do the trick since the Honda tool is about $40.
Also, what kind of grease to pack the boot/ball joint? I bought some el cheapo white lithium but I see blue, red, and even black grease being used in suspension components so I don't know what to use.
 05-09-2013, 09:40 PM
#2
MM Gruppe B
Do you have a picture of said tool, or a name/part number?
In the past when I've had to install a tight fitting boot, I have flipped the boot partially inside out placing the rolled over edge next to the component that it is to be installed on. While keeping the boot pressed against the component I begin to unroll the boot onto said component. It usually works on the second try after taking note on how the boot unrolls and pulls on itself.
If you have ever replaced the tube in a bicycle tire the technique is similar to using spoon handles to flip the bead on/off the rim.
Or you could just do what this guy did...
http://www.eskimo.com/~mikeg/S2000/tie_rod_boot/
As for grease, use chassis/balljoint/wheel bearing grease.
05-10-2013, 05:44 AM
#3
Honda-Tech Member
Join Date: Jan 2009
Location: VA
Posts: 419
Likes: 0
Received 0 Likes
on
0 Posts
Or you could just do what this guy did...
http://www.eskimo.com/~mikeg/S2000/tie_rod_boot/
http://www.eskimo.com/~mikeg/S2000/tie_rod_boot/
 05-10-2013, 08:49 PM
#4
Honda-Tech Member
Thread Starter
Join Date: Apr 2013
Location: Grand Forks, ND
Posts: 26
Likes: 0
Received 0 Likes
on
0 Posts
Or you could just do what this guy did...
http://www.eskimo.com/~mikeg/S2000/tie_rod_boot/
As for grease, use chassis/balljoint/wheel bearing grease.
http://www.eskimo.com/~mikeg/S2000/tie_rod_boot/
As for grease, use chassis/balljoint/wheel bearing grease.
Thank you SO MUCH, the tool is like $40 and its basically just like that.
06-01-2013, 09:45 AM
#5
Honda-Tech Member
Thread Starter
Join Date: Apr 2013
Location: Grand Forks, ND
Posts: 26
Likes: 0
Received 0 Likes
on
0 Posts
Hey, just a quick update for anyone else attempting this job
Easiest way to do the boots is as follows
Upper ball joint
1) pull the retaining clip off the old upper ball joint boot with needle nose pliers
2) pull the boot off, it should slide off pretty easily
3) push the new boot on (it may take a little rotating and squeezing to get it seated but can easily be done by hand)
4) the clips are basically like those split key rings so just take one of the ends with some pliers and pull it up to the seat. Hold the end in place with your fingers and work the rest of the ring up around the boot with the pliers
Tie rod ends
1) Getting these boots off is almost impossible. I tried prying, ripping, and finally, the best option, cutting. Before you even screw around with the boot and rip it, use a dremel to grind away the seat of the ball joint with a cutting disc. This will prevent debris entering the joint and reduce your sweat loss and job time substantially. Take care not to gouge the tie rod end itself ESPECIALLY where the boot seats because it is a pressure seat
2)once the old boot is out, check the grease and repack as necessary. Honda uses a nasty black grease but you can use any multipurpose grease like wheel bearing grease. (super cheap for a big tub)
3)tapping the new boot on is impossible without the special tool. unless you happen to have a 32mm deep wall socket, that is. I used a 6 point 32mm but a 12 point is probably better for even seating of the boot. What I did was take a 2x6 that was tall enough to support the tie rod end while attached to the car, then place the socket over the boot and simply whack it with a mallet. The boot seated perfectly and will last much longer that those crummy aftermarket ones.
The best part about doing the boots is that I got all 4 of them with extra retainer rings for under $10 from the dealership and new uppers and tie rod ends would have been almost $300 but my joints were still good.

Thread
Thread Starter
Forum
Replies
Last Post
Jimi Hondrix
Honda Civic / Del Sol (1992 - 2000)
59
01-27-2015 03:36 PM
rick_rabies
Honda Civic / Del Sol (1992 - 2000)
6
10-19-2010 09:34 AM