
Honda 6th gen (1998-2002) wheel stud replacement (grinding method)
 09-19-2009, 02:36 PM
#1
Honda-Tech Member
Thread Starter

Join Date: Sep 2009
Posts: 6
Likes: 0
Received 0 Likes
on
0 Posts
Was replacing studs on my Accord 1999 using the grinding method. Since I didn't find a writeup explaining the process for this specific model, decided to write one.
DISCLAIMER: This method I used is not the "proper" way and may compromise the integrity of your knuckle and studs. The recommended way is removing the hub assembly out of the knuckle and replacing the bearing, which requires a 12ton press. I AM NOT RESPONSIBLE FOR ANY CONSEQUENCES OF USING THIS WRITE UP, INCLUDING IF YOU FOLLOW MY DIRECTIONS AND DAMAGE YOUR WHEEL BEARING, KNUCKLE OR STUD BEYOND REPAIR
Tools needed:
17 mm socket
19 mm deep socket
torque wrench
hacksaw
grinder or a dremel or a drill with a dremel bit
14 mm wrench or anything else that can be put on the stud and work as a spacer
hammer
jackstand
screwdriver (sometimes - impact driver)
piece of a wire (coat hanger works just fine )
new stud
new nut
nut that would fit the stud, but has an open end unlike Honda's nuts
1. Put the car on a jack stand and remove the wheel
2. Unbolt two 17mm bolts (one in the top, one in the bottom) on the caliper bracket - make sure you are unscrewing the right bolts, you want ones without a rubber boot. You don't have to take the caliper apart or unbolt the brake line; also, you normally would not need to press in the pads. Suspend it out of the way on the strut or the upper control arm on the wire.
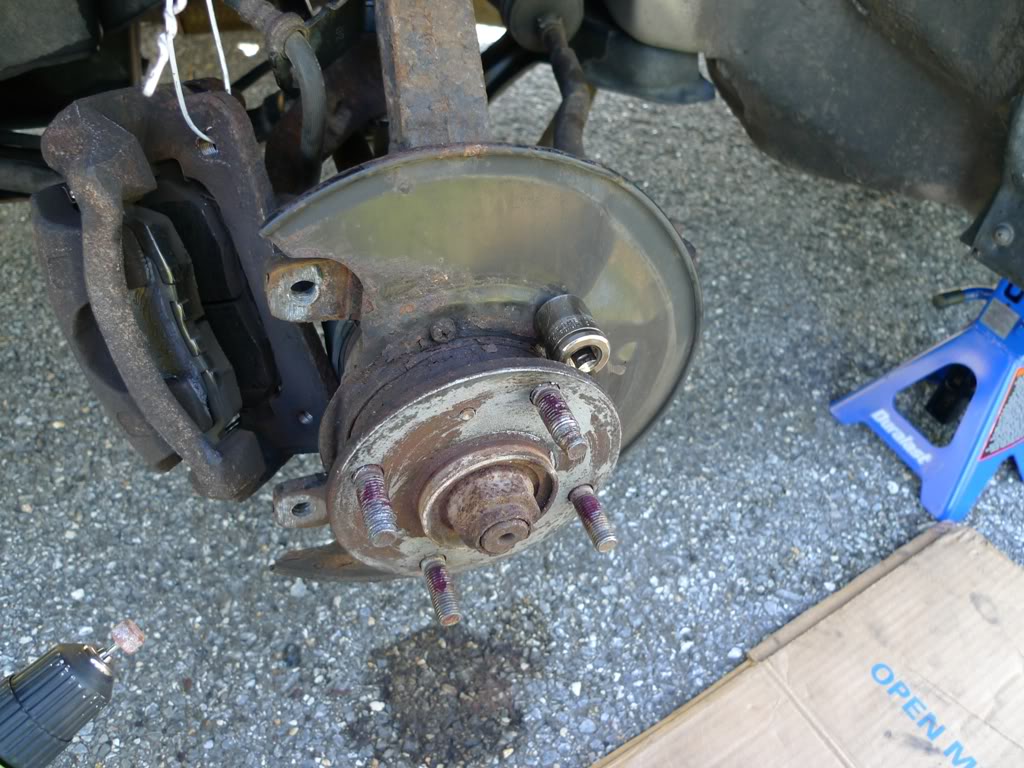
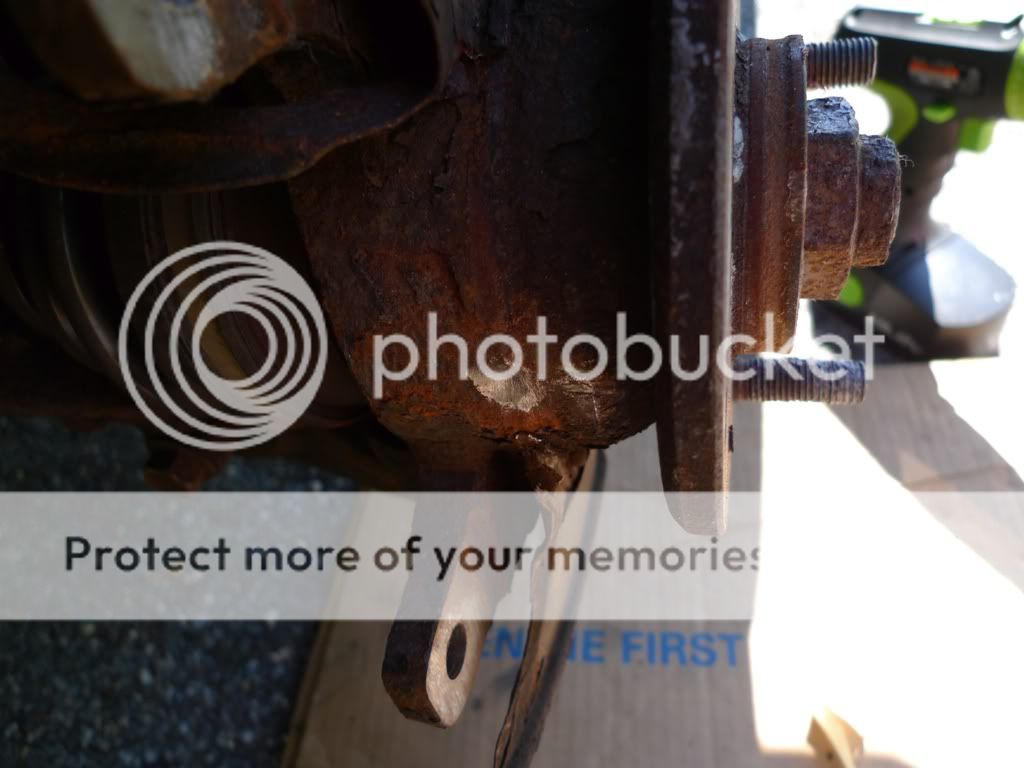
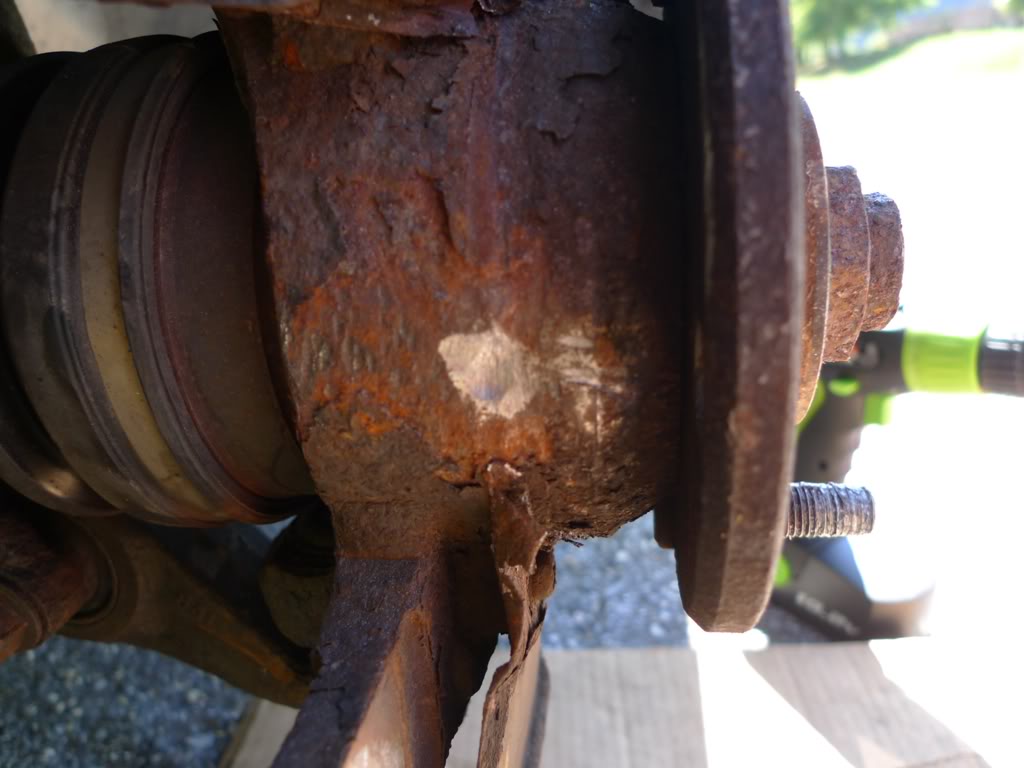
3. Unscrew the two bolts holding the rotor. You might need an impact driver for this, but mine were broken anyways. Take off the rotor. You should see something like this.
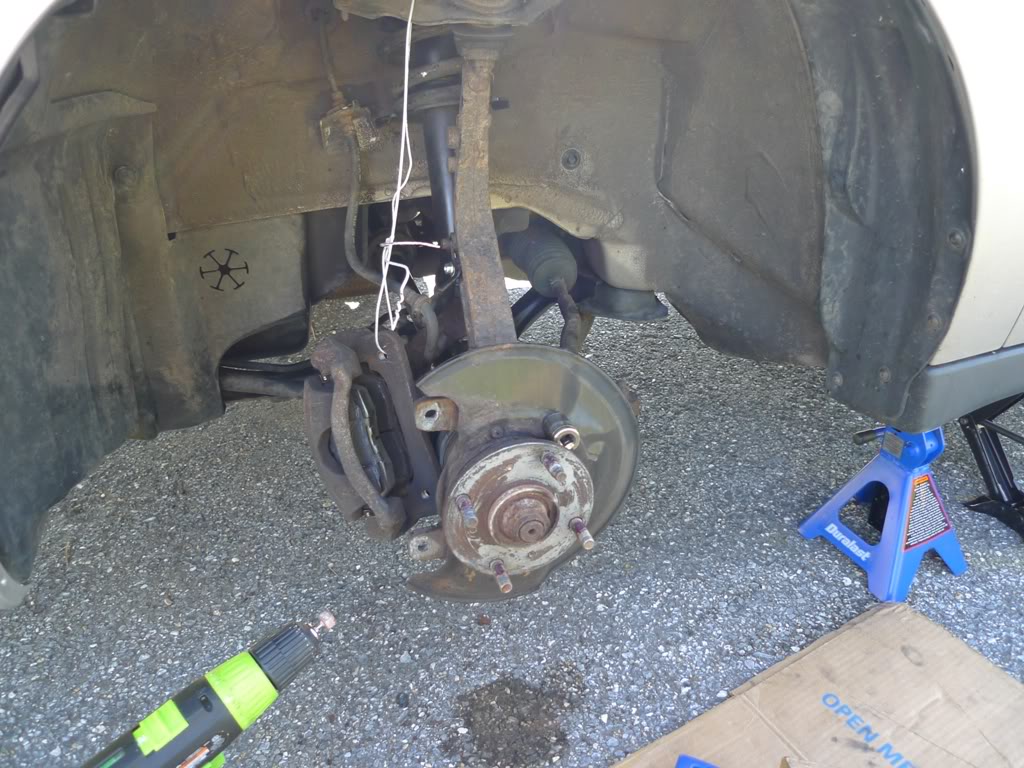
4. Here is why you can't simply push out the stud - the hub stands in the way and there are no openings like on some other cars.
 .
.
5. Put your gear to neutral (press the brake pedal just enough to release the lever - otherwise you will have to deal with pressing in the pads). Spin the hub and position the broken stud at the very top. Put something in the gap between the hub and the knuckle right next to the stud; it should fit snugly. We need this so that when we start hammering the stud, the hub will press against the knuckle rather than the bearing (which I guess can damage it). I used a 19mm socket.
6. Hummer on the end of the stud, just enough to see some gap between the head of the stud and the hub. Shouldn't be hard - mine were severely rusted, but came off fairly easy.
7. Cut the head of the stud with a hacksaw (or any other power tool if you have it).
8. Cut in half the thin (front-facing) part of dust shield behind the hub. Bend it out of the way. Mine was rusted, so didn't have to cut anything.
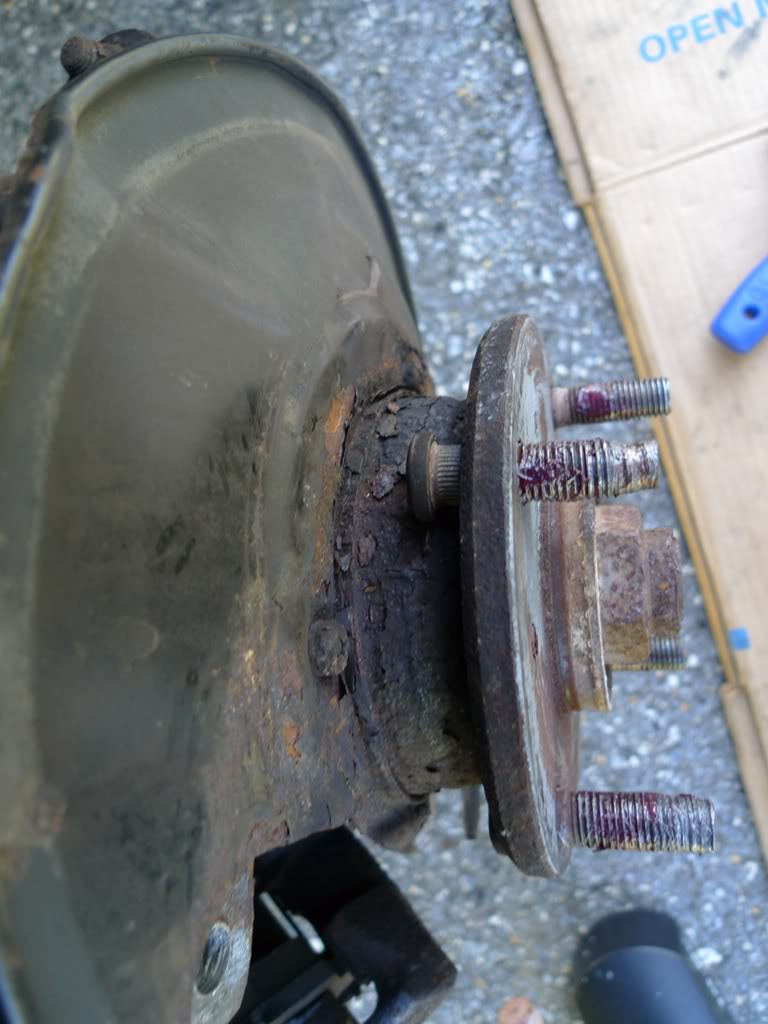
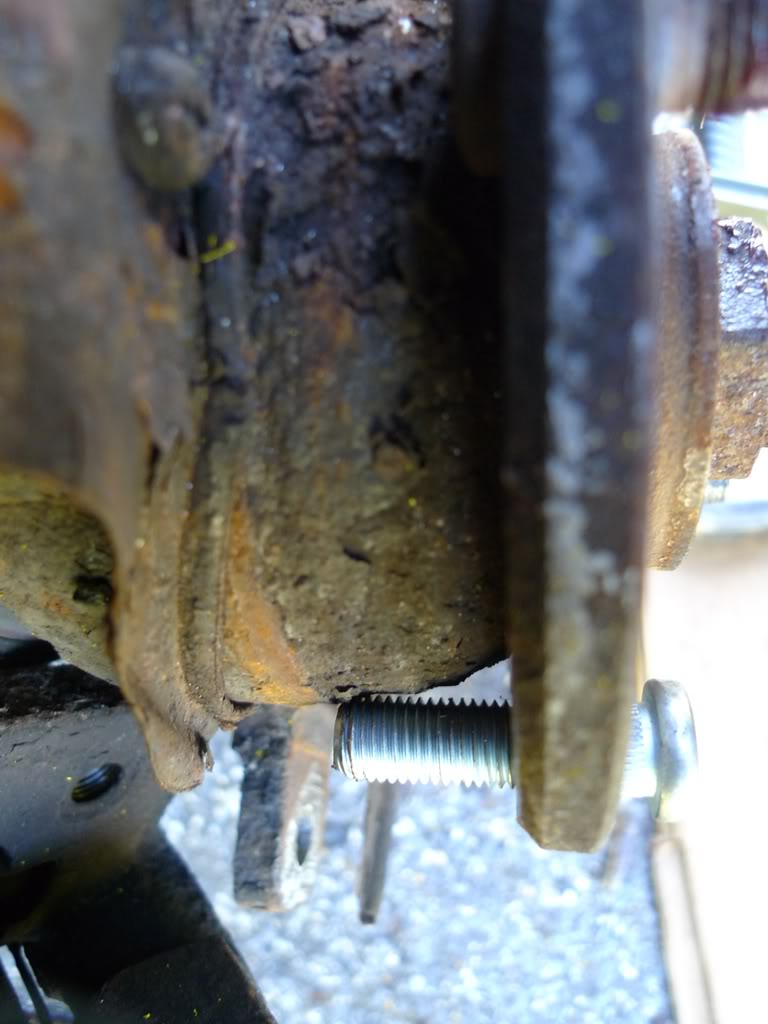
9. Turn the hub so that the cut stud faces the opening in the dust shield. Push the stud out.
10. The protruding part of the stud on the right should give you an idea of how much we need to grind off.
11. You might be tempted to hammer the new stud in right away. This will simply "fold down" the threads on the stud.
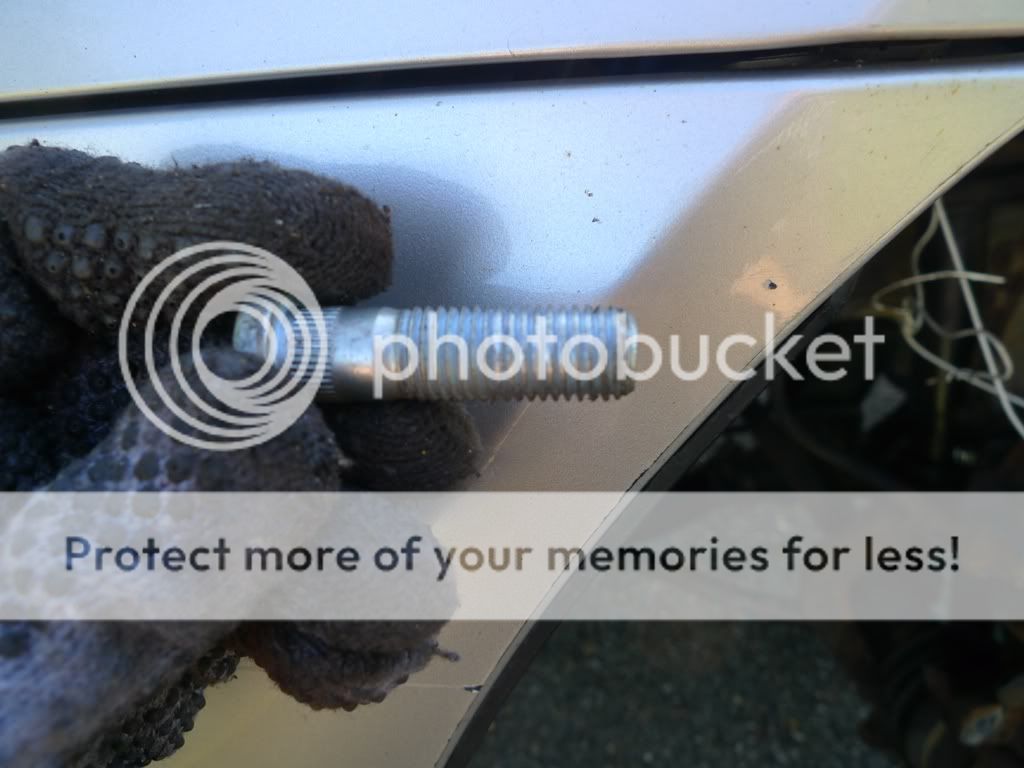
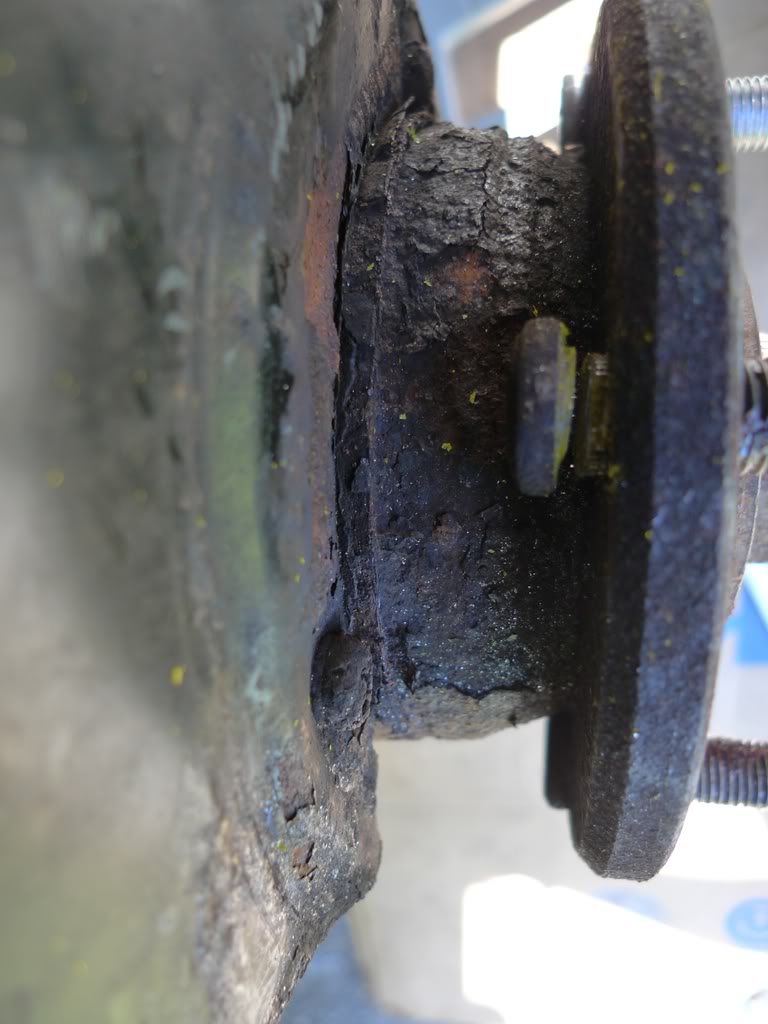
12. Cut or grind down a side of the head of the new stud to get something like this.
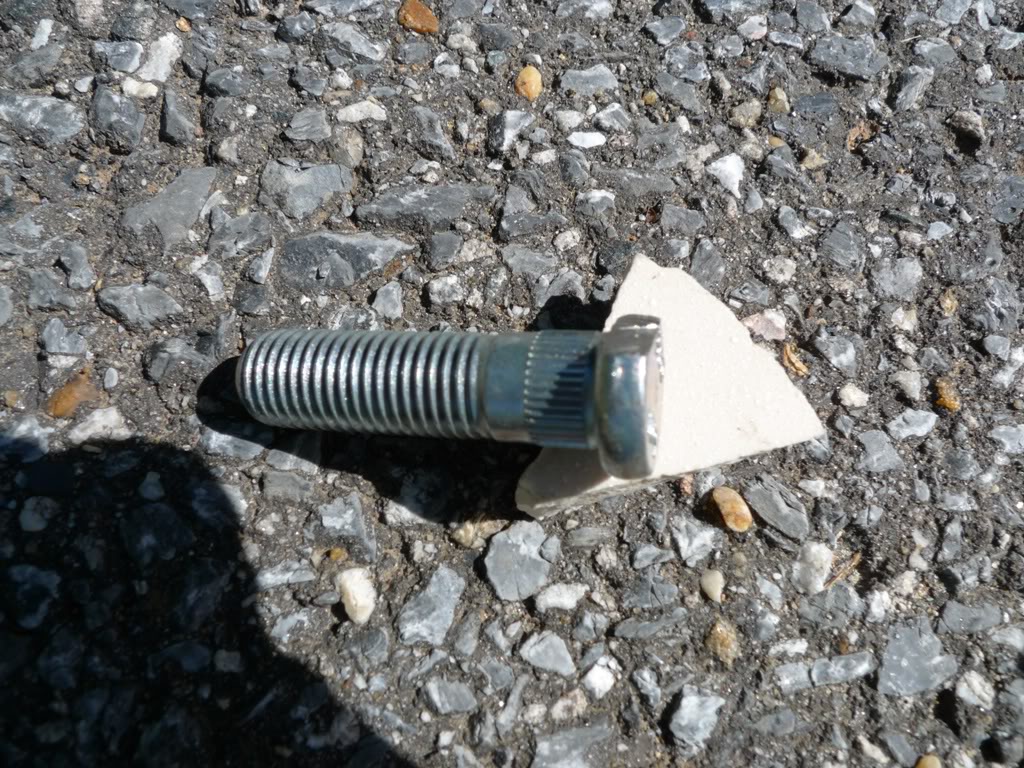
13. Grind off a part of the hub - insert the new stud and see where the head ends this will give you a idea about the length of the grinding. Also, look at the head of the stud -this will tell you the width. Overall, the groove that we need is not that big and can be made in 5 minutes or so. The most important part is to lower the ridge where the dust shield used to run.
14. Put in the new stud. It should go in easily, but a GENTLE punch of the hammer is ok also -if you need to punch hard, enlarge the groove or you will end up with the damaged thread stud - see step 11.
15. Get in the car and put it to Park or 2nd gear.
16. Take time to align the ridges on the head of the stud with the grooves in the hub; if you mess up - the stud will spin in hub, and you will have to replace the whole thing. Put a big washer or a wrench on the stud and the nut with an open end. Tightening the nut should pull the stud into the hub. Keep doing until the head of the stud is flush with the hub. For the final turns, you might want to use a torque wrench set at 80 ft/lbs, otherwise you might damage the stud again.
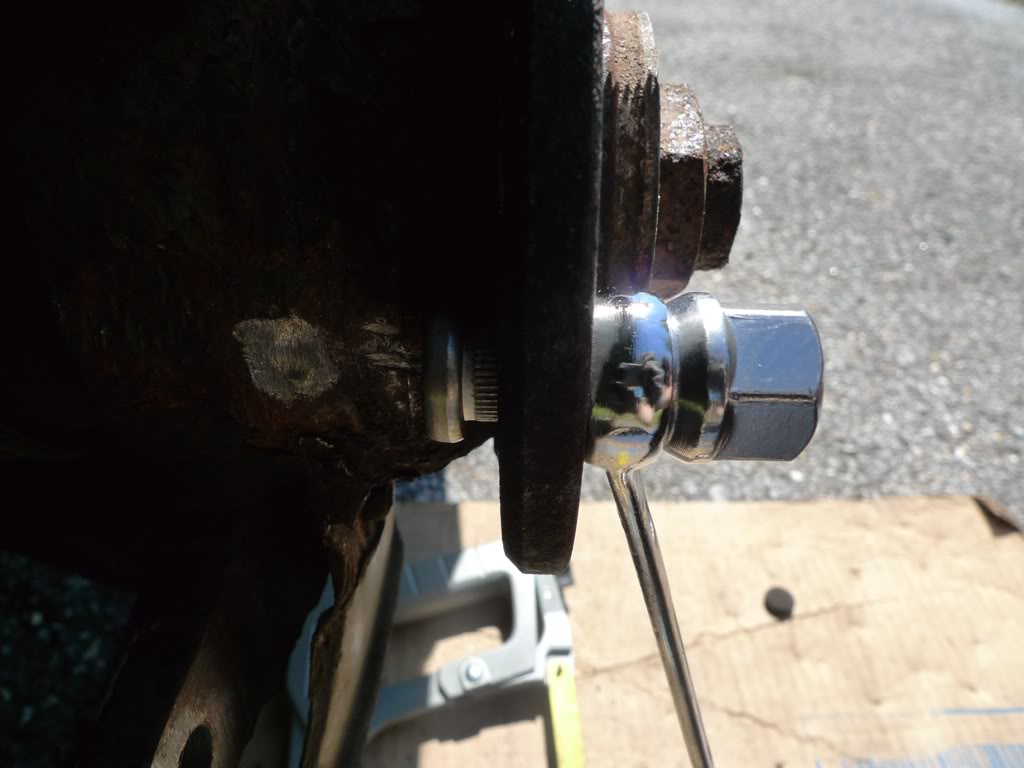
17. Repeat for the other studs
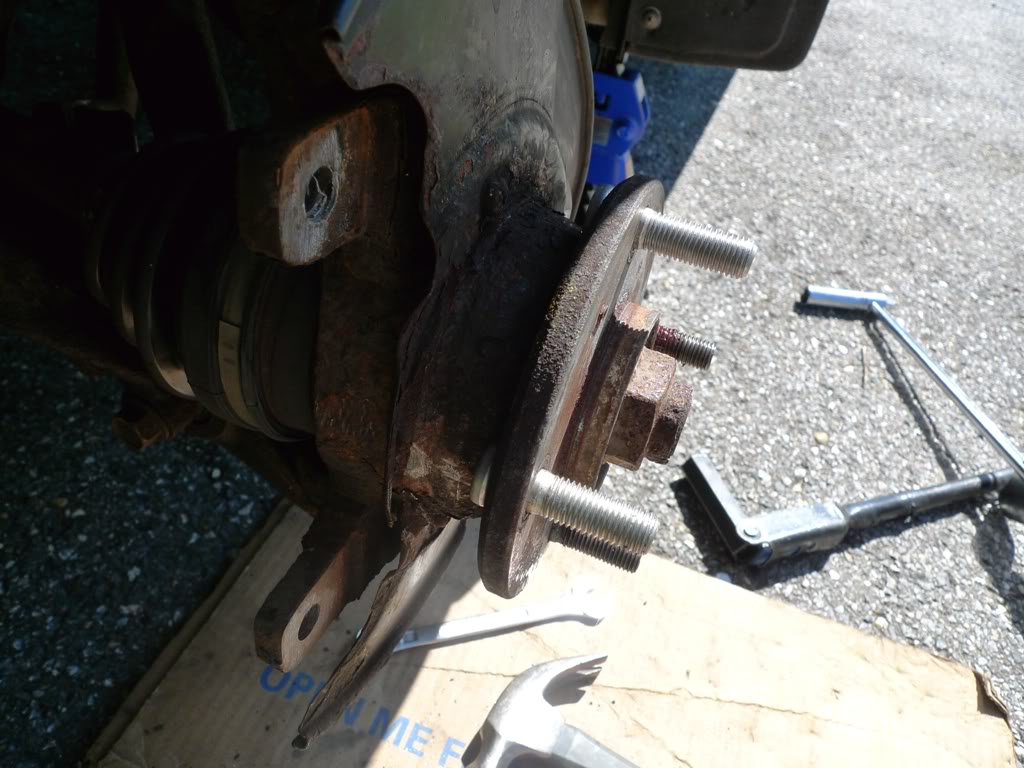
18. Bend back the dust shield. Put the rotor and its screws back on. Put the caliper bracket on; put some locking compound on its screws and tighten to 80 ft/lbs. Put back the wheel and tighten nuts to 80 ft/lbs.
That's it
DISCLAIMER: This method I used is not the "proper" way and may compromise the integrity of your knuckle and studs. The recommended way is removing the hub assembly out of the knuckle and replacing the bearing, which requires a 12ton press. I AM NOT RESPONSIBLE FOR ANY CONSEQUENCES OF USING THIS WRITE UP, INCLUDING IF YOU FOLLOW MY DIRECTIONS AND DAMAGE YOUR WHEEL BEARING, KNUCKLE OR STUD BEYOND REPAIR
Tools needed:
17 mm socket
19 mm deep socket
torque wrench
hacksaw
grinder or a dremel or a drill with a dremel bit
14 mm wrench or anything else that can be put on the stud and work as a spacer
hammer
jackstand
screwdriver (sometimes - impact driver)
piece of a wire (coat hanger works just fine )
new stud
new nut
nut that would fit the stud, but has an open end unlike Honda's nuts
1. Put the car on a jack stand and remove the wheel
2. Unbolt two 17mm bolts (one in the top, one in the bottom) on the caliper bracket - make sure you are unscrewing the right bolts, you want ones without a rubber boot. You don't have to take the caliper apart or unbolt the brake line; also, you normally would not need to press in the pads. Suspend it out of the way on the strut or the upper control arm on the wire.
3. Unscrew the two bolts holding the rotor. You might need an impact driver for this, but mine were broken anyways. Take off the rotor. You should see something like this.
4. Here is why you can't simply push out the stud - the hub stands in the way and there are no openings like on some other cars.
.5. Put your gear to neutral (press the brake pedal just enough to release the lever - otherwise you will have to deal with pressing in the pads). Spin the hub and position the broken stud at the very top. Put something in the gap between the hub and the knuckle right next to the stud; it should fit snugly. We need this so that when we start hammering the stud, the hub will press against the knuckle rather than the bearing (which I guess can damage it). I used a 19mm socket.
6. Hummer on the end of the stud, just enough to see some gap between the head of the stud and the hub. Shouldn't be hard - mine were severely rusted, but came off fairly easy.
7. Cut the head of the stud with a hacksaw (or any other power tool if you have it).
8. Cut in half the thin (front-facing) part of dust shield behind the hub. Bend it out of the way. Mine was rusted, so didn't have to cut anything.
9. Turn the hub so that the cut stud faces the opening in the dust shield. Push the stud out.
10. The protruding part of the stud on the right should give you an idea of how much we need to grind off.
11. You might be tempted to hammer the new stud in right away. This will simply "fold down" the threads on the stud.
12. Cut or grind down a side of the head of the new stud to get something like this.
13. Grind off a part of the hub - insert the new stud and see where the head ends this will give you a idea about the length of the grinding. Also, look at the head of the stud -this will tell you the width. Overall, the groove that we need is not that big and can be made in 5 minutes or so. The most important part is to lower the ridge where the dust shield used to run.
14. Put in the new stud. It should go in easily, but a GENTLE punch of the hammer is ok also -if you need to punch hard, enlarge the groove or you will end up with the damaged thread stud - see step 11.
15. Get in the car and put it to Park or 2nd gear.
16. Take time to align the ridges on the head of the stud with the grooves in the hub; if you mess up - the stud will spin in hub, and you will have to replace the whole thing. Put a big washer or a wrench on the stud and the nut with an open end. Tightening the nut should pull the stud into the hub. Keep doing until the head of the stud is flush with the hub. For the final turns, you might want to use a torque wrench set at 80 ft/lbs, otherwise you might damage the stud again.
17. Repeat for the other studs
18. Bend back the dust shield. Put the rotor and its screws back on. Put the caliper bracket on; put some locking compound on its screws and tighten to 80 ft/lbs. Put back the wheel and tighten nuts to 80 ft/lbs.
That's it
 09-18-2011, 05:01 PM
#3
big props for this writeup, i was in a right pickle when doing my brakes and i must have rolled a quadriple yatzee massive critical failure by breaking not one, not two, not three, but all FOUR studs. This writeup was spot on and worked great. The one thing I did different was use a breaker bar to slowly pull the bolt through versus a impact wrench and it seemed to work just fine.
 09-18-2011, 06:53 PM
#7
Honda-Tech Member
Thread Starter
Join Date: Sep 2009
Posts: 6
Likes: 0
Received 0 Likes
on
0 Posts
big props for this writeup, i was in a right pickle when doing my brakes and i must have rolled a quadriple yatzee massive critical failure by breaking not one, not two, not three, but all FOUR studs. This writeup was spot on and worked great. The one thing I did different was use a breaker bar to slowly pull the bolt through versus a impact wrench and it seemed to work just fine.
Glad the writeup helped, though with all 4 studs being broken - it might have being easier to pull the hub out. I feel your pain, man
Trending Topics
10-17-2011, 05:44 AM
#8
Honda-Tech Member
Join Date: Oct 2011
Posts: 10
Likes: 0
Received 0 Likes
on
0 Posts
Im about to do this to a 2000 Civic LX. Just want to make I wont hurt anything.. mainly the hub from grinding it. Thanks in advance. Good write up!
10-17-2011, 06:48 AM
#9
Honda-Tech Member
Thread Starter
Join Date: Sep 2009
Posts: 6
Likes: 0
Received 0 Likes
on
0 Posts
Sorry man, but no guarantees, do at your own risk. The hub on Accord seemed to be quite beefy, and I didn't need to grind off that much of the metal anyways. I put on it about 15000 miles since then, and don't see any problems.
10-17-2011, 06:53 AM
#10
Honda-Tech Member
I'm pretty sure that there's plenty of room on a civic rear hub to get studs out without grinding.
10-17-2011, 06:31 PM
#11
Honda-Tech Member
I did it on a 1995 Civic. I ground down the stud more than what is pictured here. I did not grind the hub at all. It worked for a daily driver.
12-06-2011, 06:50 AM
#12
Trial User

Join Date: Dec 2011
Posts: 1
Likes: 0
Received 0 Likes
on
0 Posts
First, I have to say I read your post and it is incredibly accurate. The repair shop wanted 2 hours labor, plus parts, plus shop fees, plus tax (total $250-$275) to replace a $4 stud and wheel nut! This is because they would have to pull the hub off and re-pack the wheel bearing. I figured I can follow your advice and replace it myself. Your procedure worked like a charm and I am grateful for the savings! Now if I ever have to replace another stud on that wheel it would take a fraction of the time.
PB Blaster, best stuff to spray on those stubborn caliper mounting bolts.
One other step from another website:
After grinding the head of the stud flat on one side, put the bolt in the freezer for a few minutes while finishing the grinding that needed to be done on the wheel assembly. Every little bit helps.
Thanks
Now if I ever have to replace another stud on that wheel it would take a fraction of the time. PB Blaster, best stuff to spray on those stubborn caliper mounting bolts.
One other step from another website:
After grinding the head of the stud flat on one side, put the bolt in the freezer for a few minutes while finishing the grinding that needed to be done on the wheel assembly. Every little bit helps.
Thanks
03-06-2012, 09:07 AM
#14
Trial User

Join Date: Mar 2012
Posts: 1
Likes: 0
Received 0 Likes
on
0 Posts
thanks for the step-by-step! the accord shop-guide my 1998 Accord was misleading. there was no specific stud-lug instructions, that I could find. nothing in the brakes section. there was a set of steps in one suspension section that simply said "remove hub" with no reference the the hub-bearings requiring special tools to press apart/together. then I found a section on hub/bearing rebuilding that showed what I was up against. I was shocked.
I was ready to donate the car to charity! your instructions saved the day!
I'll try to upload a photo of my dremel job (less rust here in Texas). I had to dremel both hubs because I broke a stud on both front wheels. so much for a "quick" brake job!
http://i44.tinypic.com/4vl9p1.jpg
I was ready to donate the car to charity! your instructions saved the day!
I'll try to upload a photo of my dremel job (less rust here in Texas). I had to dremel both hubs because I broke a stud on both front wheels. so much for a "quick" brake job!
http://i44.tinypic.com/4vl9p1.jpg
Last edited by brad_the_dad; 03-06-2012 at 10:39 AM. Reason: add photo
The following users liked this post:
 01-10-2013, 12:12 PM
#17
Trial User

Join Date: Apr 2011
Posts: 2
Likes: 0
Received 0 Likes
on
0 Posts
Great time saving tip. Thanks.
Can anyone help with a few Q's as to why these studs are prone to breaking. I've been working on my own vehicles for 25 years and I've never had a problem with broken studs until I bought a 99 Accord a few years ago. It's my daughter's car, and I just broke the second stud off in as many years while rotating the tires. Both times, I was attempting to remove the lug nut, only to find it pretty much frozen in place. (I am the only one who works on the vehicle, so I don't overtighten the lug nuts.) This really has me scratching my head because I've never had any other vehicle do this. I live in So Cal. so it's not the weather (rust). I've never put any lubricants on the studs, as I've always understood conventional wisdom is that you don't lubricate wheel studs in fear of them coming loose. Now I'm considering putting some anti-seize on them to prevent another one from breaking.
My questions are:
1. Is it OK to put anti-seize on the studs to prevent this from occurring?
2. Anyone know why this may be occurring?
3. Should I replace all the lug nuts, as I'm wondering if maybe the threads are wearing down, and the metal from that is causing the issue.
I appreciate any help here.
Jay
01-10-2013, 06:21 PM
#18

Great time saving tip. Thanks.
Can anyone help with a few Q's as to why these studs are prone to breaking. I've been working on my own vehicles for 25 years and I've never had a problem with broken studs until I bought a 99 Accord a few years ago. It's my daughter's car, and I just broke the second stud off in as many years while rotating the tires. Both times, I was attempting to remove the lug nut, only to find it pretty much frozen in place. (I am the only one who works on the vehicle, so I don't overtighten the lug nuts.) This really has me scratching my head because I've never had any other vehicle do this. I live in So Cal. so it's not the weather (rust). I've never put any lubricants on the studs, as I've always understood conventional wisdom is that you don't lubricate wheel studs in fear of them coming loose. Now I'm considering putting some anti-seize on them to prevent another one from breaking.
My questions are:
1. Is it OK to put anti-seize on the studs to prevent this from occurring?
2. Anyone know why this may be occurring?
3. Should I replace all the lug nuts, as I'm wondering if maybe the threads are wearing down, and the metal from that is causing the issue.
I appreciate any help here.
Jay
Can anyone help with a few Q's as to why these studs are prone to breaking. I've been working on my own vehicles for 25 years and I've never had a problem with broken studs until I bought a 99 Accord a few years ago. It's my daughter's car, and I just broke the second stud off in as many years while rotating the tires. Both times, I was attempting to remove the lug nut, only to find it pretty much frozen in place. (I am the only one who works on the vehicle, so I don't overtighten the lug nuts.) This really has me scratching my head because I've never had any other vehicle do this. I live in So Cal. so it's not the weather (rust). I've never put any lubricants on the studs, as I've always understood conventional wisdom is that you don't lubricate wheel studs in fear of them coming loose. Now I'm considering putting some anti-seize on them to prevent another one from breaking.
My questions are:
1. Is it OK to put anti-seize on the studs to prevent this from occurring?
2. Anyone know why this may be occurring?
3. Should I replace all the lug nuts, as I'm wondering if maybe the threads are wearing down, and the metal from that is causing the issue.
I appreciate any help here.
Jay
If not then do you happen to know what the lug nuts were torqued to every time that a wheel came off during service? If not then for all you know they put an impact gun that's making 150+ lb/ft and blasting the lugs down and stretching the studs, which of course over time means they get not only weaker but difficult to put the nut on and eventually you break them when the nut won't come back off.
I have owned 8 hondas in the past 16 years and not once have had a stud break on me, but a 1995 accord driven by an 18 year old neighbor of mine (who had the wheels impacted on by a buddy who "knows everything" about cars and works at a tire change place) had 4 of his studs break when we did his 5 speed swap a few weeks ago.
01-12-2013, 07:10 AM
#19
Trial User
Join Date: Apr 2011
Posts: 2
Likes: 0
Received 0 Likes
on
0 Posts
No, car was 10 years old when I bought it, so I don't know the history of it. Your probably right about stretching them prior to me owning it. Still wondering if I can use anti-seize on the other studs to prevent them from seizing. Now I'm thinking I'll just replace them all since I have to get in there to do the one. Won't take that much extra time and they're inexpensive.
01-27-2013, 05:29 PM
#20
Honda-Tech Member

Join Date: Jan 2013
Posts: 6
Likes: 0
Received 0 Likes
on
0 Posts
I was just outside in the process of replacing all 4 studs on the front driver side of my 1999 Accord. Driving home on the highway at 70mph my car made a loud shuddering noise for about 2 seconds when the front driver side dropped onto the rotor and the wheel flew 30ft in the air. Only one stud was obviously damaged which was probably the last lug to let go. Anyway, I got as far as driving the studs back when I noticed the hub was going to be in the way of removing/reinstalling the studs and immediately thought I'd have to pull the hub. Thank God for this forum and this posting of this procedure. I just got the car and changed the brakes before this happened and I know I torqued them to 80lbs but unless someone loosened them I have to wonder. Anyone know if retorquing lug nuts is necessary on Honda cars and since I didn't is this why my wheel came off.

The following users liked this post:

Thread
Thread Starter
Forum
Replies
Last Post

