
DIY: A/C - Cooling System
 06-19-2010, 02:33 PM
#1
Technical Hero
Thread Starter
Join Date: May 2002
Location: Charlotte, NC, 28227
Posts: 9,876
Likes: 0
Received 28 Likes
on
20 Posts
With summer upon us and all the threads popping up I thought I'd do a DIY thread for basic A/C and cooling system troubleshooting with pictures. I also recommend this site http://techauto.awardspace.com/overheating.html for a more technical view into the cooling system and further troubleshooting. For these DIY you will only need basic hand tools and equipment and no one should be afraid to tackle them. Please add to these if you have any tips or correct any of my mistakes as we're all here to learn. This will work more for other Honda/Acura models as well but was performed on a 96 Honda Accord DX.
DIY #1 - A/C Evaporator Drain unclog: This may occur when you are driving and all of a sudden you hear a wave of water in the dash and then it spills out on either side onto your significant others feet and you hear a scream. Also you may notice no water is dripping under the passenger side of your car with the A/C on a hot day.
Tools needed: Shop Vac, 5/16 tubing, Duct tape. You can also use compressed air for this without removing the tube but I prefer the shop vac due to the fact that it will suck out any thing that was in the evaporator box as opposed to just blowing it up and hoping it comes out the drain.
Step 1:
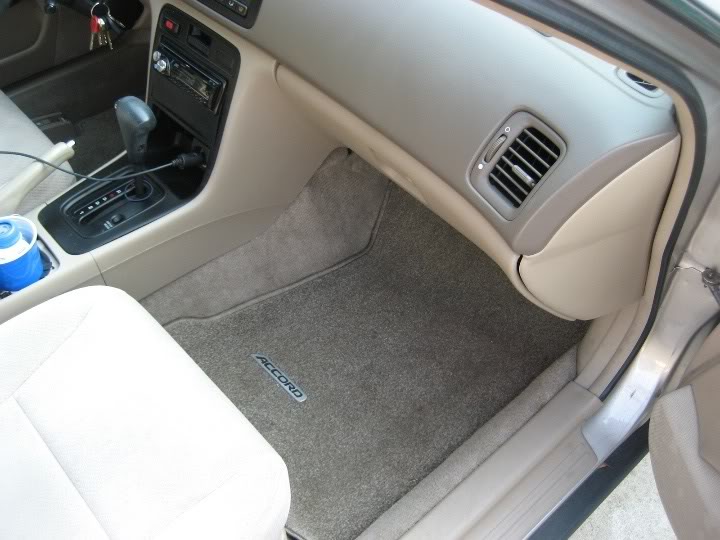
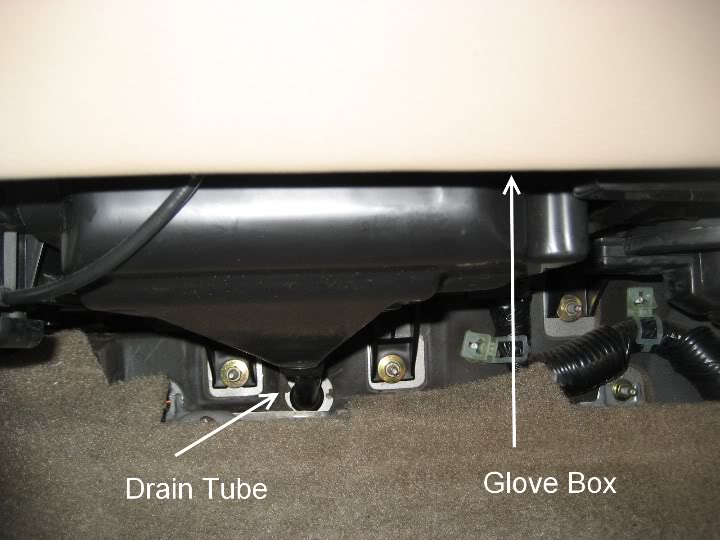
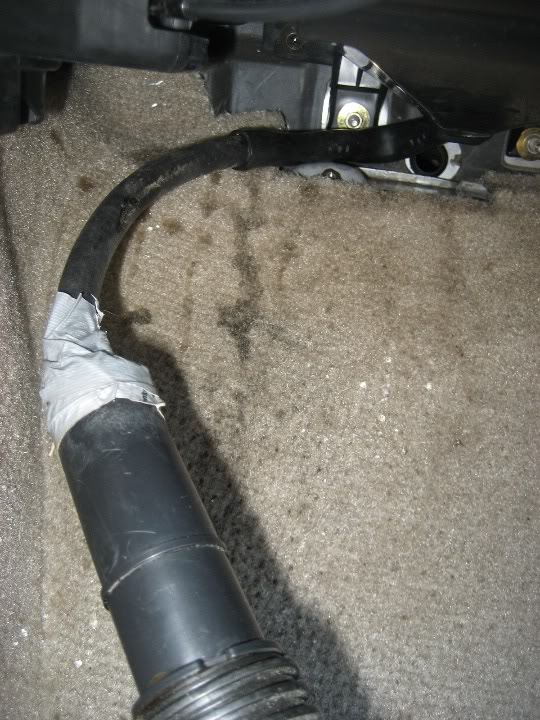
Open the passenger side door push the seat back and look up under the glove box for a black tube running into the firewall.
Passengerside.jpg?t=1276984455
Draintubeloc.jpg?t=1276984420
Step 2: Assemble your homemade suction device by inserting the 5/16 tube into the vacuum tube and wrap it air tight with duct tape.
Vacuumtool.jpg?t=1276984597
Tool2.jpg?t=1276984761
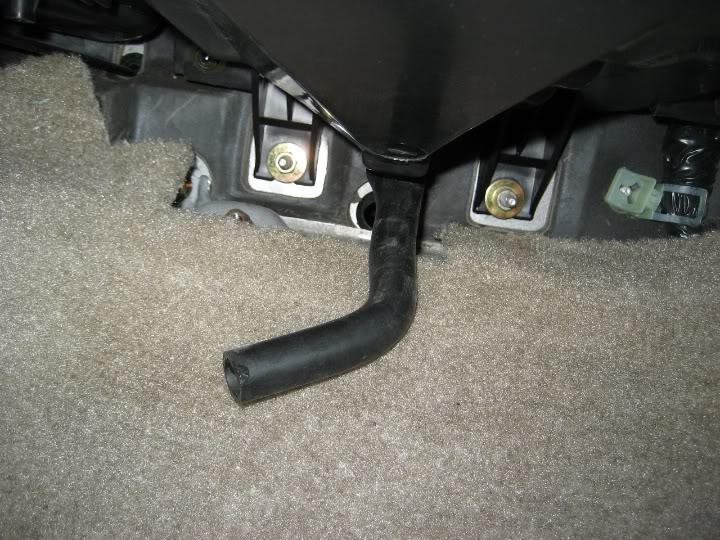
Step 3: Remove the drain tube out of the firewall hole by pulling it out and insert the 5/16 tube into it as a perfect snug fit. Turn on vacuum and let it suck for a few minutes. Reinsert tube back into firewall hole.
Draintuberemoved.jpg?t=1276984832
Suckingtube.jpg?t=1276984879
Step 4: Enjoy a leak on your car that is actually good
evapdrip.jpg?t=1276985027
DIY #2 - A/C-Heat duct system purification: You may experience sometimes turning on either your A/C or heat and getting a pretty bad urine type or mildewy smell coming from the vents. Its possible that mildew/mold or other junk has began to grow in your duct system and while this DIY won't cure it completely it will kill some or all of that funk that you've been experiencing. WARNING: AT ANY TIME DO NOT SIT IN THE CAR WITH THE DOORS CLOSED WITH THE PRODUCT DIRECTLY SPRAYING YOU WILL DIE OR AT LEAST GET A REALLY BAD HEADACHE!!!
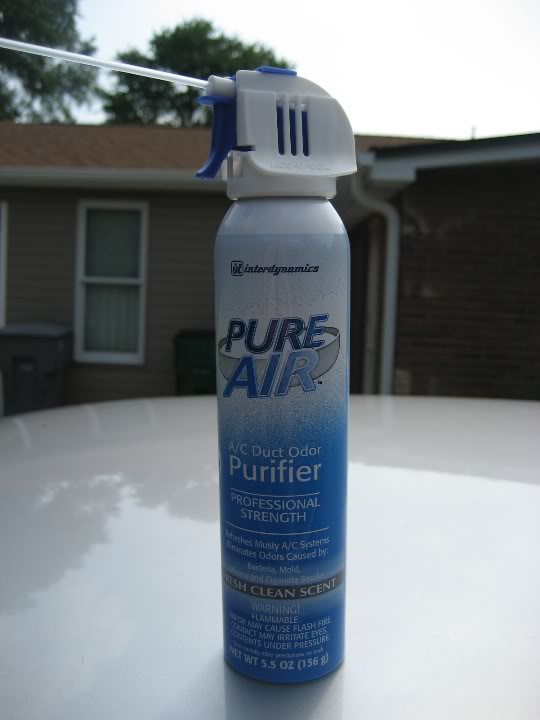
Tools needed: Some type of duct purifier spray at an autoparts store. I got this one for 5 bucks but you can shop around. I did my whole car using 5oz and it was plenty.
frigifresh.jpg?t=1276985149
Step 1: Open your windows or doors and keep them open during the whole process. On your A/C controls place the system on full power, A/C, and outside/fresh air and turn your car on.
freshair.jpg?t=1276985412
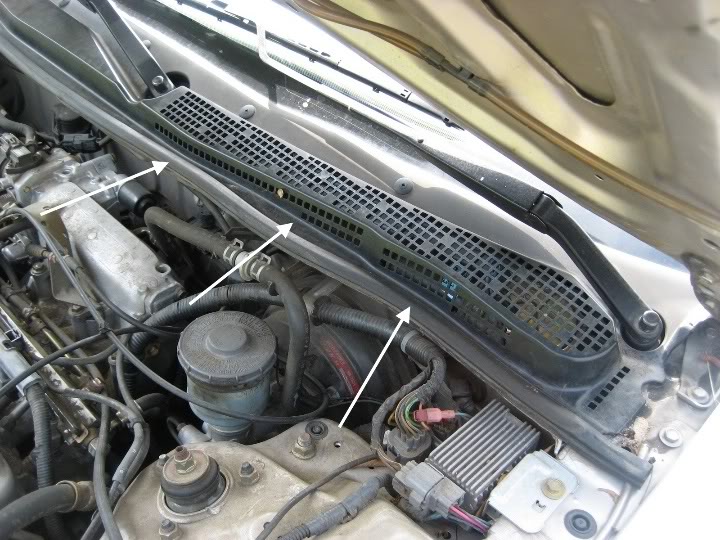
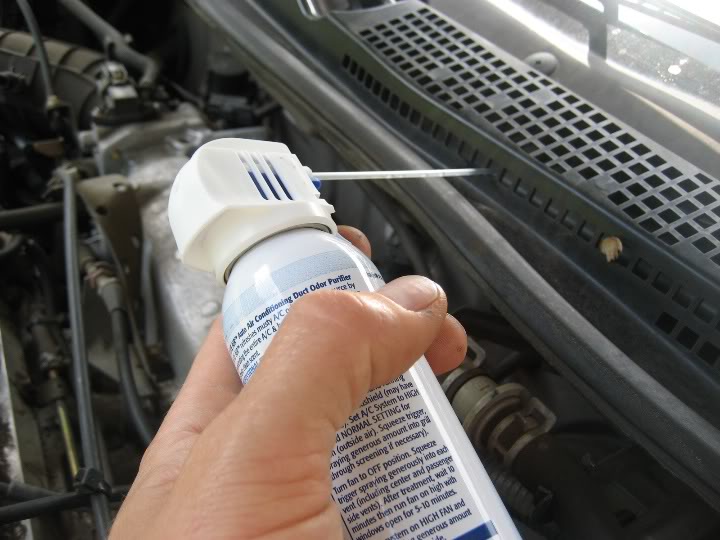
Step 2: FRESH AIR VENT PURIFY - Locate your fresh air vent by popping the hood. Get your can of spray and place the spray tube inside the vent hole (doesn't matter where) and begin to spray. I used about half the can for this part of the process. Let your car run for about 5 minutes then turn it off.
freshairvent.jpg?t=1276985873
freshairventspray.jpg?t=1276985898
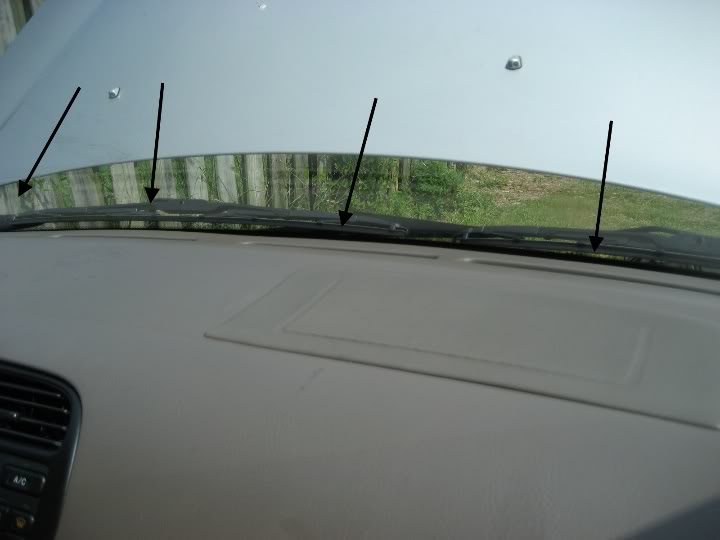
Step 3: VENTS PURIFY - With car turned off spray into each vent a good amount (about 1/2 of whats left in the can) into each vent - left side vents, center vents, right side vents and defrost vents. Let it sit for about 10 minutes and then turn the car and air conditioning back on and allow it to run normally.
leftvents.jpg?t=1276986001
centervent.jpg?t=1276986046
rightvents.jpg?t=1276986076
defrostvents.jpg?t=1276986114
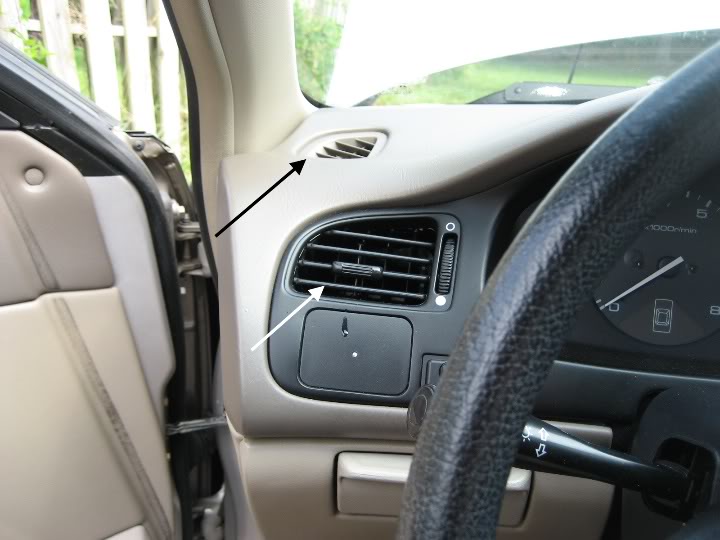
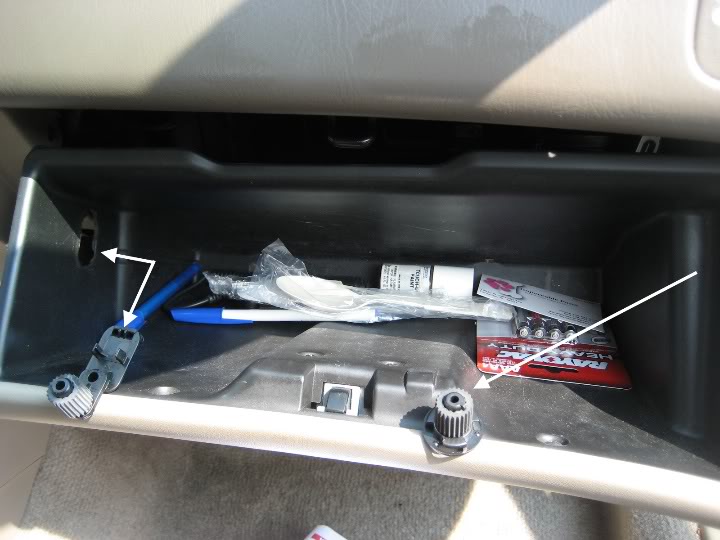
Step 4: RECIRCULATION INTAKE AIR PURIFY - Turn your A/C controls to recirculation mode. Partially remove your glove box and you will see the recirculation air intake. To remove your glove box just push in and pull out on the left tab and use a flat head screw driver to turn the right tab and your glove box will lower to access the intake. For this process you don't need to lower the glove box necessarily but I did it to show you the intake. You can spray right at this from underneath but I wanted to make sure it reach the intake. Use the rest of the can in this area. Put glove box back together. Allow the car to run for about 10 minutes and allow it to air out for about 30 minutes before driving unless you enjoy head rushes.
Recirculateair.jpg?t=1276987267
gloveremove.jpg?t=1276986542
recirculateairvent.jpg?t=1276986571
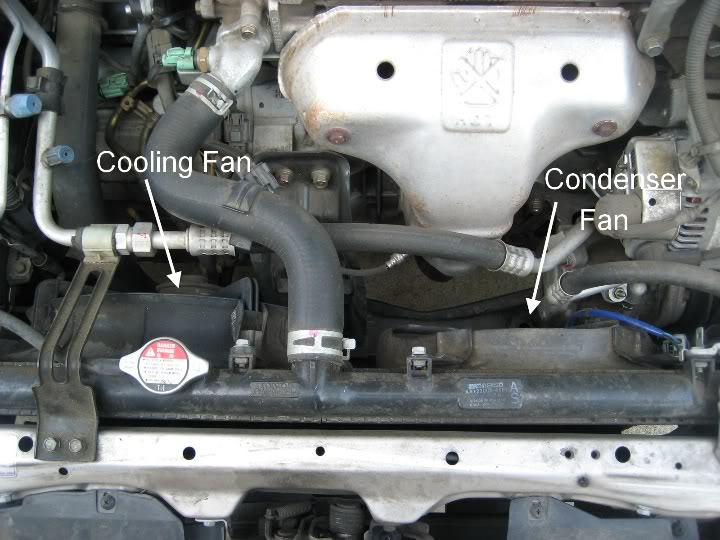
DIY #3 - Troubleshooting A/C Condenser fan that isn't working: You feel like your A/C is cool but not cool enough and you may even be experiencing some overheating with the A/C on and idling. With the A/C on you check both your fans and notice one is not running. Its possible you have a bad fan or a bad component in the circuit (fuse, relay, switch). This DIY is mainly for the condenser fan but can be similarly used for the radiator/cooling fan as well.
Step 1: Pop you hood and figure out which fan isn't running. When looking under the hood there are two fans mounted on the radiator. One is cooling/radiator fan (on left) and the other is the condenser fan (on right). With the A/C running and the compressor running as well both fans should be running or cycling with the compressor. If one is not running follow the next few steps.
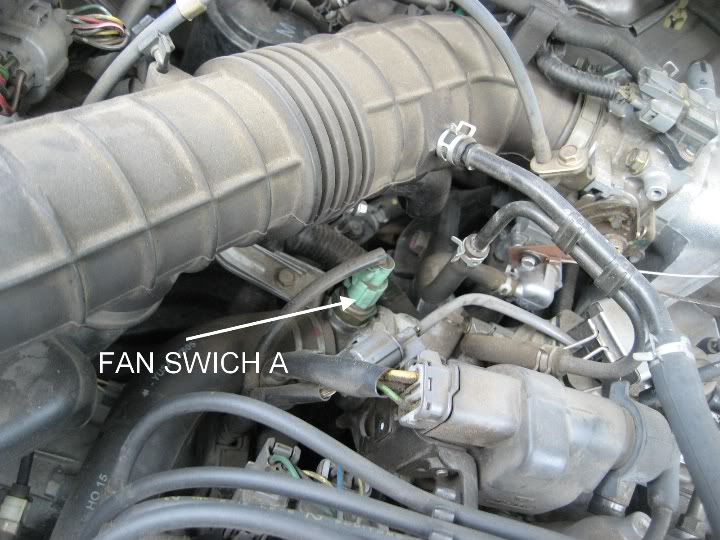
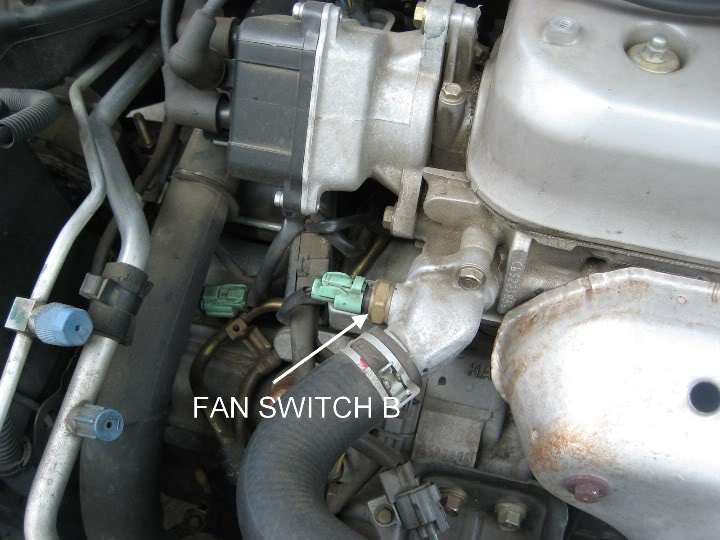
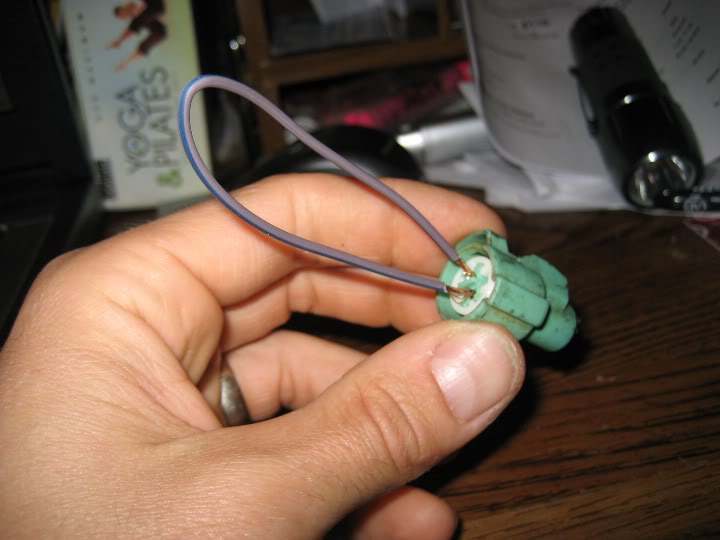
Step 2: Its always easiest to start from easiest to hardest when diagnosing. So first locate both your fan switches to recognize which is which. The Accord has two fan switches one controls the fan operation when the car is normally running (switch A) and one sends signal to the fan control module when the car is off to run the fan after the car is off for a moment of time (switch B). Locate switch A on the back side of the cylinder head and unplug the connector. Get a paperclip or a short piece of wire and place one end in one side of the connector and the other end on the other side of the connector with the car on engine running. If the fan comes on you probably have a bad switch. You can test the switch further by trying the method explained in the link included at the top of this DIY. If your fan does not cut on you can go to step 2.
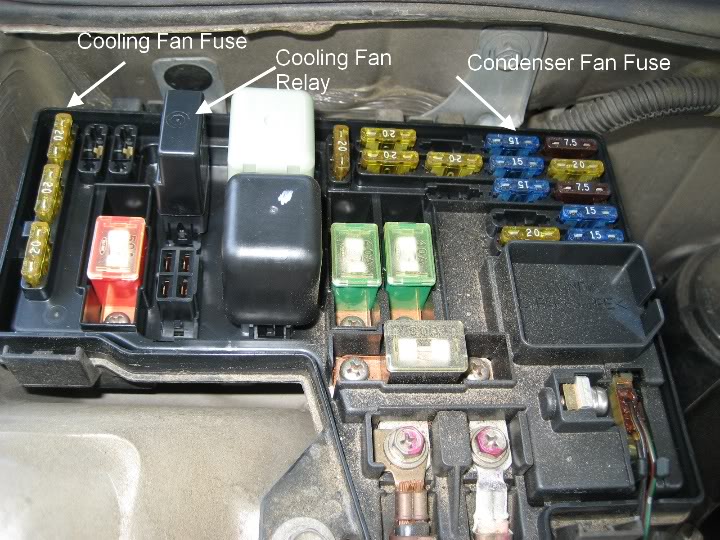
Step 2: So first in your underhood fuse box (located to the top left corner) open it and look inside for the two fan fuses and one radiator fan relay. You can check the fuses by either pulling them out and seeing if the fuse is blown or use a voltmeter to check for continuity. At this point if your condenser fan is not running and the fuse is good you've eliminated that source. If your radiator fan is not running and the fuse is good you need to check and see if your relay is good. If you happen to have power windows (I don't as the power window relay is right beside the fan relay) you are in luck because you can swap that fuse over to the radiator fan relay and see if the fan cuts on or swap the fan relay to the power window relay spot and see if your windows roll up or not. After you eliminated that you can go on to the next step the fan itself.
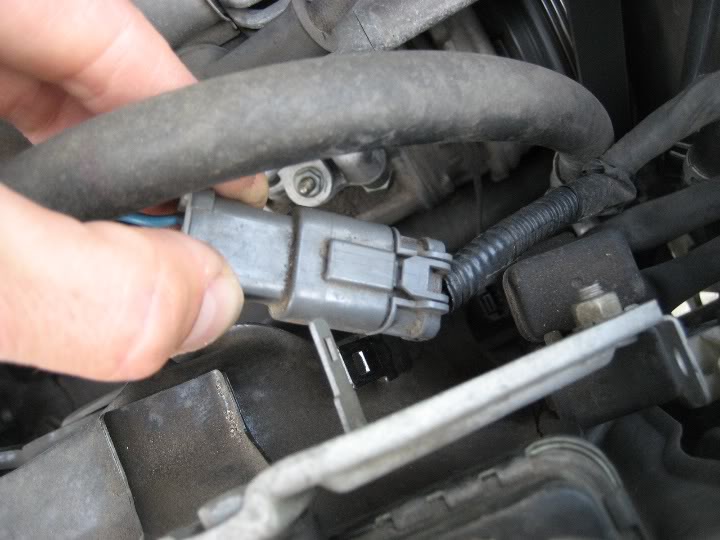
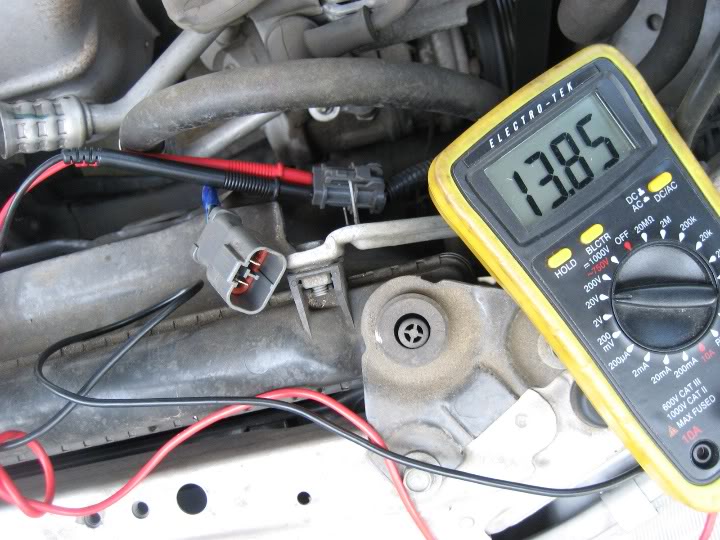
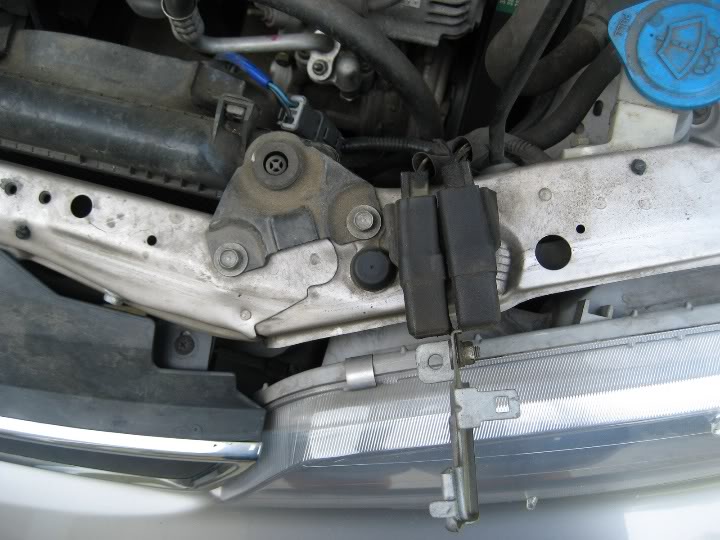
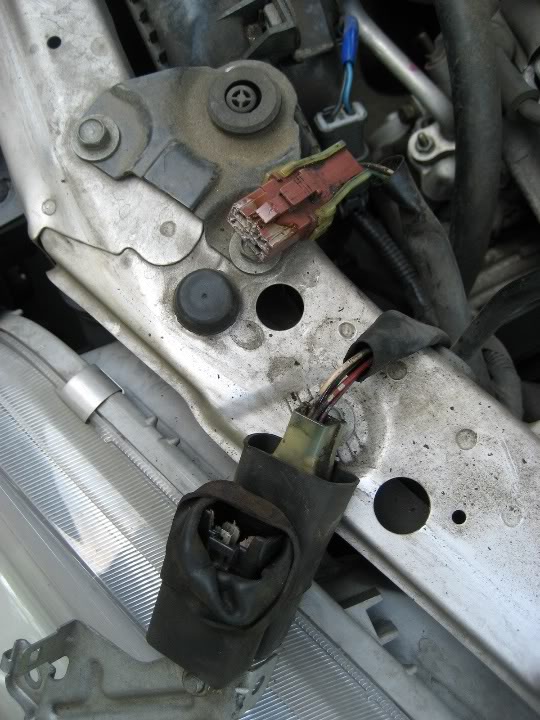
Step 3: I like to do this step next because the relays are a little harder to get to than the condenser fan plug and if you have power at the fan plug you know your relay is working correctly. The fan plug is mounted on the condenser housing and by pressing on the clip you can remove it from here to make it easier to unplug. After unplugging the fan plug use your voltmeter (if you don't have one trust me get one, I got this one at Harbor Freight for 8 bucks and yes its cheap but does what it needs to) and place the ground (black connector) into the fan plug like pictured. With the car running and A/C running there should be at least 12v at the plug if not its possible you have a condenser fan relay issue.
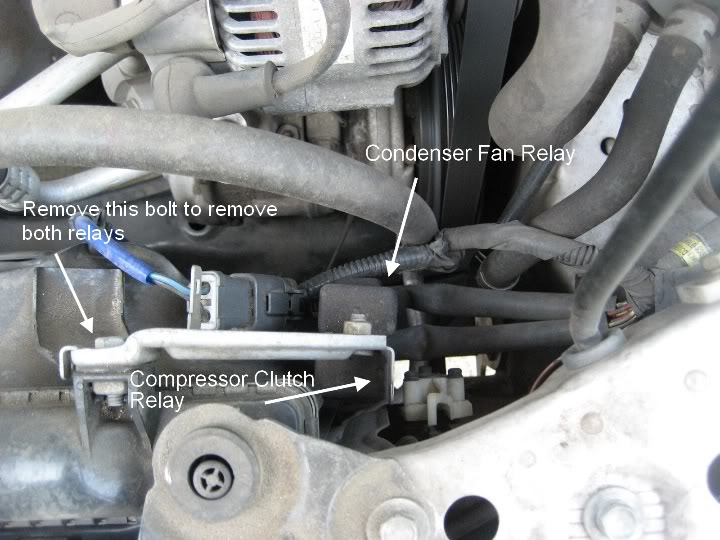
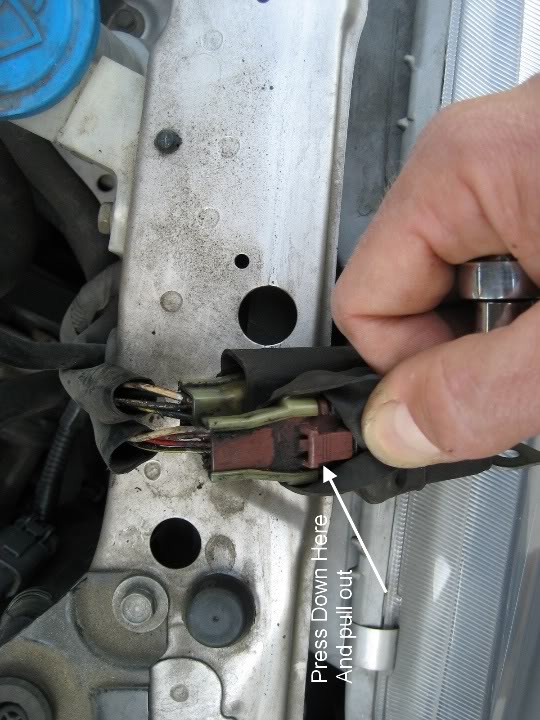
Step 4: Find the condenser fan relay mounted beside the condenser fan plug.There are two relays one is the condenser fan and one is for the compressor. Remove the 10mm bolt to remove the bracket holding both relays. The condenser fan relays is the one closest to the engine. To replace you just need to pull up on the plastic/rubber cover and press down on the plugs connector and pull out. If you suspect it is the relay simple unplug the relay and plug it into the compressor clutch relay as they are the same relay if the fan comes on with the compressor relay you know more than likely your relay is the issue. In my experience if your car is over 120K miles on the odometer your compressor fan is more than likely the culprit. I've replaced a lot of fans in the past and can tell you 8 out of 10 times it is the fan motor. The good part is that now you can buy the whole assembly on ebay for under 50 dollars that includes an all metal frame, motor and fan blade and can be changed out in well under an hour.
Hope this helps!
DIY #1 - A/C Evaporator Drain unclog: This may occur when you are driving and all of a sudden you hear a wave of water in the dash and then it spills out on either side onto your significant others feet and you hear a scream. Also you may notice no water is dripping under the passenger side of your car with the A/C on a hot day.
Tools needed: Shop Vac, 5/16 tubing, Duct tape. You can also use compressed air for this without removing the tube but I prefer the shop vac due to the fact that it will suck out any thing that was in the evaporator box as opposed to just blowing it up and hoping it comes out the drain.
Step 1:
Open the passenger side door push the seat back and look up under the glove box for a black tube running into the firewall.
Passengerside.jpg?t=1276984455
Draintubeloc.jpg?t=1276984420
Step 2: Assemble your homemade suction device by inserting the 5/16 tube into the vacuum tube and wrap it air tight with duct tape.
Vacuumtool.jpg?t=1276984597
Tool2.jpg?t=1276984761
Step 3: Remove the drain tube out of the firewall hole by pulling it out and insert the 5/16 tube into it as a perfect snug fit. Turn on vacuum and let it suck for a few minutes. Reinsert tube back into firewall hole.
Draintuberemoved.jpg?t=1276984832
Suckingtube.jpg?t=1276984879
Step 4: Enjoy a leak on your car that is actually good
evapdrip.jpg?t=1276985027
DIY #2 - A/C-Heat duct system purification: You may experience sometimes turning on either your A/C or heat and getting a pretty bad urine type or mildewy smell coming from the vents. Its possible that mildew/mold or other junk has began to grow in your duct system and while this DIY won't cure it completely it will kill some or all of that funk that you've been experiencing. WARNING: AT ANY TIME DO NOT SIT IN THE CAR WITH THE DOORS CLOSED WITH THE PRODUCT DIRECTLY SPRAYING YOU WILL DIE OR AT LEAST GET A REALLY BAD HEADACHE!!!
Tools needed: Some type of duct purifier spray at an autoparts store. I got this one for 5 bucks but you can shop around. I did my whole car using 5oz and it was plenty.
frigifresh.jpg?t=1276985149
Step 1: Open your windows or doors and keep them open during the whole process. On your A/C controls place the system on full power, A/C, and outside/fresh air and turn your car on.
freshair.jpg?t=1276985412
Step 2: FRESH AIR VENT PURIFY - Locate your fresh air vent by popping the hood. Get your can of spray and place the spray tube inside the vent hole (doesn't matter where) and begin to spray. I used about half the can for this part of the process. Let your car run for about 5 minutes then turn it off.
freshairvent.jpg?t=1276985873
freshairventspray.jpg?t=1276985898
Step 3: VENTS PURIFY - With car turned off spray into each vent a good amount (about 1/2 of whats left in the can) into each vent - left side vents, center vents, right side vents and defrost vents. Let it sit for about 10 minutes and then turn the car and air conditioning back on and allow it to run normally.
leftvents.jpg?t=1276986001
centervent.jpg?t=1276986046
rightvents.jpg?t=1276986076
defrostvents.jpg?t=1276986114
Step 4: RECIRCULATION INTAKE AIR PURIFY - Turn your A/C controls to recirculation mode. Partially remove your glove box and you will see the recirculation air intake. To remove your glove box just push in and pull out on the left tab and use a flat head screw driver to turn the right tab and your glove box will lower to access the intake. For this process you don't need to lower the glove box necessarily but I did it to show you the intake. You can spray right at this from underneath but I wanted to make sure it reach the intake. Use the rest of the can in this area. Put glove box back together. Allow the car to run for about 10 minutes and allow it to air out for about 30 minutes before driving unless you enjoy head rushes.
Recirculateair.jpg?t=1276987267
gloveremove.jpg?t=1276986542
recirculateairvent.jpg?t=1276986571
DIY #3 - Troubleshooting A/C Condenser fan that isn't working: You feel like your A/C is cool but not cool enough and you may even be experiencing some overheating with the A/C on and idling. With the A/C on you check both your fans and notice one is not running. Its possible you have a bad fan or a bad component in the circuit (fuse, relay, switch). This DIY is mainly for the condenser fan but can be similarly used for the radiator/cooling fan as well.
Step 1: Pop you hood and figure out which fan isn't running. When looking under the hood there are two fans mounted on the radiator. One is cooling/radiator fan (on left) and the other is the condenser fan (on right). With the A/C running and the compressor running as well both fans should be running or cycling with the compressor. If one is not running follow the next few steps.
Step 2: Its always easiest to start from easiest to hardest when diagnosing. So first locate both your fan switches to recognize which is which. The Accord has two fan switches one controls the fan operation when the car is normally running (switch A) and one sends signal to the fan control module when the car is off to run the fan after the car is off for a moment of time (switch B). Locate switch A on the back side of the cylinder head and unplug the connector. Get a paperclip or a short piece of wire and place one end in one side of the connector and the other end on the other side of the connector with the car on engine running. If the fan comes on you probably have a bad switch. You can test the switch further by trying the method explained in the link included at the top of this DIY. If your fan does not cut on you can go to step 2.
Step 2: So first in your underhood fuse box (located to the top left corner) open it and look inside for the two fan fuses and one radiator fan relay. You can check the fuses by either pulling them out and seeing if the fuse is blown or use a voltmeter to check for continuity. At this point if your condenser fan is not running and the fuse is good you've eliminated that source. If your radiator fan is not running and the fuse is good you need to check and see if your relay is good. If you happen to have power windows (I don't as the power window relay is right beside the fan relay) you are in luck because you can swap that fuse over to the radiator fan relay and see if the fan cuts on or swap the fan relay to the power window relay spot and see if your windows roll up or not. After you eliminated that you can go on to the next step the fan itself.
Step 3: I like to do this step next because the relays are a little harder to get to than the condenser fan plug and if you have power at the fan plug you know your relay is working correctly. The fan plug is mounted on the condenser housing and by pressing on the clip you can remove it from here to make it easier to unplug. After unplugging the fan plug use your voltmeter (if you don't have one trust me get one, I got this one at Harbor Freight for 8 bucks and yes its cheap but does what it needs to) and place the ground (black connector) into the fan plug like pictured. With the car running and A/C running there should be at least 12v at the plug if not its possible you have a condenser fan relay issue.
Step 4: Find the condenser fan relay mounted beside the condenser fan plug.There are two relays one is the condenser fan and one is for the compressor. Remove the 10mm bolt to remove the bracket holding both relays. The condenser fan relays is the one closest to the engine. To replace you just need to pull up on the plastic/rubber cover and press down on the plugs connector and pull out. If you suspect it is the relay simple unplug the relay and plug it into the compressor clutch relay as they are the same relay if the fan comes on with the compressor relay you know more than likely your relay is the issue. In my experience if your car is over 120K miles on the odometer your compressor fan is more than likely the culprit. I've replaced a lot of fans in the past and can tell you 8 out of 10 times it is the fan motor. The good part is that now you can buy the whole assembly on ebay for under 50 dollars that includes an all metal frame, motor and fan blade and can be changed out in well under an hour.
Hope this helps!
Last edited by HondaPartsHero; 06-20-2010 at 07:09 AM.

 06-19-2010, 08:03 PM
#3
Honda-Tech Member
Join Date: Aug 2005
Location: Pompano Beach, FL, USA
Posts: 3,495
Likes: 0
Received 5 Likes
on
4 Posts
My last accord had a bad small coming from the vents. One thing, if you can... i never actually saw where the cabin air filter is located on the accord. Would be nice if you could point it out. Thanks.
 07-05-2010, 04:42 PM
#7
Trial User

Join Date: Jul 2010
Posts: 2
Likes: 0
Received 0 Likes
on
0 Posts
Great post....I have a 99 2dr Accord EX and have the same wet floorboard, but looks like the evaporator case goes all the way to the firewall
Also have this clear tube that looks like drains out behind the inner fender cover on the passenger side. I inserted it into the black tube, but honestly not sure if it goes there (it was just dripping down into the floor)
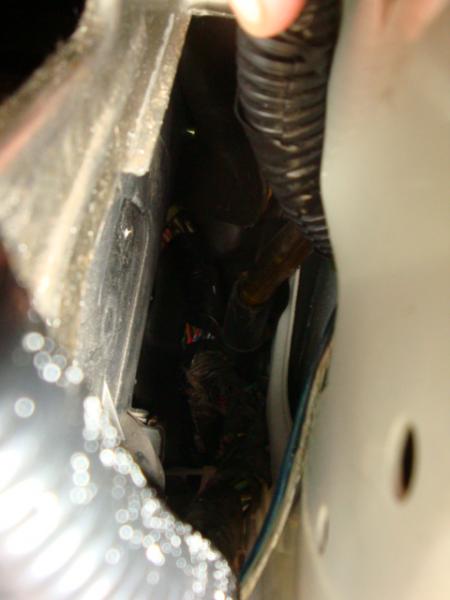
Any ideas?
Also have this clear tube that looks like drains out behind the inner fender cover on the passenger side. I inserted it into the black tube, but honestly not sure if it goes there (it was just dripping down into the floor)
Any ideas?
Trending Topics
04-22-2011, 05:15 AM
#8
Honda-Tech Member

Join Date: Feb 2011
Posts: 75
Likes: 0
Received 0 Likes
on
0 Posts
what if your fans are working and a/c is charged properly and still not getting coolness?
95 accord ex coupe
Correction....if your fans are working, compressor is kicking in and followed the first step, check for air in the lines. I had ALOT of air in mine. Let that crap out, re-charged it with r-134a and now i can hang meat in my car!
95 accord ex coupe
Correction....if your fans are working, compressor is kicking in and followed the first step, check for air in the lines. I had ALOT of air in mine. Let that crap out, re-charged it with r-134a and now i can hang meat in my car!
Last edited by shadetree101; 04-22-2011 at 06:34 AM.
 06-10-2011, 09:10 PM
#10
Honda-Tech Member
06-10-2011, 09:58 PM
#12
Great post....I have a 99 2dr Accord EX and have the same wet floorboard, but looks like the evaporator case goes all the way to the firewall
Attachment 142972
Also have this clear tube that looks like drains out behind the inner fender cover on the passenger side. I inserted it into the black tube, but honestly not sure if it goes there (it was just dripping down into the floor)
Attachment 142973
Any ideas?
Attachment 142972
Also have this clear tube that looks like drains out behind the inner fender cover on the passenger side. I inserted it into the black tube, but honestly not sure if it goes there (it was just dripping down into the floor)
Attachment 142973
Any ideas?
06-11-2011, 12:57 PM
#13
The problem is I can't really hear the cycling of the AC compressor right now due to a rough idle issue that I am trying to work out. When I do turn on the AC my idle drop 100-200 rpms and bounces back to normal at ~750 pretty regularly.
06-11-2011, 02:28 PM
#14
Honda-Tech Member
Join Date: Oct 2002
Location: Ft. Wayne, IN, USA
Posts: 481
Likes: 0
Received 0 Likes
on
0 Posts
Another thing to check if your AC is not cold, is that your heater core valve on the firewall is closing all the way and not allowing hot coolant into he heater core to fight your A/C's cooling ability.
Even with the dash **** all the way on cool, the valve under the hood is not shut all the way and I have to reach behind the motor to bump the lever a 1/4 inch to close it.
Even with the dash **** all the way on cool, the valve under the hood is not shut all the way and I have to reach behind the motor to bump the lever a 1/4 inch to close it.
06-11-2011, 11:37 PM
#15
Can you explain that a little more in depth - where do you "bump" the lever at and how can I check to ensure that the valve is closing fully.
I notice that when I put the blower on 4 (highest) I can hear the motor sound like it churning behind the passenger dash. Not a normal sound of just the air blowing but I can actually hear the motor.
Thanks for the help.
I notice that when I put the blower on 4 (highest) I can hear the motor sound like it churning behind the passenger dash. Not a normal sound of just the air blowing but I can actually hear the motor.
Thanks for the help.
06-12-2011, 06:34 AM
#16
Honda-Tech Member

On the 5th gens, and a few others, there is a blend door adjustment you might look into....sec 21, page 25 of the service manual. IMO, if the two cables are properly adjusted and the **** is not broken...there is no need to "bump" the heater control valve closed.
06-13-2011, 04:43 PM
#17
Honda-Tech Member
Join Date: Feb 2011
Posts: 75
Likes: 0
Received 0 Likes
on
0 Posts
I determined that there was air in the lines buy sticking a screwdriver in the valves that the "freon" goes in...very simple either air or fluid. Make sure you wear a glove...i dunno how that stuff reacts to most ppl but it didnt bother me i just washed it off...
06-13-2011, 04:56 PM
#18
You sure that shadetree didn't drop a branch on your head?
06-13-2011, 05:20 PM
#19
Honda-Tech Member
Join Date: Feb 2011
Posts: 75
Likes: 0
Received 0 Likes
on
0 Posts
Why? The small valve stem that I supressed let out nothing but air all the way down to zero pressure...when I put a whole can of arctic freeze in it instant chill...the bigger valve stem let out a little bit of green crap...
06-14-2011, 06:19 PM
#20
That "gas" that you hear is freon. You really need to educate yourself about A/C systems. There are two sides of the system. Being a home,fridge,auto. The principles are all the same. The "gas" side is the "low" side of which you can hook up gauges to properly charge with refrigerant. The liquid side is the high pressure side. Which the average joe should never charge with unless you like blowing refrigerant cans up and getting frostbite. You obviously have the net. So educate yourself!!
06-16-2011, 11:31 AM
#21
I'm not sure if my compressor is working properly...
My other car I hear a very distinct CLICK as the compressor engages. With my Honda (94 EX) I get a click, click, click sound which is constant. Almost like the compressor is trying to engage but isn't.
Thoughts?
My other car I hear a very distinct CLICK as the compressor engages. With my Honda (94 EX) I get a click, click, click sound which is constant. Almost like the compressor is trying to engage but isn't.
Thoughts?
01-02-2012, 06:32 PM
#23
Old Fart
Join Date: May 2004
Location: kelowna, bc, canada
Posts: 26,173
Likes: 0
Received 14 Likes
on
14 Posts
Great post....I have a 99 2dr Accord EX and have the same wet floorboard, but looks like the evaporator case goes all the way to the firewall
Attachment 142972
Also have this clear tube that looks like drains out behind the inner fender cover on the passenger side. I inserted it into the black tube, but honestly not sure if it goes there (it was just dripping down into the floor)
Attachment 142973
Any ideas?
Attachment 142972
Also have this clear tube that looks like drains out behind the inner fender cover on the passenger side. I inserted it into the black tube, but honestly not sure if it goes there (it was just dripping down into the floor)
Attachment 142973
Any ideas?
You can also check and make sure drain is not plugged from the engine side of fire wall, but if plugged bad you will need to pull the evaporator and box to clean it out.
As mentioned, I think that is one of the sun/moon roof drains, and should drain to the outside of car, yes it goes there. 94
Last edited by fcm; 01-02-2012 at 07:10 PM. Reason: typo
01-02-2012, 06:36 PM
#24
Old Fart
Join Date: May 2004
Location: kelowna, bc, canada
Posts: 26,173
Likes: 0
Received 14 Likes
on
14 Posts
No you do not, short cycling is an indication that the refrigerant charge is low, there is a bad cycling switch, or thermo. switch on compressor is bad, there is most likely still 100% R134a refrigerant in your system, just not enough of it. 94
01-02-2012, 06:45 PM
#25
Old Fart
Join Date: May 2004
Location: kelowna, bc, canada
Posts: 26,173
Likes: 0
Received 14 Likes
on
14 Posts
Although you may well have air in your system, what you hear out of the service port is refrigerant, it is a gas unless under around 50PSI of pressure, anything less and it is a gas.
If there is any air, it is a very small amount, and it is not the air that is so bad it is the moisture in the air that is bad, [very bad].
Now if you did have air, [moisture] in the system, recharging the system without placing system on a vacuum pump has not removed any of that air or moisture, so it may be working now, but be prepared for it to fail sooner then later. 94

