
Pics of more carbon fiber overlays for an Audi this time...
 11-21-2006, 09:33 PM
#1
Thread Starter

Join Date: Oct 2002
Location: Eagle Mountain, UT, USA
Posts: 1,708
Likes: 0
Received 0 Likes
on
0 Posts
Just set up a quick page with some pics and brief explanations for 9 pieces of interior trim I just finished for a customer.
http://www.lighterfaster.com/audioverlay.html
How to write up to follow as well.
http://www.lighterfaster.com/audioverlay.html
How to write up to follow as well.
 11-22-2006, 12:03 AM
#2
Honda-Tech Member
Join Date: Dec 2003
Location: Winnipeg, Manitoba, Canada
Posts: 1,874
Likes: 0
Received 0 Likes
on
0 Posts
looks really professional, thats what I have in mind for a few pieces in the interior of my skyline. I wouldnt mind seeing more pics of the pieces installed if possible.
Cheers ... Chris
Cheers ... Chris
11-22-2006, 10:14 AM
#5
Thread Starter
Join Date: Oct 2002
Location: Eagle Mountain, UT, USA
Posts: 1,708
Likes: 0
Received 0 Likes
on
0 Posts
At least 10 mins...  I had maybe 25-30 hours in all the parts. A lot anyway and thats just working time, does not include cure time or resin and paint. They are deceptive just looking at them, they were a little harder than most overlays I have done before. I am told Audi dealers sell cf trims for $1200-$1400 for the set.
I had maybe 25-30 hours in all the parts. A lot anyway and thats just working time, does not include cure time or resin and paint. They are deceptive just looking at them, they were a little harder than most overlays I have done before. I am told Audi dealers sell cf trims for $1200-$1400 for the set.
Trending Topics
11-22-2006, 05:27 PM
#11
Honda-Tech Member
<TABLE WIDTH="90%" CELLSPACING=0 CELLPADDING=0 ALIGN=CENTER><TR><TD>Quote, originally posted by SQ is the SQUAD »</TD></TR><TR><TD CLASS="quote">looks good. are you admin form racingcomposites.net?</TD></TR></TABLE>
BINGO!!!!
BINGO!!!!
11-22-2006, 05:27 PM
#12
Honda-Tech Member
<TABLE WIDTH="90%" CELLSPACING=0 CELLPADDING=0 ALIGN=CENTER><TR><TD>Quote, originally posted by crx12 »</TD></TR><TR><TD CLASS="quote">At least 10 mins... I had maybe 25-30 hours in all the parts. A lot anyway and thats just working time, does not include cure time or resin and paint. They are deceptive just looking at them, they were a little harder than most overlays I have done before. I am told Audi dealers sell cf trims for $1200-$1400 for the set.</TD></TR></TABLE>
So how much did you charge?
So how much did you charge?
11-23-2006, 08:56 AM
#15
* B A N N E D *

Join Date: Aug 2005
Location: www.compositesfab.com
Posts: 2,844
Likes: 0
Received 0 Likes
on
0 Posts
<TABLE WIDTH="90%" CELLSPACING=0 CELLPADDING=0 ALIGN=CENTER><TR><TD>Quote, originally posted by crx12 »</TD></TR><TR><TD CLASS="quote">At least 10 mins... I had maybe 25-30 hours in all the parts. A lot anyway and thats just working time, does not include cure time or resin and paint. They are deceptive just looking at them, they were a little harder than most overlays I have done before. I am told Audi dealers sell cf trims for $1200-$1400 for the set.</TD></TR></TABLE>
oh I believe that! I just cut and shaved out the rear light of a eg coupe speaker deck and overlayed that. Now I remeber why I don't offer overlay service to my customers! Way to much time involved lol. Your work looks awesome which of course is no surprise!
I had maybe 25-30 hours in all the parts. A lot anyway and thats just working time, does not include cure time or resin and paint. They are deceptive just looking at them, they were a little harder than most overlays I have done before. I am told Audi dealers sell cf trims for $1200-$1400 for the set.</TD></TR></TABLE>oh I believe that! I just cut and shaved out the rear light of a eg coupe speaker deck and overlayed that. Now I remeber why I don't offer overlay service to my customers! Way to much time involved lol. Your work looks awesome which of course is no surprise!
11-23-2006, 09:25 AM
#16
Join Date: Jul 2006
Location: Omaha, NE, USA
Posts: 59
Likes: 0
Received 0 Likes
on
0 Posts
<TABLE WIDTH="90%" CELLSPACING=0 CELLPADDING=0 ALIGN=CENTER><TR><TD>Quote, originally posted by crx12 »</TD></TR><TR><TD CLASS="quote">Just set up a quick page with some pics and brief explanations for 9 pieces of interior trim I just finished for a customer.
http://www.lighterfaster.com/audioverlay.html
How to write up to follow as well. </TD></TR></TABLE>
Looks great.
Once installed, did you have any issues with the pieces "sticking" out since they were overlayed and built up? I would think it might depend on how much (how thick) resin you used and coats of clear, so once you do your write up, it might be easier to understand.
I'm looking forward to the write up. My buddy overlayed a custom Mustang interior and we're always looking for tips and tricks of other people doing the same.
http://www.lighterfaster.com/audioverlay.html
How to write up to follow as well.
</TD></TR></TABLE>Looks great.
Once installed, did you have any issues with the pieces "sticking" out since they were overlayed and built up? I would think it might depend on how much (how thick) resin you used and coats of clear, so once you do your write up, it might be easier to understand.
I'm looking forward to the write up. My buddy overlayed a custom Mustang interior and we're always looking for tips and tricks of other people doing the same.
12-02-2006, 11:46 AM
#17
Thread Starter
Join Date: Oct 2002
Location: Eagle Mountain, UT, USA
Posts: 1,708
Likes: 0
Received 0 Likes
on
0 Posts
Check the link again, I have installed pics. Here's one:
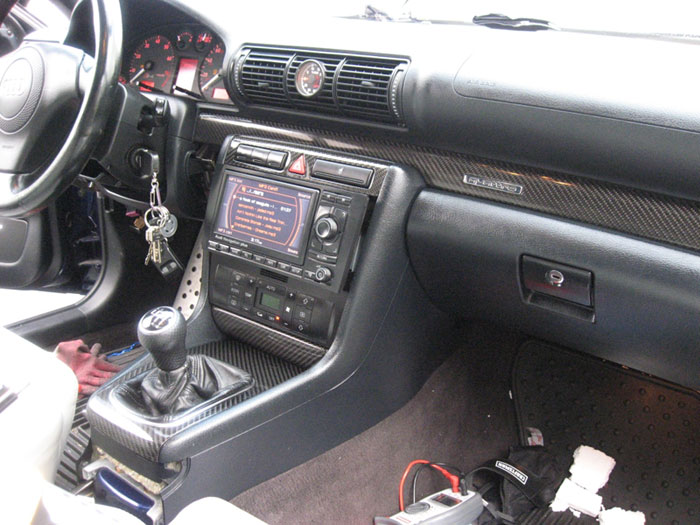
You are correct the pieces do grow when overlayed but the key to making everything fit is to work carefully to ensure you don't make them grow to much. Here is a pic of the backside edges of one of the parts:
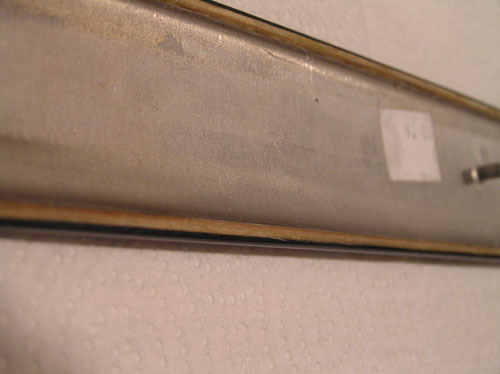
You will notice the edge is the most important part to keep straight and close to the factory part especially on trim pieces. As far as "sticking" out goes its nothing you can really notice. Its interesting because these parts are overlays to start with. I guess the factory offers brushed aluminum pieces or wood veneer. I think the just take their brushed aluminum pieces and hadd the veneer to them so in essence I am doing an overlay of an overlay. I think the factory gave some extra clearance so they could add the wood as well which helps. I did not have the car at my shop so I couldn't check as I worked. I minimized the growth as much as possible and it turns out I was more conservative than I needed to be. All the parts went right in. The only issue I had was with the ashtray since the carbon wraps almost all the way around the backside it is a little more snug when you open and close it. I also had to repair one of the brackets that had broken off whe the parts were removed so that may have contributed some. Left to right it's great, just a little tight up top. This could be remedied now since I know where I could sand a bit more since part of the overlay is not even visible on the outside. It doesn't matter since my customer isn't a smoker he never uses it. From the report I got it still opens and closes fine anyway. It's tough working without a car long distance but we made it work. I'm working on the how-to write-up now.
You are correct the pieces do grow when overlayed but the key to making everything fit is to work carefully to ensure you don't make them grow to much. Here is a pic of the backside edges of one of the parts:
You will notice the edge is the most important part to keep straight and close to the factory part especially on trim pieces. As far as "sticking" out goes its nothing you can really notice. Its interesting because these parts are overlays to start with. I guess the factory offers brushed aluminum pieces or wood veneer. I think the just take their brushed aluminum pieces and hadd the veneer to them so in essence I am doing an overlay of an overlay. I think the factory gave some extra clearance so they could add the wood as well which helps. I did not have the car at my shop so I couldn't check as I worked. I minimized the growth as much as possible and it turns out I was more conservative than I needed to be. All the parts went right in. The only issue I had was with the ashtray since the carbon wraps almost all the way around the backside it is a little more snug when you open and close it. I also had to repair one of the brackets that had broken off whe the parts were removed so that may have contributed some. Left to right it's great, just a little tight up top. This could be remedied now since I know where I could sand a bit more since part of the overlay is not even visible on the outside. It doesn't matter since my customer isn't a smoker he never uses it. From the report I got it still opens and closes fine anyway. It's tough working without a car long distance but we made it work. I'm working on the how-to write-up now.
12-02-2006, 01:39 PM
#18

Join Date: Jan 2006
Location: Fakeville, USA, USA
Posts: 838
Likes: 0
Received 0 Likes
on
0 Posts
To keep the parts fropm growing too much, couldn't you just sand them down a bit before doing the overlay?
12-02-2006, 02:06 PM
#19
Thread Starter
Join Date: Oct 2002
Location: Eagle Mountain, UT, USA
Posts: 1,708
Likes: 0
Received 0 Likes
on
0 Posts
You could but then I would have 40 hours of sanding instead of 20. In 99% of all cases sanding down the original part is not needed. The other issue is maintaining the original shape of the part. If you start sanding too much on that original you could easily mess up the shape depending on what it is. Also on these parts if I did sand off the wood veneer I would be able to gauge my sanding depth by seeing the aluminum underneath but on most overlays you are talking about plastic or some other material that is the same throughout, in this case you would need calipers to verify your depth. What is interesting is a lot of times manufacturers leave a lot of slop in the gap tolerances. Of course German and Japanese made vehicles are tighter tolerances than American made cars usually. Once you sanded all the parts down you would have to add teh exact amount back which is tough just brushing resin on. On complex shaped parts the resin runs downhill which sometimes forces you to re-coat in that area which in turn causes a bit extra resin build up somewhere else. Its a bit of a balancing act and a lot of times you have to reposition the parts to coat the areas that have too much run-off. Overlays already require a lot of labor as it is and I pretty much wanted the quickest way to get good looking parts that fit. I was just careful and it paid off.
12-02-2006, 08:40 PM
#20
Join Date: Jan 2006
Location: Fakeville, USA, USA
Posts: 838
Likes: 0
Received 0 Likes
on
0 Posts
Good to know. I figured the labor time would rise significantly to were it just might not be worth it.
I've always wanted to experiment with composites, just haven't found the time yet I guess.
Not to thread jack, but the fiberglass w/hardener you find at automotive places, is that right kind to start with, just to mess around?
12-02-2006, 09:07 PM
#21
Join Date: Jul 2006
Location: Omaha, NE, USA
Posts: 59
Likes: 0
Received 0 Likes
on
0 Posts
<TABLE WIDTH="90%" CELLSPACING=0 CELLPADDING=0 ALIGN=CENTER><TR><TD>Quote, originally posted by crx12 »</TD></TR><TR><TD CLASS="quote">You could but then I would have 40 hours of sanding instead of 20. In 99% of all cases sanding down the original part is not needed. The other issue is maintaining the original shape of the part. If you start sanding too much on that original you could easily mess up the shape depending on what it is. Also on these parts if I did sand off the wood veneer I would be able to gauge my sanding depth by seeing the aluminum underneath but on most overlays you are talking about plastic or some other material that is the same throughout, in this case you would need calipers to verify your depth. What is interesting is a lot of times manufacturers leave a lot of slop in the gap tolerances. Of course German and Japanese made vehicles are tighter tolerances than American made cars usually. Once you sanded all the parts down you would have to add teh exact amount back which is tough just brushing resin on. On complex shaped parts the resin runs downhill which sometimes forces you to re-coat in that area which in turn causes a bit extra resin build up somewhere else. Its a bit of a balancing act and a lot of times you have to reposition the parts to coat the areas that have too much run-off. Overlays already require a lot of labor as it is and I pretty much wanted the quickest way to get good looking parts that fit. I was just careful and it paid off.</TD></TR></TABLE>
Would vacuum bagging cure this? Maybe with a releasing agent on the edges and rear to insure factory fitment and less sanding?
Your parts look damn good
OT: Where do you pick up your CF? I'm looking for some blue/black carbon kevlar.
Would vacuum bagging cure this? Maybe with a releasing agent on the edges and rear to insure factory fitment and less sanding?
Your parts look damn good
OT: Where do you pick up your CF? I'm looking for some blue/black carbon kevlar.
12-02-2006, 09:12 PM
#22
Thread Starter
Join Date: Oct 2002
Location: Eagle Mountain, UT, USA
Posts: 1,708
Likes: 0
Received 0 Likes
on
0 Posts
<TABLE WIDTH="90%" CELLSPACING=0 CELLPADDING=0 ALIGN=CENTER><TR><TD>Quote, originally posted by F20Cteg »</TD></TR><TR><TD CLASS="quote">
Not to thread jack, but the fiberglass w/hardener you find at automotive places, is that right kind to start with, just to mess around?
</TD></TR></TABLE>
Yah you could play with that for pretty cheap. Just buy a can of polyester to try out.
Not to thread jack, but the fiberglass w/hardener you find at automotive places, is that right kind to start with, just to mess around?
</TD></TR></TABLE>
Yah you could play with that for pretty cheap. Just buy a can of polyester to try out.
12-02-2006, 09:20 PM
#23
Thread Starter
Join Date: Oct 2002
Location: Eagle Mountain, UT, USA
Posts: 1,708
Likes: 0
Received 0 Likes
on
0 Posts
<TABLE WIDTH="90%" CELLSPACING=0 CELLPADDING=0 ALIGN=CENTER><TR><TD>Quote, originally posted by mrrogers1 »</TD></TR><TR><TD CLASS="quote">
Would vacuum bagging cure this? Maybe with a releasing agent on the edges and rear to insure factory fitment and less sanding?
Your parts look damn good
OT: Where do you pick up your CF? I'm looking for some blue/black carbon kevlar.</TD></TR></TABLE>
You could bag the parts but if you use an envelope type bag resin will get all over the backside of the part. On some of the parts there are back sections with fine details you could not just release or wax up. I think I used about 5 thin coats of resin. It would take a lot of time to keep bagging the parts after every coat. For the most part you can work out any problems without a bag. It has been done though. The other bummer is bag wrinkling impressions which would have to be sanded out.
As far as where do I get my cf I have several sources. I only know of one place that sells blue carbon kevlar right now but I can't give away the source because it was given to me under threat of death. If I give it out that source may dry up and I depend on it to make a living so I have to keep it close to the vest. I would be happy to buy some for you and resell it to you however.
12-03-2006, 01:57 AM
#24
Thread Starter
Join Date: Oct 2002
Location: Eagle Mountain, UT, USA
Posts: 1,708
Likes: 0
Received 0 Likes
on
0 Posts
Here is the post I created that shows you how to do all this:
https://honda-tech.com/zeropost?cmd=fshow&id=53
https://honda-tech.com/zeropost?cmd=fshow&id=53

Thread
Thread Starter
Forum
Replies
Last Post
Slick GS-R
Other Make Vehicles
24
05-01-2010 11:10 AM
streetlights
Acura Integra
26
12-13-2003 09:19 AM