
DIY Bilstein revalve project
 10-27-2008, 12:21 PM
#26
Honda-Tech Member
Join Date: Oct 2003
Location: Chicago
Posts: 6,619
Likes: 0
Received 0 Likes
on
0 Posts
<TABLE WIDTH="90%" CELLSPACING=0 CELLPADDING=0 ALIGN=CENTER><TR><TD>Quote, originally posted by beanbag »</TD></TR><TR><TD CLASS="quote">Oh, are you referring to the formula about 65% critical at low speed and 25% at high speed? Yeah, I guess I can calculate that</TD></TR></TABLE>
I was talking about a specific formula to calculate the exact valving force given a certain spring rate, velocity and % critical damping. I wrote it down a while back.
I was talking about a specific formula to calculate the exact valving force given a certain spring rate, velocity and % critical damping. I wrote it down a while back.
 10-27-2008, 03:06 PM
#27
Honda-Tech Member
Thread Starter
<TABLE WIDTH="90%" CELLSPACING=0 CELLPADDING=0 ALIGN=CENTER><TR><TD>Quote, originally posted by turboteener »</TD></TR><TR><TD CLASS="quote">What are you adjusting on the Bilstiens, Mine only have a schraeder valve, not an adjustment ****? Or are you talking about the Konis?</TD></TR></TABLE>
Yeah, I meant that I drive around and adjust the Konis, and then try to match the Bilsteins to that as a first pass
Yeah, I meant that I drive around and adjust the Konis, and then try to match the Bilsteins to that as a first pass
10-27-2008, 03:20 PM
#28
Honda-Tech Member
Thread Starter
Request for ideas:
I'm looking for a way to replace the dividing piston with some kind of a bladder mechanism, and hopefully that should cut down on some of the friction. As far as I know, nitrile rubber is oil resistant. I couldn't find anything like a small nitrile bladder with a schrader, but was considering something like cutting a hole in the dividing piston, and attaching some kind of a nitrile pouch, like the finger off of a glove, and have that expand and contract as the shaft moves, instead of the dividing piston sliding. I also know they sell nitrile sheet, but I don't know of a good way to wrap and seal that up.
I'm looking for a way to replace the dividing piston with some kind of a bladder mechanism, and hopefully that should cut down on some of the friction. As far as I know, nitrile rubber is oil resistant. I couldn't find anything like a small nitrile bladder with a schrader, but was considering something like cutting a hole in the dividing piston, and attaching some kind of a nitrile pouch, like the finger off of a glove, and have that expand and contract as the shaft moves, instead of the dividing piston sliding. I also know they sell nitrile sheet, but I don't know of a good way to wrap and seal that up.
10-28-2008, 08:54 PM
#29
Honda-Tech Member
Join Date: Jan 2005
Location: aus
Posts: 54
Likes: 0
Received 0 Likes
on
0 Posts
Great work, however i have a bit of a criticism regarding your test velocities.
To obtain any sort of meaningful curve for low and high speed damping, you need to test up to at least 1m/s, which works out to be approx. 39 in/sec.
Standard passive damper industry testing is using upto 2m/s....
To obtain any sort of meaningful curve for low and high speed damping, you need to test up to at least 1m/s, which works out to be approx. 39 in/sec.
Standard passive damper industry testing is using upto 2m/s....
10-28-2008, 09:04 PM
#30
Honda-Tech Member
Join Date: Oct 2003
Location: Chicago
Posts: 6,619
Likes: 0
Received 0 Likes
on
0 Posts
<TABLE WIDTH="90%" CELLSPACING=0 CELLPADDING=0 ALIGN=CENTER><TR><TD>Quote, originally posted by SSS »</TD></TR><TR><TD CLASS="quote">Great work, however i have a bit of a criticism regarding your test velocities.
To obtain any sort of meaningful curve for low and high speed damping, you need to test up to at least 1m/s, which works out to be approx. 39 in/sec.
Standard passive damper industry testing is using upto 2m/s....</TD></TR></TABLE>
huh?
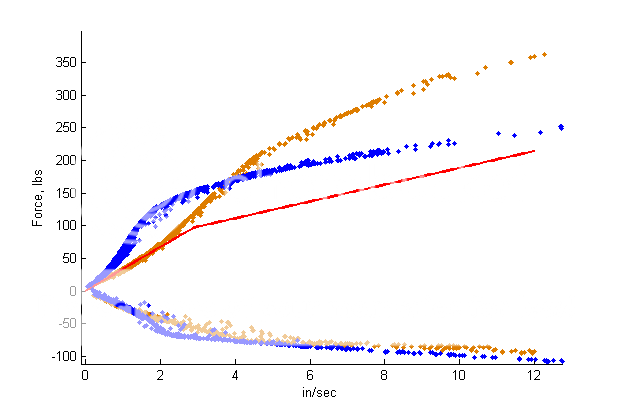
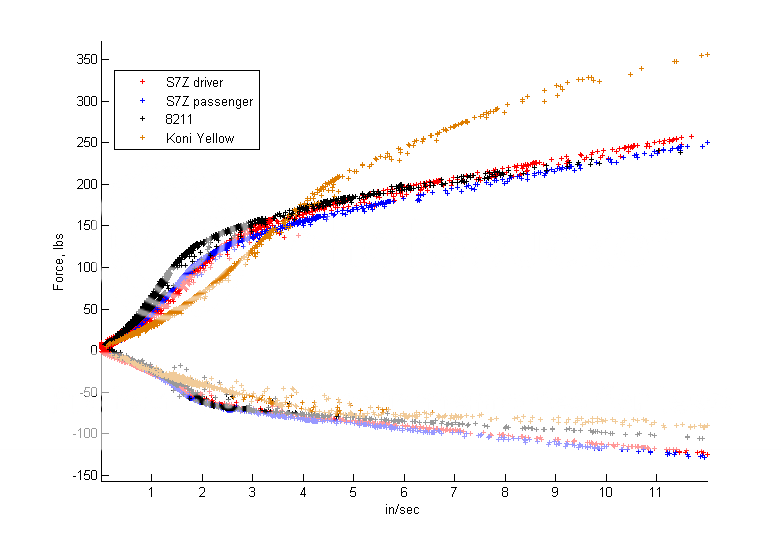
Here's a plot off Koni's dyno:

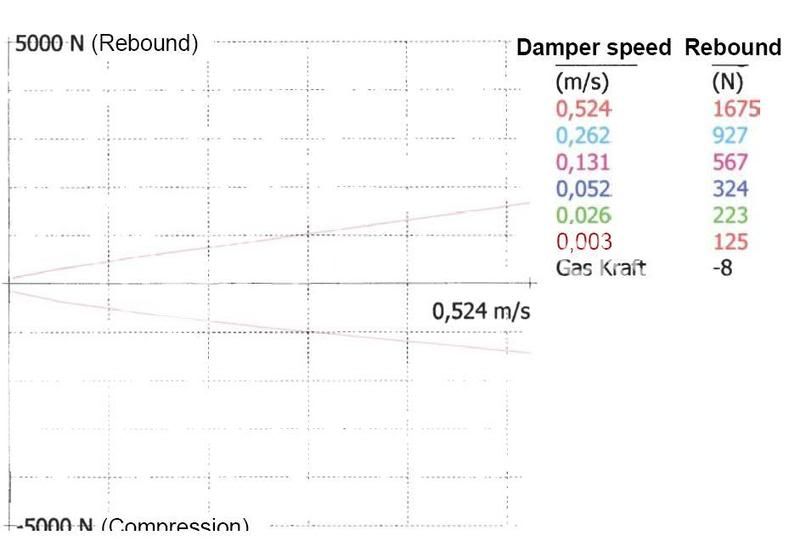
Here's one from Bilstein (oem nsx valving):
To obtain any sort of meaningful curve for low and high speed damping, you need to test up to at least 1m/s, which works out to be approx. 39 in/sec.
Standard passive damper industry testing is using upto 2m/s....</TD></TR></TABLE>
huh?
Here's a plot off Koni's dyno:
Here's one from Bilstein (oem nsx valving):
10-28-2008, 10:17 PM
#31
Honda-Tech Member
Thread Starter
<TABLE WIDTH="90%" CELLSPACING=0 CELLPADDING=0 ALIGN=CENTER><TR><TD>Quote, originally posted by SSS »</TD></TR><TR><TD CLASS="quote">Great work, however i have a bit of a criticism regarding your test velocities.
To obtain any sort of meaningful curve for low and high speed damping, you need to test up to at least 1m/s, which works out to be approx. 39 in/sec.
Standard passive damper industry testing is using upto 2m/s....</TD></TR></TABLE>
I don't know what kinds of velocities are experienced in real life, but I have read that it is usually under 2in/s and maybe 12-18in/s max unless you are a dune buggy or something. Normally nothing interesting happens on a dyno plot above 10in's, so it's typically not plotted up to those speeds. I can generate maybe upper 20's of in/s if the forces are not too high.
If you had a cyclical dyno that has a stroke of 1" and running at 30in/s, then you could probably see those turn-around hysteresis effects better
10-29-2008, 01:14 AM
#32
Honda-Tech Member
Thread Starter
<TABLE WIDTH="90%" CELLSPACING=0 CELLPADDING=0 ALIGN=CENTER><TR><TD>Quote, originally posted by WRXRacer111 »</TD></TR><TR><TD CLASS="quote">
I think Ohlins has software you can download that will show you what theoretical curve a shim combination will give you. </TD></TR></TABLE>
Thanks. I played around with the program a bit, but it looks like it is only for a particular shock +pre-defined valve stacks + their built in adjuster *****. That's OK, I found out that the bending stiffness of a shim is thickness^3, and that's all I need to know.
10-29-2008, 02:04 PM
#33
Honda-Tech Member
Join Date: Jan 2005
Location: aus
Posts: 54
Likes: 0
Received 0 Likes
on
0 Posts
<TABLE WIDTH="90%" CELLSPACING=0 CELLPADDING=0 ALIGN=CENTER><TR><TD>Quote, originally posted by beanbag »</TD></TR><TR><TD CLASS="quote">
I don't know what kinds of velocities are experienced in real life, but I have read that it is usually under 2in/s and maybe 12-18in/s max unless you are a dune buggy or something. Normally nothing interesting happens on a dyno plot above 10in's, so it's typically not plotted up to those speeds. I can generate maybe upper 20's of in/s if the forces are not too high.
If you had a cyclical dyno that has a stroke of 1" and running at 30in/s, then you could probably see those turn-around hysteresis effects better</TD></TR></TABLE>
Typically our velocity points for mapping dampers are 0.1, 0.2, 0.35, 0.5, 1 & 2 m/s for both passive and active dampers (this is for OE applications BTW). This way the whole curve is established; you might encounter a sharp input that will spike over 1m/s, and at least you know that you won't be underdamped for such an event.
Yes, you are correct, we do use a large instron hydraulic stroker for testing upto 2m/s; it's basically limited to not much more than that due to the temperature of the hydraulic fluid raising so rapidly.
In any case, for your velocity ranges, it's perfect for establishing damping forces for smooth road, ie road courses; keep up the good work, again it's great to see a DIY approach to something that is typically out of reach to most due to cost.
10-29-2008, 05:48 PM
#34
Honda-Tech Member
Join Date: Apr 2004
Location: Flat Rock, UNCC, NC, USA
Posts: 858
Likes: 0
Received 0 Likes
on
0 Posts
<TABLE WIDTH="90%" CELLSPACING=0 CELLPADDING=0 ALIGN=CENTER><TR><TD>Quote, originally posted by beanbag »</TD></TR><TR><TD CLASS="quote">Request for ideas:
I'm looking for a way to replace the dividing piston with some kind of a bladder mechanism, and hopefully that should cut down on some of the friction. As far as I know, nitrile rubber is oil resistant. I couldn't find anything like a small nitrile bladder with a schrader, but was considering something like cutting a hole in the dividing piston, and attaching some kind of a nitrile pouch, like the finger off of a glove, and have that expand and contract as the shaft moves, instead of the dividing piston sliding. I also know they sell nitrile sheet, but I don't know of a good way to wrap and seal that up.</TD></TR></TABLE>
The only way I see this possible is getting the head of the shock off. OEM Dirt Bike shocks run similar bladders (Showa and KYB), but the rubber is a lot thicker than that of a nitrile glove. It would be a lot easier on an external reservoir. I have never seen it done on a dividing piston shock before (not saying it hasn't but I personally haven't).
Bladders are also a little more difficult to bleed then your standard shock. PM if you want more info on bleeding them, I've revalved numerous dirt bike shocks and that is the hard part is always getting the bladder to seal and get all the air bubbles out of shock.
I say it can be done, but would you honestly be able to tell? I say no, you might want to look into possibly making a new piston band for the dividing piston that is coated in Teflon or something, a bit easier to tackle and might make the difference you are looking for.
Marty
10-29-2008, 09:21 PM
#35
Honda-Tech Member
Thread Starter
<TABLE WIDTH="90%" CELLSPACING=0 CELLPADDING=0 ALIGN=CENTER><TR><TD>Quote, originally posted by RedStar101 »</TD></TR><TR><TD CLASS="quote">
I say it can be done, but would you honestly be able to tell? I say no, you might want to look into possibly making a new piston band for the dividing piston that is coated in Teflon or something, a bit easier to tackle and might make the difference you are looking for.
Marty </TD></TR></TABLE>
I have seen teflon coated orings, but is the sliding friction really that much lower? And since teflon is not that elastic, how well would they seal?
10-30-2008, 12:38 AM
#36
Honda-Tech Member
Join Date: Apr 2004
Location: Flat Rock, UNCC, NC, USA
Posts: 858
Likes: 0
Received 0 Likes
on
0 Posts
On the stuff I work on there is a Teflon coated piston band and just a regular O-Ring. The piston band is a wear part since Teflon doesn't last forever. But the O-Ring still make the seal. Roehrig Dynos do a seal drag test along with a gas pressure test to zero the graph out. I have never done any testing with the dyno seal drag test using different piston bands or O-rings to see the results, but would still be a neat test to do.
10-30-2008, 05:39 PM
#37
Honda-Tech Member
Thread Starter
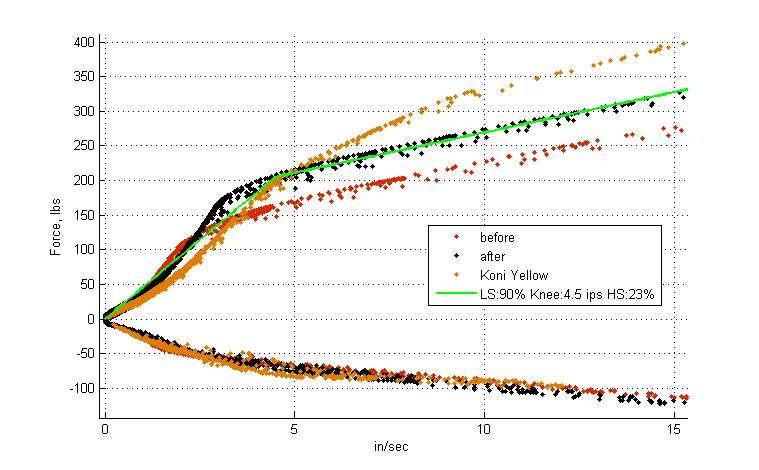
<TABLE WIDTH="90%" CELLSPACING=0 CELLPADDING=0 ALIGN=CENTER><TR><TD>Quote, originally posted by beanbag »</TD></TR><TR><TD CLASS="quote">Oh, are you referring to the formula about 65% critical at low speed and 25% at high speed? Yeah, I guess I can calculate that</TD></TR></TABLE>
Here it is, laid on top of the curves for Sport vs 8211 and 300 lbs springs.
I'm pretty surprised I happened to get it exactly right for the Sports, since all that extra high speed damping would have probably caused me to set them lower. However, it looks like the 8211's are way overdamped, but somehow they feel better, so maybe I messed up the math somewhere? I do think my settings on the 8211 have a "little" too much low speed damping, but not that much.
Modified by beanbag at 7:18 PM 10/30/2008
10-30-2008, 06:53 PM
#38
Honda-Tech Member
Thread Starter
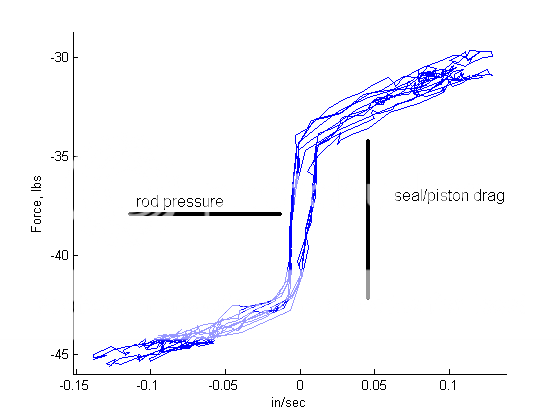
<TABLE WIDTH="90%" CELLSPACING=0 CELLPADDING=0 ALIGN=CENTER><TR><TD>Quote, originally posted by RedStar101 »</TD></TR><TR><TD CLASS="quote">On the stuff I work on there is a Teflon coated piston band and just a regular O-Ring. The piston band is a wear part since Teflon doesn't last forever. But the O-Ring still make the seal. Roehrig Dynos do a seal drag test along with a gas pressure test to zero the graph out. I have never done any testing with the dyno seal drag test using different piston bands or O-rings to see the results, but would still be a neat test to do. </TD></TR></TABLE>
Here's a seal drag test I did on the Bilstein. Do these numbers look reasonable?
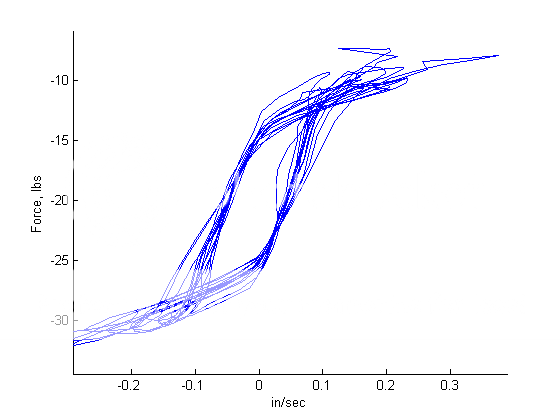
I did a similar test on the Koni sport, albeit somewhat different conditions (being as I'm a bad experimentalist and was too lazy to mount the Koni back on the dyno to use the same conditions as the Bilstein, but anyway...)
I don't know that much about the insides of the 1153, but maybe it's like vinuneuro said with all those valves and whatnot going on inside the twin tube that causes the hysteresis.
I should also take back my earlier statement regarding the low speed behavior of the 1153, since it was based on an incomplete data set.
Modified by beanbag at 8:06 PM 10/30/2008
Here's a seal drag test I did on the Bilstein. Do these numbers look reasonable?
I did a similar test on the Koni sport, albeit somewhat different conditions (being as I'm a bad experimentalist and was too lazy to mount the Koni back on the dyno to use the same conditions as the Bilstein, but anyway...)
I don't know that much about the insides of the 1153, but maybe it's like vinuneuro said with all those valves and whatnot going on inside the twin tube that causes the hysteresis.
I should also take back my earlier statement regarding the low speed behavior of the 1153, since it was based on an incomplete data set.
Modified by beanbag at 8:06 PM 10/30/2008
10-31-2008, 12:21 AM
#39
Honda-Tech Member
Thread Starter
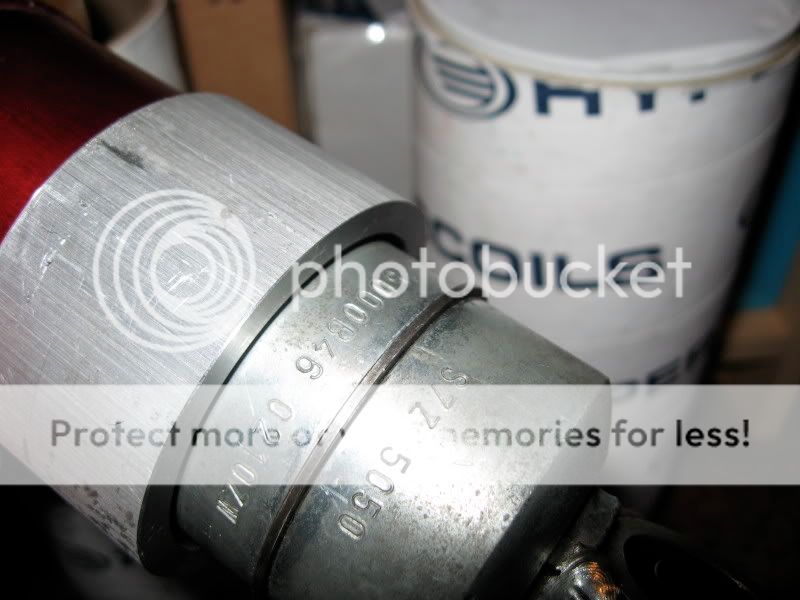
OK, back to getting commodity Bilstein shocks to work. I lathed up a circlip to ground control sleeve adapter, making sure that it slips over and around the circlip. I just want to take this opportunity to mention that I called Ground Control, and they would not sell me the sleeves and perches that are designed to work with Bilstein. I hate it when you try to give people money for products, and they refuse.
I also made a cylinder that turns the piston rod M12x1 to work with a pin mount that sticks thru the top hat bushings. Ideally, you can use a cylinder that is something like 5/8, but since my bushings were already drilled out from the 8211 project, I went with 3/4" here. I drilled a hole thru the middle to use to tighten against the hex nut.
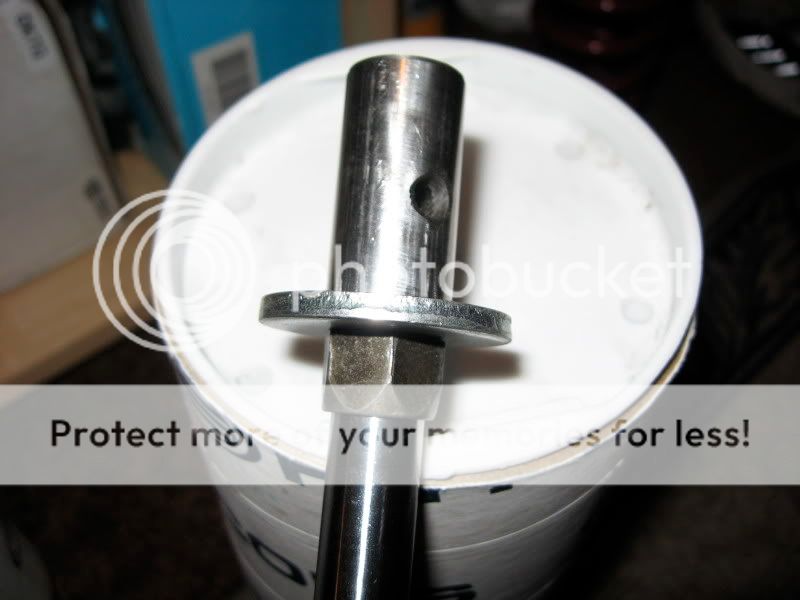
Modified by beanbag at 1:30 AM 10/31/2008
I also made a cylinder that turns the piston rod M12x1 to work with a pin mount that sticks thru the top hat bushings. Ideally, you can use a cylinder that is something like 5/8, but since my bushings were already drilled out from the 8211 project, I went with 3/4" here. I drilled a hole thru the middle to use to tighten against the hex nut.
Modified by beanbag at 1:30 AM 10/31/2008
10-31-2008, 04:02 PM
#40
Honda-Tech Member
Join Date: Oct 2003
Location: Chicago
Posts: 6,619
Likes: 0
Received 0 Likes
on
0 Posts
Did you get perches with your Bilstein's? I tried putting on Koni GC sleeves when I had my Bilstein's. The fitment around the body of the shocks was correct, and they sat fine on the raised ledge of perch.
11-05-2008, 06:41 PM
#41
Honda-Tech Member
Thread Starter
<TABLE WIDTH="90%" CELLSPACING=0 CELLPADDING=0 ALIGN=CENTER><TR><TD>Quote, originally posted by vinuneuro »</TD></TR><TR><TD CLASS="quote">Did you get perches with your Bilstein's? I tried putting on Koni GC sleeves when I had my Bilstein's. The fitment around the body of the shocks was correct, and they sat fine on the raised ledge of perch.
</TD></TR></TABLE>
No, these shocks don't come with sleeves, but you can buy them from Bilstein. What I did was find some guy that had GC sleeves that had an OD of at least 2". It turned out that this kind of sleeve isn't designed to fit over a circlip.
</TD></TR></TABLE>
No, these shocks don't come with sleeves, but you can buy them from Bilstein. What I did was find some guy that had GC sleeves that had an OD of at least 2". It turned out that this kind of sleeve isn't designed to fit over a circlip.
11-05-2008, 07:07 PM
#42
Honda-Tech Member
Thread Starter
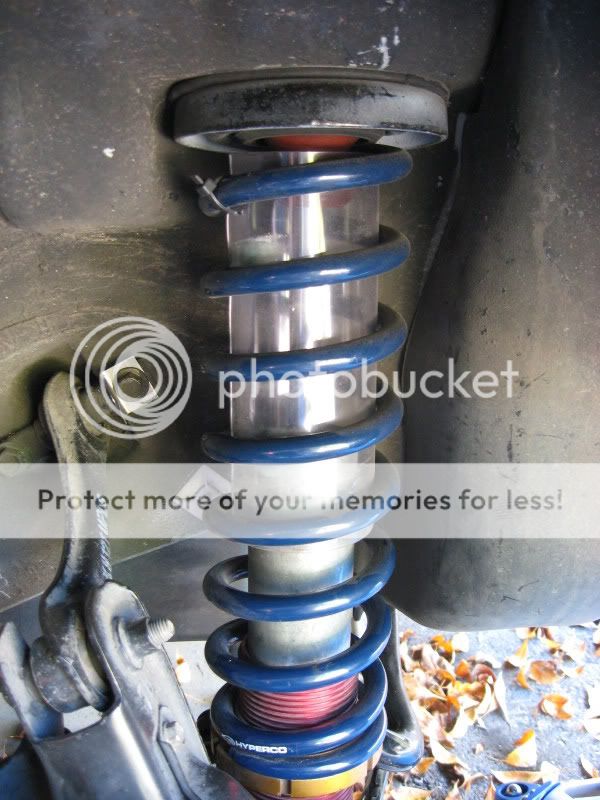
Finally got a chance to put the shocks on the car today. I valved up a pair to look like so:
I set the low speed rebound somewhere between the Koni Sport and the 8211. I would have liked to set a somewhat higher slope for the high speed rebound, but I either couldn't figure it out or didn't have the right shims for it.
The compression was set to pretty much match the current settings on the 8211's, although there is a bit more high speed slope. The curves don't match exactly, possibly due to shim variations, but oh well, close enough.
I'm rather pleased with the ride quality. Small bump absorption is fine, larger bumps/lumps/dips don't seem to throw the car around as much anymore. Swerve/roll damping seems ok too. The main thing I noticed was that the rear end of the car (where I have these shocks mounted) seem to track very well over bumps while cornering. Before when I went thru a particular bumpy corner, I did feel the rear of the car bounce around a bit, but now it seems to roll over it like nothing happened. (The front end of the car (Koni Sports) are still a little bit skittish, though).
I don't know if this is due to the reduced high speed damping, but even though the dyno plot of this shock looks very similar to the 8211, it does track over bumpy sections noticeably better.
Overall street driving comfort might be a touch worse than the 8211's (not sure yet), so maybe I can turn down the compression damping a bit and see if that helps. I've been thinking for a while now that maybe compression damping can be used to hide bad rebound damping, and if the rebound damping performance of the Bilsteins is so good, then maybe I can try turning down the compression some more for comfort, and see what the sacrifice in performance is.
I've also been thinking that (unless the calculations I did were wrong), the extra low speed damping I prefer (over the magical 65% number) might be due to damping the sway bar roll stiffness.
11-07-2008, 01:01 AM
#43
Honda-Tech Member
Thread Starter
Went to drive around some more today and was greeted by some horrible creaking noises from the shocks. I think it is from the sphericals on the Bilsteins. They are a metal-on-metal design, and even though I greased them yesterday, it looks like a few hours of driving pushed the grease out. I added some more grease, but it still creaks a bit. Ideally I would replace the bushings with Teflon coated ones, but ones in the Bilstein size are hard to find/expensive. Any good way to keep them lubricated?
In other news, I'm kind of disappointed that these Bilsteins don't come with any kind of dust seal or wiper at the top. I think these shocks are supposed to be disposable. I know that some stores sell Bilstein boots, so I could add those, but for some reason a lot of 4x4 folks claim that boots make the contamination problem worse. I went and bought some 14mm wiper seals from a motorcycle shop and plan to make an adapter to fit these on. In the meantime, I made some ghetto shock sleeves from some vinyl film.
Also, the shock shaft is a little too long (7" stroke) so the spring is loose when the shock is off the car. No big deal, but I should probably go and lathe up some cylinders to use as droop reducers.
Anyway, all this ghetto rigging is starting to annoy me a bit and maybe I should have bought some OEM fitment shocks. Oh right, but then I wouldn't have two pairs of shocks to switch back and forth.
I'm starting to think that the compression valving is a bit off. The initial impact from bumps is kind of soft, but the "rest" of the bump feels a bit harsher than before. I'm not yet sure if this means I need to turn down the low speed or high speed damping.
01-13-2009, 04:59 PM
#44
Honda-Tech Member
Join Date: Aug 2002
Location: ashEVILle, NC, USSR
Posts: 4,417
Likes: 0
Received 0 Likes
on
0 Posts
You bought race shocks, the amount of time they are used between rebuilds is minimal at best.
The 4X4 crowd should be ignored. Of course any offroad vehicle is going to get abrasive grit into everything, and a commonplace non-sealed shield (think steering rack inner tie rod accordion boots) won't do anything. The big ugly blue boots on the Bilstein HD - now you know what they are for, and with your resourcefulness you can find something like them cheaply.
There are dust seals for spherical/heims. Happy holidays: http://www.speedwaymotors.com/HEIM-S...and6,1528.html
FYI, I don't know about your era shocks but the stock ED units have a 5" stroke, I ASSume the later cars are the same but some with a longer shock body.
01-15-2009, 12:16 AM
#45
Honda-Tech Member
Thread Starter
Thanks for the suggestion of those spherical bearing seals. I may try them out if I get a chance to lathe down the mounting adapters I use. In any case, I just stuffed foam around the area, so hopefully it will hold out. I changed the grease type to one with a high Moly content, so hopefully that will last longer as well. Worst case, I have a set of Teflon lined bearings that I could press in, if I ever feel like re-making the adapters.
As for the seal on the shock, I was able to use the top cap and wiper seal off of the Bilstein shocks for "normal" street cars. So now the only difference between these shocks and the "normal" ones is the eyelet at the bottom.
Next chance I get to revalve these, I'll add droop limiters. Right now I'm trying to figure out what I want to do about the damping curves.
01-15-2009, 10:57 AM
#46
Honda-Tech Member
Join Date: Aug 2002
Location: ashEVILle, NC, USSR
Posts: 4,417
Likes: 0
Received 0 Likes
on
0 Posts
Well, keep us updated. It's not often I run up against somebody who impresses the hell out of me. Most people buy hyped shelf suspension and twist some *****, they could care less about actually knowing or doing or really performing.
02-03-2009, 01:42 AM
#47
Honda-Tech Member
Thread Starter
OK, well here's a minor update:
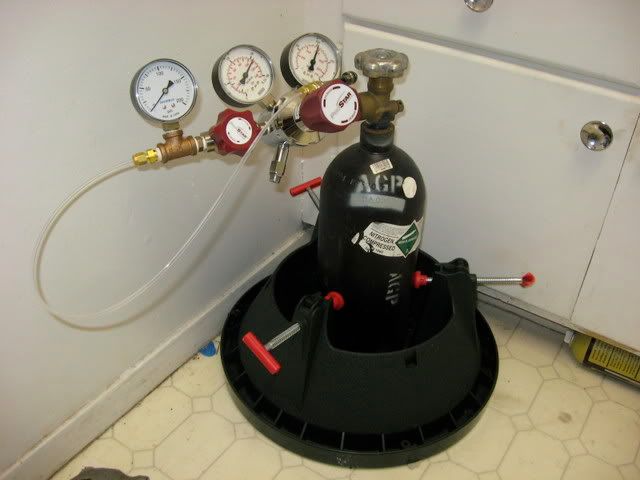
Got myself a Nitrogen charging system. It consists of a regulator I got off Craigslist, and a couple of pipe to compression fittings. I was able to rent a small tank of nitrogen from a local welding store, so this whole thing cost about $50. It's MUCH easier than using the bike pump + plastic bag + wine preserver I used earlier.
When I went to open up the shocks, there was carnage inside one of them. The dividing piston had developed grooves in it for some reason, causing air to leak into the oil side. I'm not sure how this happened, except that it was one of the first shocks I had rebuilt, and wasn't as careful about keeping a clean working environment back then. Lesson learned. Or else I could always convert to piston-less external reservoirs, and this stops becoming an issue.
I really only had two slight complaints about the current valving I had on these shocks. One was that I felt that there was a touch too much low speed rebound damping. For me, I sort of sense this as the car having a few quick, small bounces after a hit, as opposed to the bigger, slower bounce you feel after a bump if the shocks are underdamped. It's kind of hard to explain. Maybe it's the "jacked down" feeling. You just have to get a set of adjustable shocks and drive around, turning the ***** to know what I mean.
The second complaint was that after a big but slow hit, like a broad dip or lump in the road, the shocks did feel a bit underdamped, i.e. there was that overshoot afterwards. Looking at some of my shock velocity data, I saw that some of these bigger lumps in the road had shock speeds of 6-10 ips. (This is for the sprung mass motion. Unsprung mass motion can get up to 40+ ips)
Anway, what I did was take a touch off the slope of the low speed rebound, but moved the knee to higher speeds. Earlier, I had the knee at around 2 ips, and now it is closer to 3 ips. The thing I was worried about was adding more high speed rebound, and whether that would affect the wheel tracking over fast bumpy surfaces. The Koni shock has a lot more high speed rebound, and no matter what I set it at, it never tracked well over high speed bumps. Well, the Bilstein still handled it fine. So either it is because the Bilstein still has less high speed damping, or maybe it is just better than the Koni.
It's kind of hard to define the fraction of critical damping because of the progressive nature of the "nose". At very low speeds, it's near the magical 65% number, but rises above that quickly. Maybe if I keep raising the knee and lowering the low speed rebound, I'll eventually converge to the Koni curve.
The other thing I mucked around with was the compression damping. I decreased the low speed compression slope a touch also, while keeping the high speed portion the same, which also moves the knee out to higher speeds. In general, I find the slope of the low speed compression to affect how hard the edge of bumps feels, so the lower the slope, the softer the bump. I also know that if you set the high speed compression damping way too low, bumps get this weird rubbery feel, and the car actually seems to shake a bit more after hitting a bump. (I dunno, maybe at this point you also need more rebound damping to "catch" the re-extension?)
In any case, one of the things I learned while driving around with the double adjustable 8211's, is that adding more compression damping seems to reduce the tendency of the car to get "launched" from bumps and dips, at the expense of ride harshness. So the goal now is to try to keep the ride harshness down to acceptable levels, while reducing the susceptibility of getting thrown around...
So what about swerve response and turn-in? I really don't care any more. My new philospohy is to set the damping for best road holding and stability, and the turn-in response will take care of itself. Obviously, this doesn't apply to autocross people, who use dampers to make up for spring rate. My damping ideas might not even apply to the road race folks, who drive on groomed surfaces.
Last edited by beanbag; 02-03-2009 at 02:09 AM.
03-03-2009, 04:22 AM
#48
Honda-Tech Member
Join Date: Nov 2007
Location: Greenville, SC
Posts: 304
Likes: 0
Received 0 Likes
on
0 Posts
How high of a spring rate do you think I could effectively run in the front and rear using stock valved bilsteins for an ep3 civic?
By the way, thank you for sharing your knowledge/research on the forums.
By the way, thank you for sharing your knowledge/research on the forums.
09-13-2009, 08:53 AM
#50

Join Date: Apr 2009
Posts: 9
Likes: 0
Received 0 Likes
on
0 Posts
Request for ideas:
I'm looking for a way to replace the dividing piston with some kind of a bladder mechanism, and hopefully that should cut down on some of the friction. As far as I know, nitrile rubber is oil resistant. I couldn't find anything like a small nitrile bladder with a schrader, but was considering something like cutting a hole in the dividing piston, and attaching some kind of a nitrile pouch, like the finger off of a glove, and have that expand and contract as the shaft moves, instead of the dividing piston sliding. I also know they sell nitrile sheet, but I don't know of a good way to wrap and seal that up.
I'm looking for a way to replace the dividing piston with some kind of a bladder mechanism, and hopefully that should cut down on some of the friction. As far as I know, nitrile rubber is oil resistant. I couldn't find anything like a small nitrile bladder with a schrader, but was considering something like cutting a hole in the dividing piston, and attaching some kind of a nitrile pouch, like the finger off of a glove, and have that expand and contract as the shaft moves, instead of the dividing piston sliding. I also know they sell nitrile sheet, but I don't know of a good way to wrap and seal that up.
http://www.afabcorp.com/AFCO_Dynatec...e=ct_M2_double
BTW, awesome post man... found this thread from a google search doing research on properly valving shocks.
David