
ABS Code 1 - The fix with pics
 09-03-2010, 10:28 AM
#1
Honda-Tech Member
Thread Starter
Code 1 - ABS pump motor over-run - HOW TO FIX w/ pics
Tools Required:
10mm socket, socket extension
9 mm closed end wrench
10mm flare nut wrench
FINE emory cloth
screw driver
Dot 3 or 4 Brake Fluid
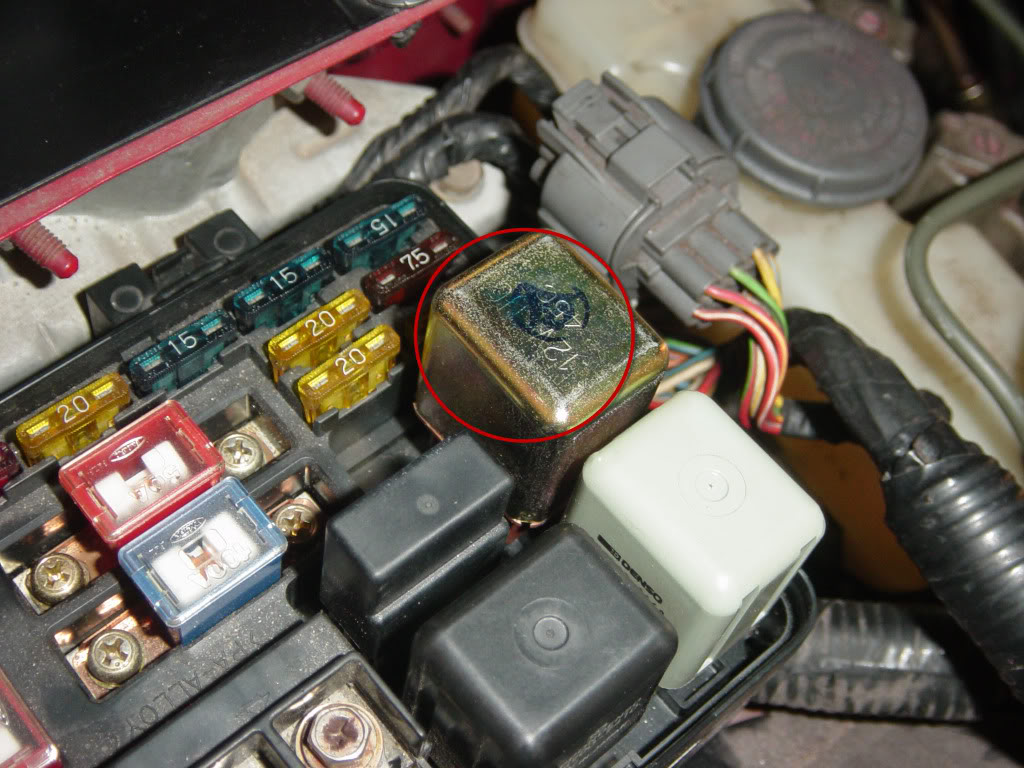
First thing to do is test your ABS pump while its still in the car. To do this you need to open the under hood fuse box and remove the ABS relay.
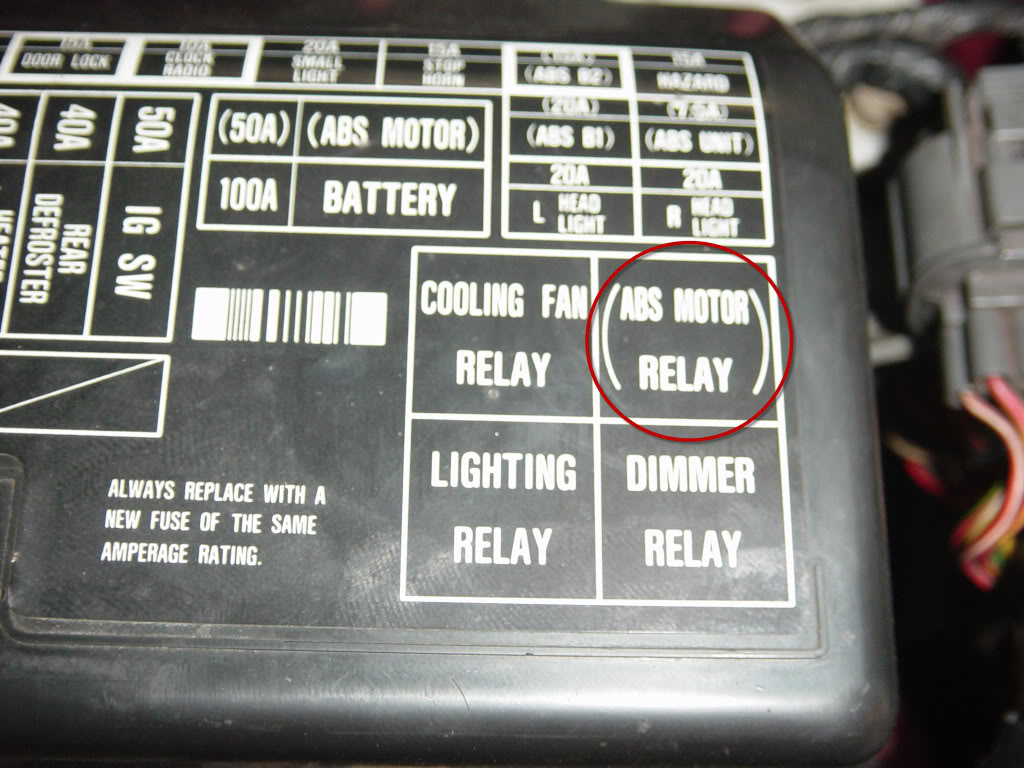
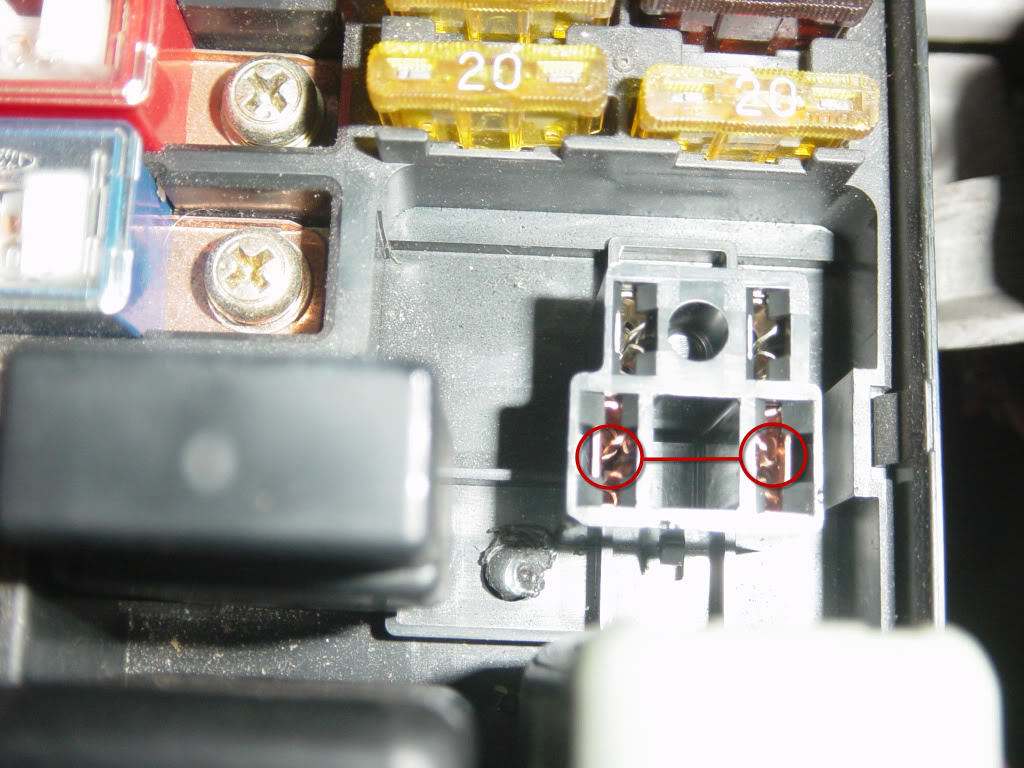
Jump the bottom 2 connectors in the fuse panel with a small length of wire. Only run it for no more then 10 seconds or you could burn up the motor. This will turn on the ABS pump. Listen closely to the noise it makes, if you hear the motor running with a small humming sound and its not very loud then the outline fix will get your back in business. The problem is that the mechanism inside the ABS accumulator is not pumping when the motor runs.
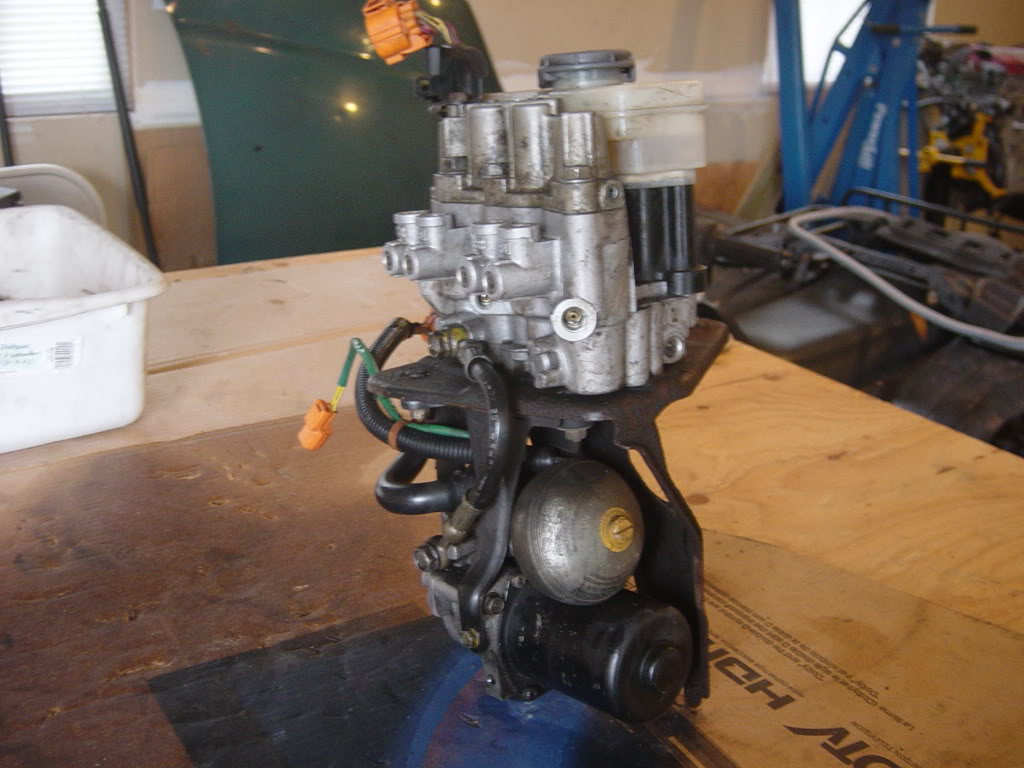
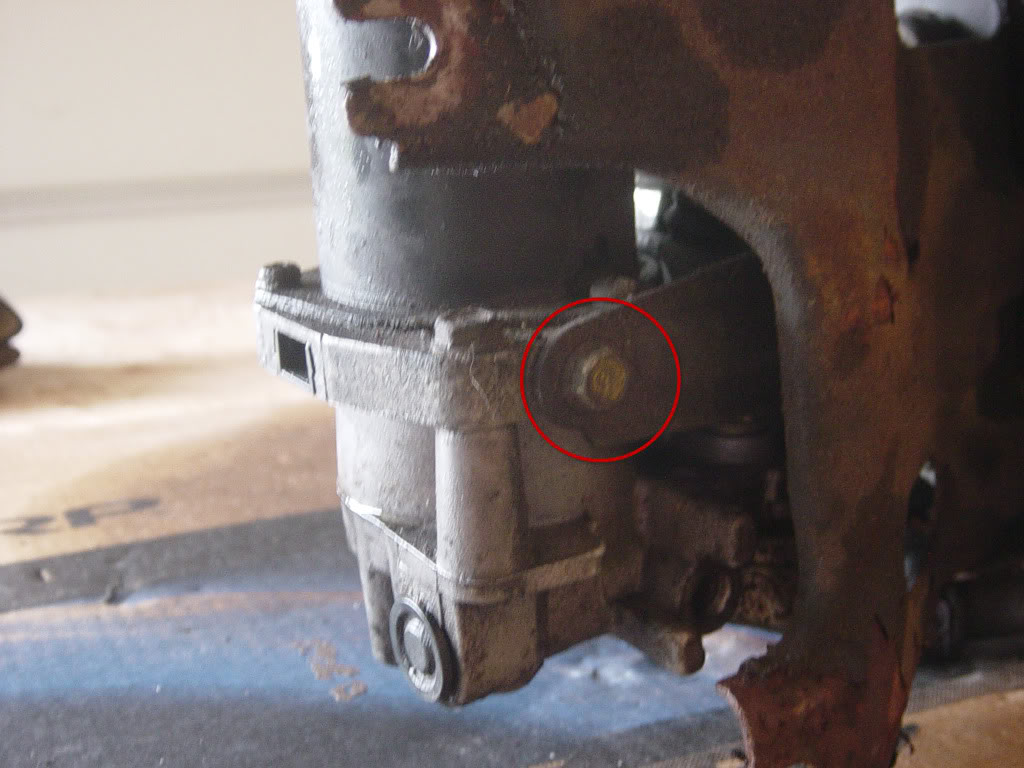
Start by removing the ABS pump from the car. Disconnect all 6 hard lines using a 10mm flare nut wrench. Then you will need to remove the top mounting bolt, and then loosen the 2 mounting bolts on the bottom. You wont need to remove the bottom bolts, the bracket will slide right out.
Remove the 2 bolts holding the motor in place
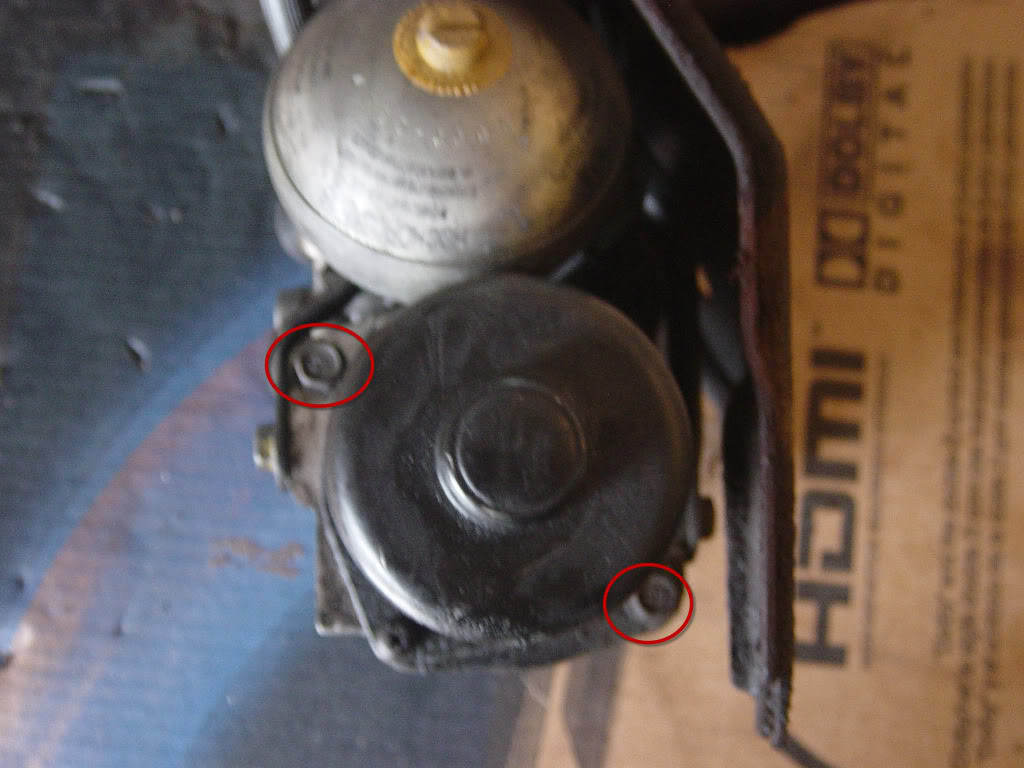
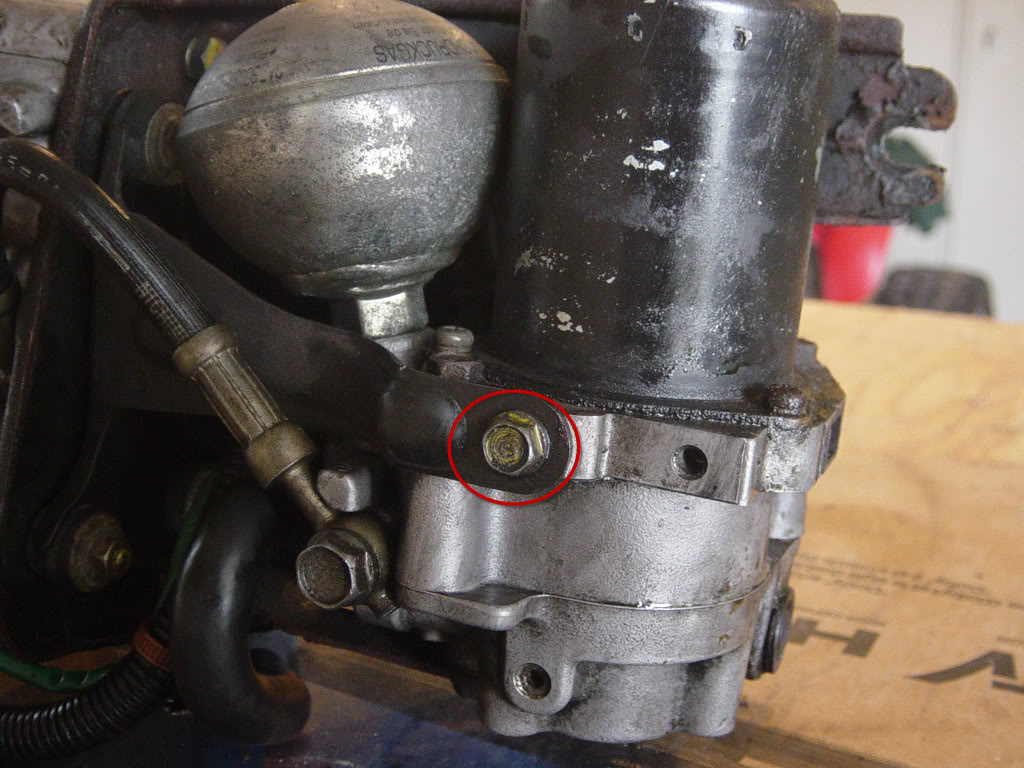
Then remove the 2 bolts securing it to the bracket
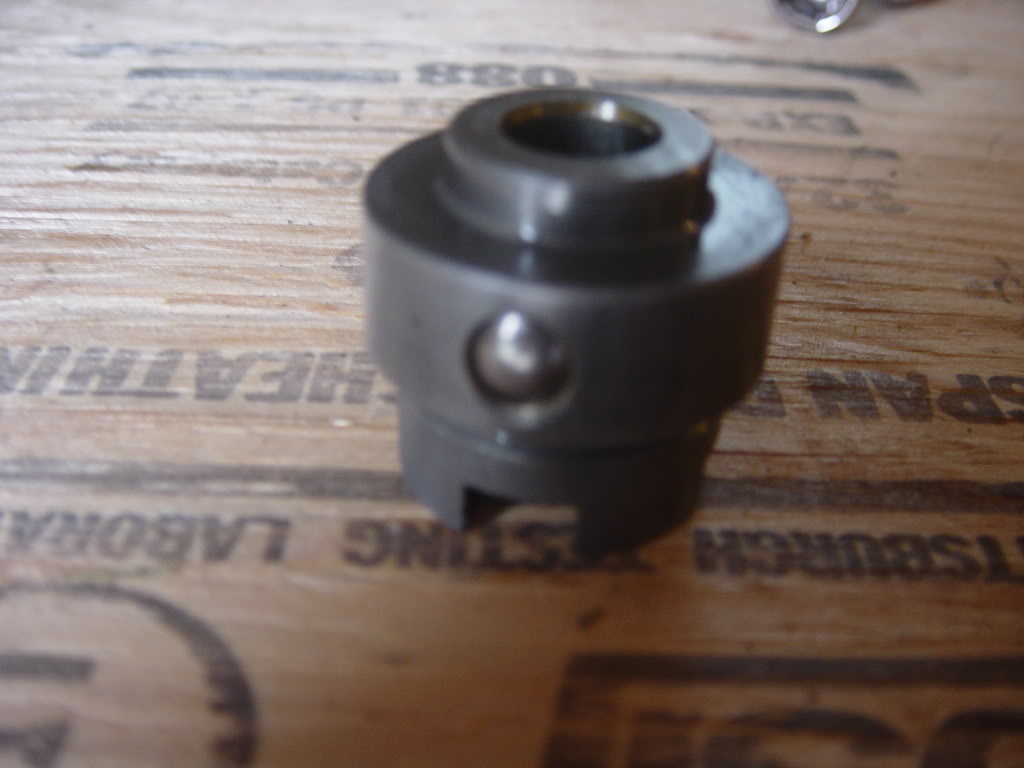
Pull the motor off the assembly, you may need to give it a few whacks with a hammer to get it off.
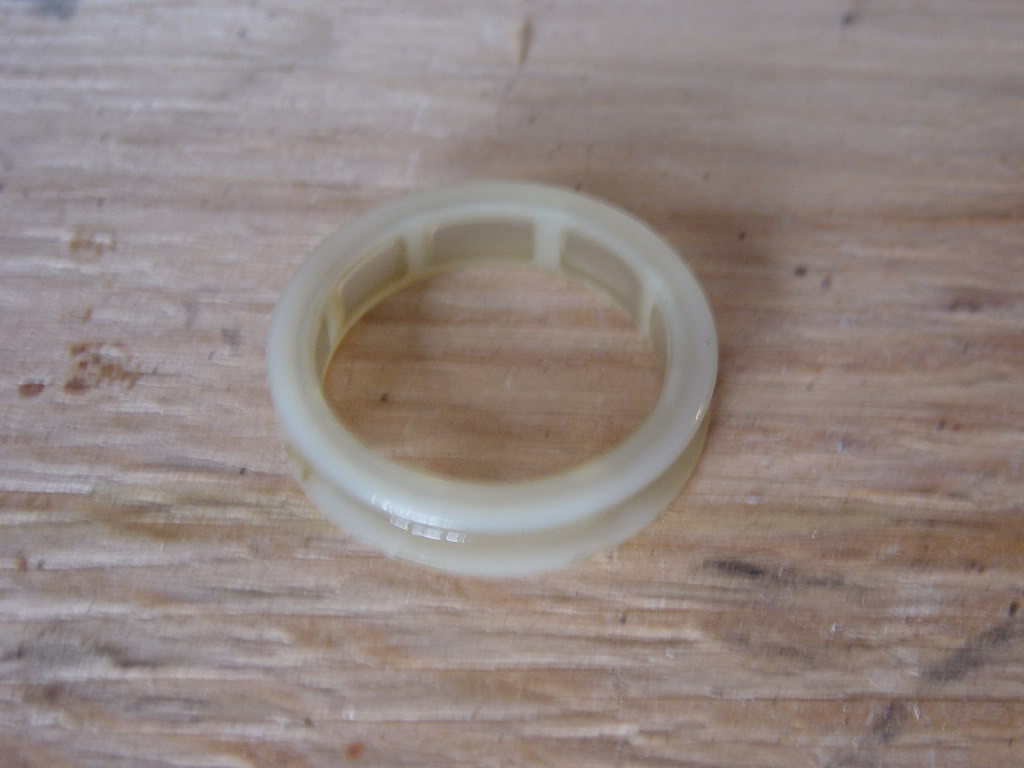
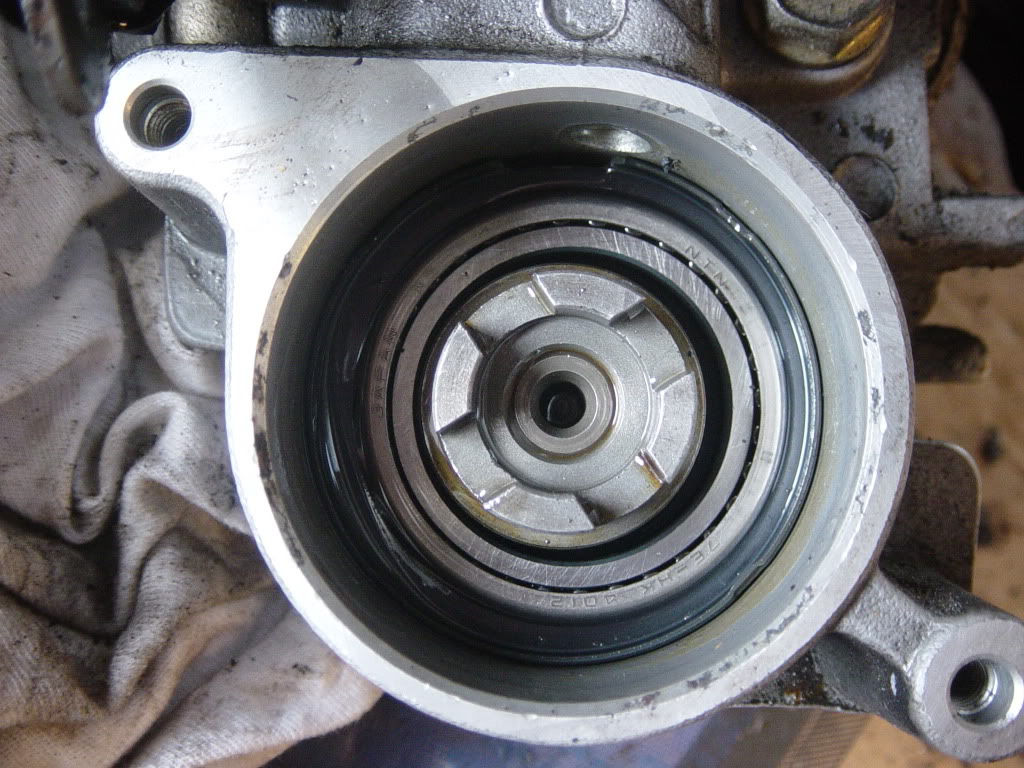
With the motor off, start by removing the plastic ring filter.
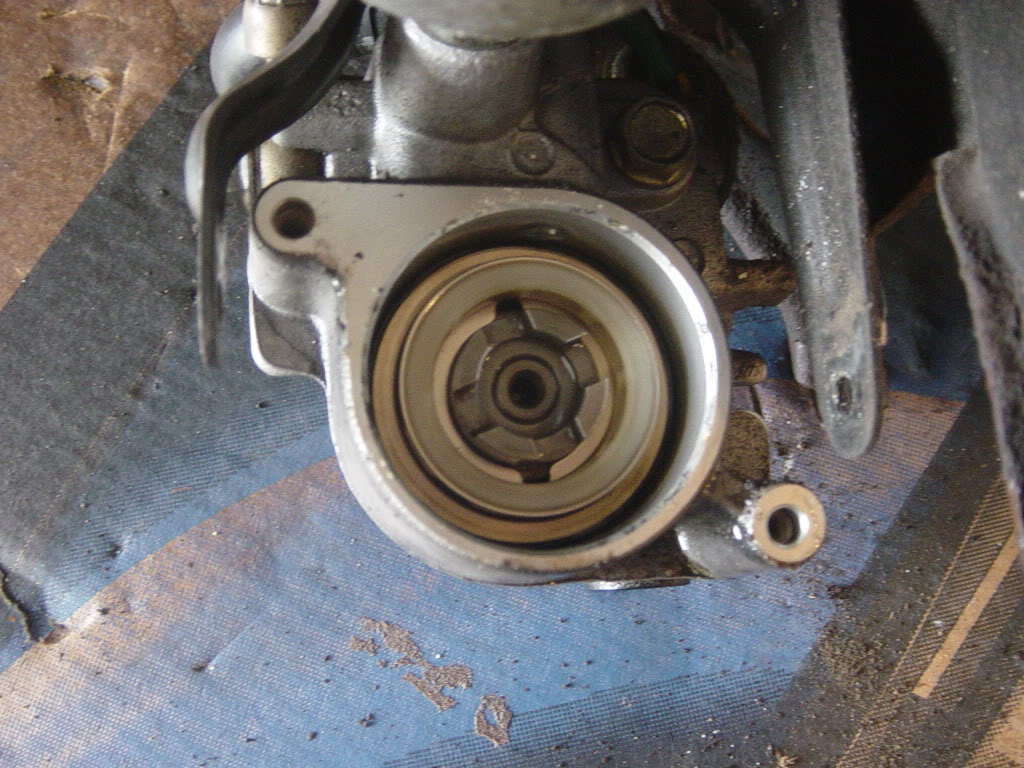
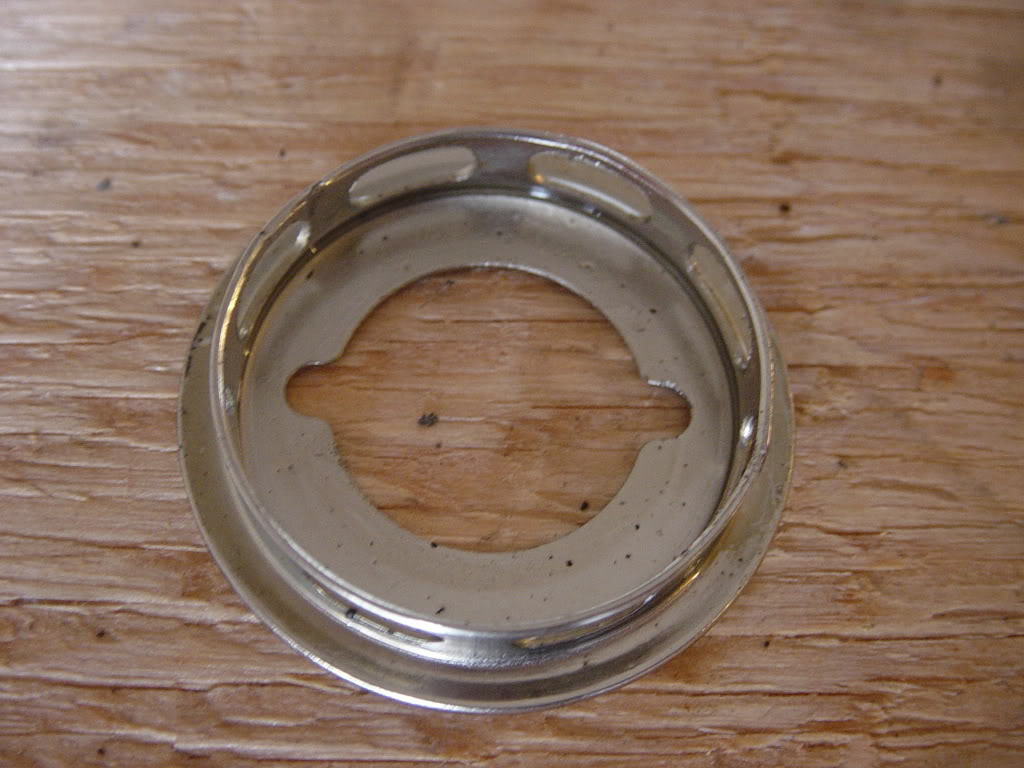
Now you need to pull the gold ring out, this can be tricky. You may have to pry it out from the edges. Be careful not to bend it up, it may take some time to get it out.
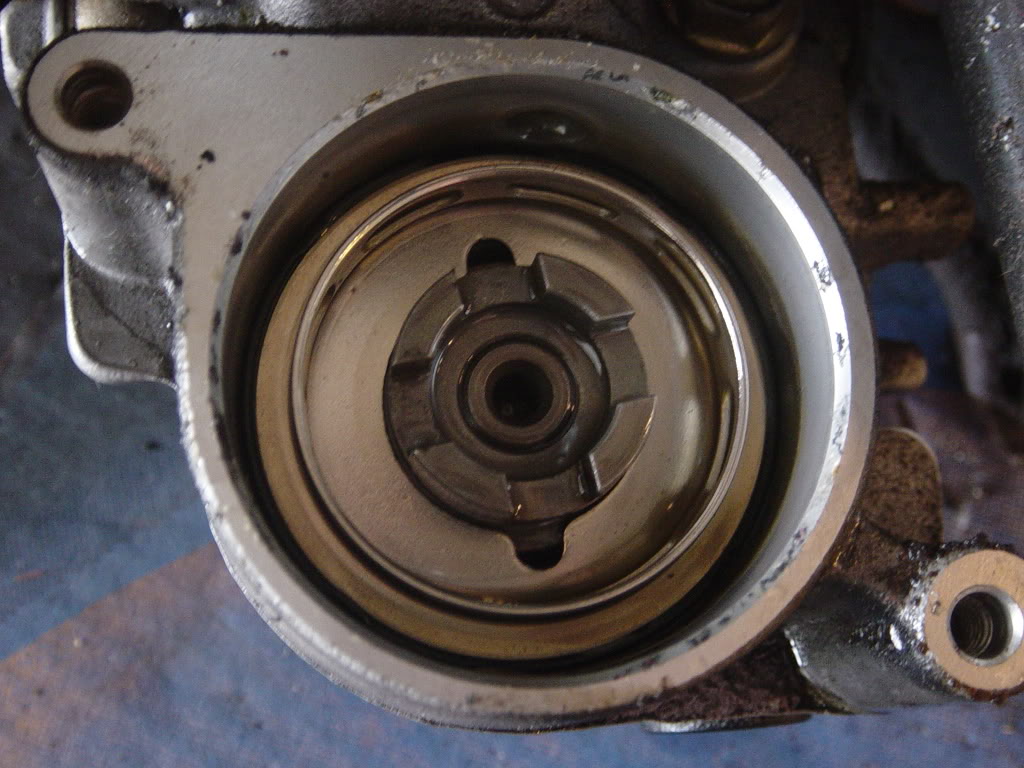
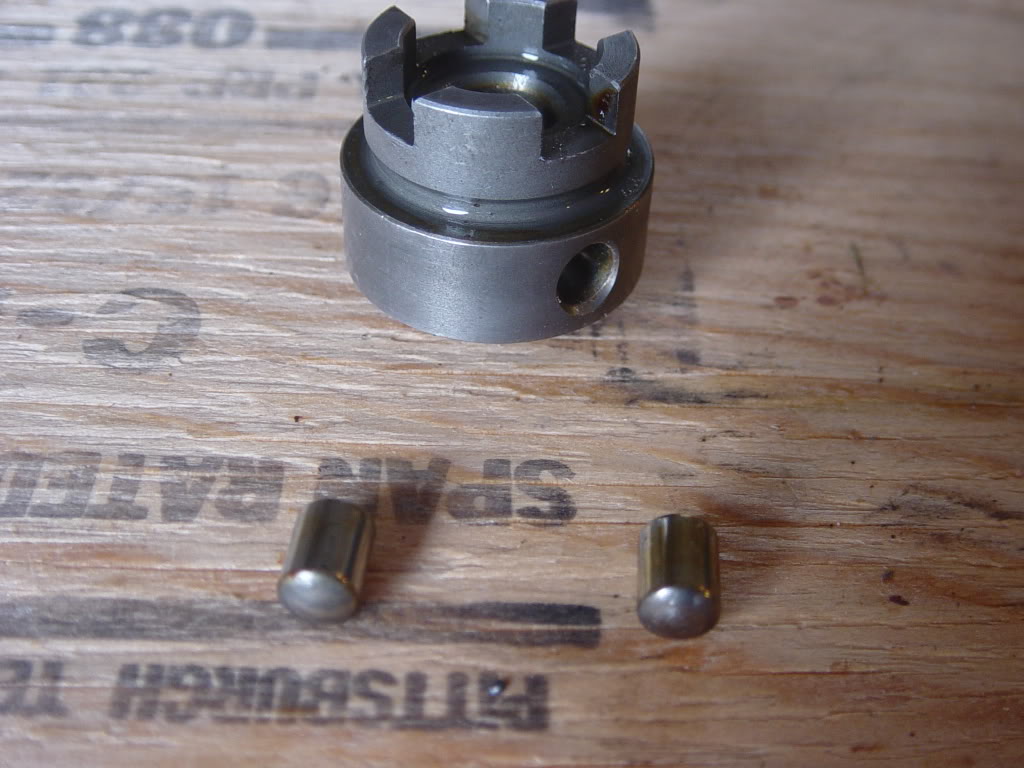
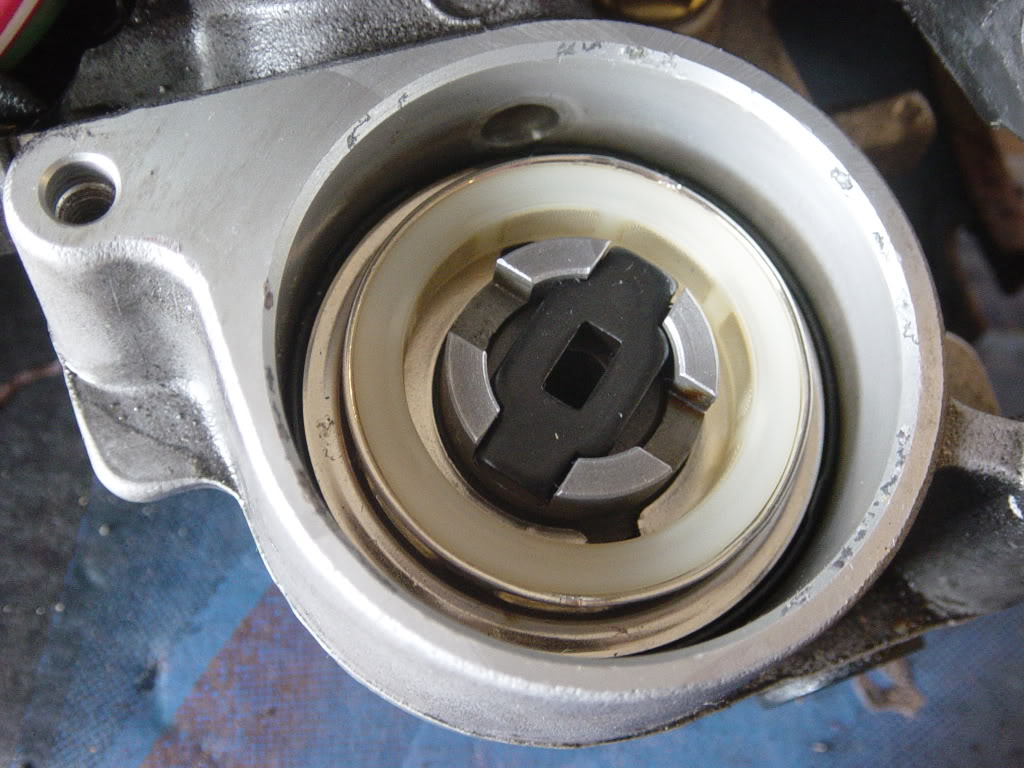
Now you can pull out the pump mechanism
With the mechanism out this is what you will need to fix. There are 2 metal sliders, one on each side. The problem is they are stuck inside. For the pump to work they need to be able to sling out when the motor spins this piece. You need to push these metal things out. You can use on of the bolts from the motor and set it on top and tap it with a hammer and it will go inside and fall out the middle.

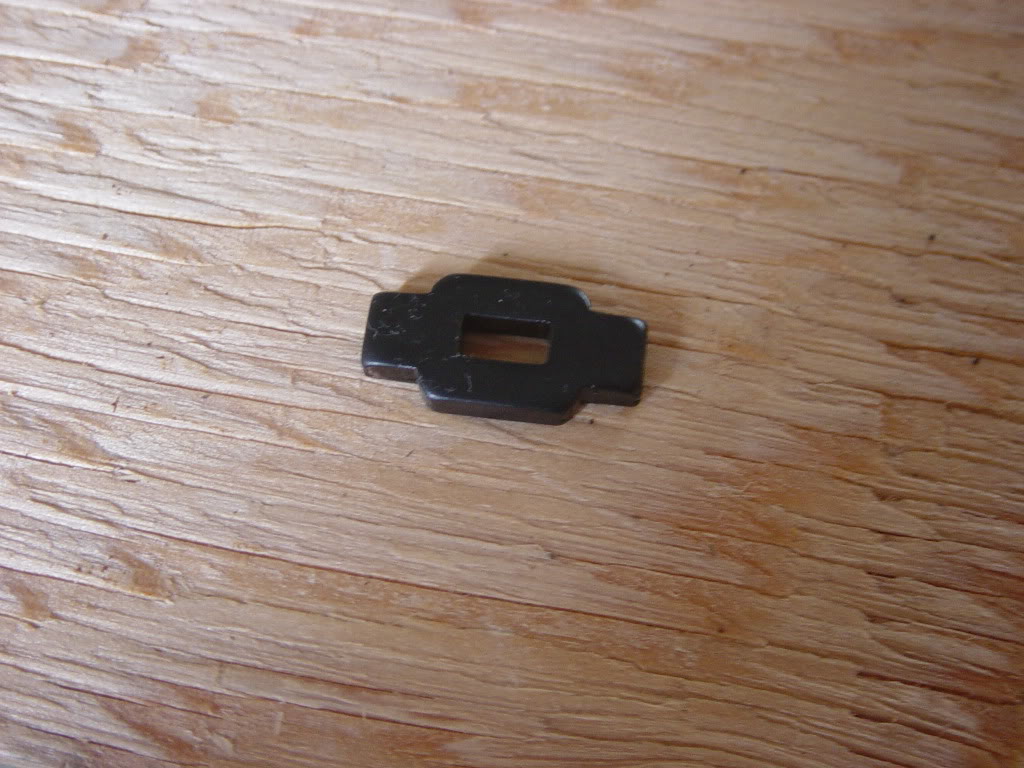
This is what they look like once removed.
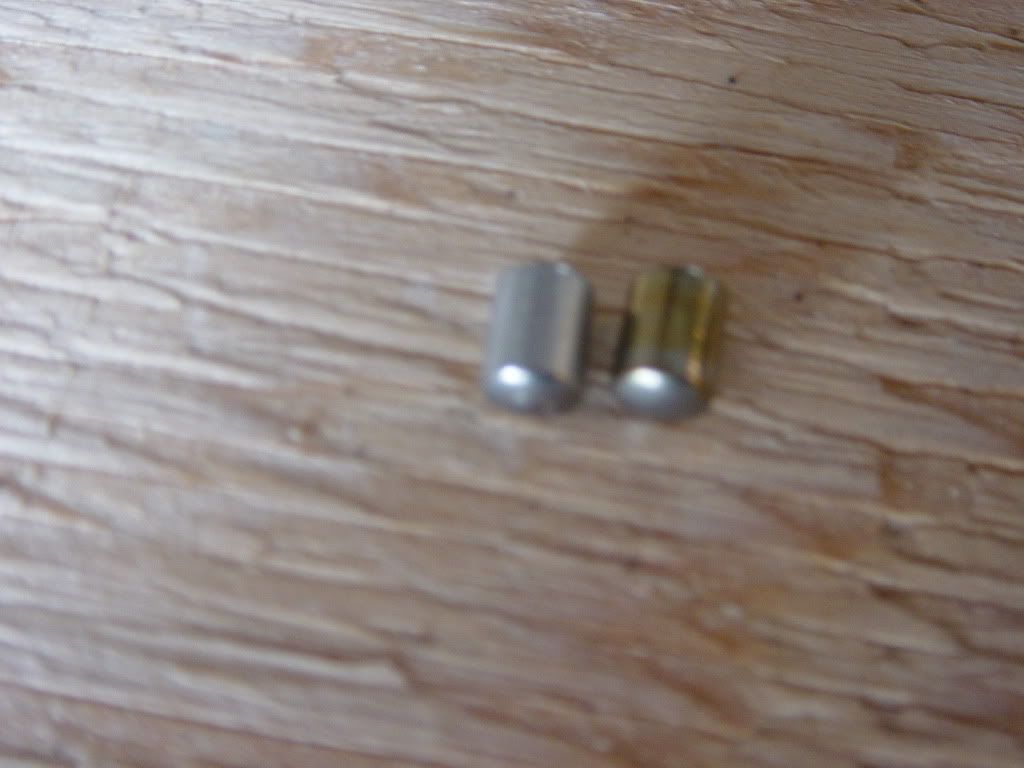
Now to clean this up and get them sliding you will need some FINE emory cloth. use the cloth to clean up the small metal sliders.
Here is one cleaned compared to the before.
Now cut a smal length of the emory cloth and stick it through the metal piece, you can then use a screw driver to use behind the paper. Move the piece back and forth and all around to clean it up real good. Dont stay in one spot too long, move it all around.

After you clean them all up they should slide in and out of this thing with no problem. If you still have resistance keep cleaning them and test again. Reinstall them into the metal piece and install it back into the pump.
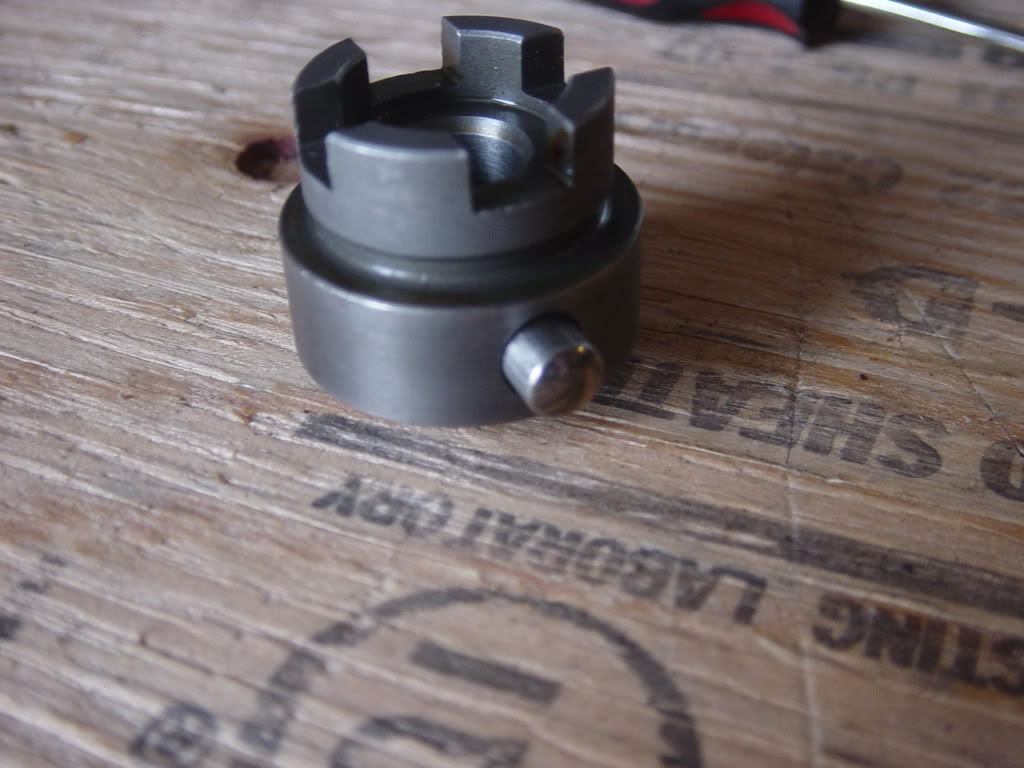
Dont forget to install this piece before installing the motor.
Reinstall the motor and tighten all the bolts and your done with the repair.
The next part is priming the pump and removing air. Stand the unit straight up. Fill it with ABS fluid. Now locate the bleeder screw.
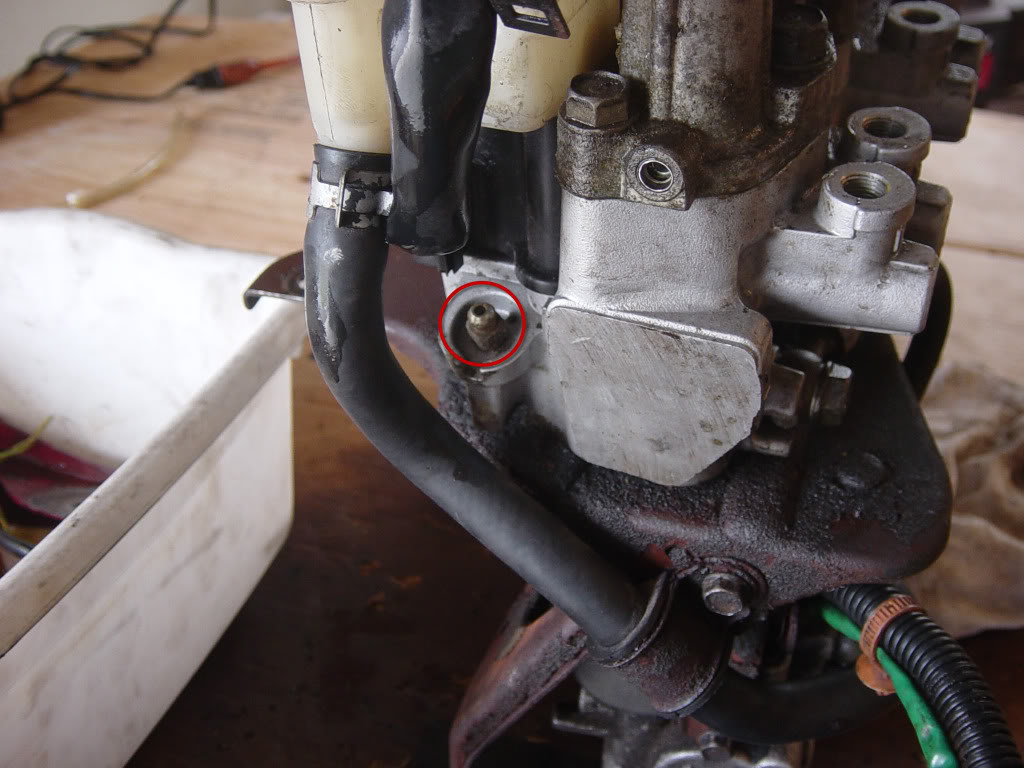
I used a 9mm wrench to open and close the bleeder. You will also need a 12v battery and a small length of tubing with a container to catch the fluid. Get yourself setup like below.
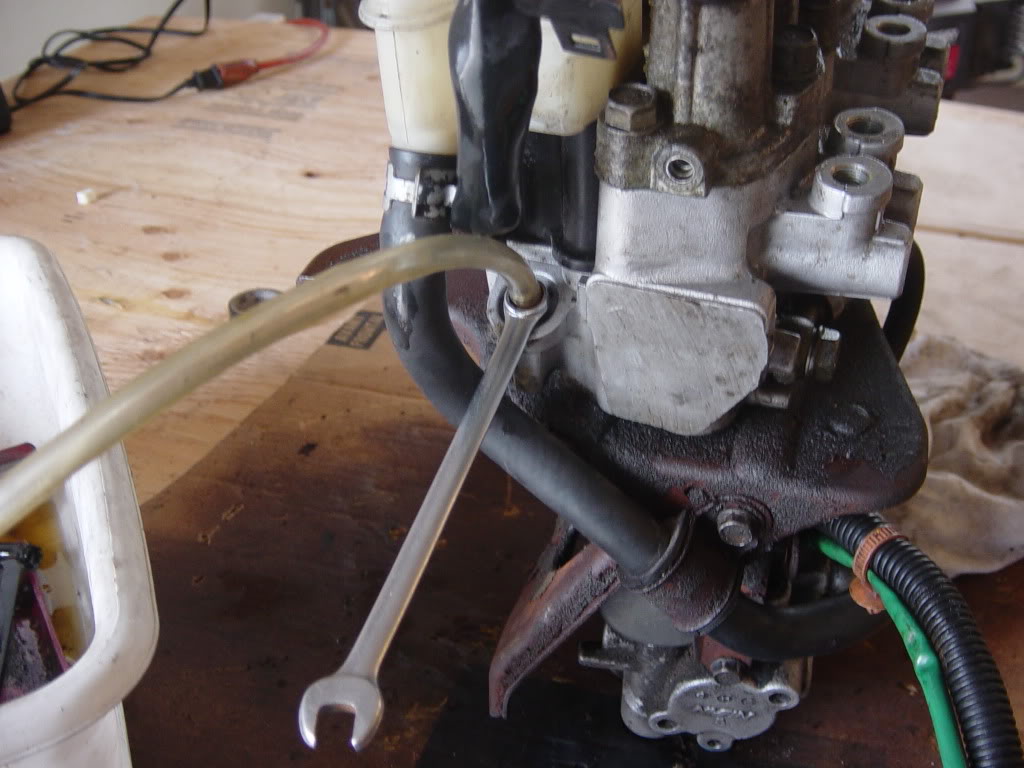
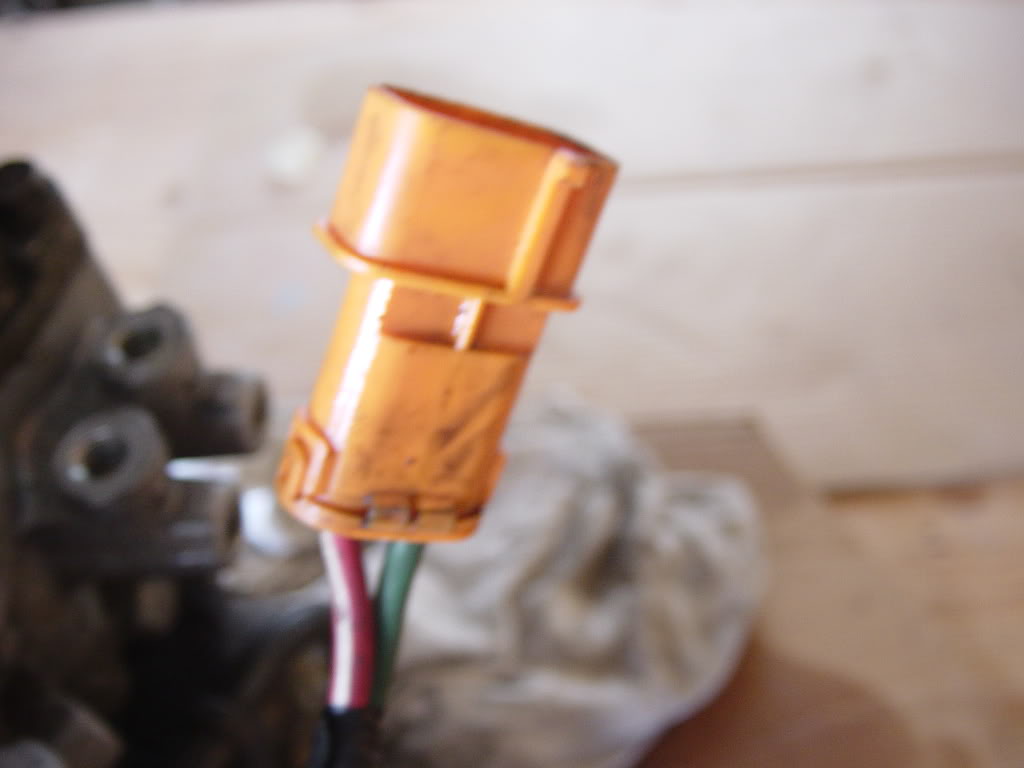
Take a 12v car battery and jump the 2 wires in the large connector. Red is positive and green is negative. Run the pump for 6-8 seconds to build pressure. You should now also notice the pump is very loud and raspy, this means its working now.
After you have built up some pressure, turn the bleeder to release the pressure and remove the air bubbles. Repeat this 4-5 times or until no more air comes out of the bleeder. Now you can reinstall the unit in the car. Once installed, bleed all 4 brakes and then start the car. Take it for a ride and you should hear the pump kick on once you start moving and using the brakes for the first time. After that you should be all set, no more ABS light. Enjoy.
mrbleegs
Tools Required:
10mm socket, socket extension
9 mm closed end wrench
10mm flare nut wrench
FINE emory cloth
screw driver
Dot 3 or 4 Brake Fluid
First thing to do is test your ABS pump while its still in the car. To do this you need to open the under hood fuse box and remove the ABS relay.
Jump the bottom 2 connectors in the fuse panel with a small length of wire. Only run it for no more then 10 seconds or you could burn up the motor. This will turn on the ABS pump. Listen closely to the noise it makes, if you hear the motor running with a small humming sound and its not very loud then the outline fix will get your back in business. The problem is that the mechanism inside the ABS accumulator is not pumping when the motor runs.
Start by removing the ABS pump from the car. Disconnect all 6 hard lines using a 10mm flare nut wrench. Then you will need to remove the top mounting bolt, and then loosen the 2 mounting bolts on the bottom. You wont need to remove the bottom bolts, the bracket will slide right out.
Remove the 2 bolts holding the motor in place
Then remove the 2 bolts securing it to the bracket
Pull the motor off the assembly, you may need to give it a few whacks with a hammer to get it off.
With the motor off, start by removing the plastic ring filter.
Now you need to pull the gold ring out, this can be tricky. You may have to pry it out from the edges. Be careful not to bend it up, it may take some time to get it out.
Now you can pull out the pump mechanism
With the mechanism out this is what you will need to fix. There are 2 metal sliders, one on each side. The problem is they are stuck inside. For the pump to work they need to be able to sling out when the motor spins this piece. You need to push these metal things out. You can use on of the bolts from the motor and set it on top and tap it with a hammer and it will go inside and fall out the middle.
This is what they look like once removed.
Now to clean this up and get them sliding you will need some FINE emory cloth. use the cloth to clean up the small metal sliders.
Here is one cleaned compared to the before.
Now cut a smal length of the emory cloth and stick it through the metal piece, you can then use a screw driver to use behind the paper. Move the piece back and forth and all around to clean it up real good. Dont stay in one spot too long, move it all around.
After you clean them all up they should slide in and out of this thing with no problem. If you still have resistance keep cleaning them and test again. Reinstall them into the metal piece and install it back into the pump.
Dont forget to install this piece before installing the motor.
Reinstall the motor and tighten all the bolts and your done with the repair.
The next part is priming the pump and removing air. Stand the unit straight up. Fill it with ABS fluid. Now locate the bleeder screw.
I used a 9mm wrench to open and close the bleeder. You will also need a 12v battery and a small length of tubing with a container to catch the fluid. Get yourself setup like below.
Take a 12v car battery and jump the 2 wires in the large connector. Red is positive and green is negative. Run the pump for 6-8 seconds to build pressure. You should now also notice the pump is very loud and raspy, this means its working now.
After you have built up some pressure, turn the bleeder to release the pressure and remove the air bubbles. Repeat this 4-5 times or until no more air comes out of the bleeder. Now you can reinstall the unit in the car. Once installed, bleed all 4 brakes and then start the car. Take it for a ride and you should hear the pump kick on once you start moving and using the brakes for the first time. After that you should be all set, no more ABS light. Enjoy.
mrbleegs
Last edited by mrbleegs; 09-05-2010 at 05:47 PM.

The following users liked this post:
09-13-2010, 04:02 PM
#6
Honda-Tech Member
Join Date: Nov 2007
Location: florida
Posts: 242
Likes: 0
Received 0 Likes
on
0 Posts
my abs light is on too but i think it it might be the wheel speed sensor cuz one day i went to the track and my car started wheel hopping of the line and since then the abs light is being on but i dont know if it is the right or left side
09-18-2010, 05:41 PM
#7
Honda-Tech Member
Join Date: Oct 2009
Location: Seattle
Posts: 54
Likes: 0
Received 0 Likes
on
0 Posts
i just want to give everyone a heads up, great tut but you make it look way too easy. to get to the 2nd bottom bolt you have to jack up the car and get it from underneath.
wiggling the whole thing out is a pain in the *** BE CAREFUL not to snap or pinch any brake lines! you will have to bend them out of the way.
you must use a flare nut wrench to break the lines loose, if you use a regular old open ended wrench youll strip them in no time.
i whent to the hardware store and asked for fine emery cloth and it turned out to basicsally be like 500 grit sand paper if not less. i tired using it but it seemed to be scratching the medal up pretty good so instead i grabbed a piece of 1000grit sand paper and polished up the pegs then i wrapped a strip of the sandpaper around a drill bit and taped it down, inserted the bit with paper into the holes in the large metal piece and worked it around for a while till the pegs slid smoothly through the holes. i cleaned it all with brake cleaner and reassembled.
havent bled the brakes yet so im not sure if it fixed the problem
Trending Topics
09-19-2010, 02:49 AM
#8
Honda-Tech Member
Join Date: Aug 2010
Location: UK
Posts: 15
Likes: 0
Received 0 Likes
on
0 Posts
Thanks. Great tutorial.
My ABS and 4WS lights sometimes come on when in heavy traffic and stay lit for a couple of hours each even though everything is working fine.
Could I go directly to the bleeding stage for both or does it indicate another problem?
My ABS and 4WS lights sometimes come on when in heavy traffic and stay lit for a couple of hours each even though everything is working fine.
Could I go directly to the bleeding stage for both or does it indicate another problem?
09-19-2010, 07:49 AM
#9
Honda-Tech Member
Ha, you don't really mention that getting that beast out is hard as hell. I did a non-ABS brake conversion a few years back and I remember a lot of choice words trying to get it out. Good write up!
09-19-2010, 12:14 PM
#10
Honda-Tech Member
Join Date: Oct 2009
Location: Seattle
Posts: 54
Likes: 0
Received 0 Likes
on
0 Posts
Yeah exactly, its a huge pain in the *** and i didnt have anyone helping me, those brake lines are in the way the whole time getting caught up on everything while you're trying to lift that heavy thing out.
anyways, i bled my brakes and tested my abs...
it works perfectly! if only i had done this sooner i probably wouldnt be driving around with my front bumper zip tied on.... :/
anyways, i bled my brakes and tested my abs...
it works perfectly! if only i had done this sooner i probably wouldnt be driving around with my front bumper zip tied on.... :/
09-19-2010, 02:15 PM
#11
Honda-Tech Member
Thread Starter
Sorry about that, i did make it look too easy. The pump is heavy and hard to get out with the lines in the way, but you just need to bend them a bit. I was able to get all the bolts from the engine bay. The 2nd bottom bolt is burried, you need to remove the intake tube and then move the evap canister out of the way to make clearance for tools down there to get it.
09-19-2010, 04:09 PM
#12
Honda-Tech Member

Join Date: Oct 2008
Location: Jacksonville Beach, Florida, United States
Posts: 1,562
Likes: 0
Received 0 Likes
on
0 Posts
Is this awesome write up faq'd yet? Gonna try this once I get some free time from other stuff that comes first like tune and painting.
09-22-2010, 12:14 AM
#13
Honda-Tech Member
Join Date: Oct 2009
Location: Seattle
Posts: 54
Likes: 0
Received 0 Likes
on
0 Posts
i suggest everyone do this right away, i slid off the road on the night of easter and messed up my front end because my tires locked up. ive got at least $1,000 worth of body damage that needs to be fixed now. this fix only costs like $1.50 and a few hours of your time. it really is worth every second you spend on it. thank you so much for the write up and i hope you guys take advantage of this. its safer for you, your car, and everyone else on the road. esp. with winter quickly approaching
10-24-2011, 05:04 PM
#16
Honda-Tech Member
Join Date: Dec 2004
Location: Bowser, BC, Canada
Posts: 539
Likes: 0
Received 0 Likes
on
0 Posts
just wanted to say thanks for this write-up, I have mine apart right now, and found the same thing - those little sliders stuck in place, I've cleaned them up and got them sliding, but haven't fully reassembled yet, and might tend a bit to the paint on the bracket for the whole abs assembly before I do reassemble and throw it back in the car... But I think overall this will do the trick.
thanks again for the great write up.
thanks again for the great write up.
06-14-2012, 09:54 PM
#17
Honda-Tech Member

Join Date: Feb 2009
Posts: 6
Likes: 0
Received 0 Likes
on
0 Posts
ok, tricky question, what if I cannot unblock the air bleeder on my wheels??? they haven't been opened for a very long time... i'm afraid not to break the air bleeders. please help
p.s. i have been looking for this tipe of tutorial for 1 month now!!! it should have been posted on google earth or wiki by now!!! thank you so much!!
p.s. i have been looking for this tipe of tutorial for 1 month now!!! it should have been posted on google earth or wiki by now!!! thank you so much!!
06-28-2012, 08:09 PM
#19
Trial User

Join Date: Jun 2012
Location: Montara, CA.
Posts: 1
Likes: 0
Received 0 Likes
on
0 Posts
I am very impressed at the accuracy of this DIY. I was able to repair my ABS in a day and I would like to thank the author for sharing this information.
06-28-2012, 09:07 PM
#21
Honda-Tech Member
Join Date: Feb 2009
Posts: 6
Likes: 0
Received 0 Likes
on
0 Posts
hi, what if I cannot unblock the air bleeder on my wheels??? they haven't been opened for a very long time... i'm afraid not to break the air bleeders. please help 10x
10-20-2012, 03:27 PM
#22
Trial User

Join Date: Oct 2012
Posts: 1
Likes: 0
Received 0 Likes
on
0 Posts
Hey i Tried bleeding my abs system but i have no fluid coming out, the reservoir was completely dry. Ive addded fluid now but still nothing..I checked the code its pump motor over run but what if i dont hear the motor running or no fluid is going into the system? is the motor completely shot? or will following these instructions fix my problem?
 02-16-2013, 02:19 PM
#24
Honda-Tech Member

Join Date: Feb 2013
Posts: 12
Likes: 0
Received 0 Likes
on
0 Posts
If anybody is still following this thread, I need some help. I have a 1996 Accord V6. I have a code 1 on my ABS. ABS light is on. The ABS motor does run when the car is started or jumpered, but nothing comes out of the ABS bleeder valve. I followed the above instructions and put the ABS module back into the car. Now I can't seem to get the air bled out of this system. I've bled all four wheels and the pedal gets hard, but as soon as you start the car, the pedal becomes soft. I mean, it goes all the way to the floor. I've bled every wheel twice and am not getting any air out at the brake cylinders. I've checked all around the ABS module and don't see any signs of leakage or hear any strange noises. Any ideas?
