
The DEFINITIVE 92-95 Civic Power Folding HEATED Mirrors / Locks / Windows DIY Guide
 03-22-2009, 01:55 AM
#1
[DIY] The DEFINITIVE 92-95 Civic Power Folding HEATED Mirrors / Power Locks / Power Windows Install DIY Guide
Preamble
This topic has been covered at various times by numerous other posters, but with information scattered all over the web, I felt the community could be well served by the incorporation of this information into one comprehensive document. This write-up focuses on upgrades I performed to my 1994 Canadian Domestic Market (CDM) CX model Hatchback using parts largely from Sedans, Coupes and some Japanese Domestic Market (JDM) vehicles, but the guide can be adapted to retrofit a CDM/USDM Coupe or even a Sedan. Additionally, I have yet to find any information detailing the correct wiring of the JDM OEM Honda Access Optional "Heated" aspect of 92-95 Civic Power Folding Heated Mirrors, and this DIY guide covers that topic.
Introduction
No Canadian Domestic Market (CDM) nor US Domestic Market (USDM) 1992-1995 Honda Civic 3dr Hatchback models (CX, VX, DX & Si) had Power Locks (PL) or Power Windows (PW) as standard or even optional equipment. This includes the upper-end Si model, which had almost every other option imaginable, but still came with manual door locks and manual windows. The Si did have Power Mirrors (PM), but other models did not. The 2dr Coupe line of Civics had a similarly configured vanilla-flavoured all-manual DX model (though a 'Special' version of the CDM DX Coupe did add factory power mirrors), but also an all-power equipped USDM EX model, with Power Locks, Power Windows, and Power Mirrors (and door-panel mounted Tweeters 1994-1995). The Si Coupe, only available in the CDM, came like its Hatchback brother equipped with Power Mirrors (though + Tweeters), but no other power options. The Coupe body type is notable because the door panels on Coupes are a DIRECT FIT replacement for the door panel on your Hatchback. Therefore, from an EX model, this gives you access to a door panel that hosts the Power Lock switch and Power Window combination switch/door cup (and Tweeters).
The North American experience differs significantly from European Domestic Market (EDM) and JDM models of Civic Hatchbacks. These markets had numerous 3dr Hatchback models and, likely due to greater competitiveness between car manufacturers and more fickle car owners (as well as their appreciation that a compact car can also have more luxurious amenities), many more models of Civics came with Power Windows, Power Locks and Power Mirrors, or a combination of the three. Coupes are typically a less-popular body configuration overseas, but they did exist, and in multiple model versions with different power options.
Additionally, and unsurprisingly, the JDM version had extra little goodies in this era of Civic that even our friends in Europe didn't get, one of which was Power Folding Mirrors (PFM), a useful feature in a land where parking and space is at a premium. Also available was the VERY rare Power Folding Heated Mirrors (PFHM), which was a factory option/upgrade and/or dealer option, and I'll speculate was a popular add-on in the temperate mountainous regions of Northern Japan. The switch for this is shown in Figure 1.

Figure 1: OEM JDM Factory or Dealer Option/Upgraded Power Folding Heated Mirror Switch. Folding
button is at top right. "Defogger" heat button is in centre.
Well, since we know that Honda Civic parts are largely interchangeable like pieces of LEGO, who says we in North America can't add a little JDM/EDM goodness to our rides? I certainly don't, and this DIY Install Guide will walk you through the steps you need to take to get your Power Locks, Power Windows and Power Folding Heated Mirrors up and running.
During the course of my install, I have come to conclusions about some long-standing questions over the interchangeability of some components in this popular modification, and I made some observations about others. This guide will address, amongst others topics:
Herein, I give detailed instructions on what to remove, and *some* details on how to remove it and re-install it, but at minimum I EXPECT you to have a USDM/CDM Helms Service Manual to consult for the major details on how to take stuff on your car apart, and for how to access some of the areas I describe below (eg., driver's footwell). No sense in me trying to tell you how to do this, when they have already done an excellent job of it already. It can be purchased as a hard copy text, or there are legitimate places where it can be downloaded as a bookmarked Adobe PDF. One link I found is here on the spoonertuner.com website.
Preparation
Notes on wiring
Connecting and installing the wiring properly will likely take you the most time out of all the operations involved in this project. I haven't hack-jobbed or jerry-rigged anything in this write-up - I firmly believe that this is about as close to a clean OEM retrofit as you can get. The one major exception I conceded was that I did not snake the new wiring through the original harnesses. This process would have been painstakingly difficult and added little value to the install; it was far easier to conceal the new harness in a different area.
My recommendation is, and if you're like me and want as clean an install as possible, you will spend time pulling the correct colour of wires from a salvage yard vehicle. This guide will tell you where to find the colour of wires in a 92-95 Civic to match the OEM colours. Ideally, all your wiring harnesses should come from a 93-95 EX Coupe, but these can be difficult to find, so I adapted the wiring harnesses from a 4dr PL/PM/PW-equipped Sedan, and have included the steps necessary to do this yourself. NB: This guide assumes you have pulled (or purchased) the entire firewall and door wiring harnesses. See this thread for an example of what I mean. You will even need some specific wire colours from an additional vehicle, to match up wire colours for some of the JDM options - there's just not enough of that colour in the pulled harnesses from just one vehicle. For these additional wires, it's ok to locate and cut them then pull them through the loom, though it's sometimes difficult to figure out where they go and they can often get stuck.
Extracting the wiring harnesses -- while painful, especially the engine/cabin one -- makes the re-wiring exercise considerably more pleasant, and guarantees you have enough length, gives you the exact OEM wire colours and means you don't have to go out and buy your OWN wire. Though I don't usually bother getting BLK (ground) wires all the way to their terminus, I did so in this project, and I consider that a wise decision, as there were numerous times that I needed to ground wires and I was able to use the existing BLK wires ending at their terminal ring. You will need additional BLK wire, so buy yourself a 25ft roll of 16 gauge, and you'll be set for this project and for many future projects.
Fuse Box Connections
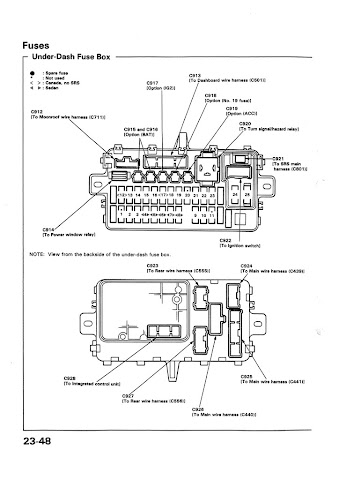
I make reference numerous times to the connector numbers (eg., C555) in the write up. This is referencing the connector numbers as described in the CDM/USDM Helms manual, typically at the under-dash fuse box. I guess this can seem pretty obscure to those of you unfamiliar with this nomenclature. I've reproduced the page below as a quick reference to give you an idea of what I'm talking about. (Click link to enlarge.)
Enlarge this image.
Addendum (April/2016): If you want to design your own OEM harness, here are the lengths of wiring required:

Wiring Connectors
Again, I will stress: Don't cut wiring if you don't have to. This makes for a much cleaner reinstall. Unplug the pins where you can, as you will probably need them anyway.
When you do have to patch together cut wires, I recommend using Bullet connectors. These attach & detach readily and are self-shielding. I suppose a cautious person would electrical-tape all the connections, but I didn't. You will need a few Wire Tap ("T-Taps") connectors, too. As I am in Canada, I purchased my electronics parts over the phone from A-1 Electronics - see A1 Electronic Parts - Serving the Toronto area for 30 years! (WARNING: TERRIBLE WEBSITE. GODAWFUL.); these had the best prices around Canada that I could find, and domestic shipping was a flat $10. I ordered a pack of 100 for each of Male & Female 14-16 (blue) & 16-18 (red) gauge Bullet connectors, and a pack of 100 of each of 14-16 (blue) & 16-18 gauge wire-taps (T-Taps). This amount might be overkill for you, but I had a bunch of projects I wanted to wire up so it was a good investment for me.
Americans can just look on eBay; there's dozens of dealers selling large bulk packs of bullet connectors and wire taps.
Pin Removal
You'll have to do a bit of this. A tiny screwdriver is your friend. Look up on honda-tech.com the correct way to remove pins from connectors, or consult this comprehensive guide.
Note on Order of Operations
The instructions, as written below, aren't necessarily meant to be followed linearly as a step-by-step process of removal and then re-installation. Read the whole thing through, first, to get an idea of what you're up against. You will have to jump around a bit from section to section as you see fit. There is no real "wrong" order to do the install, but you will run in to obvious roadblocks, in which case you'll have to figure out on your own what a logical order to proceed is.
Time Required
This project is not difficult, but required a large amount of time and multiple days of down-time for my car. Expect to spend 1-3 days foraging for parts in the salvage yard, and I spent most evenings over the course of 2-3 weeks both prepping the wiring and performing the installation. It is hard for me to gauge exactly how long I worked on the specific installation of PL/PM/PW as I was also retrofitting wiring for additional Civic options such as the Rear Wiper, Rear Fog Light and Headlight Washers. Expect it to take the equivalent of 2-3 days of work to install.
Disclaimer
Or, "Don't point fingers, you only have yourself to blame"
Every effort has been made to make these instructions as complete and accurate as possible, but no warranty or fitness is implied. The information is provided on an “as is” basis. The author(s) and the website/publisher(s) shall have neither liability nor responsibility to any person or entity with respect to any loss or damages or inconvenience arising from the information contained herein, nor due to any omissions. Read: Don't muck up your vehicle and try to blame me or anyone else. You are responsible for your own due diligence and research.
Parts Required & Removal Instructions
Online

Figure 2: PFHM wiring requires an in-line 7.5A fuse (1) and Mitsuba RC-2201 relay (2).

Figure 3a. PFHM wiring connectors showing heater pad wiring (1) and folding motor wiring (2).

Figure 3b. Many PFMs are pre-wired for heater elements (1).
Auto Glass Store

Figure 4. Burco Redi-Heat pad, product #3801.
Auto Parts Store
Under Hood

Figure 5. The 'female' connector which splits off the heated mirror switch wiring
can be obtained from the BLU/RED fog lamp wiring, located behind the connectors
at (1), deep in the driver's footwell.
Cabin: Rear Wiring Harness
Installation Instructions
Before You Begin
About These Instructions
Wiring
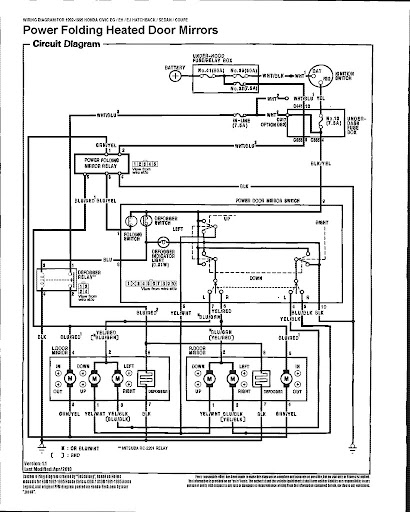
Figure 6. PFHM Wiring Diagram for a 92-95 Civic, designed in the
style of Helms diagrams. Click image for a link to a PDF version of this document.

Figure 7. Power options wiring added to a CDM 1994 Civic Hatchback Driver's door. Connectors
visible are (1) PFHM, (2) PL relay, (3) Tweeter, (4) PL switch, (5) PW switch and (6) PL actuator.
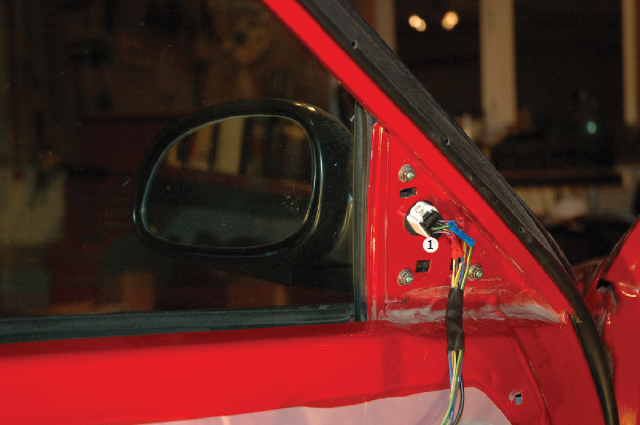
Figure 8. Close-up of PFHM mirror swapped into LHD CDM/USDM mirror shell, and connector
using OEM wiring colours (1).
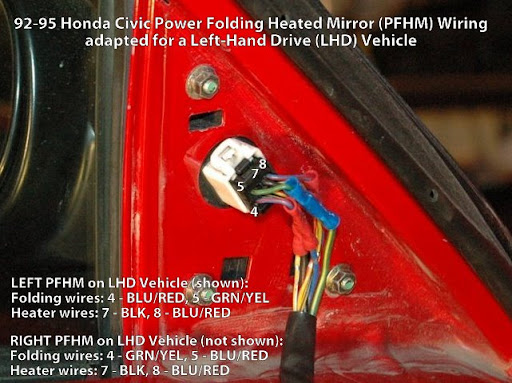
Figure 8a. Close-up of d/s mirror wiring.
Power Windows

Figure 9. RHD mirror mount is at a more acute angle than an LHD mirror for the left-hand side of the vehicle. A similar problem exists for the right side.
Visibility is reduced. RHD PFM internals should be swapped into the LHD mirror shells.

Figure 10. (1) shows screw locations to remove outer cover.

Figure 11. Remove screws at (1), (2) and (3) (not shown) to remove PFM motor internals. Screw at (2)
requires the mirror surround be popped off its central pivot at (4) (follow arrow).

Figure 12. Behind the mirror glass you will find (1) 3 strips of butyl tape(?). Widen the holes along
the dotted lines at (2) to allow for the heater element prongs from the Burco heater pad.
Figure 13. Mirrors with heating pads applied. Electrical tape should be applied
under prong contacts in area outlined in dashed line at (1).
Connectors at (2) are supplied with the heater pad.
Door Seal Plastic
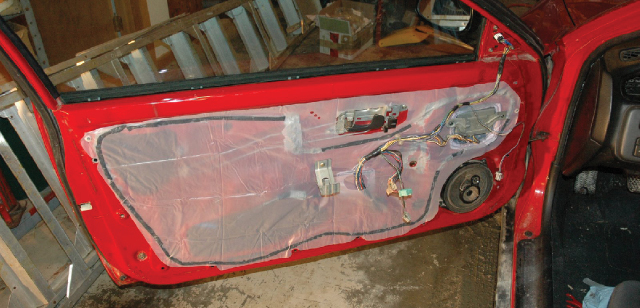
Figure 14. New door seal plastic was purchased and installed at the end of the project.
Outline of butyl tape is visible in black where original adhesive was removed.
Cabin: Under Dash/Footwell
Wiring

Figure 15. Likely stock mounting location for PFM relay (unconfirmed) at (1).
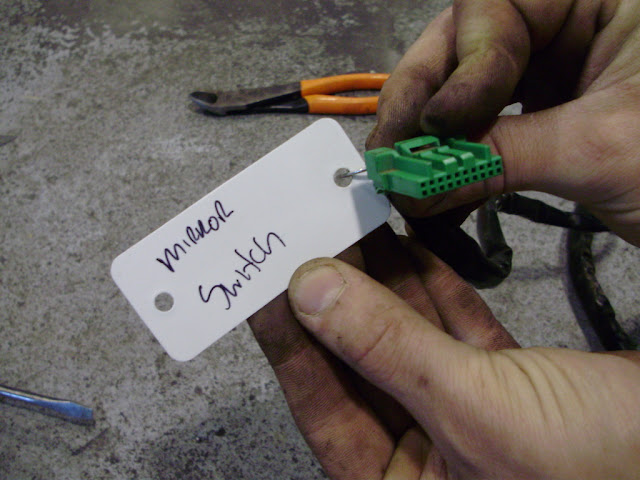
Figure 16. PM switch connector. (Image from user "twistedimage's" install guide)
Cabin: Dashboard
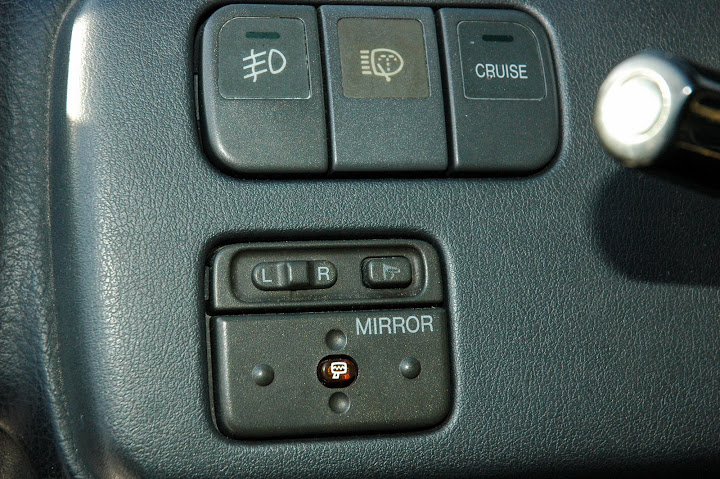
Figure 17. PFHM switch installed in dashboard.
Test Drive
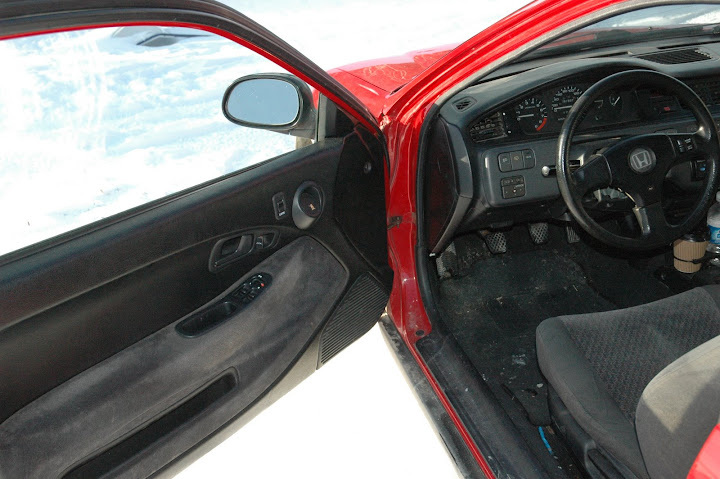
Figure 18. Final installation will look like this. More power to yah.
Good Luck and enjoy the new-found power at your fingertips.
DeSchlong
March, 2009
Preamble
This topic has been covered at various times by numerous other posters, but with information scattered all over the web, I felt the community could be well served by the incorporation of this information into one comprehensive document. This write-up focuses on upgrades I performed to my 1994 Canadian Domestic Market (CDM) CX model Hatchback using parts largely from Sedans, Coupes and some Japanese Domestic Market (JDM) vehicles, but the guide can be adapted to retrofit a CDM/USDM Coupe or even a Sedan. Additionally, I have yet to find any information detailing the correct wiring of the JDM OEM Honda Access Optional "Heated" aspect of 92-95 Civic Power Folding Heated Mirrors, and this DIY guide covers that topic.
Introduction
No Canadian Domestic Market (CDM) nor US Domestic Market (USDM) 1992-1995 Honda Civic 3dr Hatchback models (CX, VX, DX & Si) had Power Locks (PL) or Power Windows (PW) as standard or even optional equipment. This includes the upper-end Si model, which had almost every other option imaginable, but still came with manual door locks and manual windows. The Si did have Power Mirrors (PM), but other models did not. The 2dr Coupe line of Civics had a similarly configured vanilla-flavoured all-manual DX model (though a 'Special' version of the CDM DX Coupe did add factory power mirrors), but also an all-power equipped USDM EX model, with Power Locks, Power Windows, and Power Mirrors (and door-panel mounted Tweeters 1994-1995). The Si Coupe, only available in the CDM, came like its Hatchback brother equipped with Power Mirrors (though + Tweeters), but no other power options. The Coupe body type is notable because the door panels on Coupes are a DIRECT FIT replacement for the door panel on your Hatchback. Therefore, from an EX model, this gives you access to a door panel that hosts the Power Lock switch and Power Window combination switch/door cup (and Tweeters).
The North American experience differs significantly from European Domestic Market (EDM) and JDM models of Civic Hatchbacks. These markets had numerous 3dr Hatchback models and, likely due to greater competitiveness between car manufacturers and more fickle car owners (as well as their appreciation that a compact car can also have more luxurious amenities), many more models of Civics came with Power Windows, Power Locks and Power Mirrors, or a combination of the three. Coupes are typically a less-popular body configuration overseas, but they did exist, and in multiple model versions with different power options.
Additionally, and unsurprisingly, the JDM version had extra little goodies in this era of Civic that even our friends in Europe didn't get, one of which was Power Folding Mirrors (PFM), a useful feature in a land where parking and space is at a premium. Also available was the VERY rare Power Folding Heated Mirrors (PFHM), which was a factory option/upgrade and/or dealer option, and I'll speculate was a popular add-on in the temperate mountainous regions of Northern Japan. The switch for this is shown in Figure 1.
Figure 1: OEM JDM Factory or Dealer Option/Upgraded Power Folding Heated Mirror Switch. Folding
button is at top right. "Defogger" heat button is in centre.
Well, since we know that Honda Civic parts are largely interchangeable like pieces of LEGO, who says we in North America can't add a little JDM/EDM goodness to our rides? I certainly don't, and this DIY Install Guide will walk you through the steps you need to take to get your Power Locks, Power Windows and Power Folding Heated Mirrors up and running.
During the course of my install, I have come to conclusions about some long-standing questions over the interchangeability of some components in this popular modification, and I made some observations about others. This guide will address, amongst others topics:
- How to adapt a door and cabin wiring harness from a 4dr Sedan to a 3dr Hatchback (or 2dr Coupe).
- The truth about swapping JDM RHD mirror internals and mounts with its CDM/USDM LHD counterpart.
- The easiest and safest way I found to remove the glass on side door mirrors.
- Suggestion for Hatchback JDM folding mirrors on a medium budget.
- Suggestion for Heated Mirror elements on a medium or low budget.
- Suggestion for Power Windows on a low budget if you can only find an Acura Integra in the junkyard (no EX Coupes).
- Updated and detailed Helms-style Power Folding Heated Mirror wiring diagram.
Herein, I give detailed instructions on what to remove, and *some* details on how to remove it and re-install it, but at minimum I EXPECT you to have a USDM/CDM Helms Service Manual to consult for the major details on how to take stuff on your car apart, and for how to access some of the areas I describe below (eg., driver's footwell). No sense in me trying to tell you how to do this, when they have already done an excellent job of it already. It can be purchased as a hard copy text, or there are legitimate places where it can be downloaded as a bookmarked Adobe PDF. One link I found is here on the spoonertuner.com website.
Preparation
Notes on wiring
Connecting and installing the wiring properly will likely take you the most time out of all the operations involved in this project. I haven't hack-jobbed or jerry-rigged anything in this write-up - I firmly believe that this is about as close to a clean OEM retrofit as you can get. The one major exception I conceded was that I did not snake the new wiring through the original harnesses. This process would have been painstakingly difficult and added little value to the install; it was far easier to conceal the new harness in a different area.
My recommendation is, and if you're like me and want as clean an install as possible, you will spend time pulling the correct colour of wires from a salvage yard vehicle. This guide will tell you where to find the colour of wires in a 92-95 Civic to match the OEM colours. Ideally, all your wiring harnesses should come from a 93-95 EX Coupe, but these can be difficult to find, so I adapted the wiring harnesses from a 4dr PL/PM/PW-equipped Sedan, and have included the steps necessary to do this yourself. NB: This guide assumes you have pulled (or purchased) the entire firewall and door wiring harnesses. See this thread for an example of what I mean. You will even need some specific wire colours from an additional vehicle, to match up wire colours for some of the JDM options - there's just not enough of that colour in the pulled harnesses from just one vehicle. For these additional wires, it's ok to locate and cut them then pull them through the loom, though it's sometimes difficult to figure out where they go and they can often get stuck.
Extracting the wiring harnesses -- while painful, especially the engine/cabin one -- makes the re-wiring exercise considerably more pleasant, and guarantees you have enough length, gives you the exact OEM wire colours and means you don't have to go out and buy your OWN wire. Though I don't usually bother getting BLK (ground) wires all the way to their terminus, I did so in this project, and I consider that a wise decision, as there were numerous times that I needed to ground wires and I was able to use the existing BLK wires ending at their terminal ring. You will need additional BLK wire, so buy yourself a 25ft roll of 16 gauge, and you'll be set for this project and for many future projects.
Fuse Box Connections
I make reference numerous times to the connector numbers (eg., C555) in the write up. This is referencing the connector numbers as described in the CDM/USDM Helms manual, typically at the under-dash fuse box. I guess this can seem pretty obscure to those of you unfamiliar with this nomenclature. I've reproduced the page below as a quick reference to give you an idea of what I'm talking about. (Click link to enlarge.)
Enlarge this image.
Addendum (April/2016): If you want to design your own OEM harness, here are the lengths of wiring required:
Wiring Connectors
Again, I will stress: Don't cut wiring if you don't have to. This makes for a much cleaner reinstall. Unplug the pins where you can, as you will probably need them anyway.
When you do have to patch together cut wires, I recommend using Bullet connectors. These attach & detach readily and are self-shielding. I suppose a cautious person would electrical-tape all the connections, but I didn't. You will need a few Wire Tap ("T-Taps") connectors, too. As I am in Canada, I purchased my electronics parts over the phone from A-1 Electronics - see A1 Electronic Parts - Serving the Toronto area for 30 years! (WARNING: TERRIBLE WEBSITE. GODAWFUL.); these had the best prices around Canada that I could find, and domestic shipping was a flat $10. I ordered a pack of 100 for each of Male & Female 14-16 (blue) & 16-18 (red) gauge Bullet connectors, and a pack of 100 of each of 14-16 (blue) & 16-18 gauge wire-taps (T-Taps). This amount might be overkill for you, but I had a bunch of projects I wanted to wire up so it was a good investment for me.
Americans can just look on eBay; there's dozens of dealers selling large bulk packs of bullet connectors and wire taps.
Pin Removal
You'll have to do a bit of this. A tiny screwdriver is your friend. Look up on honda-tech.com the correct way to remove pins from connectors, or consult this comprehensive guide.
Note on Order of Operations
The instructions, as written below, aren't necessarily meant to be followed linearly as a step-by-step process of removal and then re-installation. Read the whole thing through, first, to get an idea of what you're up against. You will have to jump around a bit from section to section as you see fit. There is no real "wrong" order to do the install, but you will run in to obvious roadblocks, in which case you'll have to figure out on your own what a logical order to proceed is.
Time Required
This project is not difficult, but required a large amount of time and multiple days of down-time for my car. Expect to spend 1-3 days foraging for parts in the salvage yard, and I spent most evenings over the course of 2-3 weeks both prepping the wiring and performing the installation. It is hard for me to gauge exactly how long I worked on the specific installation of PL/PM/PW as I was also retrofitting wiring for additional Civic options such as the Rear Wiper, Rear Fog Light and Headlight Washers. Expect it to take the equivalent of 2-3 days of work to install.
Disclaimer
Or, "Don't point fingers, you only have yourself to blame"
Every effort has been made to make these instructions as complete and accurate as possible, but no warranty or fitness is implied. The information is provided on an “as is” basis. The author(s) and the website/publisher(s) shall have neither liability nor responsibility to any person or entity with respect to any loss or damages or inconvenience arising from the information contained herein, nor due to any omissions. Read: Don't muck up your vehicle and try to blame me or anyone else. You are responsible for your own due diligence and research.
Parts Required & Removal Instructions
Online
- In Canada and US:
- Power Folding Mirrors (PFM) (OR Power Folding Heated Mirrors (PFHM)): Mirrors that fold in at the touch of a button. PFM are a common option on vehicles in Japan. PFHM will also heat up to melt snow and frost (and to dehumidify).
- The PFHM switch is shown in Figure 1. You will also need the relay and in-line fuse (7.5A) and under-dash fusebox 'option' connector, or else you will have to build the wiring for this yourself. See Figure 2. I will detail how to do this later.
- Along with the switch, a working set of PFHM will be nearly impossible to find. However, it is common to find a PFM pre-wired for heat. It will have 7 wires, as shown in Figure 3a. The folding wires are BLU/RED and GRN/YEL on the left. The 'heat' wires are the BLU/RED and BLK wires at the top right Often these wires will lead nowhere, as shown in Figure 3b, but this makes it much easier to add the required wires to the heating elements yourself.
- You need the mirror wiring pigtails.
- Note that:
- RHD mirrors will mount fine on an LHD vehicle, but the angle of the supports is different, so the internals will need to be swapped to be able to see properly.
- The mirror glass on each side of a JDM RHD vehicle is convex, so these will need to be swapped out, too.
- Instructions for the above two steps are detailed later.
- Optional: On a budget? Try finding a set of folding mirrors for a 4DR. These tend to be about two thirds the price of 2/3DR PFMs. Since they are RHD mirrors, you will be swapping the mirror internals anyway - you don't even need the shells - so you can save some cash. This is untested by me, but I see no reason why the internals of a 4dr wouldn't fit inside a 2/3dr mirror shell.
- Power Folding Mirrors (PFM) (OR Power Folding Heated Mirrors (PFHM)): Mirrors that fold in at the touch of a button. PFM are a common option on vehicles in Japan. PFHM will also heat up to melt snow and frost (and to dehumidify).
Figure 2: PFHM wiring requires an in-line 7.5A fuse (1) and Mitsuba RC-2201 relay (2).
Figure 3a. PFHM wiring connectors showing heater pad wiring (1) and folding motor wiring (2).
Figure 3b. Many PFMs are pre-wired for heater elements (1).
- For Americans: If you cannot find a 2DR EX Coupe at a junkyard, then below is a list of items you should look for online. For Canadians: No 2/3DR Civics came with PW or PL. Either head across the border to find a 2DR EX Coupe yourself, or order these parts online.
- From a 93-95 USDM EX Coupe:
- Door Panels with PL and PW hole.
- The door panels will also have holes for tweeters - you need these too.
- Driver PL switch and bezel (driver's side only).
- Driver & Passenger PL actuators: these latch the door and allow for locking and unlocking, and door opening.
- Optional: On a budget? Though untested, I have studied them -- and I believe that you can remove the JUST THE MOTOR from the PL actuator on a Sedan, and these will bolt right on to your manual actuators on your 2/3DR. There are 3 tiny screws that should just bolt right on.
- Driver & Passenger PW switches and bezels.
- Optional: On a budget? Consider purchasing the bezels NEW from a parts dealer. They cost ~$15 each. Then, buying only the switches on eBay may translate into a substantial cost savings, plus you get brand new bezels!.
- Try to get the Driver's Switch pigtail if you need one (eg., if you pulled wiring from a Sedan), but if you can't, see the Cabin: Dashboard section below for where to find a matching connector.
- Driver & Passenger PW actuators: these move the window up and down.
- Optional: On a budget? Apparently, these can also be removed instead from a 94-01 2/3dr Acura Integra with PW, though this is untested by me. This will probably be cheaper than an online order + shipping.
- Door and floor wiring: this connects all your new electrical components to each other and to the fuse box.
- Optional: On a budget? Pull one yourself from a 4dr Sedan with PW, PL and PM. I'll show you how to adapt it to a 2/3dr.
- Door Panels with PL and PW hole.
- From a 93-95 USDM EX Coupe:
Auto Glass Store
- Burco Redi Heat Grid: Heating grid applied to the back of your mirror. See Figure 4.
- Get product #3801. Size: 3.25"H x 5.75"L.
- Cost will be ~$20-25USD each.
- It will be a close fit, but they will actually mate quite nicely on the backs of the mirrors.
- Optional: On a budget? Try adapting some motorcycle hand warmer elements to the backs of the mirrors instead. These will probably be in the $20 range for two elements.
- Butyl tape: Malleable and sticky "putty"-like substance, with about the consistency of chewing gum. Comes on a roll, like this.
- You need it to fasten your CDM/USDM mirror glass to the JDM mirror surround.
- You need it to reattach your door seal plastic.
Figure 4. Burco Redi-Heat pad, product #3801.
Auto Parts Store
- 1/2" split wiring loom: bundles the wires going across to the passenger side.
- 3/8" is too small - learn from my mistake ... as this is the size I used.
- BLK wire: Colour used for electrical grounds.
- I mentioned this above: get a nice long roll, like 25ft of 16ga.
- In-line fuse connector, if you did not get all the correct wiring with your heated mirror switch.
Under Hood
- BLU/RED wiring: you need an almost unfathomable amount of this colour. This wire will connect your heated mirror elements to the relay that controls them mounted under-dash, and connects the power folding motors to the power folding relay. Therefore, you need to run 2 sets of this colour wire to each mirror.
- In the wiring loom on RH side (Passenger side) of engine bay, connects from the horn all the way to the under-dash fuse box (or steering wheel for non-SRS).
- Again in the wiring loom on RH side (Passenger side) of engine bay, connects the ECU to some engine component.
- In the wiring loom on LH side (Driver side) of engine bay, all 94-95 Civics are pre-wired for fog lights in BLU/RED. You'll find one end near the left headlamp.
- Get as much as you can. If you get it from two cars, you will have plenty. Don't cut wiring if you don't have to. Makes for a cleaner reinstall. De-pin the connectors instead.
- Connector for the 2/3dr PW Driver's switch: If you pulled your wiring from a 4dr, you'll need one of these.
- The connector from behind the 4-way hazard flasher button is exactly the same. De-pin and take.
- Door Wiring
- Pull the whole Driver & Passenger door wiring from a 4dr or 2dr with PL, PW and PM.
- Get the PL Relay - the big box bolted to the door, below the mirrors.
- A relay from a 4dr will function properly on a 2/3dr.
- Get the plastic screw holders, too, that held the screws. Reach behind, squeeze and push out.
- Hopefully, your donor vehicle also had tweeters (N/A for 4dr and became standard in 1994-1995 2dr EX).
- If not, but your door panels do have tweeters, get a few metres of the rear speaker wiring with its connector. (The 2-pin connector is identical.)
- For Americans: Find a 2dr EX Coupe at a junkyard. These can be tricky to find, though, so see the Online section above for what to order if you can't find one locally. For Canadians: No 2/3DR Civics came with PW or PL. Either head across the border to find a 2dr EX Coupe yourself, or see the Online section above.
- Consult your Helms manual for the proper removal of all these parts.
- From a 93-95 USDM EX Coupe:
- Door Seal Plastic: keeps moisture and road grime out of your car.
- Try to remove it all in one piece. If this is not possible, it is ~$10 from your Honda dealer, and even less if you just cut up some plastic sheeting from a hardware store. You should be able to get by without hacking up the Passenger side plastic seal on your install.
- P/Ns: Driver's side is 72361-SR3-G00, Passenger side is 72321-SR3-J00.
- Door Seal Plastic: keeps moisture and road grime out of your car.
-
- Door Panels with PL and PW switch holes.
- In 1994-1995 the door panels will definitely have holes for tweeters - you would need these too.
- PL switch and bezel (driver's side only).
- Driver & Passenger PL actuators: these latch the door and allow for locking and unlocking, and door opening.
- Driver & Passenger PW switches and bezels.
- Driver & Passenger PW actuators: these move the window up and down.
- Driver & Passenger PM covers: if you are upgrading from a manual mirror, you will need the plastic mirror covers from the inside of the door.
- Careful not to break them! Pull out at the top, and it will come free. Two hooks keep them in place along the bottom.
- Door Panels with PL and PW switch holes.
- Get all wiring that connects from the Driver's door to the fuse box, part-way towards the back along under the carpet between the driver's seat and door sill trim (possibly only necessary on a 4-dr), and along the front firewall to the Passenger's side.
- I believe this wiring also includes the PM switch wiring, which is nice because now you can use unspliced wires instead of the pigtail you got with the JDM switch. You'll only have to add in the wiring for the JDM folding and heat options.
- If I recall correctly, you don't need the any colour of wiring that enters the under-hood compartment, aside from the BLU/RED stated already, however removing the engine wiring harness may still be desirable.
- Follow the guide written by 'twistedimage' , for a photo-intensive guide on how to disassemble the cabin wiring. It will also give you a good idea of what you'll find under there that you'll be removing.
- Power Window Relay
- Small relay that plugs in on the left side of the fuse box.
- Fuses for PL (No. 6, 20A) & PW (No. 5 & 8, 20A)
- Get some extras too, in case you blow a couple.
- Extra wiring colours you need: verify that you have these colours in the wiring that you pulled.
- BLU/YEL: Folding wire from mirror switch.
- WHT/BLU: Power wire to folding relay.
- BLU, WHT/BLU, WHT, etc.: Wiring from the mirror heat switch to relays, etc., if you didn't get this with your heated mirror switch.
- To build it properly with all the correct connectors:
- Get the male brown plug from underneath a 4dr power window switch where the BLK wire is connected.
- Get the female brown plug from the fog light wire on a 94-95 Civic near the firewall by the large connectors where they enter the engine compartment. See Figure 5. It might be blue-taped up high under there, and difficult to access! But, it's there. (See how in the wiring diagram the wiring is "split" at the WHT wire before it connects to the in-line fuse? This allows you to plug something else into the same option connector.)
- The relay is a Mitsuba RC-2201. This is the same relay that is use for the horn relay on vehicles with SRS. It's on the right side of the under-dash fuse box. Otherwise, it is also found on vehicles with A/C in the engine compartment.
- 7.5A fuse.
- As mentioned, get the in-line fuse holder from an auto parts store.
- To build it properly with all the correct connectors:
Figure 5. The 'female' connector which splits off the heated mirror switch wiring
can be obtained from the BLU/RED fog lamp wiring, located behind the connectors
at (1), deep in the driver's footwell.
Cabin: Rear Wiring Harness
- GRN/YEL wiring: connects the power folding motors to the power folding relay.
- I believe I pulled it from the wiring harness that goes to the rear. There should be two GRN/YEL wires in there, as I recall. Be sure you get enough to go across the front of the car and up to each door mirror.
- There might be more of this colour in the cabin wiring harness you pulled above, but I forget.
Installation Instructions
Before You Begin
- Remove the negative cable of your battery before performing any electrical work on your vehicle.
- My car doesn't have SRS, but I take it they can blow up in your face, so take necessary precautions to disable. Your Helms manual is explicit in this regard.
- Take the front seat out. You'll be spending a lot of time on your back.
About These Instructions
- The vast majority of the instructions you need to perform the install are located here (by Erik??) and here (by "twistedimage"); I do not need to repeat this information in my write-up.
- Instead, I will detail additional information that will help with the install and swap, and refer you to these guides when necessary. Together, this should help overcome any problems that you might encounter.
- Two things I would do differently from "twistedimage's" write-up:
- I wouldn't cut the speaker wiring. I would just de-pin the existing speaker wires at their connection at the fuse box, and replace them with the new harness' speaker wires.
- Use a 1/2" split plastic wiring loom (or a 3.8" if you aren't wiring the PFM/PFHMs) to hold the wires going to the passenger side, instead of wrapping in electrical tape.
Wiring
- Wiring diagrams: Attached to this post are some wiring diagrams which will help you.
- Figure 6 (click for PDF link) is a wiring diagram I created in the style of Helms diagrams to help you wire your PFMs and PFHMs.
- Consult your CDM/USDM Helms manual for other wiring diagrams. For your additional reference, I attached to this post the PL and PW diagrams from Mitchell OnDemand5.
- NOTE: The EDM Helms (if you've got it) shows the PL wiring for a 3dr Hatchback to the Passenger side incorrectly. It should read BLU/BLK, BLU/GRN & BLU/YEL instead of GRN/BLK, GRN & GRN/YEL, respectively.
Figure 6. PFHM Wiring Diagram for a 92-95 Civic, designed in the
style of Helms diagrams. Click image for a link to a PDF version of this document.
- If you removed your door wiring from a 4dr, note that:
- The connectors for the PM, PL switch, PL actuators, PL Relay, PW actuators, and Passenger PW switch are exactly the same as for a 2/3dr.
- Replace the Driver PW switch with the 10-pin "hazard switch" connector. Consult the wiring diagram attached to this post.
- The wiring for the Passenger PW switch for a 2/3dr is different from a 4dr!! Consult the wiring diagram attached to this post - otherwise you will blow the 20A fuse if you don't change it. I learned this the hard way.
- You need to perform the following additional steps:
- Extend the wiring for the door lock actuator. 4dr doors are shorter, so the wiring doesn't reach!
- Remove the wires for both Rear PW. You need to disassemble the wiring loom and remove pins from the connector that goes through the door and for the switch. The following wire colours will be removed: GRN/BLK, GRN/YEL, GRN; YEL/BLK, YEL, YEL/GRN
- Replace the large BLK pin from the 4dr harness with one that will fit in to the smaller connector.
- CDM & USDM vehicles might also have some extra wires for an optional OEM "security system". It is optional to get rid of these, too. They splice off the power door lock switch wires. However, you might find them useful if adding a security system at a later date.
- The connectors for the PM, PL switch, PL actuators, PL Relay, PW actuators, and Passenger PW switch are exactly the same as for a 2/3dr.
- You will need to add your BLU/RED & GRN/YEL for the folding motor, BLU/RED & BLK for the heater elements, and wiring for the Tweeters if necessary. See Figures 7 and 8.
- Splice these in through your door connector using the pins and pigtails from the wires you removed to adapt the 4dr wiring to your 2/3dr.
- If you have a EX Coupe harness, then I don't know what you're going to have to do to get the wires through the door. There must be some unused pins that you can remove from another part of the harness that will work.
Figure 7. Power options wiring added to a CDM 1994 Civic Hatchback Driver's door. Connectors
visible are (1) PFHM, (2) PL relay, (3) Tweeter, (4) PL switch, (5) PW switch and (6) PL actuator.
Figure 8. Close-up of PFHM mirror swapped into LHD CDM/USDM mirror shell, and connector
using OEM wiring colours (1).
Figure 8a. Close-up of d/s mirror wiring.
Power Windows
- Actuators
- Nothing tricky here, just follow your Helms manual, and the picture walkthrough I linked to above.
- Switches
- Driver side: After you pin the connector properly (if removed from a 4dr) into the "hazard switch" connector, it should be plug'n'play.
- Passenger side: Recall that the pin locations are different between a 4dr and a 2dr switch.
- Actuators
- The whole thing with its rods and everything is a real pain to get out.
- Thankfully, you can just unscrew the motor (three small screws) and screw it on to the manual actuator and you have performed the upgrade.
- You will probably have to move the rear window glass channel out of the way
- Switch
- Is plug'n'play.
- Relay
- Mount the plastic screw holders in the square holes.
- Remove your mirror internals: you are swapping the RHD mirror internals with its LHD counterpart, since the angle of the supports is different. See Figure 9.
- NOTE: The following steps worked PERFECTLY for my upgrade from original Manual Mirrors. CDM/USDM regular Power Mirrors are slightly different in their design, however, and this design will NOT accommodate the PFM's internals. I suppose you could also just use the JDM mirror casing and mount them on the CDM/USDM manual LHD mounts - that would probably work; once again though this does not apply to regular PMs as this part is different also. If they are different colours, you'll probably want to apply a coat of paint.
- Follow this guide by '99CivicSiBrian' to disassemble your mirrors (all four). Don't follow his instructions for the mirror glass removal - my way is better.
- Figure 10 shows you where to look under the mirrors for the screws that hold on the outer cover. These can be reached by moving the mirror manually out of the way and exposing the screws to access with your screwdriver.
- Remove the PFM internals. Figure 11 shows where to find some of the screws to unmount it (there are more on top, not shown). There is one screw which cannot be accessed without popping the mirror off its central pivot. Apply a bit of force using your fingers to pop it off.
- NOTE: Look between the mirror surround and the pivot. You DO NOT need to pry off the metal ring around the mirror surround plastic first - you'll only wind up breaking something.
- You will also have to de-pin the wiring connector. Use a Sharpie to write directly on the connector the colour of the wires at each location.
- Your internals should now be free.
Figure 9. RHD mirror mount is at a more acute angle than an LHD mirror for the left-hand side of the vehicle. A similar problem exists for the right side.
Visibility is reduced. RHD PFM internals should be swapped into the LHD mirror shells.
Figure 10. (1) shows screw locations to remove outer cover.
Figure 11. Remove screws at (1), (2) and (3) (not shown) to remove PFM motor internals. Screw at (2)
requires the mirror surround be popped off its central pivot at (4) (follow arrow).
- Remove the mirror glass: Since the mirror glass on each side of a JDM RHD vehicle is convex, these will need to be swapped out, too, with your stock CDM/USDM ones.
- Get a large, wide pot - one that the mirrors will fit inside - and boil some water. Start with the JDM ones b/c this will give you practice as it's not as big a deal if these ones break.
- Remove the water from the direct heat.
- Use some tongs or heat-resistant gloves to grip the mirror w/motor in the hot water. Long BBQ tongs work.
- Suspend JUST THE MIRROR PART in the water for 2 to 5 mins. This will make the plastic housing nice and soft.
- Remove from the water. Start at the pointed end: Pop the plastic housing off and peel it away from the mirror, using just your fingers. Be careful, but I found the mirrors just peeled away once they were nice and wet and soft.... just like how I like my ladies.
- What you will see: The JDM ones are held on in 3 spots less than 1in square by some thick blobs of ... butyl tape I think? See Figure 12. There is also a wide strip of masking tape on the back of the mirror which I think serves only to provide some grip for the tape blob.
- If you NEED to pry, only use a WIDE flat-edged screw driver, and only if absolutely necessary. Be sure to cover it in a shop towel or rag.
- I did break a mirror, but it is definitely because I was trying to go too fast. Go SLOWLY.
- You need a clean surface to apply the heater elements. Remove the masking tape using a method that will not scratch the back of your mirror. Try using a product called "Goo-Gone" with a shop towel. I often see it at dollar stores.
- Don't scratch the back of your mirror. You will regret it. Don't use anything more abrasive than your fingernail if you're trying to get any crud off the back.
Figure 12. Behind the mirror glass you will find (1) 3 strips of butyl tape(?). Widen the holes along
the dotted lines at (2) to allow for the heater element prongs from the Burco heater pad.
- Install your heater elements.
- Widen the holes in the area shown in Figure 12 on each mirror surround. I used a utility knife and it cut away easily.
- IMPORTANT: I found that the mirror backing will conduct electricity, short-circuiting the element and melting the back of the mirror surface. This is not good. To prevent this, apply some electrical tape on the back of the mirror element to cover up where the BACK of the metal prong contacts would touch the mirror. See Figure 13.
- Peel away the back to expose the sticky backing of the element.
- Poke the element prongs through the holes you just widened, and sit it temporarily in place.
- Place the mirror CENTRES AND ON TOP of the mirror surround (you don't need to install it yet), then tip everything upside down so the heater element falls onto the back of the mirror. The elements will now be properly lined up.
- Lift off the mirror again and press the element down firmly so it is attached and there are no air bubbles. You will wind up with something that looks like Figure 13.
Figure 13. Mirrors with heating pads applied. Electrical tape should be applied
under prong contacts in area outlined in dashed line at (1).
Connectors at (2) are supplied with the heater pad.
- Put everything back together again.
- Install the mirror glass with heater element into the surround.
- It helps if the mirror surround is still warm and malleable.
- I used blobs of "Automotive Goop" (basically, a goopy glue) on the three spots where the mirrors were originally attached to the housing/surround.
- Now that I think of it, the sticky blobs were probably butyl tape - you could use this instead.
- Wire the back of your mirror.
- For God's sake, mount the mirror housing back on to the CDM/USDM mirror mount -- the thing that holds the mirror to the door -- not the JDM one. The angles of the mounts are different for RHD vs. LHD cars, and you still won't be able to see properly out of your mirrors. Again... refer to Figure 9.
- Squirt some oil around the pivot point for the folding mirrors. If they do not fold smoothly, it will sound like they are on an endless loop and you'll think they are broken.
- Install the mirror glass with heater element into the surround.
Door Seal Plastic
- When you're done wiring and bolting everything in AND after you've finished troubleshooting, apply the butyl tape along the edge and cover it with the door seal plastic. See Figure 14.
Figure 14. New door seal plastic was purchased and installed at the end of the project.
Outline of butyl tape is visible in black where original adhesive was removed.
Wiring
- Decide on a location to mount your folding mirror relay.
- I believe the stock mounting location on a JDM Civic is identified in Figure 15.
- CDM Civics have their Daytime Running Light (DRL) relay located here. You'll have to find another spot.
- CDM/USDM Civics with Cruise Control have a mounting bracket here. There are holes at the top. CDM vehicles have the DRL mounted here, but you can use the other hole. USDM vehicles should have both holes free.
- Though I added OEM Cruise Control, I couldn't use this location either, as it was already occupied by my DRL relay and Headlight Washer relay. Instead, I found another mounting location behind the dashboard, but not on the body - it was black, so perhaps a dash support bracket? Regardless, it accepted a 10mm bolt, so I was happy.
Figure 15. Likely stock mounting location for PFM relay (unconfirmed) at (1).
- If you removed your door wiring from a 4dr, note that:
- You need to perform the following additional step:
- Remove the wires for the Rear PW. You need to disassemble the wiring loom and remove pins from the connector that goes through the door.
- You need to perform the following additional step:
- Add the extra wires to your mirror connector on your new harness for the folding and heat options.
- Removal of the pins is tricky if you don't know this tip:
- Find a really, really small Hex key. It will need to fit into the small hole in the front of the connector. See Figure 16.
- Pop open the plastic lever at the back. Stick your Hex key into the front hole... I believe the one at the top. You should feel some resistance, but keep pressing and you should overcome it. You've now pushed back the metal on the pin which was holding it fast. Pull out on the wire and it will come loose.
- BLU wire from SLOT 8 is from the heat switch.
- BLU/YEL from SLOT 1 is from the folding switch.
- Removal of the pins is tricky if you don't know this tip:
Figure 16. PM switch connector. (Image from user "twistedimage's" install guide)
- Add the wiring for the folding mirror relay to the harness.
- You need to have first decided on a location to know how much wiring you'll need.
- Consult my wiring diagram for the mirrors to understand how they are wired.
- Add a WHT/BLU wire to C555 SLOT 9 for power to the folding relay.
- Extend the BLU/YEL from the mirror switch to the relay.
- Extend the BLU/RED & GRN/YEL to the Driver & Passenger door connectors for the folding motor.
- Extend BLK to Ground.
- Add the wiring for the heater elements to the harness.
- You didn't get the heated mirror relay and in-line fuse? Consult my wiring diagram for the mirrors to build it yourself.
- Extend the BLU/RED & BLK to the Driver & Passenger door connectors for the heater elements.
- Again, follow "twistedimage's" guide to lay down the wiring to the Driver's and Passenger's side
- As I mentioned above, use a 1/2" split wiring loom to wrap the wires instead of electrical tape.
- I wouldn't cut the speaker wiring. I would just de-pin the existing speaker wires at their connection at the fuse box, and replace them with the new harness' speaker wires. (You can then just leave the existing wires where they are. Just tape up the ends.)
- I didn't run my wiring parallel with the existing harness. I ran it under the carpet at the driver's feet, then up and across the passenger compartment behind the blower unit to reach the passenger door.
Cabin: Dashboard
- Mirror Switch
- Connect and install it after you have finished adding any additional wires. See Figure 17.
Figure 17. PFHM switch installed in dashboard.
Test Drive
- Reconnect your battery and try it all out.
- Normal PL operation will involve:
- When the door is closed:
- The key will lock all doors from the outside on the Driver's side (but not unlock).
- The switch will open or close the lock.
- Pushing the Driver's side lock in (not the switch) will lock all doors.
- When the door is open:
- As a safety measure against locking your keys in the car, the Driver's door will not lock or unlock without pulling open the inside door handle.
- When the door is closed:
- Normal PW operation will involve:
- Turn your ignition to IG1.
- Your power windows should now work.
- Push the Driver's side switch all the way down to have the window roll all the way down automagically.
- ON/OFF switch will stop the passenger window from being activated.
- Normal PFHM operation will involve:
- Turn your ignition to IG1.
- PM will now work.
- Folding operation will now work.
- Heat will now work. Button will glow orange when depressed.
- If it does not work on the first try, troubleshoot all your connections. Use the Helms manual to guide you.
- I suggest that testing your ground connections (all of 'em) is a good test to begin with.
- It's possible that you got wires crossed in the door connection, if you were adding wires. This is a good place to start looking if you have problems.
- I wouldn't completely reassemble all your parts before your first test drive. Leave off certain pieces of trim to make it easier to troubleshoot if you encounter problems.
- Reassemble your door panels and attach all switches and you're ready to rock 'n' roll. See Figure 18.
Figure 18. Final installation will look like this. More power to yah.
DeSchlong
March, 2009
Last edited by deschlong; 05-17-2016 at 02:51 AM. Reason: Image links fixed (04/2013), incorrect info re:PMs fixed (08/2014), Addendum (04/2016)
 03-22-2009, 03:40 AM
#2
Incredible write-up, very detailed. 
I've always wondered what you guys do up there in the winter.
I've always wondered what you guys do up there in the winter.
Last edited by BryanM.; 03-09-2010 at 04:36 PM. Reason: grammatical error
03-22-2009, 05:31 AM
#3
Seagull Management
Join Date: Jun 2008
Location: Miramichi, NB, Canada
Posts: 15,150
Likes: 0
Received 24 Likes
on
22 Posts
That is a sweet write up, A+ I didn't know heated mirrors existed for 5th gen civics, I tried for the longest time to get some confirmation on it, I've seen 4th gen and 6th gen before, just never 5th gen. Only thing about the write up i'd change is in regards to scotchlock/tap splice connectors, they suck, and thats an understatement, solder and shrink tubing is where its at.
You have no idea how much stuff i've done in the winter, engine swap, auto to manual swap, stripping parts cars in the snowbank (note, stripping cars outside in the cold and snow is every bit as bad as it sounds)
You have no idea how much stuff i've done in the winter, engine swap, auto to manual swap, stripping parts cars in the snowbank (note, stripping cars outside in the cold and snow is every bit as bad as it sounds)
03-22-2009, 12:28 PM
#4
That is a sweet write up, A+ I didn't know heated mirrors existed for 5th gen civics, I tried for the longest time to get some confirmation on it, I've seen 4th gen and 6th gen before, just never 5th gen. Only thing about the write up i'd change is in regards to scotchlock/tap splice connectors, they suck, and thats an understatement, solder and shrink tubing is where its at.
The heated mirror switch is certainly an odd duck component for these vehicles. Check out this link for a neat thread on other interesting optional and rare parts for 5th Generation Civics. The next write-up I plan to do is for my heated seats ... but that one is gonna be a lot shorter than this one.
03-22-2009, 09:55 PM
#6
Junior Member

Join Date: Mar 2009
Posts: 147
Likes: 0
Received 0 Likes
on
0 Posts
great write up i just bought some 95 civic ek doors complete and wanted to put them on to my bubble this write up with help
03-22-2009, 10:01 PM
#7
Honda-Tech Member
Join Date: Apr 2008
Location: Fontana, Ca, United States
Posts: 3,163
Likes: 0
Received 3 Likes
on
3 Posts
VERY nice write up!
i will do this to my Ek. but i gotta find or make a switch for the heated mirrors
i will do this to my Ek. but i gotta find or make a switch for the heated mirrors
Trending Topics
03-23-2009, 10:37 AM
#8
Some CDM EKs came with stock heated mirrors. Don't know about USDM. You could head across the border and order a switch there, or else ask one of us quintessentially nice Canucks to order and ship one to you. Get one now, while the exchange rate is still in your favour.
04-05-2009, 10:16 AM
#9
Junior Member
Join Date: Mar 2009
Location: POMONA
Posts: 25
Likes: 0
Received 0 Likes
on
0 Posts
damn... thats alot of instruction hahaha , kinda confusing . but thanks alot bro for all the help .. ill try to follow it...
06-02-2009, 08:38 AM
#10
Honda-Tech Member
Join Date: Nov 2008
Location: The Mitten
Posts: 59
Likes: 0
Received 0 Likes
on
0 Posts
Awesome write up. My friend Randy told me about this write up. I plan on trying thison my EK. Well atleast part of it. I have the power folding mirrors but my passenger side isnt working all that well. Going to try to take mine apart to see what wrong. Hopefully this gide will help me out. Plus I also get to rewire my mirrors since they dont fold out too well.
Big props to you for this write up. Its been save to my HDD for further easement of work.
Big props to you for this write up. Its been save to my HDD for further easement of work.
07-01-2009, 10:56 AM
#14
Honda-Tech Member

Join Date: Jun 2009
Posts: 226
Likes: 0
Received 0 Likes
on
0 Posts
A+PLUS!!!!!  Great info and writeup!
I couldn't help but notice the headlight washer switch. Do you have the system installed? Any DIY on that?
Great info and writeup!I couldn't help but notice the headlight washer switch. Do you have the system installed? Any DIY on that?
07-01-2009, 11:02 AM
#15
^^ Yep, check my signature for all my DIYs.
Only one I haven't done (I think) is for my OEM-wired heated seats, and the Prelude steering wheel retrofit.
Only one I haven't done (I think) is for my OEM-wired heated seats, and the Prelude steering wheel retrofit.
07-01-2009, 11:05 AM
#16
Honda-Tech Member
 So Official!
09-30-2009, 11:29 PM
So Official!
09-30-2009, 11:29 PM
#18
Honda-Tech Member
Join Date: Jul 2008
Location: los angeles, ca, united states
Posts: 3,978
Likes: 0
Received 0 Likes
on
0 Posts
this is really helpful ...good job what website did u purchase the heated mirror thingies ....and also ..anywhere they might have the power heated mirror switch...that would be appreciated as i am interested in doing this ...
10-01-2009, 11:50 AM
#19
The heater pads can be purchased through any local Auto Glass dealer, if they retail Burco products. Check the Burco website for dealer links.
You will have to watch eBay for the heated switch ... however, your Location states "Los Angeles" ... now why in heaven's name would you want heated mirrors??!?! Leave them for us people who have to deal with snow! The regular power folding mirror switches are everywhere.
You will have to watch eBay for the heated switch ... however, your Location states "Los Angeles" ... now why in heaven's name would you want heated mirrors??!?! Leave them for us people who have to deal with snow! The regular power folding mirror switches are everywhere.
10-01-2009, 11:55 AM
#20
Honda-Tech Member
iTrader: (1)
Join Date: Jun 2004
Posts: 7,889
Likes: 0
Received 0 Likes
on
0 Posts
how would u know if the mirrors have the heating element in them without taking them apart??
10-01-2009, 12:07 PM
#21
First off, notice how the connector on my power folding mirrors has 7 wires? That is your first clue, but does not guarantee you have the pads. I guess if you applied 12V to the wires and checked to see if the mirror glass got hot, would be one way.
However, it would probably take you just as long to take off the front cover (3 screws, Figure 10) and check to see if there are leads from the back of the mirror glass around to where they connect at Figure 3b.
However, it would probably take you just as long to take off the front cover (3 screws, Figure 10) and check to see if there are leads from the back of the mirror glass around to where they connect at Figure 3b.
10-01-2009, 12:13 PM
#22
Honda-Tech Member
iTrader: (1)
Join Date: Jun 2004
Posts: 7,889
Likes: 0
Received 0 Likes
on
0 Posts
i guess that makes sense.. i have the switch and my mirrors have the 7 wires.. i got the mirrors and switch separate..
10-01-2009, 12:21 PM
#23
Right, yeah so did I. Before I bought the mirrors I thought "sweet, they've already got the pads and wiring!" ... then did all the in-car wiring and hooked them up ... and got nothing. That's when I took them apart to find out what was going on. I knew about the Burco pads already though, so I knew it wasn't going to be a problem getting them retrofitted. Was just hoping I didn't have to go through that extra step.
What about the relay and in-line fuse wiring? Did you get that with your switch, too? If not, my DIY instructions tell you how to build your own.
Where did you find your switch?
What about the relay and in-line fuse wiring? Did you get that with your switch, too? If not, my DIY instructions tell you how to build your own.
Where did you find your switch?
10-01-2009, 12:33 PM
#24
Honda-Tech Member
iTrader: (1)
Join Date: Jun 2004
Posts: 7,889
Likes: 0
Received 0 Likes
on
0 Posts
the relay for the defrost i dont have but i could easily get or i could even use a bosche... thats not a problem..
10-01-2009, 03:59 PM
#25
Honda-Tech Member
Join Date: Jul 2008
Location: los angeles, ca, united states
Posts: 3,978
Likes: 0
Received 0 Likes
on
0 Posts
alright kew thanx...and the reason for wanting them is because ..exactly, there are plenty power folding switches all over la...who doesn't have power folding mirrors...but who has power folding ''heated'' mirrors?? not many...so basically..just to be different from the rest...and also, i usually roll out early mornings since i work grave yard ..n it does get really foggy. they can come in handy here and there.....
ill keep a look out for those switches...i will only purchase one lol..there will be plenty to go around for u guys out there...
ill keep a look out for those switches...i will only purchase one lol..there will be plenty to go around for u guys out there...