
2004 civic cluster in EK??
 01-31-2010, 07:25 PM
#1
Honda-Tech Member
Thread Starter
Join Date: Jun 2009
Location: IL, CHICAGO
Posts: 223
Likes: 0
Received 0 Likes
on
0 Posts
Any one done 2003/04 civic cluster swap in 99/00 EK ??
i seen one online was ready to swap in but not sure if everything will work
let me know.
thx
i seen one online was ready to swap in but not sure if everything will work
let me know.
thx

 02-01-2010, 10:12 AM
#4
Honda-Tech Member

Join Date: Feb 2009
Posts: 11
Likes: 0
Received 0 Likes
on
0 Posts
Taken from JDMRides.ca
my friend picked up a civic 98 hatch cx a week ago and he was annoyed that the car had no rpm gauge so we when junkyard shopping picked up a em2 cluster, tryed finding a installation guide could not find anything so i did a wiring diargam of my own.
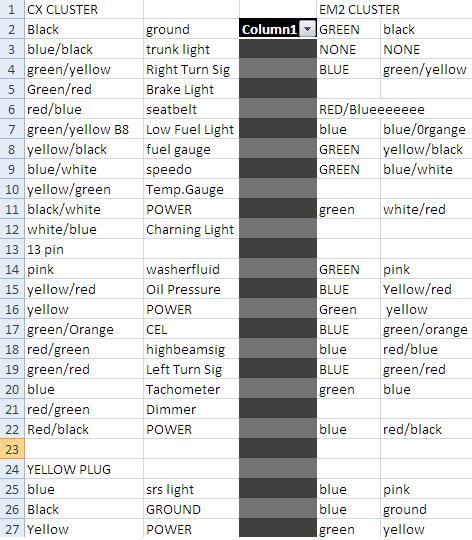
and we installed it everything is functional and working it reads the km.s speedo rpm gas everything and it fits nice with the dash minor modifying the cluster trim
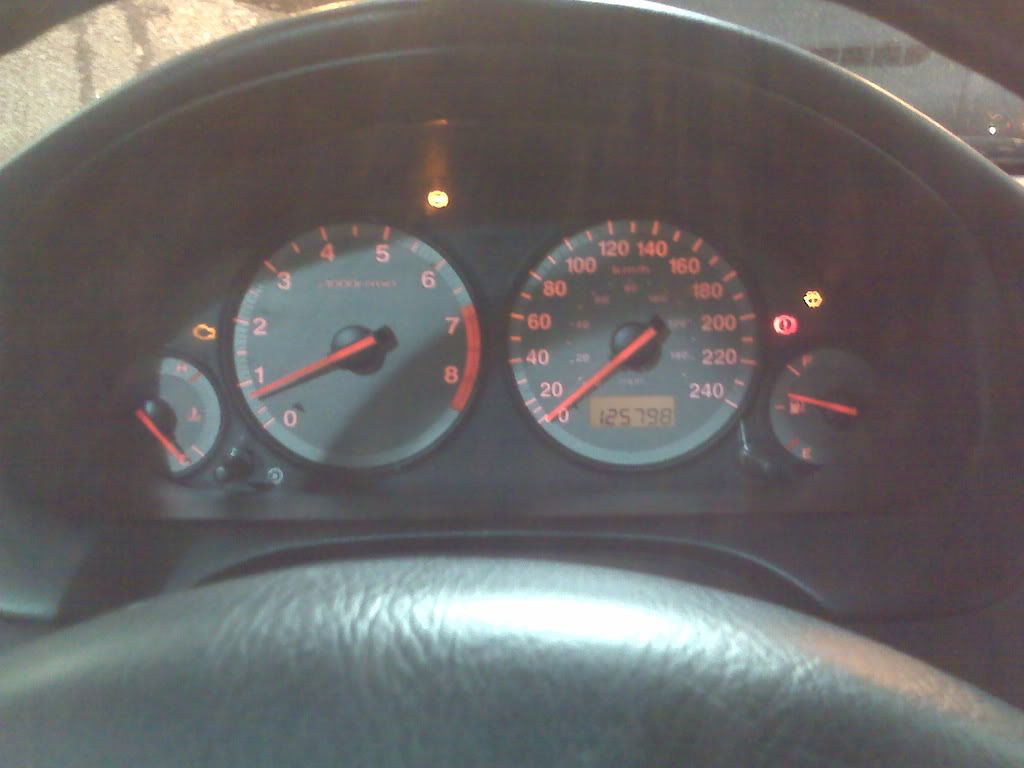
only un functional lights where the ABS light henc the cx doesnt have abs and washer fluid light also cx model doesnt have that sencor but over all everything is working here is a pic bad quality(cell pic)
enjoy
cheap easy and it looks good
and we installed it everything is functional and working it reads the km.s speedo rpm gas everything and it fits nice with the dash minor modifying the cluster trim
only un functional lights where the ABS light henc the cx doesnt have abs and washer fluid light also cx model doesnt have that sencor but over all everything is working here is a pic bad quality(cell pic)
enjoy
cheap easy and it looks good
02-01-2010, 04:50 PM
#6
Honda-Tech Member
Join Date: Aug 2006
Location: Right near the beach BOI, Ga
Posts: 2,246
Likes: 0
Received 0 Likes
on
0 Posts
Are you sure your not talking about the CRV cluster. They kind of resemble eack other.
And the CRV cluster is plug and play.
http://img12.imageshack.us/img12/8692/crvcluster8tm.jpg
http://img12.imageshack.us/img12/5114/crvnight0sc.jpg
And the CRV cluster is plug and play.
http://img12.imageshack.us/img12/8692/crvcluster8tm.jpg
http://img12.imageshack.us/img12/5114/crvnight0sc.jpg
Trending Topics
03-11-2010, 12:15 AM
#10
Honda-Tech Member

Join Date: Jan 2010
Posts: 107
Likes: 0
Received 0 Likes
on
0 Posts
i know this thread is a bit old but if an em2 cluster works in an ek then i think 04 civc cluster will work too. because i know someone who converted his non-optitron gauge (2001-2003 civic cluster) to 04-05 cluster. he has a write up of that too.
 03-11-2010, 07:38 AM
#16
Honda-Tech Member
Join Date: Jan 2010
Posts: 107
Likes: 0
Received 0 Likes
on
0 Posts
here you go. I don't take credit for this since I wasn't the one who wrote this up. my friend from Club7thgen.com did this to his 02 civic. he changed his cluster to 04-05.
Disclaimer:
User is presumed to have a fair level of mechanical or auto electrical skill in doing this DIY. The author shall not in any way be held responsible for any damage resulting from user’s fault or failure to follow the suggested steps proposed by the author. It’s the user’s responsibility to research thoroughly on the project and validate this DIY.[/i]
Tools and Materials:
• Optitron gauge cluster assembly
• Adjustable/socket wrench or spanner
• Utility knife or cutter
• Short and long shaft Philips screwdrivers
• 1mm or smaller, drill bit
• Electric drill or Dremel tool (preferably, w/ variable speed and reverse)
• Duct tape (gray or black)
• Electrical vinyl tape
• 12 cm or 5 inches gauge 14 or 15 stranded wire (black with yellow stripe, preferred)
• 2 sets bullet connectors (optional)
• Soldering iron and lead set (optional)
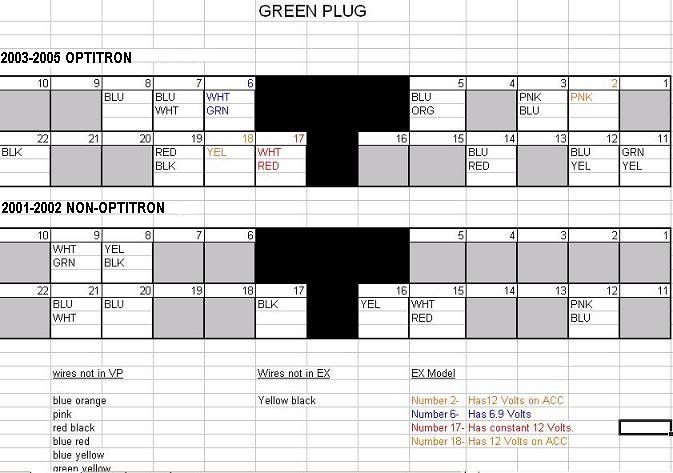
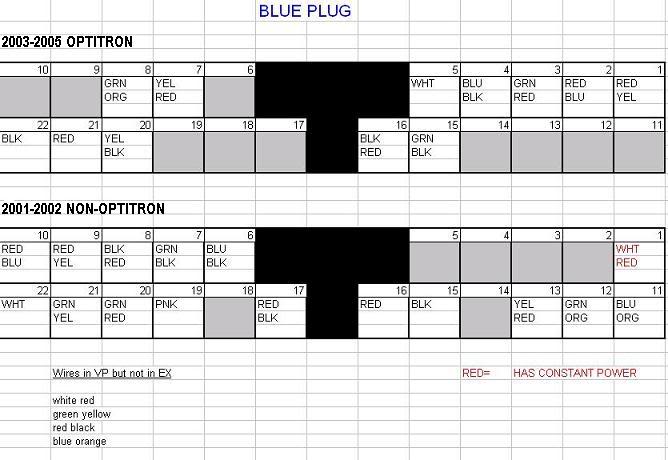
Pin-out Diagrams (courtesy of 7thgencivic.com)
Instructions:
1. Record your car’s mileage. Mileage is kept in the cluster and not in the car’s ECM. Once the cluster is replaced, a new mileage, depending on what is stored in the cluster, will be indicated.
2. Using an adjustable/socket wrench or spanner, disconnect the negative battery terminal. DO NOT reconnect until the swap is completed.
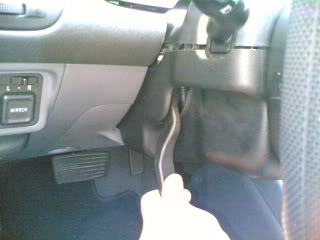
3. Pull down the steering column lever to adjust the steering wheel to the lowest position
4. Remove the upper steering column cover.
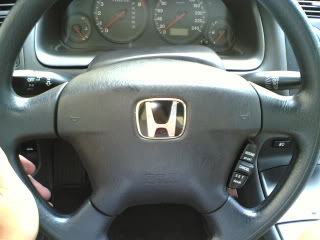
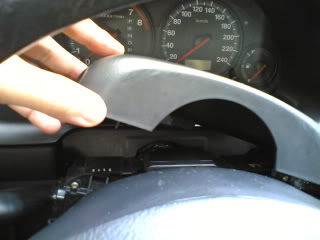
5. Remove the two (2) screws holding the gauge cluster bezel with a short shaft Philips screwdriver.
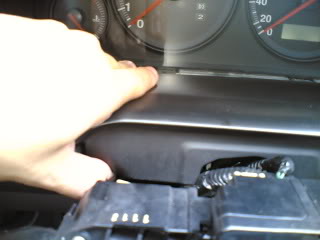
6. Starting at the bottom, pull the bezel away from the cluster until an audible click is heard indicating that the 2 clips below are already unattached.
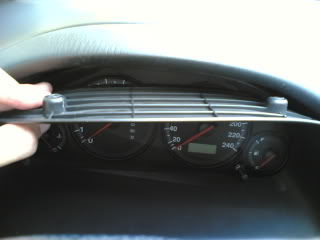
7. Gently pry and wedge the top of the bezel using your fingers and pull it away from the cluster. There are no upper mounting clips here. Remove the bezel taking care not to scratch the cluster lens.
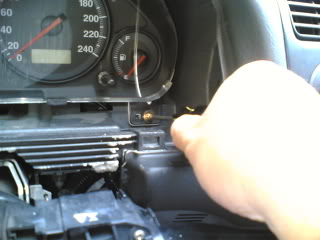

8. Using a short or long shaft screwdriver, remove the two(2) lower and center top mounting screws of the cluster.
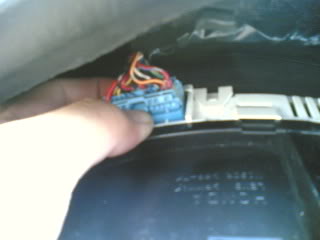
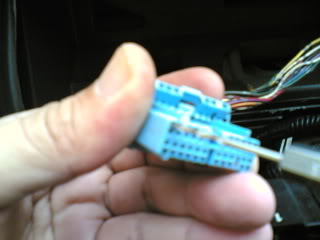
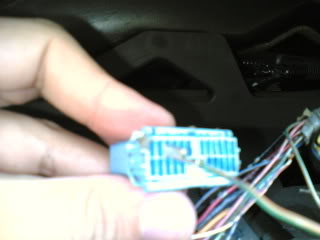
9. Press on the harness connector lock and pull out the blue and green connectors from the cluster.
10. Remove the cluster taking care not to scratch the lens. Set it aside in a safe place.
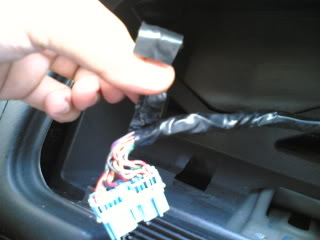
11. Using a utility knife or cutter, remove the factory loom of the cluster harness past the point where the branches meet.
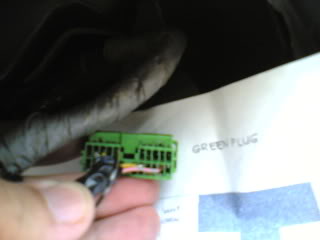
12. Pry the secondary connector locks on both sides of each connector.
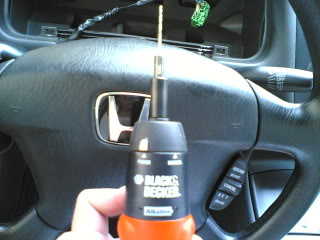
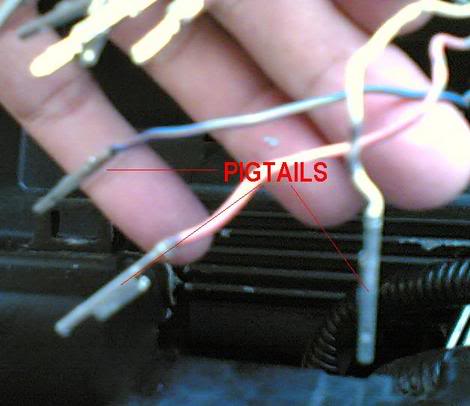
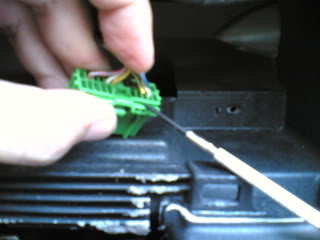
13. Using a 1mm or smaller bit and drill or (Dremel tool), slowly drill through the cluster end of the connector to release the pigtails. Drill through the hole corresponding to the pigtail’s lock and NOT through the hole of the pin. If your drill has a variable speed, start with the lowest speed. Periodically stop drilling to check if the pigtail is already free by pulling the wire gently away from the connector. DO NOT use force in pulling the wire. If it can’t be pulled without much effort, then you still need to drill some more.
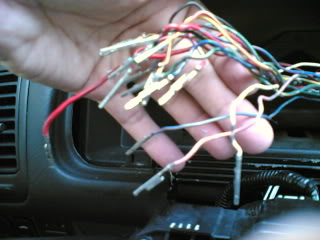
14. Remove all pigtails from the blue and green connectors. In case a pigtail is detached from the wire, re-connect them using a soldering iron and lead.
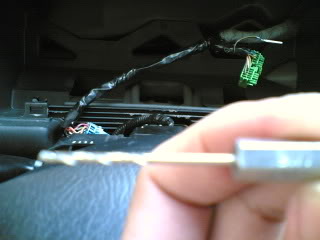
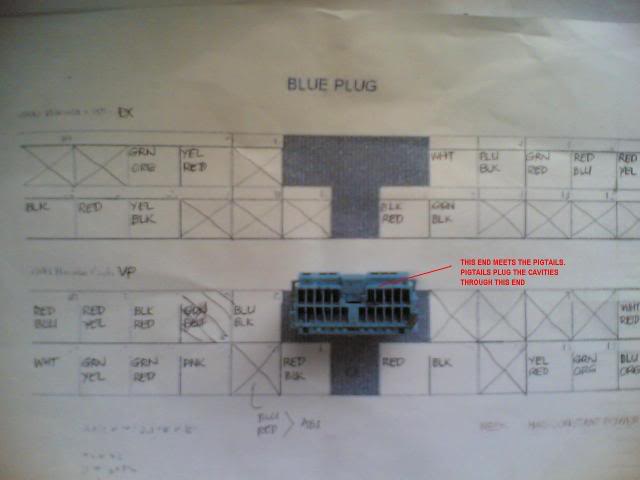 <== note the orientation of the connector w/ respect to the diagram
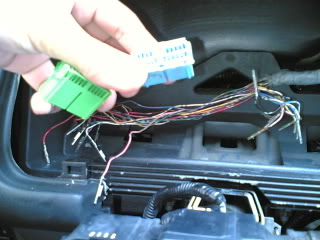
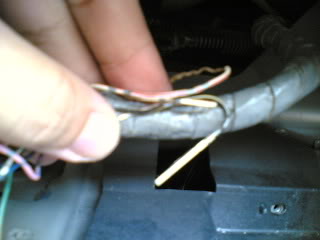
15. Identify the wires needed to be routed from the blue connector to the green connector and vice versa using the pin-out diagram above. The wires are color-coded and are NOT interchangeable.
16. For the Philippine-version Vti-s Civic, two(2) wires will not be used, namely:
• BLACK/YELLOW
• WHITE/RED
Insulate the un-used pigtails with electrical vinyl tape.
17. Cut the BLACK/YELLOW wire from the green connector about 2 inches from the tip of the pigtail and lengthen it using a piece of gauge 14 or 15 stranded wire. The joints should be secured with bullet connectors or soldered. This wire will be routed towards to the blue connector later.
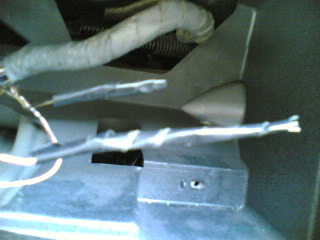
18. Re-insert the pigtails in the correct connector using the pin-out diagram as guide. Most wires will be re-routed to the other connector while some will remain in the same connector but in different holes. Check if the pigtails are secured and not loose.
19. To preserve the neat, factory appearance of your harness, arrange the wires and fold and re-bundle the excess wires. DO NOT cut the excess length. Use a duct tape corresponding to your factory loom to cover the bundled wires. Philippine-version Civics have gray-colored factory looms.
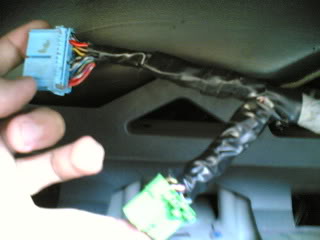
20. This is how it should look like after the factory loom is replaced with duct tape.
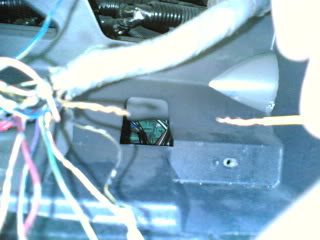
21. Plug in the connectors to the optitron gauge and position the gauge on dash mounts. DO NOT put the screws back yet.
22. Check if the pigtails are secured. Push back in any pigtail that has come out when the connectors are replaced.
23. Re-connect the negative battery terminal. Put the gear selector in neutral (or park for a/t) and check if the handbrake is engaged.
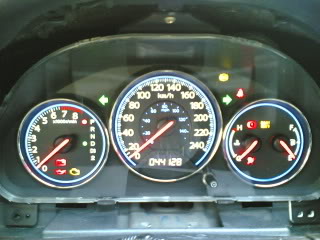
24. Start the engine and see if the optitron gauge is functional. Check if all indicators, lights, warning buzzers, etc., are working. The fuel indicator will usually indicate a lower or higher level but will indicate the correct level after a few minutes. If an indicator light is not functioning, like for example the right turn signal light does not blink, check the GREEN/YELLOW wire if its pigtail has become loose.
25. Re-assembly will the reverse order of removal.
Disclaimer:
User is presumed to have a fair level of mechanical or auto electrical skill in doing this DIY. The author shall not in any way be held responsible for any damage resulting from user’s fault or failure to follow the suggested steps proposed by the author. It’s the user’s responsibility to research thoroughly on the project and validate this DIY.[/i]
Tools and Materials:
• Optitron gauge cluster assembly
• Adjustable/socket wrench or spanner
• Utility knife or cutter
• Short and long shaft Philips screwdrivers
• 1mm or smaller, drill bit
• Electric drill or Dremel tool (preferably, w/ variable speed and reverse)
• Duct tape (gray or black)
• Electrical vinyl tape
• 12 cm or 5 inches gauge 14 or 15 stranded wire (black with yellow stripe, preferred)
• 2 sets bullet connectors (optional)
• Soldering iron and lead set (optional)
Pin-out Diagrams (courtesy of 7thgencivic.com)
Instructions:
1. Record your car’s mileage. Mileage is kept in the cluster and not in the car’s ECM. Once the cluster is replaced, a new mileage, depending on what is stored in the cluster, will be indicated.
2. Using an adjustable/socket wrench or spanner, disconnect the negative battery terminal. DO NOT reconnect until the swap is completed.
3. Pull down the steering column lever to adjust the steering wheel to the lowest position
4. Remove the upper steering column cover.
5. Remove the two (2) screws holding the gauge cluster bezel with a short shaft Philips screwdriver.
6. Starting at the bottom, pull the bezel away from the cluster until an audible click is heard indicating that the 2 clips below are already unattached.
7. Gently pry and wedge the top of the bezel using your fingers and pull it away from the cluster. There are no upper mounting clips here. Remove the bezel taking care not to scratch the cluster lens.
8. Using a short or long shaft screwdriver, remove the two(2) lower and center top mounting screws of the cluster.
9. Press on the harness connector lock and pull out the blue and green connectors from the cluster.
10. Remove the cluster taking care not to scratch the lens. Set it aside in a safe place.
11. Using a utility knife or cutter, remove the factory loom of the cluster harness past the point where the branches meet.
12. Pry the secondary connector locks on both sides of each connector.
13. Using a 1mm or smaller bit and drill or (Dremel tool), slowly drill through the cluster end of the connector to release the pigtails. Drill through the hole corresponding to the pigtail’s lock and NOT through the hole of the pin. If your drill has a variable speed, start with the lowest speed. Periodically stop drilling to check if the pigtail is already free by pulling the wire gently away from the connector. DO NOT use force in pulling the wire. If it can’t be pulled without much effort, then you still need to drill some more.
14. Remove all pigtails from the blue and green connectors. In case a pigtail is detached from the wire, re-connect them using a soldering iron and lead.
<== note the orientation of the connector w/ respect to the diagram15. Identify the wires needed to be routed from the blue connector to the green connector and vice versa using the pin-out diagram above. The wires are color-coded and are NOT interchangeable.
16. For the Philippine-version Vti-s Civic, two(2) wires will not be used, namely:
• BLACK/YELLOW
• WHITE/RED
Insulate the un-used pigtails with electrical vinyl tape.
17. Cut the BLACK/YELLOW wire from the green connector about 2 inches from the tip of the pigtail and lengthen it using a piece of gauge 14 or 15 stranded wire. The joints should be secured with bullet connectors or soldered. This wire will be routed towards to the blue connector later.
18. Re-insert the pigtails in the correct connector using the pin-out diagram as guide. Most wires will be re-routed to the other connector while some will remain in the same connector but in different holes. Check if the pigtails are secured and not loose.
19. To preserve the neat, factory appearance of your harness, arrange the wires and fold and re-bundle the excess wires. DO NOT cut the excess length. Use a duct tape corresponding to your factory loom to cover the bundled wires. Philippine-version Civics have gray-colored factory looms.
20. This is how it should look like after the factory loom is replaced with duct tape.
21. Plug in the connectors to the optitron gauge and position the gauge on dash mounts. DO NOT put the screws back yet.
22. Check if the pigtails are secured. Push back in any pigtail that has come out when the connectors are replaced.
23. Re-connect the negative battery terminal. Put the gear selector in neutral (or park for a/t) and check if the handbrake is engaged.
24. Start the engine and see if the optitron gauge is functional. Check if all indicators, lights, warning buzzers, etc., are working. The fuel indicator will usually indicate a lower or higher level but will indicate the correct level after a few minutes. If an indicator light is not functioning, like for example the right turn signal light does not blink, check the GREEN/YELLOW wire if its pigtail has become loose.
25. Re-assembly will the reverse order of removal.
03-11-2010, 07:44 AM
#17
Honda-Tech Member
Join Date: Jan 2010
Posts: 107
Likes: 0
Received 0 Likes
on
0 Posts
if em2 (2001-2003) cluster works in ek and em2 (2004-2005) cluster works in em2 (2001-2003), then EM2 (2004-2005) cluster should also fit EKs.
GL to those who want to install 04-05 cluster.
GL to those who want to install 04-05 cluster.
03-11-2010, 12:26 PM
#19
Honda-Tech Member
Join Date: Sep 2008
Location: San Francisco, CA, USA
Posts: 595
Likes: 0
Received 0 Likes
on
0 Posts
Nice thread! The 04 cluster looks more like the EK clusters and the 2005 one look more like a Integra cluster. LOL One question have is if the 2004 cluster perfect fitment on the EK?
03-11-2010, 01:05 PM
#20
Honda-Tech Member
Join Date: Jan 2010
Posts: 107
Likes: 0
Received 0 Likes
on
0 Posts
2001-2005 civic clusters should have the same dimensions. with that said, i think you just have to modify the cluster trim of the ek to fit the 04 cluster in. this is as per cyrus_gremlins post above.
