
[FAQ] Civic EG/EH 92-95 JDM Headlight Washer / Rear Wiper / Trunk Light Install DIY
 02-02-2009, 07:29 PM
#1
Honda Civic 92-95 EG/EH OEM JDM Headlight Washer / Hatchback Rear Wiper / Trunk Light Install DIY Guide
Update August 2009: Scroll to bottom of this post for a video of the HLW in operation.
Update May 2011: Attached a RW/W wiring diagram to this post.


Excuse the filth -- but that is precisely the reason why I need the headlight washers, isn't it.
Preamble
Most Canadian Domestic Market (CDM) and all US Domestic Market (USDM) 1992-1995 Honda Civic CX and VX Hatchback models did not come supplied with a rear wiper/washer. As these are the base (CX) and fuel-efficient (VX) models, evidently the Honda geniuses believed that owners would not benefit from the added amenity and/or weight. While many Civic 'tuner' enthusiasts would likely agree that a rear wiper is not useful nor needed, there are those Civic owners who, for more practical reasons, would appreciate the utility of a rear wiper. For example, I live in Canada's Far North where we experience a cornucopia of difficult driving conditions: snowfall and blizzards, -45 temperatures, sand and salt road grime, spring melt filth, torrential rainstorms, summer dust, forest fire haze and ash -- to just name a few. The inability to see out my back window when Mother Nature is throwing her worst at me was always a sore point between me and my 1994 CDM 3dr Honda Civic CX. Sure, in winter the rear defogger worked OK, but rarely would it compare to the effectiveness that a quick rear wipe would have to knock all that snow off... and the spring melt and summer road grime that would build up would usually obscure my view out the back window for hours -- because up here, it can be 2+ hours between gas stations on our remote highways.... often with many kilometres of gravel and construction in between (and beautiful scenery!). Ergo, a rear wiper install seems like a pretty good idea.
UPDATE MARCH 2010: Interested in adding REAR intermittent wiper functionality? Now you can, with parts from a 1997 CR-V. Follow my DIY.
UPDATE MAY 2015: Note if you have A/C and need to install a washer bottle, you do NOT need to drain the system and remove the dryer to remove the bottle. Loosen apart the dryer bracket (3 bolts) and lift the dryer out and move it aside out of the way. The aluminum lines are flexible enough to permit this without damage.
Headlight washers, too, offer a certain utility for your vehicle, enabling you to clear the filth kicked up by the car ahead and obscuring your clear vision of the road. That and you can finally thumb your nose at those Euro-Luxury automobile owners who think they are in an exclusive club with their fancy headlight washer options. OK, maybe it's not quite like that. Anyway, headlight washers were a standard feature on the very rare Japanese Domestic Market (JDM) Honda Civic Ferio (Sedan) EH1 4WD RTSi model. Check out this post to see some photos of the RTSi from the JDM Ferio brochure, and this site to have a close-up view of the headlight washer assembly.
Do I really have to explain why you need a trunk light? Si models got 'em. No one else did. It's dark back there. Get a trunk light. There's a delete plate where it should be. Probably one of the easiest and immediately useful modifications you can make to your Civic hatchback.
Synopsis
The following guide describes the approximate steps I followed to install the OEM rear wiper/washer (RW/W), trunk light (TL), and headlight washers (HLW) on a "vanilla" manual-transmission Canadian Domestic Market (CDM) 3dr 1994 Honda Civic CX. I'm combining the install instructions because they all require access to about the same areas of your car (kinda). Anyway, the only fancy option this car came with originally was OEM floor mats. The instructions apply specifically to 92-95 Civic CDM/USDM hatchbacks, but the instructions for the headlight washer, with likely very few changes, can be interpreted for application on a Sedan or Coupe. For most of the six years I have owned my car, it was totally bone stock. I had only ever put oil, gas and washer fluid into it. At the time of this write-up, I had wired in, over recent months, a number of OEM options, including Cruise Control, Rear Fog Lamp, Power Locks, Power Windows, Power Folding Heated Mirrors, and Seat Heaters - the instructions for some of which I have written up in other DIYs on this site.
Herein, I give detailed instructions on what to remove, and *some* details on how to remove it and re-install it, but at minimum I EXPECT you to have a USDM/CDM Helms Service Manual to consult for the major details on how to take stuff on your car apart, and for how to access some of the areas I describe below (eg., rear quarter panels). No sense in me trying to tell you how to do this, when they have already done an excellent job of it already. It can be purchased as a hard copy text, or there are legitimate places where it can be downloaded as a bookmarked Adobe PDF. One link I found is here on the spoonhonda.com website.
Preparation
Notes on wiring
Wiring will likely take you a fair bit of time out of all the operations involved in this project. My recommendation is, and if you're like me and want as clean an install as possible, you should spend time pulling the correct colour of wires from a salvage yard vehicle. This guide will tell you which wires to remove and where to find the correct colour of wires in a 92-95 Civic to match the OEM colours. At the very least, get as much wiring as possible, you will thank me later. Usually I de-pin the connector and remove the wire from the loom, but what I've done to cheat before is to cut the wires and pull them through the loom, though it's sometimes difficult to figure out where they go and they can often get stuck.
Pulling a whole lot of the correct colour of wire - while painful - makes the re-wiring exercise considerably more pleasant, and guarantees you have enough length, gives you the exact OEM wire colours and means you don't have to go out and buy your OWN wire. I don't usually bother getting BLK (ground) wires all the way to their terminus, so buy yourself a 25ft roll of 16 gauge BLK wire, and you'll be set for this project and for many future projects.
**NOTE:** Many connections to the specific pins on the under-dash fuse box were not explicitly identified in either the CDM/USDM or foreign market Helms manuals. Therefore, I had to determine the correct pins through 'ohm-ing out' with my multimeter, between the fuse location and the pins. For example, the wiring diagram for a headlight washer switch one of the Helms manuals shows that power for the headlight washer relay is connected from the under-dash fuse box, through Fuse No. 11 (20A), and out to a WHT/BLK wire to the relay. It does NOT specify the correct connector junctions and pins where these wires connect to the fuse box. I had to discover this manually. Remarkably, this is new information not found anywhere else on the web or in other service manuals (eg., Haynes, Mitchell), and I have marked it with a "**" to indicate that you won't be able to substantiate this information with any other source.
Fuse Box Connections
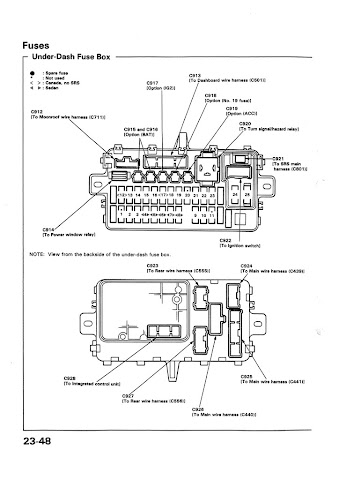
I make reference numerous times to the connector numbers (eg., C555) in the write up. This is referencing the connector numbers as described in the CDM/USDM Helms manual, typically at the under-dash fuse box. I guess this can seem pretty obscure to those of you unfamiliar with this nomenclature. I've reproduced the page below as a quick reference to give you an idea of what I'm talking about. (Click it to enlarge.)
Wiring Connectors
Don't cut wiring if you don't have to. Makes for a cleaner reinstall. De-pin the connectors where you can, as you will probably need the pins anyway.
To patch together cut wires, I recommend using Bullet connectors. These attach & detach readily and are self-shielding. I suppose a cautious person would electrical-tape or heat-shrink seal all the connections, but I didn't. You will need a few wire tap ("T-Taps") connectors, too. As I am in Canada, I purchased my electronics parts over the phone from A-1 Electronics - see http://www.a1parts.com/ (WARNING: TERRIBLE WEBSITE. GODAWFUL.); these had the best prices around Canada that I could find, and domestic shipping was a flat $10. I ordered a pack of 100 for each of Male & Female 14-16 (blue) & 16-18 (red) gauge Bullet connectors, and a pack of 100 of each of 14-16 (blue) & 16-18 gauge wire-taps (T-Taps), which might be overkill for you, but I had a bunch of projects I wanted to wire up so it was a good investment for me.
Americans can just look on eBay; there's dozens of dealers selling large bulk packs of bullet connectors and wire taps.
Pin Removal
You'll have to do a bit of this. A tiny screwdriver is your friend. Look up on honda-tech.com the correct way to remove pins from connectors, or consult this comprehensive guide.
Note on Order of Operations
The instructions, as printed below, aren't necessarily meant to be followed linearly as a step-by-step process of removal and then re-installation. Read the whole thing through, first, to get an idea of what you're up against. You will have to jump around a bit from section to section as you see fit. There is no real "wrong" order to do the install, but you will run in to obvious roadblocks, such as the need to remove the rear quarter panel to run the wiring... but before you do this, you might want to have already installed the wiper switch, for which you'll first have to learn how to take apart the steering column covers properly from your Helms manual.
Time Required
This project is no cakewalk. It took me about about a day and a half (8am to 5pm) of manual labour to remove all the parts from a salvage yard wreck. Reinstallation took longer: about two whole long days (7am to 8pm) -- but I was a real novice when I did it, barely able to even read a wiring diagram.
Disclaimer
Or, "Don't point fingers, you only have yourself to blame"
Every effort has been made to make these instructions as complete and accurate as possible, but no warranty or fitness is implied. The information is provided on an “as is” basis. The author(s) and the website/publisher(s) shall have neither liability nor responsibility to any person or entity with respect to any loss or damages or inconvenience arising from the information contained herein, nor due to any omissions. Read: Don't muck up your vehicle and try to blame me or anyone else. You are responsible for your own due diligence and research.
Parts Required & Removal Instructions
Online
Under Hood

Figure 1. Rear wiper/washer tubing (in pink) emerges from washer bottle near (1) and is
clipped into place at (3), where there is a junction point. It snakes under the wiring
towards the firewall. (2) is cruise control actuator.

Figure 2. Driver's side firewall view from under-hood.
(1) is nipple where tubing enters cabin. It can be brittle
rubber. (2) is master brake cylinder. (3) is daytime running
lights resistor on CDM vehicles.
Cabin: Steering Column
Cabin: Dashboard
Cabin: Under Dash/Footwell

Figure 3. Left side of body in driver's footwell under dash. (1) is junction connector
where LT GRN and GRN pass through. (2) is OEM mounting location of HLW relay.
It can be very hard to access. Note large wiring loom above. (3) is brown junction
connector between main harness and engine compartment harness. Use T-Taps
from GRN/BLK at (3a) to wire HLW relay. (4) is ground bolt, which may be obscured
by a cruise brain and bracket. Note 10cm length of BLK wire I extended from this
bolt to ease grounding of future wiring after installation of cruise brain bracket.
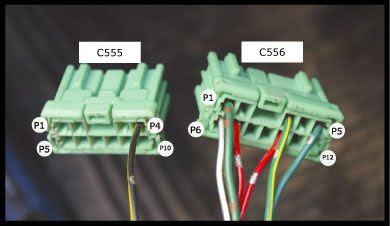
Figure 4. Connectors C555 and C556 from behind under-dash fuse box.
Pin slots (P##) and direction of counting shown. GRN/BLK to RW/W
connects at P1 on C556. WHT/BLU for TL connects at P6 on C556.
Cabin: Door Sill, Rear Quarter Panel and Rear Wiring Harness

Figure 5. Rear tailgate glass. Note gap at (1) between wire retainers
and defroster lines. Civic vehicles without a RW/W do not have a gap
to allow for these wire retainers.
Installation Instructions
*I have attached a rear wiper/washer wiring diagram to this post. Should make installation easier.*
Under Hood

Figure 6. A comparison of (1) HLW bottle and (2) standard-issue CDM/USDM bottle. Note larger size in (1a) vs. (2a).
Front and Rear washer motors are different in (1b) vs. (2b); I don't think they are interchangeable, either, due to space
constraints. (1c) is special bracket over top of the headlight washer motor that attaches at (1d). My bottle was missing
the small bracket at (1e) but this did not seem to affect mounting stability.
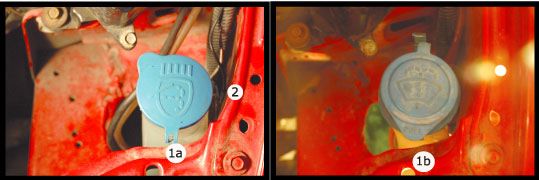
Figure 7. A comparison of washer bottle caps. (1a) shows glyph (symbol) for HLW, (1b)
is standard-issue CDM/USDM bottle cap. (2) is location of grounding bolt.
Front End / Bumper

Figure 8. Upper under-side of front bumper. (1) HLW nozzle cut-out outline is faintly
visible; here I have already outlined it in black marker. Note discolouration in the centre -
this is a small bump which might help identify the location on your bumper. Use a 22mm (7/8")
hole saw centred on the dot to create the initial hole in your bumper. Orientation:
(2) is top side of bumper, (3) is fog light bracket (or front air dam).

Figure 8a. Proper size/shape of headlight washer nozzle hole.

Figure 9. Upper under-side of bumper with retaining pawl (1) inserted correctly
on HLW nozzle (2).
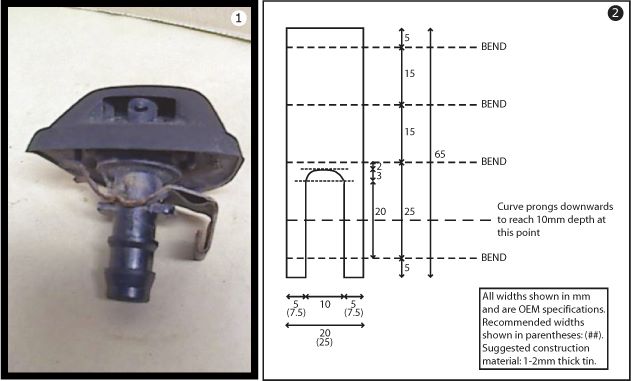
Figure 10. HLW nozzle and pawl (1) (inserted incorrectly) and DIY schematic blueprint (2)
for construction of your own pawls. Note that pawl should be bent at correct angles to be
shaped as in (1).

Figure 11. Close up of one-way valve (1) and tubing.
Note direction of arrow at (1). (2) are metal
pressure crimps to keep tubing in place. (3) is where
nozzle attaches.

Figure 12a. Front end prior to bumper install with HLW
system mounted. Bumper gussets (1a) must be
removed (1b). (2) is stock bumper foam which will keep
the HLW tubing to passenger's side in place. (3) is
HLW nozzle which still requires adjustment to its
pointing direction.

Figure 12b. Mounted washer squirter nozzles should look like this. Ensure that they are about parallel with the headlight and flush with the bumper.
Cabin: Steering Column
Cabin: Under Dash/Footwell
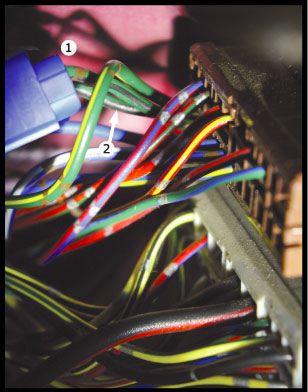
Figure 13. Close-up of brown junction connector between main
harness and engine compartment harness, showing (1) T-Taps on
GRN/BLK for HLW relay. Don't get wire confused with BLK/GRN,
shown with arrow at (2). Fog light BLU/RED can be found tucked
up and to the right of this junction connector.
Cabin: Dashboard

Figure 14. HLW switch wiring diagram.
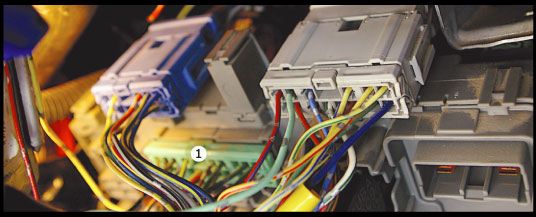
Figure 15. GRN/BLK to HLW dash switch emerges from C501 connector (1).
Cabin: Door Sill, Rear Quarter Panel and Rear Wiring Harness
Test Drive
Good Luck with your project. Now you'll 'see' what you've been missing.
DeSchlong
February, 2009
Update August 2009: Scroll to bottom of this post for a video of the HLW in operation.
Update May 2011: Attached a RW/W wiring diagram to this post.
Excuse the filth -- but that is precisely the reason why I need the headlight washers, isn't it.
Preamble
Most Canadian Domestic Market (CDM) and all US Domestic Market (USDM) 1992-1995 Honda Civic CX and VX Hatchback models did not come supplied with a rear wiper/washer. As these are the base (CX) and fuel-efficient (VX) models, evidently the Honda geniuses believed that owners would not benefit from the added amenity and/or weight. While many Civic 'tuner' enthusiasts would likely agree that a rear wiper is not useful nor needed, there are those Civic owners who, for more practical reasons, would appreciate the utility of a rear wiper. For example, I live in Canada's Far North where we experience a cornucopia of difficult driving conditions: snowfall and blizzards, -45 temperatures, sand and salt road grime, spring melt filth, torrential rainstorms, summer dust, forest fire haze and ash -- to just name a few. The inability to see out my back window when Mother Nature is throwing her worst at me was always a sore point between me and my 1994 CDM 3dr Honda Civic CX. Sure, in winter the rear defogger worked OK, but rarely would it compare to the effectiveness that a quick rear wipe would have to knock all that snow off... and the spring melt and summer road grime that would build up would usually obscure my view out the back window for hours -- because up here, it can be 2+ hours between gas stations on our remote highways.... often with many kilometres of gravel and construction in between (and beautiful scenery!). Ergo, a rear wiper install seems like a pretty good idea.
UPDATE MARCH 2010: Interested in adding REAR intermittent wiper functionality? Now you can, with parts from a 1997 CR-V. Follow my DIY.
UPDATE MAY 2015: Note if you have A/C and need to install a washer bottle, you do NOT need to drain the system and remove the dryer to remove the bottle. Loosen apart the dryer bracket (3 bolts) and lift the dryer out and move it aside out of the way. The aluminum lines are flexible enough to permit this without damage.
Headlight washers, too, offer a certain utility for your vehicle, enabling you to clear the filth kicked up by the car ahead and obscuring your clear vision of the road. That and you can finally thumb your nose at those Euro-Luxury automobile owners who think they are in an exclusive club with their fancy headlight washer options. OK, maybe it's not quite like that. Anyway, headlight washers were a standard feature on the very rare Japanese Domestic Market (JDM) Honda Civic Ferio (Sedan) EH1 4WD RTSi model. Check out this post to see some photos of the RTSi from the JDM Ferio brochure, and this site to have a close-up view of the headlight washer assembly.
Do I really have to explain why you need a trunk light? Si models got 'em. No one else did. It's dark back there. Get a trunk light. There's a delete plate where it should be. Probably one of the easiest and immediately useful modifications you can make to your Civic hatchback.
Synopsis
The following guide describes the approximate steps I followed to install the OEM rear wiper/washer (RW/W), trunk light (TL), and headlight washers (HLW) on a "vanilla" manual-transmission Canadian Domestic Market (CDM) 3dr 1994 Honda Civic CX. I'm combining the install instructions because they all require access to about the same areas of your car (kinda). Anyway, the only fancy option this car came with originally was OEM floor mats. The instructions apply specifically to 92-95 Civic CDM/USDM hatchbacks, but the instructions for the headlight washer, with likely very few changes, can be interpreted for application on a Sedan or Coupe. For most of the six years I have owned my car, it was totally bone stock. I had only ever put oil, gas and washer fluid into it. At the time of this write-up, I had wired in, over recent months, a number of OEM options, including Cruise Control, Rear Fog Lamp, Power Locks, Power Windows, Power Folding Heated Mirrors, and Seat Heaters - the instructions for some of which I have written up in other DIYs on this site.
Herein, I give detailed instructions on what to remove, and *some* details on how to remove it and re-install it, but at minimum I EXPECT you to have a USDM/CDM Helms Service Manual to consult for the major details on how to take stuff on your car apart, and for how to access some of the areas I describe below (eg., rear quarter panels). No sense in me trying to tell you how to do this, when they have already done an excellent job of it already. It can be purchased as a hard copy text, or there are legitimate places where it can be downloaded as a bookmarked Adobe PDF. One link I found is here on the spoonhonda.com website.
Preparation
Notes on wiring
Wiring will likely take you a fair bit of time out of all the operations involved in this project. My recommendation is, and if you're like me and want as clean an install as possible, you should spend time pulling the correct colour of wires from a salvage yard vehicle. This guide will tell you which wires to remove and where to find the correct colour of wires in a 92-95 Civic to match the OEM colours. At the very least, get as much wiring as possible, you will thank me later. Usually I de-pin the connector and remove the wire from the loom, but what I've done to cheat before is to cut the wires and pull them through the loom, though it's sometimes difficult to figure out where they go and they can often get stuck.
Pulling a whole lot of the correct colour of wire - while painful - makes the re-wiring exercise considerably more pleasant, and guarantees you have enough length, gives you the exact OEM wire colours and means you don't have to go out and buy your OWN wire. I don't usually bother getting BLK (ground) wires all the way to their terminus, so buy yourself a 25ft roll of 16 gauge BLK wire, and you'll be set for this project and for many future projects.
**NOTE:** Many connections to the specific pins on the under-dash fuse box were not explicitly identified in either the CDM/USDM or foreign market Helms manuals. Therefore, I had to determine the correct pins through 'ohm-ing out' with my multimeter, between the fuse location and the pins. For example, the wiring diagram for a headlight washer switch one of the Helms manuals shows that power for the headlight washer relay is connected from the under-dash fuse box, through Fuse No. 11 (20A), and out to a WHT/BLK wire to the relay. It does NOT specify the correct connector junctions and pins where these wires connect to the fuse box. I had to discover this manually. Remarkably, this is new information not found anywhere else on the web or in other service manuals (eg., Haynes, Mitchell), and I have marked it with a "**" to indicate that you won't be able to substantiate this information with any other source.
Fuse Box Connections
I make reference numerous times to the connector numbers (eg., C555) in the write up. This is referencing the connector numbers as described in the CDM/USDM Helms manual, typically at the under-dash fuse box. I guess this can seem pretty obscure to those of you unfamiliar with this nomenclature. I've reproduced the page below as a quick reference to give you an idea of what I'm talking about. (Click it to enlarge.)

Wiring Connectors
Don't cut wiring if you don't have to. Makes for a cleaner reinstall. De-pin the connectors where you can, as you will probably need the pins anyway.
To patch together cut wires, I recommend using Bullet connectors. These attach & detach readily and are self-shielding. I suppose a cautious person would electrical-tape or heat-shrink seal all the connections, but I didn't. You will need a few wire tap ("T-Taps") connectors, too. As I am in Canada, I purchased my electronics parts over the phone from A-1 Electronics - see http://www.a1parts.com/ (WARNING: TERRIBLE WEBSITE. GODAWFUL.); these had the best prices around Canada that I could find, and domestic shipping was a flat $10. I ordered a pack of 100 for each of Male & Female 14-16 (blue) & 16-18 (red) gauge Bullet connectors, and a pack of 100 of each of 14-16 (blue) & 16-18 gauge wire-taps (T-Taps), which might be overkill for you, but I had a bunch of projects I wanted to wire up so it was a good investment for me.
Americans can just look on eBay; there's dozens of dealers selling large bulk packs of bullet connectors and wire taps.
Pin Removal
You'll have to do a bit of this. A tiny screwdriver is your friend. Look up on honda-tech.com the correct way to remove pins from connectors, or consult this comprehensive guide.
Note on Order of Operations
The instructions, as printed below, aren't necessarily meant to be followed linearly as a step-by-step process of removal and then re-installation. Read the whole thing through, first, to get an idea of what you're up against. You will have to jump around a bit from section to section as you see fit. There is no real "wrong" order to do the install, but you will run in to obvious roadblocks, such as the need to remove the rear quarter panel to run the wiring... but before you do this, you might want to have already installed the wiper switch, for which you'll first have to learn how to take apart the steering column covers properly from your Helms manual.
Time Required
This project is no cakewalk. It took me about about a day and a half (8am to 5pm) of manual labour to remove all the parts from a salvage yard wreck. Reinstallation took longer: about two whole long days (7am to 8pm) -- but I was a real novice when I did it, barely able to even read a wiring diagram.
Disclaimer
Or, "Don't point fingers, you only have yourself to blame"
Every effort has been made to make these instructions as complete and accurate as possible, but no warranty or fitness is implied. The information is provided on an “as is” basis. The author(s) and the website/publisher(s) shall have neither liability nor responsibility to any person or entity with respect to any loss or damages or inconvenience arising from the information contained herein, nor due to any omissions. Read: Don't muck up your vehicle and try to blame me or anyone else. You are responsible for your own due diligence and research.
Parts Required & Removal Instructions
Online
- Headlight washer assembly - likely your best bet to find these rare parts. Proper installation will include:
- In-dash switch, special oversized bottle with cap & both mounting brackets, front, rear & headlight washer motors, bumper tubing with squeezy crimping clips, bumper hose clips & two valves, two headlight squirter nozzles with rubber bases and retainer pawls, and the under-dash headlight washer relay. See here for a mostly complete set (missing bottle mounting brackets).
- Note that:
- I did not use the bumper hose clips.
- The system can be run without the relay. The nozzles will squirt for as long as you hold the button down - actually a very good set-up, and I think I like it better this way than with the relay installed.
- You can make your own pawls and I will show you how.
- You definitely need the bottle.
- The valves are very, very important, as are the nozzles (obviously).
- All electrical connections must come with pigtail harnesses.
Under Hood
- For only CDM/USDM RW/W install:
- Washer bottle with front and rear washer motor: in front of driver's side wheel.
- Follow Helms manual instructions for removal. Basically, remove bumper to unbolt from body.
- CDM CX:
- You do not need wiring as your Civic should already be pre-wired under the hood for the RW/W.
- CDM VX / USDM VX, CX:
- You are not pre-wired and need the wiring. I am not completely clear on how to do this as my vehicle was pre-wired, however it seems as straight-forward as removing the wiring all the way to the washer combination switch. (Not saying this will be easy, though.)
-
- Wire colour from the switch to the washer bottle will be GRN/BLK for 92/93 or GRN/YEL for 94/95 vehicles.
- Washer bottle with front and rear washer motor: in front of driver's side wheel.
- For HLW and RW/W:
- Rear washer tubing: along driver's side hood edge, to rear squirter nozzle. See Figures 1 and 2.
- Separate it where it is joined, just past the clamp midway up the hood.
- AFTER you have pulled the tubing through into the cabin (see below):
- Use a flat blade screwdriver to pry the grommet towards you. Work slowly. It is very old and can be brittle rubber.
- Don't pull on the nippley part, you'll definitely wreck it that way.
- Rear washer tubing: along driver's side hood edge, to rear squirter nozzle. See Figures 1 and 2.
- For HLW:
- RED/WHT: Connects the under-dash switch to the HLW relay.
- Pull 1-2m from the loom that runs under-hood along the passenger side to the headlight.
- RED/WHT: Connects the under-dash switch to the HLW relay.
Figure 1. Rear wiper/washer tubing (in pink) emerges from washer bottle near (1) and is
clipped into place at (3), where there is a junction point. It snakes under the wiring
towards the firewall. (2) is cruise control actuator.
Figure 2. Driver's side firewall view from under-hood.
(1) is nipple where tubing enters cabin. It can be brittle
rubber. (2) is master brake cylinder. (3) is daytime running
lights resistor on CDM vehicles.
- For RW/W:
- Combination Wiper Switch: right side of combination unit on steering wheel. Has a collar with the rear wiper functionality on it.
- Follow Helms manual instructions for removal. Basically, you remove the steering column covers and unscrew. Remove the connectors. Pull outwards towards passenger side to get it out.
- CDM CX:
- You don't need any connector pigtails because your Civic is pre-wired down to the driver's footwell for the RW/W.
- CDM VX / USDM VX, CX:
- You are not pre-wired and need the wiring. I am not completely clear on how to do this as my vehicle was pre-wired, however it seems as straight-forward as removing the wiring all the way to the washer combination switch. (Not saying this will be easy, though.)
- You will also have intermittent wipers, which the CDM VX and USDM CX & VX models did not have.
- Combination Wiper Switch: right side of combination unit on steering wheel. Has a collar with the rear wiper functionality on it.
- For HLW:
- WHT/BLK: Connects under-dash fuse box to HLW relay.
- Runs from ignition switch to under-dash fuse box. De-pin and keep. You need a pin to connect to the under-dash fuse box, so don't just cut the wire.
- WHT/BLK: Connects under-dash fuse box to HLW relay.
Cabin: Dashboard
- For HLW:
- (Optional) "Neo-wedge bulbs": bulbs that light up dashboard switches. There is a chance that the HLW dashboard switch has a blown bulb, so to resolve this problem, grab some extra bulbs.
- Pry out the eg., rear defrost switch and/or hazard light switch and twist out the bulbs with a flathead screwdriver. They are all the same and will fit the HLW switch.
- Put these somewhere safe/padded from impacts and the wrath of your tools.
- (Optional) "Neo-wedge bulbs": bulbs that light up dashboard switches. There is a chance that the HLW dashboard switch has a blown bulb, so to resolve this problem, grab some extra bulbs.
Cabin: Under Dash/Footwell
- For RW/W:
- Rear washer tubing
- Pull carefully through nipple/grommet in firewall INTO THE CABIN after disconnecting under-hood.
- I found it difficult to locate where tubing enters cabin.
- LT GRN/BLK and GRN: run to RW/W from connector junction.
- These connect at the junction shown in Figure 3, in the driver's footwell. It's there, underneath the carpet, attached on to the body with a clip. It will be behind the Cruise Control computer brain bracket, if equipped (you'll have to remove this to access it).
- CDM CX:
- Are wired to this junction for the RW/W, from the combination switch.
- CDM VX / USDM VX, CX:
- You are not pre-wired and you need the wiring to this junction from the combination switch.
- Those with the RW/W have the correct wiring that continues on from here towards the rear. De-pin the wires from the junction.
- GRN/BLK: runs to RW/W from under-dash fuse box.
- De-pin from P1 on C556. See Figure 4.
- Rear washer tubing
- For TL:
- WHT/BLU: constant power wire from under-dash fuse box.
- De-pin from P6 on C556. See Figure 4.
- Wiring diagrams often show this wire as being WHT/RED but this is incorrect, in my experience.
- If you cannot find an Si in a salvage yard, try obtaining this wire from a sedan -- since many (though not all) sedans have a trunk light, it should be there, but I have not verified this.
- WHT/BLU: constant power wire from under-dash fuse box.
Figure 3. Left side of body in driver's footwell under dash. (1) is junction connector
where LT GRN and GRN pass through. (2) is OEM mounting location of HLW relay.
It can be very hard to access. Note large wiring loom above. (3) is brown junction
connector between main harness and engine compartment harness. Use T-Taps
from GRN/BLK at (3a) to wire HLW relay. (4) is ground bolt, which may be obscured
by a cruise brain and bracket. Note 10cm length of BLK wire I extended from this
bolt to ease grounding of future wiring after installation of cruise brain bracket.
Figure 4. Connectors C555 and C556 from behind under-dash fuse box.
Pin slots (P##) and direction of counting shown. GRN/BLK to RW/W
connects at P1 on C556. WHT/BLU for TL connects at P6 on C556.
- For HLW:
- 10mm bolts
- Get a few of these b/c you might need some during re-installation (eg., for the relay).
- RED/BLK and RED: Connects dash light bulb to dimmer switch on re-installation.
- 20A Fuse: Plugs in to Fuse No. 11, to power the HLW relay.
- 10mm bolts
- Integrated Control Unit (ICU) from behind the fuse box.
- If you want to add the intermittent wiper option, you will need the ICU from the donor vehicle.
- The ICU has nothing to do with the rear wiper function.
Cabin: Door Sill, Rear Quarter Panel and Rear Wiring Harness
- RW/W & TL Wires and tubing:
- Follow Helms manual instructions to remove whatever's in your way (eg., trunk release lever, rear quarter panels). Pull through loom to free your wires up. Make a note of where the tubing runs for correct future re-installation.
- Get all the clips that hold the tubing to the body.
- For RW/W:
- De-pin LT GRN/BLK, GRN, GRN/BLK at large rear connector behind rear quarter panel. Make a note of which wire goes where.
- For TL:
- De-pin WHT/BLU at large rear connector behind rear quarter panel. Make a note of where it is connected.
- Get some extra GRN wire for the grounding of the light, if you need it. This GRN wire will be poached from the wire which senses the ground on the tailgate latch.
- For HLW:
- WHT/RED: Connects the HLW relay to the motor under-hood.
- Has to be pretty long.
- Find a sedan with power locks. WHT/RED runs along the door sill to the rear doors. Cut it by where it begins its run to the rear below the hood latch/main relay, and on the other end at the REAR PASSENGER side and pull it through. Might have to loosen things up along the back seat, but this will give you enough length to run the length to the from inside the cabin to the front bumper on re-installation.
- GRN/BLK: Connects the under-dash fuse box to the HLW switch. Connects from other GRN/BLK to the HLW relay.
- GRN/BLK also powers the back-up lights. Clip 1-2m from the wiring loom.
- WHT/RED: Connects the HLW relay to the motor under-hood.
- Trunk Light assembly: located in the trunk on the rear driver's side quarter panel on an Si.
- Honda p/n 34260-SH3-004. It is also available from numerous different models and years of 1990-2006 Civic, CRX & Insight, and 1994-2001 Acura Integra.
- It just pries out. Get the pigtail harness. Can use a pigtail for a Civic rear speaker connector, if necessary.
- Must have the switch to turn on/off, so a light from a 92-95 sedan is not correct.
- Online is also a good place to find the trunk light, if you do not have an Si model in your local salvage yard.
- Tailgate wiring loom and tubing: starting at next to rear driver's side passenger seat.
- I removed the complete rear wiring harness for reinstallation into my vehicle, cutting it only past the rear driver's side tail lamp by where the back tailgate trim cover begins... about in line with the tailgate latch. YOU might want to do something different (ie., just pull the wires that you need), but I will just give instructions for what I did for my vehicle.
- Disconnect at the junction and unclip from body (keep all clips).
- Drop the headliner at the back to disconnect the wiring and tubing, pull it down through the back driver's side pillar. The loom should now be free.
- Get all the tubing clips (3?) from under the headliner.
- (Optional) Rear tail lamp wiring harness.
- Get this too while you're back there if you want to perform the Rear Fog Lamp install.
- For RW/W:
- Hatch glass and rear wiper: get the whole deal - glass, wiper, struts and spoiler. Follow Helms manual instructions for removal. You might have to pay a lot for this part, but here's why you need it all:
- The cutout for the squirter nozzle in the spoiler is already there. You don't have to make it, like I did.
- You don't have to mess around with removing the rear wiper assembly, like I did. Incidentally, the 'special nut' noted in the Helms manual is 23mm.
- You don't have to mess around with glueing the rubber trim wire retainers over top of the defroster lines, like I did - which I suspect is lowering my defogging performance in winter. ie., the defroster lines are different on a vehicle with a RW/W - there is a gap left around the edge where the wiring retainers go. See Figure 5. This actually surprised me a lot, because so many parts on these vehicles are interchangeable, I didn't expect them to design the rear window differently for vehicles with and without RW/W. Learn from my mistake.
- IT'S PLUG AND PLAY.
- DID I MENTION IT'S PLUG AND PLAY? IT'S PLUG AND PLAY.
- Check if the rear wiper blade is OEM or some knock-off. The OEM one has TWO lengths of slim silver metal which runs the length of either side of the wiper blade. The wiper clips over-top of this metal and it acts as a stiffener to the rubber blade.
- Hatch glass and rear wiper: get the whole deal - glass, wiper, struts and spoiler. Follow Helms manual instructions for removal. You might have to pay a lot for this part, but here's why you need it all:
Figure 5. Rear tailgate glass. Note gap at (1) between wire retainers
and defroster lines. Civic vehicles without a RW/W do not have a gap
to allow for these wire retainers.
Installation Instructions
*I have attached a rear wiper/washer wiring diagram to this post. Should make installation easier.*
Under Hood
- For RW/W and HLW:
- Washer Bottle
- Follow Helms manual instructions for removal of old one. New one bolts right on. See Figure 6 and 7 for a comparison of the bottles.
- HLW bottle has the extra brackets noted in Figure 6. I was missing one, but it did not seem to affect mounting stability at all.
- Attach your wiring to the front and back. Both will be there.
- Washer Bottle
Figure 6. A comparison of (1) HLW bottle and (2) standard-issue CDM/USDM bottle. Note larger size in (1a) vs. (2a).
Front and Rear washer motors are different in (1b) vs. (2b); I don't think they are interchangeable, either, due to space
constraints. (1c) is special bracket over top of the headlight washer motor that attaches at (1d). My bottle was missing
the small bracket at (1e) but this did not seem to affect mounting stability.
Figure 7. A comparison of washer bottle caps. (1a) shows glyph (symbol) for HLW, (1b)
is standard-issue CDM/USDM bottle cap. (2) is location of grounding bolt.
- RW/W Tubing
- Snake it to meet the holder at mid-way up hood. See Figure 1.
- Firewall grommet
- Remove the grommet plug and insert the grommet nipple from this angle. It can be tricky. See Figure 2.
- You'll fish the tubing through later from inside the cabin.
- For HLW:
- After poking WHT/RED through the large rubber grommet holding the driver's side main wiring loom (see below), I cable tied it parallel to the existing wiring in a 3/8" split plastic wiring loom through the engine compartment (alongside my Cruise Control Install wires).
- The BLK wire from the motor I extended to the ground bolt by the washer bottle cap. See Figure 7.
- Connect pigtails with bullet connectors.
Front End / Bumper
- For HLW:
- Remove your bumper.
- Follow Helms manual instructions for removal.
- HLW nozzle holes: outline of the holes are faintly visible on the underside of the bumper (Thank-you, Honda).
- Outline them in a marker pen like in Figure 8. Mine also had a little bump in the middle, if that helps you identify where it is.
- Preferably, use a 22mm (7/8") hole saw to make your hole. It makes your life 10,000x easier and it makes the perfect size hole. Line it up with the dot in the centre, and the rounded bottom part of the hole (Figure 8) then drill your hole. No going back now! All that remains is to make the "triangle" bits on the two sides, which can be easily done using a utility knife. The "triangle" bits are required to accept the design of the washer nozzle, to make them line up flush with the bumper. The shape should be about the same as in Figure 8a.
- Nozzles will sit flush with the bumper when installed correctly.
- Remove your bumper.
Figure 8. Upper under-side of front bumper. (1) HLW nozzle cut-out outline is faintly
visible; here I have already outlined it in black marker. Note discolouration in the centre -
this is a small bump which might help identify the location on your bumper. Use a 22mm (7/8")
hole saw centred on the dot to create the initial hole in your bumper. Orientation:
(2) is top side of bumper, (3) is fog light bracket (or front air dam).
Figure 8a. Proper size/shape of headlight washer nozzle hole.
- Retaining pawl.
- Slide it in front to back to retain the washer nozzle in the bumper. See Figure 9.
- If you did not get any with your HLW assembly, or they were too damaged to re-use, follow the blueprints in Figure 10 to create new ones from 1-2mm thick tin.
Figure 9. Upper under-side of bumper with retaining pawl (1) inserted correctly
on HLW nozzle (2).
Figure 10. HLW nozzle and pawl (1) (inserted incorrectly) and DIY schematic blueprint (2)
for construction of your own pawls. Note that pawl should be bent at correct angles to be
shaped as in (1).
- HLW tubing:
- Ensure that the one-way valves as in Figure 11 are directed properly. Follow the direction of the arrow printed on the valve.
- Connect the HLW nozzles to the main tubing and to the motor. Ensure that all the tubing crimps along the length of all the hoses are placed properly.
- I didn't bother with the bumper tubing retainers (along the front inside of the bumper to the passenger side), as the foam bumper support gets in the way. If you leave the retainers off, the hose is held in place by the pressure of the foam along the inside of the bumper, and it will all mount OK.
- I suspect this is because the JDM bumper design is different from CDM/USDM. Different safety & design standards, etc.
- Pro-tip (added July 2011): Place the foam on the bumper support. As you mount the bumper, reach through the grill and tuck the tubing in front of the bumper foam to set it in place. Begin at the driver's side (important) right about at the T-joint in the tubing, then work your way along to the passenger side. Having mounted my bumper a number of times since my original HLW install, I can say with assurance that this is the best technique.
Figure 11. Close up of one-way valve (1) and tubing.
Note direction of arrow at (1). (2) are metal
pressure crimps to keep tubing in place. (3) is where
nozzle attaches.
- Front-end bumper gussets.
- These get in the way of the headlight washer tubing; take them out. See Figure 12a. Squeeze along the top and bottom and pull towards you.
Figure 12a. Front end prior to bumper install with HLW
system mounted. Bumper gussets (1a) must be
removed (1b). (2) is stock bumper foam which will keep
the HLW tubing to passenger's side in place. (3) is
HLW nozzle which still requires adjustment to its
pointing direction.
- Final inspection.
- Consult Figure 12b for an example of how the nozzles should fit on your bumper.
Figure 12b. Mounted washer squirter nozzles should look like this. Ensure that they are about parallel with the headlight and flush with the bumper.
Cabin: Steering Column
- For RW/W:
- CAUTION: DON'T BREAK THE TABS WHEN REMOVING THE STEERING COLUMN COVERS! You've been warned. It's very easy to do if you just reef on it. Pry each apart carefully. Be patient. You probably broke the tabs on the column cover on the car you salvaged parts from, and made a mental note not to do that on your own vehicle.
- Combination Wiper Switch
- Follow Helms manual instructions for removal. Replace with the one with the rear wiper collar from your salvage vehicle. Plug in connectors.
Cabin: Under Dash/Footwell
- For RW/W:
- LT GRN/BLK, GRN and GRN/BLK.
- Reconnect at the junction or off the under-dash fuse box from where you removed it from the salvage vehicle and route wires towards the rear.
- Tubing
- After inserting the firewall nipple grommet, push your tubing from inside the cabin into the engine compartment and connect it up.
- LT GRN/BLK, GRN and GRN/BLK.
- For TL:
- WHT/BLU
- Reconnect at the under-dash fuse box from where you removed it (at P6 on C556, see Figure 4) and route wire towards the rear.
- WHT/BLU
- For HLW:
- No. 11 (20A) Fuse.
- Plug it in.
- HLW Relay
- Mount it in its OEM location as identified in Figure 3 using a 10mm bolt. It can be a real pain to access. It is semi-obscured by a massive bundle of wiring which fights you the whole way. Be persistent.
- Alternatively, mount it on the Cruise Control (CC) computer brain bracket, if you have already performed an OEM CC retrofit install. There are two 10mm holes at the top of the bracket.
- WHT/BLK
- Pin one end into **SLOT 2 on 5-pin C439 connector** on the under-dash fuse box.
- Begin counting from the top left corner, looking at the connector from the wire side. (Top has the release button.)
- This slot routes power from Fuse No. 11 (20A) to the HLW relay.
- Trim to size and use bullet connectors to connect pigtails.
- GRN/BLK
- Use a wire tap (T-tap) to tap in to a GRN/BLK off the junction connectors as shown in Figures 3 and 13.
- Don't confuse GRN/BLK with BLK/GRN! What happens is pretty funny, though.
- Trim to size and use bullet connectors to connect pigtails.
- No. 11 (20A) Fuse.
Figure 13. Close-up of brown junction connector between main
harness and engine compartment harness, showing (1) T-Taps on
GRN/BLK for HLW relay. Don't get wire confused with BLK/GRN,
shown with arrow at (2). Fog light BLU/RED can be found tucked
up and to the right of this junction connector.
-
-
- RED/WHT
- Route the wire towards the dashboard switch.
- Trim to size and use bullet connectors to connect pigtails.
- WHT/RED
- The bundle of wire that enters the engine compartment passes through a large rubber grommet. The simplest way to pass your WHT/RED through is just to poke a hole through the rubber. Disassembling the bundle and adding the new wires to it is a daunting task which I did not undertake, though it *would* look more OEM.
- This would also be the time to add any other wiring you would like to send to the engine compartment. Think about adding a BRN, BRN/BLK and BRN/WHT for a future addition of CC.
- Also, this is a good time to drop down the 1-pin BLU/RED fog light option connector which is blue-taped high above the white brace holding the brown (and white) junction connectors shown in Figures 3 and 13, possibly even behind the padded rubber matting. It's there, believe me. Keep hunting.
- BLK
- Ground it.
- You might consider hooking up a short lead of BLK wire (~10cm) to the ground screw at the body around here. See Figure 3. I used a U-terminal, and slid it under the grounding bolt. On the other end, I used an O-terminal. Through it, I put a small screw with a nut. As I needed to do other wiring, I could just lead the BLK ground wires terminated with their own O-terminal, back to this screw/nut, which allowed for way easier grounding than making everything reach behind where the ground screw is obscured. Not OEM, but pretty clean, nonetheless.
- RED/WHT
-
Cabin: Dashboard
- For HLW:
- Wire the dashboard HLW Switch pigtail as follows, using the diagram in Figure 14:
- GRN/BLK
- Connect to GRN/BLK wire from PIN E.
- Route the wire towards the under-dash fuse box.
- Pin one end into **SLOT 10 on 20-pin C501 connector** on the under-dash fuse box. See Figure 15.
- RED/WHT
- Connect to RED/WHT wire from PIN D.
- Route the wire towards the HLW relay mounting location, if you have not done so already.
- Trim to size and use bullet connectors to connect pigtails.
- RED/BLK
- Connect to RED/BLK wire from PIN C.
- Use a T-taps or other means to connect this wire to other existing RED/BLK wiring.
- RED
- Connect to BLK wire from PIN B
- The mismatch of colours is because there is no dash/gauge bulb dimmer switch on JDM vehicles. We are adding this functionality...uhh, even though the HLW switch takes the place of the dimmer switch!
- Use a T-taps or other means to connect this wire to other existing dimmer switch RED wiring.
- GRN/BLK
- Wire the dashboard HLW Switch pigtail as follows, using the diagram in Figure 14:
Figure 14. HLW switch wiring diagram.
Figure 15. GRN/BLK to HLW dash switch emerges from C501 connector (1).
-
- Set your dimmer switch to your favourite setting and mount it somehow behind the dashboard switches so it doesn't rattle around.
- It's inaccessible now and I doubt you'll ever miss it.
- Set your dimmer switch to your favourite setting and mount it somehow behind the dashboard switches so it doesn't rattle around.
Cabin: Door Sill, Rear Quarter Panel and Rear Wiring Harness
- For RW/W and/or TL:
- Snake your wires along to meet up with the large junction connector. Insert your wire pins in the same location as where you removed them.
- Snake the tubing through this area, too, reconnecting clips to body where removed.
- For RW/W:
- Tailgate / Trunk wiring harness and tubing
- Disconnect and remove your current Reconnect wiring at the large connector junction and attach to body using clips. Reconnect all other wiring connections at rear.
- You should offset the cutting of the wires at the back, to make for less bulk when reconnecting using your bullet connectors.
- Drop the headliner and fish the RW/W wiring and tubing up through the side sill. It's a pain, but there's no other way, unless you want to take off the side panel trim (daunting task).
- Note how that long rubber thing that keeps the headliner in place is fitted. It reinstalls right back into place after you're done; you'll never know the difference.
- Don't forget to install the tubing holders underneath the headliner.
- Rear window
- Reinstall and connect wiring and tubing.
- Tailgate / Trunk wiring harness and tubing
- For TL:
- Wiring
- Add a length of WHT/BLU from the junction connector to over the wheel well, if you need to (ie., you did not get the wiring from an Si).
- "Ground" your GRN wire to the GRN wire for the trunk latch (NOT THE ONE FOR THE REAR WIPER!) using a T-Taps or other means.
- Trim to size and use bullet connectors to connect pigtails.
- WHT/BLU connects to PIN1, GRN to PIN2, if memory serves.
- Wiring
Test Drive
- Reconnect your battery and try out your system while the car is parked.
- I wouldn't completely reassemble all your parts before your first test. Leave off certain pieces of trim to make it easier to troubleshoot if you encounter problems.
- For RW/W:
- Normal operation will involve:
- Ignition turned to 'ON' (IG1).
- Engage the RW/W collar for the wiper/washer combination switch:
- Turn down (momentary switch) to spray the rear window.
- Turn up once to engage rear wiper. It tends to go pretty fast, and there is no 'intermittent' setting. (To add intermittent functionality, see my other DIYs.)
- While the rear wiper is engaged, turn up once again (momentary switch) to spray the rear window.
- While the rear wiper is engaged, turn down once to disengage. It should park itself at the bottom again.
- Normal operation will involve:
- For HLW:
- Normal operation will involve:
- Ignition turned to 'ON' (IG1).
- Engage the HLW with the dashboard button:
- The relay sends a signal to the HLW motor to spray for about 1sec. It's a powerful burst.
- There will likely be some amount of overspray.
- Normal operation will involve:
- For TL:
- Normal operation will involve:
- Operable at all times.
- Open the trunk latch:
- If the switch is set to 'ON', light will engage.
- Can be disengaged by switch to remain 'OFF'.
- Normal operation will involve:
- Generally, if a system does not operate normally, troubleshoot all your connections. Where possible, follow the troubleshooting directions in your Helms TO THE LETTER! It will help you track down the problem the quickly. Trust it.
- That said, I suggest that testing your ground connections (all of 'em) is a good test to begin with.
- A blown bulb will not affect the operation, but should be replaced!
Good Luck with your project. Now you'll 'see' what you've been missing.
DeSchlong
February, 2009
Last edited by deschlong; 05-02-2015 at 09:54 PM. Reason: 1. Added video, hole saw info, no pre-wiring for some cars. 2. Note on REAR int. wiper. 3. RW/W diagram.
 02-02-2009, 08:18 PM
#2
Honda-Tech Member
Join Date: Mar 2008
Location: ON, Canada
Posts: 178
Likes: 0
Received 0 Likes
on
0 Posts
Wow such a detailed and very informative post. Tho I would assume it'd be pretty hard to source all the parts. where'd you pick up the headlight washer nozzle and switch?
02-02-2009, 08:42 PM
#3
...wait is this a nozzel that sprays on the head light? no wiper? well it wouldn't work with how our head lights have dimples and aren't smooth. crazy though i had no idea.
i am very glad my car did not come with this!
detailed write up though
i am very glad my car did not come with this!
detailed write up though
02-02-2009, 11:26 PM
#4
Honda-Tech Member
iTrader: (5)
Join Date: Mar 2005
Location: upstate, ny, us
Posts: 942
Likes: 0
Received 0 Likes
on
0 Posts
Nice write up, your one of the few not giving your rear wiper up for the wiper plug.
02-08-2009, 02:27 PM
#5
Update: It's been about a month since the headlight washer mod and I am quite happy with it. I have had a few opportunities to use it and I find it is quite effective at blasting snow off and clearing road grime. The blast from the nozzles is very powerful -- not like your windshield ones that spray in two tiny jets.


 07-04-2009, 11:07 AM
#11
Pimpin' Pimpin'
Join Date: May 2005
Location: oregon, usa
Posts: 531
Likes: 0
Received 0 Likes
on
0 Posts
Switch lights up white.
Last edited by BrandonRyan; 07-07-2009 at 10:09 AM.
 08-29-2009, 04:40 PM
#15
Junior Member

Join Date: Aug 2009
Location: New Jersey
Posts: 11
Likes: 0
Received 0 Likes
on
0 Posts
Great post!
I used what I learned from your post to put a rear wiper in my 92 VX. I got the wiper stalk switch and rear wiper mechanism off ebay - also got the integrated control unit off ebay so I could use the intermittent front wiper position that is on the new stalk.
Then off to the junkyard. Non of the junkyards near me have any hatchbacks. I was able to get an extra washer pump and the connector that connects to the rear wiper stalk switch (from an older CRX).
You mention (and I've seen in at least one other post) that the hatchback civics are pre-wired in the dashboard for a rear wiper. My VX had non of the wires for the rear wiper. No connector for the stalk and none of the other wires under the dash. Also no connector for the rear washer pump.
First I mounted the new wiper stalk.Then installed the newer integrated control unit on the back of the fuse box that has the intermittent front wiper circuitry.
Veriified that worked.
Then mounted the rear wiper. It's box was already mounted to the glass but had no motor in it.
Took the front bumper off to get to the washer reservoir. Drilled a 3/4" hole in the reservoir to mount the rear washer pump. The reservoir had a mounting spot for the rear pump. The washer pump and it's rubber grommet need a 0.83" hole. So I used a round file to make the hole bigger. Put a dab of silicon sealant on the grommet before installation just to make sure it did not leak.
Then ran the washer hose back to the rear of the car. Next were the wires for the washer pump. Both the hose and wires went thru the proper hole in the firewall. I used the plastic plug that was in the hole. Drilled a hole in it just big enough to snugly fit the house and wires.
Then ran the wires back from the dash to the rear wiper. Both the hose and wires fit in the plastic wire chase under the carpet that runs front to back. The hose and wires then ran along the original harness past the back seat and up the rear pillar and under the roof trim to the flexible accordion tube into the rear hatch.
Turned the key on and tried it. It all worked fine.
I used your directions and the shop manual to make sure I got the wiring done correctly.
Your tip on where to pick off the switched +12V from connector C556 was right on. I had snipped a few additional connectors while at the junkyard for spare parts.
The only items left to do are to mount the rear washer spray nozzle and find an appropriate way to hold and conceal the wiper wiring as it goes around the rear glass to the motor.
The rear nozzle should be here in a couple days. I ordered it from Bernardi Honda. It was only $2.51. All my custom wiring connections were soldered and heat shrink wrapped.
Thanks!
08-29-2009, 08:32 PM
#16
^^ @N2UAD:
Hey - that's great! Glad I could help, and thanks for posting your story.
That's a good point you made about no pre-wiring for the RW/W on your VX. I meant to update this post earlier when I realized that I erred in assuming that all 5th Gen hatchbacks were pre-wired for the rear washer (squirter) motor. I recently picked up a CDM 92 VX, and noticed that it was not pre-wired.
I think I caught a lucky break with my CDM CX -- reason being that many CDM CXs came mounted with a rear wiper; this was a factory option, I presume. So, although my rear wiring differed (it did not have the wires), they must have used the same generic harness for the Driver's Side engine harness for all CDM CX/DX/Si.
I'll update my write-up. Thanks for the reminder.
Tell me - did you add the trunk light, too, at the same time? It's only two wires!
Last edited by deschlong; 08-29-2009 at 08:56 PM.
08-30-2009, 03:31 AM
#17
Junior Member
Join Date: Aug 2009
Location: New Jersey
Posts: 11
Likes: 0
Received 0 Likes
on
0 Posts
Nope, forgot about the trunk light until I was putting the rear back together. Then I realized I could have grabbed a trunk light from a sedan in the junk yard.
Next time I'm at the junk yard I'll get a light and wire it in. After the rear wiper the light will be a piece of cake!
Thanks
Next time I'm at the junk yard I'll get a light and wire it in. After the rear wiper the light will be a piece of cake!
Thanks
08-30-2009, 07:38 AM
#20
Nope, forgot about the trunk light until I was putting the rear back together. Then I realized I could have grabbed a trunk light from a sedan in the junk yard.
Next time I'm at the junk yard I'll get a light and wire it in. After the rear wiper the light will be a piece of cake!
Thanks
Next time I'm at the junk yard I'll get a light and wire it in. After the rear wiper the light will be a piece of cake!
Thanks
It sprays a powerful jet of washer fluid - many times more powerful than your windshield spray.
Thanks.
08-30-2009, 05:43 PM
#21
Junior Member
Join Date: Aug 2009
Location: New Jersey
Posts: 11
Likes: 0
Received 0 Likes
on
0 Posts
I ran the wires for the trunk light today. Did not take long since my back was still in the contorted twisted shape needed to get under the dash And your tip on where to plug the connector into the fusebox was a timesaver. Nowhere in the Honda service manual does it give pinouts for each of the connectors. Honda manuals are some of the best out there (that I've used) and so I'm surprised by this glaring lack of info that I commonly see in manuals for other brands.
I checked the trunk light part number you mentioned 34260-SH3-004. At the online Honda dealers it's about $20 so next time I order something I'll get it. Unless someone here has one? Or I find one on ebay.
Today I also neatened up the wires running along the edge of the glass to the rear wiper motor. Since I did not have the Honda original wiring setup I improvised. I had a few feet of 1/4" ID black thin walled tubing. Figured I'd run it around the back glass with the wires in it but I ran into a problem. I took the 4 pins out of the wiper connector but the pins were too big to go thru the tubing. I could get one wire thru and then the next would not go. So I cut the pins off the 4 wires and then I could get them all thru the tubing using a 'fish' wire.
I soldered the 4 connector pins back on the wires and clipped them back into the plastic housing and plugged it into the wiper motor. Now I took narrow 3M double sided body molding tape and ran it down one side of the black tubing. I closed myself into the rear trunk area and carefully ran the tubing down the left side of the glass and then across the bottom - over to the motor.
I was able to avoid running the tubing and body molding tape over the defrost wires. (Although it does run over some decorative lines that run along the edge of the glass)
This way if I ever have to take the tape off the glass I will not peel up the defrost wires.
Now I'm just waiting to get the squirt nozzle in the mail.
Does anyone know just where the nozzle is supposed to go? And where the hose comes up from the body (under the headliner) into the top section of the window?
It looks like it would come up right about in the middle where my car has a rubber plug and then enter the spoiler to the left of that. But I've not seen one so I don't know for sure.
When I ran the hose the other day I brought it up into the black accordion where the wires run. It looks like that the wrong spot for it so I'll have to pull it back out and re-route it.
So far I have about about 10 hrs work time into this including the trip to the junk yard. These instructions in this FAQ saved me a boatload of time.
Thanks,
Rich
And your tip on where to plug the connector into the fusebox was a timesaver. Nowhere in the Honda service manual does it give pinouts for each of the connectors. Honda manuals are some of the best out there (that I've used) and so I'm surprised by this glaring lack of info that I commonly see in manuals for other brands.I checked the trunk light part number you mentioned 34260-SH3-004. At the online Honda dealers it's about $20 so next time I order something I'll get it. Unless someone here has one? Or I find one on ebay.
Today I also neatened up the wires running along the edge of the glass to the rear wiper motor. Since I did not have the Honda original wiring setup I improvised. I had a few feet of 1/4" ID black thin walled tubing. Figured I'd run it around the back glass with the wires in it but I ran into a problem. I took the 4 pins out of the wiper connector but the pins were too big to go thru the tubing. I could get one wire thru and then the next would not go. So I cut the pins off the 4 wires and then I could get them all thru the tubing using a 'fish' wire.
I soldered the 4 connector pins back on the wires and clipped them back into the plastic housing and plugged it into the wiper motor. Now I took narrow 3M double sided body molding tape and ran it down one side of the black tubing. I closed myself into the rear trunk area and carefully ran the tubing down the left side of the glass and then across the bottom - over to the motor.
I was able to avoid running the tubing and body molding tape over the defrost wires. (Although it does run over some decorative lines that run along the edge of the glass)
This way if I ever have to take the tape off the glass I will not peel up the defrost wires.
Now I'm just waiting to get the squirt nozzle in the mail.
Does anyone know just where the nozzle is supposed to go? And where the hose comes up from the body (under the headliner) into the top section of the window?
It looks like it would come up right about in the middle where my car has a rubber plug and then enter the spoiler to the left of that. But I've not seen one so I don't know for sure.
When I ran the hose the other day I brought it up into the black accordion where the wires run. It looks like that the wrong spot for it so I'll have to pull it back out and re-route it.
So far I have about about 10 hrs work time into this including the trip to the junk yard. These instructions in this FAQ saved me a boatload of time.
Thanks,
Rich
08-30-2009, 06:05 PM
#22
I have that trunk light for you ... $15 shipped. I can even dig out a pigtail for it, I think.
Man, I even have a rear spoiler with the proper washer tubing for you if you want it. Milano red. Brand new brake light bulb, too. Condition is 9/10, I'd say, from memory.
However, if you want to cut your own hole ... lift the tailgate up and look just to the left of the brake light, on the black plastic. You should see a small square area lightly showing raised in the plastic. It's not obvious, but this is the square of plastic you need to cut out. I used a small saw and file. Lots and lots of filing, til I got it right. If you look right underneath it, you'll see the mounting screw points for the squirter that you ordered.
09-01-2009, 05:05 PM
#23
Junior Member
Join Date: Aug 2009
Location: New Jersey
Posts: 11
Likes: 0
Received 0 Likes
on
0 Posts
DeSchlong - Thanks for offering to sell me the parts. I waited to reply until I got the rear squirt nozzle in the mail and see if I could install it. And 'll get the trunk light from Bernardi parts next time I order.
It turned out to be easy to install the nozzle. I took the spoiler off and turned it upside down on the bench. Until I actually got the nozzle and took the spoiler off I really did not know where the nozzle mounted. But it was obvious once the aprts were in front of me.
Then I held the nozzle in location (on the two standoffs for the screws) and marked the left and right edge with a razor blade on the black plastic part of the spoiler. Then measured in the depth of the nozzle and marked that with the blade. I cut the spoiler plastic with a box cutter razor. It took about 20 careful passes with the blade to score about 1/2 thru the plastic. Then I took needle nose pliers to snap the square piece out. Mounted the nozzle with 2 screws and then re-ran the hose from under the headliner and up thru the rubber grommet.
I used a leather punch to cut a hole in the rubber grommet just the right size to make it a snug fit. The hose I used is actually a fuel line. It's a clear yellow color and very kink resistant. I had about 25 ft left over from a job I did.
The first pic is with the spoiler just sitting on top of the roof so I could attach the hose.
The second pic is one I took at the beginning of the job showing the rear washer pump that was added to the washer jug.