
[DIY] Honda Civic 92-95 "OEM" Rear Fog Lamp Retrofit Install Guide
 01-23-2009, 07:33 PM
#1
[DIY] Honda Civic 92-95 "OEM" Rear Fog Lamp Retrofit Install Guide
A.K.A., the "Poor Man's" rear fog light retrofit.
Preamble
Vehicles destined for the European Domestic Market (EDM) are mandated to have red rear fog lamps in order to comply with ECE Regulation 48, regarding vehicle lighting. Rear fog lamps are supposed to increase vehicle conspicuity from behind in conditions of low visibility (rain, fog, snow, dust, etc.) in addition to tail lamps. Though the regulations stipulate an allowance for two rear red fog lamps, one single lamp is also permitted, if mounted on the driver's side of the vehicle, an arrangement that vehicle manufacturers often perform. In the 1992-95 series EDM Hatchback/Sedan/Coupe Honda Civic, this single rear fog lamp is integrated into the driver's side inner tail lamp, below the white reversing lamp. On Left-hand Drive (LHD) Civics, this is the left side inner tail lamp, and on Right-hand Drive (RHD) Civics like in the UK Domestic Market (UKDM), this is obviously the right side inner tail lamp. It is operated by a switch on the dashboard, mounted to the right of the EDM Rear Defogger Switch, and is wired to operate only when the headlamps are activated.
Regulations in North America vary widely with jurisdiction at the provincial/state level. Some explicitly permit one or two rear fog lamps, no jurisdictions specifically require their installation, and some do not explicitly disallow their installation. Thus, they are rarely seen. An exception is on vehicle manufacturers traditionally based in Europe (eg., BMW, Volvo, Audi, Mini), who sometimes choose to leave rear fog lamps installed on some models destined for the Canadian Domestic Market (CDM) and/or United States Domestic Market (USDM). For these vehicles to be approved for use here in North America there must be some approval at some regulatory level to permit rear fog lamp functionality.
Purpose of this DIY Installation Guide
If you're interested in increasing your vehicle's conspicuity, and/or are tired of people plowing in to the back of your Civic in poor driving conditions, then I guess you're a good candidate for installing a Rear Fog Lamp.
Follow this "poor man's" guide to install a Rear Fog Lamp into your CDM/USDM Civic in its OEM location, without the need to install a set of EDM tail lamps, while retaining the best functionality of both the EDM and CDM/USDM specifiations, all an estimated cost of only ~$25-30CAD.
Legal Status in Canada
I'll focus on a couple of Canadian examples alluding to this grey-area of regulation, because this is the jurisdiction I'm most familiar with.
Transport Canada, the organisation which regulates motor vehicle safety in Canada, surprisingly makes only one obscure reference to rear fog lamps in all of their pages upon pages of regulations and standards. It appears in the Motor Vehicle Safety Act as follows:
The following is an excerpt from the British Columbia B.C. Reg. 26/58, Motor Vehicle Act. After you read it, you might get the sense that a rear fog lamp is not explicitly permitted in BC, which might be one conclusion:
Tail lamps
4.15 (1) A motor vehicle, trailer or semitrailer must be equipped with 2 tail lamps, mounted on the rear of the motor vehicle, trailer or semitrailer, that are capable of displaying only red light visible from a distance of 150 m to the rear on both sides of the motor vehicle, trailer or semitrailer at an angle of 45� from the longitudinal axis of the motor vehicle, trailer or semitrailer.
[en. B.C. Reg. 476/98, s. 2.]
By this logic, the use of a bright rear tail (fog) lamp in inclement weather conditions - a "rear fog lamp" in name only - might bring you in line with the letter of the law, if your other tail lamps are not visible at 150m (~500ft). Granted, it states you'd need two of this brightness, visible at this distance, but if you're going to get a ticket for only one rear fog lamp, when everyone else driving by has none, then you're probably not going to get any ticket at all. Theoretically, you could modify these instructions to install a rear fog lamp on either side, if you desire.
The following is an excerpt from the Ontario Highway Traffic Act, R.S.O. 1990, CHAPTER H.8.
Lamps required on all motor vehicles except motorcycles
62. (1) When on a highway at any time from one-half hour before sunset to one-half hour after sunrise and at any other time when, due to insufficient light or unfavourable atmospheric conditions, persons and vehicles on the highway are not clearly discernible at a distance of 150 metres or less, every motor vehicle other than a motorcycle shall carry three lighted lamps in a conspicuous position, one on each side of the front of the vehicle which shall display a white or amber light only, and one on the rear of the vehicle which shall display a red light only. R.S.O. 1990, c. H.8, s. 62 (1).
Only one tail lamp required, eh, Mr. Ancient Ontario Regulations?? Wow. Anyway, as far as I can tell, the Act makes no reference at all to fog lamps, rear nor front. I can't find a relevant section which explicitly permits them, save perhaps for this provision, referring to front lamps:
Strength of front lamps
(9) No motor vehicle shall carry on the front thereof more than four lighted lamps that project a beam having an intensity of over 300 candela. R.S.O. 1990, c. H.8, s. 62 (9).
Anyway, so once again, based on section 62(1), I would use the logic that when poor atmospheric conditions dictate it, you are trying to adhere to the letter of the law by activating a bright rear tail (fog) lamp when visibility is reduced to less than 150m.
I'm no lawyer, so I don't know if these arguments hold any water, but I would suggest you find the relevant legislation for your home province/state, print it out, and keep it in your car. If you're ever questioned about it, you'll look mighty s.m.r.t. producing the relevant legislation. Proves you've done your homework, and that you seek to comply with the law.
Americans should check their state or national regulators regarding bright rear-facing red lamps to see if they are explicitly disallowed. I know there is an oft-quoted section of the Californian law regarding vehicle lighting which explicitly allows one or two rear fog lamps to be used during adverse atmospheric conditions.
Synopsis
The following guide describes the approximate steps I followed to configure an OEM-style rear fog lamp to a "vanilla" manual-transmission Canadian Domestic Market (CDM) 3dr 1994 Honda Civic CX. The only fancy option this car came with originally was OEM floor mats. The instructions apply specifically to 92-95 Civic CDM/USDM hatchbacks, but, with likely very few changes, can be interpreted for application on a Sedan or Coupe. For most of the six years I have owned my car, it was totally bone stock. I had only ever put oil, gas and washer fluid into it. At the time of this write-up, I had wired in, over the previous 7 months, a number of OEM options, including a Rear Wiper, Headlight Washers, Cruise Control, Power Locks, Power Windows, Power Folding Heated Mirrors and a Trunk Light, the instructions for some of which I have written up in other DIYs on this site.
Herein, I give detailed instructions on what to remove, and *some* details on how to remove it and re-install it, but at minimum I EXPECT you to have a USDM/CDM Helms Service Manual to consult for the major details on how to take stuff on your car apart, and for how to access some of the areas I describe below (eg., rear quarter panels). No sense in me trying to tell you how to do this, when they have already done an excellent job of it already. It can be purchased as a hard copy text, or there are legitimate places where it can be downloaded as a bookmarked Adobe PDF. To better understand the functioning of the Rear Fog Lamp, it might help you to have the EDM version of the Helms Service Manual. This, too, can be purchased in hard copy or downloaded from sources on the Web. One link I found is here on the spoonhonda.com website.
Rear Tail Lamps - a comparison of JDM/CDM/USDM vs. EDM
Or, "Not all tail lamps are created equal"
Aside from the addition of the rear fog lamp on EDM Civics, what's the difference between the tail lamps for the different markets, I hear you ask? The answer: I frankly don't know for sure, absolutely positively. I've never examined a set in my hands. What I can only tell you is what I've deduced from pictures and wiring diagrams, which I think is actually still a lot of good information. Figure 1 shows the front and back side of a complete set of EDM tail lamps from a LHD hatchback, with integrated rear fog lamp. See anything odd? Look at the back of the passenger side inner tail lamp, and compare it to the driver's side where the rear fog lightbulb is installed (recall that when you're looking at the back of the setup, the driver's side is on the right of the photo, passenger on left). If you said to yourself "well, there's no bulb on the equivalent location on the passenger side of where the rear fog lightbulb is," or words to that effect, well that is exactly my point. There doesn't appear to be anything there on the passenger side, at all. Let's take a closer look at both sides to see what we can learn.
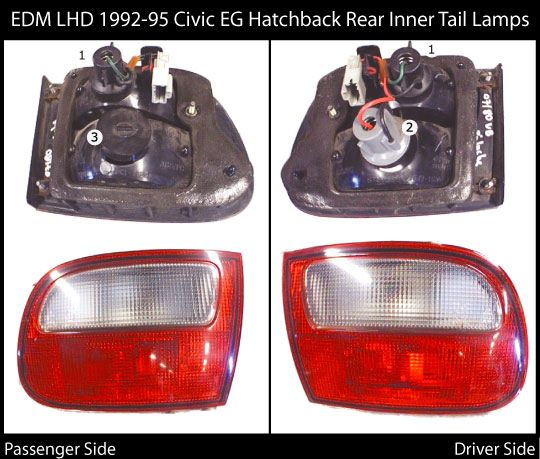
Figure 1. Comparison of EDM EG LHD Hatchback Inner Tail Lamps. (1) is white reversing bulb socket.
Note that (2) is wired, but equivalent location on passenger side (3) is not wired. This spot would be wired for the fog lamp on an RHD vehicle, however, where it would be considered now the driver's side.
Driver's side
Figures 2 and 3 show the front and back of a Japanese Domestic Market (JDM) rear inner tail lamp from the side of a hatchback as where you find a rear fog lamp on the vehicles for the different markets. Confused? Right. OK, technically, this is the right side for a JDM RHD Civic, but functionally it is identical to the driver's side inner tail lamp of an LHD CDM/USDM EH-chassis code Civic hatchback. We can likely safely call it a JDM/CDM/USDM inner tail lamp, even though there are differences in construction, as noted in this post: https://honda-tech.com/forums/honda-civic-del-sol-1992-2000-1/jdm-vs-edm-eg-rear-inner-tail-lights-1623119/. (Notable differences are the tinted reversing reflector housing, and a different construction of the lower reflector area between the EDM and JDM) On top is the reversing bulb, wired GRN/BLK. In the lower half is a large socket for a small bulb. This bulb is wired RED/BLK, which is the colour used to turn on parking lamps, meaning this lamp is ON when the parking lamps (and headlamps) are turned ON. Not surprisingly, it functions solely as a "tail parking lamp."
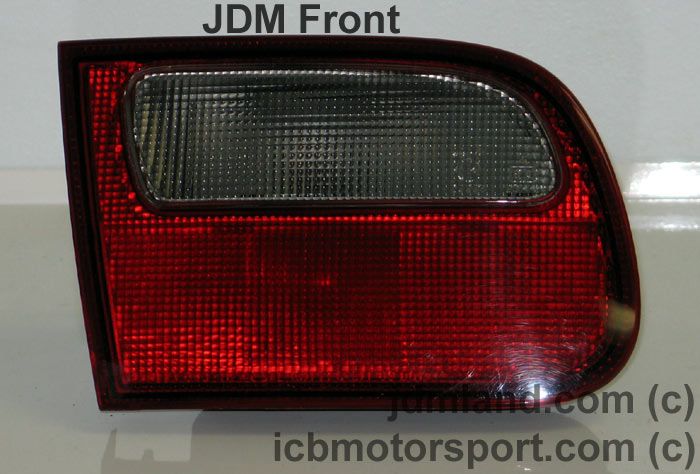
Figure 2. Front of a JDM EG Civic Inner Tail Lamp.
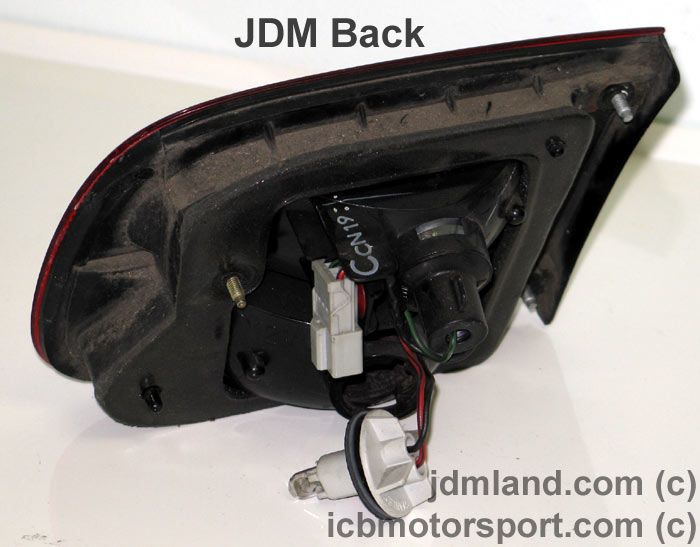
Figure 3. Back of a JDM EG Civic Inner Tail Lamp. Note small tail lamp bulb.
Figures 4 and 5 show the front and back of an LHD EDM driver's side rear inner tail lamp for a hatchback. Again, on top is the reversing bulb, wired GRN/BLK. Below is the rear fog lamp bulb. ECE Regulation 48 states that the lamp can have a maximum brightness of 300 candelas, which, coincidentally (and conveniently, as you'll see...) is the maximum brightness allowable by North American regulations for brake lamps. In fact, apparently some vehicle manufacturers, mostly European I think, just rewire their EDM rear fog lamps into brake lamps for the CDM/USDM. The bulb is large and needs to be bright, but fits in the same size socket opening in the tail lamp housing (I am not referring to the bulb socket holder itself, but the hole in the back side of the tail lamp housing) as the above JDM/CDM/USDM tail parking lamp. There is only one wire running to it, a reddish one (likely RED/YEL, according to EDM wiring diagrams), and, importantly, note that the bulb has only one filament. Does this imply that the sole function of this socket on an EDM Civic is to operate as a rear fog lamp, and never as a tail parking lamp, as on a CDM/USDM vehicle? Let's compare with the passenger side, to see what is located in the same socket there.
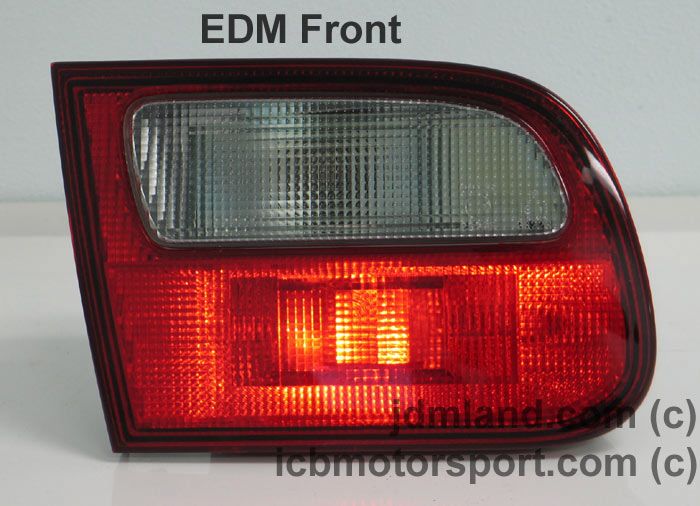
Figure 4. Front of a EDM EG Civic Inner Tail Lamp.
Figure 5. Back of a EDM EG Civic Inner Tail Lamp. Note large bulb with single filament.
Passenger's side
Figure 6 is a close-up view of the back of the passenger's side inner tail lamp from an LHD EDM Civic hatchback. In the socket where you find the passenger side "tail parking lamp" on a JDM/CDM/USDM Civic hatchback, there is what appears to be a delete plug, and it certainly has no wires leading to it from the connector junction. This image seems to confirm what I stated above: that there are in fact NO "tail parking lamps" mounted in the inner tail lamps of 92-95 EDM Civic hatchbacks! This post: https://honda-tech.com/forums/showthread.php?t=1623119 , mentioned earlier, also supports this observation.

Figure 6. Back of passenger side Inner Tail Lamp from EDM EG Civic. (1) is delete-plug/
block-off plate.
The Conundrum
If in fact on JDM/CDM/USDM vehicles the lower inner tail lamps function only as "tail parking lamps" but on EDM vehicles they are either a driver's side rear fog lamp or a passenger side empty socket, how do we here in North America retain the functionality of the tail parking lamps while adding the benefit of a rear fog lamp in its OEM location? Purchasing an OEM rear fog lamp from one of the many "JDM/EDM Parts" places for $50-100+ is not only expensive, but it leaves you with lost functionality, which, in addition to me finding unpalatable, I worry that there may be vehicle safety laws which require the tail parking lamps to be present in that location. Incidentally, I am also not a proponent of cutting out holes in my bumper and plugging it with an aftermarket rear fog lamp, if this is not how Honda originally mounted it on my model of vehicle in a different market.
"Poor Man's" Rear Fog Lamp
Or, "How to add a swanky new EDM OEM feature and reduce rear-end collisions for $25-$30"
I am pleased to share with you my hybrid "poor man's" solution to this problem, which I think you'll agree is clean, inexpensive and clever. At the centre of all this cleverness is the humble brake lamp bulb. The bulb in Figure 7 is your standard run-of-the-mill brake lamp bulb. This one I removed from my own vehicle to photograph. We're all familiar with them, and they are located in the rear corner lamp assembly of our hatchbacks/sedans/coupes. What's special about brake lamp bulbs is that they contain TWO filaments. One lights up dimly when you turn on your parking lamps (and headlamps), the other lights up very brightly when pressing the brake. It lights up so bright, in fact, that it is comparable to the brightness of a rear fog lamp, as these are both mandated to have the same maximum brightness of 300 candelas, according to European and North American regulations!

Figure 7. Standard-issue Brake Lamp Bulb. (1) indicates dual-filament: tail light and brake light.
Arrows show (faintly) raised area which allows for fitting of bulb only in brake lamp socket.
This bulb, then, seems to have both features we need in one handy package: tail parking light and, effectively, a bright rear fog light. The question remains, though, as to how we mount it in the same socket as the EDM rear fog lamp? The following section walks you through the procedure, and you'll likely wind up kicking yourself for realizing how painfully simple and inexpensive it all was.
Preparation
Notes on wiring
Wiring will likely take you a fair bit of time out of all the operations involved in this project. My recommendation is, and if you're like me and want as clean an install as possible, you should spend time pulling the correct colour of wires from a salvage yard vehicle. This guide will tell you where to find the colour of wires in a 92-95 Civic to match the EDM OEM colours. At the very least, get as much wiring as possible, you will thank me later. Usually I de-pin the connector and remove the wire from the loon, but what I've done to cheat before is to cut the wires and pull them through the loom, though it's sometimes difficult to figure out where they go and they can often get stuck.
Pulling a whole lot of the correct colour of wire - while painful - makes the re-wiring exercise considerably more pleasant, and guarantees you have enough length, gives you the exact OEM wire colours and means you don't have to go out and buy your OWN wire. I don't usually bother getting BLK (ground) wires all the way to their terminus, so buy yourself a 25ft roll of 16 gauge BLK wire, and you'll be set for this project and for many future projects.
**NOTE:** Many connections to the specific pins on the under-dash fuse box were not explicitly identified in either the CDM/USDM or UKDM/EDM Helms manuals. Therefore, I had to determine the correct pins through 'ohm-ing out' with my multimeter, between the fuse location and the pins. For example, the wiring diagram for a Rear Fog Lamp in the EDM Helms manual shows a RED wire connected from the combination light switch to the under-dash fuse box, through Fuse No. 20 (7.5A), and out to a RED/WHT wire to the Rear Fog Lamp switch. It does NOT specify the correct connector junctions and pins where these wires connect to the fuse box. I had to discover this manually. Remarkably, this is new information not found anywhere else on the web or in other service manuals (eg., Haynes, Mitchell), and I have marked it with a "**" to indicate that you won't be able to substantiate this information with any other source.
HERE is a link to the fuse box connector numbers that I reference in this DIY. For example, when I state connector "C440", you can see on this diagram which one I am referencing.
Wiring Connectors
Don't cut wiring if you don't have to. Makes for a cleaner reinstall. De-pin the connectors where you can, as you will probably need the pins anyway.
To patch together cut wires, I recommend using Bullet connectors. These attach & detach readily and are self-shielding. I suppose a cautious person would electrical-tape or heat-shrink seal all the connections, but I didn't. You will need a few wire tap ("T-Taps") connectors, too. As I am in Canada, I purchased my electronics parts over the phone from A-1 Electronics - see http://www.a1parts.com/ (WARNING: TERRIBLE WEBSITE. GODAWFUL.); these had the best prices around Canada that I could find, and domestic shipping was a flat $10. I ordered a pack of 100 for each of Male & Female 14-16 (blue) & 16-18 (red) gauge Bullet connectors, and a pack of 100 of each of 14-16 (blue) & 16-18 gauge wire-taps (T-Taps), which might be overkill for you, but I had a bunch of projects I wanted to wire up so it was a good investment for me.
Americans can just look on eBay; there's dozens of dealers selling large bulk packs of bullet connectors and wire taps.
Pin Removal
You'll have to do a bit of this. A tiny screwdriver is your friend. Look up on honda-tech.com the correct way to remove pins from connectors, or consult this comprehensive guide.
Note on Order of Operations
The instructions, as printed below, aren't necessarily meant to be followed linearly as a step-by-step process of removal and then re-installation. Read the whole thing through, first, to get an idea of what you're up against. You will have to jump around a bit from section to section as you see fit. There is no real "wrong" order to do the install, but you will run in to obvious roadblocks, such as the need to remove the rear quarter panel to run the wiring... but before you do this, you might want to have already installed the dash switch, for which you'll first have to learn how to take apart the dash properly from your Helms manual.
Time Required
This project is not very difficult at all. It might take an hour to remove the correct wiring from a salvage yard wreck. Expect to spend an evening or two to commit to reinstallation.
Disclaimer
Or, "Don't point fingers, you only have yourself to blame"
Every effort has been made to make these instructions as complete and accurate as possible, but no warranty or fitness is implied. The information is provided on an “as is” basis. The author(s) and the website/publisher(s) shall have neither liability nor responsibility to any person or entity with respect to any loss or damages or inconvenience arising from the information contained herein, nor due to any omissions. Read: Don't muck up your vehicle and try to blame me or anyone else. You are responsible for your own due diligence and research.
Parts Required & Removal Instructions
Or, "Ask of the junkyard and ye shall receive"
Online
Figure 8. (1) shows EDM Rear Defogger Switch on left side. Note Rear Fog Light glyph (symbol) in (2).
Pigtails in (3) are shown; existing connection for Rear Defog Switch can be used, but pigtail for
Rear Fog Lamp Switch must be acquired.
Auto Parts Store
Under Hood
Cabin: Steering Column & Under Dash/Footwell
Cabin: Dashboard
Cabin: Rear Wiring Harness
Tailgate / Trunk
Figure 9. Rear Corner Tail Lamp Wiring Harness in the
throes of being disassembled. Tail parking lamp bulb socket (1)
can be discarded. (2) is brake lamp bulb socket and (3) is
turn signal indicator bulb socket. Note that metal bulb cylinder
holders (2a) and (3a) are the same diameter.
Installation Instructions
Or, "What comes out ... must go in ..."
Before You Begin
Cabin: Steering Column & Under Dash/Footwell

Figure 10. Pin locations on a USDM (not CDM) combination light switch connector.
Plug your large RED wire into PIN G. (Never mind the wire that comes from PIN H.)
(Image modified from user 'dnt94civic', from their JDM steering wheel/horn DIY)
Cabin: Dashboard
Figure 11. Fog Lamp Switch wiring diagram. Excerpt from Helms manual.
Cabin: Rear Wiring Harness
Tailgate / Hatchback Trunk
Test Drive

Figure 12. With just Tail Lamps (1a) and with addition of Fog Lamp (1b).
Good Luck and enjoy not getting rear ended by some distracted soccer mom.
DeSchlong
January, 2009
A.K.A., the "Poor Man's" rear fog light retrofit.
Preamble
Vehicles destined for the European Domestic Market (EDM) are mandated to have red rear fog lamps in order to comply with ECE Regulation 48, regarding vehicle lighting. Rear fog lamps are supposed to increase vehicle conspicuity from behind in conditions of low visibility (rain, fog, snow, dust, etc.) in addition to tail lamps. Though the regulations stipulate an allowance for two rear red fog lamps, one single lamp is also permitted, if mounted on the driver's side of the vehicle, an arrangement that vehicle manufacturers often perform. In the 1992-95 series EDM Hatchback/Sedan/Coupe Honda Civic, this single rear fog lamp is integrated into the driver's side inner tail lamp, below the white reversing lamp. On Left-hand Drive (LHD) Civics, this is the left side inner tail lamp, and on Right-hand Drive (RHD) Civics like in the UK Domestic Market (UKDM), this is obviously the right side inner tail lamp. It is operated by a switch on the dashboard, mounted to the right of the EDM Rear Defogger Switch, and is wired to operate only when the headlamps are activated.
Regulations in North America vary widely with jurisdiction at the provincial/state level. Some explicitly permit one or two rear fog lamps, no jurisdictions specifically require their installation, and some do not explicitly disallow their installation. Thus, they are rarely seen. An exception is on vehicle manufacturers traditionally based in Europe (eg., BMW, Volvo, Audi, Mini), who sometimes choose to leave rear fog lamps installed on some models destined for the Canadian Domestic Market (CDM) and/or United States Domestic Market (USDM). For these vehicles to be approved for use here in North America there must be some approval at some regulatory level to permit rear fog lamp functionality.
Purpose of this DIY Installation Guide
If you're interested in increasing your vehicle's conspicuity, and/or are tired of people plowing in to the back of your Civic in poor driving conditions, then I guess you're a good candidate for installing a Rear Fog Lamp.
Follow this "poor man's" guide to install a Rear Fog Lamp into your CDM/USDM Civic in its OEM location, without the need to install a set of EDM tail lamps, while retaining the best functionality of both the EDM and CDM/USDM specifiations, all an estimated cost of only ~$25-30CAD.
Legal Status in Canada
I'll focus on a couple of Canadian examples alluding to this grey-area of regulation, because this is the jurisdiction I'm most familiar with.
Transport Canada, the organisation which regulates motor vehicle safety in Canada, surprisingly makes only one obscure reference to rear fog lamps in all of their pages upon pages of regulations and standards. It appears in the Motor Vehicle Safety Act as follows:
Schedule IV to the Regulations
Special Wiring Requirements — Section S5.5 of TSD 108
(19) In addition to the requirements of section S5.5.7 of TSD 108, the lamps referred to in section S5.5.7(a) of TSD 108 shall be activated when
(a) the front fog lamps on the vehicle are activated in a steady-burning state other than as daytime running lamps; or
(b) the rear fog lamps on the vehicle are activated in a steady-burning state.
This subsection doesn't say much except that it means front or rear fog lamps can only come on when your headlamps are also activated.Special Wiring Requirements — Section S5.5 of TSD 108
(19) In addition to the requirements of section S5.5.7 of TSD 108, the lamps referred to in section S5.5.7(a) of TSD 108 shall be activated when
(a) the front fog lamps on the vehicle are activated in a steady-burning state other than as daytime running lamps; or
(b) the rear fog lamps on the vehicle are activated in a steady-burning state.
The following is an excerpt from the British Columbia B.C. Reg. 26/58, Motor Vehicle Act. After you read it, you might get the sense that a rear fog lamp is not explicitly permitted in BC, which might be one conclusion:
Fog lamps
4.11 (1) A motor vehicle may be equipped with 2 fog lamps, mounted on the front of the vehicle below the headlamps, that are capable of displaying only white or amber light.
(2) Each fog lamp must be
(a) mounted not more than 30 cm below the headlamps, and
(b) adjusted and aimed so that, at a distance of 8 m from the lamp, the centre of the beam is at least 10 cm below the height of the fog lamp.
(3) The fog lamp wiring and switch must permit simultaneous operation of the parking lamps, tail lamps, licence plate lamp and, if required, clearance lamps.
(4) The operator of a vehicle may use fog lamps instead of headlamps when atmospheric conditions make the use of headlamps disadvantageous.
[en. B.C. Reg. 476/98, s. 2.]
But, the act also stipulates how tail lamps should operate (subsections 2 through 6 omitted for brevity):4.11 (1) A motor vehicle may be equipped with 2 fog lamps, mounted on the front of the vehicle below the headlamps, that are capable of displaying only white or amber light.
(2) Each fog lamp must be
(a) mounted not more than 30 cm below the headlamps, and
(b) adjusted and aimed so that, at a distance of 8 m from the lamp, the centre of the beam is at least 10 cm below the height of the fog lamp.
(3) The fog lamp wiring and switch must permit simultaneous operation of the parking lamps, tail lamps, licence plate lamp and, if required, clearance lamps.
(4) The operator of a vehicle may use fog lamps instead of headlamps when atmospheric conditions make the use of headlamps disadvantageous.
[en. B.C. Reg. 476/98, s. 2.]
Tail lamps
4.15 (1) A motor vehicle, trailer or semitrailer must be equipped with 2 tail lamps, mounted on the rear of the motor vehicle, trailer or semitrailer, that are capable of displaying only red light visible from a distance of 150 m to the rear on both sides of the motor vehicle, trailer or semitrailer at an angle of 45� from the longitudinal axis of the motor vehicle, trailer or semitrailer.
[en. B.C. Reg. 476/98, s. 2.]
The following is an excerpt from the Ontario Highway Traffic Act, R.S.O. 1990, CHAPTER H.8.
Lamps required on all motor vehicles except motorcycles
62. (1) When on a highway at any time from one-half hour before sunset to one-half hour after sunrise and at any other time when, due to insufficient light or unfavourable atmospheric conditions, persons and vehicles on the highway are not clearly discernible at a distance of 150 metres or less, every motor vehicle other than a motorcycle shall carry three lighted lamps in a conspicuous position, one on each side of the front of the vehicle which shall display a white or amber light only, and one on the rear of the vehicle which shall display a red light only. R.S.O. 1990, c. H.8, s. 62 (1).
Strength of front lamps
(9) No motor vehicle shall carry on the front thereof more than four lighted lamps that project a beam having an intensity of over 300 candela. R.S.O. 1990, c. H.8, s. 62 (9).
I'm no lawyer, so I don't know if these arguments hold any water, but I would suggest you find the relevant legislation for your home province/state, print it out, and keep it in your car. If you're ever questioned about it, you'll look mighty s.m.r.t. producing the relevant legislation. Proves you've done your homework, and that you seek to comply with the law.
Americans should check their state or national regulators regarding bright rear-facing red lamps to see if they are explicitly disallowed. I know there is an oft-quoted section of the Californian law regarding vehicle lighting which explicitly allows one or two rear fog lamps to be used during adverse atmospheric conditions.
Synopsis
The following guide describes the approximate steps I followed to configure an OEM-style rear fog lamp to a "vanilla" manual-transmission Canadian Domestic Market (CDM) 3dr 1994 Honda Civic CX. The only fancy option this car came with originally was OEM floor mats. The instructions apply specifically to 92-95 Civic CDM/USDM hatchbacks, but, with likely very few changes, can be interpreted for application on a Sedan or Coupe. For most of the six years I have owned my car, it was totally bone stock. I had only ever put oil, gas and washer fluid into it. At the time of this write-up, I had wired in, over the previous 7 months, a number of OEM options, including a Rear Wiper, Headlight Washers, Cruise Control, Power Locks, Power Windows, Power Folding Heated Mirrors and a Trunk Light, the instructions for some of which I have written up in other DIYs on this site.
Herein, I give detailed instructions on what to remove, and *some* details on how to remove it and re-install it, but at minimum I EXPECT you to have a USDM/CDM Helms Service Manual to consult for the major details on how to take stuff on your car apart, and for how to access some of the areas I describe below (eg., rear quarter panels). No sense in me trying to tell you how to do this, when they have already done an excellent job of it already. It can be purchased as a hard copy text, or there are legitimate places where it can be downloaded as a bookmarked Adobe PDF. To better understand the functioning of the Rear Fog Lamp, it might help you to have the EDM version of the Helms Service Manual. This, too, can be purchased in hard copy or downloaded from sources on the Web. One link I found is here on the spoonhonda.com website.
Rear Tail Lamps - a comparison of JDM/CDM/USDM vs. EDM
Or, "Not all tail lamps are created equal"
Aside from the addition of the rear fog lamp on EDM Civics, what's the difference between the tail lamps for the different markets, I hear you ask? The answer: I frankly don't know for sure, absolutely positively. I've never examined a set in my hands. What I can only tell you is what I've deduced from pictures and wiring diagrams, which I think is actually still a lot of good information. Figure 1 shows the front and back side of a complete set of EDM tail lamps from a LHD hatchback, with integrated rear fog lamp. See anything odd? Look at the back of the passenger side inner tail lamp, and compare it to the driver's side where the rear fog lightbulb is installed (recall that when you're looking at the back of the setup, the driver's side is on the right of the photo, passenger on left). If you said to yourself "well, there's no bulb on the equivalent location on the passenger side of where the rear fog lightbulb is," or words to that effect, well that is exactly my point. There doesn't appear to be anything there on the passenger side, at all. Let's take a closer look at both sides to see what we can learn.
Figure 1. Comparison of EDM EG LHD Hatchback Inner Tail Lamps. (1) is white reversing bulb socket.
Note that (2) is wired, but equivalent location on passenger side (3) is not wired. This spot would be wired for the fog lamp on an RHD vehicle, however, where it would be considered now the driver's side.
Driver's side
Figures 2 and 3 show the front and back of a Japanese Domestic Market (JDM) rear inner tail lamp from the side of a hatchback as where you find a rear fog lamp on the vehicles for the different markets. Confused? Right. OK, technically, this is the right side for a JDM RHD Civic, but functionally it is identical to the driver's side inner tail lamp of an LHD CDM/USDM EH-chassis code Civic hatchback. We can likely safely call it a JDM/CDM/USDM inner tail lamp, even though there are differences in construction, as noted in this post: https://honda-tech.com/forums/honda-civic-del-sol-1992-2000-1/jdm-vs-edm-eg-rear-inner-tail-lights-1623119/. (Notable differences are the tinted reversing reflector housing, and a different construction of the lower reflector area between the EDM and JDM) On top is the reversing bulb, wired GRN/BLK. In the lower half is a large socket for a small bulb. This bulb is wired RED/BLK, which is the colour used to turn on parking lamps, meaning this lamp is ON when the parking lamps (and headlamps) are turned ON. Not surprisingly, it functions solely as a "tail parking lamp."
Figure 2. Front of a JDM EG Civic Inner Tail Lamp.
Figure 3. Back of a JDM EG Civic Inner Tail Lamp. Note small tail lamp bulb.
Figures 4 and 5 show the front and back of an LHD EDM driver's side rear inner tail lamp for a hatchback. Again, on top is the reversing bulb, wired GRN/BLK. Below is the rear fog lamp bulb. ECE Regulation 48 states that the lamp can have a maximum brightness of 300 candelas, which, coincidentally (and conveniently, as you'll see...) is the maximum brightness allowable by North American regulations for brake lamps. In fact, apparently some vehicle manufacturers, mostly European I think, just rewire their EDM rear fog lamps into brake lamps for the CDM/USDM. The bulb is large and needs to be bright, but fits in the same size socket opening in the tail lamp housing (I am not referring to the bulb socket holder itself, but the hole in the back side of the tail lamp housing) as the above JDM/CDM/USDM tail parking lamp. There is only one wire running to it, a reddish one (likely RED/YEL, according to EDM wiring diagrams), and, importantly, note that the bulb has only one filament. Does this imply that the sole function of this socket on an EDM Civic is to operate as a rear fog lamp, and never as a tail parking lamp, as on a CDM/USDM vehicle? Let's compare with the passenger side, to see what is located in the same socket there.
Figure 4. Front of a EDM EG Civic Inner Tail Lamp.
Figure 5. Back of a EDM EG Civic Inner Tail Lamp. Note large bulb with single filament.
Passenger's side
Figure 6 is a close-up view of the back of the passenger's side inner tail lamp from an LHD EDM Civic hatchback. In the socket where you find the passenger side "tail parking lamp" on a JDM/CDM/USDM Civic hatchback, there is what appears to be a delete plug, and it certainly has no wires leading to it from the connector junction. This image seems to confirm what I stated above: that there are in fact NO "tail parking lamps" mounted in the inner tail lamps of 92-95 EDM Civic hatchbacks! This post: https://honda-tech.com/forums/showthread.php?t=1623119 , mentioned earlier, also supports this observation.
Figure 6. Back of passenger side Inner Tail Lamp from EDM EG Civic. (1) is delete-plug/
block-off plate.
The Conundrum
If in fact on JDM/CDM/USDM vehicles the lower inner tail lamps function only as "tail parking lamps" but on EDM vehicles they are either a driver's side rear fog lamp or a passenger side empty socket, how do we here in North America retain the functionality of the tail parking lamps while adding the benefit of a rear fog lamp in its OEM location? Purchasing an OEM rear fog lamp from one of the many "JDM/EDM Parts" places for $50-100+ is not only expensive, but it leaves you with lost functionality, which, in addition to me finding unpalatable, I worry that there may be vehicle safety laws which require the tail parking lamps to be present in that location. Incidentally, I am also not a proponent of cutting out holes in my bumper and plugging it with an aftermarket rear fog lamp, if this is not how Honda originally mounted it on my model of vehicle in a different market.
"Poor Man's" Rear Fog Lamp
Or, "How to add a swanky new EDM OEM feature and reduce rear-end collisions for $25-$30"
I am pleased to share with you my hybrid "poor man's" solution to this problem, which I think you'll agree is clean, inexpensive and clever. At the centre of all this cleverness is the humble brake lamp bulb. The bulb in Figure 7 is your standard run-of-the-mill brake lamp bulb. This one I removed from my own vehicle to photograph. We're all familiar with them, and they are located in the rear corner lamp assembly of our hatchbacks/sedans/coupes. What's special about brake lamp bulbs is that they contain TWO filaments. One lights up dimly when you turn on your parking lamps (and headlamps), the other lights up very brightly when pressing the brake. It lights up so bright, in fact, that it is comparable to the brightness of a rear fog lamp, as these are both mandated to have the same maximum brightness of 300 candelas, according to European and North American regulations!
Figure 7. Standard-issue Brake Lamp Bulb. (1) indicates dual-filament: tail light and brake light.
Arrows show (faintly) raised area which allows for fitting of bulb only in brake lamp socket.
Preparation
Notes on wiring
Wiring will likely take you a fair bit of time out of all the operations involved in this project. My recommendation is, and if you're like me and want as clean an install as possible, you should spend time pulling the correct colour of wires from a salvage yard vehicle. This guide will tell you where to find the colour of wires in a 92-95 Civic to match the EDM OEM colours. At the very least, get as much wiring as possible, you will thank me later. Usually I de-pin the connector and remove the wire from the loon, but what I've done to cheat before is to cut the wires and pull them through the loom, though it's sometimes difficult to figure out where they go and they can often get stuck.
Pulling a whole lot of the correct colour of wire - while painful - makes the re-wiring exercise considerably more pleasant, and guarantees you have enough length, gives you the exact OEM wire colours and means you don't have to go out and buy your OWN wire. I don't usually bother getting BLK (ground) wires all the way to their terminus, so buy yourself a 25ft roll of 16 gauge BLK wire, and you'll be set for this project and for many future projects.
**NOTE:** Many connections to the specific pins on the under-dash fuse box were not explicitly identified in either the CDM/USDM or UKDM/EDM Helms manuals. Therefore, I had to determine the correct pins through 'ohm-ing out' with my multimeter, between the fuse location and the pins. For example, the wiring diagram for a Rear Fog Lamp in the EDM Helms manual shows a RED wire connected from the combination light switch to the under-dash fuse box, through Fuse No. 20 (7.5A), and out to a RED/WHT wire to the Rear Fog Lamp switch. It does NOT specify the correct connector junctions and pins where these wires connect to the fuse box. I had to discover this manually. Remarkably, this is new information not found anywhere else on the web or in other service manuals (eg., Haynes, Mitchell), and I have marked it with a "**" to indicate that you won't be able to substantiate this information with any other source.
HERE is a link to the fuse box connector numbers that I reference in this DIY. For example, when I state connector "C440", you can see on this diagram which one I am referencing.
Wiring Connectors
Don't cut wiring if you don't have to. Makes for a cleaner reinstall. De-pin the connectors where you can, as you will probably need the pins anyway.
To patch together cut wires, I recommend using Bullet connectors. These attach & detach readily and are self-shielding. I suppose a cautious person would electrical-tape or heat-shrink seal all the connections, but I didn't. You will need a few wire tap ("T-Taps") connectors, too. As I am in Canada, I purchased my electronics parts over the phone from A-1 Electronics - see http://www.a1parts.com/ (WARNING: TERRIBLE WEBSITE. GODAWFUL.); these had the best prices around Canada that I could find, and domestic shipping was a flat $10. I ordered a pack of 100 for each of Male & Female 14-16 (blue) & 16-18 (red) gauge Bullet connectors, and a pack of 100 of each of 14-16 (blue) & 16-18 gauge wire-taps (T-Taps), which might be overkill for you, but I had a bunch of projects I wanted to wire up so it was a good investment for me.
Americans can just look on eBay; there's dozens of dealers selling large bulk packs of bullet connectors and wire taps.
Pin Removal
You'll have to do a bit of this. A tiny screwdriver is your friend. Look up on honda-tech.com the correct way to remove pins from connectors, or consult this comprehensive guide.
Note on Order of Operations
The instructions, as printed below, aren't necessarily meant to be followed linearly as a step-by-step process of removal and then re-installation. Read the whole thing through, first, to get an idea of what you're up against. You will have to jump around a bit from section to section as you see fit. There is no real "wrong" order to do the install, but you will run in to obvious roadblocks, such as the need to remove the rear quarter panel to run the wiring... but before you do this, you might want to have already installed the dash switch, for which you'll first have to learn how to take apart the dash properly from your Helms manual.
Time Required
This project is not very difficult at all. It might take an hour to remove the correct wiring from a salvage yard wreck. Expect to spend an evening or two to commit to reinstallation.
Disclaimer
Or, "Don't point fingers, you only have yourself to blame"
Every effort has been made to make these instructions as complete and accurate as possible, but no warranty or fitness is implied. The information is provided on an “as is” basis. The author(s) and the website/publisher(s) shall have neither liability nor responsibility to any person or entity with respect to any loss or damages or inconvenience arising from the information contained herein, nor due to any omissions. Read: Don't muck up your vehicle and try to blame me or anyone else. You are responsible for your own due diligence and research.
Parts Required & Removal Instructions
Or, "Ask of the junkyard and ye shall receive"
Online
- EDM Rear Fog Lamp Switch and pigtail: Switch which turns on/off rear fog lamp. See Figure 8.
- I have no idea how long it would take you to track this down, so start hunting ASAP. Since most readers of this will be in North America, your best bet for finding this is going to be online, likely on eBay. Or, try some other places like PasswordJDM, etc.
- If you get the OEM switch, you will also need the Rear Window Defogger Switch, because, for whatever reason on EDM vehicles, the Rear Window Defogger Switch is in the opposite location from the USDM/CDM one! That is to say, the EDM Rear Fog Lamp Switch takes the place of the location of the Rear Window Defogger Switch on USDM/CDM vehicles.
- Another notable difference is that an EDM Rear Window Defogger Switch does not have a built-in timer unit as does a CDM/USDM switch. The defogger is either ON or OFF. Personally, I think I like this set-up better.
- If you can't get the EDM Rear Window Defogger Switch, consider installing the Rear Fog Lamp Switch in the location where the CDM/USDM Cruise Control switch is mounted.
- Technically, it's not necessary to get the pigtail for the EDM Rear Window Defogger Switch, as the pin layout and connector is identical to your CDM/USDM switch.
- I believe the switch layout is also the same on UKDM vehicles, even though they're RHD, so if you're thinking you can be clever and you can "beat the system" by getting a Rear Fog Lamp Switch from a UKDM vehicle, thinking the switches will be reversed, you're outta luck.
- Also note that the symbol for a rear fog lamp has the lines pointing STRAIGHT out from the half-circle headlamp glyph, not angled down, which is the symbol for a Front Fog Lamp.
- I don't think you should be paying much more than $20-25 for these switches, but I guess it's all about supply and demand.
- If you've already installed a Front Fog Lamp Switch, you should consider moving this over the the far left dashboard spot. If you've already got a moonroof switch there ... I guess you're hooped. Try looking for a middle lower console-mounted Rear Fog Lamp Switch.
Figure 8. (1) shows EDM Rear Defogger Switch on left side. Note Rear Fog Light glyph (symbol) in (2).
Pigtails in (3) are shown; existing connection for Rear Defog Switch can be used, but pigtail for
Rear Fog Lamp Switch must be acquired.
Auto Parts Store
- For USDM vehicles only:
- RED wiring: you're outta luck trying to find wide-gauge solid red wiring on a USDM Honda Civic. There's none, AFAIK, because you don't have Daytime Running Lights (DRL) like Canadian vehicles do.
- Your only RED is thin 18-gauge wire that connects to the dimmer switch - this isn't thick enough.
- Thankfully, this colour is easy to find at any auto parts store. Get 12 or 10 gauge, you'll need about 1m total.
- Incidentally, I am glad I have DRL. I find it GREATLY increases vehicle conspicuity, especially on grey days or in the rain, when it's just that much more tricky to spot oncoming cars. Americans should consider pillaging a CDM vehicle and retrofitting DRL for that added bling factor ... uh, I mean safety from morons on the road.
- RED wiring: you're outta luck trying to find wide-gauge solid red wiring on a USDM Honda Civic. There's none, AFAIK, because you don't have Daytime Running Lights (DRL) like Canadian vehicles do.
- Brake lamp/Tail lamp bulb: this will be your stand-in for a combination tail lamp bulb and rear fog lamp bulb.
- You need one, if you didn't grab a functioning one from the salvage vehicle.
- 7.5A Fuse
- You need one, if you didn't pull one from the salvage vehicle.
Under Hood
- RED/WHT wiring: this wire will connect your under-dash fuse box, and feeds through in behind the gauge cluster to the Rear Fog Lamp Switch.
- In the wiring loom on RH side (Passenger side) of engine bay, it connects to headlamp.
- Get as much as you can, but 4-5ft should be plenty. Don't cut wiring if you don't have to. Makes for a cleaner reinstall. De-pin the connectors instead.
- RED/YEL wiring: this wire will connect your Rear Fog Lamp Switch, through in behind the gauge cluster, down through the rear wiring harness all the way back to the fog lamp on the rear tail gate.
- In the wiring loom on LH side (Driver side) of engine bay, it connects to headlamp.
- Since this wire has to be really long, get as much as possible! ie., from the headlamp back to the firewall. (You'll also be getting more from inside the cabin.)
- Note that there is additional RED/YEL wiring in the wiring loom on the RH (Passenger) side in the engine bay, that goes to from the ECU to ?? - possibly the distributor - you might want to get this too. Don't bother de-pinning at the ECU - this pin is not compatible with the pins you'll be using to reconnect the Rear Fog Lamp.
Cabin: Steering Column & Under Dash/Footwell
- RED wiring: this wire will connect power for the Rear Fog Lamp from the combination lamp switch (by your steering wheel) to a location on the under-dash fuse box.
- Remove the steering column covers.
- For CDM vehicles
- Connects the combination headlamp switch to the Daytime Running Lights (DRL) relay under in the footwell, on the left.
- Pull the whole wire out including the pins, from behind the headlamp switch to the DRL relay. You won't need to use it all, but it helps to have a lot. If you want to cut it, leave a pigtail closer to the DRL, but remember to get the pigtail off the DRL relay too.
- For USDM vehicles
- Sorry, Yanks. See "Auto Parts Store" section to get your RED wiring.
- You should take two wire leads from behind the headlamp combination switch, you'll need one to connect to the under-dash fuse box and one to connect to the right spot on the headlamp combination switch. Don't get the massive one in the middle on the WHT wire, just some of the medium size ones are fine (eg., RED/WHT and RED/GRN).
- If you don't care about matching up the OEM RED wire colour, pull one of the other colour 12ga wires and be done with it. Make sure it's long enough though. This option is not as clean an install.
- For CDM vehicles
- Remove the steering column covers.
- 7.5A Fuse: the Rear Fog Lamp is independently fused (in SLOT 20).
- Grab some from your salvage vehicle, or else you'll have to buy one at the parts store.
Cabin: Dashboard
- RED/BLK: this wire connects your under-dash fuse box to the Rear Fog Lamp switch.
- There's plenty of it around the dash. Make sure it can reach from about where the large splitter is taped to the body behind the dash near the Dimmer Switch, to where your Rear Defogger Switch is located.
- RED: this wire connects your Rear Fog Lamp switch to the dash lights Dimmer Switch.
- There's plenty of it around the dash. Make sure it can reach from about where the large splitter is taped to the body behind the dash near the Dimmer Switch, to where your Rear Defogger Switch is located.
- (Optional) "Neo-wedge bulbs": bulbs that light up dashboard switches. There is a chance that the Rear Fog Lamp Switch and/or EDM Rear Defogger Switch has blown bulbs, so to resolve this problem, grab some extra bulbs. These are very, very handy to have around.
- Pry out the eg., rear defrost switch and/or hazard light switch and twist out the bulbs with a flathead screwdriver. The bulbs are all the same and will fit the either of your new switches.
- Put these somewhere safe/padded from impacts and the wrath of your tools.
Cabin: Rear Wiring Harness
- RED/YEL wiring: yes, you need more - again, this wire will connect your Rear Fog Lamp Switch to along behind the gauge cluster, down through the rear wiring harness and all the way back to the fog lamp bulb on the rear tail gate.\
- The rear RH (Pass) speaker uses this colour in the wiring loom that goes from the under-dash fuse box and under the carpet between the driver's seat and door, all the way to the back.
- Get as much RED/YEL as possible, you don't want to be caught short!
Tailgate / Trunk
- Corner Brake lamp / Tail lamp / Turn Signal harness: the short three-bulb harness from a back corner tail lamp assembly. See Figure 9.
- This is where the magic happens! This harness will be adapted to fit the rear inner tail lamp assembly with a Brake Lamp / Taillamp bulb to function as a Rear Fog Lamp / Taillamp.
- I got the Driver's side one, but either one should work.
- I paid $5 CAD for mine, bought separately. If you combine yours with the other wiring you're pulling, maybe you'll pay only $5 for everything.
Figure 9. Rear Corner Tail Lamp Wiring Harness in the
throes of being disassembled. Tail parking lamp bulb socket (1)
can be discarded. (2) is brake lamp bulb socket and (3) is
turn signal indicator bulb socket. Note that metal bulb cylinder
holders (2a) and (3a) are the same diameter.
Installation Instructions
Or, "What comes out ... must go in ..."
Before You Begin
- Remove the negative cable of your battery before performing any electrical work on your vehicle.
- My car doesn't have SRS, but I take it they can blow up in your face, so take necessary precautions to disable. Your Helms manual is explicit in this regard.
Cabin: Steering Column & Under Dash/Footwell
- CAUTION: DON'T BREAK THE TABS WHEN REMOVING THE STEERING COLUMN COVERS! You've been warned. It's very easy to do if you just reef on it. Pry each apart carefully. Be patient. You probably broke the tabs on the column cover on the car you salvaged parts from, and made a mental note not to do that on your own vehicle.
- RED wire: 10- or 12-gauge RED wire from combination light switch to under-dash fuse box.
- Pin one end into PIN G on combination switch connector (Figure 10). Consult your Helms wiring diagrams in the Lighting System Component Location for where this is and how to access it.
- Pin other end into **PIN 5 on 7-pin C440 connector.**
- Begin counting from the top left corner, looking at the connector from the wire side.
- This pin routes power from the combination light switch to Fuse No. 20 (7.5A).
- Additional info for CDM vehicles
- Shorten the length of your wire from the salvage vehicle to the necessary length. Splice the pigtail to the end that will plug into the under-dash fuse box as this creates less bulk around the steering wheel column.
- Since this PIN G is already occupied with the RED wire connecting your DRL, you need to tap in using either a 10- or 12-ga T-Taps, or share the connection from inside the connector with your new wire.
- I wasn't comfortable using a T-Taps on my existing vehicle lighting wiring. This system struck me as too essential to the safe operation of my vehicle to start putting nicks and cuts in the wires.
- I cut a small (0.4cm X 6cm) piece of 1-2mm thick aluminum (an excellent electrical conductor), buffed it with sandpaper to ensure good contact, and wedged half of it under the existing RED wire pin inside the connector. I plugged the new pin through the part sticking out, hooked the aluminum around so the pin wouldn't slide off, and covered all exposed contacts with electrical tape.
- I was content to have jerry-rigged connection now split using a good conductor and without damaging my vehicle lighting wiring.
- Additional information for USDM vehicles
- As mentioned earlier, PIN G will be empty (since you have no DRLs).
- Recall that my instructions were for you to grab some wire pigtails from the combination light switch connector on the salvage vehicle? Well, splice these pigtails you pulled to both ends of your RED wire.
- Be sure to measure out the proper length from the combo switch to the fuse box!
- RED/WHT wire
- Pin into **PIN 13 on C501 connector.**
- Begin counting from the top left corner, looking at the connector from the wire side.
- This pin routes power from Fuse No. 20 (7.5A) to the Rear Fog Lamp Switch on the dashboard.
- 7.5A Fuse
- Plug it in to Fuse No. 20.
Figure 10. Pin locations on a USDM (not CDM) combination light switch connector.
Plug your large RED wire into PIN G. (Never mind the wire that comes from PIN H.)
(Image modified from user 'dnt94civic', from their JDM steering wheel/horn DIY)
Cabin: Dashboard
- Follow Helms manual instructions for removal of gauge cluster. You need to work in behind there.
- Pry out and unplug your existing switches or blanks where your Rear Defogger Switch is located, as per the Helms manual.
- Cover a flat-head screwdriver with a cloth so you don't damage your dashboard.
- Wire the Rear Fog Lamp Switch pigtail as follows, using the diagram in Figure 11:
- RED/WHT
- Connect to RED/WHT wire from PIN E.
- RED/YEL
- Connect to RED/YEL wire from PIN D.
- RED/BLK
- Connect to RED/BLK wire from PIN C.
- Use a T-taps or other means to connect this wire to other existing RED/BLK wiring.
- RED (not your 10-gauge! This is the small 18-gauge wire.)
- Connect to BLK wire from PIN B
- The mismatch of colours is because there is no dash/gauge bulb Dimmer Switch on an EDM vehicle. We are adding this functionality.
- Use a T-taps or other means to connect this wire to other existing dimmer switch RED wiring.
- BLK (Ground)
- Connect to BLK wire from PIN A
- Use a T-taps or other means to connect this wire to other existing BLK (Ground) wiring.
- RED/WHT
Figure 11. Fog Lamp Switch wiring diagram. Excerpt from Helms manual.
- Plug in your Rear Window Defogger and Rear Fog Lamp switch connectors and insert them into the dash.
- Recall that you can use your current OEM Rear Window Defogger connector, but you will need to swap front bezels for the EDM one. With a bit of LIGHT pressure, the bezels just pry off.
- Use electrical tape to tape wiring flush with existing dashboard/gauge cluster wiring harness.
Cabin: Rear Wiring Harness
- Follow the Helms manual instructions for access to the wiring next to the driver's seat and removal of the rear quarter panel and cover for the back base of the trunk.
- RED/YEL
- Pass the wire from the dashboard wiring harness through the blue junction connector on the under-dash fuse box.
- Snake it through with the bundle of wires between the door and the driver's seat to connect to the large rear junction connector.
- Follow it along either through or adjacent to the rear wiring loom to the tailgate.
- Pass it through the connector near where it exits the cabin and enters the rubber tubing leading to the tailgate.
Tailgate / Hatchback Trunk
- Follow the Helms manual instructions for access to the wiring at for the cover of the tailgate.
- RED/YEL
- Continue snaking alongside or through existing wiring looms to reach the driver's side inner tail lamp.
- Use a hangar or something stiff to fit your wire through the rubber shield tubing connecting the tailgate wiring to the body, if you need to, though I found it easy enough just to poke through.
- End the wire at the 4-pin connector for the inner tail lamp. Insert its pin into the unused open slot of the inner tail lamp connector.
- Continue snaking alongside or through existing wiring looms to reach the driver's side inner tail lamp.
- Driver's Side Inner Tail lamp on your vehicle
- De-pin the male RED/BLK wire that leads to the parking tail lamp bulb holder. Leave the female RED/BLK wire connector intact.
- Cut the BLK wire ABOVE (but not AT) the location where it is split and taped; this is because you will be splicing a ground back in to this wire.
- Set the parking tail lamp bulb holder aside; you no longer need it.
- Corner Brake / Tail / Turn Signal lamp harness from salvage yard vehicle.
- De-pin the connector. You don't need it.
- Cut the small tail lamp bulb on this harness away. You don't need it.
- Cut its RED/BLK wire at the location where it is split and taped. Re-tape any exposed wire.
- Cut the BLK wire for the all three of the bulbs where they are split and taped to separate all the bulb holders from each other.
- Notice that the fitment of the grey turn-signal bulb holder is the same pattern as the black inner tail lamp parking lamp bulb holder, where you will be installing the Rear Fog Lamp? Test-fit it in this socket. It fits and locks into the hole the same way, but holds a much bigger bulb.
- Notice that the metal cylindrical bulb holders for the brake lamp and turn-signal indicator are the same diameter, but have a different pattern of fitment for the different type of bulbs? (ie., one- or two-filament.) See Figure 9 again. You will swap the INNER METAL CYLINDER SLEEVE AND BULB BASE PIGTAIL assembly from the black brake lamp bulb holder into the grey turn-signal indicator bulb holder.
- Squirt some WD-40 or other lubricant between metal and the plastic. Let it sit for a while to infuse. This will loosen up its snug fit.
- Grasp the plastic at the base with a large pair of pliers and grasp the top of the metal cylinder that's sticking out with a pair of needlenose pliers.
- Work it out by twisting and pulling apart, slowly. Be careful not to bend or break anything -- any damage might be hard to fix!
- Pull the cylinder assemblies and wires out through their holders. Insert the brake lamp bulb cylinder and bulb base pigtail into the grey turn signal bulb holder. No need to exchange the BLK (Ground) wire, leave it where it is, pressed between the cavity of the holder and the outer side of the cylinder.
- Insert a new 2-filament brake lamp bulb / tail parking lamp bulb into the socket.
- In the end, your harness should look like Figure 11a.

Figure 11a. Rear fog light harness that you are constructing will look like this. -
- Now you're ready to install the bulb and holder into the Driver's Side Inner Tail lamp.
- Pin RED/BLK into the same location on the Driver's Side Inner Tail lamp where you removed the RED/BLK previously from the original tail parking lamp.
- Clip the GRN/WHT (former brake light filament wire) and use bullet connectors to replace it with a RED/YEL lead. Pin it in to match up with RED/YEL on the other side.
- Use some bullet connectors to reconnect BLK.
- Now you're ready to install the bulb and holder into the Driver's Side Inner Tail lamp.
Test Drive
- Reconnect your battery and try it out while the car is parked. It should glow brightly as in Figure 12.
- Normal operation will involve:
- Turn on your headlamps
- Press the Rear Fog Lamp switch.
- Normal operation will involve:
- If it does not work on the first try, troubleshoot all your connections.
- I suggest that testing your ground connections (all of 'em) is a good test to begin with.
- A blown bulb will not affect the operation of your switch, but should be replaced!
- I wouldn't completely reassemble all your parts before your first test drive. Leave off certain pieces of trim to make it easier to troubleshoot if you encounter problems.
- Head out somewhere with no traffic, and test out your system.
Figure 12. With just Tail Lamps (1a) and with addition of Fog Lamp (1b).
Good Luck and enjoy not getting rear ended by some distracted soccer mom.
DeSchlong
January, 2009
Last edited by deschlong; 05-05-2013 at 09:35 PM. Reason: 01/2013: Added a new pic of the rear fog harness. 05/2013:Broken pic links fixed.

 01-23-2009, 08:12 PM
#4
Honda-Tech Member
iTrader: (5)
Join Date: Mar 2005
Location: upstate, ny, us
Posts: 942
Likes: 0
Received 0 Likes
on
0 Posts
Nice wright up. Doesnt the edm delsol have a fog light in the bumper? If so that would be a nice idea as well but this one is clean.
02-14-2009, 02:32 PM
#5
HT's TOP CHEF
iTrader: (1)
Join Date: Apr 2006
Location: DICKIES & FLIP FLOPS, FL
Posts: 7,548
Likes: 0
Received 0 Likes
on
0 Posts
Nice now I can finally wire up my rear fog like it's supposed to be.
05-14-2009, 09:27 PM
#7
The concept behind the wiring would work - as in, switch powers on only when headlights are on, under-dash fuse, wire to the back light - but note that the way an EF CRX Rear Fog Lamp mounts is totally different. The manual I have here shows it being integrated next to the driver's side back-up light. Hmm, well I guess that's similar, heh. I have an EF circuit diagram here if you need it.
Trending Topics
05-14-2009, 09:47 PM
#8
Honda-Tech Member

Join Date: Feb 2008
Location: Summerville, SC, USA
Posts: 345
Likes: 0
Received 0 Likes
on
0 Posts
As for someone whos been rear-ended before...Im definatly going to do this to my car! Ive always wanted to, but i never knew how until now...thanks for this very in-depth thread!
05-16-2009, 01:32 PM
#9
Honda-Tech Member
The concept behind the wiring would work - as in, switch powers on only when headlights are on, under-dash fuse, wire to the back light - but note that the way an EF CRX Rear Fog Lamp mounts is totally different. The manual I have here shows it being integrated next to the driver's side back-up light. Hmm, well I guess that's similar, heh. I have an EF circuit diagram here if you need it.
 05-27-2009, 07:06 AM
#12
Did you use any relays for the fog switch? I know on my EK switch we had to use what is called a latching relay set up in order for the switch to work light up properly
05-27-2009, 07:24 AM
#14
No, there is no relay required. The light operates much like how brake or tail lights work - no relay required. The trickiest thing was figuring out where to plug in the wires into the fuse box. I knew it was fused by #20, but what pin does the #20 fuse connect in and out? A multimeter helped here. I tested each and every pin. I reference this in my "Notes on wiring: Preparation" section.
It's possible that the EK rear fog lamp wiring is different, though?
It's possible that the EK rear fog lamp wiring is different, though?
 04-12-2010, 01:14 AM
#17
Honda-Tech Member
 10-25-2010, 02:59 PM
#19
Deschlong,
Would the connector and wiring be the samefor a center console mounted rear fog light switch? This is the route I am forced to take, due to my EH3 having every slot in the dash filled now that I have front fog lights.
I am going to put seat a seat heater switch in one opening in the center console, which leaves me one left for the rear fog light.
Thanks,
Tim
10-25-2010, 04:58 PM
#21
tlarimer:
Unfortunately, there was never a console-mounted rear fog light switch made for the EG, nor any vehicle with a rear fog switch that would fit that standard-sized slot. Some people use a console-mounted *front* fog switch, but this has the wrong glyph/symbol on it for *rear* fog lights so it's not ideal. If you go this route, I don't know what connector is used for the back of this switch (never seen one), but it will be able to be wired up properly. The connector is probably fairly common to find at a junkyard.
Another option is to use the console switch as your front fog lights, and find an OEM EDM rear fog light switch for your rear. This is a clean solution and one I'd especially recommend if you have an ugly aftermarket front fog switch in your dash that doesn't match.
Another option is to turn your cruise button ON, so it's on all the time, hide it behind the dash, and install the EDM rear fog switch in that position.
10-25-2010, 05:23 PM
#22
Thanks for the thorough answer, as usual you bring up some great points.
I actually picked up a OEM JDM rear defroster switch/front fog light switch with all wiring from NZ.
So now I just need to figure out the best route to take without sacrificing function and keeping with the OEM EG looks.
I actually picked up a OEM JDM rear defroster switch/front fog light switch with all wiring from NZ.
So now I just need to figure out the best route to take without sacrificing function and keeping with the OEM EG looks.
10-26-2010, 06:16 PM
#23
Deschlong,
I gotta ask, where did you place your cluster dimmer switch after your HLW install?
I am trying to figure out what to do with all my accessory switches already installed in the dash, think I figured out the Front and rear fog light switch positions, but if I want any other upgrades I need to get creative...
 (Hint: Under Fig 15.)
10-26-2010, 06:30 PM
(Hint: Under Fig 15.)
10-26-2010, 06:30 PM
#25
How did I miss that...lol
Not that I have your DIY page favorited or anything....
I was thinking about just going with a JDM unadjustable cluster and moving my USDM speedo into it, since I will be doing door open and low fuel indicators in the near future as well....
Not that I have your DIY page favorited or anything....
I was thinking about just going with a JDM unadjustable cluster and moving my USDM speedo into it, since I will be doing door open and low fuel indicators in the near future as well....