
[DIY] 92-00 Civic REAR Hatch Glass Intermittent Wiper Retrofit Guide
 02-13-2010, 09:20 PM
#1
[DIY] 92-00 Civic REAR Hatch Glass Intermittent Wiper Retrofit Guide
Background
I've always thought that the way the rear wiper functions on our Civics (4th, 5th, 6th Gens and probably others) was pretty lame. I find it annoying in two ways:
So, some of you may know, but probably not very many of you, that the European Domestic Market (EDM) 6th Gen Civics had a REAR intermittent wiper during model years 1998-2000. Presumably, this is because the Europeans would no longer tolerate this sorry state of automobile engineering. It consists of a separate relay box mounted under the dash between the steering column and the heater control unit.
Upon learning this, it occurred to me that a retrofit would be possible on a 5th or 6th Gen Civic and would be relatively easy, provided I could find that all-important relay. But I'm in North America (Canada, actually), so where to look?
The answer lies in a 1997 Honda CR-V. So the 98+ CR-V models all had their rear intermittent wiper functionality integrated into the ICU, BUT the 97 model ONLY had a separate relay box. And, lucky me, there were TWO 97 CR-Vs in the local wrecker yard.
You'll find the box between the steering column and the heater control unit center console. It's grey and labelled with its part number 38650-SV5-G01. Technically, this isn't the same part number as in the EDM 98-00 Civic, but I believe this is only due to the shape of the bracket it comes with in Europe. The wiring for the 97 CR-V and the EDM 98-00 Civic are identical.
The following instructions are specifically for a 5th Gen Civic Hatchback, but could easily be applied to a 6th Gen with little or no modification.
(SPRING 2012 EDIT: FYI - With further research I have discovered that it is possible to swap a 98-01 CRV ICU with integrated rear intermittent wiper function into a 5th Gen Civic. I have completed a retrofit on my own vehicle but have not completed the write-up for this. But, if you are having trouble finding an elusive 1997 CR-V, know that a retrofit is also possible using parts from the 98-01 also. Note that this ICU performs about 4 or 5 full wipes before entering intermittent mode.)
Tool List
The bare minimum you will need is:
Philips screwdrivers
Tiny screwdriver for removing wiring pins from connectors
Wire snips
Metric socket set
Wiring supplies like butt and/or bullet connectors, wiring crimps, etc., and/or equipment for soldering wires, electrical tape
Spare lengths of wires with MALE pins - colours required are GRN, GRN/BLK, LT GRN, LT GRN/BLK
Drill bits or spot-weld remover (~5/16”)
Approx. 40cm of ~3/4" split-loom harness
Pin Removal
You'll have to do a bit of this. A tiny screwdriver is your friend. Look up on honda-tech.com the correct way to remove pins from connectors, or consult this comprehensive guide.
Project Difficulty and Time Commitment
This project is not difficult, especially since I've given you all the information you need to perform the wiring. Budget an hour+ foraging for the parts in the salvage yard. It took me 3 hours to re-install, working at a medium pace, including fabricating my wiring patch harness.
Disclaimer
Or, "Don't point fingers, you only have yourself to blame"
Every effort has been made to make these instructions as complete and accurate as possible, but no warranty or fitness is implied. The information is provided on an “as is” basis. The author(s) and the website/publisher(s) shall have neither liability nor responsibility to any person or entity with respect to any loss or damages or inconvenience arising from the information contained herein, nor due to any omissions. Read: Don't muck up your vehicle and try to blame me or anyone else. You are responsible for your own due diligence and research.
Parts Required & Removal Instructions
From the Salvage Yard
Find a 1997 Honda CR-V at the wreckers (10th digit of VIN will be “V”)...
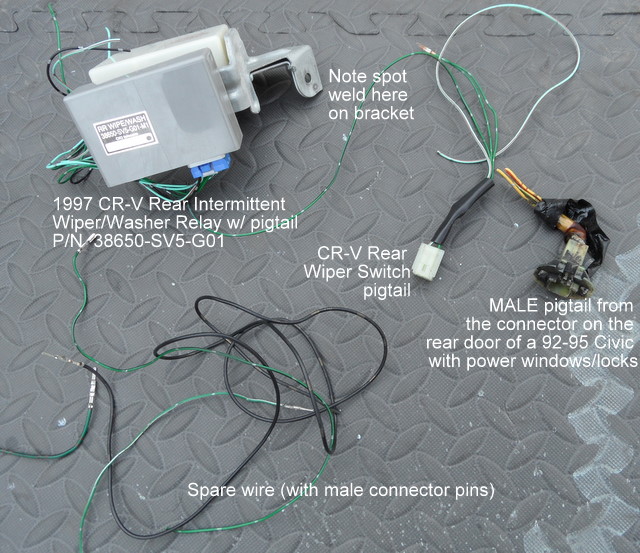
Figure 1.
Installation Instructions
The low-down: Basically you're mounting the relay under the dash, then creating a patch cable between your current Civic’s RR. W/W switch and going to the CR-V’s RR Int. W/W Relay and the CR-V’s RR. W/W switch pigtail that you removed.
Before You Begin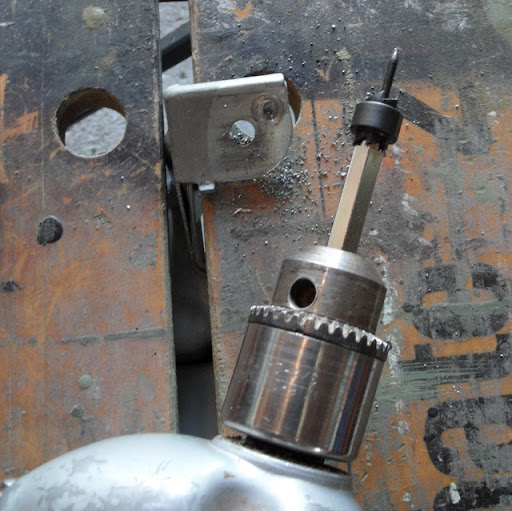
Figure 2.
Cabin: Under Dash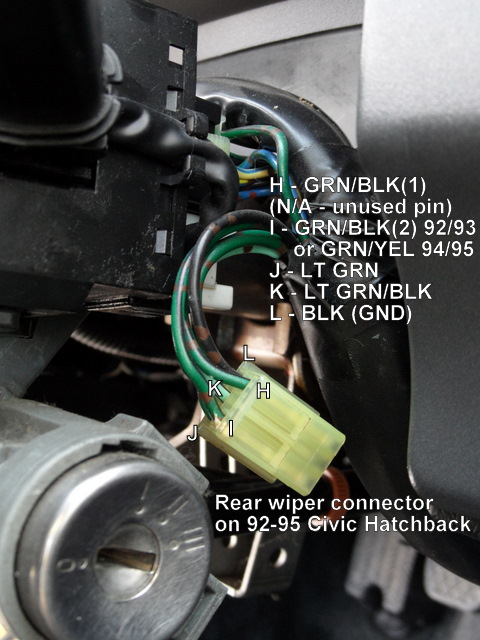
Figure 3.

Figure 4.
Wiring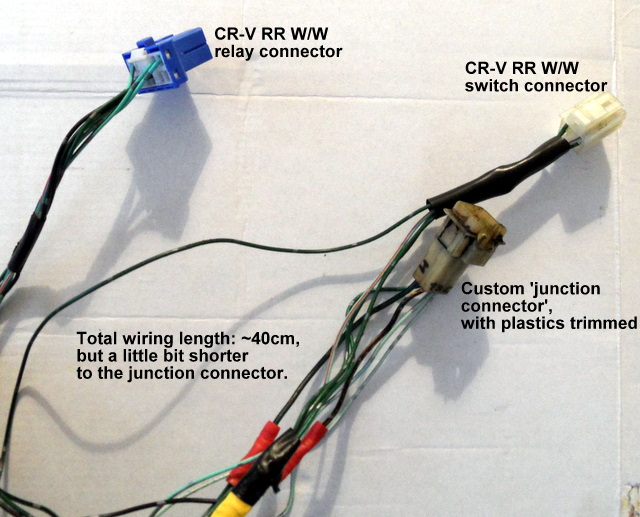
Figure 5.

Figure 6.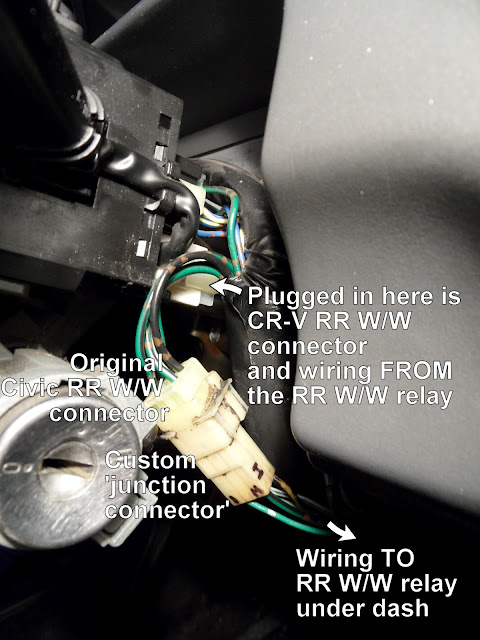
Figure 7.
Test Drive
DeSchlong
December, 2010
NOTE: I’ll post a movie of the operation soon.....
Background
I've always thought that the way the rear wiper functions on our Civics (4th, 5th, 6th Gens and probably others) was pretty lame. I find it annoying in two ways:
- The most obvious is that the wiper is either ON or OFF. It functions (wipes) very fast -- I think I've only been through a couple of rainfalls which merited that speed. So, it's faster than the average rainfall can keep it wet, and faster than any snow or salty road spray can collect. Your options, then, are few: Leave it on, wiping a mostly dry window and probably degrading the wiper rubber and generally looking stupid, or manually turning it on and off.
- When you MIST the rear window (twist down), you have to manually turn it to ON to make it wipe to clear the fluid. Otherwise, it just dribbles down the back of the car. Really, Honda? You didn't think this one through did you?
So, some of you may know, but probably not very many of you, that the European Domestic Market (EDM) 6th Gen Civics had a REAR intermittent wiper during model years 1998-2000. Presumably, this is because the Europeans would no longer tolerate this sorry state of automobile engineering. It consists of a separate relay box mounted under the dash between the steering column and the heater control unit.
Upon learning this, it occurred to me that a retrofit would be possible on a 5th or 6th Gen Civic and would be relatively easy, provided I could find that all-important relay. But I'm in North America (Canada, actually), so where to look?
The answer lies in a 1997 Honda CR-V. So the 98+ CR-V models all had their rear intermittent wiper functionality integrated into the ICU, BUT the 97 model ONLY had a separate relay box. And, lucky me, there were TWO 97 CR-Vs in the local wrecker yard.
You'll find the box between the steering column and the heater control unit center console. It's grey and labelled with its part number 38650-SV5-G01. Technically, this isn't the same part number as in the EDM 98-00 Civic, but I believe this is only due to the shape of the bracket it comes with in Europe. The wiring for the 97 CR-V and the EDM 98-00 Civic are identical.
The following instructions are specifically for a 5th Gen Civic Hatchback, but could easily be applied to a 6th Gen with little or no modification.
(SPRING 2012 EDIT: FYI - With further research I have discovered that it is possible to swap a 98-01 CRV ICU with integrated rear intermittent wiper function into a 5th Gen Civic. I have completed a retrofit on my own vehicle but have not completed the write-up for this. But, if you are having trouble finding an elusive 1997 CR-V, know that a retrofit is also possible using parts from the 98-01 also. Note that this ICU performs about 4 or 5 full wipes before entering intermittent mode.)
Tool List
The bare minimum you will need is:
Philips screwdrivers
Tiny screwdriver for removing wiring pins from connectors
Wire snips
Metric socket set
Wiring supplies like butt and/or bullet connectors, wiring crimps, etc., and/or equipment for soldering wires, electrical tape
Spare lengths of wires with MALE pins - colours required are GRN, GRN/BLK, LT GRN, LT GRN/BLK
Drill bits or spot-weld remover (~5/16”)
Approx. 40cm of ~3/4" split-loom harness
Pin Removal
You'll have to do a bit of this. A tiny screwdriver is your friend. Look up on honda-tech.com the correct way to remove pins from connectors, or consult this comprehensive guide.
Project Difficulty and Time Commitment
This project is not difficult, especially since I've given you all the information you need to perform the wiring. Budget an hour+ foraging for the parts in the salvage yard. It took me 3 hours to re-install, working at a medium pace, including fabricating my wiring patch harness.
Disclaimer
Or, "Don't point fingers, you only have yourself to blame"
Every effort has been made to make these instructions as complete and accurate as possible, but no warranty or fitness is implied. The information is provided on an “as is” basis. The author(s) and the website/publisher(s) shall have neither liability nor responsibility to any person or entity with respect to any loss or damages or inconvenience arising from the information contained herein, nor due to any omissions. Read: Don't muck up your vehicle and try to blame me or anyone else. You are responsible for your own due diligence and research.
Parts Required & Removal Instructions
From the Salvage Yard
Find a 1997 Honda CR-V at the wreckers (10th digit of VIN will be “V”)...
- Remove the Rear Intermittent Washer/Wiper Relay from the under-side of the dash, with a LONG length of pigtail … about 35cm.
- Part number is marked on it: 38650-SV5-G01
- Spot welded to it is the Interlock relay (if the CR-V is an AT)
- Keep the bolt
- Get the connector and pigtail from behind the Rear Wiper/Washer Switch
- Try to get the wiring to past where the GRN and the GRN/BLK wires are split (under blue tape, probably). This means spending some time disassembling the wiring loom, but it makes your job easier when you need to put it all back together.
- Remove the MALE connector and ~10cm pigtail from inside one of the rear doors
- This connector will fit into the female connector of your Civic’s rear wiper/washer switch.
- Getting this connector means you do not have to cut and splice any of your vehicle’s existing wiring.
- I suspect there are many other possible donor vehicle models which will have this same male connector so check around in the junkyard.
Figure 1.
Installation Instructions
The low-down: Basically you're mounting the relay under the dash, then creating a patch cable between your current Civic’s RR. W/W switch and going to the CR-V’s RR Int. W/W Relay and the CR-V’s RR. W/W switch pigtail that you removed.
Before You Begin
- Remove the negative cable of your battery before performing any electrical work on your vehicle.
- Notice that the bracket for the relay is spot welded to another relay? That’s annoying.
- Drilling it out with either a spot weld driller (fast) (Fig 2) or some drill bits (medium-fast) will create a nice hole which you will use to then mount the bracket under the dash.
Figure 2.
Cabin: Under Dash
- Remove the under-dash knee bolster and the steering column covers. Remove the connector from the RR W/W switch (Figure 3)
- Mount the relay with the 10mm mounting bolt you removed - see Figure 4
- Examine the distance the wiring has to travel from the relay to the RR W/W switch - about 35-40 cm.
- Trim the plastics sticking out around the junction connector you removed
Figure 3.
Figure 4.
Wiring
- OK, the wiring is confusing. I had a diagram here but it even confused me when I looked at it … and I MADE it.
- I am **** and I removed the pins from the RR W/W junction connector that I pulled and supplied new wires that I salvaged that were the correct colour (except the BLK one - just coloured that in with a Sharpie)
- The easiest way to figure out the wiring is to look at Figure 5 and 6 below and read what I write here:
- Beginning from the CR-V RR W/W switch connector pigtail, connect
- LT GRN/RED to the Relay pigtail (easy)
- Both GRN wires to PIN I on the RR W/W junction connector, AND to the Relay pigtail
- GRN/BLK to PIN H on the RR W/W junction connector AND to the Relay pigtail
- Beginning from the CR-V RR Int W/W Relay pigtail, connect:
- LT GRN, LT GRN/BLK, and BLK to PINS J, K, and L (in that order - easy) on the RR W/W junction connector
- Beginning from the CR-V RR W/W switch connector pigtail, connect
- End result will look like Figure 5. Wrap your wiring in a split wiring loom and tape it up a bit (Figure 4).
Figure 5.
Figure 6.
- Insert the patch cable connectors in their place (Figure 7)
Figure 7.
Test Drive
- Reconnect your battery.
- Normal operation will involve:
- Turn your ignition to IG1.
- Turn towards you to spray washer fluid. The wiper will wipe 2 or 3 times automatically.
- Turn away from you one notch. The wiper will operate with a delay between wipes.
- Turn away from you once more to spray fluid again. The wiper will wipe 2 or 3 times automatically then return to operating with a delay between wipes.
- If it does not work on the first try, troubleshoot all your connections. I had a bad connection on the relay and had to adjust one of the pins on the relay’s connector. A fluke problem but definitely a challenge to solve.
- I wouldn't completely reassemble all your parts before your first test try. Leave off certain pieces of trim to make it easier to troubleshoot if you encounter problems.
DeSchlong
December, 2010
NOTE: I’ll post a movie of the operation soon.....
Last edited by deschlong; 11-11-2018 at 01:16 PM. Reason: Small edit. | Jul/2013: Major update with photos. 98+ CRV parts also work.
 04-22-2010, 09:00 PM
#2
I completely agree with 1. and 2.
I hate how its too fast and not intermittent and hate how it just keeps dripping there. I always thought I was missing a nozzle lol! This is so much work though and sourcing these parts are never easy. I take off my hat to you though, these DIYs are off the chain, Im surprised your threads aren't very popular. Too much hassle for your average tuner I guess.
I hate how its too fast and not intermittent and hate how it just keeps dripping there. I always thought I was missing a nozzle lol! This is so much work though and sourcing these parts are never easy. I take off my hat to you though, these DIYs are off the chain, Im surprised your threads aren't very popular. Too much hassle for your average tuner I guess.
04-23-2010, 05:24 PM
#3
I'll never be able to do this since I have a coupe, but your DIY write-ups are top-notch. I'll be doing the cabin air filter retrofit soon and will be taking pics to add to it.
Great job again!
Great job again!

Trending Topics
07-17-2013, 09:41 PM
#8
No. This write-up uses parts from a 1997 CRV. HOWEVER, you can use the ICU (NOT ECU) from a 1998-2001 CRV ... but you'll have to figure out wiring on your own. I did this but haven't put pen to paper / fingers to keyboard to explain it.
I clarified my edit to the OP to state that I am only talking about CRV ICUs.
I clarified my edit to the OP to state that I am only talking about CRV ICUs.
11-23-2013, 07:51 AM
#9

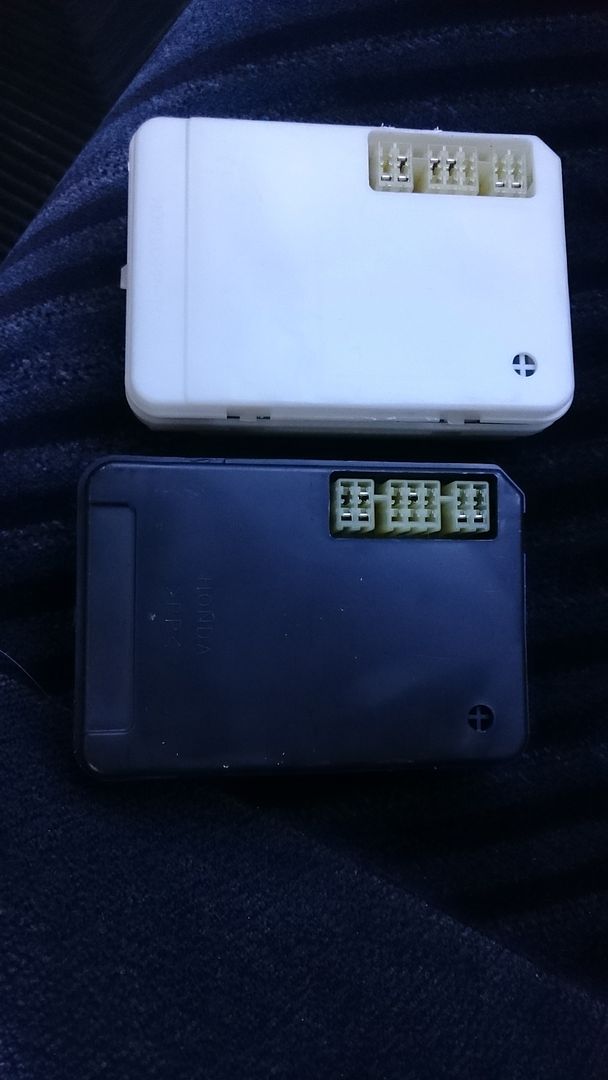
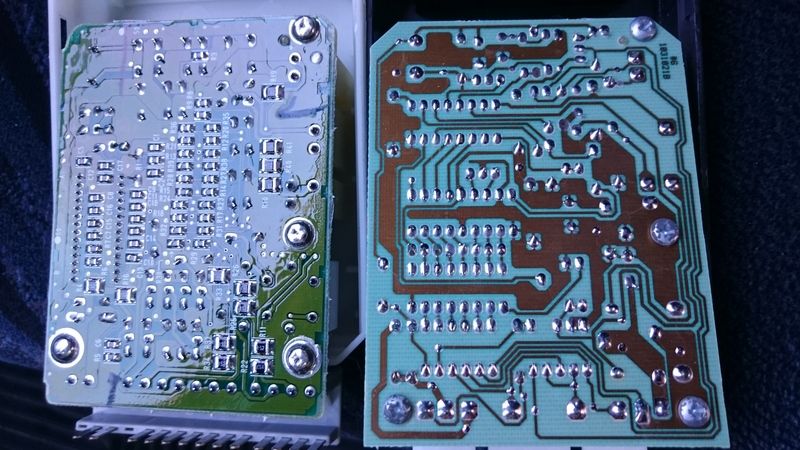
Great write-up! I just got a DC2 ITR UKDM -98Spec main harness for my EG/EJ Custom ABS retrofit and it came with DC2 ICU. I noticed that it uses same connectors than EG, but there is many additional components inside it and couple spare pins:
Civic EJ2 left, DC2 ITR right:


Im just thinking that what is the additional relay in DC2 ICU and what are the other differences. If i plug it to my EJ2, is there going to be any noticeable differences in some functions? I can get the schematics for both cars and study them myself, but if someone have tried this and could tell experiences it would be great!
Civic EJ2 left, DC2 ITR right:
Im just thinking that what is the additional relay in DC2 ICU and what are the other differences. If i plug it to my EJ2, is there going to be any noticeable differences in some functions? I can get the schematics for both cars and study them myself, but if someone have tried this and could tell experiences it would be great!
01-20-2015, 02:48 PM
#10
Honda-Tech Member

Join Date: Jan 2015
Posts: 3
Likes: 0
Received 0 Likes
on
0 Posts
Any chance you have a pic of the control unit plug and wires?
Thanks
Thanks
Last edited by deschlong; 01-20-2015 at 03:27 PM. Reason: No need to quote the whole original post.
01-20-2015, 03:37 PM
#12
Honda-Tech Member
Join Date: Jan 2015
Posts: 3
Likes: 0
Received 0 Likes
on
0 Posts
I did see those.
I was hopping for what wire goes to which pins in the controller.
H-h, I-i, ect....
Got mine off eBay, no plug.
So I'm planning on by passing the plug in the unit and just adding two OEM plugs from a wrecking yard Civic.
Hack a trashed harness....
I was hopping for what wire goes to which pins in the controller.
H-h, I-i, ect....
Got mine off eBay, no plug.
So I'm planning on by passing the plug in the unit and just adding two OEM plugs from a wrecking yard Civic.
Hack a trashed harness....
01-20-2015, 03:43 PM
#13
Use Google to hunt for the CR-V service manual. Info is in there. You should be able to poach a connector from some other Honda. Off the top of my head, the plugs that go into the door lock relays are very similar, though the number of pins may differ.
01-20-2015, 04:13 PM
#14
Honda-Tech Member
Join Date: Jan 2015
Posts: 3
Likes: 0
Received 0 Likes
on
0 Posts
Yippy.... I never did have much luck searching the internet...
Was just dumb luck I found this dyi.
Not even sure what I WAS looking for when I found it...
No pics for me?

Was just dumb luck I found this dyi.
Not even sure what I WAS looking for when I found it...
No pics for me?
03-01-2016, 05:35 PM
#15
Honda-Tech Member
i know i'm bumping an old thread here and this may not be the right place for it:
Deschlong, was the ICU swap a direct replacement. meaning, did all other function work without having to re-pin anything?
I just tried an ICU replacement on my EK. I pulled the ICU from a 99 CRV. Part Number 38600-S10-A01-M1
I can report that the rear wiper doesn't go into intermittent mode.
The front wipers also don't function properly using the CRV ICU. They would run in high speed at all time and when turned off would not return to the "parked" position.
Any insight you can provide deschlong?
I've included picture of the 2 modules here: the white one is the CRV, the black the EK.
03-02-2016, 11:53 AM
#16
^ You're doing it wrong. You need to repin the connector, function-for-function on EK/EG vs. CRV. Compare the wiring diagrams. Obv. you need the CRV pigtail since the connector is different.
Also, adding wires is necessary for rear intermittent. Re-read this DIY. It's the same principle using a subharness only it doesn't use an external control unit for rear intermittent, it uses the ICU.
Also, adding wires is necessary for rear intermittent. Re-read this DIY. It's the same principle using a subharness only it doesn't use an external control unit for rear intermittent, it uses the ICU.
06-06-2017, 03:47 PM
#17

[DIY] 92-00 Civic REAR Hatch Glass Intermittent Wiper Retrofit Guide
(SPRING 2012 EDIT: FYI - With further research I have discovered that it is possible to swap a 98-01 CRV ICU with integrated rear intermittent wiper function into a 5th Gen Civic. I have completed a retrofit on my own vehicle but have not completed the write-up for this. But, if you are having trouble finding an elusive 1997 CR-V, know that a retrofit is also possible using parts from the 98-01 also. Note that this ICU performs about 4 or 5 full wipes before entering intermittent mode.)
NOTE: I�ll post a movie of the operation soon.....
Thanks for this and the many tutorials. They have helped a lot!
I have a 95 civic hatchback CX.
I am taking on a big project: installing #1 rear wiper/washer #2 headlights on, key out, AND door open chime and #3 intermittent front wiper function, all at once
It seems I can do this with the 98-01 CR-V ICU and CR-V donor parts. I know you said you didn't want to do the whole write-up for the rear intermittent wiper using the CR-V ICU just yet. I just have one request that will take you a little time but not as much as doing that write-up. If you or anyone else can answer this it would be great!
I'm headed to the junkyard to get the parts soon. What is the simple list of items I need to pull from the CR-V donor car to make these three upgrades a reality?
I can figure everything else out on my own.
Cheers!
06-06-2017, 04:03 PM
#18
From 98-01 CRV (not 97):
- Column switch + pigtails (fits 92-00 Civic)
- ICU + pigtails
- Check if you can find something akin to the MALE connector I show in Figure 1. Just turns making a sub-harness that much easier.
06-15-2017, 12:12 PM
#19
I pulled the ICU + pigtails from a 1998 CR-V with 4WD. I have everything figured out except for one wire.
In the 11th slot of the ICU connector, there is a WHT/BLK wire (with two grey stripes every inch or so). It is in the same place as the GRN/RED wire from the **picture copied below** of the 94-97 Integra 15-pin ICU connector you included in your "[DIY] OEM 92-95 Honda Civic Lights-On Chime Retrofit..." thread.
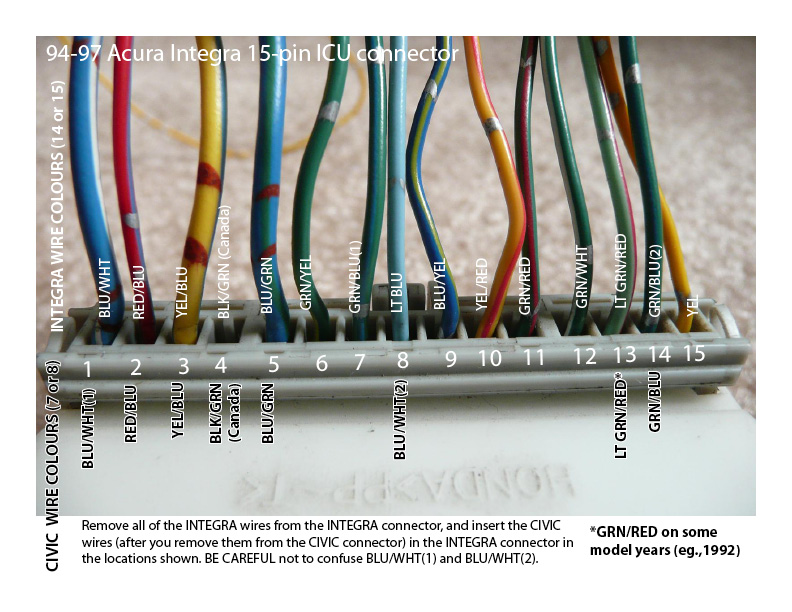
I am assuming that the WHT/BLK wire in the 98 CR-V ICU connector is reserved to alert me when the lights are on AND key is out AND door is open: with a chime or beep sound.
Is this correct? If it is, where can I T-tap or run the wire into nearby under the dash to get that helpful lights-on alert? If this WHT/BLK wire is not used for this chime/beep sound, please help with the correct answer for this issue.
Any help would be greatly appreciated.
01-08-2018, 03:07 PM
#22
Finally got around to the install. Pretty straight forward. Great idea and thanks, deschlong, on getting the CR-V Service Manual! That and the EG 92-95 Civic Service Manuals were key in completing this project.
Here, I'm giving some tips for anyone trying to do this, too, at least until deschlong does that write-up he talked about in 2012 on the ICU part of this project. If he does write that, you can figure out everything else with these tips until then.
Took me 3.5 hours at the junkyard to get all the CR-V parts. That's because I didn't know what I was doing. It can probably be done a lot quicker. I broke the base plate of the wiper switch in the process because I didn't pull that part out correctly. But it fits perfectly secure in the steering wheel, with no play at all.
Took me about 10-12 hours to do the install (all of it). But if you know your way around these sort of things it will take you less time. I also prepared the wiring with labels to help me at the time of install, so I didn't have to look at any diagrams when I got into the CX to do the work. That took a couple of hours. This was my second upgrade, so it was a little easier for me. My first project was installing cruise control, so I had a little experience. But before these two projects I was a complete amateur with no electrical experience. You can do it too!
Recap of what I did:
I have a 95 civic hatchback CX.
I did a big project: installed #1 rear wiper/washer #2 headlights on, key out, AND door open chime and #3 intermittent front & rear wiper function, all at once.
What I needed:
1 a used rear wiper and a used washer bottle (both off an 92-95 EG hatchback w/rear wiper/washer)
2 new tubing for rear washer
3 rear washer nozzle (very hard to find unless you get it in combination with rear glass/spoiler/wiper etc., or overseas somewhere)
4 the three black garnishes for rear window from Honda are the most tricky thing (still don't have an answer for those, but maybe overseas someone has them but I have to agree that getting the entire rear window with spoiler/wiper/rear washer nozzle attached is the best way to go)
5 wiper motor (my remanufactured one doesn't fit properly in my cx, but it works for now just fine) but I'd get a used one next time
6 as much wiring as possible off a 98-01 CR-V (from switch to as far as you can get to make the rewiring easier, from ICU + connector & as much wiring as you can get, and from the rear wiper with connectors also as much as you can get)
7 ICU off 98-01 CR-V
8 wiper switch off 98-01 CR-V all the clips and grommets to go along with the wiring/tubing front-to-back (you might need multiple clips, so don't just buy one of each (see diagrams in Service Manual for Civic to see how many you need of each)
9 extra wire to fill any gaps
10 voltage meter
11 electrical tape
12 heat-shrink
Wiring:
The only tricky parts were one wire from the ICU that is not used because the CR-V has a key hole light and one wire in the CX that goes straight from the wiper switch into a connector going out of the firewall, so I had to tap into that wire in order to get it to go into the ICU properly. For the wire going from the CX wiper switch to the firewall, you can use a voltage meter to find which wire you need to tap into by finding continuity.
Most of the wiring is simply de-pin and re-pin. Keep the CX wiring when you can, it makes it a cleaner install, because the wiring is already in the looms and the perfect length. Also, this way the wires are all CX OEM colors for those parts of the wiring.
I kept my CX tailgate glass, against the suggestion of another DIY write-up. I fished/pulled the wiring through the rubber conduits in the glass by using a long plastic tie and masking tape. This made it easy and I didn't have to remove the glass from the spoiler.
Tips:
- You can lift the A/C tubing up and out of the way without disconnecting the A/C in order to get the old washer bottle out and the new double pump bottle in.
- Learn how to de-pin wires. I used a medium sized staple as my tool. I filed it down to a point/fine edge by filing both sides. Then I used a pair of needle nosed pliers to hold the pin. Probably a small pair of needle nosed vice grips would be best.
- Learn how to read the basics of the Service Manual diagrams. And re-wire function for function.
- You can download a free PDF *OCR* program. This gives you the ability to search any PDF you scan through the program for specific key words. Just run any Service Manual PDF through once you have it downloaded. This can save you hours of work if the Service Manual(s) you download does not have searchable text.
The following users liked this post:
01-09-2018, 04:44 AM
#23
^^^ It shocks me to this day when people actually use my write-ups.
Congrats on tackling a major job! FYI the rear wiper motor on the CRV is the same as on a 92-95 Civic (minus the wiper arm)... the case and everything, even the finger lift. If you need to replace yours then source it from there. I don't know if you did this too, but you can add a front wiper/washer function with that CRV ICU by adding one wire (this is the functionality that sprays AND wipes the windscreen (about 3 passes) when you pull the wiper arm towards you). This is what I mean though it used a different ICU but you get the picture. Cheers!
Congrats on tackling a major job! FYI the rear wiper motor on the CRV is the same as on a 92-95 Civic (minus the wiper arm)... the case and everything, even the finger lift. If you need to replace yours then source it from there. I don't know if you did this too, but you can add a front wiper/washer function with that CRV ICU by adding one wire (this is the functionality that sprays AND wipes the windscreen (about 3 passes) when you pull the wiper arm towards you). This is what I mean though it used a different ICU but you get the picture. Cheers!
01-09-2018, 06:24 AM
#24
Don't be surprised. This is why forums are successful. We don't want folks to struggle like us. And we want folks to learn and feel successful like we have. Work is one of our only real pleasures in life. It's all about sharing the love. That's why I took time to reply to this thread. I want folks to succeed, too!
I need to check to see if the front wiper does that function from the "OFF" position. I know that it does utilize this function from the "INTERMITTENT" position. In the "INTERMITTENT" position for the front wiper, if you use the "SPRAY" function, then the wiper passes three successive times at the low speed, then automatically returns to the "INTERMITTENT" mode.
Also - for the rear wiper - when first turning on the rear wiper, the wiper passes five times at a low successive speed without pause, then it enters the 'INTERMITTENT" mode until you turn the wiper off.
I will check to see if the front wiper passes three successive times when the wiper wand is in the "OFF" position, and then I'll repost once I test for that feature.
While I am out there, I will unplug the ICU and snap a photo of the wiring, so that anyone wanting to tackle this kind of project can try to use my connector/wiring picture as a reference when studying the CR-V / Civic Service Manuals and figuring out all the correct wiring.
The following users liked this post:
01-10-2018, 09:56 PM
#25
I did not create a sub-harness like you (deschlong) suggested for me to do, because I found that an extra plug and sub-harness was redundant / unnecessary, rather than helpful for my particular situation and my particular project. Instead, I simply used the rear wiper switch connector (with pigtail) off of a 98-01 CR-V. My CX did not have this connector or wiring anyway.
All original 7 wires from the CX ICU connector need to be re-pined into the 98-01 CR-V ICU connector / plug. The other CR-V ICU connector / plug wiring is illustrated below in a photo. Using the original 7 CX wires in the CR-V connector is faster and gives a cleaner OEM look. The whole process is straight forward and actually pretty simple. So you won�t have any problems with these upgrades if you use all the parts off of the 98-01 CR-V, especially if you just use the rear wiper motor off a CR-V, because then you just plug that bad boy up and it will work properly. Thanks for that TIP deschlong!
**Notes On Functionality Upgrades You�ll Get With This Install
In the �OFF� position, when washing BOTH either the front OR the rear windows, the wiper will automatically make 2 slow consecutive passes then auto park. To get this result for the REAR WINDOW you must twist upwards, towards the top spray symbol.
In the �ON� position, when washing the FRONT window, the wiper still makes two passes, then auto parks. The REAR wiper makes five passes, then auto parks. To get this result for the REAR WINDOW you must twist downward, towards the bottom spray symbol.
These WASH functions work like this once you release. So if you hold the wash, the wipers will continue to wipe constantly, then enter that two or five time swipe / park sequence.
PHOTOS
Here are three pictures of the finished wire connectors coming out of the back of the upgraded wiper & washer switch/wand in the CX, then two pictures of the rear wiper motor connectors (one of each side of the plugs), then finally the new upgraded and hybrid 98-01 CR-V ICU connector.
***Explanation of Notes on Photo of Installed CR-V ICU Connector***
The photo at the bottom is labeled BLUE with a ( location ) indicating each of the OLD CX ICU connector locations. Simply Remove these from the CX connector and Plug them into the new CR-V connector as seen in the photo, De-Pinning and replacing the former CR-V wire with those already in your CX. There are 7 of these wires you need to De- and Re-Pin into the new CR-V connector.
The photo at the bottom is also labeled with PURPLE indicating original location and function of wires you will need to leave in the connector ( Do Not De-Pin These Wires). Simply connect them with the wires indicated on the photo which correlate with the correct color and function of each wire used. There are 5 of these wires.
Have Fun ! !
All original 7 wires from the CX ICU connector need to be re-pined into the 98-01 CR-V ICU connector / plug. The other CR-V ICU connector / plug wiring is illustrated below in a photo. Using the original 7 CX wires in the CR-V connector is faster and gives a cleaner OEM look. The whole process is straight forward and actually pretty simple. So you won�t have any problems with these upgrades if you use all the parts off of the 98-01 CR-V, especially if you just use the rear wiper motor off a CR-V, because then you just plug that bad boy up and it will work properly. Thanks for that TIP deschlong!
^^^ It shocks me to this day when people actually use my write-ups.
Congrats on tackling a major job! FYI the rear wiper motor on the CRV is the same as on a 92-95 Civic (minus the wiper arm)... the case and everything, even the finger lift. If you need to replace yours then source it from there. I don't know if you did this too, but you can add a front wiper/washer function with that CRV ICU by adding one wire (this is the functionality that sprays AND wipes the windscreen (about 3 passes) when you pull the wiper arm towards you). This is what I mean though it used a different ICU but you get the picture. Cheers!
Congrats on tackling a major job! FYI the rear wiper motor on the CRV is the same as on a 92-95 Civic (minus the wiper arm)... the case and everything, even the finger lift. If you need to replace yours then source it from there. I don't know if you did this too, but you can add a front wiper/washer function with that CRV ICU by adding one wire (this is the functionality that sprays AND wipes the windscreen (about 3 passes) when you pull the wiper arm towards you). This is what I mean though it used a different ICU but you get the picture. Cheers!
**Notes On Functionality Upgrades You�ll Get With This Install
In the �OFF� position, when washing BOTH either the front OR the rear windows, the wiper will automatically make 2 slow consecutive passes then auto park. To get this result for the REAR WINDOW you must twist upwards, towards the top spray symbol.
In the �ON� position, when washing the FRONT window, the wiper still makes two passes, then auto parks. The REAR wiper makes five passes, then auto parks. To get this result for the REAR WINDOW you must twist downward, towards the bottom spray symbol.
These WASH functions work like this once you release. So if you hold the wash, the wipers will continue to wipe constantly, then enter that two or five time swipe / park sequence.
PHOTOS
Here are three pictures of the finished wire connectors coming out of the back of the upgraded wiper & washer switch/wand in the CX, then two pictures of the rear wiper motor connectors (one of each side of the plugs), then finally the new upgraded and hybrid 98-01 CR-V ICU connector.
***Explanation of Notes on Photo of Installed CR-V ICU Connector***
The photo at the bottom is labeled BLUE with a ( location ) indicating each of the OLD CX ICU connector locations. Simply Remove these from the CX connector and Plug them into the new CR-V connector as seen in the photo, De-Pinning and replacing the former CR-V wire with those already in your CX. There are 7 of these wires you need to De- and Re-Pin into the new CR-V connector.
The photo at the bottom is also labeled with PURPLE indicating original location and function of wires you will need to leave in the connector ( Do Not De-Pin These Wires). Simply connect them with the wires indicated on the photo which correlate with the correct color and function of each wire used. There are 5 of these wires.
Have Fun ! !
Last edited by jeff.bill.roger; 01-11-2018 at 05:09 AM.
The following users liked this post: