
Sealing Intake Runner EGR Ports After Drilling & Cleaning?
 08-05-2010, 03:33 PM
#1
Honda-Tech Member
Thread Starter
im working on the 91 f22a1 accord.
i just got done cleaning out the egr ports on the intake, as per the diy how-to in the faq. the problem is that i had to drill out the plugs because the slide hammer kept popping loose when trying to remove them. and after going up a couple sizes in screw, i dont have anything bigger that will also fit in the slide hammer. so i was pretty much left with the choice of not doing the job, or drilling through the plugs. but, i figured that since the article mentions doing so for the older models, it wouldnt hurt.
so that's what i did. and when finished i closed them off with solder, which is also stated in the article. however, when i start up the car, i can put my finger over 3 of 4 ports and feel strong vacuum. and its not driving too well. i also used some carb cleaner in the ports, so the poor running (and temporarily smoking like hell!) is hopefully from that too.
so anyway, im wondering what else i can use to seal those holes up. when i read solder, i thought "wtf", because ive never had luck getting it to bond with large pieces of metal... let alone be air tight. so i was thinking something like JB Weld, or some other high temp epoxy would probably be the best, right? then i remembered that i already have some exhaust pipe joint and seam sealer putty that i could use. i mean, do you think it would withstand the heat and do the job? im thinking that the thin-walled steel pipe would probably get a lot warmer than a big chunk of metal that outside air flows through.
so what's the verdict on the exhaust putty?
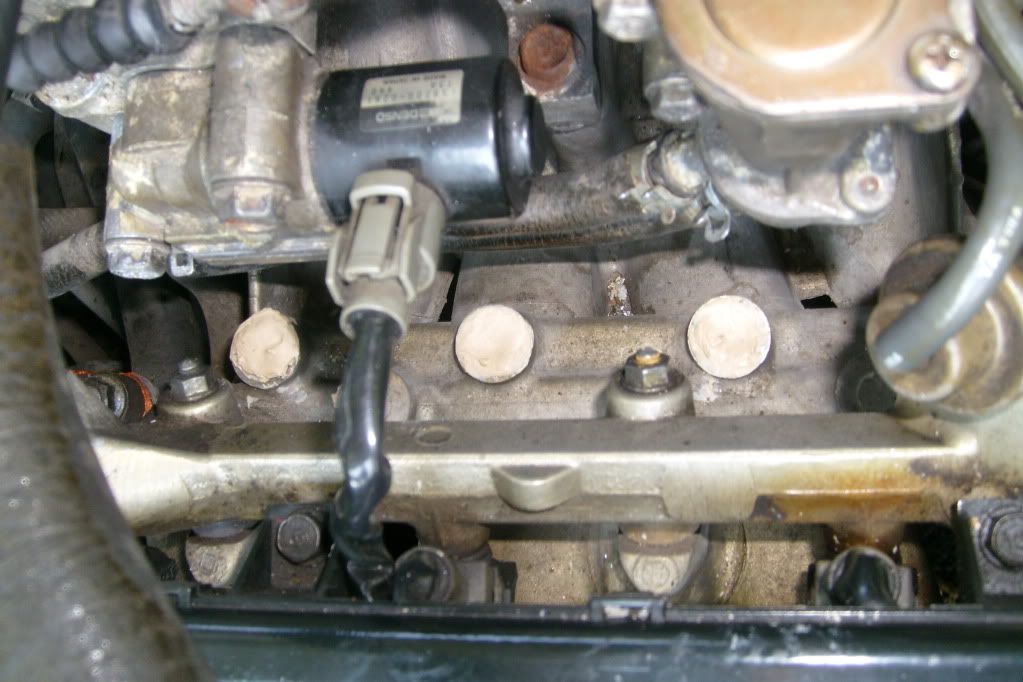
here's a pic of what i need to seal up:
(any need to clean out those other 2 plugs?)

i just got done cleaning out the egr ports on the intake, as per the diy how-to in the faq. the problem is that i had to drill out the plugs because the slide hammer kept popping loose when trying to remove them. and after going up a couple sizes in screw, i dont have anything bigger that will also fit in the slide hammer. so i was pretty much left with the choice of not doing the job, or drilling through the plugs. but, i figured that since the article mentions doing so for the older models, it wouldnt hurt.
so that's what i did. and when finished i closed them off with solder, which is also stated in the article. however, when i start up the car, i can put my finger over 3 of 4 ports and feel strong vacuum. and its not driving too well. i also used some carb cleaner in the ports, so the poor running (and temporarily smoking like hell!) is hopefully from that too.
so anyway, im wondering what else i can use to seal those holes up. when i read solder, i thought "wtf", because ive never had luck getting it to bond with large pieces of metal... let alone be air tight. so i was thinking something like JB Weld, or some other high temp epoxy would probably be the best, right? then i remembered that i already have some exhaust pipe joint and seam sealer putty that i could use. i mean, do you think it would withstand the heat and do the job? im thinking that the thin-walled steel pipe would probably get a lot warmer than a big chunk of metal that outside air flows through.
so what's the verdict on the exhaust putty?
here's a pic of what i need to seal up:
(any need to clean out those other 2 plugs?)
Last edited by double b from wv; 08-08-2010 at 06:17 AM.
 08-05-2010, 06:28 PM
#3
Honda-Tech Member
Thread Starter
EDIT: i went ahead and threw the link into the OP to clear things up for everyone else.
08-05-2010, 06:37 PM
#4
Honda-Tech Member

I would suggest you remove the old ones and buy new ones to replace them. The procedure for the 91 and up says to remove them, did you? Or did you just drill through and then clean?
08-06-2010, 02:17 AM
#5

First of all, there are six not four. The two just below the other four need to be cleaned out too. You didn't do those.
There's more info here....
https://honda-tech.com/forums/honda-accord-1990-2002-2/egr-port-cleaning-without-using-carb-cleaner-2559172/
The very first picture in that thread has the slide hammer tool you need to buy. I'm hoping you have kragen/o'reilly's in you area. That slide hammer is like 10 bucks.
08-06-2010, 07:25 AM
#6
Honda-Tech Member
Thread Starter
it would really help if you guys actually took the time to read the original post. i included all these details so that i wouldnt have to come back and explain the situation time and time again, like i am now. believe it or not, i can read and look at pictures, so if this was your normal run-of-the-mill problem, which was covered in the article, i wouldnt need to ask for other peoples opinion.
i did try pulling them out w/ a slide hammer, but the screw kept pulling out before the plugs came loose. so pretty much, i had to drill through them if i wanted to clean things up. i figured that since the older models had no plugs, and it is mandatory that you drill and seal holes on the intake, then it should work on the plugs too.
at this point, i might be able to thread the hammer screw through the hole, and get enough bite to remove the plugs. maybe not. id rather just seal them over and be done w/ it. when you get down to it, there's no real difference in the end result.
see post #1
is there a need to clean the other two? the how-to doesnt mention it, or show it in the pics.
thanks for the link
at this point, i might be able to thread the hammer screw through the hole, and get enough bite to remove the plugs. maybe not. id rather just seal them over and be done w/ it. when you get down to it, there's no real difference in the end result.
First of all, there are six not four. The two just below the other four need to be cleaned out too. You didn't do those.
There's more info here....
https://honda-tech.com/forums/showthread.php?t=2559172
The very first picture in that thread has the slide hammer tool you need to buy. I'm hoping you have kragen/o'reilly's in you area. That slide hammer is like 10 bucks.
There's more info here....
https://honda-tech.com/forums/showthread.php?t=2559172
The very first picture in that thread has the slide hammer tool you need to buy. I'm hoping you have kragen/o'reilly's in you area. That slide hammer is like 10 bucks.
is there a need to clean the other two? the how-to doesnt mention it, or show it in the pics.
thanks for the link
08-06-2010, 07:26 AM
#7
Honda-Tech Member
Thread Starter
im going to go out there and try the exhaust joint putty in a while. if it burns through or doesnt seal, ill go down to the store and get some jb weld or something.
Trending Topics
08-06-2010, 02:21 PM
#8
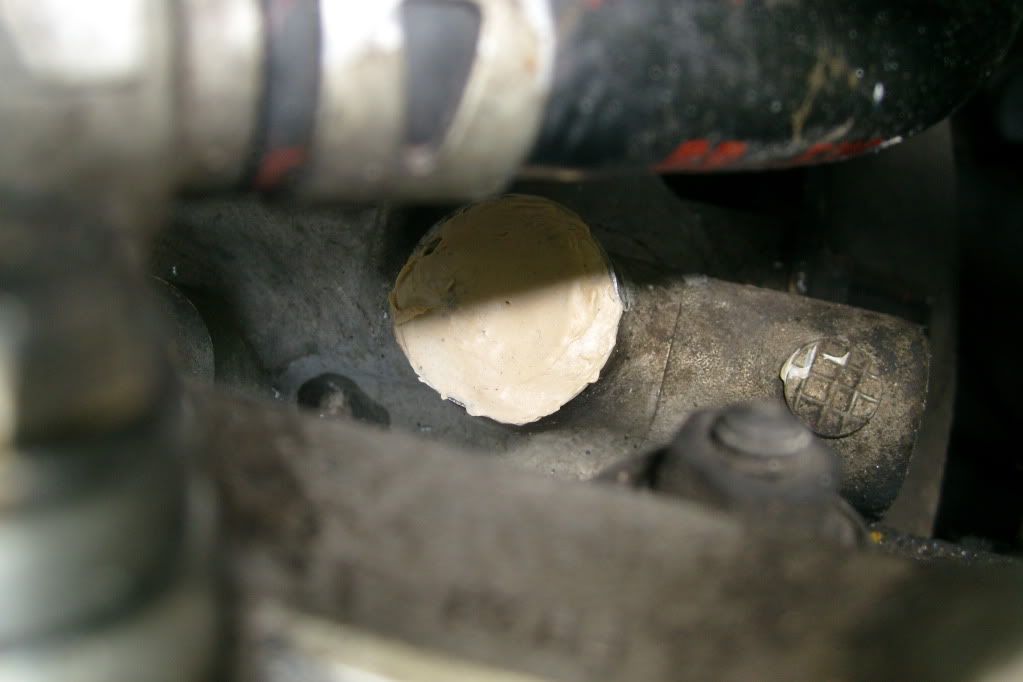
Then is it safe to assume that the above pic is NOT the finished product? Don't get upset 'cause we're basing our opinions on what you uploaded.
If you buy the slide hammer suggested the screws that come with it should have no problems screwing into that hole, if I'm not mistaken. If you pop those old plugs out and put new real plugs in you won't have to worry about any leaks and/or stuff getting into your intake system. I think the last thing you want is glue to fall into your intake system and getting stuck somewhere. Also, I don't really see, going by that pic, how you could have really cleaned out the port with that small amount of room, again, assuming that pic IS the finished product.
Yes, you do have to do the other two. The DIY you posted doesn't say there are only four for the 91 and ups. It references only 4 for when doing the 90 accords with no removable plugs. I've never serviced one of those so maybe it's safe to assume that for those cars there are only 4, but for the 91-93's there are six that need to be done. When you go to the Honda dealer to get the plugs they will hand you 6 plugs.
08-06-2010, 02:40 PM
#9
Honda-Tech Member

Join Date: Jan 2008
Location: Fullerton, CA, USA
Posts: 632
Likes: 0
Received 0 Likes
on
0 Posts
Could you just use a bigger drill bit and drill the plugs totally out and buy the OEM aluminum silver plugs to close them up?
08-06-2010, 07:04 PM
#10
Honda-Tech Member
Or, I've heard of people "taping" the plugs and just installing a bolt of the correct size? If nothing else then you are only using cement/sealant on the threads of the bolt going into the plugs. Or try using the bolt to pull the plug.
08-07-2010, 08:26 AM
#11
Honda-Tech Member
Thread Starter
its not that im getting upset, but its pretty damn frustrating when you take the time to lay everything out in post #1 (what i've tried, why im looking to do it this way, etc), but people apparently only read the title and dive into replying with something that's really a waste of mine and their time. the only thing im asking people to opine about is the sealing method.
If you buy the slide hammer suggested the screws that come with it should have no problems screwing into that hole, if I'm not mistaken. If you pop those old plugs out and put new real plugs in you won't have to worry about any leaks and/or stuff getting into your intake system. I think the last thing you want is glue to fall into your intake system and getting stuck somewhere. Also, I don't really see, going by that pic, how you could have really cleaned out the port with that small amount of room, again, assuming that pic IS the finished product.
the hole i drilled is nearly the same diameter as the port holes, so the only real difference is about 1/32" diameter, and the 3/8" depth of the plug (estimated sizes). the cleaning went well. i cleaned it out with a drill bit, some solid copper wire, a paper clip, and some carb cleaner. i just had to use a little longer piece to compensate for plug depth.
the putty im using is pretty damn thick, and it sets like a weld. so far it seems to be doing alright. and since i used a smaller bit for going through the plug (the screw bore was a bigger one), the hole kind of tapers down, so its even less likely for stuff to suck through.
Yes, you do have to do the other two. The DIY you posted doesn't say there are only four for the 91 and ups. It references only 4 for when doing the 90 accords with no removable plugs. I've never serviced one of those so maybe it's safe to assume that for those cars there are only 4, but for the 91-93's there are six that need to be done. When you go to the Honda dealer to get the plugs they will hand you 6 plugs.
but after thinking about it, i came to this determination: the plugs are basically there for convenience. on the older models, SOP was to drill out the ports and seal them back up after cleaning. i dont see what the difference is here really. if i pull the plugs, i might be able to get a little more of the carbon removed, but that's really pointless in itself. unless i took the entire intake off and cleaned out all of it, i dont think a mm or so of port buildup is going to make much of a difference. and that's assuming that the carb cleaner didnt eat that little bit away when i sprayed it out.
----------------------------------------------------------------------
so as it stands now, ive sealed off the holes with the putty mentioned above. so far it seems like its doing the job. if it turns out not to work though, i think ill try running the screw through the plug and pulling them again.
and make no mistake about it, this car is not going for high book value! i only paid $750 for it back in '04. its sat for the last 3 years or so. right at this moment, besides it running like **** due to this old egr problem, i've also sprung a leak in the power steering down by the rack, and im pretty sure my ignition coil is going out on me too (but my multimeter is 3 counties away, so i cant test to make sure). oh, did i mention that im unemployed and working under the table for what amounts to a part time job? yeah well, that too.
look guys, im not big on cutting corners, esp with my cars, but right now i have bigger problems to take care of than this optional cleaning job. i just want to get it done well enough for now, and when things are looking a little better for me, i'll go back and do it right... provided the car makes it that long.
08-07-2010, 12:51 PM
#12
That's why I always say to just drill through the first time so you have enough screw in there to make sure it pops out the plug. The last thing you want is to have to go through what you are. If your drill bit isn't big enough you run the risk of squishing the plug so hard against the sides that it won't come out. If your drill bit is too big then it won't grab enough. You must have been using too big of a drill bit for the slide hammer screw you were gonna use.
08-07-2010, 01:22 PM
#13
Honda-Tech Member
Join Date: Jan 2008
Location: Fullerton, CA, USA
Posts: 632
Likes: 0
Received 0 Likes
on
0 Posts
That's why I always say to just drill through the first time so you have enough screw in there to make sure it pops out the plug. The last thing you want is to have to go through what you are. If your drill bit isn't big enough you run the risk of squishing the plug so hard against the sides that it won't come out. If your drill bit is too big then it won't grab enough. You must have been using too big of a drill bit for the slide hammer screw you were gonna use.
I was thinking of using the small size then go up gradually until the right size for the screw. I read that the screw bits that came with the sliding hammer is not good so you would use a better quality screw to pull the plugs up. But the head of the better quality screws might be too big to fit into the sliding hammer.
08-07-2010, 01:43 PM
#14
Obviously you know the slide hammer I suggest people use when doing this. It comes with three screws. I was using a bit from a set of 8 or 10 I bought at Walmart. I don't know the exact size but when looking at the screw you just get use the bit that is just smaller than the inside size of the screw. I was able to do all six with one screw, although it was mangled up pretty good when I was done, but even with a lil thread on the screw the plug should pop right out.
08-07-2010, 05:39 PM
#15
Honda-Tech Member
Thread Starter
So what size drill bit is ideal for the first time popping?
I was thinking of using the small size then go up gradually until the right size for the screw. I read that the screw bits that came with the sliding hammer is not good so you would use a better quality screw to pull the plugs up. But the head of the better quality screws might be too big to fit into the sliding hammer.
I was thinking of using the small size then go up gradually until the right size for the screw. I read that the screw bits that came with the sliding hammer is not good so you would use a better quality screw to pull the plugs up. But the head of the better quality screws might be too big to fit into the sliding hammer.
i think the problem was that i wasnt boring deep enough into the plug (ironically, i didnt want to punch all the way through). i think the screw wasnt getting enough threads biting to keep it in the plug. maybe the next size up would have worked better.
Obviously you know the slide hammer I suggest people use when doing this. It comes with three screws. I was using a bit from a set of 8 or 10 I bought at Walmart. I don't know the exact size but when looking at the screw you just get use the bit that is just smaller than the inside size of the screw. I was able to do all six with one screw, although it was mangled up pretty good when I was done, but even with a lil thread on the screw the plug should pop right out.
----------------------------------------------------------------
anyway, the exhaust putty is holding well. when i get the extra cash, ill go back over it and try to pull those other two plugs, clean it out, and replace all 6 of them. but for right now, it seems okay.
08-08-2010, 09:08 AM
#16
Honda-Tech Member
Thread Starter
alright, i found a link to the sealant i used. LINK
seems to be holding pretty good. also runs a lot better than before. im pretty sure the coil is going out though, so it will run good, then kind of miss for while... typical bad coil stuff.
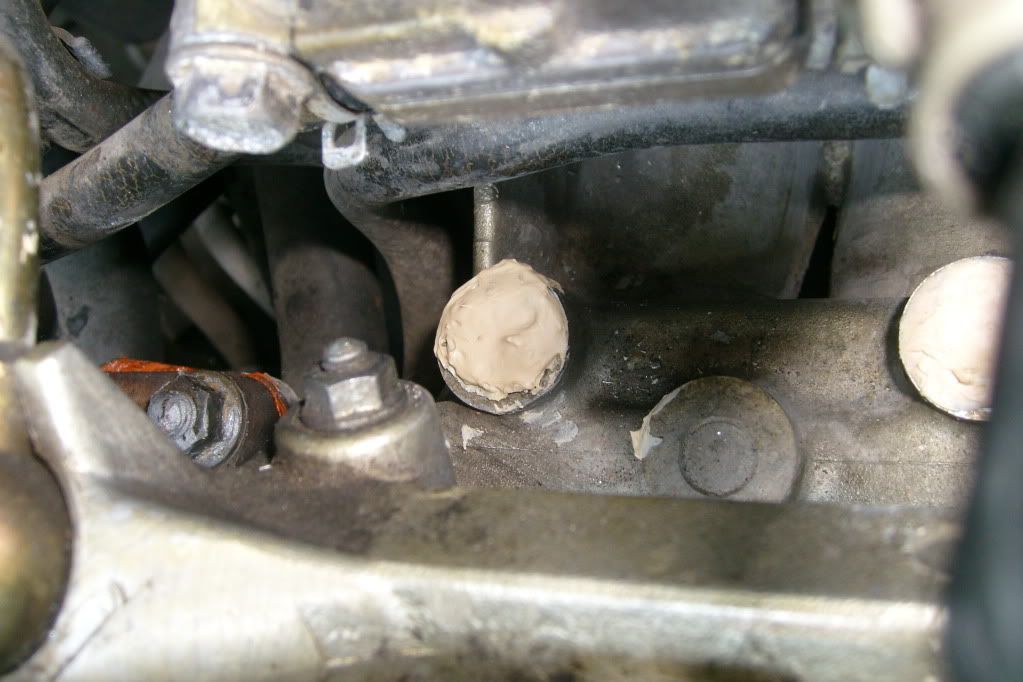
i'll probably hit them with some sandpaper to give it a more finished look. that one on the distributor side looks pretty rough though, so i might fill it in first.
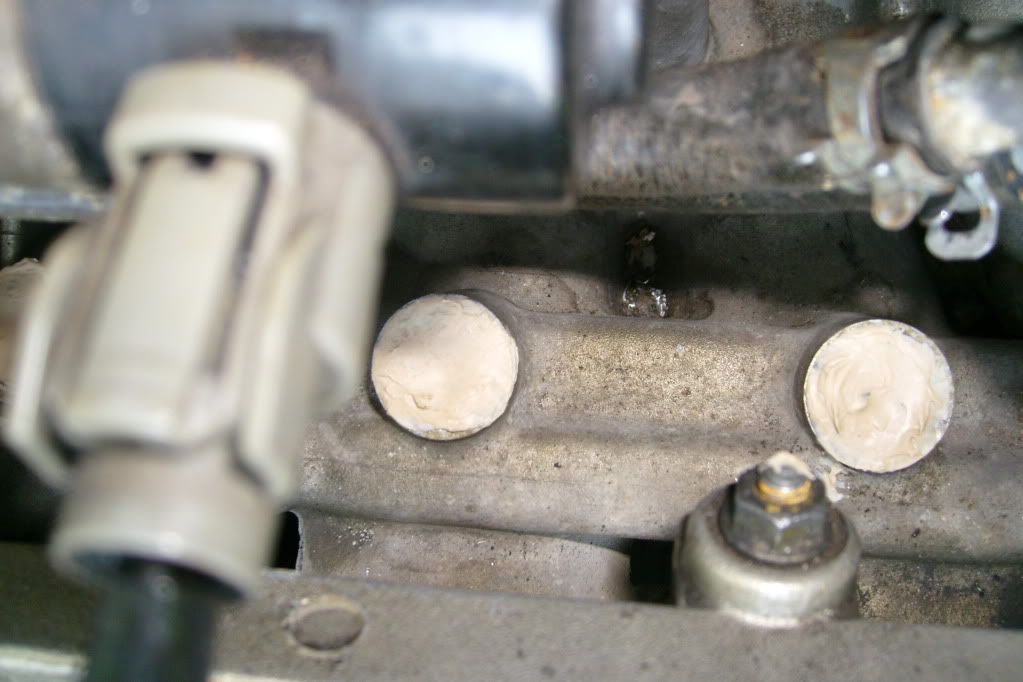
here are some pics of the results.
(another shot of the bore holes)


- 1000 degree
- Waterproof
- Resists heat & corrosion from exhaust gases
seems to be holding pretty good. also runs a lot better than before. im pretty sure the coil is going out though, so it will run good, then kind of miss for while... typical bad coil stuff.
i'll probably hit them with some sandpaper to give it a more finished look. that one on the distributor side looks pretty rough though, so i might fill it in first.
here are some pics of the results.
(another shot of the bore holes)
08-08-2010, 09:20 AM
#17
Honda-Tech Member
Thread Starter
oh yeah, i checked my bit set and it looks like the last one i went with was a 9/64", using the screws that came with the small Bondo slide hammer.
i also tried the 7/64 and 1/8 bits, but those were too small. the next size up i have from the 9/64 is a 5/32, which looks to be nearly as large as the screw itself (including the treads). i stopped with the 9/64 because the 5/32 just looked too big for the screws, and i didnt want to drill them out too much.
the bits are just regular wood/plastic/metal ones. nothing special.
as suggested by the how-to, i coated the bit with some wheel bearing grease so the shavings didnt fall down into the intake.
08-10-2010, 07:33 PM
#18
Honda-Tech Member
Join Date: Jan 2008
Location: Fullerton, CA, USA
Posts: 632
Likes: 0
Received 0 Likes
on
0 Posts
That's why I always say to just drill through the first time so you have enough screw in there to make sure it pops out the plug. The last thing you want is to have to go through what you are. If your drill bit isn't big enough you run the risk of squishing the plug so hard against the sides that it won't come out. If your drill bit is too big then it won't grab enough. You must have been using too big of a drill bit for the slide hammer screw you were gonna use.
Also Holmesnmanny, how did you screw in the screw that came with the sliding hammer? Needle nose pliers? It did not have the groove for the screwdriver.
Thanks.
Last edited by Bad_dude; 08-10-2010 at 09:38 PM.
08-10-2010, 10:35 PM
#19
Honda-Tech Member
Thread Starter
the plug was about 1/2 inch thick... ball park. i just drilled with light pressure once i got deep enough to be concerned, because even if you know how deep to go, you dont want to be leaning on it when it punches through. plus, dont forget to grease the bit to catch the shavings.
i had problems with the hammer screw too. mine were phillips head. i put the screw through the tip of the hammer and sat it/them over the holes and drove in w/ a screwdriver. i screwed them in until the screwdriver started slipping out and messing up the head. i didnt want it to be permanently attached to the plug. still, the screw kept popping out of the hole. i dont know if i wasnt getting it in deep enough for good bite, if the screws are junk (it looked like cutting the threads wore a lot of the theads down), or what the deal was. like others have said, you dont want to put too big of a screw in and spread the plug, or you're working against yourself. and the slide hammer has such a small head, none of the screws i have around there fit it.
i had problems with the hammer screw too. mine were phillips head. i put the screw through the tip of the hammer and sat it/them over the holes and drove in w/ a screwdriver. i screwed them in until the screwdriver started slipping out and messing up the head. i didnt want it to be permanently attached to the plug. still, the screw kept popping out of the hole. i dont know if i wasnt getting it in deep enough for good bite, if the screws are junk (it looked like cutting the threads wore a lot of the theads down), or what the deal was. like others have said, you dont want to put too big of a screw in and spread the plug, or you're working against yourself. and the slide hammer has such a small head, none of the screws i have around there fit it.
08-11-2010, 12:50 AM
#20
the plug was about 1/2 inch thick... ball park. i just drilled with light pressure once i got deep enough to be concerned, because even if you know how deep to go, you dont want to be leaning on it when it punches through. plus, dont forget to grease the bit to catch the shavings.
i had problems with the hammer screw too. mine were phillips head. i put the screw through the tip of the hammer and sat it/them over the holes and drove in w/ a screwdriver. i screwed them in until the screwdriver started slipping out and messing up the head. i didnt want it to be permanently attached to the plug. still, the screw kept popping out of the hole. i dont know if i wasnt getting it in deep enough for good bite, if the screws are junk (it looked like cutting the threads wore a lot of the theads down), or what the deal was. like others have said, you dont want to put too big of a screw in and spread the plug, or you're working against yourself. and the slide hammer has such a small head, none of the screws i have around there fit it.
i had problems with the hammer screw too. mine were phillips head. i put the screw through the tip of the hammer and sat it/them over the holes and drove in w/ a screwdriver. i screwed them in until the screwdriver started slipping out and messing up the head. i didnt want it to be permanently attached to the plug. still, the screw kept popping out of the hole. i dont know if i wasnt getting it in deep enough for good bite, if the screws are junk (it looked like cutting the threads wore a lot of the theads down), or what the deal was. like others have said, you dont want to put too big of a screw in and spread the plug, or you're working against yourself. and the slide hammer has such a small head, none of the screws i have around there fit it.
08-11-2010, 07:08 AM
#21
Honda-Tech Member
Join Date: Jan 2008
Location: Fullerton, CA, USA
Posts: 632
Likes: 0
Received 0 Likes
on
0 Posts
You're supposed to unscrew the end cap of the slide hammer off, then place the screw into the cap then screw the cap back on tight. Then using the other end of the slide hammer, which has a handle you screw the entire slide hammer assembly using the screw that is fastened tightly inside the abovementioned cap into the plug. You don't use a screwdriver period. The slide hammer becomes a screwdriver with the screw in end cap thing. Then using the sliding middle portion of the slide hammer you go from the bottom position and slide it up to the top, thereby putting pressure on the plug that the screw is plugged into and "popping" it out. That's why I posted the link to that other thread where I describe in detail what I just said. I don't think you really ever looked at that other thread. It would have saved you a lot of hassle. What's the point in having a slide hammer if you don't use it.
Thanks.
08-11-2010, 12:22 PM
#23
Honda-Tech Member
Thread Starter
You're supposed to unscrew the end cap of the slide hammer off, then place the screw into the cap then screw the cap back on tight. Then using the other end of the slide hammer, which has a handle you screw the entire slide hammer assembly using the screw that is fastened tightly inside the abovementioned cap into the plug. You don't use a screwdriver period. The slide hammer becomes a screwdriver with the screw in end cap thing. Then using the sliding middle portion of the slide hammer you go from the bottom position and slide it up to the top, thereby putting pressure on the plug that the screw is plugged into and "popping" it out. That's why I posted the link to that other thread where I describe in detail what I just said. I don't think you really ever looked at that other thread. It would have saved you a lot of hassle. What's the point in having a slide hammer if you don't use it.
i did as you described with the end of the hammer (put screw through tip, then hammer screwed into tip). the problem i had is that even when the hammer was fully seated in the tip, the screw still turned under pressure. maybe i didnt have the tip tight enough, because i didnt use a wrench to tighten the tip to the hammer (are you supposed to? now that i think about it, the tip is a hex shape to fit a wrench). so yeah, i probably didnt use it right. it would be nice if they printed some damn instructions on the pack though!
08-11-2010, 12:57 PM
#24
Honda-Tech Member
Join Date: Jan 2008
Location: Fullerton, CA, USA
Posts: 632
Likes: 0
Received 0 Likes
on
0 Posts
I did this when the car was cold but coolant was still lost and I change a few of the hoses and even more coolant is lost.
On the 4th port I am drilling and the it went through but the bit broke inside there. What do I do now so that it won't through the port guys? I used the tiny drill bit first before putting the bigger one in then screw with slide hammer. It's the tiny one that broke in there. I am afraid it's small enough to go through the port.
Thanks.
Last edited by Bad_dude; 08-11-2010 at 01:25 PM.
08-11-2010, 01:54 PM
#25
I did this when the car was cold but coolant was still lost and I change a few of the hoses and even more coolant is lost.
On the 4th port I am drilling and the it went through but the bit broke inside there. What do I do now so that it won't through the port guys? I used the tiny drill bit first before putting the bigger one in then screw with slide hammer. It's the tiny one that broke in there. I am afraid it's small enough to go through the port.
Thanks.
On the 4th port I am drilling and the it went through but the bit broke inside there. What do I do now so that it won't through the port guys? I used the tiny drill bit first before putting the bigger one in then screw with slide hammer. It's the tiny one that broke in there. I am afraid it's small enough to go through the port.
Thanks.