
CR-X SiR K24 build from Australia
 07-14-2015, 06:27 PM
#26
Steve at Heart
Great build. 
When will you be mocking up the steering wheel hub and spacer? Can you measure the length of the hub please. Would like to compare between a Momo and the ASR spacers with ASR hub.
When will you be mocking up the steering wheel hub and spacer? Can you measure the length of the hub please. Would like to compare between a Momo and the ASR spacers with ASR hub.
 07-14-2015, 10:15 PM
#27
Honda-Tech Member
Thread Starter
Join Date: Feb 2007
Location: Melbourne, Victoria, Australia
Posts: 441
Likes: 0
Received 0 Likes
on
0 Posts
Nice to see things coming along. I love the custom hydro setup, looks like you put a good amount of planning into its functionality.
I like the look of the anodized black parts over the more commonly seen chrome too.
Best Honda chassis(CRX): check
K24: check
Custom fab: check
Koni/GC: check
6ULs: check
J's lip: check
Looks like all the ingredients of a well built track car, keep it up bro!
I like the look of the anodized black parts over the more commonly seen chrome too.
Best Honda chassis(CRX): check
K24: check
Custom fab: check
Koni/GC: check
6ULs: check
J's lip: check
Looks like all the ingredients of a well built track car, keep it up bro!
07-19-2015, 03:54 AM
#28
Honda-Tech Member
Thread Starter
Join Date: Feb 2007
Location: Melbourne, Victoria, Australia
Posts: 441
Likes: 0
Received 0 Likes
on
0 Posts
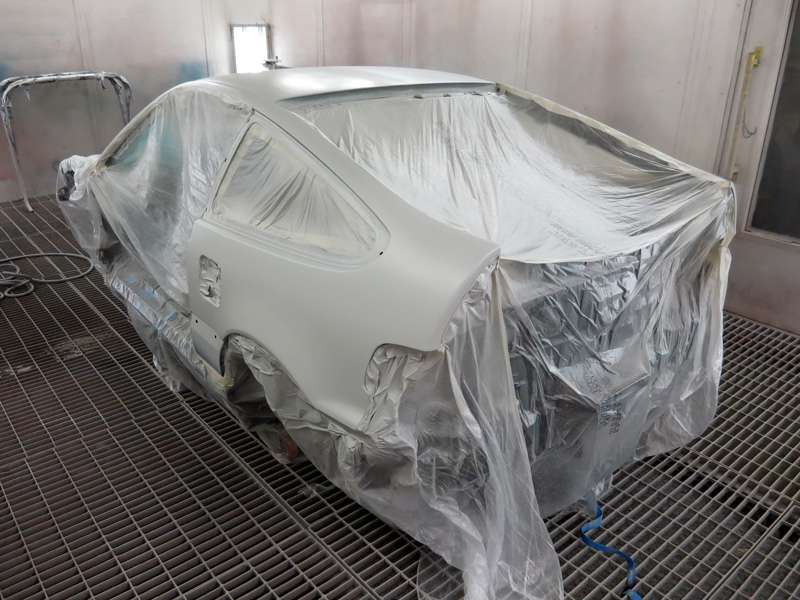
I stopped by the paint shop to drop off the J's Racing front lip yesterday and the paint guys have made some progress. The majority of the bodywork has been done, all the exterior panels are primed and it's getting close to paint.
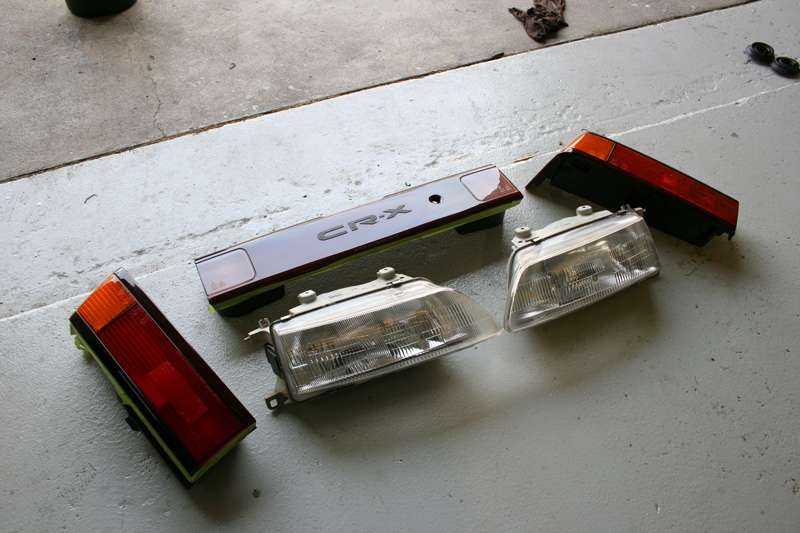
Today I got a couple of small jobs done, firstly I polished my tail lights, centre garnish and head lights. I still need to buff the RHS corner light (once I find it), to make it match up to a fresh new OEM LHS corner light that I bought a while ago from a local CR-X enthusiast. The lights came out nicely with just a polish, but will need a bit more work and sanding to remove the deeper scratches.

Then I started stripping down my front and rear calipers ready for a rebuild. I'll just be using the standard calipers with Hawk DTC60 (F) and DTC30 (R) pads initially and will see how they perform on track before making any changes. With the B16A they were excellent, but I'll have nearly twice as much power now and I expect I'll need a bit more heat capacity in the future. I do have some titanium pad shims for the front to try to keep the heat under control though, which I've used on my DC5R before.

New seals and dust boots for the calipers are on their way and I'm thinking of putting a fresh set of braided lines and at least front pads in it too.
Today I got a couple of small jobs done, firstly I polished my tail lights, centre garnish and head lights. I still need to buff the RHS corner light (once I find it), to make it match up to a fresh new OEM LHS corner light that I bought a while ago from a local CR-X enthusiast. The lights came out nicely with just a polish, but will need a bit more work and sanding to remove the deeper scratches.
Then I started stripping down my front and rear calipers ready for a rebuild. I'll just be using the standard calipers with Hawk DTC60 (F) and DTC30 (R) pads initially and will see how they perform on track before making any changes. With the B16A they were excellent, but I'll have nearly twice as much power now and I expect I'll need a bit more heat capacity in the future. I do have some titanium pad shims for the front to try to keep the heat under control though, which I've used on my DC5R before.
New seals and dust boots for the calipers are on their way and I'm thinking of putting a fresh set of braided lines and at least front pads in it too.
07-20-2015, 07:34 AM
#29
Honda-Tech Member
iTrader: (19)
Join Date: Dec 2008
Location: NORCAL
Posts: 438
Likes: 0
Received 0 Likes
on
0 Posts
Love everything you're doing to the car and the fact that you're thinking every technical aspect out rather than just throwing random parts at it! I look forward to seeing this build through!
07-29-2015, 04:08 AM
#32
Honda-Tech Member
Thread Starter
Join Date: Feb 2007
Location: Melbourne, Victoria, Australia
Posts: 441
Likes: 0
Received 0 Likes
on
0 Posts
Thanks guys.
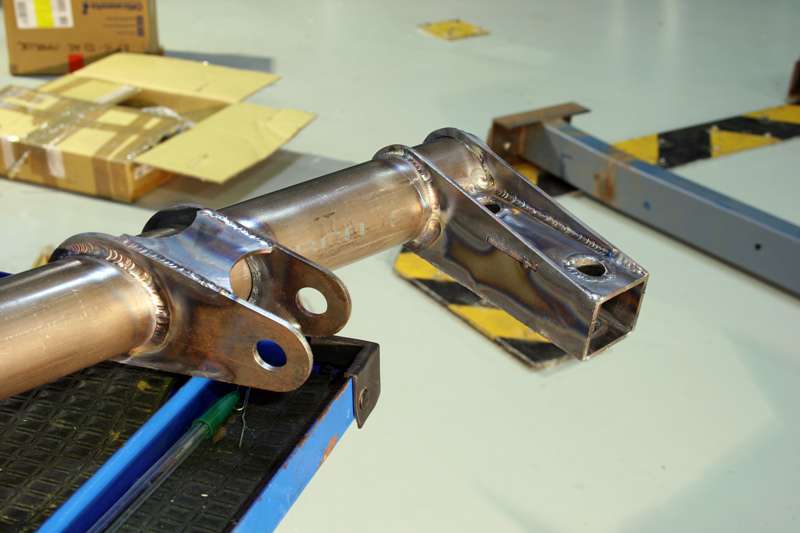
A little more progress over the last few days. I picked up the laser cut parts for the traction bar and the tube sections this week. After some advice from a friend (he has a DC2 that you can see here: https://honda-tech.com/acura-integra...3211535/page4/) I changed the design of the areas that bolt to the chassis slightly to make it easier to make, and added some gussets on the clevises where the rod ends will attach. Here's the revised design:

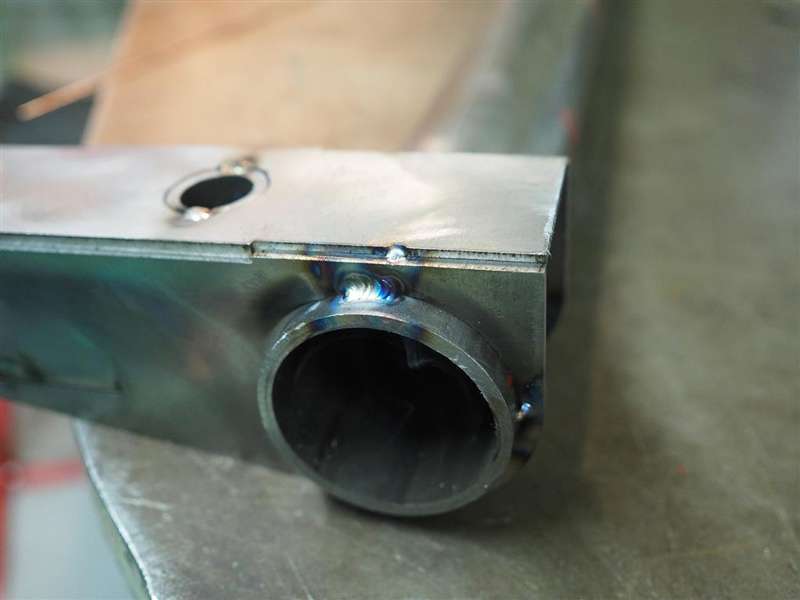
So tonight I cut the tube to length and mocked up all the parts together to check everything fitted as I wanted, and everything looks pretty good. Will tack it together this weekend, but will wait to fit it to the car before final welding so I can compensate if the car is not quite straight.

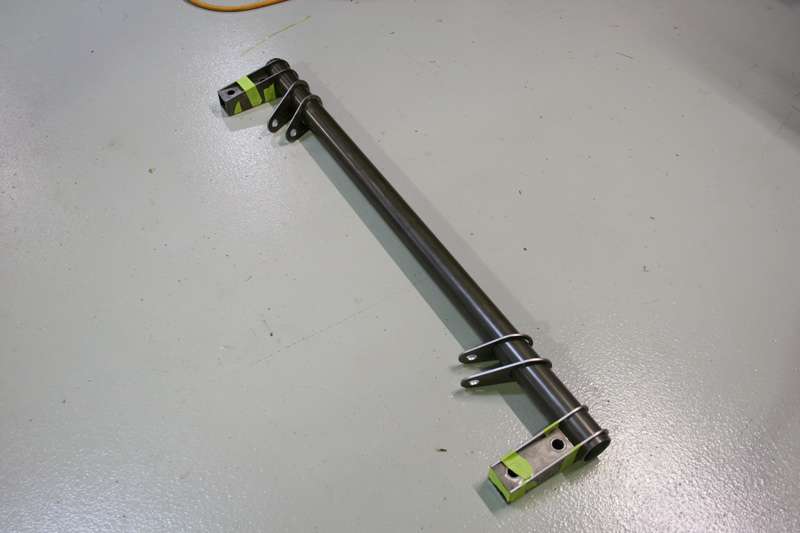
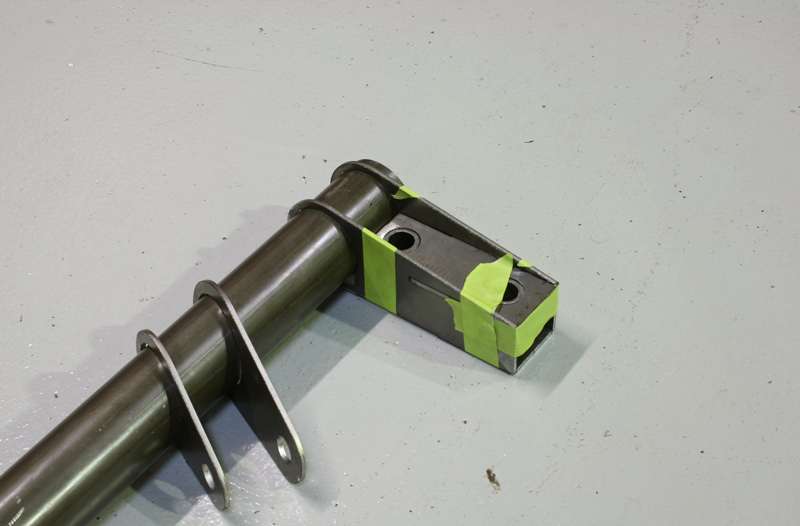
Here you can see the how the plates that make up each end section interlock, which should make it nearly impossible for me to screw it up when I weld it together. Material is all 4130 with is massive overkill probably, but I'll see how it goes and and maybe make a lighter version 2 in the future.
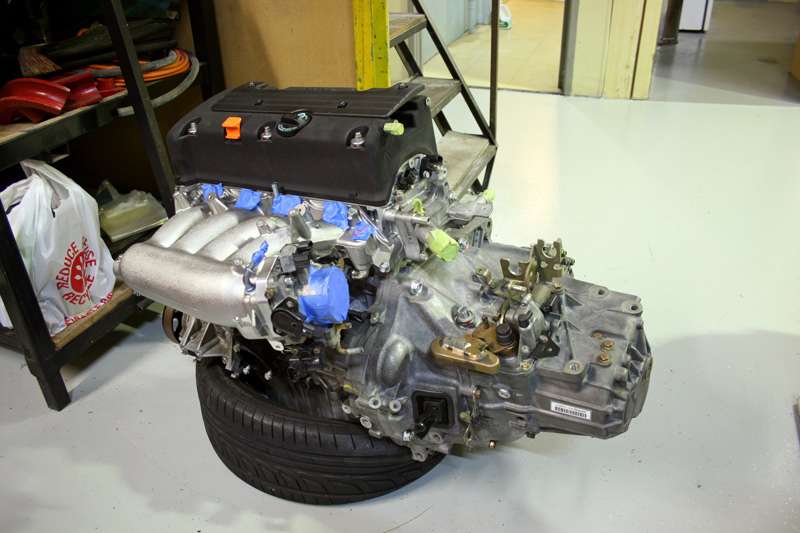
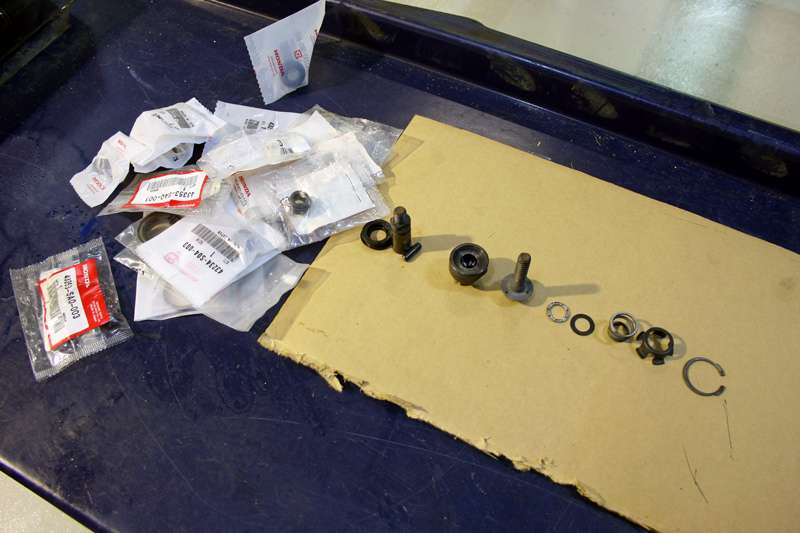
Yesterday I started to fit my gearbox to the engine ready to drop in, but got to this point and realised that I didn't have the bolts for the clutch pressure plate. Thankfully a friend has some spares from one of his Honda projects, so I'll pick them up and put it together over the weekend.

The gearbox I'm using is from a friend's Integra Type R, and I've given it a bit of a freshen up with a new 3-4 gear shift fork (my friend shifts way too roughly and managed to bend the fork at a track event one day and had to drive home unable to engage 3rd gear), a set of Synchrotech carbon lined synchros and fresh seals and bearings. Still has the OEM LSD in it.

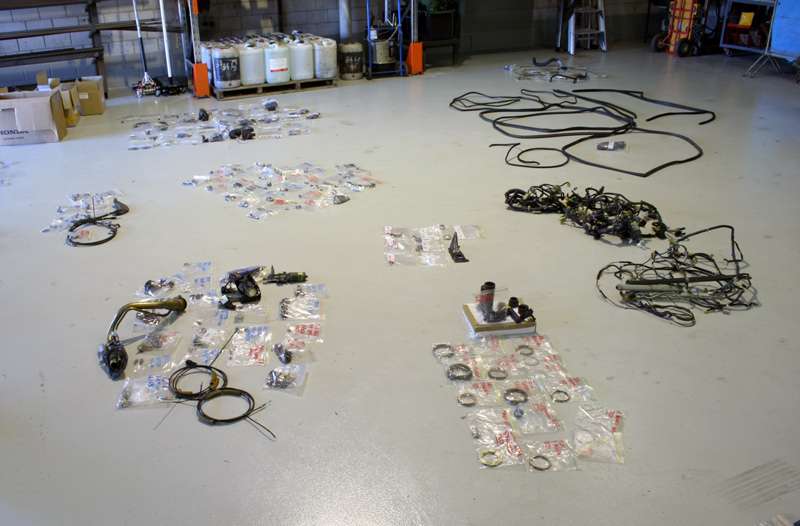
Also spent a bit of time organising all my parts last weekend to make re-assembly go more smoothly, there's a surprising amount of parts in a CR-X when they're all spread out on the floor. Sorted everything out according to where it goes on the car and found most of the parts I'll need soon, except some of the bolts to attach the gearbox to the engine, so I've ordered those:
 08-02-2015, 09:08 PM
#34
Honda-Tech Member
Thread Starter
Join Date: Feb 2007
Location: Melbourne, Victoria, Australia
Posts: 441
Likes: 0
Received 0 Likes
on
0 Posts
^ Thanks!
Got a bit more done over the weekend, and on Friday I finally picked up all my parts from the powdercoater:

Had the following parts done: Front and rear bumper supports, front subframe (that I had previously modified for clearance to the ASP header), front and rear lower control arms, suspension forks, trailing arms with brackets and dust shields, front swaybar, front bumper mounts, dash support bar, engine mount brackets (since I'd also modified these slightly), and PCI side mount brackets. Making progress on getting all the suspension parts together, more updates soon.
Got a bit more done over the weekend, and on Friday I finally picked up all my parts from the powdercoater:
Had the following parts done: Front and rear bumper supports, front subframe (that I had previously modified for clearance to the ASP header), front and rear lower control arms, suspension forks, trailing arms with brackets and dust shields, front swaybar, front bumper mounts, dash support bar, engine mount brackets (since I'd also modified these slightly), and PCI side mount brackets. Making progress on getting all the suspension parts together, more updates soon.
08-06-2015, 05:01 PM
#35
Honda-Tech Member
Thread Starter
Join Date: Feb 2007
Location: Melbourne, Victoria, Australia
Posts: 441
Likes: 0
Received 0 Likes
on
0 Posts
Making more slow progress, preparing for when I get the car back from paint. I've pressed all the new OEM bushes in to the front and rear lower control arms, which was a lot easier than getting the old ones out. I'll probably use sphericals bushes in the LCAs in the future, so I'll just swap these fresh ones over to my EF2 daily driver then. I didn't get new bushes for the upper control arms as I'll be replacing them with adjustable items soon enough.

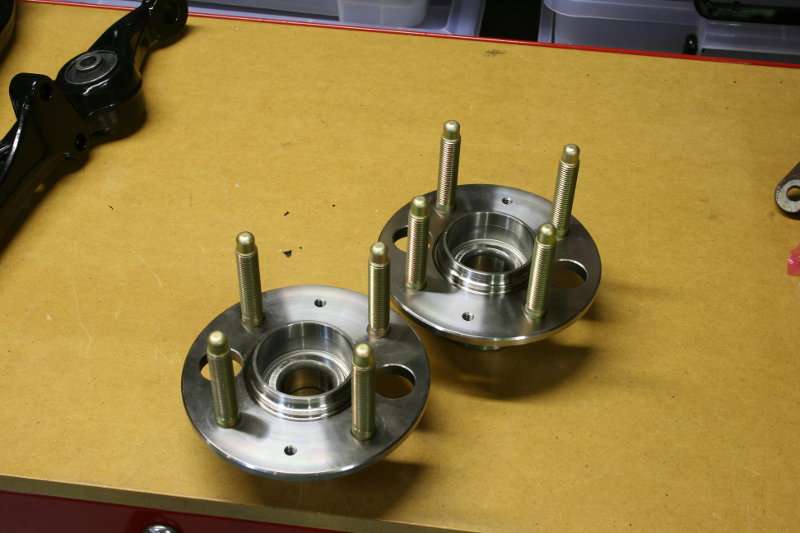
Have also put my ARP extended studs into the rear hubs, and started re-assembling the rear trailing arms. I'm aiming to have everything ready to have the engine in and car rolling within a day or two once I get it back.
At the paint shop things are happening, all the removable panels are done (except for the matte parts of the bumpers, and the mouldings) and the guys are moving on to the interior and engine bay.
08-12-2015, 05:38 AM
#36
Honda-Tech Member
Thread Starter
Join Date: Feb 2007
Location: Melbourne, Victoria, Australia
Posts: 441
Likes: 0
Received 0 Likes
on
0 Posts
Last night I received the picture below from my mate at the panel shop, looks like they're nearly finished so I should get the car back soon looking nice and fresh. For those curious the engine bay and interior colour is a slightly tweaked DC5 Satin Silver Metallic.

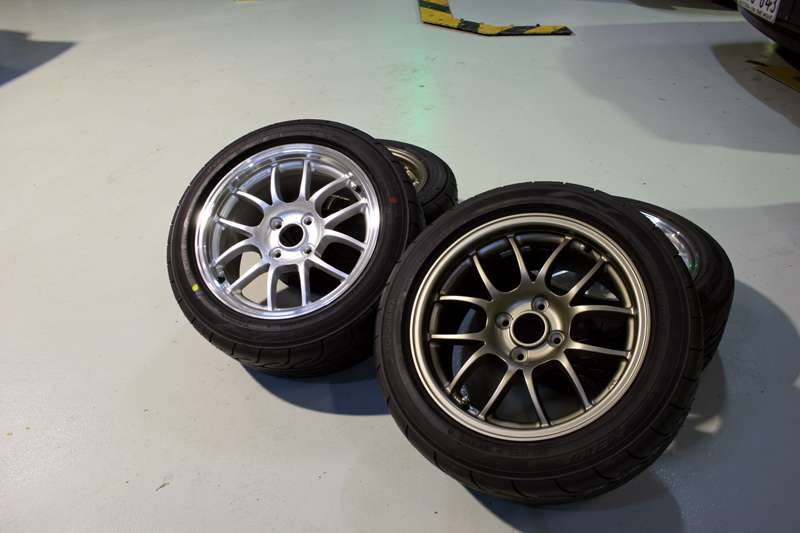
Today I had a set of Advan AD08Rs fitted to some of my 6ULs (15x8s). The wheels are mismatched colours because I made up the set with 2 pairs of rears from sets that I bought to run staggered Hoosier tyre setups. Unfortunately the AD08R is the control tyre that I have to use for an upcoming event, and they aren't available in any wide 15" sizes.
The bolts to mate the engine to the transmission finally turned up, so I manhandled it into place and bolted it up, along with the half shaft:
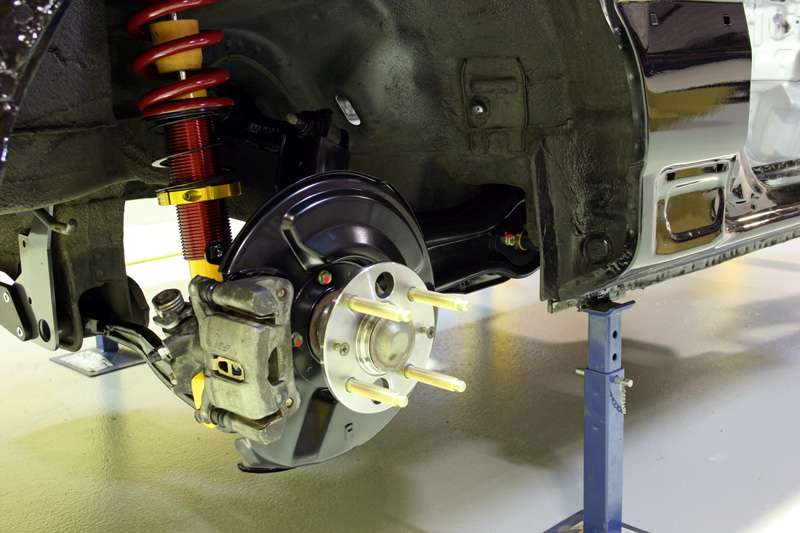
Then I moved on to getting my rear suspension all together. Firstly re-fitted the spindles and splash shields, then fitted the new OEM hubs with ARP studs, PCI spherical trailing arm bushes, and SPC toe links after setting them to the same length as the OEM arms. The PCI bushes have the spherical offset to correct the rear toe curve back toward stock behaviour at lower ride heights. I'll measure the bump steer when I get a chance and compare it measurements I've done on my EF2 to see how much of an effect it has had.

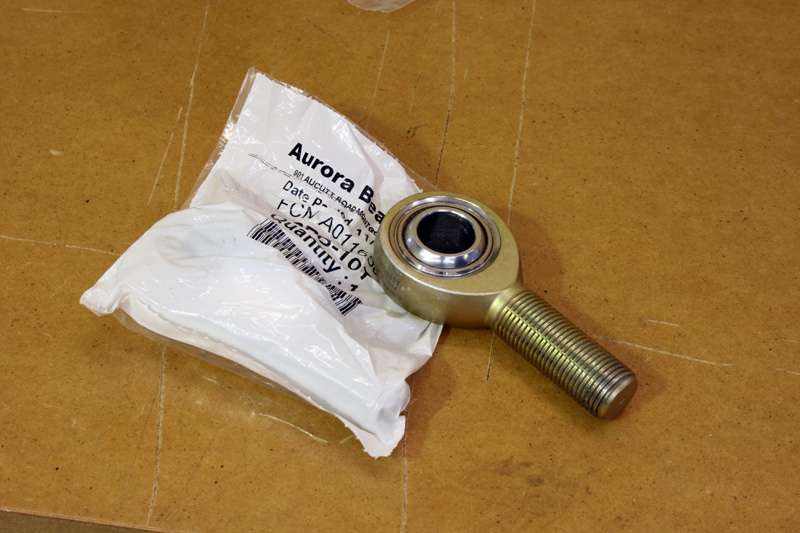
The red SPC arms are pretty ugly so I think I'll get them stripped and re-anodized black next time I pull the car apart, and the rod ends look a bit cheap so will probably replace them with something nicer from Aurora.
More updates soon.
Today I had a set of Advan AD08Rs fitted to some of my 6ULs (15x8s). The wheels are mismatched colours because I made up the set with 2 pairs of rears from sets that I bought to run staggered Hoosier tyre setups. Unfortunately the AD08R is the control tyre that I have to use for an upcoming event, and they aren't available in any wide 15" sizes.
The bolts to mate the engine to the transmission finally turned up, so I manhandled it into place and bolted it up, along with the half shaft:
Then I moved on to getting my rear suspension all together. Firstly re-fitted the spindles and splash shields, then fitted the new OEM hubs with ARP studs, PCI spherical trailing arm bushes, and SPC toe links after setting them to the same length as the OEM arms. The PCI bushes have the spherical offset to correct the rear toe curve back toward stock behaviour at lower ride heights. I'll measure the bump steer when I get a chance and compare it measurements I've done on my EF2 to see how much of an effect it has had.
The red SPC arms are pretty ugly so I think I'll get them stripped and re-anodized black next time I pull the car apart, and the rod ends look a bit cheap so will probably replace them with something nicer from Aurora.
More updates soon.
08-15-2015, 05:36 AM
#37
Honda-Tech Member
Thread Starter
Join Date: Feb 2007
Location: Melbourne, Victoria, Australia
Posts: 441
Likes: 0
Received 0 Likes
on
0 Posts
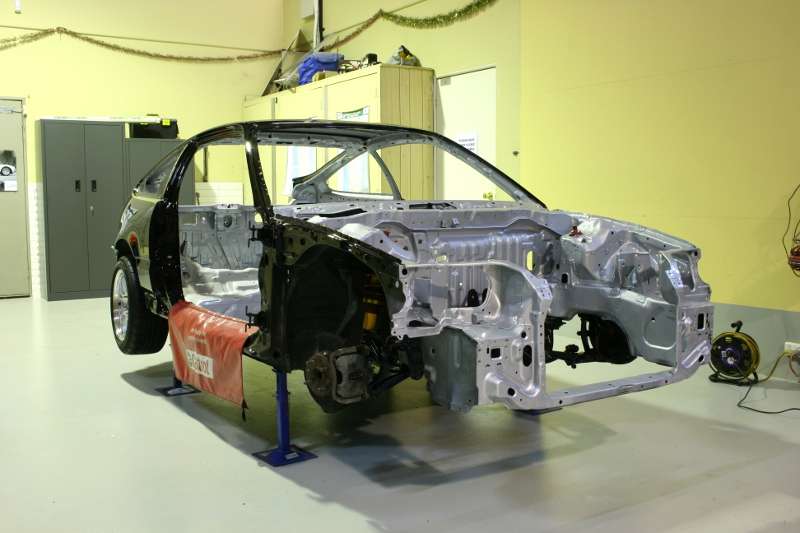
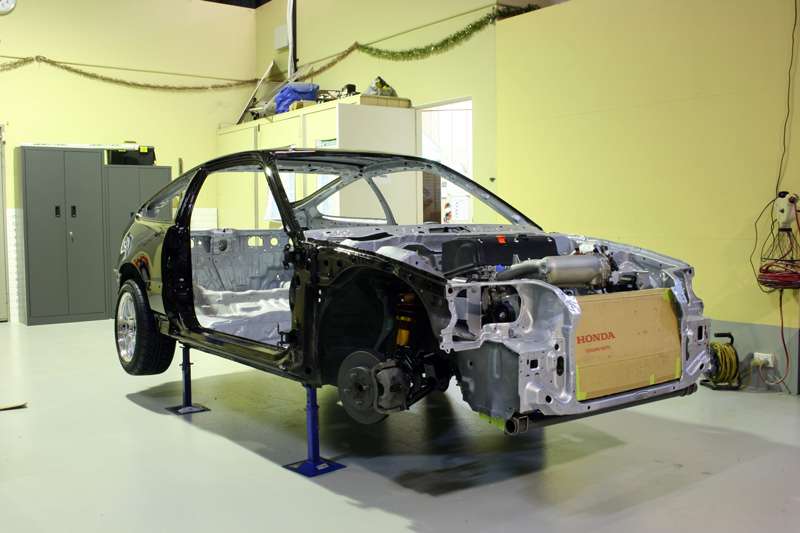
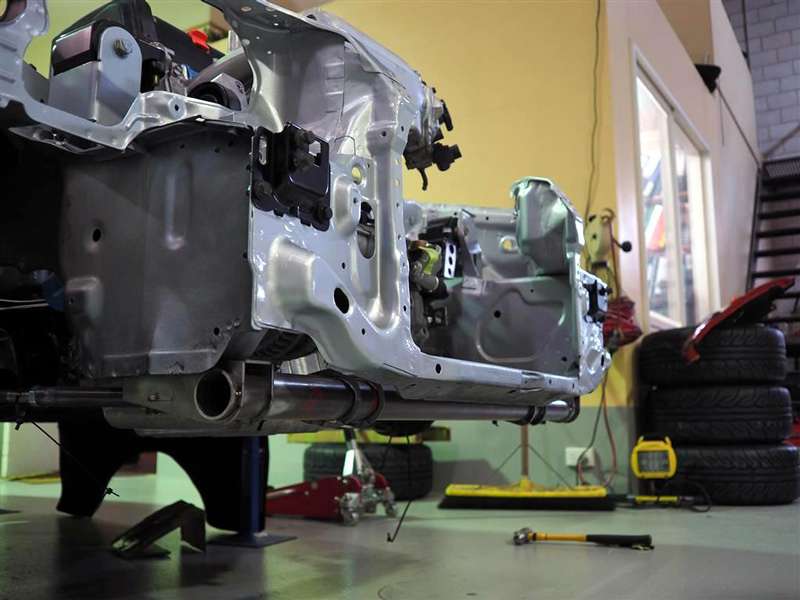
I finally received the car back from the paint shop yesterday, now all I need to do is put it back together. The colour combination is the standard Flint Black Metallic on the exterior, with the interior and engine bay done in a Satin Silver Metallic-ish colour. All the removable panels not pictured are hidden away until needed, and I also still need to get all the plastic mouldings re-done:

Today I gave it a quick wash, scrubbed the underbody a bit and set it up on stands in the corner of the workshop:


Then I finished up assembling the brake calipers. There's a heap of parts in the handbrake mechanism, hopefully I put it back together in the correct order.

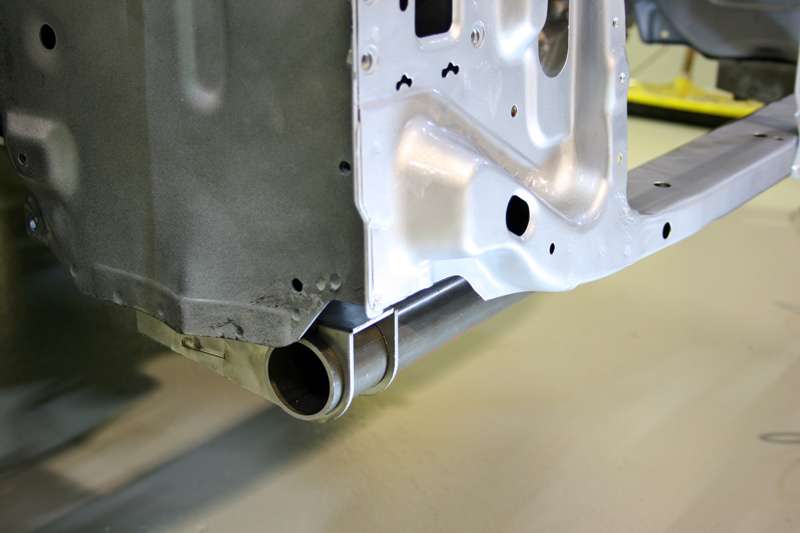
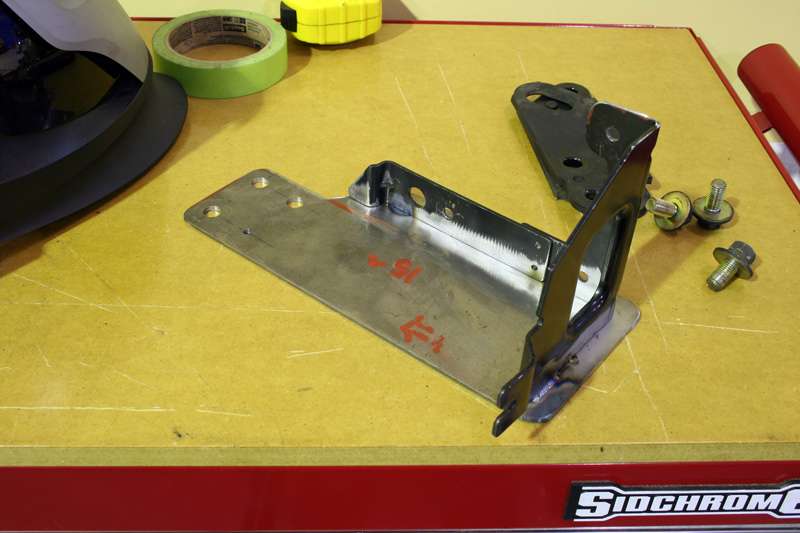
After that I started bolting the suspension into the car. I got the rear mostly together, until I found that the ASR 32mm rear sway bar brackets bolt to tow hook mounting points which the Japanese models don't appear to have. On my car there's 3 holes on each side rearward of the 2 that the OEM rear swaybar uses, but there's no reinforcement or internal thread in the holes, which I guess there is on the US CR-Xs, can someone confirm? So I'll need to make up a slim reinforcing plate with a couple of nuts welded on to slide in through the end of the chassis:
Next up is to get the front suspension fitted, and once I've got the sub-frame and steering rack in I'll drop the motor and box in and start working on the plumbing and wiring.
Today I gave it a quick wash, scrubbed the underbody a bit and set it up on stands in the corner of the workshop:
Then I finished up assembling the brake calipers. There's a heap of parts in the handbrake mechanism, hopefully I put it back together in the correct order.
After that I started bolting the suspension into the car. I got the rear mostly together, until I found that the ASR 32mm rear sway bar brackets bolt to tow hook mounting points which the Japanese models don't appear to have. On my car there's 3 holes on each side rearward of the 2 that the OEM rear swaybar uses, but there's no reinforcement or internal thread in the holes, which I guess there is on the US CR-Xs, can someone confirm? So I'll need to make up a slim reinforcing plate with a couple of nuts welded on to slide in through the end of the chassis:
Next up is to get the front suspension fitted, and once I've got the sub-frame and steering rack in I'll drop the motor and box in and start working on the plumbing and wiring.
08-16-2015, 01:39 PM
#40
Honda-Tech Member
Wow this looks like a great build!
08-16-2015, 04:09 PM
#41
Steve at Heart
ChargeR- Whited just installed a ASR on his USDM recently. Maybe he can assist. Link to build thread below.
https://honda-tech.com/honda-crx-ef-...006841/page15/
https://honda-tech.com/honda-crx-ef-...006841/page15/
08-17-2015, 05:49 PM
#42
Honda-Tech Member
Thread Starter
Join Date: Feb 2007
Location: Melbourne, Victoria, Australia
Posts: 441
Likes: 0
Received 0 Likes
on
0 Posts
ChargeR- Whited just installed a ASR on his USDM recently. Maybe he can assist. Link to build thread below.
https://honda-tech.com/honda-crx-ef-...006841/page15/
https://honda-tech.com/honda-crx-ef-...006841/page15/
Cheers guys.
I made a bit more progress last night after work. I started by assembling the steering rack, with new rack ends and boots. Unfortunately the steering rack is a bit filthy still, as I don't have time to re-build it at this stage.

I also fitted a pair of rack stopper spacers that are part of the tie rod end kit that I'm developing along with another local Honda enthusiast engineer. The spacers slightly limit the rack travel to ensure that the tie rod end doesn't contact the inner part of the wheel at full lock, since our tie rod ends do not have the bend for wheel clearance. The flat washer sitting next to the rack is the part that usually fits in this location to limit the rack travel.

All assembled with new rubber rack mounts:

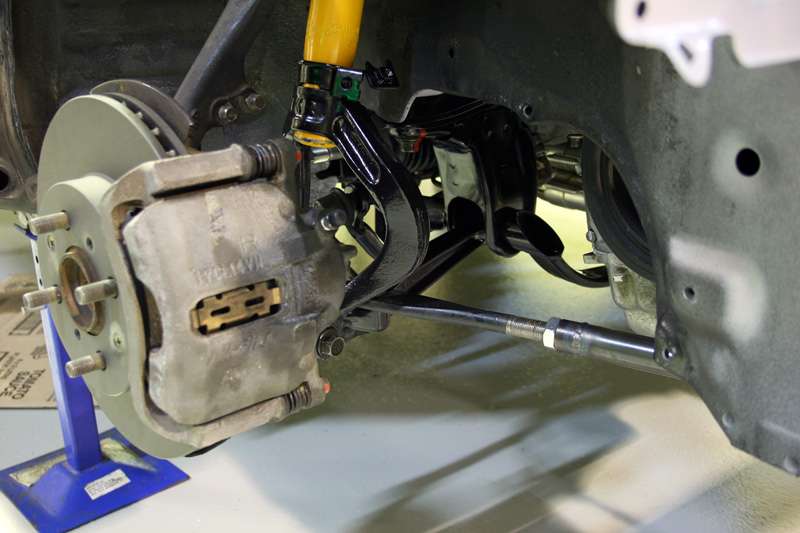
Then fitted it into the car, along with the uprights, upper and lower control arms, coilovers and front swaybar. Apologies for the untidy looking suspension uprights and upper control arms, I've got replacements under way for both these so I haven't given them the full strip down and re-furbish treatment.

That's where I was up to when I called it a night. I'll drop the motor in tonight.
08-21-2015, 01:40 AM
#43
Honda-Tech Member
Thread Starter
Join Date: Feb 2007
Location: Melbourne, Victoria, Australia
Posts: 441
Likes: 0
Received 0 Likes
on
0 Posts
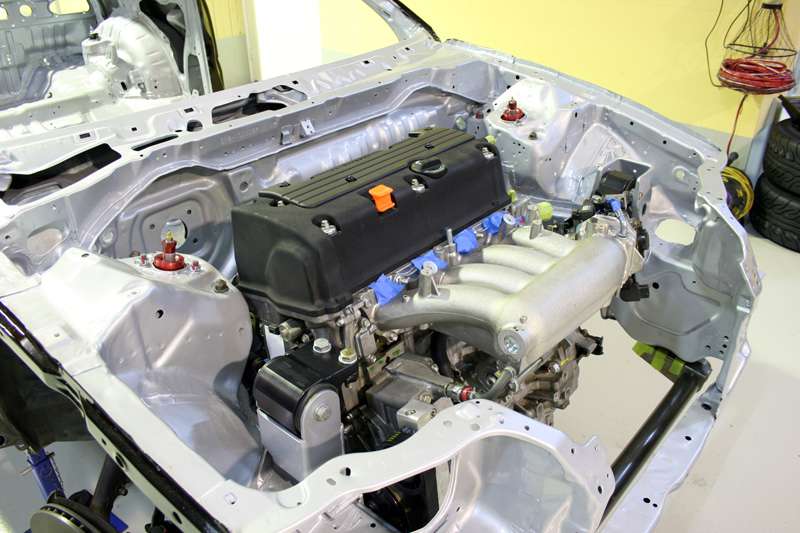
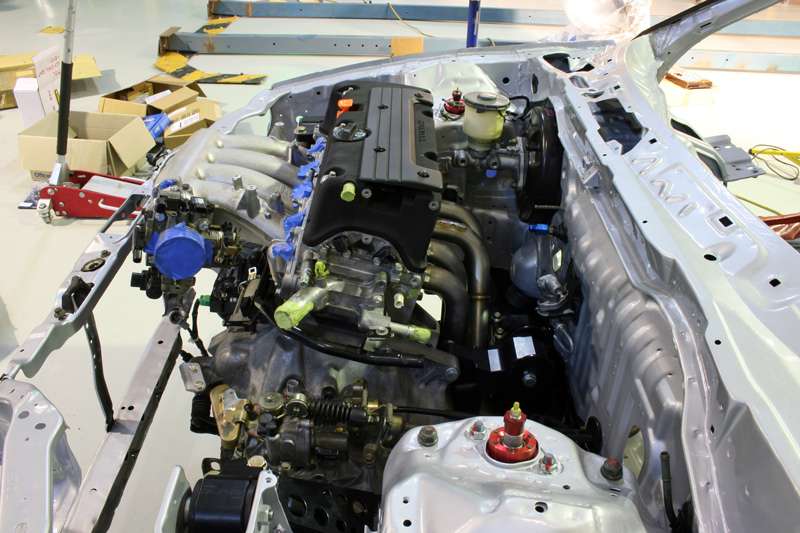
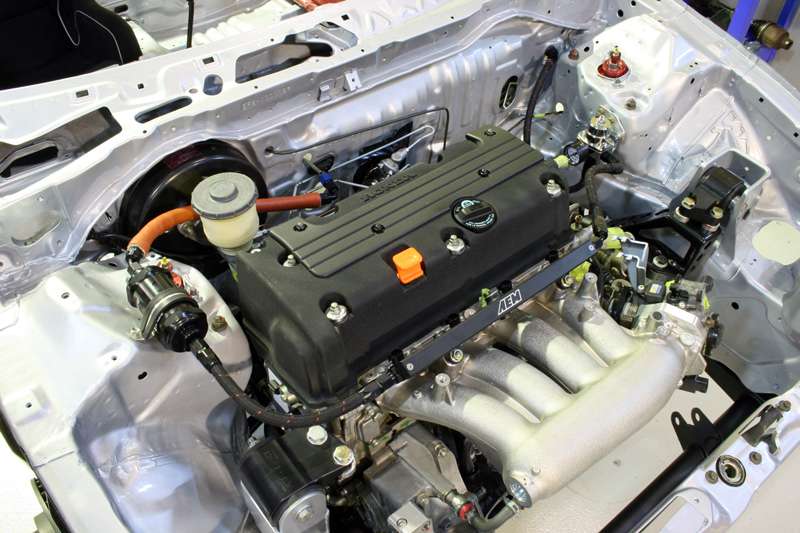
On Tuesday evening I dropped the engine and gearbox in, hopefully for the last time this year. No issues fitting it in, I made a couple of slight modifications to the mounts and brackets to suit the EF8, since it was originally B series the Hasport kit doesn't fit perfectly. It looks like clearance to the steering rack will be quite tight with the ASP header, maybe I'm the first person with this header in a RHD EF? Ignore all the mis-matched hardware, it's temporary until I replace all the trashy Hasport stuff with OEM flange bolts and nuts.
I then bolted a few more bits and pieces on, including the alternator, and the following night moved on to mocking up a radiator in cardboard, with the help of a mate. Here's my radiator template in place, the power of cardboard dreams:

Here's where I got up to before giving up for the evening.
The radiator will be only slightly smaller in frontal area than the standard EF8 part (needed for clearance from the alternator) but with the increase in thickness it should function well enough. I had hoped to mount the radiator off the top of my fabricated front suspension cross-member, but unfortunately the alternator occupies that space.
I then modelled up the radiator ready to send off to have it made by PWR. Have since decided I don't like this design because of the location of the outlet, and will be relocating the inlet and outlet and going with a horizontal flow design.

Picked up the modified OEM radius rods I'll be using in my custom traction bar, so I'd like to get that all welded together and fitted up over the weekend, and hopefully get my pedal assembly and brake master in so I can start doing the hard lines.
I then bolted a few more bits and pieces on, including the alternator, and the following night moved on to mocking up a radiator in cardboard, with the help of a mate. Here's my radiator template in place, the power of cardboard dreams:
Here's where I got up to before giving up for the evening.
The radiator will be only slightly smaller in frontal area than the standard EF8 part (needed for clearance from the alternator) but with the increase in thickness it should function well enough. I had hoped to mount the radiator off the top of my fabricated front suspension cross-member, but unfortunately the alternator occupies that space.
I then modelled up the radiator ready to send off to have it made by PWR. Have since decided I don't like this design because of the location of the outlet, and will be relocating the inlet and outlet and going with a horizontal flow design.
Picked up the modified OEM radius rods I'll be using in my custom traction bar, so I'd like to get that all welded together and fitted up over the weekend, and hopefully get my pedal assembly and brake master in so I can start doing the hard lines.
Last edited by chargeR; 08-21-2015 at 02:06 AM.
 08-24-2015, 06:22 PM
#47
Steve at Heart
<p>Have you seen the Scirocco radiators people used in the EF chassis for a tucked radiator? </p><p>Food for thought.</p><p>https://www.google.com/search?q=EF+s...rocco+radiator</p>
08-31-2015, 06:30 PM
#48
Honda-Tech Member
Thread Starter
Join Date: Feb 2007
Location: Melbourne, Victoria, Australia
Posts: 441
Likes: 0
Received 0 Likes
on
0 Posts
 .
. ) now so unfortunately having to use a lot of old bolts and parts so the end result won't be as clean as it looks now unfortunately.
Making some more slow progress, I better pick up the pace given it's only 45 days until my first event. Over the weekend I got my front suspension cross-member, or traction bar as it's often called, all mocked up:
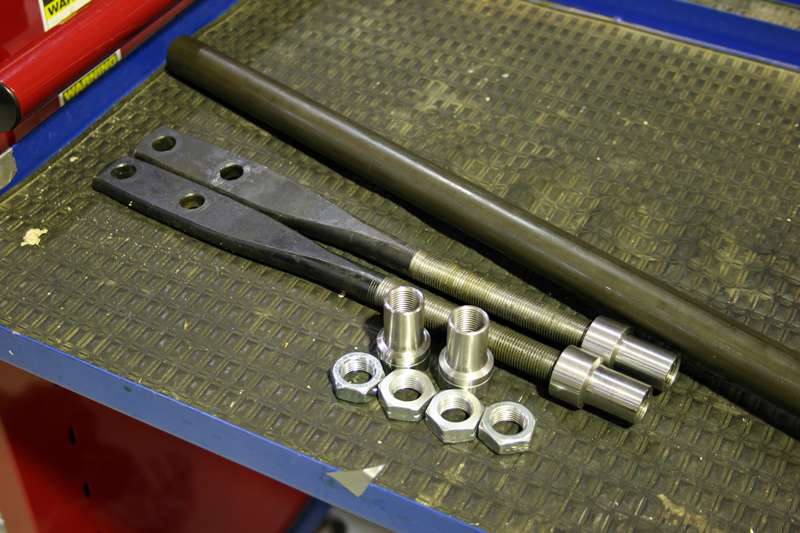
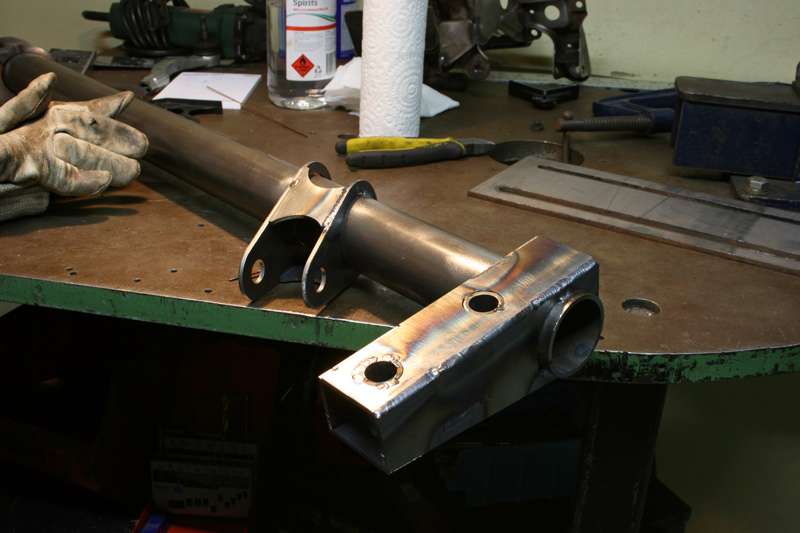
Here's all the bits that go into my fabricated radius rods. Some 1" .120 thick tubing, left and right hand tube ends, jam nuts and the standard radius rods which have been shortened with a 5/8"-18 thread cut into them.
I then welded the tube ends to the tube section and fitted the whole assembly in the car to double check the measurements of the tabs where the radius rods attach, and then tacked it together.

I'm now part way through welding it so I'll finish it off this evening and give it a coat of paint since I don't have time for another batch of powdercoating before my first track event:
On Saturday I picked up my bumpers, front lip and trim from the panel shop all freshly sprayed with the correct matte finish in the right spots. I hate CR-Xs with gloss painted trim and mouldings, so I'm pleased that the painted finish has turned out great as the mouldings were very faded before.

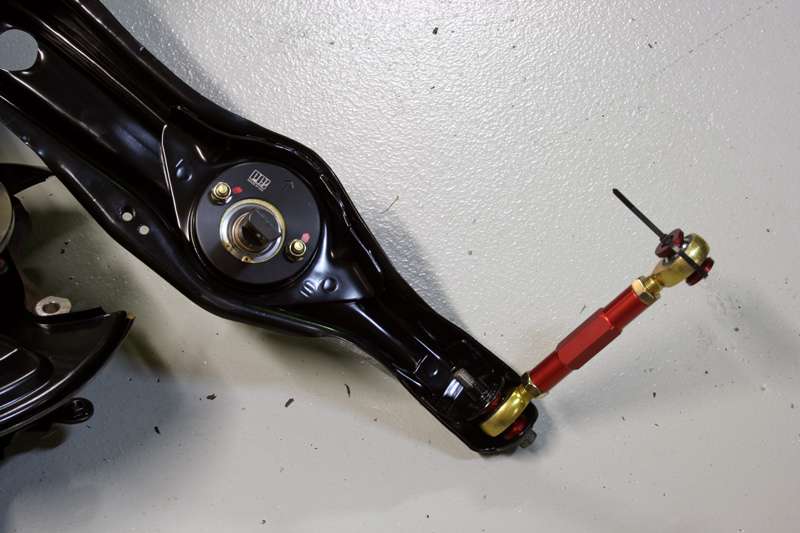
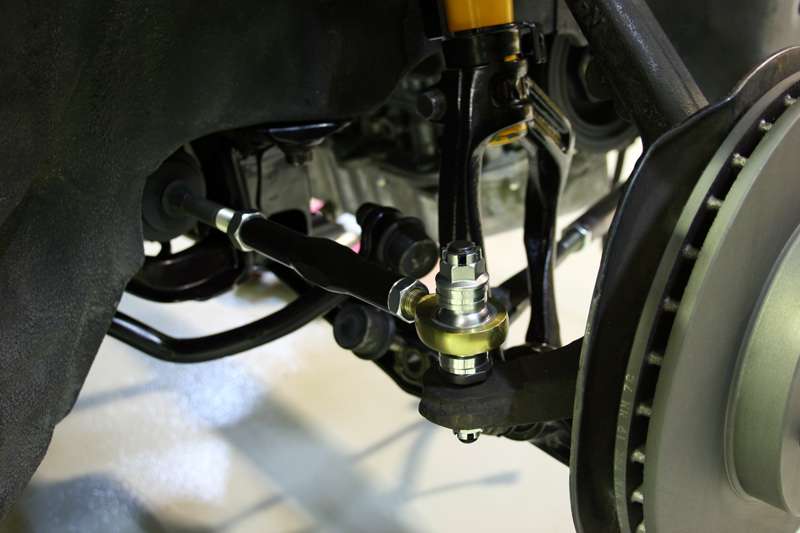
I've also fitted up a pair of the tie rod ends that a friend and I have been developing. The parts are designed to correct bump steer at lowered ride heights, or with aftermarket geometry parts like roll centre adjusters.
They're only loosely installed at the moment as I still need to roughly set the toe, measure the bump steer and add or remove spacers beneath the outer rod end to correct it if necessary. This should be a good test of the kit as the EF8 will have around 3 times more power than my EF2 hatch that I've already got the kit on and should develop a much greater cornering forces once I put some proper tyres on it.
Here's all the bits in the kit:
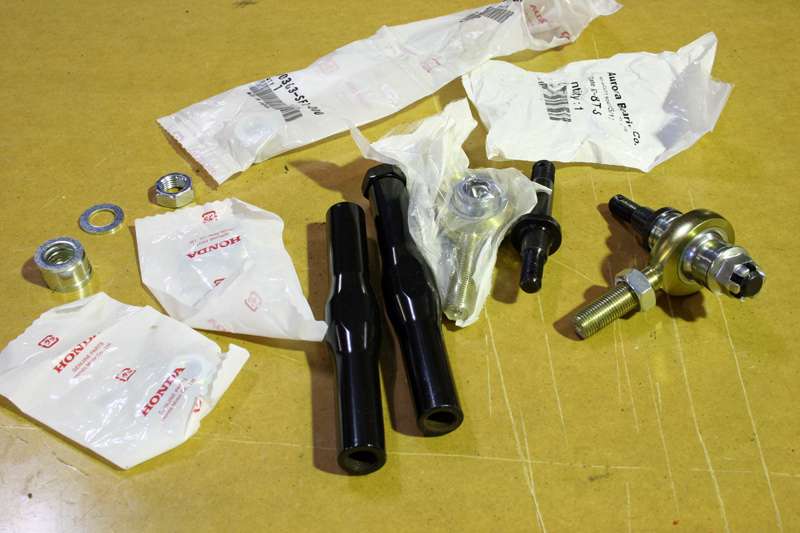
Here they are roughly assembled. I had to shorten the black turn-buckle section by about 12mm as the EF8 tie rod end, like much of the car, is a special snow flake and shorter in length than all the other 88-00 double wishbone Hondas.

Installed:
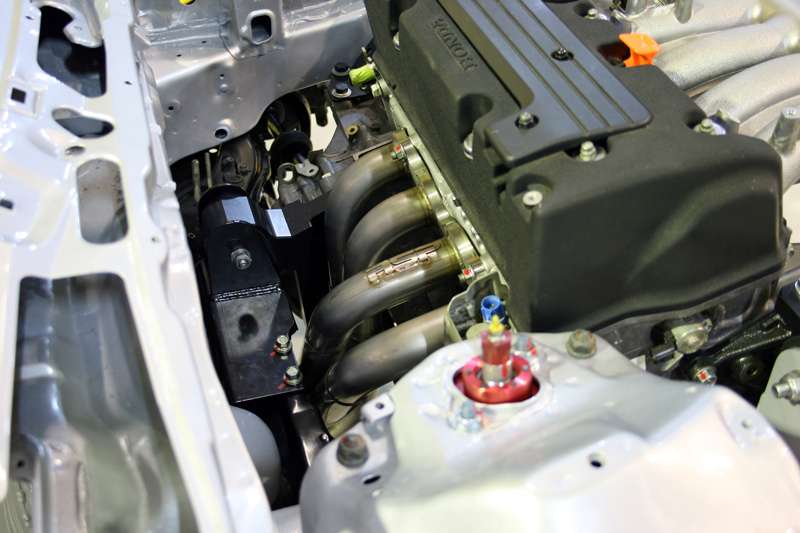
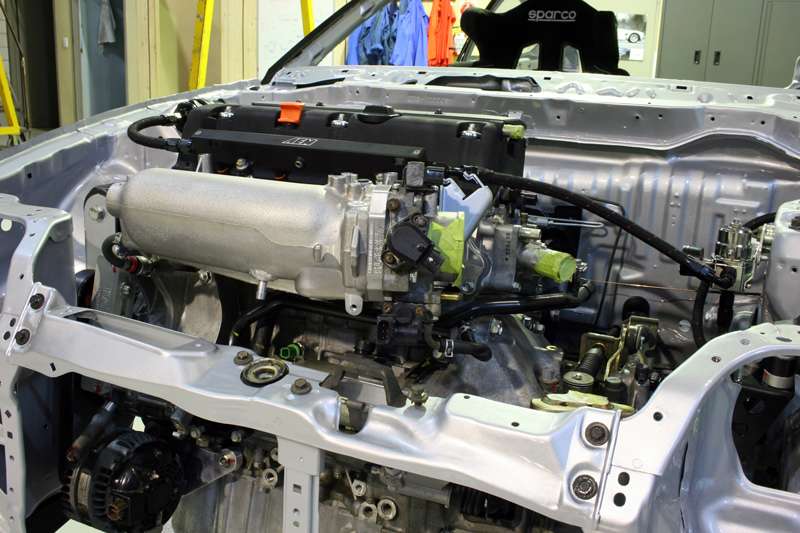
I also fitted up my ASP big tube header, which required some tweaking of the engine mounts to get enough clearance to the steering rack. I foolishly didn't check clearance with the rack installed when I test fitted it a long time ago. I think that the header might have been designed for a car with manual steering, not the bulkier power steering rack that I have.
More updates soon, the car is close to rolling so once I've finished up the suspension/brakes I'll move on to plumbing and wiring.
09-09-2015, 06:20 AM
#50
Honda-Tech Member
Thread Starter
Join Date: Feb 2007
Location: Melbourne, Victoria, Australia
Posts: 441
Likes: 0
Received 0 Likes
on
0 Posts

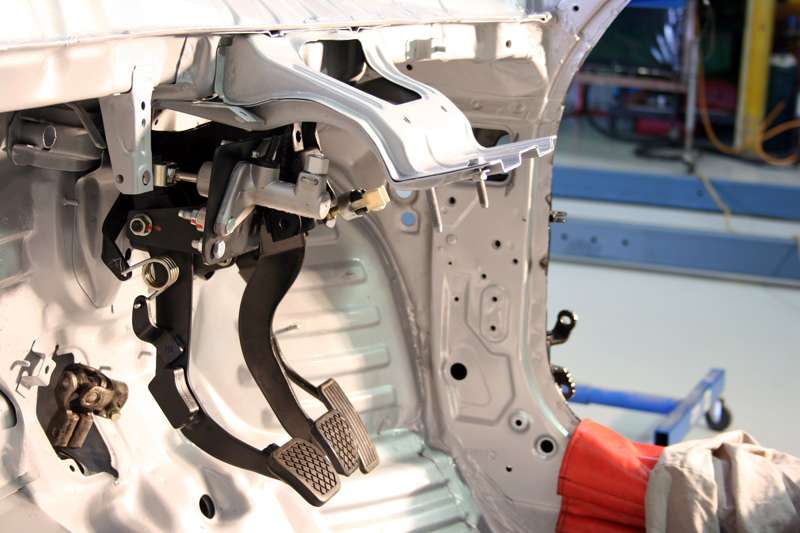
Over the weekend I got a few things done on the car, and have been steadily ticking things off my to do list since then. Started off on Saturday by putting a coat of paint on my pedal assembly and putting it all together with the new EP3 master cylinder:

Then installed it in the car and clearances look okay, so now I just need a clutch hose made up to suit. Haven't quite worked out where I'll mount the reservoir yet, but I'm thinking I'll run a hose back through the firewall and tuck it up next to the brake booster somewhere.
After that I finished welding up the traction bar:
Then gave it a coat of paint, roughly assembled it and bolted it in to the car. I'm using some Aurora high performance series rod ends, which I'm hoping will be fairly durable since they were fairly expensive. They've got a radial load capacity of over 11 tons so they shouldn't be highly stressed in this application though!
After that I installed the shifter and cables, along with the brake master cylinder and booster. The position of the gear **** seems good, though it might be better a little further back given my height so I might put in the vice and give it a bend:
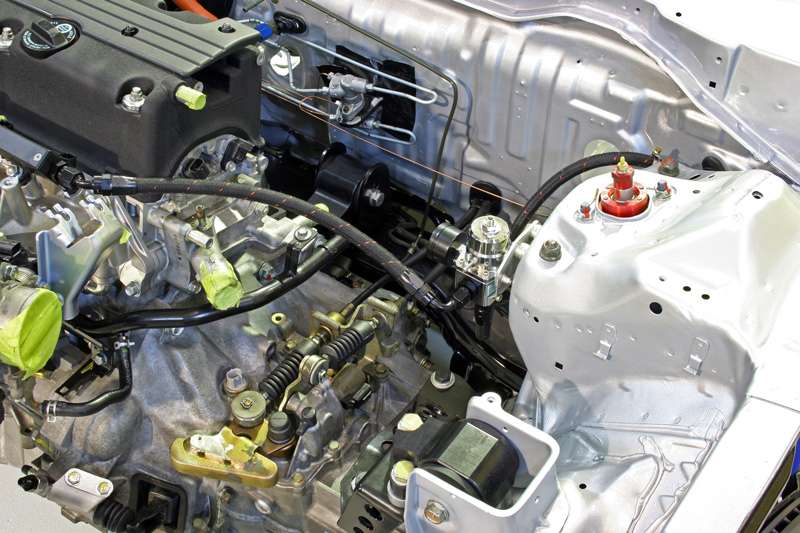
Somewhere around this time I installed the fuel tank with a new Aeromotive pump, and put all the hard lines back in. On Sunday I plumbing the car continued. A friend came around and started making up the new hard lines in the engine bay to suit the new brake proportioning valve location which you can see a bit further down.
While he was doing that I pulled the intake manifold off to remove the original fitting for the brake booster vacuum next to the throttle body mounting flange, welded up the hole and then welded a barb on the bottom side. I'm trying to minimise the amount of stuff hanging out of the bonnet.
That's about where the weekend finished. On Monday evening I made up all the flexible fuel hoses. I'm using Aeroquip lightweight hose and fittings, an Aeromotive FPR and a Fuelab filter. I may need to tweak the location of the fuel filter though as where it sits now might touch the bonnet.
The orange stuff is a heat resistant sleeve made by Aeroquip, which I added to give me a bit more piece of mind given how close the fuel line is to the header. Here's the fuel bits on the other side.. Can also see the nice brake hard lines that my friend started making up, since I don't have the precision or patience for that job:
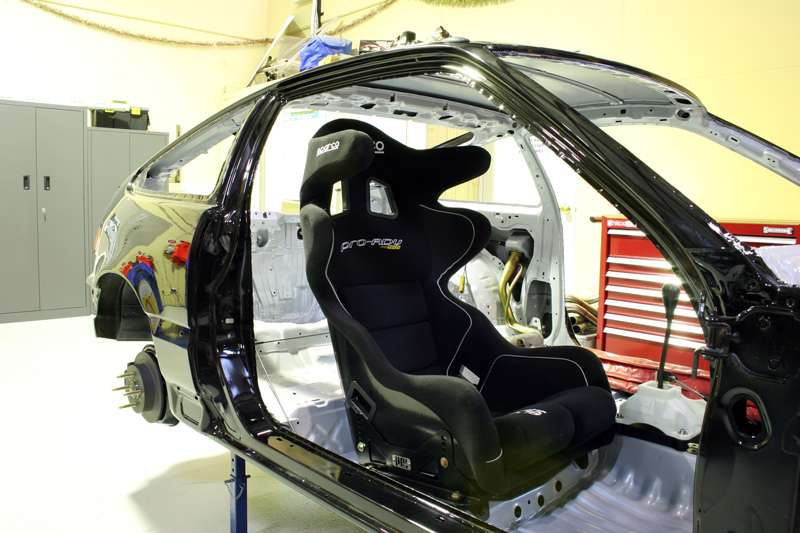
Test fitted my seat. Seems like the driving position should be good, though I think next time I pull the car apart I'll mount the seat directly to the floor and fit some reinforcement underneath. Being an extra 20-30mm lower would be nice.
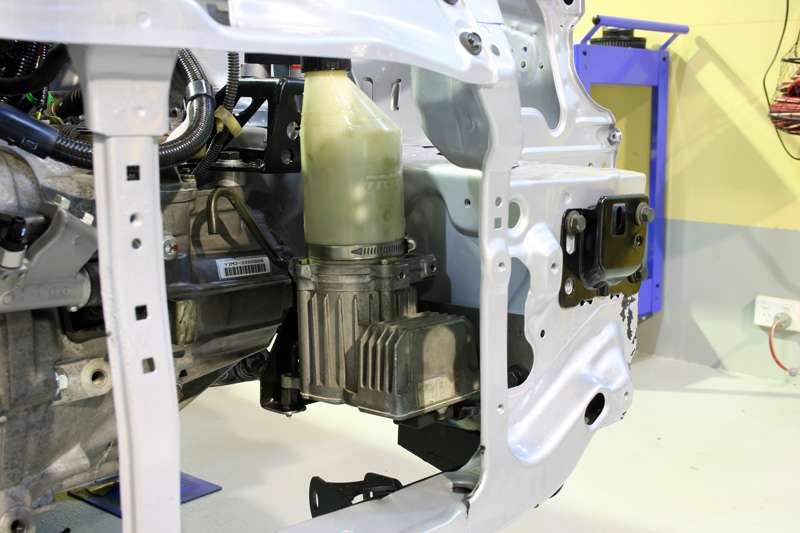
Tonight I built a bracket to mount the power steering pump, using a piece of 3mm plate and the original Astra bracket cut down a bit. The only location that seems to work without putting it inside the cabin (which isn't ideal since it's just my street car after all) was down next to the chassis rail on the passenger side. Not great for weight distribution but at least it's convenient for where the original hard lines which I'm hoping to re-use are routed and accessible so I can fill it up.
Fully welded and mounted:

Lastly with the help of another friend we started planning out the wiring. The setup is fairly basic, just an OEM DC5 engine and charge harness, which we'll modify to suit the battery and fuse box locations on the EF, a Rywire conversion harness to make all the important bits work, and during the process I'll strip some unused bits out of the harness (AC wiring, B series wiring) and tidy it up a bit:

More updates as they happen. Radiator should be here soon, and there's another large package winging its way toward me from Japan too.