
How To: Turn your Clear Housing JDM Headlights to Black Housings for about $10
 12-20-2007, 02:23 PM
#1
Honda-Tech Member
Thread Starter
Join Date: Jul 2003
Location: dirty jerzey
Posts: 417
Likes: 0
Received 0 Likes
on
0 Posts
This is my first write up/how-to and im doing it because i saw all the how to's on making just about every other headlight into a black housing but nothing really on the JDM integra headlights. I recently just got my JDM front end in, and they shipped me clear housings instead of the black and wouldnt help me out at all. so i said eff it i'll make my own. so here goes...
First heres what your goin to need to do this.
- Flathead Screw Driver
- Some kind of Pry tool ( I used a Chisel)
- Phillips Head Screw Driver to remove a few little screws
- Utility Knife
- Masking Tape
- Rubbing or Denatured Alcohol
- One of those Green Scuffing Pads (got mine at ACE Hardware for liek a dollar)
- Can of Black Primer
- Can of Black Semi-Gloss paint
- One Tube of a Clear RTV Silicone Caulk (make sure its RTV becuase thats the only kind of silicone that wont mildew or tkae damage from weather)
- An oven big enough to fit the Headlights into
The 2 cans of Paint and the Scuff pad cost me i think $9.67 at ACE Hardware
(I got the tube of caulk for free from a friend of mine that works at a glass shop but that shouldnt cost for then $5 )
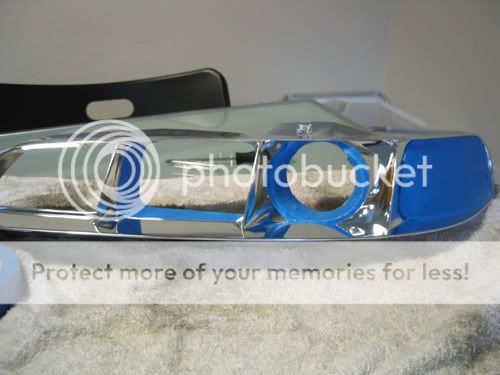
Headlight Before-

Step 1- Set your oven to 200 degrees and let it warm up. (These headlights are long so i had to take all but one rack out to make it fit.)While your waiting for the oven to heat up make sure all the bulbs are out of the headlight.
Step 2- Take the Flathead screw driver and remove 4 little clips that help hold the outter plastic casing to the housing ( 2 on the top and 2 on the bottom)

Step 3- There is one little screw that also holds the plastic outer casing to the headlight housing. Its located on the backside of the headlight of the corner light section

Step 4- Now that the oven is to temp, and making sure you removed the bulbs harness etc. stick the headlight into the over for 7 minutes

Step 5- After its been in there for 7 minutes take it out and get ready to start prying the hell outta this thing. I found it easier to start at each of the plastic retainers and work my way from top to bottom. As you pry the outter plastic lense from the housing cut the glue. it makes it much easier. this is the hardest part of the whole process, it took me a solid 10-15 minutes to get the two pieces apart. BE CAREFUL THOUGH! the outer lense is only plastic and it will crack or break if you pry to hard. Patience is a Virtue

This is what it should look like after its totally apart-

Step 6- Now that the outer lense is seperated from the headlight housing, flip it over and you will see 4 screws. Take them out with your Phillipshead screwdriver.

Step 7- After the screws are removed give the inner chrome plastic piece a gentle tug and it will come out. might take a minute but it'll come out eventually.

Step 8- Use Masking tape to tape off the clear corner light section so paint does not get on it. Then take the inner plastic piece that has the chrome on it and use the scuffing pad to scuff up the chrome surface so that the primer has something to stick to. After your satisfied that you've scuffed all the chrome up, wipe everything down with some rubbing alcohol, windex, or whatever other type of cleaning product like that you have.

Step 9- Spray it with the Primer. I did about 3 coats, letting each coat dry for a good 15min. After your done with the primer, move on to the Semi-Gloss Black. Again I did about 3 coats and the same drying time. When your done and its dried, remove the masking tape and it should look like this-

Step 10- Pop the now painted inner piece back into the clear outter casing, and re-install the screws you took out before-

Step 11- Now that your back to just 2 seperate pieces, your ready for them to go back together. At this point you'll want to get the oven back up to 200 degrees because you need to put the headlight housing back into the oven so it heats up the glue again so the clear outter lense has something to help secure it back with the headlight housing. This also greatly increases the chance of you not getin mositure in your fresh new headlights
Step 12- Once your satisfied that everythings back together and in the way it should be, re-install the one screw you took out by the corner light section. (I used some clamps to help hold everything together, but thats really personal prefrence.) Put the four clips on the top and bottom of the headlight and any minor gaps or any parts you think moisture might be able to get in through, use the Clear RTV Silicone and caulk them shut.
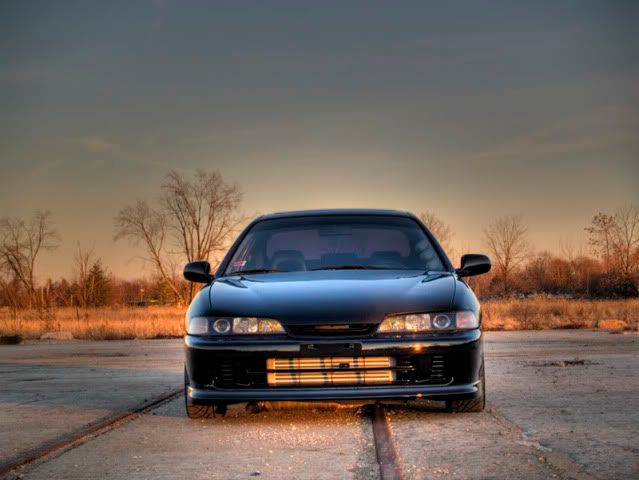
THATS IT! Heres a Before and After Pic so you can see the drastic difference. Im EXTREMLY happy with how they came out

I plan on buffing the outter lense so they are much more shiny but heres both finished products

Hope this helps anyone thats intrested in doing this
First heres what your goin to need to do this.
- Flathead Screw Driver
- Some kind of Pry tool ( I used a Chisel)
- Phillips Head Screw Driver to remove a few little screws
- Utility Knife
- Masking Tape
- Rubbing or Denatured Alcohol
- One of those Green Scuffing Pads (got mine at ACE Hardware for liek a dollar)
- Can of Black Primer
- Can of Black Semi-Gloss paint
- One Tube of a Clear RTV Silicone Caulk (make sure its RTV becuase thats the only kind of silicone that wont mildew or tkae damage from weather)
- An oven big enough to fit the Headlights into
The 2 cans of Paint and the Scuff pad cost me i think $9.67 at ACE Hardware
(I got the tube of caulk for free from a friend of mine that works at a glass shop but that shouldnt cost for then $5 )
Headlight Before-
Step 1- Set your oven to 200 degrees and let it warm up. (These headlights are long so i had to take all but one rack out to make it fit.)While your waiting for the oven to heat up make sure all the bulbs are out of the headlight.
Step 2- Take the Flathead screw driver and remove 4 little clips that help hold the outter plastic casing to the housing ( 2 on the top and 2 on the bottom)
Step 3- There is one little screw that also holds the plastic outer casing to the headlight housing. Its located on the backside of the headlight of the corner light section
Step 4- Now that the oven is to temp, and making sure you removed the bulbs harness etc. stick the headlight into the over for 7 minutes
Step 5- After its been in there for 7 minutes take it out and get ready to start prying the hell outta this thing. I found it easier to start at each of the plastic retainers and work my way from top to bottom. As you pry the outter plastic lense from the housing cut the glue. it makes it much easier. this is the hardest part of the whole process, it took me a solid 10-15 minutes to get the two pieces apart. BE CAREFUL THOUGH! the outer lense is only plastic and it will crack or break if you pry to hard. Patience is a Virtue
This is what it should look like after its totally apart-
Step 6- Now that the outer lense is seperated from the headlight housing, flip it over and you will see 4 screws. Take them out with your Phillipshead screwdriver.
Step 7- After the screws are removed give the inner chrome plastic piece a gentle tug and it will come out. might take a minute but it'll come out eventually.
Step 8- Use Masking tape to tape off the clear corner light section so paint does not get on it. Then take the inner plastic piece that has the chrome on it and use the scuffing pad to scuff up the chrome surface so that the primer has something to stick to. After your satisfied that you've scuffed all the chrome up, wipe everything down with some rubbing alcohol, windex, or whatever other type of cleaning product like that you have.
Step 9- Spray it with the Primer. I did about 3 coats, letting each coat dry for a good 15min. After your done with the primer, move on to the Semi-Gloss Black. Again I did about 3 coats and the same drying time. When your done and its dried, remove the masking tape and it should look like this-
Step 10- Pop the now painted inner piece back into the clear outter casing, and re-install the screws you took out before-
Step 11- Now that your back to just 2 seperate pieces, your ready for them to go back together. At this point you'll want to get the oven back up to 200 degrees because you need to put the headlight housing back into the oven so it heats up the glue again so the clear outter lense has something to help secure it back with the headlight housing. This also greatly increases the chance of you not getin mositure in your fresh new headlights
Step 12- Once your satisfied that everythings back together and in the way it should be, re-install the one screw you took out by the corner light section. (I used some clamps to help hold everything together, but thats really personal prefrence.) Put the four clips on the top and bottom of the headlight and any minor gaps or any parts you think moisture might be able to get in through, use the Clear RTV Silicone and caulk them shut.
THATS IT! Heres a Before and After Pic so you can see the drastic difference. Im EXTREMLY happy with how they came out
I plan on buffing the outter lense so they are much more shiny but heres both finished products
Hope this helps anyone thats intrested in doing this
 12-20-2007, 02:28 PM
#2
Honda-Tech Member
Join Date: Sep 2006
Location: N. california
Posts: 1,951
Likes: 0
Received 0 Likes
on
0 Posts
nice rightup and good pics
i think there are several of these on here but idk about the jdm itr lights. i like this one. goodjob
i think there are several of these on here but idk about the jdm itr lights. i like this one. goodjob
12-20-2007, 02:32 PM
#3
Honda-Tech Member
Thread Starter
Join Date: Jul 2003
Location: dirty jerzey
Posts: 417
Likes: 0
Received 0 Likes
on
0 Posts
<TABLE WIDTH="90%" CELLSPACING=0 CELLPADDING=0 ALIGN=CENTER><TR><TD>Quote, originally posted by yc_dc4mar »</TD></TR><TR><TD CLASS="quote">nice rightup and good pics
i think there are several of these on here but idk about the jdm itr lights. i like this one. goodjob </TD></TR></TABLE>
Thanks. yea i didnt really have an extra $500 or so sitting around this time of year to spend so i figured this was the next best thing
i think there are several of these on here but idk about the jdm itr lights. i like this one. goodjob
</TD></TR></TABLE>Thanks. yea i didnt really have an extra $500 or so sitting around this time of year to spend so i figured this was the next best thing
12-20-2007, 02:37 PM
#4
official honda whore
Join Date: Nov 2002
Location: not tellin you where, pa, usa
Posts: 8,454
Likes: 0
Received 0 Likes
on
0 Posts
<TABLE WIDTH="90%" CELLSPACING=0 CELLPADDING=0 ALIGN=CENTER><TR><TD>Quote, originally posted by LS stretch »</TD></TR><TR><TD CLASS="quote">
Thanks. yea i didnt really have an extra $500 or so sitting around this time of year to spend so i figured this was the next best thing </TD></TR></TABLE>
its exactly what i would do if i could live without HID
Thanks. yea i didnt really have an extra $500 or so sitting around this time of year to spend so i figured this was the next best thing
</TD></TR></TABLE>its exactly what i would do if i could live without HID
12-20-2007, 02:40 PM
#5
Honda-Tech Member
Join Date: Sep 2006
Location: N. california
Posts: 1,951
Likes: 0
Received 0 Likes
on
0 Posts
its cool bec you can paint it for 10-20 bucks. after market hids are 100-200bucks. and thats still cheaper than the hid black housings by far. even retro fitting oem ones is cheaper im sure.
12-20-2007, 02:41 PM
#6
Honda-Tech Member
Thread Starter
Join Date: Jul 2003
Location: dirty jerzey
Posts: 417
Likes: 0
Received 0 Likes
on
0 Posts
<TABLE WIDTH="90%" CELLSPACING=0 CELLPADDING=0 ALIGN=CENTER><TR><TD>Quote, originally posted by coptzer »</TD></TR><TR><TD CLASS="quote">
its exactly what i would do if i could live without HID</TD></TR></TABLE>
i have a direct fit HID kit that i got brand new for $150 They're 9K, worked for me and the way my engine bay is i didnt want the massive ballast that are on the OEM headlights.
its exactly what i would do if i could live without HID</TD></TR></TABLE>
i have a direct fit HID kit that i got brand new for $150 They're 9K, worked for me and the way my engine bay is i didnt want the massive ballast that are on the OEM headlights.
Trending Topics
12-03-2008, 09:42 AM
#9
Honda-Tech Member
iTrader: (1)
Join Date: Jan 2002
Location: Nowhere and Everywhere
Posts: 29,530
Likes: 0
Received 52 Likes
on
46 Posts
The projector has its own internal reflector and doesn't need anything external to put the light on the road. Also the OP did not paint the high beam reflector, or the fog light reflector, as you can clearly see in the pics. The only thing he painted was the bezel/trim around the lights.
12-03-2008, 12:57 PM
#10
Honda-Tech Member
iTrader: (1)
Join Date: Jan 2007
Location: Doylestown, PA
Posts: 1,122
Likes: 0
Received 0 Likes
on
0 Posts
One important thing you might want to add, is that you need to shut off the oven once you put it in. Leave it on, and kiss your headlights good bye as they melt!
Nice write-up!
Nice write-up!
12-04-2008, 08:39 AM
#12
Honda-Tech Member
Thread Starter
Join Date: Jul 2003
Location: dirty jerzey
Posts: 417
Likes: 0
Received 0 Likes
on
0 Posts
12-04-2008, 08:40 AM
#13
Honda-Tech Member
Thread Starter
Join Date: Jul 2003
Location: dirty jerzey
Posts: 417
Likes: 0
Received 0 Likes
on
0 Posts
i left the oven on the whole time. i just periodically opened the oven took it out, checked the pry-abilitly (if thats even a word) and then if it needed more time , put it back in
12-04-2008, 08:52 AM
#14
Honda-Tech Member
iTrader: (1)
Join Date: Jan 2002
Location: Nowhere and Everywhere
Posts: 29,530
Likes: 0
Received 52 Likes
on
46 Posts
I see that there was supposed to be some of the bezel piece left as chrome around the projector and the high beam. I actually did that with the projector bezel on my 98+ headlights. I painted the bezel black but left the inner ring portion chrome. Looks 100x better than the just painting the whole thing black.
12-04-2008, 10:40 AM
#16
Honda-Tech Member
 12-04-2008, 10:41 AM
#17
Junior Member
Join Date: Jan 2006
Location: So Cal, CA, USA
Posts: 155
Likes: 0
Received 0 Likes
on
0 Posts
lol...i just did this last week and was about to do a write up. I never got around to it because it totally kicked my ***....I took apart 3 sets at the same time instead of just one. Took FOREVER! Anyways, nice write up. I used tinfoil and actually removed all the wiring / bulbs from the housing before baking them. I agree with 200 degrees and bake them for about 9 minutes, then quickly and carefully pry them apart. Make sure not to deform the housing or let the factory silicone harden in the wrong spots!
12-04-2008, 03:42 PM
#19
Honda-Tech Member
Thread Starter
Join Date: Jul 2003
Location: dirty jerzey
Posts: 417
Likes: 0
Received 0 Likes
on
0 Posts
i got it for 1200 shipped. the hood was the only part that needed body work. nothing serious though. only thing i was really not happy about was how the packaged and shipped it to me. they basically wrapped clear packaging tape over EVERYTHING and i spent a few hours with an eraser wheel and thinner to get it all off. P.I.T.A.
12-15-2008, 08:55 AM
#20
Honda-Tech Member
Join Date: Jan 2007
Location: LA
Posts: 1,457
Likes: 0
Received 0 Likes
on
0 Posts
oops, actually you were part wrong and part right, and I was part wrong and part right.
I see that there was supposed to be some of the bezel piece left as chrome around the projector and the high beam. I actually did that with the projector bezel on my 98+ headlights. I painted the bezel black but left the inner ring portion chrome. Looks 100x better than the just painting the whole thing black.
I see that there was supposed to be some of the bezel piece left as chrome around the projector and the high beam. I actually did that with the projector bezel on my 98+ headlights. I painted the bezel black but left the inner ring portion chrome. Looks 100x better than the just painting the whole thing black.
see the difference? the OP did not mask off the high beam section..
09-23-2010, 10:00 AM
#23
Honda-Tech Member
Join Date: May 2010
Posts: 59
Likes: 0
Received 0 Likes
on
0 Posts
i have a set of chrome and a set of hid. the housing are shot on the hids. can i swap the middle piece thats black with the chrome and use those?

Thread
Thread Starter
Forum
Replies
Last Post
MadCityLude
Honda Prelude
15
09-06-2006 09:09 AM

