
FAQ: How to Replace Rear Suspension Bushings -- FULL GUIDE
 06-06-2011, 08:06 PM
#1
How to Overhaul Rear Suspension Bushings on a Gen 3 GSR/LS/RS/GS/SE Integra
Disclaimer: I am not a licensed automotive expert. Users of the guide assume full responsibility for any errors or misinformation in the guide or in this thread and any injury or damage sustained while following the guide (or doing anything else for that matter!). USE AT YOUR OWN RISK!
Suspension bushings have a hard life, and they are the unsung heroes of any suspension. Every single articulating attachment point on the suspension is controlled by a bushing. These bushings prevent destructive (and noisy) metal-on-metal contact and provide a necessary degree of compliance that smoothes the ride while also allowing the suspension to do its work.
Bushings are exposed to the outside elements and they endure enormous physical loads while they do their jobs. As a result, they eventually wear. After 10-15 years of use the rubber in the bushings will begin to dry and visibly crack. The consequence of worn bushings is a squeaky, sloppy, and poorly controlled ride. As gen 3 Integras age more and more people are going to be finding it is time to replace their bushings.
Swapping out the bushings is also an excellent time to get other suspension work done (such as coilover installation or sway bar swaps). See my ASR brace/ITR sway bar installation guide for inspiration.
The purpose of this guide is to provide both a quick reference for experienced people working on their bushings (in the form of charts and tables presented below), and to also make this job accessible to people who, like me, have never worked on suspensions before. I found this to be a daunting job and I hope this guide is able to help some people.
I have split this into sections to help people find the information they want.
And sorry this is so wordy. I didn’t really take many pictures as I was not having the greatest time while I was doing this, LOL. I’ll try to update with pics occasionally. Till then this might be a boring read :/
A word of caution – replacing bushings is time-consuming, challenging, and often frustrating. I recommend it only with people who have skill and experience in dealing with truly difficult bolts in hard-to-reach locations. Inexperienced mechanics are advised to pursue other projects before tackling this.
Performance Benefits of Bushings
As mentioned above, bushings provide key contact points in your suspension and transfer all of the loads the suspension experiences. In general, the most important features of a bushing are its stiffness, its reliability, and its ability to do its job in silence.
From a pure performance perspective, stiffness is what matters most. Stiffer bushings allow for less slop in the suspension and more rapid transmission of forces. As a result, they also transmit more vibration, resulting in a loss of ride quality. Therefore the classic tradeoff exists between street- and track-focused bushings.
In general, however, most people find that the benefits of stiffer bushings outweigh the ride penalty, although this is subjective and depends somewhat on the material in the bushing.
Types of Bushings
The two major types of bushings are polyurethane and hardened rubber. These have some natural advantages and disadvantages.
Polyurethane (PU, or poly) bushings are cheap, very stiff and relatively easy to install. Unfortunately, they also wear quickly (lasting only a few years in some cases), can require regular lubrication to prevent creaking, and vary in quality. It’s probably safe to say that cheap poly bushings should be avoided, but high quality bushings are made to last. Many people swear by poly bushings, but many find that they prefer rubber instead. Energy Suspension is the most famous manufacturer of poly bushings.
Rubber bushings are somewhat expensive and (I’ve heard) are a little harder to install. However, they also wear much better than PU (lasting 15 years or more) and can be made to be either very stiff or relatively soft, depending upon the demands of the user. OEM bushings are made from a relatively soft rubber. PIC/SUJA make bushing kits that use a harder rubber than stock, and HardRace and Mugen make sets that are harder still. Many users find that even the hardest rubber bushings offer acceptable ride quality. That has certainly been my experience.
My personal perspective is that rubber is the superior material for suspension components, and I recommend hardened rubber bushings for both daily driven and track-focused cars. Rubber is durable and strong, and even hard, competition-focused rubber bushings have a relatively smooth, sweet feel when driven on.
Installation Considerations
Bushings are difficult to install because installation requires complete removal of the suspension in addition to special tools for bushing removal and installation. Suspension bolts are relatively easy to reach, but they often seize tightly to the bushings and can be impossible to remove once seized. Bushings can also seize to their suspension arms and can be hard to dislodge.
Because suspension work is difficult, time consuming, and requires a rather complete toolbox, I recommend that only relatively experienced shadetree mechanics try to overhaul their bushings by themselves. However, people who are up to the task can save an enormous amount of money doing this work themselves.
This guide is written as a complete DIY guide, but it is possible to get professional help on some of the steps. For example, people who don’t have access to a press can remove the suspension arms themselves and take them to a shop to have the bushings removed and installed.
 06-06-2011, 08:06 PM
#2
---- Tools and Equipment ----
For suspension removal (* indicates optional):
- A complete metric socket set with short sockets from 10-17 mm and deep sockets from 10-14 mm and an extender
- 14 mm short and deep 6-pt impact sockets
- 12-pt sockets in the 12 and 14 mm sizes*
- A large (2’) breaker bar
- A strong impact driver*
- Penetrating lube e.g PB Blaster
- A floor jack, wheel chocks, and two jackstands
- A propane torch*
- A mallet and a metal hammer
- A quality torque wrench
- Vice grips
- Reciprocating saw with a carbide blade or similar cutting tool
- 14 mm box wrench
- Drill*
- Anti-seize compound
- Silicone suspension grease*
For bushing extraction/installation
(Using a press is strongly advised for DIYers. If you don’t use a press you don’t need items indicated with a + but you do need a big hammer. You will also need a hotter-burning fuel than propane in your torch because you will need to more completely burn out the rubber in the old bushings)
- A strong (20+ ton ideal) shop press+
- Metric sockets 22-26 mm+
- SAE sockets 1 1/16” – 1 3/16+
- A deep 22 mm socket+
- A propane torch*
- A reciprocating saw with a metal cutting blade*
- An RTA bushing extractor tool*
- An old chisel or punch*
Because you will be removing a LOT of bolts to do this work, I strongly recommend keeping careful track of your bolts by putting them in labeled envelopes (I didn’t do this, but don’t follow my example!).
Suspension Anatomy

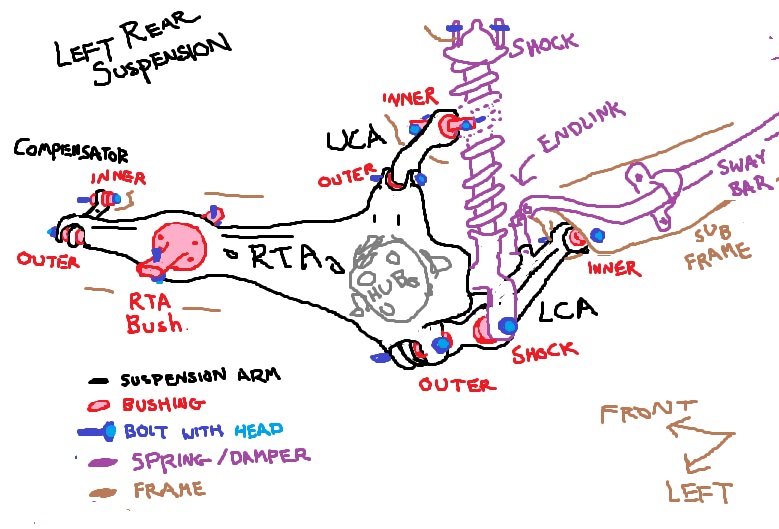
Note: Part numbers are given for a Gen 3 GS-R coupe. Numbers may differ for sedans, ITRs, and LS/GS/RS/SE Integras!
Lower Control Arm (LCA, 15/17) – This is the best known part of the suspension because it’s visible and replacements are popular. It connects to the RTA and establishes the arc of motion that the wheel follows as it travels up and down. The inner portion of the LCA attaches to the subframe and the outer portion attaches to the RTA. The LCA also attaches to the bottom of the shock absorber and to the sway bar endlink. This has three bushings to be replaced (inner LCA, shock, outer LCA).
Right LCA (15) 52350-SH3-G31
Left LCA (17) 52360-SH3-G31
Rear Trailing Arm (RTA, 20/21) – This is the largest suspension arm. It contains the hub assembly and attaches to the UCA and LCA at the rear of the car, to the compensator arm farther towards the front of the car, and to the frame of the car. The RTA pivots at the RTA bushing. The RTA bushing is the only bushing in the RTA. It is the only bushing that differs between the left and right side of the car.
Right RTA (20) 52370-ST7-G91
Left RTA (21) 52371-ST7-G91
Upper Control Arm (UCA, 22/23) – This small arm attaches to the frame and the top of the RTA. Together with the LCA it controls the vertical motion of the wheel and camber. This has two bushings that need to be replaced (inner UCA, outer UCA).
Right UCA (22) 52390-SR0-A00
Left UCA (23) 52400-SR3-000
Compensator Arm (14) – This small arm controls the orientation of the wheel during its travel and is the point at which toe is set. Right and left compensators are identical. Each compensator has two identical bushings that need to be replaced.
Compensator Arm x2 (14) 52341-SR3-010
An Inventory of Bolts
Note: total numbers of each bolt used on both sides of the car are given
Inner LCA bolt x2* (35) 14 mm 90173-SR3-003
Endlink bolt x2 (30) 14 mm 90120-SB0-003
Shock bolt x2 (na) 14 mm 90172-SK7-A01
Outer LCA bolt x2* (34) 14 mm 90173-SR3-003
Inner UCA bolt x4 (29) 14 mm 90117-SH3-004
Outer UCA bolt x2 (33) 14 mm 90172-S04-003
RTA bushing bolt x4 (36) 17 mm 90174-SJ4-003
Inner/Outer Compensator bolt x4 (32) 14 mm 90171-S04-003
*Inner/Outer LCA bolts are depicted separately but have identical parts numbers
An Inventory of Bushings
Note: All suspension arms ship with bushings pre-installed. Required numbers to overhaul both sides of the car are given
Inner/Outer LCA Bushing x4 (19) 52365-SK7-A02
Shock Bushing x2 (24) 52622-SK7-A02
Inner UCA bushing x2 no/unknown Honda part number
Outer UCA bushing x2 no/unknown Honda part number
Right RTA bushing x1 no/unknown Honda part number
Left RTA bushing x1 no/unknown Honda part number
Compensator bushing x4 no/unknown Honda part number
For suspension removal (* indicates optional):
- A complete metric socket set with short sockets from 10-17 mm and deep sockets from 10-14 mm and an extender
- 14 mm short and deep 6-pt impact sockets
- 12-pt sockets in the 12 and 14 mm sizes*
- A large (2’) breaker bar
- A strong impact driver*
- Penetrating lube e.g PB Blaster
- A floor jack, wheel chocks, and two jackstands
- A propane torch*
- A mallet and a metal hammer
- A quality torque wrench
- Vice grips
- Reciprocating saw with a carbide blade or similar cutting tool
- 14 mm box wrench
- Drill*
- Anti-seize compound
- Silicone suspension grease*
For bushing extraction/installation
(Using a press is strongly advised for DIYers. If you don’t use a press you don’t need items indicated with a + but you do need a big hammer. You will also need a hotter-burning fuel than propane in your torch because you will need to more completely burn out the rubber in the old bushings)
- A strong (20+ ton ideal) shop press+
- Metric sockets 22-26 mm+
- SAE sockets 1 1/16” – 1 3/16+
- A deep 22 mm socket+
- A propane torch*
- A reciprocating saw with a metal cutting blade*
- An RTA bushing extractor tool*
- An old chisel or punch*
Because you will be removing a LOT of bolts to do this work, I strongly recommend keeping careful track of your bolts by putting them in labeled envelopes (I didn’t do this, but don’t follow my example!).
Suspension Anatomy
Note: Part numbers are given for a Gen 3 GS-R coupe. Numbers may differ for sedans, ITRs, and LS/GS/RS/SE Integras!
Lower Control Arm (LCA, 15/17) – This is the best known part of the suspension because it’s visible and replacements are popular. It connects to the RTA and establishes the arc of motion that the wheel follows as it travels up and down. The inner portion of the LCA attaches to the subframe and the outer portion attaches to the RTA. The LCA also attaches to the bottom of the shock absorber and to the sway bar endlink. This has three bushings to be replaced (inner LCA, shock, outer LCA).
Right LCA (15) 52350-SH3-G31
Left LCA (17) 52360-SH3-G31
Rear Trailing Arm (RTA, 20/21) – This is the largest suspension arm. It contains the hub assembly and attaches to the UCA and LCA at the rear of the car, to the compensator arm farther towards the front of the car, and to the frame of the car. The RTA pivots at the RTA bushing. The RTA bushing is the only bushing in the RTA. It is the only bushing that differs between the left and right side of the car.
Right RTA (20) 52370-ST7-G91
Left RTA (21) 52371-ST7-G91
Upper Control Arm (UCA, 22/23) – This small arm attaches to the frame and the top of the RTA. Together with the LCA it controls the vertical motion of the wheel and camber. This has two bushings that need to be replaced (inner UCA, outer UCA).
Right UCA (22) 52390-SR0-A00
Left UCA (23) 52400-SR3-000
Compensator Arm (14) – This small arm controls the orientation of the wheel during its travel and is the point at which toe is set. Right and left compensators are identical. Each compensator has two identical bushings that need to be replaced.
Compensator Arm x2 (14) 52341-SR3-010
An Inventory of Bolts
Note: total numbers of each bolt used on both sides of the car are given
Inner LCA bolt x2* (35) 14 mm 90173-SR3-003
Endlink bolt x2 (30) 14 mm 90120-SB0-003
Shock bolt x2 (na) 14 mm 90172-SK7-A01
Outer LCA bolt x2* (34) 14 mm 90173-SR3-003
Inner UCA bolt x4 (29) 14 mm 90117-SH3-004
Outer UCA bolt x2 (33) 14 mm 90172-S04-003
RTA bushing bolt x4 (36) 17 mm 90174-SJ4-003
Inner/Outer Compensator bolt x4 (32) 14 mm 90171-S04-003
*Inner/Outer LCA bolts are depicted separately but have identical parts numbers
An Inventory of Bushings
Note: All suspension arms ship with bushings pre-installed. Required numbers to overhaul both sides of the car are given
Inner/Outer LCA Bushing x4 (19) 52365-SK7-A02
Shock Bushing x2 (24) 52622-SK7-A02
Inner UCA bushing x2 no/unknown Honda part number
Outer UCA bushing x2 no/unknown Honda part number
Right RTA bushing x1 no/unknown Honda part number
Left RTA bushing x1 no/unknown Honda part number
Compensator bushing x4 no/unknown Honda part number
Last edited by GagnarTheUnruly; 09-24-2011 at 03:28 PM.
06-06-2011, 08:06 PM
#3
---- Prepare for Suspension Removal ----
If your car has been lowered, mark the orientation of the RTA bushing before lifting up your car!.
You will thank me for this later. In fact, do it even if you aren’t lowered. Put a dab of whiteout or magic marker a spot on the trailing arm that lines up with the bolt hole on the bushing. This way you can install the new bushing in the orientation it will want to be in when the car is at natural ride-height. Doing so reduces the stress on the bushing and dramatically extends its life.
With that out of the way, loosen the lugs on the rear wheel and safely raise the front end of the car and place jackstands on the designated tabs ahead of each wheel.
Go nuts with PB Blaster
-Spray every single suspension bolt with PB. Thoroughly coat the front and back of each bolt, sharply tap all sides with a hammer, and repeat. Do this every several days for 1-2 weeks before beginning the project. It’s OK, and maybe even helpful, to drive while you’re breaking in the bolts.
See the bolt inventory, or my drawings below, for a full list of the bolts that need to be PB Blasted.
Remove the Rear Brake Caliper
The first order of business is to remove all the brake components from the RTA and get them out of the way. To do this remove the rear-facing mud shield attached on the upper inside area of the rear trailing arm/hub assembly (RTA, 20/21 on the diagram). It is held on via two, 10 mm bolts.
Next, remove the caliper from the hub by removing the two, inside-facing 14 mm bolts holding it on. Swing the caliper up and hook it over the sway bar (or better yet, by an old coathanger), taking care not to stretch the brake hose.
Remove the Brake Disc
Mine always comes right off, but if it’s stuck work it off by threading the caliper bolts through the two threaded holes on the brake disc. As you thread the bolts through they will push against the hub and will help push the disc off of the hub. If these holes have screws in them, remove the screws with a Philips-head screwdriver or drill them out if they are stuck. They do not need to be replaced.
Note: If you are going to be removing the RTA bushing with an RTA bushing extractor tool, the following steps (removing the parking brake cable and VSS from the RTA) are purely optional, and you can skip down to the ‘suspension removal’ section. You will, however, still need to remove the VSS mounting bracket from the LCA (2 bolts). If you are going to remove the RTA bushing with the press, follow the steps below before proceeding to the ‘suspension removal’ section.
Remove the Parking Brake Cable
If you are going to remove the RTA from the car (to press out the bushing), you will need to get the parking brake cable off of the RTA. This cable passes through the RTA (annoyingly) and connects to the brake caliper. The cable attaches to a spring loaded lever on the top of the caliper, via a cotter/clevis pin. Pull the hairpin cotter with a pair of pliers and then pull the clevis straight out with vice grips. If it seizes soak it in PB and come back in the morning.
You will see that the cable passes through a bracket on the caliper just ahead of where you removed the pins (near the end of the rubber boot). This is secured by a thin metal clip. Hammer the back of the clip with a screwdriver or punch to dislodge it. Next, pull the cable backwards through the hole in the bracket and pull it out of the pass-through in the RTA. To do this successfully you will probably need to remove a bracket holding the cable to the RTA. This is secured on the inside-facing side of the RTA with a 12 mm bolt.
Remove the VSS Signal Wire
With the brakes on both sides removed, it’s time to remove the VSS signal wire for the ABS system (25/26) from the LCA and RTA. It is connected to the LCA via two easy to spot bolts (this step is necessary regardless of whether you plan to completely remove the RTA).
In the lower, forward-facing side of the hub assembly you will see a splash guard protecting the VSS (1/2). This is held on with three 10 mm bolts (31). Remove it, and then the VSS by removing the bolts holding it to the hub (28 x2). Carefully pry the shielded VSS wire away from the hub and let it dangle in a safe area of your workspace. To avoid fouling the VSS with dirt or contaminating it with difficult-to-remove metal filings, wrap a plastic bag around it.
With the VSS removed from the LCA, and the VSS and parking brake removed from the RTA, you will be safe to remove both arms from the car for bushing installation.
---- Suspension Removal ----
Loosen All Bolts
Using a 6 point impact socket Begin by loosening all the necessary bolts to ensure that the PB penetrated (see the bolt inventory or drawing above). This is best done slowly and carefully with a large (2’) breaker bar and a 6-pt impact socket. Standard sockets will not stand up to the stress needed to loosen these bolts, and 12-pt sockets will quickly strip your bolts. If you feel that the bolt is beginning to strip, consider treating with PB blaster for another week.
Because it is at an awkward angle, it may not be possible to loosen the outer compensator bolt until the RTA has been removed from the car.
If a bolt is stuck:
- Treat again with penetrating oil. Coat the bolt in oil and tap sharply with a metal hammer to help the oil penetrate. Several daily PB treatments can sometimes free stuck bolts.
- If possible, try heating with a propane torch. Heat the metal around the bolt (not the bolt itself) for several minutes, then try to torque the bolt loose. Be careful not to use the torch close to the fuel tank, brake lines, brake hoses, or VSS cable. For many of these bolts heating may not be appropriate. Do not use a torch if you hope to reuse the bushing.
- Hammer at it with an impact gun. The shock caused by an impact gun can often free stuck bolts. Or destroy them.
- Saw it out with a reciprocating saw with a carbide bit. Take care not to sever the VSS wire and make sure the saw blade has enough room to travel across the stuck bolt without hitting something behind the bolt or seizing in the bushing. Expect to spend some time sawing through the bolts if you have to use this. Once you have sawed out the bolt, twist off the head with vice grips and attempt to forward-thread the threaded end out the nut it passes through, using vice grips. If it is seized to the nut you will need to drill it out or knock off the welded nut. You can also try tack-welding a nut onto the exposed threads and wrenching it out. If you knock off the welded nut, replace it with a locknut and lock washer. This is easiest if the arm is off of the car.
You may want to replace any bolts that nearly seized on you or that have a reputation to seize. I replaced all of the LCA bolts.
Begin Removing Suspension Arms
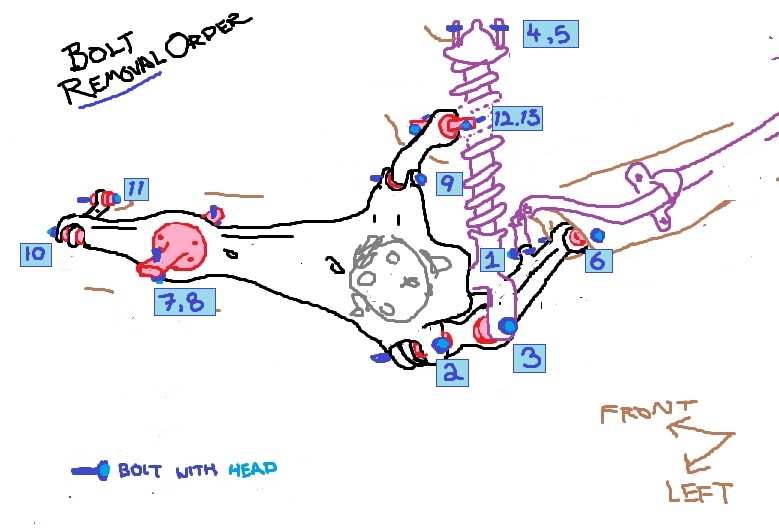
Once you’ve loosened as many bolts as you can, you can start removing suspension components. I recommend the following procedure:
1) Remove the endlink mount bolt on both sides of the car and rotate the sway bar up and out of the way.
2) Support the hub with a floor jack.
3) Remove the outer LCA bolt (14 mm).
4) Release the floor jack and let the springs push the LCA out of the RTA assembly.
5) Remove the shock bolt (14 mm).
6) Open the trunk, remove the plastic panels covering the shock towers, and remove the 12 mm bolts holding the shock absorber assembly against the shock tower. Remove the shock and place it to the side.
7) Remove the inner LCA bolt (14 mm) to remove the LCA from the subframe.
8) Remove the RTA bushing bolts (17 mm).
9) Support the hub with your floor jack, and remove the outer UCA bolt (14 mm).
10) Release the jack and allow the RTA to dangle.
11) At this point, you should be able to remove the RTA bushing with an extractor tool, if you have one. Otherwise, you’ll be removing the RTA and pressing out the bushing.
12) Either lever down the RTA to give you access to the outer compensator bolt, or remove the inner compensator bolt and then remove the outer compensator bolt with the RTA off of the car.
13) Remove the two inner UCA bolts (14 mm) to remove the UCA from the frame.
At this point, all suspension arms (LCA, UCA, RTA, and compensator) will be off of the car and ready for bushing removal!
If your car has been lowered, mark the orientation of the RTA bushing before lifting up your car!.
You will thank me for this later. In fact, do it even if you aren’t lowered. Put a dab of whiteout or magic marker a spot on the trailing arm that lines up with the bolt hole on the bushing. This way you can install the new bushing in the orientation it will want to be in when the car is at natural ride-height. Doing so reduces the stress on the bushing and dramatically extends its life.
With that out of the way, loosen the lugs on the rear wheel and safely raise the front end of the car and place jackstands on the designated tabs ahead of each wheel.
Go nuts with PB Blaster
-Spray every single suspension bolt with PB. Thoroughly coat the front and back of each bolt, sharply tap all sides with a hammer, and repeat. Do this every several days for 1-2 weeks before beginning the project. It’s OK, and maybe even helpful, to drive while you’re breaking in the bolts.
See the bolt inventory, or my drawings below, for a full list of the bolts that need to be PB Blasted.
Remove the Rear Brake Caliper
The first order of business is to remove all the brake components from the RTA and get them out of the way. To do this remove the rear-facing mud shield attached on the upper inside area of the rear trailing arm/hub assembly (RTA, 20/21 on the diagram). It is held on via two, 10 mm bolts.
Next, remove the caliper from the hub by removing the two, inside-facing 14 mm bolts holding it on. Swing the caliper up and hook it over the sway bar (or better yet, by an old coathanger), taking care not to stretch the brake hose.
Remove the Brake Disc
Mine always comes right off, but if it’s stuck work it off by threading the caliper bolts through the two threaded holes on the brake disc. As you thread the bolts through they will push against the hub and will help push the disc off of the hub. If these holes have screws in them, remove the screws with a Philips-head screwdriver or drill them out if they are stuck. They do not need to be replaced.
Note: If you are going to be removing the RTA bushing with an RTA bushing extractor tool, the following steps (removing the parking brake cable and VSS from the RTA) are purely optional, and you can skip down to the ‘suspension removal’ section. You will, however, still need to remove the VSS mounting bracket from the LCA (2 bolts). If you are going to remove the RTA bushing with the press, follow the steps below before proceeding to the ‘suspension removal’ section.
Remove the Parking Brake Cable
If you are going to remove the RTA from the car (to press out the bushing), you will need to get the parking brake cable off of the RTA. This cable passes through the RTA (annoyingly) and connects to the brake caliper. The cable attaches to a spring loaded lever on the top of the caliper, via a cotter/clevis pin. Pull the hairpin cotter with a pair of pliers and then pull the clevis straight out with vice grips. If it seizes soak it in PB and come back in the morning.
You will see that the cable passes through a bracket on the caliper just ahead of where you removed the pins (near the end of the rubber boot). This is secured by a thin metal clip. Hammer the back of the clip with a screwdriver or punch to dislodge it. Next, pull the cable backwards through the hole in the bracket and pull it out of the pass-through in the RTA. To do this successfully you will probably need to remove a bracket holding the cable to the RTA. This is secured on the inside-facing side of the RTA with a 12 mm bolt.
Remove the VSS Signal Wire
With the brakes on both sides removed, it’s time to remove the VSS signal wire for the ABS system (25/26) from the LCA and RTA. It is connected to the LCA via two easy to spot bolts (this step is necessary regardless of whether you plan to completely remove the RTA).
In the lower, forward-facing side of the hub assembly you will see a splash guard protecting the VSS (1/2). This is held on with three 10 mm bolts (31). Remove it, and then the VSS by removing the bolts holding it to the hub (28 x2). Carefully pry the shielded VSS wire away from the hub and let it dangle in a safe area of your workspace. To avoid fouling the VSS with dirt or contaminating it with difficult-to-remove metal filings, wrap a plastic bag around it.
With the VSS removed from the LCA, and the VSS and parking brake removed from the RTA, you will be safe to remove both arms from the car for bushing installation.
---- Suspension Removal ----
Loosen All Bolts
Using a 6 point impact socket Begin by loosening all the necessary bolts to ensure that the PB penetrated (see the bolt inventory or drawing above). This is best done slowly and carefully with a large (2’) breaker bar and a 6-pt impact socket. Standard sockets will not stand up to the stress needed to loosen these bolts, and 12-pt sockets will quickly strip your bolts. If you feel that the bolt is beginning to strip, consider treating with PB blaster for another week.
Because it is at an awkward angle, it may not be possible to loosen the outer compensator bolt until the RTA has been removed from the car.
If a bolt is stuck:
- Treat again with penetrating oil. Coat the bolt in oil and tap sharply with a metal hammer to help the oil penetrate. Several daily PB treatments can sometimes free stuck bolts.
- If possible, try heating with a propane torch. Heat the metal around the bolt (not the bolt itself) for several minutes, then try to torque the bolt loose. Be careful not to use the torch close to the fuel tank, brake lines, brake hoses, or VSS cable. For many of these bolts heating may not be appropriate. Do not use a torch if you hope to reuse the bushing.
- Hammer at it with an impact gun. The shock caused by an impact gun can often free stuck bolts. Or destroy them.
- Saw it out with a reciprocating saw with a carbide bit. Take care not to sever the VSS wire and make sure the saw blade has enough room to travel across the stuck bolt without hitting something behind the bolt or seizing in the bushing. Expect to spend some time sawing through the bolts if you have to use this. Once you have sawed out the bolt, twist off the head with vice grips and attempt to forward-thread the threaded end out the nut it passes through, using vice grips. If it is seized to the nut you will need to drill it out or knock off the welded nut. You can also try tack-welding a nut onto the exposed threads and wrenching it out. If you knock off the welded nut, replace it with a locknut and lock washer. This is easiest if the arm is off of the car.
You may want to replace any bolts that nearly seized on you or that have a reputation to seize. I replaced all of the LCA bolts.
Begin Removing Suspension Arms
Once you’ve loosened as many bolts as you can, you can start removing suspension components. I recommend the following procedure:
1) Remove the endlink mount bolt on both sides of the car and rotate the sway bar up and out of the way.
2) Support the hub with a floor jack.
3) Remove the outer LCA bolt (14 mm).
4) Release the floor jack and let the springs push the LCA out of the RTA assembly.
5) Remove the shock bolt (14 mm).
6) Open the trunk, remove the plastic panels covering the shock towers, and remove the 12 mm bolts holding the shock absorber assembly against the shock tower. Remove the shock and place it to the side.
7) Remove the inner LCA bolt (14 mm) to remove the LCA from the subframe.
8) Remove the RTA bushing bolts (17 mm).
9) Support the hub with your floor jack, and remove the outer UCA bolt (14 mm).
10) Release the jack and allow the RTA to dangle.
11) At this point, you should be able to remove the RTA bushing with an extractor tool, if you have one. Otherwise, you’ll be removing the RTA and pressing out the bushing.
12) Either lever down the RTA to give you access to the outer compensator bolt, or remove the inner compensator bolt and then remove the outer compensator bolt with the RTA off of the car.
13) Remove the two inner UCA bolts (14 mm) to remove the UCA from the frame.
At this point, all suspension arms (LCA, UCA, RTA, and compensator) will be off of the car and ready for bushing removal!
Last edited by GagnarTheUnruly; 06-06-2011 at 08:39 PM.
06-06-2011, 08:06 PM
#4
---- Bushing Removal ----
You can use a number of strategies to remove the bushings. Odds are you’ll wind up using several during the course of the install.
Option 1: Burn them out!
With a propane torch you can burn rubber bushings to cinders, simplifying extraction in some ways and making it more difficult in others.
Advantages: Burnt rubber is very easy to remove with a mallet, a press, or a clamp. Once the rubber is removed, the outer metal collar of the bushing can be removed without a press, or much more easily with a press.
Disadvantages: Removing the collar without a press requires sawing breaks in the collar, which is stressful and kind of a PITA. Excessive heat can also damage the integrity of the suspension arm. Also bushing smoke is extremely toxic. If you do this stand downwind of the bushing and keep your head below it.
Possible Tactics:
- Burn out the bushings, then hammer the rubber out with a mallet and a socket. Once the rubber is more or less out of the bushing, carefully saw out a break in the collar using a reciprocating saw. Take care not to nick the arm when you cut through the collar. The collar is of a softer metal, simplifying things a little. Once you have a cut that goes all the way across the collar, hammer at the broken collar with a punch or an old chisel or screwdriver to remove it.
- Burn the bushings, then press the rubber out using a socket, and press the collar out using a larger socket. Burning the bushings, even a little, makes pressing the collar out much easier, so this is an effective tactic for freeing ultra-seized bushings. If you lack an appropriately sized socket, you can even press collars out with a collar that you had to cut out using the method described above.
Option 2: Press them out!
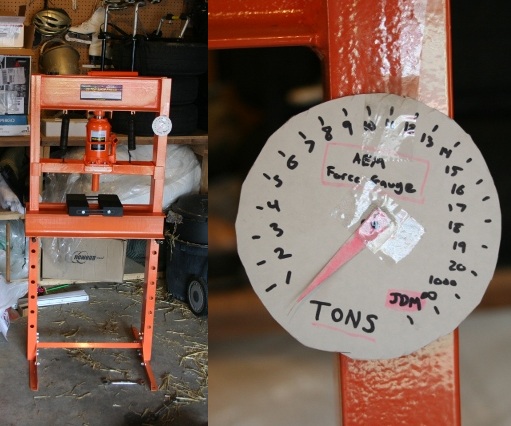
If your press is up to the task, you can press out bushings without having to burn them. This is certainly the case with the RTA bushing, and the UCA and compensator bushings, which are relatively easy to press out. My press is a 20 ton (upgraded to JDM spec), so it’s more than capable.
Advantages: Causes no possible harm to the suspension arm, as long as you carefully set up the press.
Disadvantages: Takes a pretty strong press (20+ tons). Putting this much force on the bushing is a little freaky. They also release somewhat excitingly. Perhaps this is counts as an advantage… Also, this may not be possible with badly seized bushings.
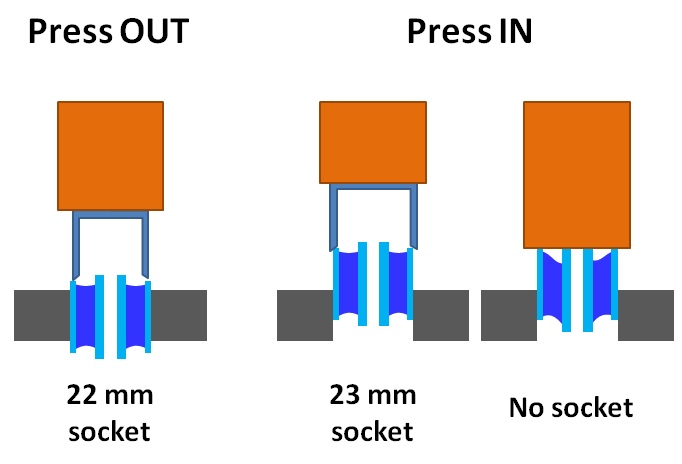
To press out the bushings it is important that you use a correctly sized socket. You need a socket that can pass through the suspension arm without binding, but also that lines up squarely with the outer collar. The outer collar is what you want to apply force to. With the exception of the RTA bushing, do NOT try to press the bushing by pressing on the rubber or on the inner collar (unless the bushing has already been burnt with a torch).
Make sure to use appropriate eye protection when pressing. When pressing bushings out it may be a good idea to put some sort of cardboard or plexiglass shield in front of the press, as sockets have a tendency to come flying off. I used an old vacuum box and my future children thank me.
To press out the RTA bushing, work around the outer edge of the bushing, pressing it down a little bit at a time. You can press out the metal tongue if it’s in the way.
When using a press, common sense rules the day. Make sure that the press is centered and that forces are directed straight down toward the bushing. Also make sure that you properly support the suspension arm and as close to the bushing as possible. If the blocks you set it on are very far apart, the arm can bend irreparably or twist violently out of position. In general, each arm has a ‘best’ way to place it in the press.
LCA – put the blocks under the flat machined surface right next to each bushing. Get the blocks as close together as you can, such that they will still allow the bushing to pass between them as you press them out. Honda does make a bushing driver for these bushings: 07NAD-SS00101
UCA – put the rearward-facing, convex side down. On these you can get away with the other orientation as well. Note that pressing out the inner UCA bushing requires a deep 22 mm socket. A shallow or deep 22 mm socket can be used on the outer bushing. Warning! Take note of the orientation of the metal tongue before removing the bushing! You need to install the new bushing in exactly the same orientation as the old bushing. Mark the arm with a pencil or with whiteout to ensure you don’t make a mistake.
RTA – put the outer side of the RTA up. The flat flanges on the inner side of the arm will set easily on the press. Make sure you mark the orientation of the metal tongue before removing the bushing! You need to install the new bushing in the exact same orientation as the old bushing. Mark the arm with a pencil or with whiteout to ensure you don’t make a mistake, if you haven’t already. This only works if the RTA was already correctly ‘clocked’ to your ride height – i.e. a factory-installed RTA bushing at factory installed height. If you’ve changed ride height since the RTA was installed you’ll have to guess at the correct position or you should’ve marked it before raising the car.
Make a note of the depth of installation of all the bushings before removing them. Most bushings center on the middle of the collar they fit into on the suspension arm, but the RTA needs to be flush with the outer edge of the RTA.
Compensator – put the convex side down as well.
Option 3: Buy new arms!
Buying new arms simplifies things enormously, although it’s probably not cost effective to replace all of them.
Advantages: New arms come with bushings pre-installed, so if OEM bushings are OK with you it’s a good way to go. Arms also cost barely more than the bushings that come in them. A hidden advantage is that, even if you are replacing bushings with aftermarket parts, extracting new bushings from new arms is very easy with a press or even a hammer. This is also your best ever excuse for buying those beautiful Funciton 7 LCA’s you’ve had your eye on…
Disadvantages: Cost.
I bent one of my LCAs during bushing removal, so I wound up getting new LCAs, and I’m glad I did because it made everything easier.
Option 4: Have a shop press in/out the bushings
Advantages: This is probably cheaper than buying new arms and you can have the shop press in whatever aftermarket bushings you want.
Disadvantages: Cost.
---- Bushing Installation ----
Believe it or not, this is the trickiest part of the installation in some ways. To make it go easier, freeze the bushings overnight in the freezer. This will shrink them and make the job slightly easier. It’s probably easiest to do this work on a hot day when the suspension arms are nice and warm. If you try to press in a bushing and fail, you should freeze it again. The pressure you exert on the bushing will heat it very rapidly, so you only have one brief shot at pressing in the bushing while it’s still cold.
Tips:
- Gently clean the inside of the suspension arms where the bushings go with medium-grit sandpaper, but don’t scrub so hard that you widen the hole.
- Press in bushings in the same direction that you pressed them out.
- Size-up the socket you use to press in a bushing (e.g. if you pressed out with a 22, press in with a 23). This will help you stabilize the socket and the bushing as you start to apply force (otherwise they will try to buckle to the side). Sometimes sizing down helps as well. While it’s possible to do the removal/install with a limited selection of sockets, having flexibility makes the job much easier. I got 22-26mm and 1 1/16” – 1 �“ Crafstman 5-piece socket sets for $15 each and I used almost all of the sockets.
- Proceed with care. If the bushing buckles it will warp and then it will be a royal pain to install.
- If a bushing is being a particular bastard (compensator bushings, I’m looking at you), press it in without using a socket. Press down on the top of the protruding inner collar. The rubber will deform until the inner ring is also snug with the press. At this point buckling is impossible and it will drive straight in.
- Take note of the orientation of the inner UCA bushing and the RTA bushing before pressing them into place.
- Compared to bushing removal, relatively little force is needed to push the bushings in. The tricky part is keeping them straight as you’re pressing.
- To press in the RTA bushing, use the RTA bushing extractor tool, or hammer around the outer collar of the bushing. It will hammer in to the correct depth in just a few minutes.
- Make sure you install the RTA bushing in its original location (if at stock height
Suspension Re-Assembly
With the new bushings installed, re-assemble the suspension in the following order. Snug bolts but do not tighten them unless otherwise indicated. The general principle is to avoid tightening any bolts that pass through the center of bushings.
Re-Assemble Suspension
Use anti-seize compound on all bolts to facilitate future suspension work!
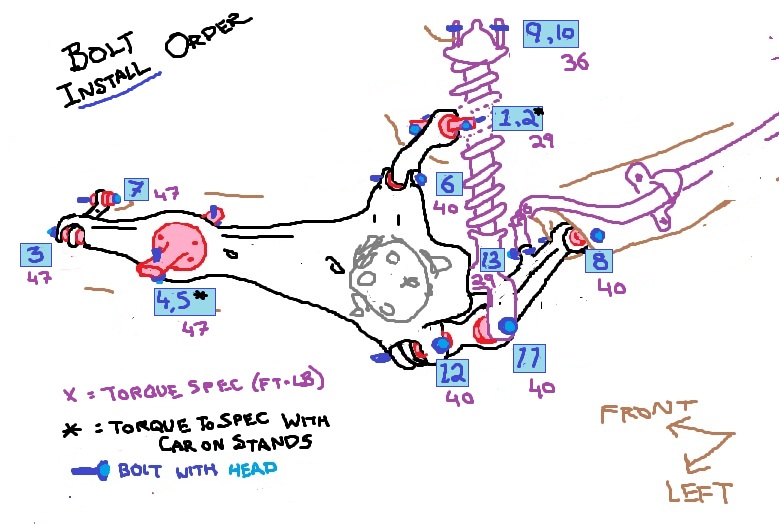
1) Attach the UCA to the frame using the inner UCA bolts and torque to 29 ft-lbs.
2) Attach the compensator to the RTA and hand-snug the bolt.
3) Raise the RTA against the frame of the car and begin threading in the RTA bushing bolts. Stop when they have enough of a bite to hold up the RTA
4) Attach the RTA to the UCA and snug the bolt.
5) Attach the compensator to the frame and snug the bolt.
6) Tighten the RTA bushing bolts to 47 ft. lbs.
7) Put the rotor back on the hub, re-attach the brake caliper, and reconnect the parking brake cable (remember to run the cable through the RTA and to attach the cable bracket back onto the inside face of the RTA).
8) Attach the LCA inner bushing to the subframe.
9) Mount the VSS wire back onto the LCA (2 bolts)
10) Swing the sway bar down so that the endlinks are in the correct orientation.
11) Mount the shock absorber to the tower (accessible in the trunk) and tighten the nuts to 36 ft-lbs.
12) Attach the shock absorber to the LCA and snug the bolt. Ensure that the VSS wire passes through the shock fork above the bushing on the LCA.
13) Using a floor jack, raise the LCA outer bushing into the appropriate spot on the RTA. Take care not to raise the LCA so high that the car lifts off of its jackstand.
14) Use a breaker bar or jack handle as a pry bar to help guide the LCA into the RTA. Tapping the LCA with a mallet will also help get it into position.
15) Reconnect the endlink to the LCA.
16) Attach the VSS to the hub and mount the VSS shield and parking brake splash guard.
17) Mount your rear wheels, snug the lug nuts, and lower the car.
18) Give the chassis some firm bounces to set the bushings.
Tighten Suspension Bolts
At this point the next step is to tighten the suspension bolts to spec. The order does not matter. The trick is that the suspension has to be in its load-bearing position when you do. To do this you have a few options.
One option is to simply tighten the bolts when the car is on the ground. This is easiest with a ratcheting torque wrench, but it can be done with an old-fashioned deflecting beam wrench and 12-pt sockets. This will not be possible if your car has been lowered.
Another option is to mark the position of the suspension when it’s on the ground and to mimic that position when it’s in the air by raising the hub with a floor jack. You probably won't be able to get all the way to ride height, but for some people that may be good enough.
If you have ramps, you can drive up on the ramps and tighten the suspension bolts then. Many bolts will be easier to reach with the car off the ground.
The best option, however, is to remove the coilover shocks. First, put the suspension back together and lower the car to ride height. Mark the location of the hub relative to the body at ride height (I look to see where the center of the hub lines up with the body panels). Then raise the rear of the car onto jackstands, remove the wheel and shock assembly, and using your jack lift the hub to ride height. Now you can very easily access all of the suspension bolts. Tighten them to spec, put the shock assembly and wheel back on, and lower the car. The shock bolt is the most accessible on the car, and will be easy to tighten with the car on the ground.
Regardless of what you do, these are the torque specifications:
Endlink Bolt* – 39 ft-lbs
LCA Inner Bolt* – 40 ft-lbs
LCA Shock Bolt* – 40 ft-lbs
LCA Outer Bolt* – 40 ft-lbs
UCA Inner Bolt – 29 ft-lbs
UCA Outer Bolt* – 40 ft-lbs
RTA Bushing Bolt –47 ft-lbs
Compensator Inner Bolt* – 47 ft-lbs
Compensator Outer Bolt* – 47 ft-lbs
* = These should only be tightened to spec. with the suspension at ride-height
You may also want to apply some silicone suspension grease to some or all of the bushings, particularly if they get squeaky on you.
Also note that you should have a professional rear suspension alignment done after finishing this project.
All done! Don’t forget to tighten your lugnuts, and enjoy your Integra with a refreshed suspension! Toss her around a few corners and tell your neighbors that Gagnar sent you.
Please feel free to post comments, corrections, concerns, and suggestions, and thanks for reading!
You can use a number of strategies to remove the bushings. Odds are you’ll wind up using several during the course of the install.
Option 1: Burn them out!
With a propane torch you can burn rubber bushings to cinders, simplifying extraction in some ways and making it more difficult in others.
Advantages: Burnt rubber is very easy to remove with a mallet, a press, or a clamp. Once the rubber is removed, the outer metal collar of the bushing can be removed without a press, or much more easily with a press.
Disadvantages: Removing the collar without a press requires sawing breaks in the collar, which is stressful and kind of a PITA. Excessive heat can also damage the integrity of the suspension arm. Also bushing smoke is extremely toxic. If you do this stand downwind of the bushing and keep your head below it.
Possible Tactics:
- Burn out the bushings, then hammer the rubber out with a mallet and a socket. Once the rubber is more or less out of the bushing, carefully saw out a break in the collar using a reciprocating saw. Take care not to nick the arm when you cut through the collar. The collar is of a softer metal, simplifying things a little. Once you have a cut that goes all the way across the collar, hammer at the broken collar with a punch or an old chisel or screwdriver to remove it.
- Burn the bushings, then press the rubber out using a socket, and press the collar out using a larger socket. Burning the bushings, even a little, makes pressing the collar out much easier, so this is an effective tactic for freeing ultra-seized bushings. If you lack an appropriately sized socket, you can even press collars out with a collar that you had to cut out using the method described above.
Option 2: Press them out!
If your press is up to the task, you can press out bushings without having to burn them. This is certainly the case with the RTA bushing, and the UCA and compensator bushings, which are relatively easy to press out. My press is a 20 ton (upgraded to JDM spec), so it’s more than capable.
Advantages: Causes no possible harm to the suspension arm, as long as you carefully set up the press.
Disadvantages: Takes a pretty strong press (20+ tons). Putting this much force on the bushing is a little freaky. They also release somewhat excitingly. Perhaps this is counts as an advantage… Also, this may not be possible with badly seized bushings.
To press out the bushings it is important that you use a correctly sized socket. You need a socket that can pass through the suspension arm without binding, but also that lines up squarely with the outer collar. The outer collar is what you want to apply force to. With the exception of the RTA bushing, do NOT try to press the bushing by pressing on the rubber or on the inner collar (unless the bushing has already been burnt with a torch).
Make sure to use appropriate eye protection when pressing. When pressing bushings out it may be a good idea to put some sort of cardboard or plexiglass shield in front of the press, as sockets have a tendency to come flying off. I used an old vacuum box and my future children thank me.
To press out the RTA bushing, work around the outer edge of the bushing, pressing it down a little bit at a time. You can press out the metal tongue if it’s in the way.
When using a press, common sense rules the day. Make sure that the press is centered and that forces are directed straight down toward the bushing. Also make sure that you properly support the suspension arm and as close to the bushing as possible. If the blocks you set it on are very far apart, the arm can bend irreparably or twist violently out of position. In general, each arm has a ‘best’ way to place it in the press.
LCA – put the blocks under the flat machined surface right next to each bushing. Get the blocks as close together as you can, such that they will still allow the bushing to pass between them as you press them out. Honda does make a bushing driver for these bushings: 07NAD-SS00101
UCA – put the rearward-facing, convex side down. On these you can get away with the other orientation as well. Note that pressing out the inner UCA bushing requires a deep 22 mm socket. A shallow or deep 22 mm socket can be used on the outer bushing. Warning! Take note of the orientation of the metal tongue before removing the bushing! You need to install the new bushing in exactly the same orientation as the old bushing. Mark the arm with a pencil or with whiteout to ensure you don’t make a mistake.
RTA – put the outer side of the RTA up. The flat flanges on the inner side of the arm will set easily on the press. Make sure you mark the orientation of the metal tongue before removing the bushing! You need to install the new bushing in the exact same orientation as the old bushing. Mark the arm with a pencil or with whiteout to ensure you don’t make a mistake, if you haven’t already. This only works if the RTA was already correctly ‘clocked’ to your ride height – i.e. a factory-installed RTA bushing at factory installed height. If you’ve changed ride height since the RTA was installed you’ll have to guess at the correct position or you should’ve marked it before raising the car.
Make a note of the depth of installation of all the bushings before removing them. Most bushings center on the middle of the collar they fit into on the suspension arm, but the RTA needs to be flush with the outer edge of the RTA.
Compensator – put the convex side down as well.
Option 3: Buy new arms!
Buying new arms simplifies things enormously, although it’s probably not cost effective to replace all of them.
Advantages: New arms come with bushings pre-installed, so if OEM bushings are OK with you it’s a good way to go. Arms also cost barely more than the bushings that come in them. A hidden advantage is that, even if you are replacing bushings with aftermarket parts, extracting new bushings from new arms is very easy with a press or even a hammer. This is also your best ever excuse for buying those beautiful Funciton 7 LCA’s you’ve had your eye on…
Disadvantages: Cost.
I bent one of my LCAs during bushing removal, so I wound up getting new LCAs, and I’m glad I did because it made everything easier.
Option 4: Have a shop press in/out the bushings
Advantages: This is probably cheaper than buying new arms and you can have the shop press in whatever aftermarket bushings you want.
Disadvantages: Cost.
---- Bushing Installation ----
Believe it or not, this is the trickiest part of the installation in some ways. To make it go easier, freeze the bushings overnight in the freezer. This will shrink them and make the job slightly easier. It’s probably easiest to do this work on a hot day when the suspension arms are nice and warm. If you try to press in a bushing and fail, you should freeze it again. The pressure you exert on the bushing will heat it very rapidly, so you only have one brief shot at pressing in the bushing while it’s still cold.
Tips:
- Gently clean the inside of the suspension arms where the bushings go with medium-grit sandpaper, but don’t scrub so hard that you widen the hole.
- Press in bushings in the same direction that you pressed them out.
- Size-up the socket you use to press in a bushing (e.g. if you pressed out with a 22, press in with a 23). This will help you stabilize the socket and the bushing as you start to apply force (otherwise they will try to buckle to the side). Sometimes sizing down helps as well. While it’s possible to do the removal/install with a limited selection of sockets, having flexibility makes the job much easier. I got 22-26mm and 1 1/16” – 1 �“ Crafstman 5-piece socket sets for $15 each and I used almost all of the sockets.
- Proceed with care. If the bushing buckles it will warp and then it will be a royal pain to install.
- If a bushing is being a particular bastard (compensator bushings, I’m looking at you), press it in without using a socket. Press down on the top of the protruding inner collar. The rubber will deform until the inner ring is also snug with the press. At this point buckling is impossible and it will drive straight in.
- Take note of the orientation of the inner UCA bushing and the RTA bushing before pressing them into place.
- Compared to bushing removal, relatively little force is needed to push the bushings in. The tricky part is keeping them straight as you’re pressing.
- To press in the RTA bushing, use the RTA bushing extractor tool, or hammer around the outer collar of the bushing. It will hammer in to the correct depth in just a few minutes.
- Make sure you install the RTA bushing in its original location (if at stock height
Suspension Re-Assembly
With the new bushings installed, re-assemble the suspension in the following order. Snug bolts but do not tighten them unless otherwise indicated. The general principle is to avoid tightening any bolts that pass through the center of bushings.
Re-Assemble Suspension
Use anti-seize compound on all bolts to facilitate future suspension work!
1) Attach the UCA to the frame using the inner UCA bolts and torque to 29 ft-lbs.
2) Attach the compensator to the RTA and hand-snug the bolt.
3) Raise the RTA against the frame of the car and begin threading in the RTA bushing bolts. Stop when they have enough of a bite to hold up the RTA
4) Attach the RTA to the UCA and snug the bolt.
5) Attach the compensator to the frame and snug the bolt.
6) Tighten the RTA bushing bolts to 47 ft. lbs.
7) Put the rotor back on the hub, re-attach the brake caliper, and reconnect the parking brake cable (remember to run the cable through the RTA and to attach the cable bracket back onto the inside face of the RTA).
8) Attach the LCA inner bushing to the subframe.
9) Mount the VSS wire back onto the LCA (2 bolts)
10) Swing the sway bar down so that the endlinks are in the correct orientation.
11) Mount the shock absorber to the tower (accessible in the trunk) and tighten the nuts to 36 ft-lbs.
12) Attach the shock absorber to the LCA and snug the bolt. Ensure that the VSS wire passes through the shock fork above the bushing on the LCA.
13) Using a floor jack, raise the LCA outer bushing into the appropriate spot on the RTA. Take care not to raise the LCA so high that the car lifts off of its jackstand.
14) Use a breaker bar or jack handle as a pry bar to help guide the LCA into the RTA. Tapping the LCA with a mallet will also help get it into position.
15) Reconnect the endlink to the LCA.
16) Attach the VSS to the hub and mount the VSS shield and parking brake splash guard.
17) Mount your rear wheels, snug the lug nuts, and lower the car.
18) Give the chassis some firm bounces to set the bushings.
Tighten Suspension Bolts
At this point the next step is to tighten the suspension bolts to spec. The order does not matter. The trick is that the suspension has to be in its load-bearing position when you do. To do this you have a few options.
One option is to simply tighten the bolts when the car is on the ground. This is easiest with a ratcheting torque wrench, but it can be done with an old-fashioned deflecting beam wrench and 12-pt sockets. This will not be possible if your car has been lowered.
Another option is to mark the position of the suspension when it’s on the ground and to mimic that position when it’s in the air by raising the hub with a floor jack. You probably won't be able to get all the way to ride height, but for some people that may be good enough.
If you have ramps, you can drive up on the ramps and tighten the suspension bolts then. Many bolts will be easier to reach with the car off the ground.
The best option, however, is to remove the coilover shocks. First, put the suspension back together and lower the car to ride height. Mark the location of the hub relative to the body at ride height (I look to see where the center of the hub lines up with the body panels). Then raise the rear of the car onto jackstands, remove the wheel and shock assembly, and using your jack lift the hub to ride height. Now you can very easily access all of the suspension bolts. Tighten them to spec, put the shock assembly and wheel back on, and lower the car. The shock bolt is the most accessible on the car, and will be easy to tighten with the car on the ground.
Regardless of what you do, these are the torque specifications:
Endlink Bolt* – 39 ft-lbs
LCA Inner Bolt* – 40 ft-lbs
LCA Shock Bolt* – 40 ft-lbs
LCA Outer Bolt* – 40 ft-lbs
UCA Inner Bolt – 29 ft-lbs
UCA Outer Bolt* – 40 ft-lbs
RTA Bushing Bolt –47 ft-lbs
Compensator Inner Bolt* – 47 ft-lbs
Compensator Outer Bolt* – 47 ft-lbs
* = These should only be tightened to spec. with the suspension at ride-height
You may also want to apply some silicone suspension grease to some or all of the bushings, particularly if they get squeaky on you.
Also note that you should have a professional rear suspension alignment done after finishing this project.
All done! Don’t forget to tighten your lugnuts, and enjoy your Integra with a refreshed suspension! Toss her around a few corners and tell your neighbors that Gagnar sent you.
Please feel free to post comments, corrections, concerns, and suggestions, and thanks for reading!
Last edited by GagnarTheUnruly; 09-24-2011 at 03:23 PM.
06-07-2011, 01:27 PM
#5
Honda-Tech Member
Great write up. even though there are past write up about this, it's still good to have a updated version.
BTW the 2nd gen integra aka DA9, DA6, etc... have the same setup (minus the swaybar setup) so that apply to them too.
BTW the 2nd gen integra aka DA9, DA6, etc... have the same setup (minus the swaybar setup) so that apply to them too.
09-23-2011, 08:48 AM
#7
Daisy... Daisy...
I'm in on this, as I need to do this soon. I was thinking about modifying my Porto-Power to replace the RTA bushings in situ.
Trending Topics
09-23-2011, 07:41 PM
#9
Honda-Tech Member
I replaced my RTA bushings using a hammer. Took me a couple hours but I didn't need a press, for those who need it done without a press - it's possible.
 11-18-2011, 10:15 AM
#14

Rear Trailing Arm (RTA, 20/21) � This is the largest suspension arm. It contains the hub assembly and attaches to the UCA and LCA at the rear of the car, to the compensator arm farther towards the front of the car, and to the frame of the car. The RTA pivots at the RTA bushing. The RTA bushing is the only bushing in the RTA. It is the only bushing that differs between the left and right side of the car.
Right RTA (20) 52370-ST7-G91
Left RTA (21) 52371-ST7-G91
Right RTA (20) 52370-ST7-G91
Left RTA (21) 52371-ST7-G91
The bushings have these Honda part numbers:
'90-'93 Integra: 52385-SK7-N02
'94-'01 Integra: 52385-SR3-000
(the bushings are the same for left and right)
These separate replacement bushings were made available as part of a campaign that dealt with rear-suspension noise. TSB 06-010 was issued to inform dealers.
When I bought my own bushings, these parts did not show up in the dealer software diagrams, but the part number did when typed in manually: It came up as "Bushing, RR", and was about $70.
11-18-2011, 11:42 AM
#15
^^ Thanks, I can't remember if I mentioned it either, but it is a good point to raise. You can use a RTA bushing extractor to press it out with the arm still on the car, or you can hammer it out with the arm on the car as long as you have enough patience.
Since I have a shop press and I have gotten good at removing the arm I prefer to remove it with the press, but for people without a press it's easier to change bushings on the car and I agree it is definitely NOT cost effective to replace the whole trailing arm!
Since I have a shop press and I have gotten good at removing the arm I prefer to remove it with the press, but for people without a press it's easier to change bushings on the car and I agree it is definitely NOT cost effective to replace the whole trailing arm!
 Awesome writeup!
01-29-2012, 02:05 PM
Awesome writeup!
01-29-2012, 02:05 PM
#17
Honda-Tech Member
that's a great write up, i have a question for you I have the jdm lower control arms in the above number 44 or 45 can the buses be replaced and if so do you have the part number?
01-29-2012, 08:37 PM
#18
AFAIK USDM and JDM are the same when it comes to suspension parts. The only difference is ITR, which have different LCAs and coilovers both in the US and in Japan. 44 and 45 are left and right ITR LCAs.
The ITR shock bushing is 52622-SR3-003. I imagine the LCA bushings are the same as other Integras but I'm having trouble finding out for sure.
The ITR shock bushing is 52622-SR3-003. I imagine the LCA bushings are the same as other Integras but I'm having trouble finding out for sure.
01-30-2012, 02:11 AM
#20
Honda-Tech Member
AFAIK USDM and JDM are the same when it comes to suspension parts. The only difference is ITR, which have different LCAs and coilovers both in the US and in Japan. 44 and 45 are left and right ITR LCAs.
The ITR shock bushing is 52622-SR3-003. I imagine the LCA bushings are the same as other Integras but I'm having trouble finding out for sure.
The ITR shock bushing is 52622-SR3-003. I imagine the LCA bushings are the same as other Integras but I'm having trouble finding out for sure.
 03-31-2013, 08:34 PM
#22
Honda-Tech Member
do you think this "threaded rod technique" would work
03-31-2013, 09:16 PM
#23
I'd be surprised. Some bushings will take ca. 20 tons to press out, possibly more. You'd be hard-pressed to get that kind of a clamp load on a bolt that you were turning by hand.
I'd see it working on new bushings that aren't bonded to the arm -- but old bushings that are seized in I just don't know. But I guess it's cheap so no harm in trying.
I'd see it working on new bushings that aren't bonded to the arm -- but old bushings that are seized in I just don't know. But I guess it's cheap so no harm in trying.
04-01-2013, 01:57 PM
#24
Honda-Tech Member
I'd be surprised. Some bushings will take ca. 20 tons to press out, possibly more. You'd be hard-pressed to get that kind of a clamp load on a bolt that you were turning by hand.
I'd see it working on new bushings that aren't bonded to the arm -- but old bushings that are seized in I just don't know. But I guess it's cheap so no harm in trying.
I'd see it working on new bushings that aren't bonded to the arm -- but old bushings that are seized in I just don't know. But I guess it's cheap so no harm in trying.
1) Buy new Function7 LCAs
2) Buy Hardrace hard rubber bushing
Pros for F7 LCAs:
-Ease of install
-Fast (no waiting for bushings)
-Warranty
-Looks nice
Cons:
-Expensive
Pros for Hardrace:
-Less Expensive
-Superb Quality (rubber)
-I prefer OEM look
Cons:
-Waiting
-Unsure if able to install in garage
-Possible Damage