
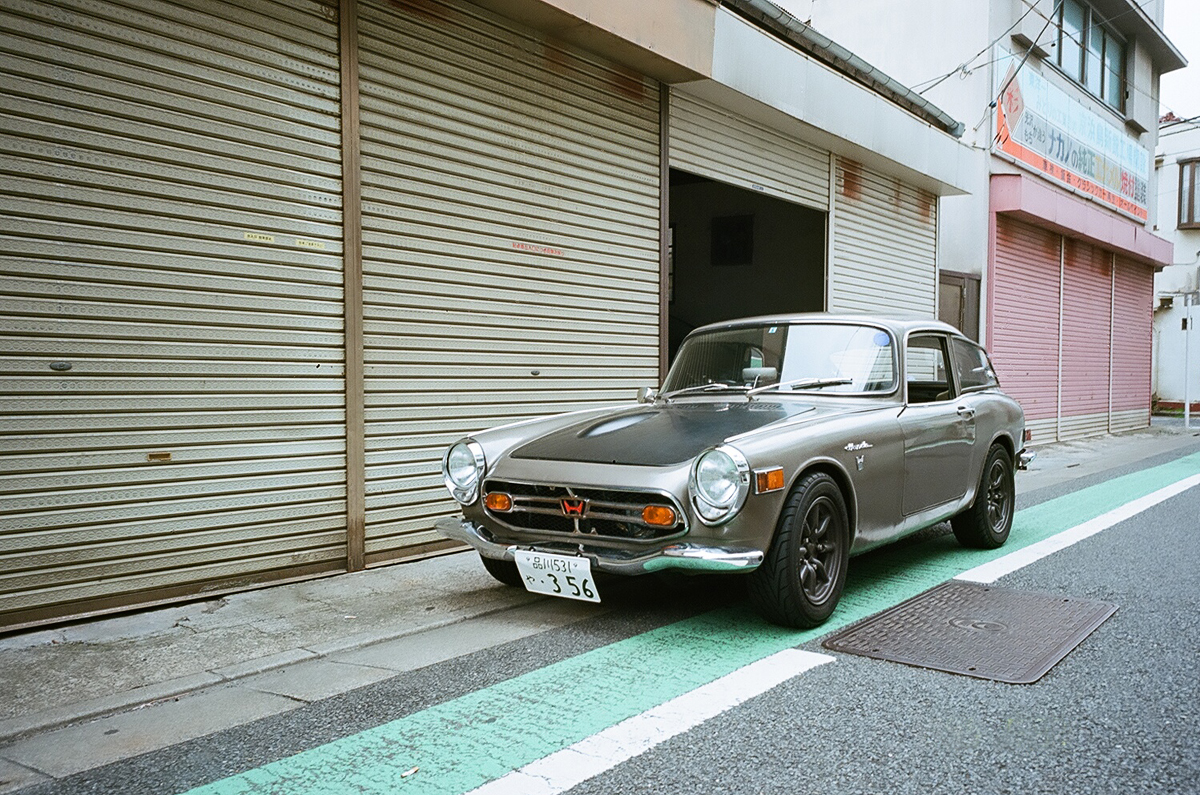
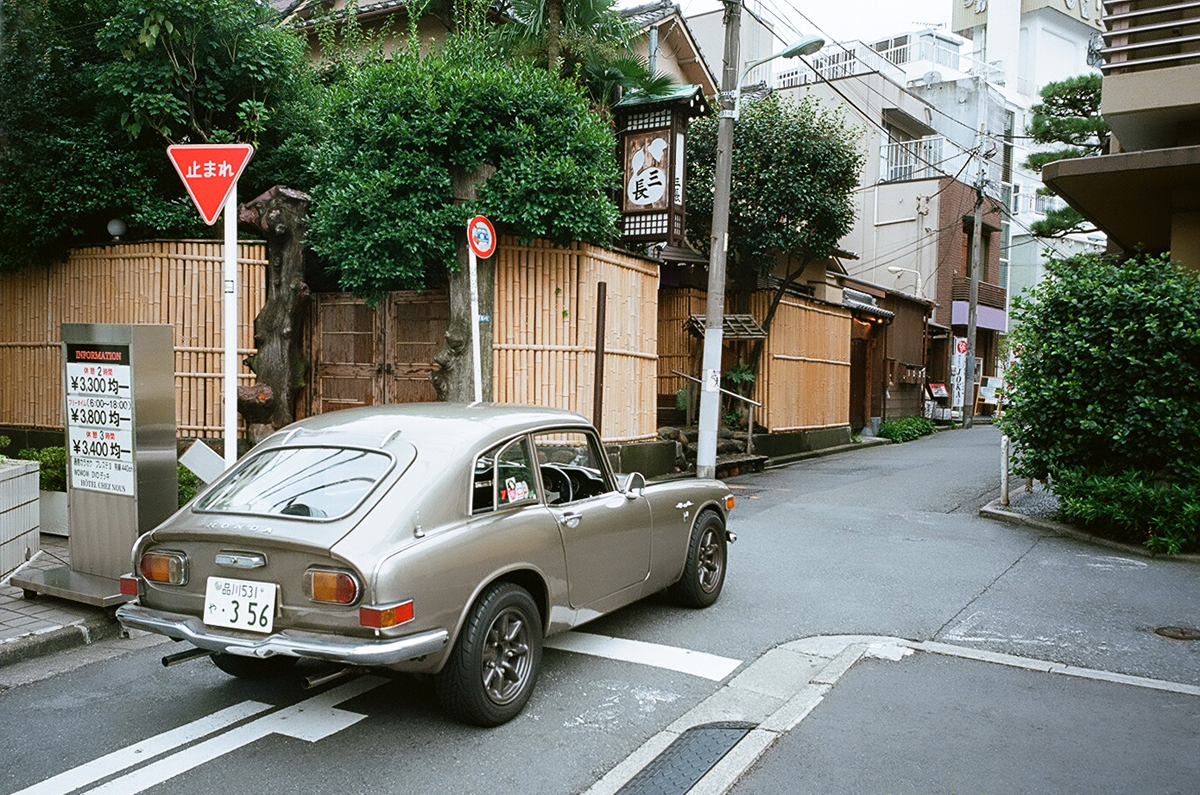
1969 S800M Coupe.
 04-23-2015, 03:30 AM
#276
Honda-Tech Member
Thread Starter

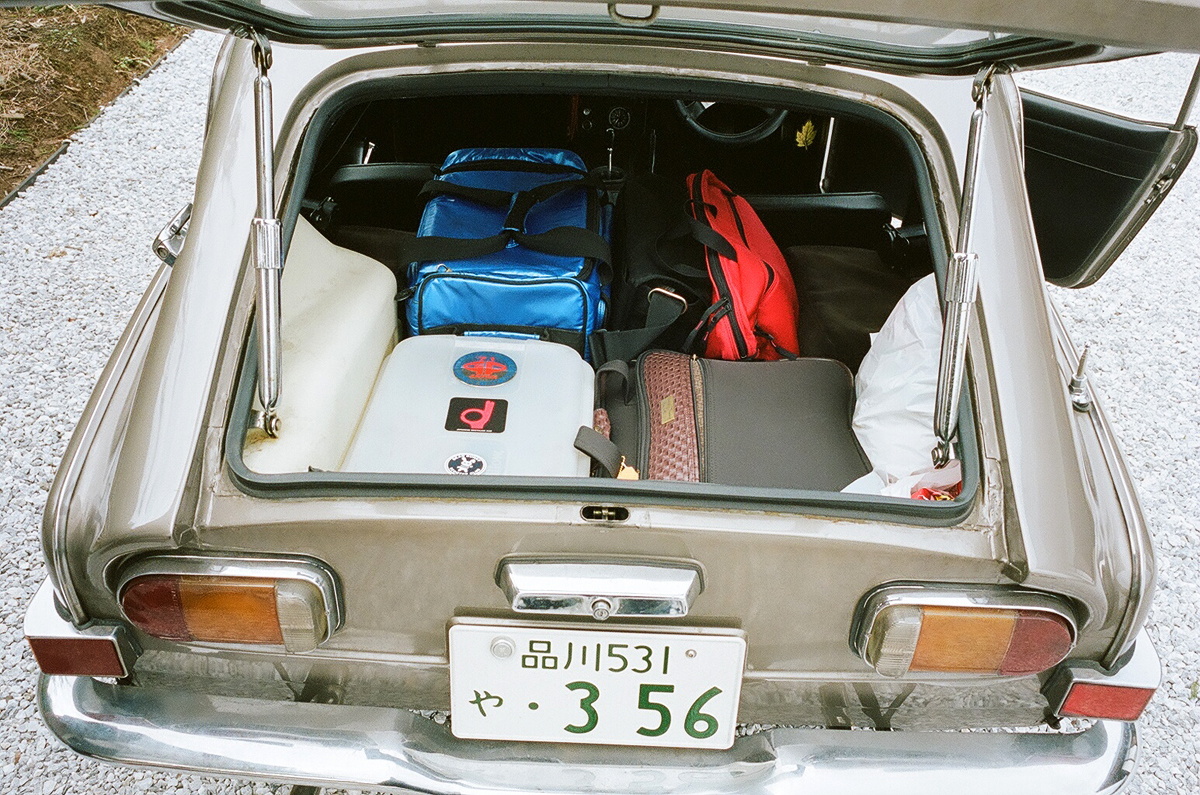
Last weekend, two days after the S660 was released, I drove the Hachi down to Kawasaki, and took my friend's S660 for drive. On the way home, I drove the GT-B. The Chev stayed where it was... More on the S660 here: Japanese Nostalgic Car - S660 Review.

 04-26-2015, 12:11 AM
#278
Honda-Tech Member
Thread Starter
Thanks!
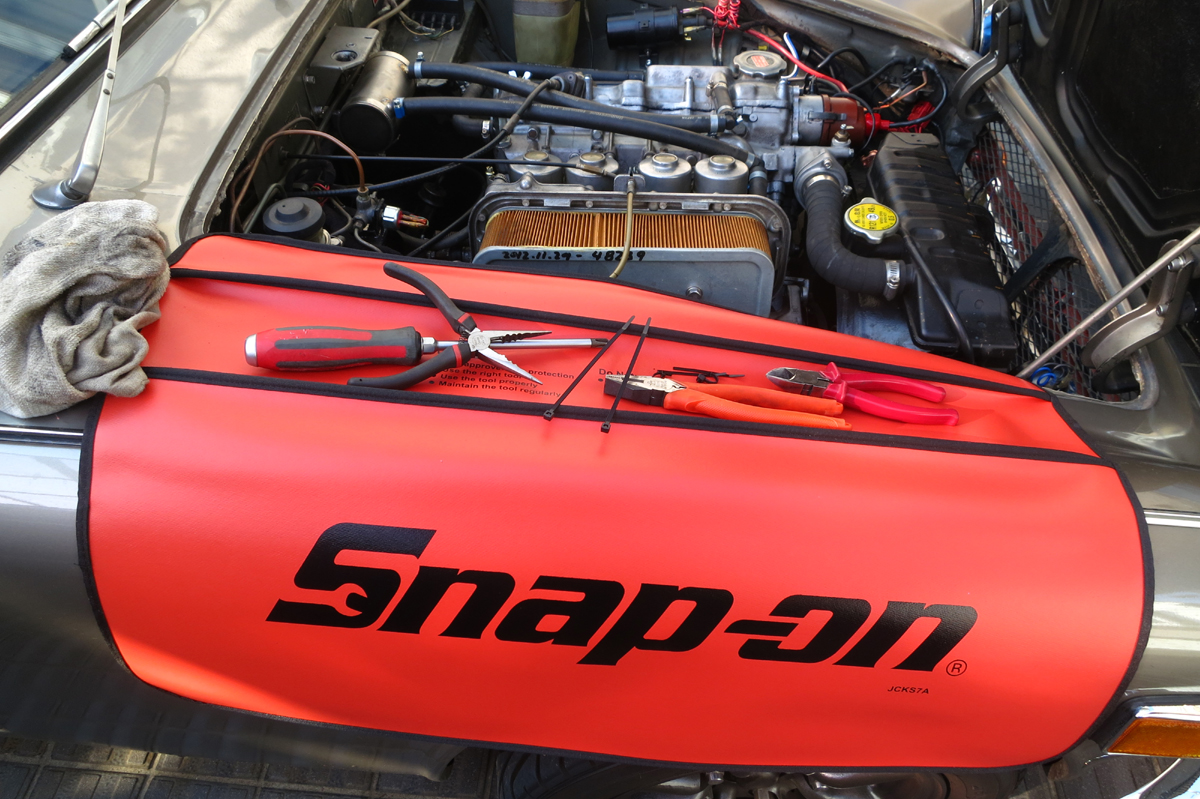
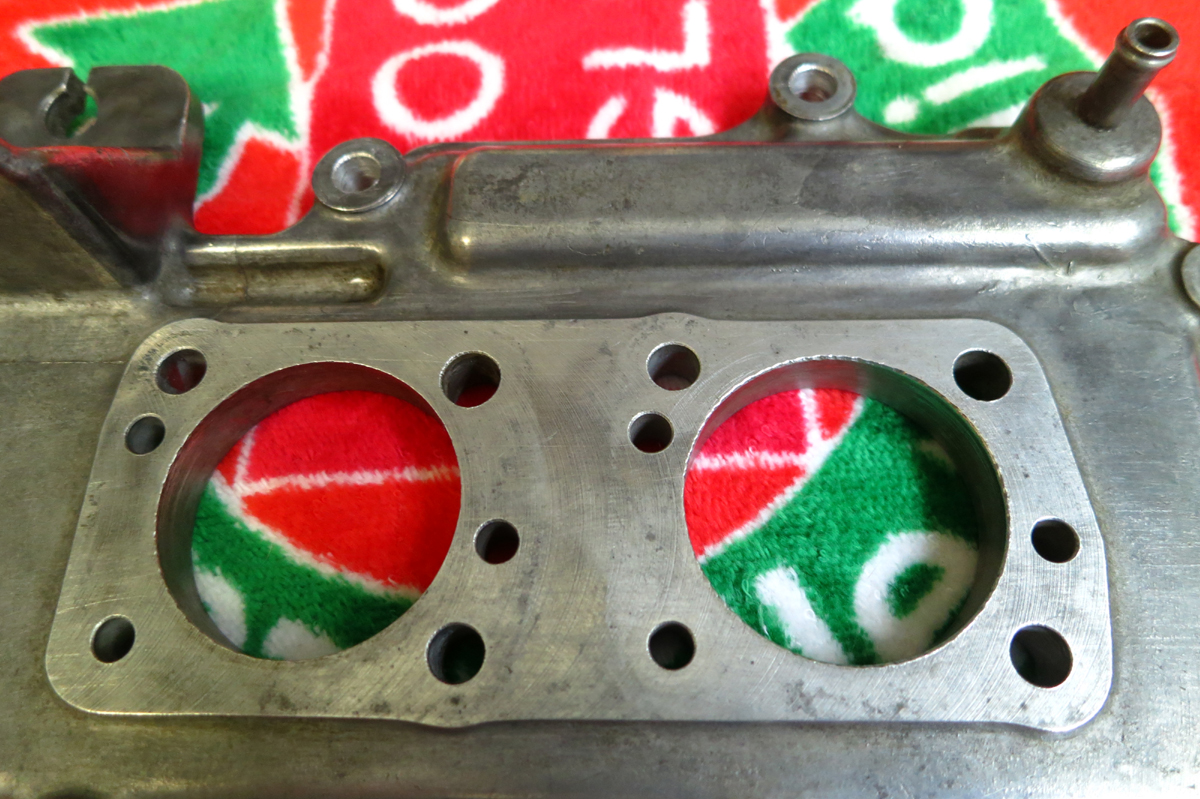
I've always used tea-towels, or onsen-towels as guard protectors, and a friend suggested I should use the real thing. Wow, what a difference! I bought a small guard protector, and it is kind of like when I first used a wheeled creeper. Amazingly easy to handle tools, keep them from slipping, and protect car at the same. I've no idea how I went without one for so long. Not expensive either. Neko.
I've always used tea-towels, or onsen-towels as guard protectors, and a friend suggested I should use the real thing. Wow, what a difference! I bought a small guard protector, and it is kind of like when I first used a wheeled creeper. Amazingly easy to handle tools, keep them from slipping, and protect car at the same. I've no idea how I went without one for so long. Not expensive either. Neko.
05-04-2015, 05:32 PM
#281
Honda-Tech Member
Thread Starter
Yes! It was tremendous. Not straight line fast, but smooth, and very stable through corners. The roof, and electric rear window make a great open car combination. The six speed is great too... Quality is great too. Neko.
05-24-2015, 01:26 AM
#282
Honda-Tech Member
Thread Starter
Well, that was fun! Float valve stuck open, drained fuel tank into sump. It made a huge mess coming out, and with fuel pump on two or three venturi just leaked and leaked. So out come the carbs, and I've ordered a pile of needle & seat valves, O-rings, gaskets, and bits. Hopefully for a decent overhaul and fix. Pity as it was running sooo well...
I also finished installing the ETC card reader. I think anyway, as the fuel fumes had me a bit giddy by the end of the day...
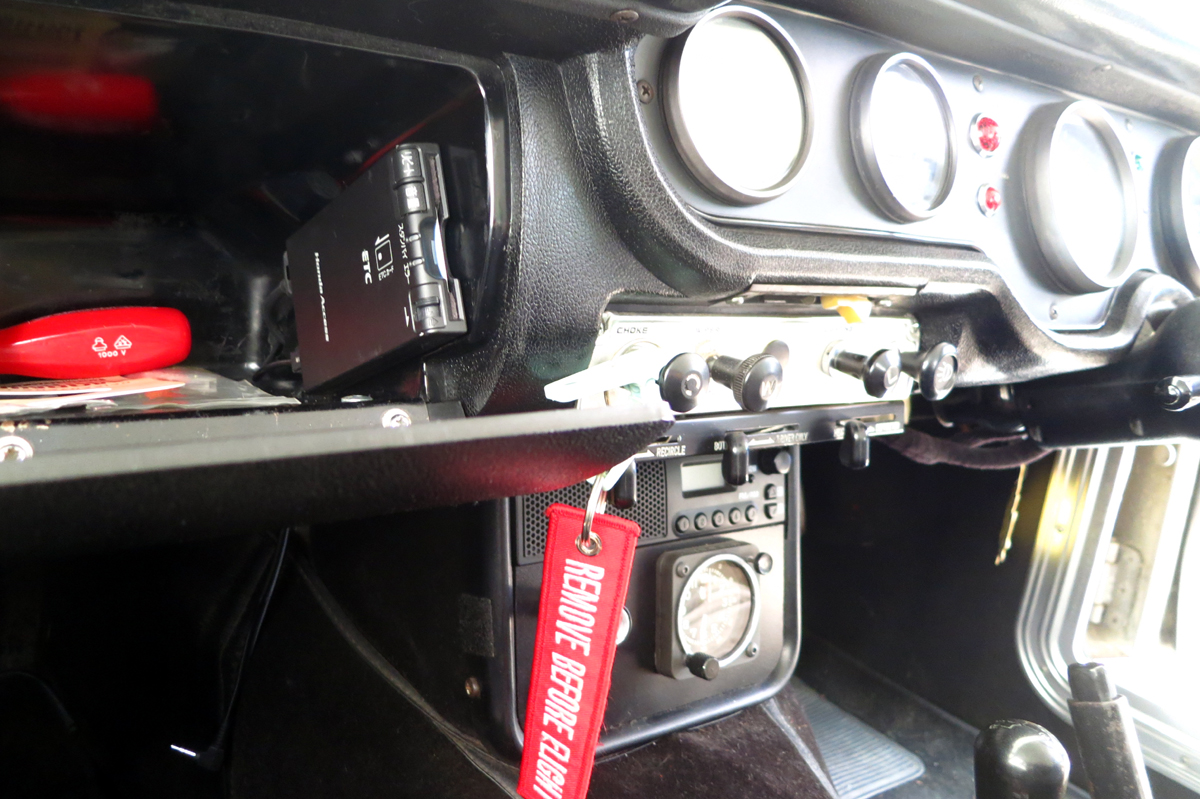
I also finished installing the ETC card reader. I think anyway, as the fuel fumes had me a bit giddy by the end of the day...
06-30-2015, 04:59 AM
#283
Honda-Tech Member

Join Date: Jun 2015
Posts: 11
Likes: 0
Received 0 Likes
on
0 Posts
What an amazing thread!
I have just bought an S 600 today. Needs a light restoration, but I have plenty of info here!
Cheers for that Neko
Lee in South Australia
I have just bought an S 600 today. Needs a light restoration, but I have plenty of info here!
Cheers for that Neko
Lee in South Australia
07-04-2015, 10:01 PM
#284
Honda-Tech Member
Thread Starter
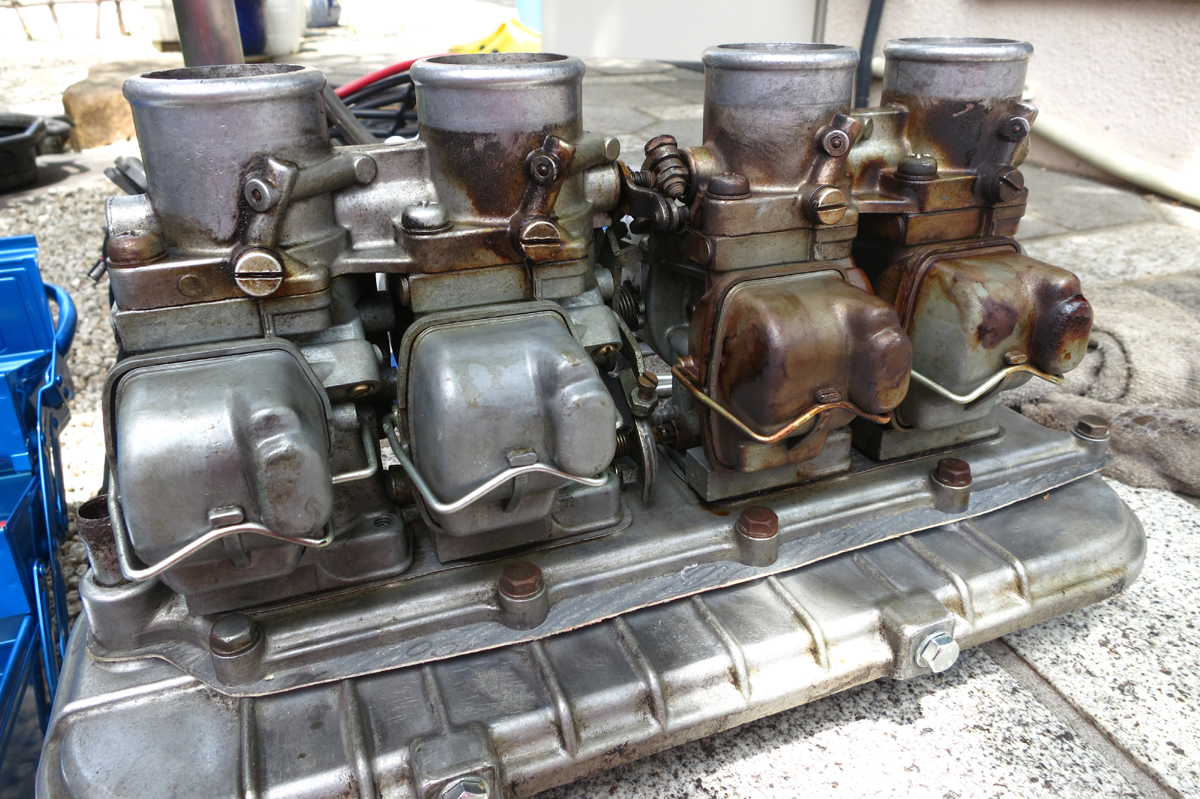
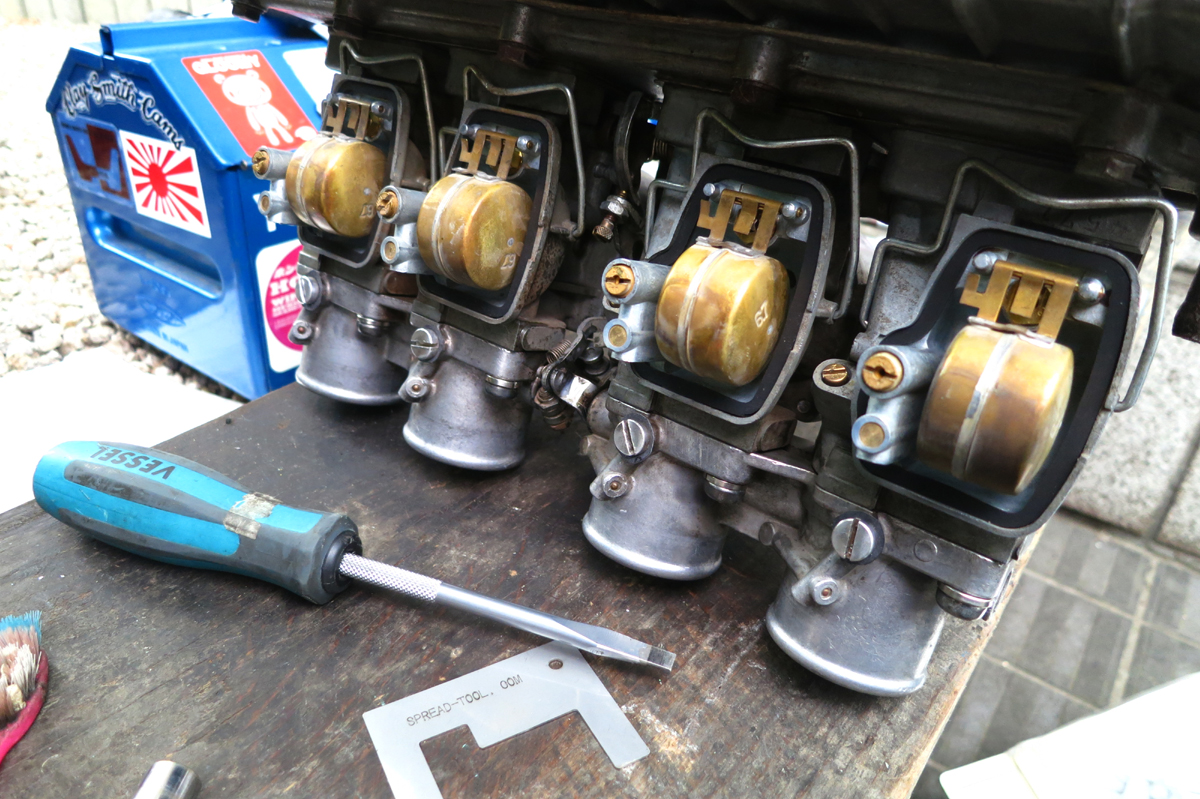
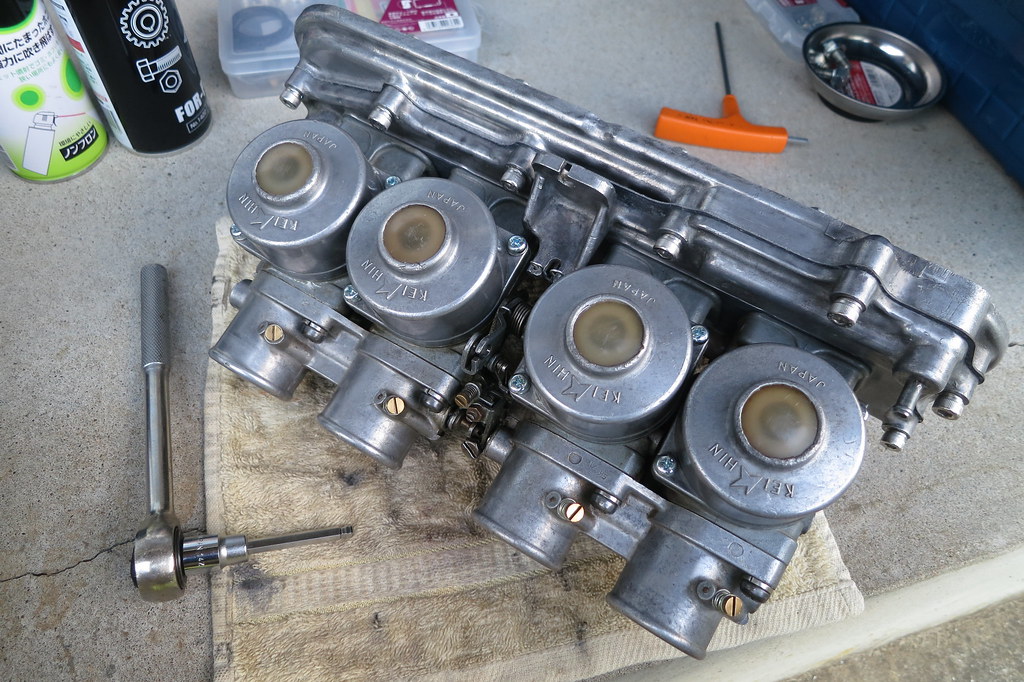
Carbs out:
Upside down and bowls opened to replace needle-and-seat (float) valves:
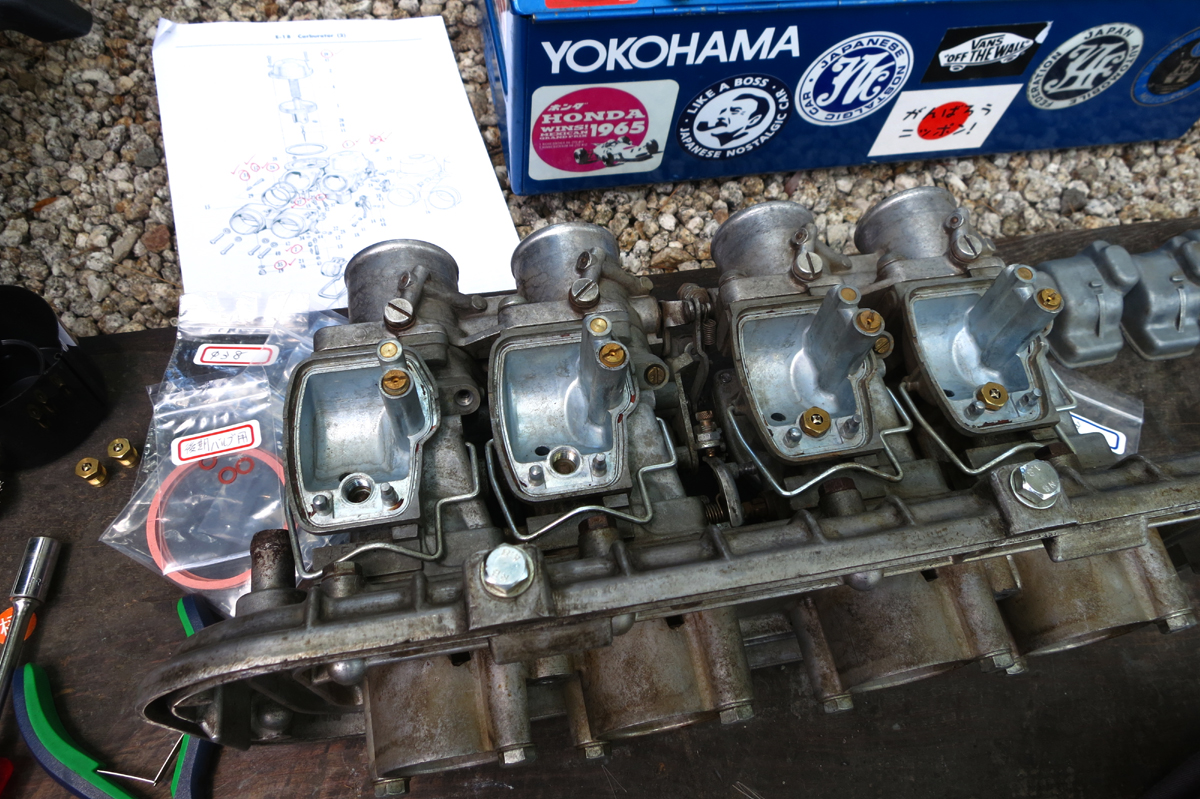
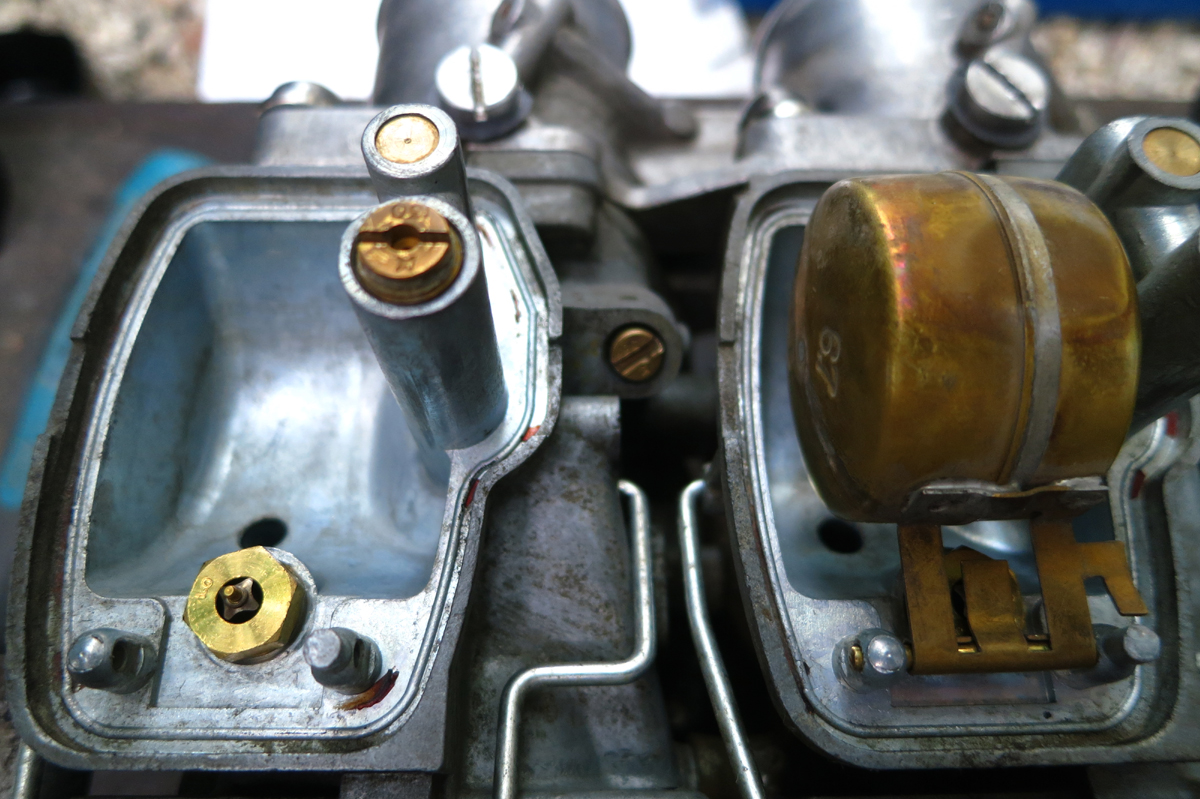
New float valves:
With carbs propped up to the appropriate 15 degree off vertical angle adjust float height with Spread Tools float gauge to just on 21mm:

All new float valves, seat gaskets, and cover gaskets installed:
New O-ring sets:
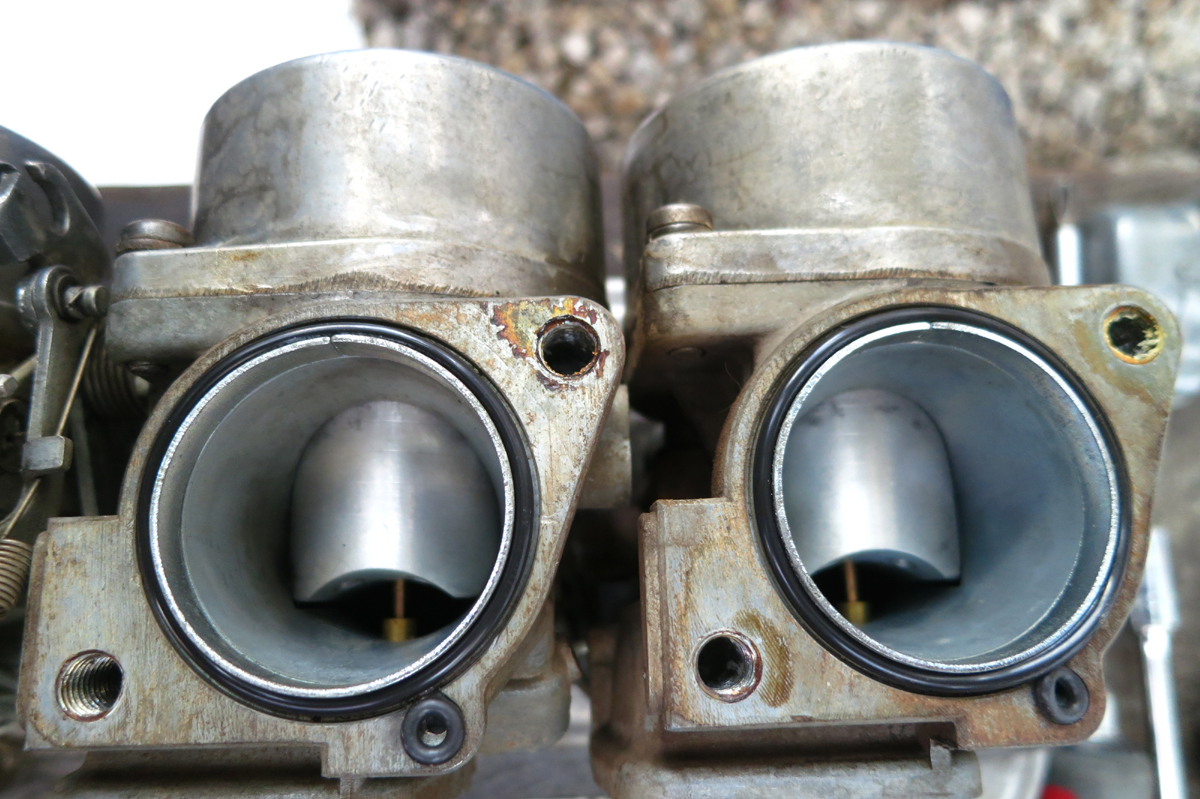
Flow-plate removed:
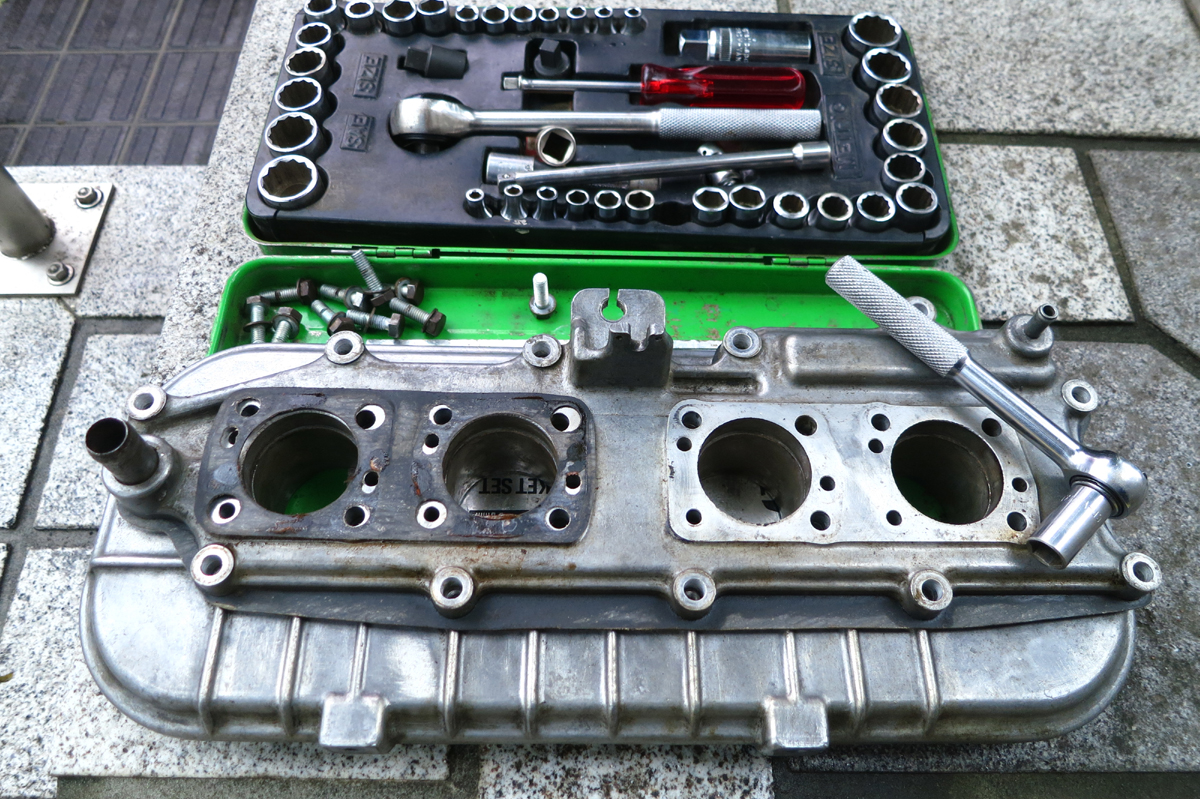
Input from fuel line top left, and input to One and Two as indents from main chamber. You can see gunk has settled on lower edge of flow channel, and bits floating about too:
I also installed all new fuel lines in engine compartment, from hard-line forward, and a fuel cut-off solenoid to avoid the Coupe problem of occasional flooding on engine-down hills, and the nasty possibility of cylinders full of un-compressible liquid fuel from a stuck valve. With the tank higher than the carbs, this happened to me once, and the cut-off solenoid from Ortmann will stop. Note **** on bottom of solenoid to over-ride electrics if needed:

I also reterminated my temp gauge sender wire too as it was a bit flaky:
Next, flow plate cleaning and new gaskets... Neko.
 07-04-2015, 11:27 PM
#286
Honda-Tech Member
Join Date: Jun 2015
Posts: 11
Likes: 0
Received 0 Likes
on
0 Posts
Cheers mate
I have it home now, and have been having a look around to see what needs doing to it.
As it has been sitting for so long, the motor is locked up, so I'm freeing that up with Penetrol and see if that works. If not, i may pull it out and start to pull it apart.
will have a look at the other site too
I have it home now, and have been having a look around to see what needs doing to it.
As it has been sitting for so long, the motor is locked up, so I'm freeing that up with Penetrol and see if that works. If not, i may pull it out and start to pull it apart.
will have a look at the other site too
07-05-2015, 02:26 AM
#287
Honda-Tech Member
Thread Starter
Cheers mate
I have it home now, and have been having a look around to see what needs doing to it.
As it has been sitting for so long, the motor is locked up, so I'm freeing that up with Penetrol and see if that works. If not, i may pull it out and start to pull it apart.
will have a look at the other site too
I have it home now, and have been having a look around to see what needs doing to it.
As it has been sitting for so long, the motor is locked up, so I'm freeing that up with Penetrol and see if that works. If not, i may pull it out and start to pull it apart.
will have a look at the other site too
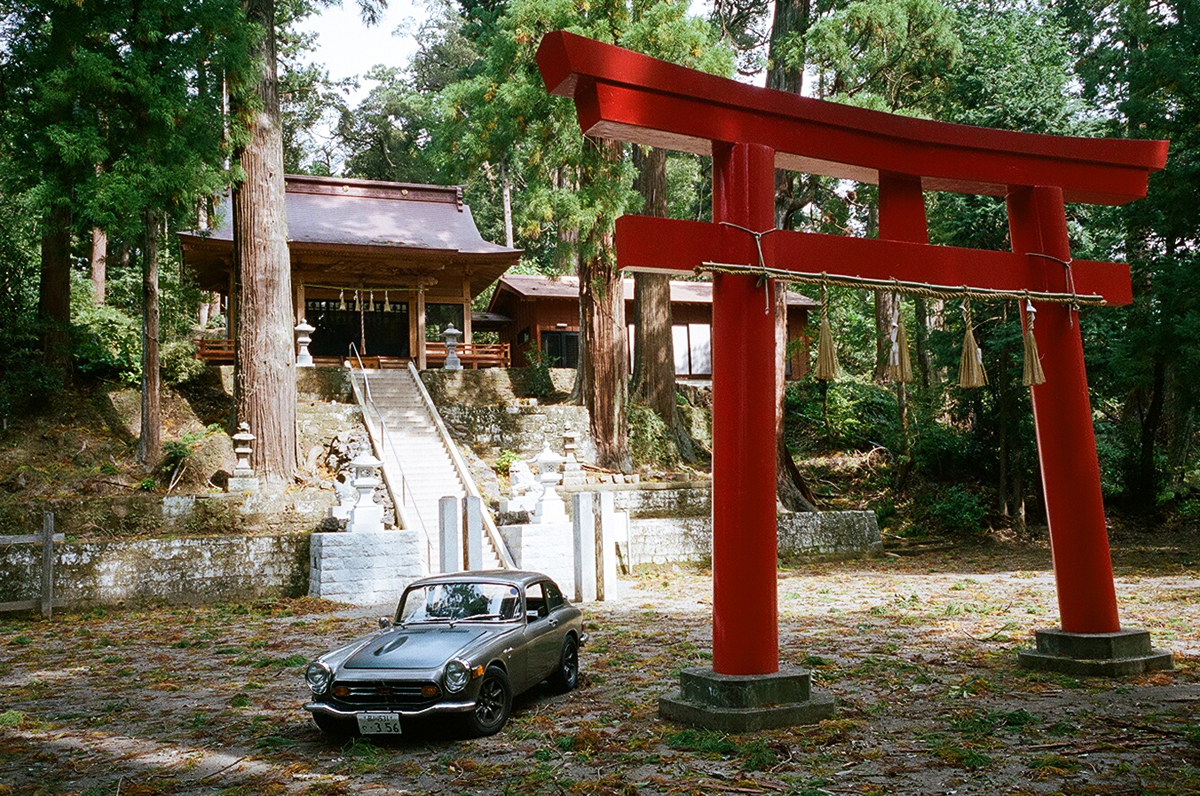
Some idle pics from my local area:

Down to a local lake for a picnique:

Warming up for a blast around my local touge:
See ya! Neko.
Last edited by Kuroneko; 07-05-2015 at 02:45 AM.
07-05-2015, 03:38 PM
#288
Honda-Tech Member
Thread Starter
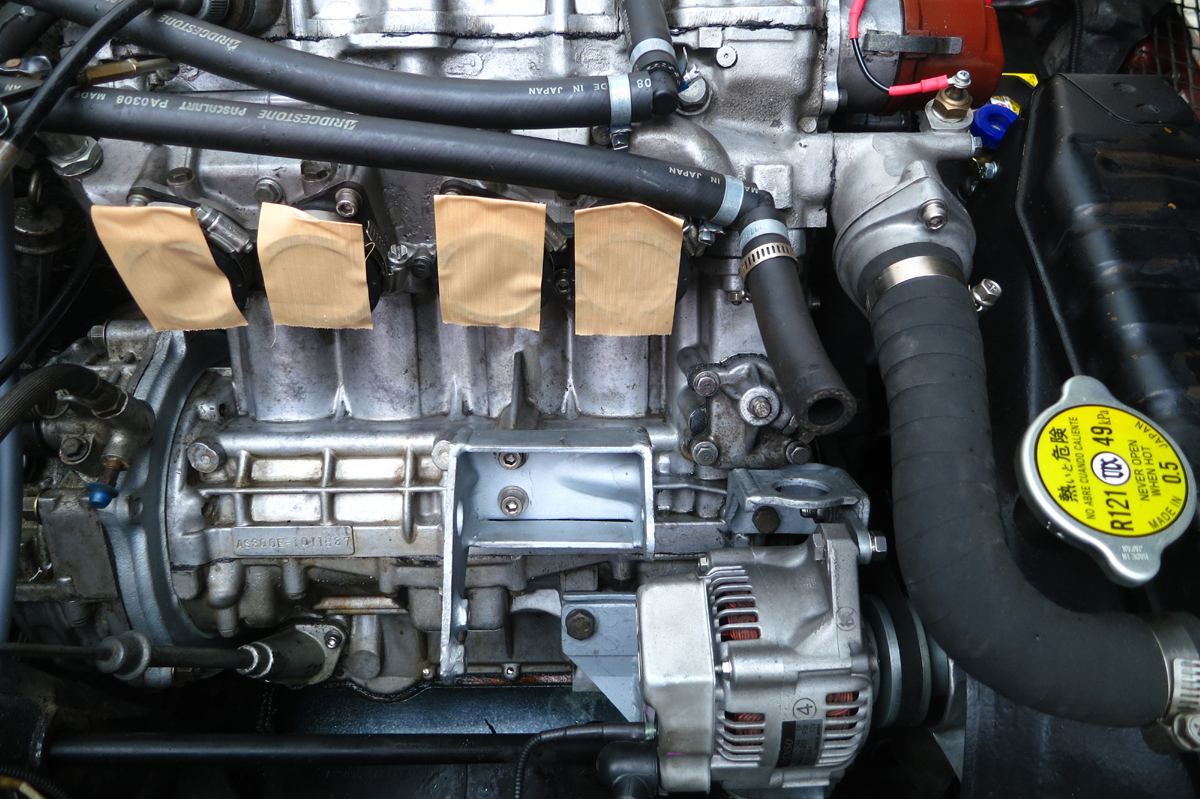
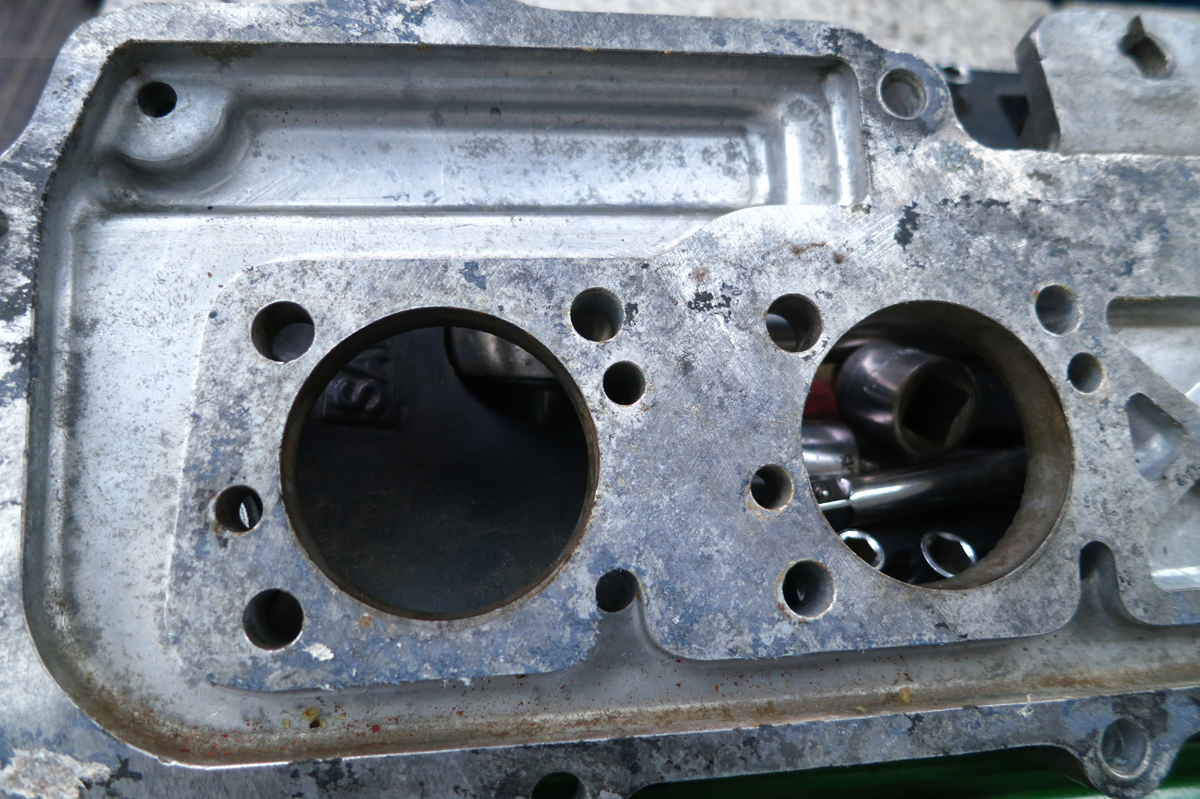
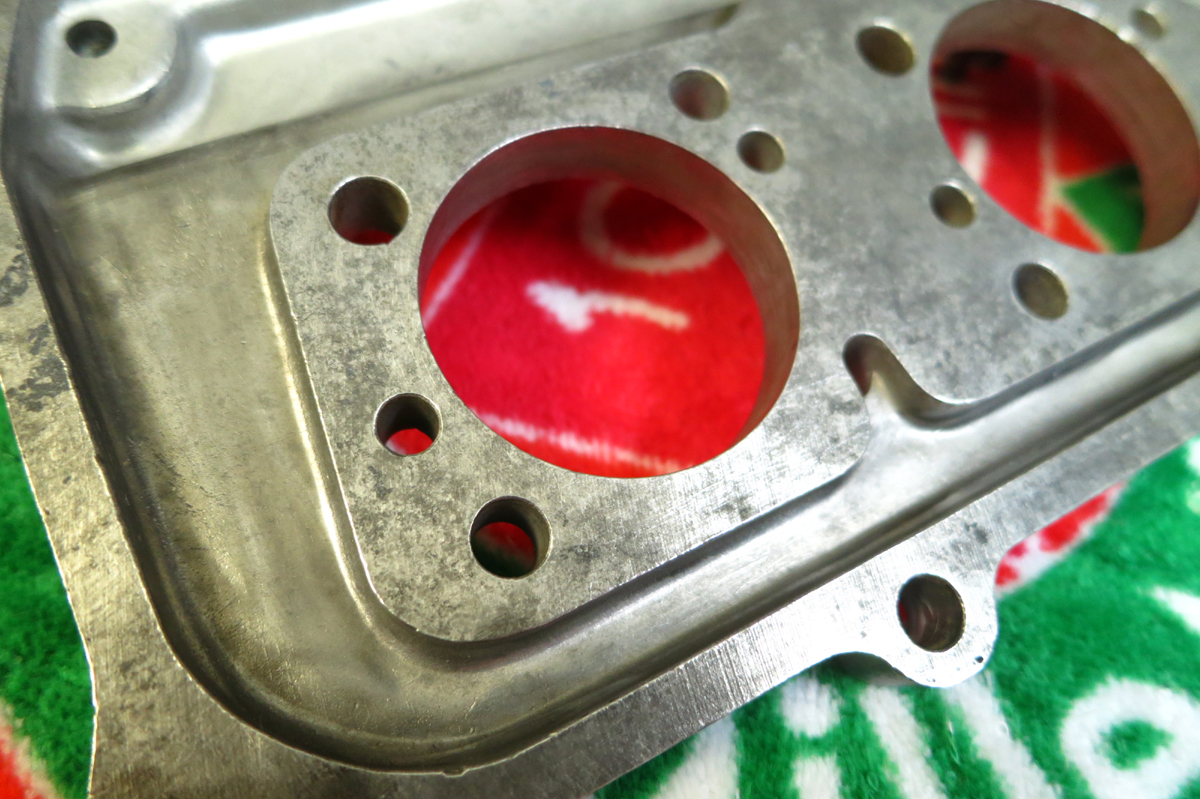
Inside work overnight... Cleaning fuel plate and carb mount flange. Or whatever they're called. Thinking about the convoluted path the fuel takes before it is ingested, it occurred to me on the outer edge of the machined aluminum plate the fuel was likely either cooled or remains cool before making its way into carbs... Light Dremmel work:
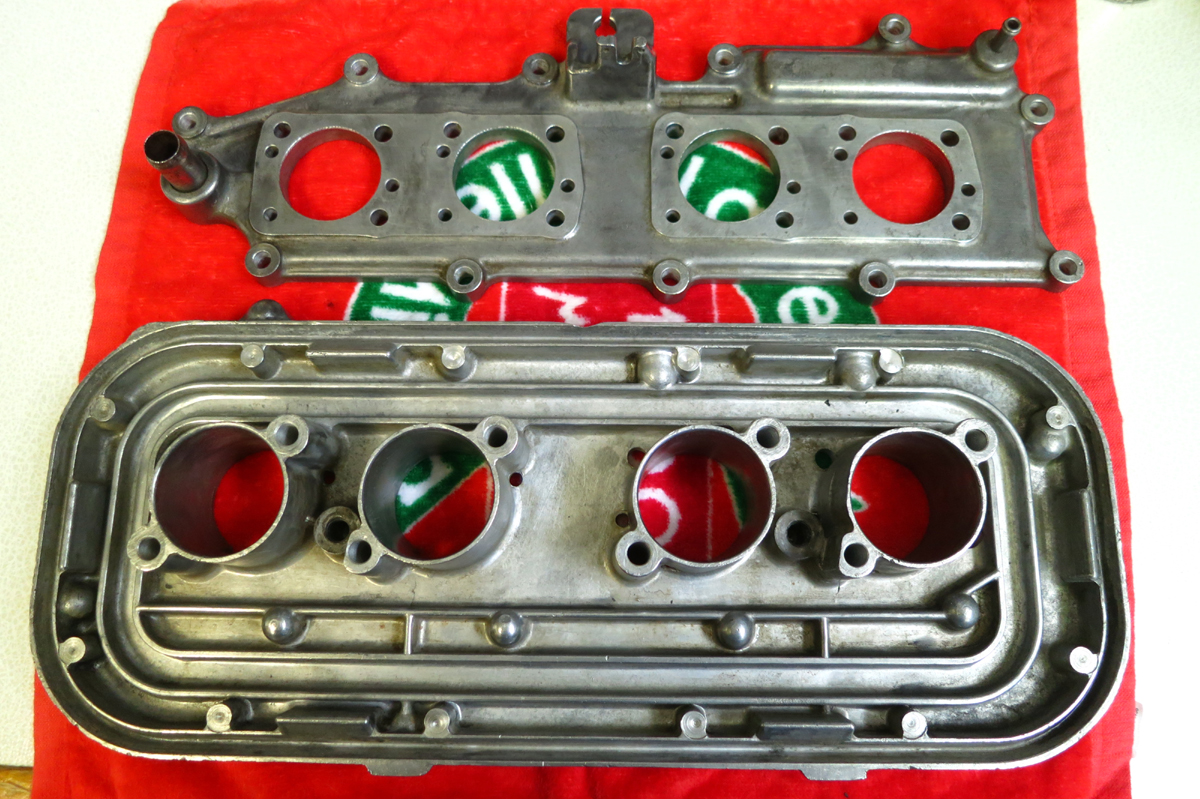
Fuel path now clean, smooth, and shiny:
Carb mount flange, with new gaskets on order from Spread Tools:
Next, reassembly and attempted adjustments. Though, my exhaust taco now has a few holes and for proper adjustments they should of course be fixed first. Neko.
Fuel path now clean, smooth, and shiny:
Carb mount flange, with new gaskets on order from Spread Tools:
Next, reassembly and attempted adjustments. Though, my exhaust taco now has a few holes and for proper adjustments they should of course be fixed first. Neko.
07-07-2015, 05:36 AM
#289
Honda-Tech Member
Thread Starter
Arrgghh... I ordered the wrong gasket, and now have to wait for a new one to arrive. No carbs. No driving. Just old photographs to look at...
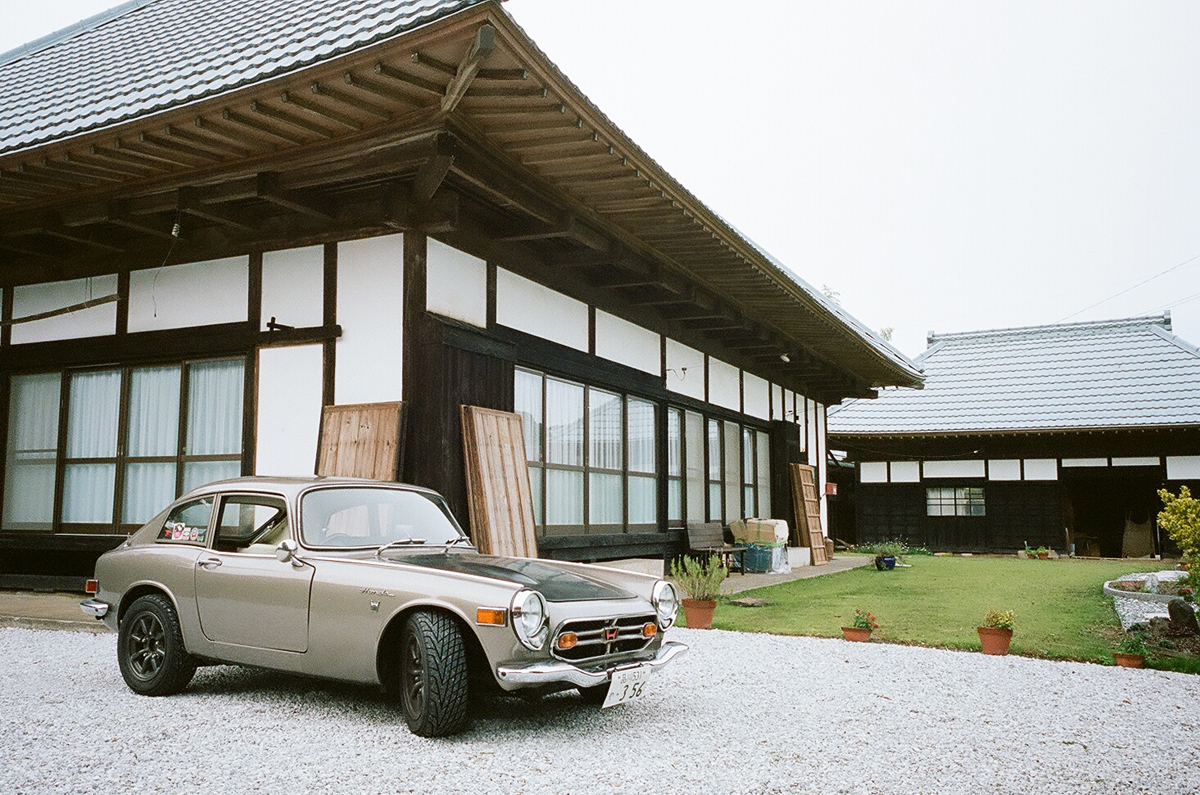
Our kura (store house) that needs reforming, and I've got permission to turn it into a garage. While a good idea for an S800, not much else would fit. So likely to just remain as storage...

Dropping the film off for development, and obviously adjusting the new headlights from last year:

Our kura (store house) that needs reforming, and I've got permission to turn it into a garage. While a good idea for an S800, not much else would fit. So likely to just remain as storage...
Dropping the film off for development, and obviously adjusting the new headlights from last year:
07-08-2015, 10:04 AM
#290
Honda-Tech Member

Join Date: Jan 2012
Location: Concord, TN.
Posts: 117
Likes: 0
Received 0 Likes
on
0 Posts
Arrgghh... I ordered the wrong gasket, and now have to wait for a new one to arrive. No carbs. No driving. Just old photographs to look at...
Our kura (store house) that needs reforming, and I've got permission to turn it into a garage. While a good idea for an S800, not much else would fit. So likely to just remain as storage...
Dropping the film off for development, and obviously adjusting the new headlights from last year:
Our kura (store house) that needs reforming, and I've got permission to turn it into a garage. While a good idea for an S800, not much else would fit. So likely to just remain as storage...
Dropping the film off for development, and obviously adjusting the new headlights from last year:
Loving the car and scenery photo's.
 07-12-2015, 04:41 AM
#291
Honda-Tech Member
Thread Starter

 07-16-2015, 02:37 AM
#292
Honda-Tech Member
Thread Starter
Carbs installed, cabled, and ready for a warm-up and adjustment. One of the problems in Tokyo though is the proximity of neighbors. While they tolerate my 06:00 starts, and late night runs to Daikoku etc, tuning in my driveway generally brings out some polite comments, 'gee, your car really is loud', 'is that oil I can smell', and the most recent, 'I wondered if there was a new garage nearby...' All polite code for 'STOP THAT NOISE AND SMELL'.
Luckily, there's a big university car park not far way, so I will take it over there hopefully being able to tweak my mixtures... Neko.


 07-19-2015, 07:03 AM
#294
Honda-Tech Member
Thread Starter
07-28-2015, 12:31 AM
#296
Honda-Tech Member
Thread Starter
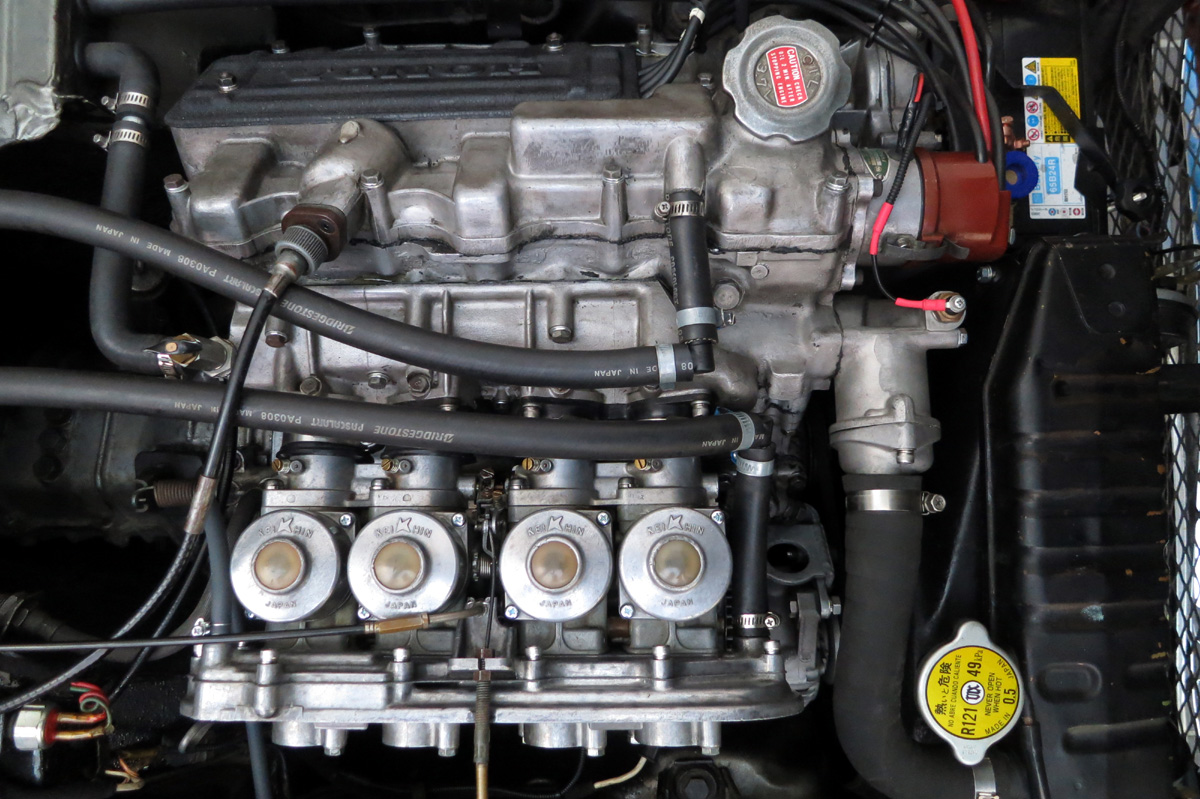
Thanks! Bigger versions possibly available on Fickle under Tokyo Scooter Stuff. I got the carbs on with new mounts today. Removed the oil-catch tank, and adjusted with the help of a good friend. 35C and she started perfectly, warmed up nicely, and stayed rock-steady at 90C even stuck in the hot Tokio traffic. I did get a few chances to rev it out though:
See ya! Neko.
See ya! Neko.
07-31-2015, 06:06 PM
#297
Honda-Tech Member
Thread Starter
Out testing my carb overhaul work this weekend in Shimokitazwa... Running really well! Sounds great without any air-cleaner. I might leave it that way.
08-03-2015, 01:50 PM
#298
Honda-Tech Member

Join Date: Apr 2014
Posts: 7
Likes: 0
Received 0 Likes
on
0 Posts

My S was Original delevered in GB in pb31 it was from the 80' racing green. I saw your black hood and the made up my mind; its goneby pb31 with a touch of ralley black.

The rear also got a touch of black.
08-04-2015, 07:29 AM
#299
Honda-Tech Member
Thread Starter
Great looking S! I can see a few roundels on mine as well now... Neat.
Though, mine is more a streetable machine, and not for the track. Yours is raced perhaps? Neko.
Though, mine is more a streetable machine, and not for the track. Yours is raced perhaps? Neko.
08-09-2015, 12:59 AM
#300
Honda-Tech Member
Thread Starter
Trap for new players...
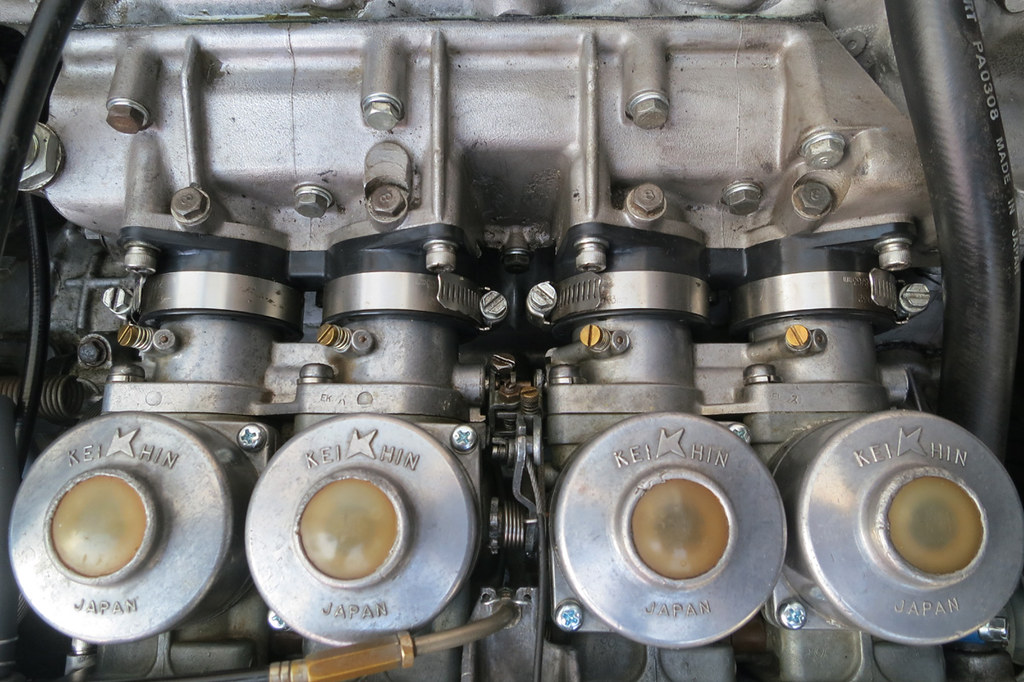
When I replaced the Keihin mounts two years ago, I also installed some fat stainless hose clamps to seal. I also did them up tight. The fat clamps though bore down on the rubber seal unevenly over their width - tight over the flange on the carb venturi, and loose over the carb sleeve. As a result, the carb mounts slowly failed (black rubber bits x4 above)...
So, a skinnier hose clamp - similar in size to the OEM screw clamp - was sourced and installed. Fat and skinny above and below on side view diagram.
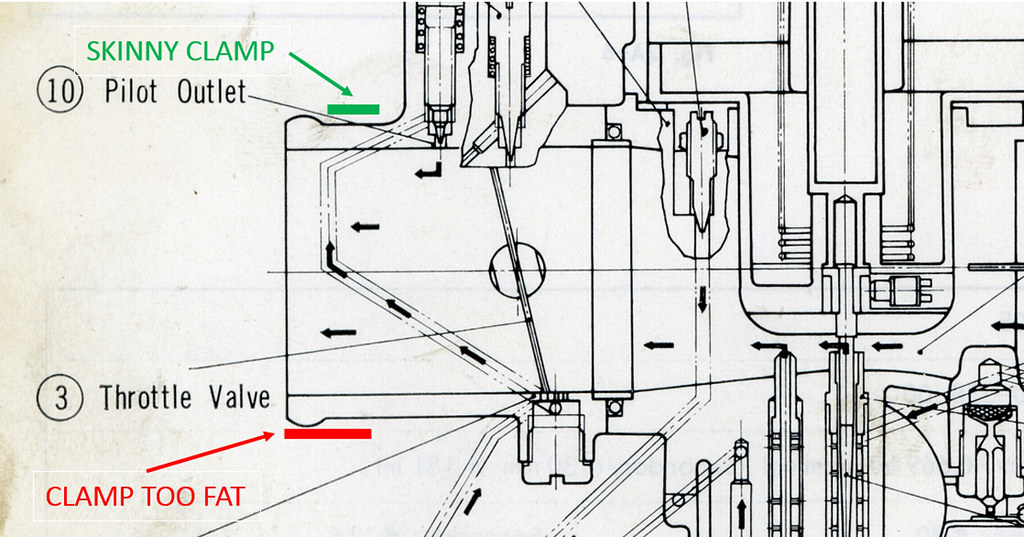
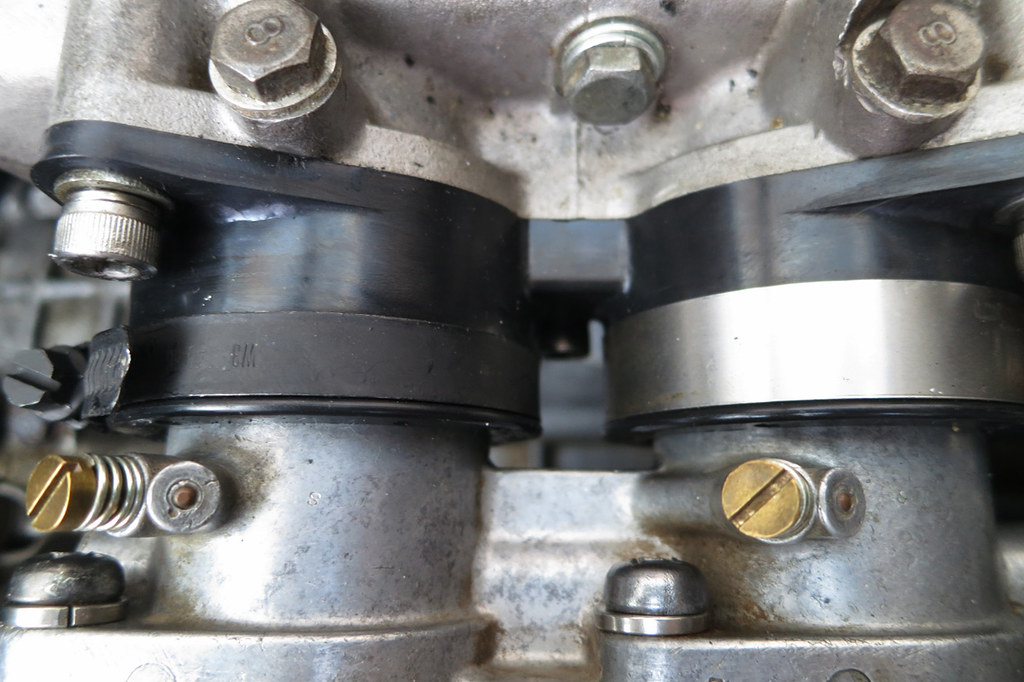
The skinny clamp now only bears down on the venturi sleeve, and not the flange. Like the OEM clamp it too only loosely secures the carb mount, and does not need to be over-tightened, merely snug. Hopefully with new mounts replacing the ones I cracked, the skinny hose clamps (kakoii in street-cred black), and the looser effort in tightening, they will last longer.
In adjusting the carbs my biggest problem was getting 1 & 2 to draw air the same as 3 & 4 at idle. Long story involving flow meters and idle jets, but the problem was simply the spring-loaded lock nut Pair Sync Screw between the sets - 1 & 2 were not uncovering idle port when closed and 3 & 4 were uncovered and drew fuel / air just fine. You're never going to sync like that.
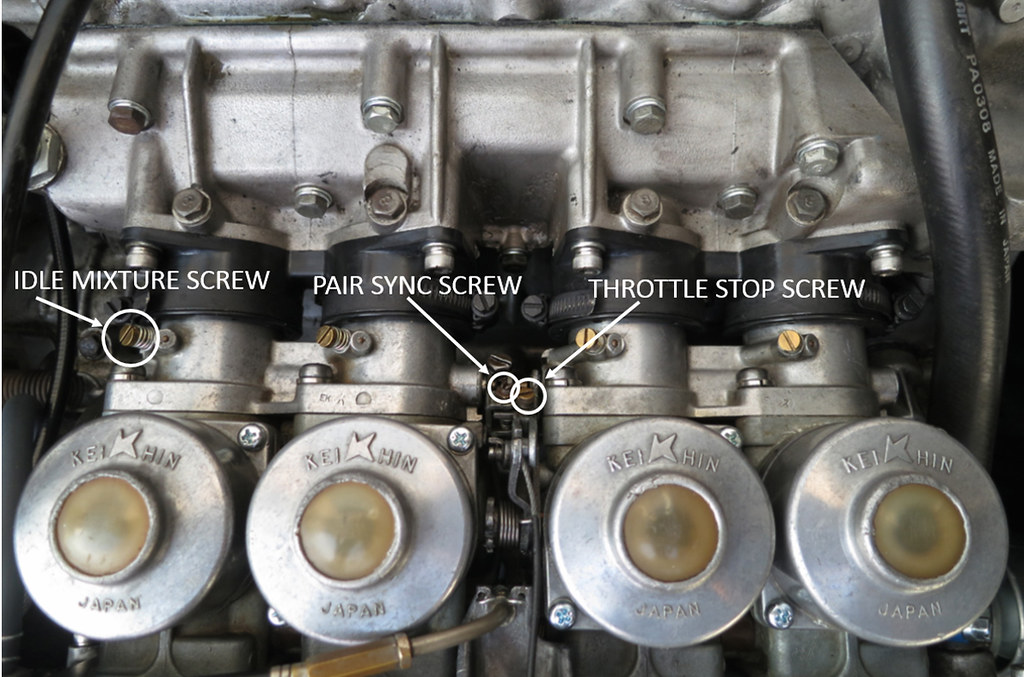
Remove carbs, set visually (something I did not do before installing after rebuild). Adjust Throttle Stop Screw (for idle speed) up a bit, then tweak all four Idle Mixture Screws for max flow on each venturi, then back off Throttle Stop Screw to slow the idle to just over 1000rpm. Ensuring the Pair Sync Screw setting keeps each set drawing the same volume as the idle slows down - not recovering idle flow ports with throttle valve again...
The factory manual says the Idle Mixture Screw should be around 1 1/8 open from closed for max idle air flow sweet spot, and mine are exactly this. Note too 'closed' is when the Idle Mixture Screw is tightened slightly with a little resistance, and not done up tight like a conventional screw or bolt. The screw is soft brass and the tip will deform or bend if done up too tight.
Though I can get the idle to around 1000 with no issues, at night with the HD alternator and lights and wipers on, the idle slows even further with the load (lucky no AC), so a higher day time idle speed of 1500 or so avoids the need to tickle the throttle at the lights at night. Neko.
When I replaced the Keihin mounts two years ago, I also installed some fat stainless hose clamps to seal. I also did them up tight. The fat clamps though bore down on the rubber seal unevenly over their width - tight over the flange on the carb venturi, and loose over the carb sleeve. As a result, the carb mounts slowly failed (black rubber bits x4 above)...
So, a skinnier hose clamp - similar in size to the OEM screw clamp - was sourced and installed. Fat and skinny above and below on side view diagram.
The skinny clamp now only bears down on the venturi sleeve, and not the flange. Like the OEM clamp it too only loosely secures the carb mount, and does not need to be over-tightened, merely snug. Hopefully with new mounts replacing the ones I cracked, the skinny hose clamps (kakoii in street-cred black), and the looser effort in tightening, they will last longer.
In adjusting the carbs my biggest problem was getting 1 & 2 to draw air the same as 3 & 4 at idle. Long story involving flow meters and idle jets, but the problem was simply the spring-loaded lock nut Pair Sync Screw between the sets - 1 & 2 were not uncovering idle port when closed and 3 & 4 were uncovered and drew fuel / air just fine. You're never going to sync like that.
Remove carbs, set visually (something I did not do before installing after rebuild). Adjust Throttle Stop Screw (for idle speed) up a bit, then tweak all four Idle Mixture Screws for max flow on each venturi, then back off Throttle Stop Screw to slow the idle to just over 1000rpm. Ensuring the Pair Sync Screw setting keeps each set drawing the same volume as the idle slows down - not recovering idle flow ports with throttle valve again...
The factory manual says the Idle Mixture Screw should be around 1 1/8 open from closed for max idle air flow sweet spot, and mine are exactly this. Note too 'closed' is when the Idle Mixture Screw is tightened slightly with a little resistance, and not done up tight like a conventional screw or bolt. The screw is soft brass and the tip will deform or bend if done up too tight.
Though I can get the idle to around 1000 with no issues, at night with the HD alternator and lights and wipers on, the idle slows even further with the load (lucky no AC), so a higher day time idle speed of 1500 or so avoids the need to tickle the throttle at the lights at night. Neko.
Last edited by Kuroneko; 08-10-2015 at 04:45 PM. Reason: Added diagrams.