
Round 3: Aztec Green Pearl EJ2 Coupe -94! OEM Goodies

 12-09-2014, 05:00 PM
#102
Honda-Tech Member
Join Date: Nov 2005
Location: Albuquerque, NM, USA
Posts: 202
Likes: 0
Received 0 Likes
on
0 Posts
I love this build! You're paying a lot of good, careful attention to lots of cool modifications and repairs, things that people typically neglect. Awesome work!
12-10-2014, 01:46 AM
#103
Honda-Tech Member
Thread Starter

Thanks a lot for all the nice words! 
Next bigger thing i need to buy is sandblasting cabinet. And i just might try my luck with Eastwood Powder Coating System. Does someone have any experience with that particular system? There is so many parts and brackets that need blasting and coating and i pretty much live in the middle of nowhere, so im forced to do all things by myself.
Here is couple of new pictures about the work of getting rid of the rust. Im trying my best to do it correctly, which involves of replacing any heavy corroded spots with new sheet metal, mildly corroded parts get sandblasting + chemical removal of rust and all the new welds are going to be protected with Volvo:s welding primer (Zing based i think) and 3M product that does the same thing. No exposed welds here.
Okay, so here we go again. I analyzed the historical sediment layers i found from the sills and checked out the history of the car. Undersealing has been done in 2005 in some undersealing shop. After that, the car has seen lots of sand roads and salty winters. Then the previous owners saw that sills are getting rusty, so they emptied a lot of undersealing wax cans to the sills. Straight over all the **** and debris...
Cursing begins. You cant believe how much **** came out of that 44cm length of the sill! Even 4cm layer of sand, rust, underseal in the whole 44cm length.

Trailing arm removal:

Then i opened it up a little:

More detailed inspection:

20cm area of the sill emptied (still 24cm to go):

Ventilation works:

I wanted to be absolutely sure about all the areas what could be corroded, so i needed to remove the jacking point. 6 spot welds:


... In that moment i needed a war plan. I�m not able to translate that to you right now (too little time for that, sorry). But to make it short, i need to change many layers of metal, in the correct order, so i can still paint them.
20cm off:

Not so pretty to watch:

So, i need to remove this part, so i can get to the next layer:


I need to remove the side sills lower part from the back to the first "wall". After that its rust free all the way to the front of the car:


New side sills lower part for the 44cm length:

And new side sills "side part" for the 54cm:


More rust:


After removing that piece, i cleaned up the healthy area completely with wire wheel and Bilt Hamber deox gel to get rid of any surface rust. Immeditially after that i covered the area with 3M MIG/Spot weld primer to prevent any surface rust forming:


RTA-mounting point cover needs to be made from the scratch. I�ll be using 1,2mm sheet metal.


First pics taken from the 5 lug swap. Basic "UK spec" rust :D :

After first treatment of Bilt Hamber Deox C, still needs thread cleaning and another Deox C round:

I only bought the rear hubs like pictured to save some shipping costs (+ wheel bearing/spindle/ABS-sensors ofc). I�ll be using the existing RTA:s, cleaned, coated and bushes replaced with HardRace ones.
Next bigger thing i need to buy is sandblasting cabinet. And i just might try my luck with Eastwood Powder Coating System. Does someone have any experience with that particular system? There is so many parts and brackets that need blasting and coating and i pretty much live in the middle of nowhere, so im forced to do all things by myself.
Here is couple of new pictures about the work of getting rid of the rust. Im trying my best to do it correctly, which involves of replacing any heavy corroded spots with new sheet metal, mildly corroded parts get sandblasting + chemical removal of rust and all the new welds are going to be protected with Volvo:s welding primer (Zing based i think) and 3M product that does the same thing. No exposed welds here.
Okay, so here we go again. I analyzed the historical sediment layers i found from the sills and checked out the history of the car. Undersealing has been done in 2005 in some undersealing shop. After that, the car has seen lots of sand roads and salty winters. Then the previous owners saw that sills are getting rusty, so they emptied a lot of undersealing wax cans to the sills. Straight over all the **** and debris...
Cursing begins. You cant believe how much **** came out of that 44cm length of the sill! Even 4cm layer of sand, rust, underseal in the whole 44cm length.
Trailing arm removal:
Then i opened it up a little:
More detailed inspection:
20cm area of the sill emptied (still 24cm to go):
Ventilation works:
I wanted to be absolutely sure about all the areas what could be corroded, so i needed to remove the jacking point. 6 spot welds:
... In that moment i needed a war plan. I�m not able to translate that to you right now (too little time for that, sorry). But to make it short, i need to change many layers of metal, in the correct order, so i can still paint them.
20cm off:
Not so pretty to watch:
So, i need to remove this part, so i can get to the next layer:
I need to remove the side sills lower part from the back to the first "wall". After that its rust free all the way to the front of the car:
New side sills lower part for the 44cm length:
And new side sills "side part" for the 54cm:
More rust:
After removing that piece, i cleaned up the healthy area completely with wire wheel and Bilt Hamber deox gel to get rid of any surface rust. Immeditially after that i covered the area with 3M MIG/Spot weld primer to prevent any surface rust forming:
RTA-mounting point cover needs to be made from the scratch. I�ll be using 1,2mm sheet metal.
First pics taken from the 5 lug swap. Basic "UK spec" rust :D :
After first treatment of Bilt Hamber Deox C, still needs thread cleaning and another Deox C round:
I only bought the rear hubs like pictured to save some shipping costs (+ wheel bearing/spindle/ABS-sensors ofc). I�ll be using the existing RTA:s, cleaned, coated and bushes replaced with HardRace ones.
Last edited by HiTec; 12-10-2014 at 04:10 AM.
12-11-2014, 08:31 AM
#104

This is very inspiring. I'm a up and coming mechanic who just joined this forum because i just recently picked up the same exact model civic a 93 ej2 coupe aztec green except mine is a DX. Without all the power options or sunroof unfortunately. Basically i want to be a man who can do everything your doing. I want to know everything about cars. Right now i'm trying to get my ASE and im trying to learn electronics which is more challenging for me than mechanical. What did you do to learn so much about wiring?
12-13-2014, 07:00 PM
#105
Honda-Tech Member
Beautiful work! As everyone else has mentioned, your attention to detail is amazing. You do things the right way the first time, which so many people just don't seem to get.
I look forward to more updates!
I look forward to more updates!
12-14-2014, 04:43 AM
#106
Honda-Tech Member
Thread Starter
Thanks again guys! I could tell a really long story about how i get involved to electronics, but i think one picture of my childhood tells it all :D :

I�ve always been interested about electricity and cars, so im pretty much self learned everything i know today. Sure, i studied to be electronic engineer, but that school was huge disappointment and didnt give me as much that i was hoping for. jovy, just start from the basics and be careful not to bite too big piece at the time with your project as its really easy to get tired with too many things going on simultaneously, good luck!
As for the project, i think that the old proverb describes it right. If its worth doing, its worth of doing well. I dont like to do same thing twice because of stupidity or laziness.
Yesterday i continued with the RTA point. I made the first 90 degree bend in vice and also noticed that the original part has 2 additional bends. I wanted the new part to look as much OEM as possible, so i needed to do those bends too. Came out pretty good:

Piecing it together:


Small detail:


Then the first test with new Kemppi Minarcmig Evo 170 welding machine. Couldnt be more happier with it! I think that now is the time to learn something new about welding as this machine works really logically when compared to previously machines which "electronics" were from the time where Soviet Union still existed and which wire feeding system had feeded countles of kilometres of wire and worn up baddly:

Next piece:


Testing:


So hard part to fabricate because of non-symmertric rounded shape. But i want it to look OEM, so i need to use some hours to it. I dont want just weld some square box to the car and call it a day. The rust you see in the part thats still attached to the car is going to be removed. I just need to do all these things in correct order, as said earlier.
I�ve always been interested about electricity and cars, so im pretty much self learned everything i know today. Sure, i studied to be electronic engineer, but that school was huge disappointment and didnt give me as much that i was hoping for. jovy, just start from the basics and be careful not to bite too big piece at the time with your project as its really easy to get tired with too many things going on simultaneously, good luck!
As for the project, i think that the old proverb describes it right. If its worth doing, its worth of doing well. I dont like to do same thing twice because of stupidity or laziness.
Yesterday i continued with the RTA point. I made the first 90 degree bend in vice and also noticed that the original part has 2 additional bends. I wanted the new part to look as much OEM as possible, so i needed to do those bends too. Came out pretty good:
Piecing it together:
Small detail:
Then the first test with new Kemppi Minarcmig Evo 170 welding machine. Couldnt be more happier with it! I think that now is the time to learn something new about welding as this machine works really logically when compared to previously machines which "electronics" were from the time where Soviet Union still existed and which wire feeding system had feeded countles of kilometres of wire and worn up baddly:
Next piece:
Testing:
So hard part to fabricate because of non-symmertric rounded shape. But i want it to look OEM, so i need to use some hours to it. I dont want just weld some square box to the car and call it a day. The rust you see in the part thats still attached to the car is going to be removed. I just need to do all these things in correct order, as said earlier.
12-14-2014, 02:22 PM
#107
Honda-Tech Member
its the most equipped EG ive never seen !
your work is absolutely motivating and interessting.
rust is common here too !!! it make life difficult, but it look like your gonna fix it the right way!
keep it up !
your work is absolutely motivating and interessting.
rust is common here too !!! it make life difficult, but it look like your gonna fix it the right way!
keep it up !
12-14-2014, 03:47 PM
#108
Honda-Tech Member
Wow great work on the rust repairs.
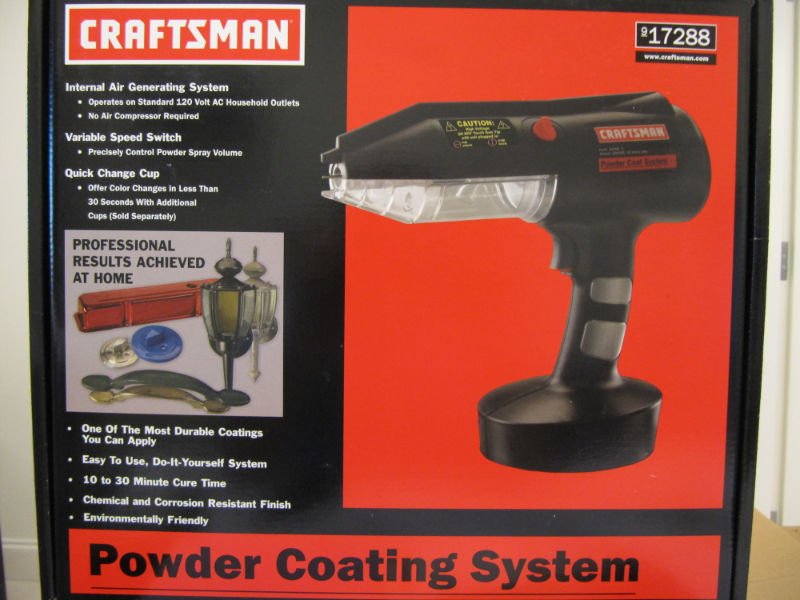
As far as powder coating, I use the craftsman kit for small jobs.
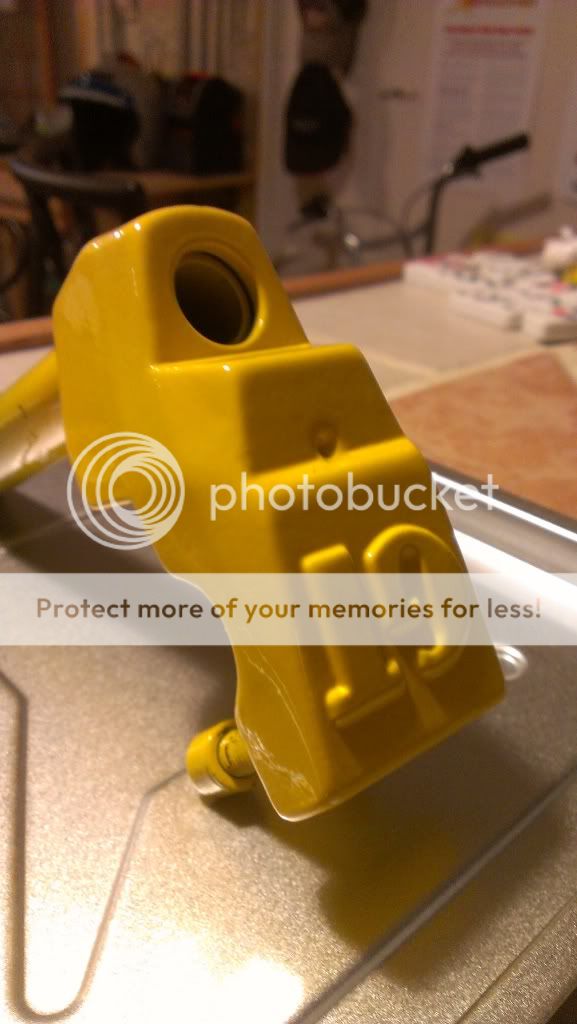
This one:
Here's an old school bike stem cooking and done.

For the actual powder, check out prismaticpowders.com. They usually have some deals and you can get some colors for super cheap.
As far as powder coating, I use the craftsman kit for small jobs.
This one:
Here's an old school bike stem cooking and done.
For the actual powder, check out prismaticpowders.com. They usually have some deals and you can get some colors for super cheap.
12-16-2014, 01:20 PM
#109
Honda-Tech Member
This thread needs to be moved to a new special "Next Level" section, along with the SHG DC5 build...
12-28-2014, 04:06 AM
#111
Honda-Tech Member
Thread Starter
Wow, i really appreciate all the feedback,nice words and tips you give! My english isnt good enough so i could accurately describe how i feel when someone levels my project with SHG:s awesome DC5 build, but its just amazing. And thanks for the tip joey1320!
I must say that im not trying to "compete" with anybody, i just want to do the best i can with pretty limited resources when compared to ex. sponsored or serious money builds. If somehow leveling things up with resources, im somewhere in the middle. I have a place for my car, but i dont have a car lifter (pillar lifter?), i have some basic tools but i dont have some expensive things that i would really to ease and speed things up. I dont have friends or other acquaintances that work ex. a powder coating or machining shop or something like that. I live in the small town as i said earlier. My money situation is what it is, i dont have job right now, or if we are accurate i�ve never had any "permanent" jobs. All the parts in any of my builds are paid only by me. I dont have any sponsors or "garage friends" that help with things. All the things that i do when im at the garage i do by myself (excluding impossible things when my dad, mom or bro is forced to keep something from dropping or spinning etc).
Im trying to buy all the expensive parts when i have a temporary employment, even if i dont need them right now. Then when im out of job, im saving up and buying some of the cheaper parts that i need. I really dont mean to this all to sound cheesy or whining or anything, thats not the case. I just want to clear some things up. My serious "dream", if i can say so, is someday in the future to move up to the USA with my fiancee and work in some kind of shop that works with cars, or then study and go to work with car company. To get a job in USA, from Finland is going to be a challenge. If I�ve understood correctly, you cant search a job when just a visiting USA (it illegal?). Somehow someone should hire me when i still live in Finland and then i could move to the states? Anyways, im just 24 years old and i hope to have plenty of time to achieve that goal.
But, as for the project wise, i have a small update. I�ve been thinking about the suspension/brakes/etc:
Fronts:
- Sandblasted and powder coated control arms
- HardRace bushings
- New bearings
- ABS wiring shield sandblasting/pc
- BuddyClub extended balljoints
- OEM length ARP wheel studs
- MTEC 300mm grooved brake discs
- New S2000 calipers, brackets and pads
- ITR Spec98 24mm swaybar
- OEM endlinks
- BC Racing BR-Series damper/height adjustable front struts and springs
- New bolts, other hardware etc etc.
Rear:
- Sandblasting/powder coating control arms/hubs
- HardRace RTA bushings
- OEM length ARP wheel studs
- MTEC 262mm grooved brake discs
- ITR Spec98 calipers, brackets and pads
- New e-brake cables
- Function7 LCA:s
- Skunk2 camber kit
- OEM toe arms with HardRace bushings
- (Genuine) ASR brace
- ASR 24mm swaybar
- Some endlinks (not spherical this time).
- BC Racing BR-Series damper/height adjustable rear struts and springs
- New bolts, other hardware etc etc.
I already own a lots of those listed parts, so it helps a lot.
Small update about the RTA mounting point:


Looks pretty good to me. Still needs to be finished, but it should look fully original when finished and welded up. All the shapes are 1:1 when compared to the original part

As you can see from the previous pic, i tried to acid of the rust from the vertical part. It has a lot of crates(?) so im going to change that parts also, so theres not going to be any rust. If i had a place/equipment to sandblast, that would also work because the rust is nowhere near to be through the metal.
Showing some phosphoric acid to the rust:

I also happened to find this awesome Honda Access part (i think it might be taken from the Prelude). I think its rare to find it with full, uncut harness:


Does anyone have any info, schematics, manuals etc about the Honda Access Dusk sensor that could help out with the install? Im going to install this one way or another, but any help would still be greatly appreciated
I found some info about this:
If theres no manuals or anything, i need to study Prelude headlight/cornerlight schematics so i can modify the sensor harness to work with the Civics electronics.
I must say that im not trying to "compete" with anybody, i just want to do the best i can with pretty limited resources when compared to ex. sponsored or serious money builds. If somehow leveling things up with resources, im somewhere in the middle. I have a place for my car, but i dont have a car lifter (pillar lifter?), i have some basic tools but i dont have some expensive things that i would really to ease and speed things up. I dont have friends or other acquaintances that work ex. a powder coating or machining shop or something like that. I live in the small town as i said earlier. My money situation is what it is, i dont have job right now, or if we are accurate i�ve never had any "permanent" jobs. All the parts in any of my builds are paid only by me. I dont have any sponsors or "garage friends" that help with things. All the things that i do when im at the garage i do by myself (excluding impossible things when my dad, mom or bro is forced to keep something from dropping or spinning etc).
Im trying to buy all the expensive parts when i have a temporary employment, even if i dont need them right now. Then when im out of job, im saving up and buying some of the cheaper parts that i need. I really dont mean to this all to sound cheesy or whining or anything, thats not the case. I just want to clear some things up. My serious "dream", if i can say so, is someday in the future to move up to the USA with my fiancee and work in some kind of shop that works with cars, or then study and go to work with car company. To get a job in USA, from Finland is going to be a challenge. If I�ve understood correctly, you cant search a job when just a visiting USA (it illegal?). Somehow someone should hire me when i still live in Finland and then i could move to the states? Anyways, im just 24 years old and i hope to have plenty of time to achieve that goal.
But, as for the project wise, i have a small update. I�ve been thinking about the suspension/brakes/etc:
Fronts:
- Sandblasted and powder coated control arms
- HardRace bushings
- New bearings
- ABS wiring shield sandblasting/pc
- BuddyClub extended balljoints
- OEM length ARP wheel studs
- MTEC 300mm grooved brake discs
- New S2000 calipers, brackets and pads
- ITR Spec98 24mm swaybar
- OEM endlinks
- BC Racing BR-Series damper/height adjustable front struts and springs
- New bolts, other hardware etc etc.
Rear:
- Sandblasting/powder coating control arms/hubs
- HardRace RTA bushings
- OEM length ARP wheel studs
- MTEC 262mm grooved brake discs
- ITR Spec98 calipers, brackets and pads
- New e-brake cables
- Function7 LCA:s
- Skunk2 camber kit
- OEM toe arms with HardRace bushings
- (Genuine) ASR brace
- ASR 24mm swaybar
- Some endlinks (not spherical this time).
- BC Racing BR-Series damper/height adjustable rear struts and springs
- New bolts, other hardware etc etc.
I already own a lots of those listed parts, so it helps a lot.
Small update about the RTA mounting point:
Looks pretty good to me. Still needs to be finished, but it should look fully original when finished and welded up. All the shapes are 1:1 when compared to the original part
As you can see from the previous pic, i tried to acid of the rust from the vertical part. It has a lot of crates(?) so im going to change that parts also, so theres not going to be any rust. If i had a place/equipment to sandblast, that would also work because the rust is nowhere near to be through the metal.
Showing some phosphoric acid to the rust:
I also happened to find this awesome Honda Access part (i think it might be taken from the Prelude). I think its rare to find it with full, uncut harness:
Does anyone have any info, schematics, manuals etc about the Honda Access Dusk sensor that could help out with the install? Im going to install this one way or another, but any help would still be greatly appreciated
I found some info about this:
THIS IS AN OPTIONAL UPGRADE FOR PRELUDE'S MADE BY HONDA ACCESS ALLOWS YOU TO HAVE YOUR HEADLIGHTS AUTOMATICALLY TURN ON AT A DESIRED AMBIENT LIGHTING.
INFORMATION & INSTALLATION TIPS:
THE DIAL ON THE SENSOR ADJUST THE SENSITIVITY TO SUN-LIGHT.
THE TYPICAL SETTING IS SO THAT THEY COME ON WHEN DUSK STARTS.
THE BLACK SWITCH ON THE SIDE IS THE OFF AND ON SWITCH.
THE HEADLIGHT SWITCH ON THE TOP OF THE SENSOR ALLOWS WHETHER OR NOT JUST THE CORNER LIGHTS COME ON AUTOMATICALLY OR BOTH HEAD & CORNER-LIGHTS COME ON.
THE TWO 20-PIN LARGE GRAY COUPLERS ARE INSERTED IN BETWEEN THE MATCHING COUPLERS UNDER THE HONDA DASHBOARD.THIS PLUG ONLY MATCHES ONE CONNECTION THAT WILL FIT SO ERROR IS UNLIKELY.(PLEASE SEE CLOSE UP PICTURE#11 OF THE 20-PIN CONNECTOR TO VERIFY COMPATIBILITY)
THE GROUND SPADE CAN BE GROUNDED AT THE CLOSEST SPOT ON CAR.
THE DUSK SENSOR OF COURSE SHOULD BE MOUNTED WITH DOUBLE SIDED TAPE ONTO THE DASHBOARD EXPOSED TO SUNLIGHT AS SEEN IN DEMO PICTURE#12.
THE BROWN PLUG WITH SINGLE PIN IS INSERTED INTO THE NUMBER TWO OPTION SLOT UNDER DASH FUSE BOX OR JUNCTION BLOCK.
IF THAT OPTION SLOT IS IN USE,THIS HARNESS COMES WITH A FEMALE EXTENSION PLUG WHICH ALLOWS YOU TO INSERT THE OTHER OPTION ITEM PLUG INTO THE FEMALE CONNECTOR ON THE HARNESS.
Last edited by HiTec; 12-28-2014 at 08:00 AM.
01-01-2015, 05:15 PM
#112
wow your only 24! I thought you were much older judging off the amount of knowledge you have and quality of your build. I want to take the same route as you with my ej2. Could you pm or tell me where you bought your sound deadening? Happy new year btw.
01-02-2015, 05:44 AM
#113
Honda-Tech Member
Thread Starter
Thanks for the compliment! And happy new year to you too!
The sound deadening mats used in this build are StP Black Gold (one bulk back) and StP Silver (one bulk back). Silver is lighter than black gold, so thats why i used that above the window line (in all pillars and roof). I also deadened the floor with silver, but i used two layers in those points that needed it the most. I dont know where you can get that stuff in USA or do they even sell it? I�ve understood that dynamat is almost the same product and also very popular in states.
Taken from StP:s fb page:
btw, I�ve also got a small update for the build!
I received the dusk sensor and immeditially started to study how it works. What i can tell about the main harness, its probably not from prelude. It has 16-pin gray connector and as far as i know, preludes have 15 pin or 20 pin connectors?
So, i didnt even bother to look after prelude service manual. I took my multimeter and started to track the wires and in same time, wrote all to the paper, step by step. After that i was ready to test if it works, heres my (awful to watch) test rig:

And heres a little video for you all to show that it works (change the quality from upper right corner after hitting the play button):
Honda Access JDM Dusk Sensor
I didnt do any tricks with the sensitivity, so it was what it was when i received it.
There�s very little info or if nothing about this accessory. I�ve seen some people asking around help to get these sensors to work. When i bought this sensor, I promised in the "Show OFF your RARE Honda - Acura parts" group to post some kind of info, schematics or instructions and i�m a man of my words, so here it goes.
Okay, here we have the main sensor:

Thats what you usually get when you buy this option. Main sensor has 4 pin connector, so if you ever need to change your sensor or remove your dash, you dont have to remove whole harness. Sensor is same in every model of this option, only main harness differs (because car model differences).
Sensor pins explained:
- YEL/GRN = +12V input (from "hot when running" accessory slot in fusebox)
- BLK = Ground
- BLU = Negative output to relay. This wire will output negative signal when the sensor main switch in side side of the sensor is "ON" and when its dark enough. DO NOT DRIVE ANYTHING ELSE THAN RELAY FROM THIS OUTPUT OR YOU WILL FRY THE SENSOR ELECTRONICS.
- BLU/RED = Second negative output to additional relay. This wire will output negative signal when the sensor main switch in the side of the sensor is "ON" and when the "Headlight" switch on top of the sensor is "ON" and when its dark enough. Sensor has 2 output channels so you can control headlights and side lights separately. DO NOT DRIVE ANYTHING ELSE THAN RELAY FROM THIS OUTPUT OR YOU WILL FRY THE SENSOR ELECTRONICS.
Here is some detailed picture of the sensor:
"HEADLIGHT switch":

Optical cell:

Main on-off switch and sensitivity dial:

Main harness:

Harness has a nice coupler, so when you use the "C"-slot in the fusebox, you can put any additional option to the harnesses coupler

Fuse (2A mini blade type).

Relay connector:

Relay pins explained:
- YEL/GRN = +12V input (from "hot when running" accessory slot in fusebox)
- BLU = Negative signal from sensor
- RED/BLK = Relay contact terminal
- RED/GRN = Relay contact terminal
Theres only 3 wires between the sensor main harness and 16- pin main harness. They are: BLU/RED, RED/BLK and RED/GRN.

You can pretty much wire it like you want, two outputs give pretty much free hands for what to do with it. You example use the other output wire to drive NC relay for side lights or DRL:s and then the other wire to drive NO relay for your main lights. When the dusk comes, the sensor switches them over. When the sensor senses dark, it turns lights on instantly, but when turning lights off there is a delay (prevents your headlights doing disco-tech when you drive under street lights.)
I hope this helps someone who is struggling with the sensor. I could do a DIY guide once i install this to my car, but i dont know when thats going to happen cause i have lots of other things to do first.
The sound deadening mats used in this build are StP Black Gold (one bulk back) and StP Silver (one bulk back). Silver is lighter than black gold, so thats why i used that above the window line (in all pillars and roof). I also deadened the floor with silver, but i used two layers in those points that needed it the most. I dont know where you can get that stuff in USA or do they even sell it? I�ve understood that dynamat is almost the same product and also very popular in states.
Taken from StP:s fb page:
STANDARTPLAST was created on a base of Soviet Army research institute in 1979 and was established as a private company in 1996. The company is based in Ivanovo city, Russia and all products are 100% made in Russia under strict quality control. We DDD over 1'000 employees across 5 plants in Russia. Products are being continuously developed at the Central Scientific Research Lab, Chemical Department and Acoustic Laboratory.
STANDARTPLAST’s key competence is a systematic approach to the solution of noise and vibration issues in the vehicle. The materials were originally designed for use in submarines. The effective damping of noise and resonance makes the submarines acoustically invisible.
STANDARTPLAST has a wide range of products for any damping application, a selection of the best performing materials are available on the European market and now available in the UK. With military grade construction and highly effective damping, STANDARTPLAST mats are already the preferred choice of many car audio competitors including Mr Per Soder (Two times EMMA European champion).
I received the dusk sensor and immeditially started to study how it works. What i can tell about the main harness, its probably not from prelude. It has 16-pin gray connector and as far as i know, preludes have 15 pin or 20 pin connectors?
So, i didnt even bother to look after prelude service manual. I took my multimeter and started to track the wires and in same time, wrote all to the paper, step by step. After that i was ready to test if it works, heres my (awful to watch) test rig:
And heres a little video for you all to show that it works (change the quality from upper right corner after hitting the play button):
Honda Access JDM Dusk Sensor
I didnt do any tricks with the sensitivity, so it was what it was when i received it.
There�s very little info or if nothing about this accessory. I�ve seen some people asking around help to get these sensors to work. When i bought this sensor, I promised in the "Show OFF your RARE Honda - Acura parts" group to post some kind of info, schematics or instructions and i�m a man of my words, so here it goes.
Okay, here we have the main sensor:
Thats what you usually get when you buy this option. Main sensor has 4 pin connector, so if you ever need to change your sensor or remove your dash, you dont have to remove whole harness. Sensor is same in every model of this option, only main harness differs (because car model differences).
Sensor pins explained:
- YEL/GRN = +12V input (from "hot when running" accessory slot in fusebox)
- BLK = Ground
- BLU = Negative output to relay. This wire will output negative signal when the sensor main switch in side side of the sensor is "ON" and when its dark enough. DO NOT DRIVE ANYTHING ELSE THAN RELAY FROM THIS OUTPUT OR YOU WILL FRY THE SENSOR ELECTRONICS.
- BLU/RED = Second negative output to additional relay. This wire will output negative signal when the sensor main switch in the side of the sensor is "ON" and when the "Headlight" switch on top of the sensor is "ON" and when its dark enough. Sensor has 2 output channels so you can control headlights and side lights separately. DO NOT DRIVE ANYTHING ELSE THAN RELAY FROM THIS OUTPUT OR YOU WILL FRY THE SENSOR ELECTRONICS.
Here is some detailed picture of the sensor:
"HEADLIGHT switch":
Optical cell:
Main on-off switch and sensitivity dial:
Main harness:
Harness has a nice coupler, so when you use the "C"-slot in the fusebox, you can put any additional option to the harnesses coupler
Fuse (2A mini blade type).
Relay connector:
Relay pins explained:
- YEL/GRN = +12V input (from "hot when running" accessory slot in fusebox)
- BLU = Negative signal from sensor
- RED/BLK = Relay contact terminal
- RED/GRN = Relay contact terminal
Theres only 3 wires between the sensor main harness and 16- pin main harness. They are: BLU/RED, RED/BLK and RED/GRN.
You can pretty much wire it like you want, two outputs give pretty much free hands for what to do with it. You example use the other output wire to drive NC relay for side lights or DRL:s and then the other wire to drive NO relay for your main lights. When the dusk comes, the sensor switches them over. When the sensor senses dark, it turns lights on instantly, but when turning lights off there is a delay (prevents your headlights doing disco-tech when you drive under street lights.)
I hope this helps someone who is struggling with the sensor.
I could do a DIY guide once i install this to my car, but i dont know when thats going to happen cause i have lots of other things to do first.
01-02-2015, 10:10 AM
#116
Honda-Tech Member
Helluva post on the Dusk Sensor my friend! What a nice addition to the Honda community. Thanks for sharing!
01-04-2015, 09:42 AM
#118
Honda-Tech Member
Thread Starter
Small update about the trailing arm point again.
Okay, it was time to move on to the vertical part that had rust. As i told in the previous posts, i tested if i could acid the rust away. That didnt work because of the heavy pitted rust. So, i needed to remove the rusted part.
First i thought that the RTA-mounting point was fixed also to somewhere else than that vertical part, but i was wrong. It was now only held by 3 spot welds. I could have made a jig and fix the mounting point to chassis, so it wouldnt move, but i really needed to check everything from the RTA mounting point, so thats why i needed to remove it. So, i needed to make careful measurements and use different kinds of "fixed points" to make sure i can weld it to exact same location that were it originally were.
Here is just some pic about some of the measurements:

When all measurements were made, i removed the part:


And started to do new one:

Those rought markings are were the bend starts, were the middle part of the bend is and when it stops. I needed to made the bend in two stages because i didnt have exactly right sized pipe:

Then (almost) 90 degree bend:

Checking out:

In this parts also, there is a non-symmetrical bend in one corner, so i needed to do a small cut and draw marks where the bends roughly start:

Then i removed all the surface rust from inside of the RTA-mounting point location with acid:


Testing:

First test fit with car:


Tacked in place. The gap between the parts is optimal for perfect penetration for welds:

In this point i know what some of you might say "heyy, there is some visible surface rust /pitting in some of the pics". I know. When i test fitted the parts and tacked them and took pics, i didnt remove all the rust from outside of the old metal thats in the car. But i can assure that i removed all the surface rust and pitted parts before i made the final welds. I�m not going to screw this up by cutting corners, so dont worry
Also the 3M welding primer you see in the parts in some pictures, is because i dont want the parts to gather any more surface rust during the time when i dont acidify, sand, grind or weld, thats why the critical parts are almost always protected.Also, i didnt pay too much attention to how the welds look from outside. What i really concentrated on, was how the welds look from inside, where i obviously cant weld because its impossible to fit welding pistol there. (Keep in mind that I�m also a far from professional welder). Thats why i made sure that all the welds were "hot" and there was perfect penetration on welds. (And also because the outside of the welds are going to be (almost) fully ground down and because of the location of the weld is really pain to weld.) So, the welds arent the prettiest when looked from outside, but they surely are right in every other way:

Then it was time to find out the right spot for the RTA-mounting point. (Here you can also see how the 3M Welding primer behaves when welded):


And here you can see more cleaning and protecting before my long lunch break:

Holes welded up and small amount of welding primer:

More of "finding the right angle and spot":

And there it was:

I then tacked it up with small weld and started to finish the lower part of the mounting point:

So the original part has two holes. One is RTA bolt hole and the other is probably a water hole. So, i needed to shape the water hole so it looks OEM. Vice and two sockets and it was perfect:

Then some fitting and filing (picture is taken from the first test fit):


That blueish stuff you see in previous pic is this:

Here it is how it looks when partially welded up. I didnt get a change to weld it 100% because there was too many blackouts in the power lines (Finnish winter). Thats why i packed things up and protected the parts with zinc from both sides:


So, theres only some finishing touches to be made (clean up, weld it 100%, clean up the visible part of the welds, cut excess metal off and weld 2 easy parts to the RTA-mounting point and then that location is ready. Then i finally get a change to move up to the sill.
01-04-2015, 01:33 PM
#119
Honda-Tech Member
i left for a couple months, come back and your still killing it.... good, no scratch that, GREAT build dude
01-21-2015, 04:13 AM
#120
Honda-Tech Member
Thread Starter
Thanks!
Tiny update; front calipers that I ordered in new years eve arrived last week:


Powder coated S2000/EP3 (16CL16VN) "Mugen AGBS" calipers. 300mm OEM BBK coming up
Tiny update; front calipers that I ordered in new years eve arrived last week:
Powder coated S2000/EP3 (16CL16VN) "Mugen AGBS" calipers. 300mm OEM BBK coming up
01-21-2015, 08:01 AM
#121
Honda-Tech Member
this is awesome work!
I see you plan on buddy club extended ball joints... i've been looking around for some as well and would stay away from buddy club only because I have seen knock-offs of their product with the original looking box and everything.
I plan to do the hardrace extended ball joints instead for $135
I see you plan on buddy club extended ball joints... i've been looking around for some as well and would stay away from buddy club only because I have seen knock-offs of their product with the original looking box and everything.
I plan to do the hardrace extended ball joints instead for $135
01-21-2015, 08:08 AM
#122
Honda-Tech Member
Join Date: Oct 2006
Location: Covered in Tattoos, NYC
Posts: 755
Likes: 0
Received 0 Likes
on
0 Posts
LOVE the LED amber guage mod!!! i want that so bad!!!
edit: just seen the diy powdercoating, very impressive. You're unbelievablely talented bro
edit: just seen the diy powdercoating, very impressive. You're unbelievablely talented bro
02-27-2015, 02:22 AM
#123
Honda-Tech Member
Thread Starter
Thanks for the warning bbarbulo. I have BuddyClub balljoints in my EG8 and i like them, but i just might try the HardRace versions of them.
Some new stuff i ordered from US came in last week:

So, the first thing i tackled with was the glove box damper. non-SRS Civics don�t have this feature and i find it pretty odd, because it adds some "luxury". I hate how the stock glove box opens up. I know that the right way to add the damper would have involved changing the glove box and the metal behind it to SRS-version, but the SRS glove box is smaller than non-SRS and i dont like it. So, retrofitting the damper to the non-SRS versions of the parts
Start:

So, first i needed to remove some plastic from the right side of the damper, so it has some space to move up and down. Damper bracket is pretty much plug and play to non-SRS glove box metal strut. I only added one washer and nut.

This is how it looks behind:

When the damper was attached to dash, it was time to find the right spot to attach the damper to glove box, so it works correctly. I just looked up some pics taken from SRS-glove box and drilled a hole to same spot in my glove box:

Then i found some nylon shims from my garage that were perfect fit to the dampers glove box end. Shims work like bearings. I used one washer to prevent the damper from moving sideways and the wide screw prevents the damper from coming loose. Screw comes through the glove box and is visible from inside if you look closely (about 3mm is visible). I did hide it using another square nylon part where it scews, so it looks as original as possible. Thats why i drilled the hole to that bend part of the glove box and as close to the glove box "wall" as possible.


...And it works perfect
Test video:
OEM glove box damper
The next thing i addressed was completing the rear deck. I bought brand new rear speaker brackets from Honda to achieve as perfect installation as possible. Rear speaker brackets also support the rear deck cover from below (whats the right word for it?). I know you US guys these parts are common, but in Finland we only have handful of Coupes around, so the parts are very hard or nearly impossible to find. One nice thing about these is that they are meant for 6,5 inch speaker, so if i want to add surround sound (because PXA-H800 supports it), its easy to find good quality speakers.


Then i completed the rear deck cover and attached the speaker grills.

Perfect fitment, as it should be because OEM parts (Dirty parts, sorry!):


Then i opened up the ITR ABS computer to check out if theres some caps that i should change to prevent some problems. Theres no need to, i measured the caps and they are perfectly fine.

I also cleaned up the front end from old undersealing and started to change up some parts.


New sunroof water grommet (what a major pain in the *** to change btw):


Next thing; some more cleaning and changing the hinges:

I removed the surface rust as much as possible, acidified it and then applied Bilt Hamber Hydrate 80 on top of the bare metal for protection:


Hinges installed and adjusted, Hydrate 80 and Dinitrol ML between body and hinges, and hinges greased with teflon based marine grease.

Next thing to do is to remove and replace the cracked seam sealer, order some new inner fenders for both side and right side hinges and water grommet from Honda.
Back to the rust work again:


I examined how the lower half of quarter panel should be removed correctly and found out the perfect, original Honda way to remove it, so the body work is easier to do and welds can be protected also from inside. Look how Honda lists the part 1 and 5 in this pic, thats how you want to remove the lower half of the quarter panel to attack the rust:


It doesnt look too bad when cleaned up:

As you can see from these pics, it would have been impossible to correctly remove and replace the rust parts if i didnt remove this part:


The plan is to replace only the rusty parts of the metal and keep as much original metal as possible to ease up the bodywork thats why the lip of the rear fender in this part is not replaced (as this part doesnt have rust on it):

Rough test fit from inside (thats why the edges of the parts wont line up):

Bonus pic taken from first S2000 caliper test fit to ITR knuckle:

Some new stuff i ordered from US came in last week:
So, the first thing i tackled with was the glove box damper. non-SRS Civics don�t have this feature and i find it pretty odd, because it adds some "luxury". I hate how the stock glove box opens up. I know that the right way to add the damper would have involved changing the glove box and the metal behind it to SRS-version, but the SRS glove box is smaller than non-SRS and i dont like it. So, retrofitting the damper to the non-SRS versions of the parts
Start:
So, first i needed to remove some plastic from the right side of the damper, so it has some space to move up and down. Damper bracket is pretty much plug and play to non-SRS glove box metal strut. I only added one washer and nut.
This is how it looks behind:
When the damper was attached to dash, it was time to find the right spot to attach the damper to glove box, so it works correctly. I just looked up some pics taken from SRS-glove box and drilled a hole to same spot in my glove box:
Then i found some nylon shims from my garage that were perfect fit to the dampers glove box end. Shims work like bearings. I used one washer to prevent the damper from moving sideways and the wide screw prevents the damper from coming loose. Screw comes through the glove box and is visible from inside if you look closely (about 3mm is visible). I did hide it using another square nylon part where it scews, so it looks as original as possible. Thats why i drilled the hole to that bend part of the glove box and as close to the glove box "wall" as possible.
...And it works perfect
Test video:
OEM glove box damper
The next thing i addressed was completing the rear deck. I bought brand new rear speaker brackets from Honda to achieve as perfect installation as possible. Rear speaker brackets also support the rear deck cover from below (whats the right word for it?). I know you US guys these parts are common, but in Finland we only have handful of Coupes around, so the parts are very hard or nearly impossible to find. One nice thing about these is that they are meant for 6,5 inch speaker, so if i want to add surround sound (because PXA-H800 supports it), its easy to find good quality speakers.
Then i completed the rear deck cover and attached the speaker grills.
Perfect fitment, as it should be because OEM parts
(Dirty parts, sorry!):Then i opened up the ITR ABS computer to check out if theres some caps that i should change to prevent some problems. Theres no need to, i measured the caps and they are perfectly fine.
I also cleaned up the front end from old undersealing and started to change up some parts.
New sunroof water grommet (what a major pain in the *** to change btw):
Next thing; some more cleaning and changing the hinges:
I removed the surface rust as much as possible, acidified it and then applied Bilt Hamber Hydrate 80 on top of the bare metal for protection:
Hinges installed and adjusted, Hydrate 80 and Dinitrol ML between body and hinges, and hinges greased with teflon based marine grease.
Next thing to do is to remove and replace the cracked seam sealer, order some new inner fenders for both side and right side hinges and water grommet from Honda.
Back to the rust work again:
I examined how the lower half of quarter panel should be removed correctly and found out the perfect, original Honda way to remove it, so the body work is easier to do and welds can be protected also from inside. Look how Honda lists the part 1 and 5 in this pic, thats how you want to remove the lower half of the quarter panel to attack the rust:
It doesnt look too bad when cleaned up:
As you can see from these pics, it would have been impossible to correctly remove and replace the rust parts if i didnt remove this part:
The plan is to replace only the rusty parts of the metal and keep as much original metal as possible to ease up the bodywork thats why the lip of the rear fender in this part is not replaced (as this part doesnt have rust on it):
Rough test fit from inside (thats why the edges of the parts wont line up):
Bonus pic taken from first S2000 caliper test fit to ITR knuckle:
02-27-2015, 04:15 PM
#124
Honda-Tech Member
iTrader: (19)
Join Date: Dec 2008
Location: NORCAL
Posts: 438
Likes: 0
Received 0 Likes
on
0 Posts
Amazing work! So much attention to detail and you seem to have a very broad range of skills from electrical to body work/rust repair! Very impressive!
02-27-2015, 07:46 PM
#125
Honda-Tech Member

Join Date: Jan 2010
Posts: 162
Likes: 0
Received 0 Likes
on
0 Posts
Wow, great thread, I have only gone through this last page, but I think I'm about to spend a couple hours going through it all. Reminds me a lot of the eg I am currently restoring, only difference is your back end on the left side was messed up, while mine was the front. Keep up the good work and great documentation, I will be keeping an eye on this thread, it's nice to see other enthusiasts taking care of things themselves, vs dropping your car off at a body shop and hoping your body guy doesn't cut corners lol. Like that is possible haha. Great job sir