
Project 'Make Gagnar's Car Nice Again:' My Build Thread
 05-12-2014, 07:35 AM
#326
Dirty, I'm not sure why but I thought you might find this interesting. A couple months after I did the swap I managed to find a buyer for my engine. However the buyer was in Louisiana and I was in Nevada, so I had to ship the engine cross country. Shipping an engine is not the easiest thing in the world, so I thought I'd show the steps involved:
Step 1: Find a freight broker
If you are shipping LTL (less-than-truckload) freight, i.e. you are are not contracting an entire semi trailer for your goods, chances are you will contract the work through a freight broker. These guys will schedule you with a carrier and handle the paperwork and coordination. Going with a brokerage is often cheaper and easier for regular people than contracting with carriers independently.
I used Engines Direct Freight and I liked them. All you do is call them, tell them you will be crating and palleting an engine, the approximate weight (~350 lbs.) and the approximate time of the shipment. They will help you figure out where to go and get you the necessary documentation.
Step 2: Obtain a pallet
The 100% best way to ship an engine is in a crate that is bolted to a standard 40" x 48" pallet. Pallets are pretty easy to find because they tend to pile up at places that receive a lot of shipments. For this reason, you should not have to buy one.
I recommend driving around to businesses that you know get a lot of shipments (like grocery stores, hardware stores, or any other kind of store, really) and that don't do a lot of shipping. Just talk to a manager and ask if you can take a pallet.
Be advised that some businesses, particularly larger ones like Home Depot or other "big-box" stores contract with pallet transportation companies who specialize in recycling pallets and/or selling them back to companies that do a lot of shipping. Large stores may also have their own system for re-distributing pallets and they are not likely to want to give any up. You'll have more luck and smaller or less tightly run places. I got mine at the shipping/receiving office at the University of Nevada and they were happy to be rid of a pallet.
A word of caution: make sure you get a 40" x 48" so-called standard size pallet. There are lots of other sizes but you freight carrier will be happiest with the standard size.
Step 3: Make a plan
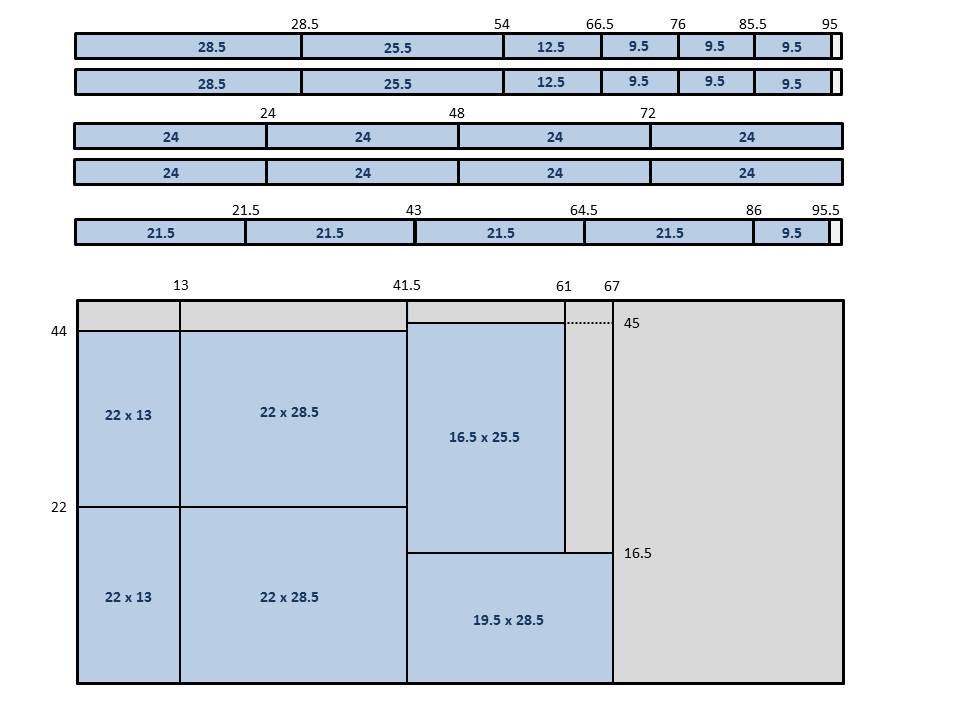
Before heading to the hardware store, it's necessary to draw up a schematic of what you will be building and to figure out exactly how much material you will need to buy (and in what lengths). This is the plan I (more or less) used. It requires:
2x4 lengths:
2 - 28.5"
2 - 25.5"
2 - 12.5"
7 - 9.5"
8 - 24"
4 - 21.5"
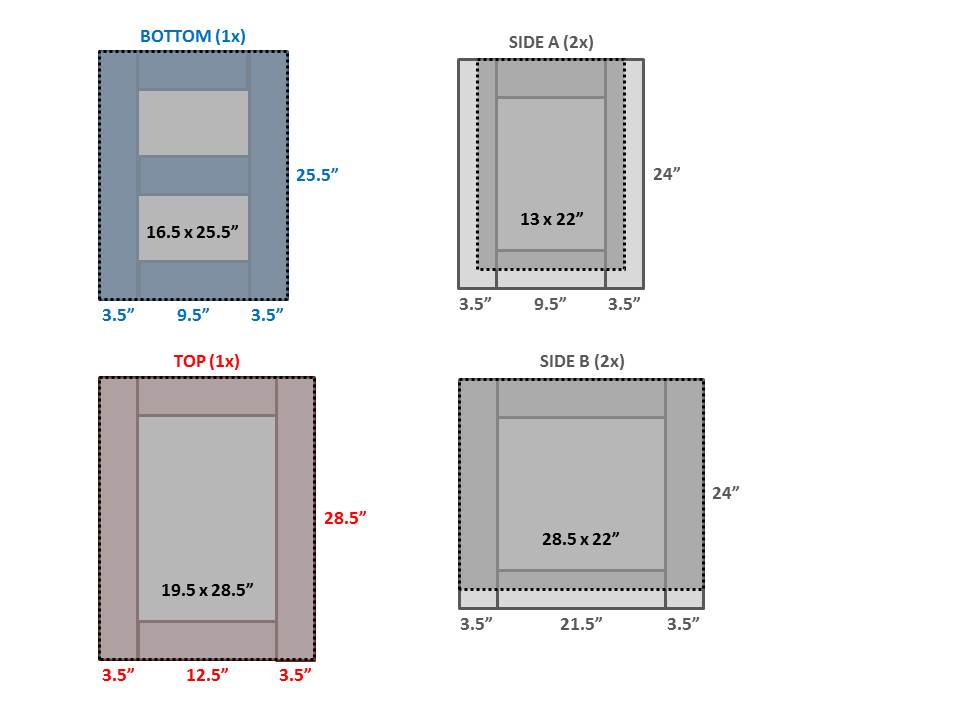
Plywood sheets:
2 - 13 x 22"
2 - 28.5 x 22"
1 - 16.5 x 25.5"
1 - 19.5 x 28.5"
To do this you need five 8' lengths of 2x4s and one 4'x8' sheet of cheap plywood. These can be cut as follows:
Here is the schematic for how these are assembled:
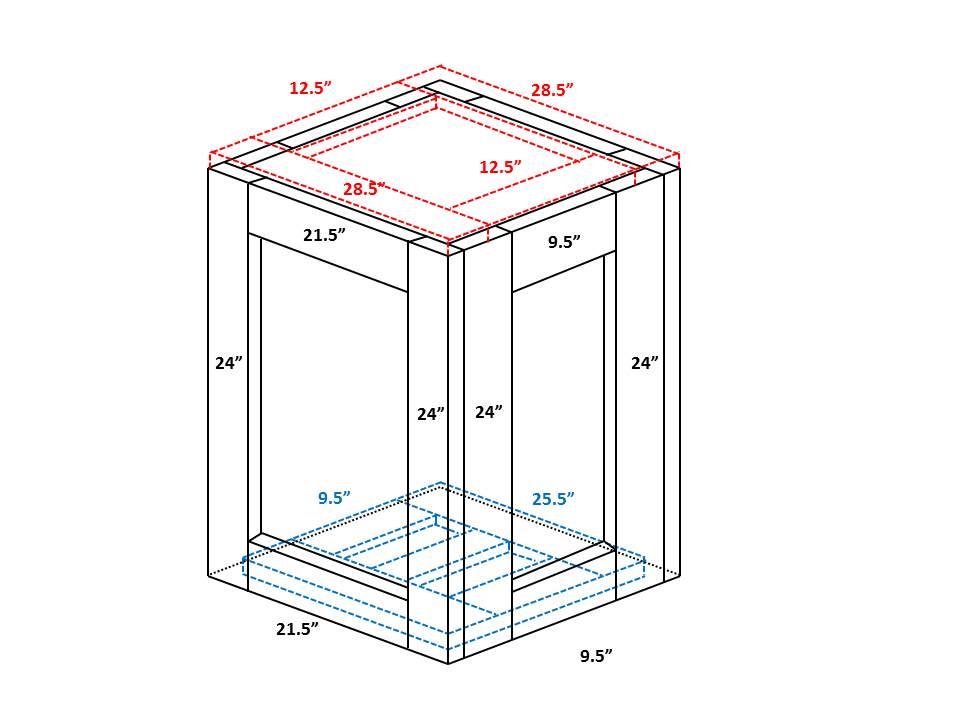
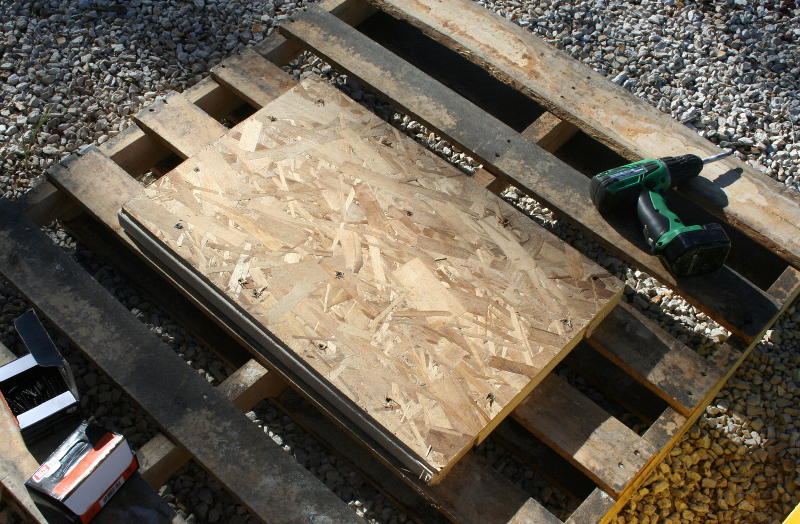
Once the plan is in place and the materials are cut, it's time to start assembly. I started by screwing the base to the pallet:
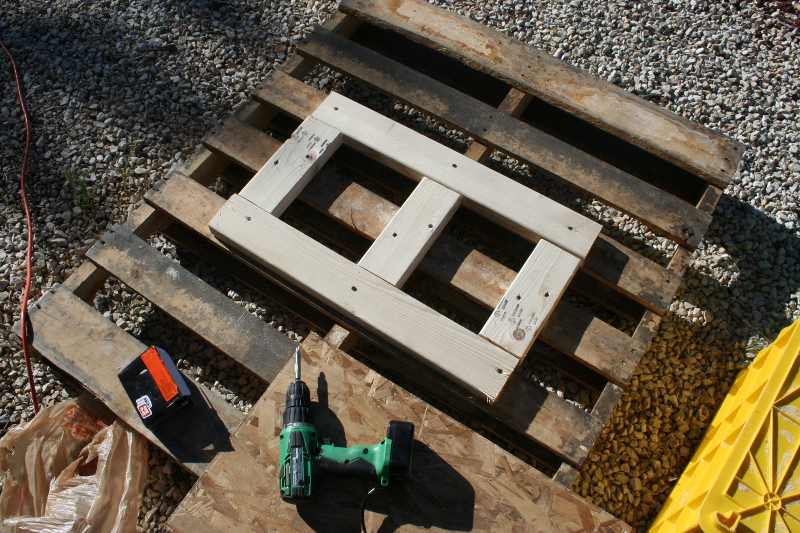
Then I screwed the base plywood to the 2x4s:
Next I assembled the sides:
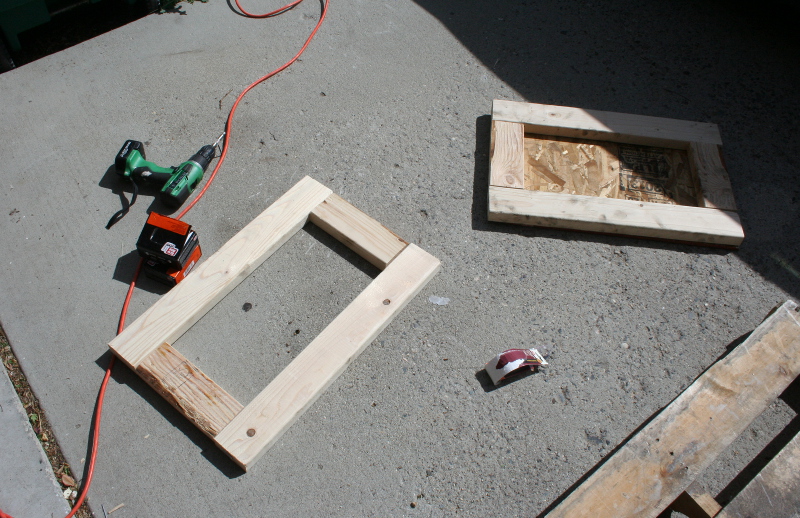
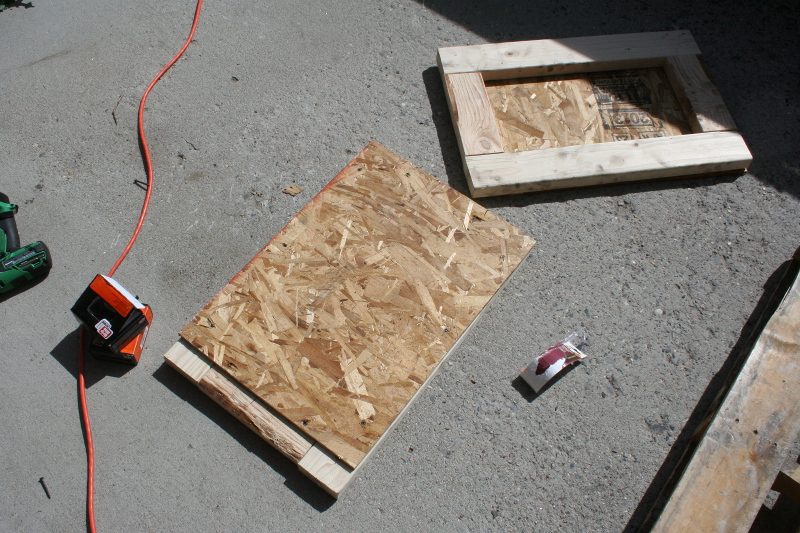
Note that I did NOT pre-assemble the top! If everything does not go together perfectly, you might want to hold off on building the top in case you need some more wiggle room.
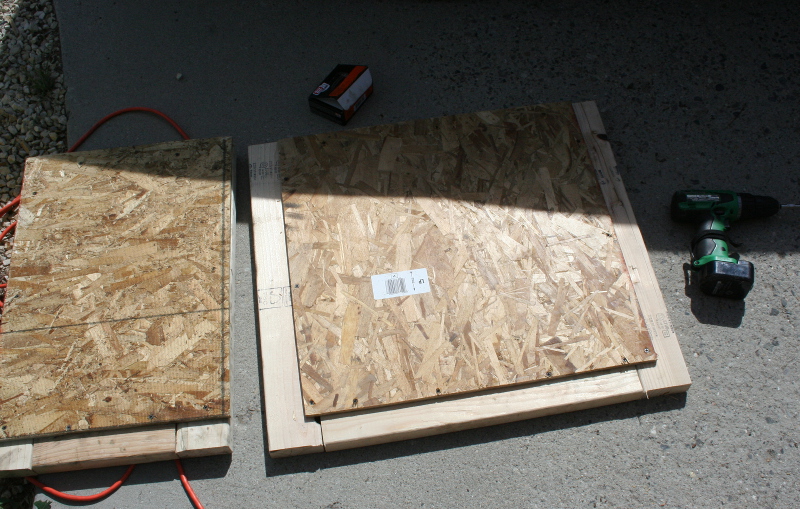
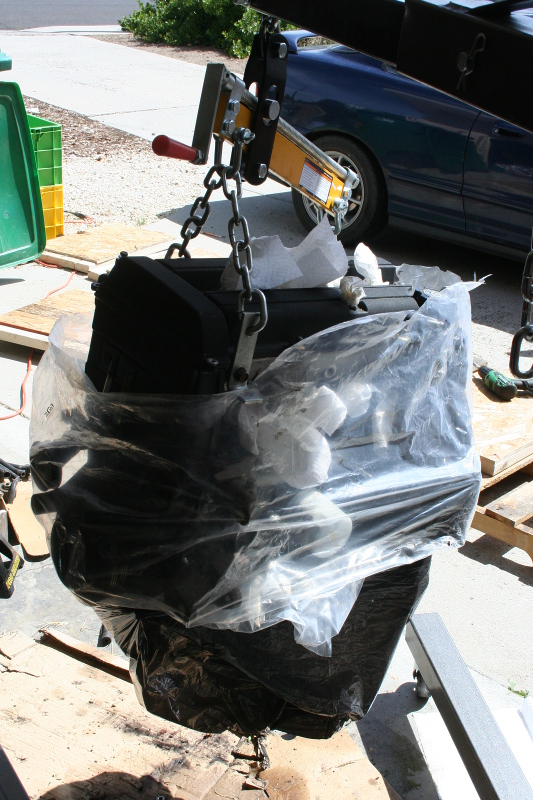
I screwed three of the walls together, wrapped the engine in a couple trash bags and plugged the holes with paper towels (the engine must also be drained of any fluids beforehand), and put the engine in the half-finished crate. Note that the plywood was facing in on these walls:
Step 1: Find a freight broker
If you are shipping LTL (less-than-truckload) freight, i.e. you are are not contracting an entire semi trailer for your goods, chances are you will contract the work through a freight broker. These guys will schedule you with a carrier and handle the paperwork and coordination. Going with a brokerage is often cheaper and easier for regular people than contracting with carriers independently.
I used Engines Direct Freight and I liked them. All you do is call them, tell them you will be crating and palleting an engine, the approximate weight (~350 lbs.) and the approximate time of the shipment. They will help you figure out where to go and get you the necessary documentation.
Step 2: Obtain a pallet
The 100% best way to ship an engine is in a crate that is bolted to a standard 40" x 48" pallet. Pallets are pretty easy to find because they tend to pile up at places that receive a lot of shipments. For this reason, you should not have to buy one.
I recommend driving around to businesses that you know get a lot of shipments (like grocery stores, hardware stores, or any other kind of store, really) and that don't do a lot of shipping. Just talk to a manager and ask if you can take a pallet.
Be advised that some businesses, particularly larger ones like Home Depot or other "big-box" stores contract with pallet transportation companies who specialize in recycling pallets and/or selling them back to companies that do a lot of shipping. Large stores may also have their own system for re-distributing pallets and they are not likely to want to give any up. You'll have more luck and smaller or less tightly run places. I got mine at the shipping/receiving office at the University of Nevada and they were happy to be rid of a pallet.
A word of caution: make sure you get a 40" x 48" so-called standard size pallet. There are lots of other sizes but you freight carrier will be happiest with the standard size.
Step 3: Make a plan
Before heading to the hardware store, it's necessary to draw up a schematic of what you will be building and to figure out exactly how much material you will need to buy (and in what lengths). This is the plan I (more or less) used. It requires:
2x4 lengths:
2 - 28.5"
2 - 25.5"
2 - 12.5"
7 - 9.5"
8 - 24"
4 - 21.5"
Plywood sheets:
2 - 13 x 22"
2 - 28.5 x 22"
1 - 16.5 x 25.5"
1 - 19.5 x 28.5"
To do this you need five 8' lengths of 2x4s and one 4'x8' sheet of cheap plywood. These can be cut as follows:
Here is the schematic for how these are assembled:
Once the plan is in place and the materials are cut, it's time to start assembly. I started by screwing the base to the pallet:
Then I screwed the base plywood to the 2x4s:
Next I assembled the sides:
Note that I did NOT pre-assemble the top! If everything does not go together perfectly, you might want to hold off on building the top in case you need some more wiggle room.
I screwed three of the walls together, wrapped the engine in a couple trash bags and plugged the holes with paper towels (the engine must also be drained of any fluids beforehand), and put the engine in the half-finished crate. Note that the plywood was facing in on these walls:
 05-12-2014, 07:40 AM
#327
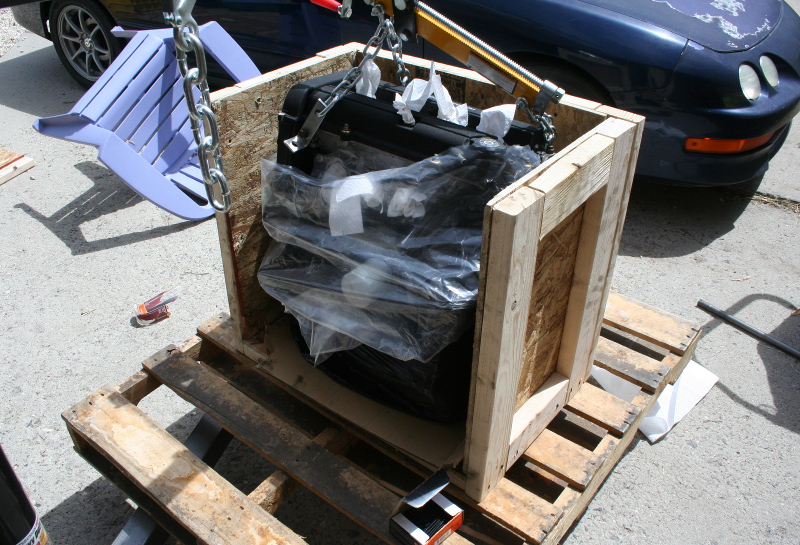
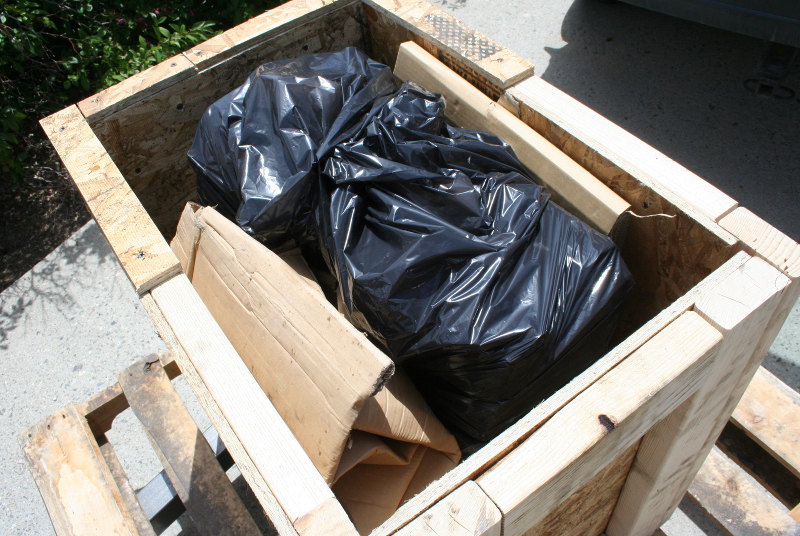
Next I screwed on the last wall and stuffed in some heavy-duty cardboard for filler to stop the engine from banging around inside the crate:
Don't use styrofoam for this -- it can't hold up to the weight of the engine. Despite their popularity styrofoam peanuts make a pretty bad filler.
With the engine in I added the top panel and was done. Note that my panel looks a bit different than in the schematics. There are a couple reasons for this. First, I cut the 2x4s a little too short because I miss-measured. Second, I could not get the engine to sit upright on its oil pan by myself (it's heavy!). So one corner of the engine was a little bit high.
Dealing with this was no problem since I had plenty of plywood left over. You'll note that the top of the crate is not even. THIS IS A GOOD THING. Having an even top will encourage the shipper to stack another pallet on your crate. To stop them from doing this you WANT an uneven surface on the top. If you used a level piece of plywood to finish the crate, just screw some scrap 2x4s to the top to make it impossible to stack on top of the crate.
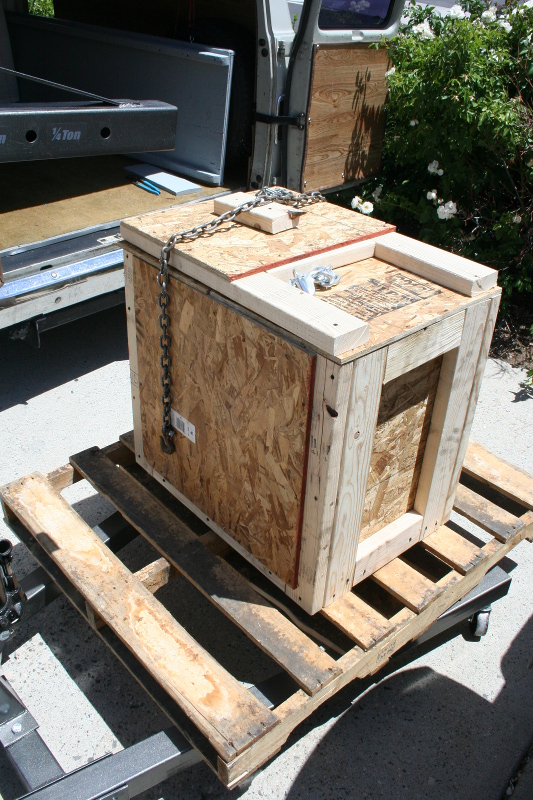
With the crate done, I hoisted it into a neighbors van and off we went to the carrier to deliver the engine. It got to Louisiana about a week later.
Don't use styrofoam for this -- it can't hold up to the weight of the engine. Despite their popularity styrofoam peanuts make a pretty bad filler.
With the engine in I added the top panel and was done. Note that my panel looks a bit different than in the schematics. There are a couple reasons for this. First, I cut the 2x4s a little too short because I miss-measured. Second, I could not get the engine to sit upright on its oil pan by myself (it's heavy!). So one corner of the engine was a little bit high.
Dealing with this was no problem since I had plenty of plywood left over. You'll note that the top of the crate is not even. THIS IS A GOOD THING. Having an even top will encourage the shipper to stack another pallet on your crate. To stop them from doing this you WANT an uneven surface on the top. If you used a level piece of plywood to finish the crate, just screw some scrap 2x4s to the top to make it impossible to stack on top of the crate.
With the crate done, I hoisted it into a neighbors van and off we went to the carrier to deliver the engine. It got to Louisiana about a week later.
05-12-2014, 07:49 AM
#328
did you paint the hood or what?
i did a foam roller rustoleum job on mine.
looks better, far from perfect but not bad for one coat and no sanding.
i bought a cheapo ebay paint gun but since i've started
addressing cosmetic issues the car is already starting to draw
unwanted attention.:unsure: all the newer butt ugly cars
out there arent helping lol. saw a cute gal driving a mint red 95 rs
the other day, really stood out. nice tegs are so fresh! kudos to you sir!:applause:
Being married makes it easier because I don't need to impress anyone LOL.
What I decide probably depends on how my cash flow looks in the next 6 months or so. If we are making a lot of extra money I might just have the whole car painted. If it's going to be another 2 years before I can paint the car I may do a quickie job on the hood as a band-aid.
05-13-2014, 07:08 AM
#329
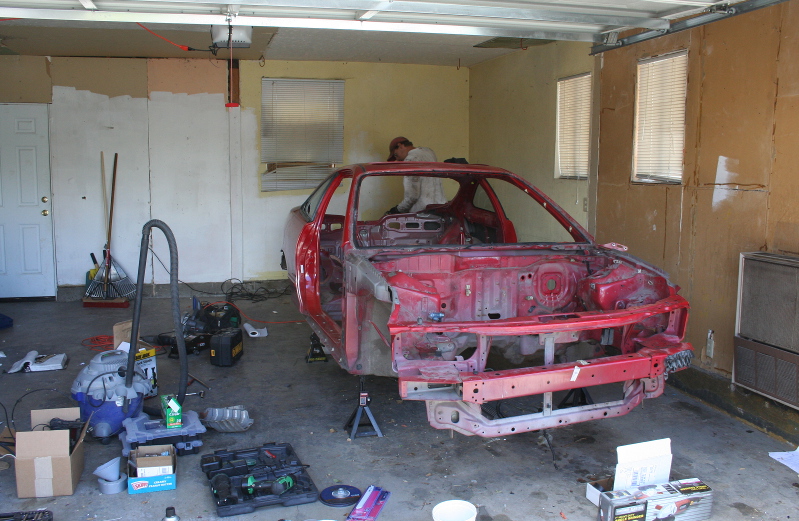
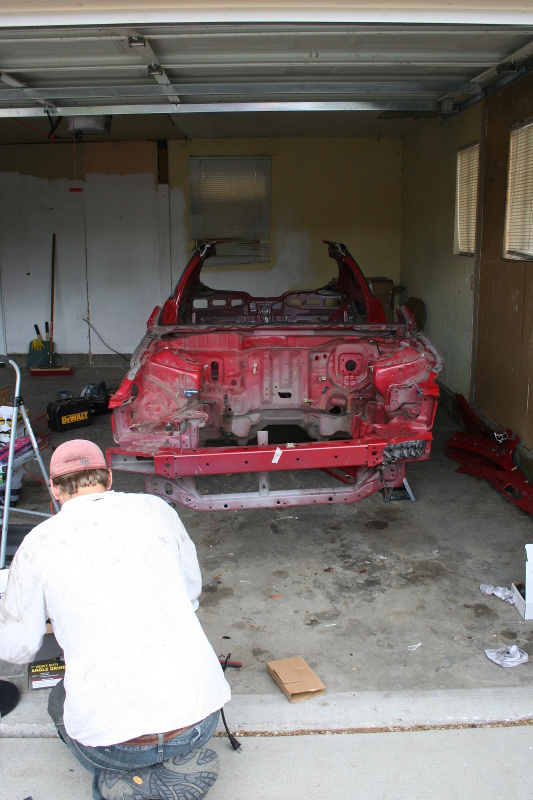
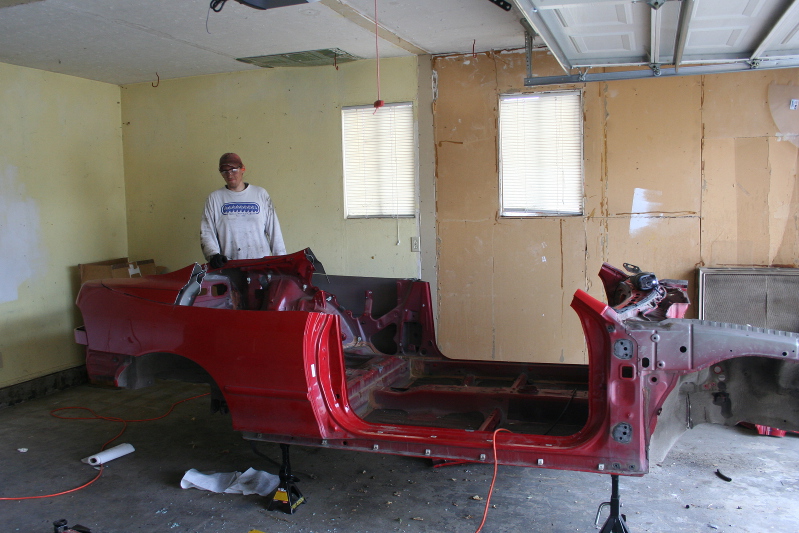
Some months passed after the swap and I was too busy with work to get any car work done. However, my wife and I moved to a new (and much better) house in Reno and everything had to go. The DAY BEFORE our lease expired, it was time to move the car.
I spent a few weeks pulling everything off until I had an empty shell, then with my wife's help I got to work.
Unibodies are weird; they are really just formed pieces of sheet metal welded and glued together. I couldn't believe how thin and flimsy the actual structural panels are. Most of the metal is not much thicker than a couple pieces of paper.
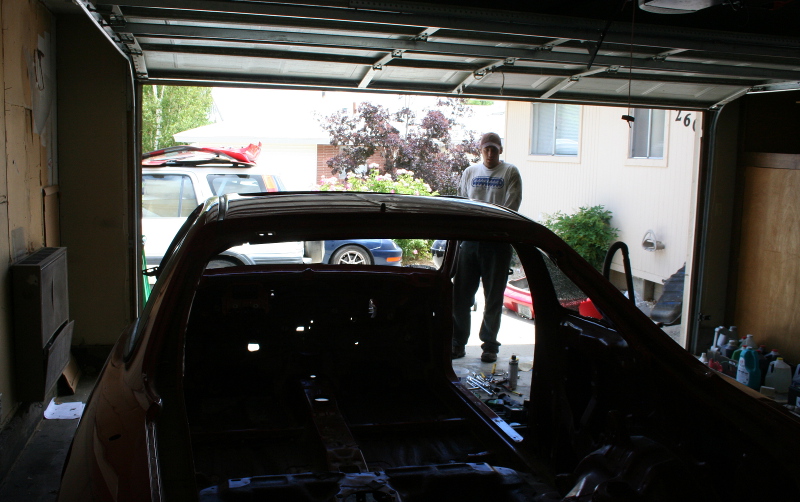
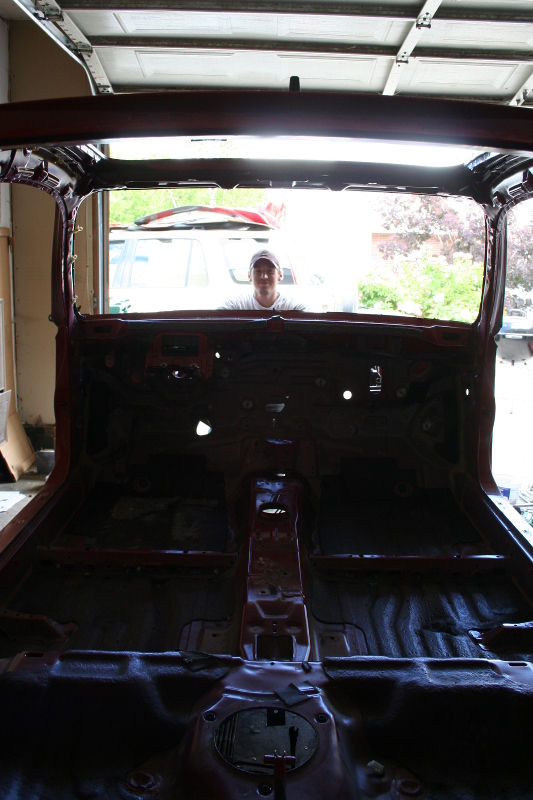
We worked into the night (I really wish I had pictures of this as the sparks were pretty awesome). The next morning, our garage looked like this:
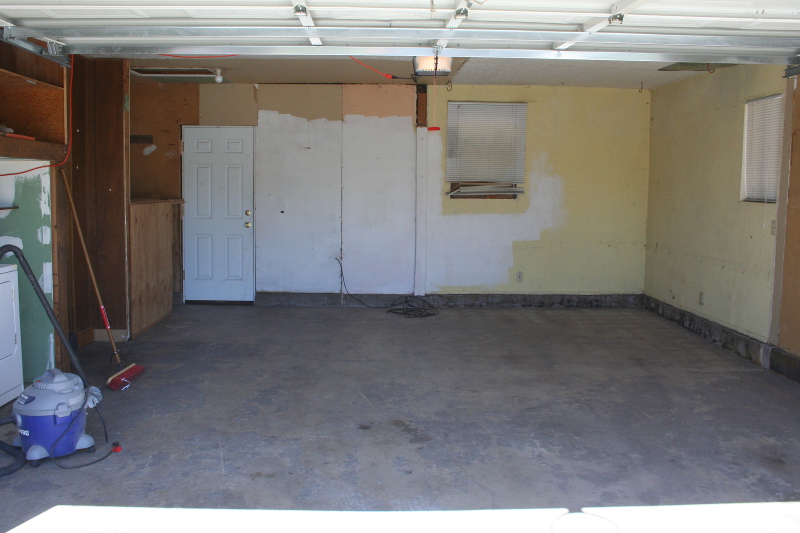
It was surreal to see a space where a car used to be. I took all the scrap to a scrapyard. The Integra vanished into thin air.
I spent a few weeks pulling everything off until I had an empty shell, then with my wife's help I got to work.
Unibodies are weird; they are really just formed pieces of sheet metal welded and glued together. I couldn't believe how thin and flimsy the actual structural panels are. Most of the metal is not much thicker than a couple pieces of paper.
We worked into the night (I really wish I had pictures of this as the sparks were pretty awesome). The next morning, our garage looked like this:
It was surreal to see a space where a car used to be. I took all the scrap to a scrapyard. The Integra vanished into thin air.
05-14-2014, 02:46 PM
#330
Honda-Tech Member
Join Date: May 2010
Location: Suburbs of Philadelphia
Posts: 3,706
Likes: 0
Received 2 Likes
on
2 Posts
Damn that's pretty crazy, I would have never even had the slightest clue on shipping something like that. I'm guessing the scrapped car was a doner parts car?
05-15-2014, 03:53 AM
#331
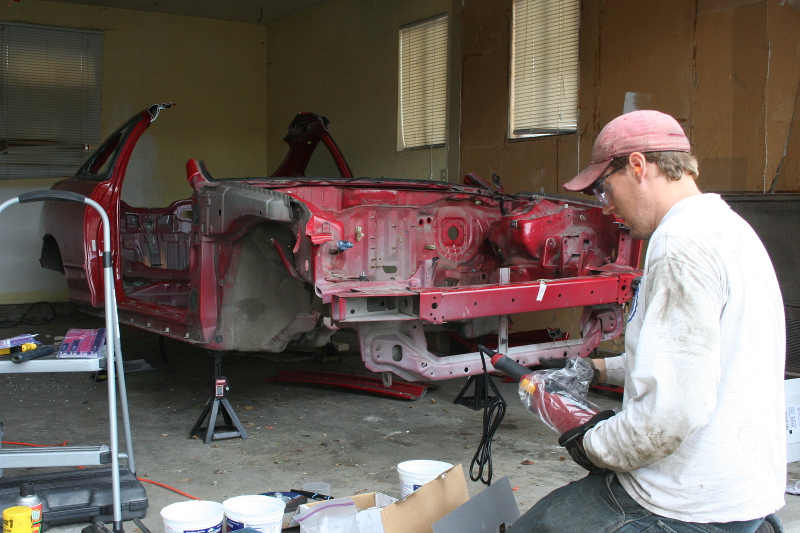
That red shell was my old 96 Milano GSR. It got wrecked in Montana by a lady who ran a stopsign at a blind intersection. I used it as the donor car for a 98 LS I bought in Reno. This whole swap was all about getting the parts I wanted off the GSR onto the Adriatic blue LS.
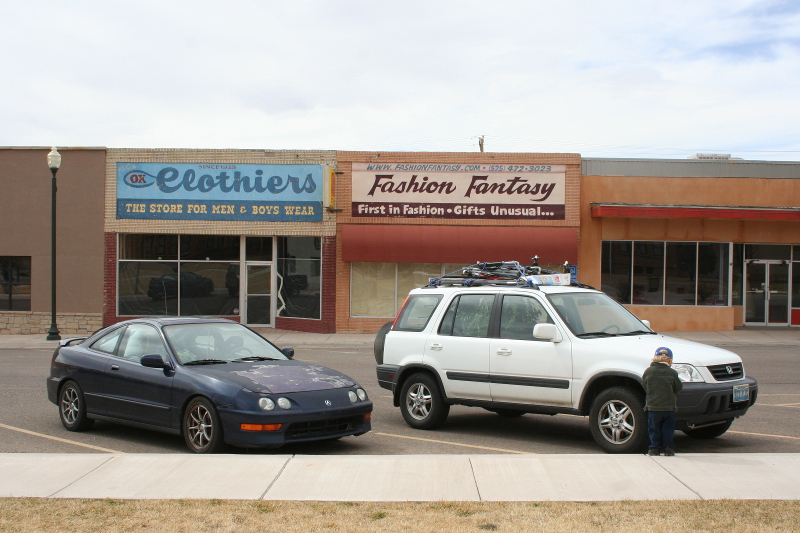
So now I have two cars: the GSR/ITR swapped LS and the white 99 CRV you see in a bunch of photos.
So now I have two cars: the GSR/ITR swapped LS and the white 99 CRV you see in a bunch of photos.
05-15-2014, 12:53 PM
#332
We lived in Reno for about another 6-7 months in a house we liked much better. Then, in March '14 we got an opportunity to move to College Station, TX, and jumped at the chance. I'm sorry to say I won't miss very much about Reno. It's a nice enough town and the mountains are great, but my boss was not so enjoyable. I will miss running in the desert but not much else.
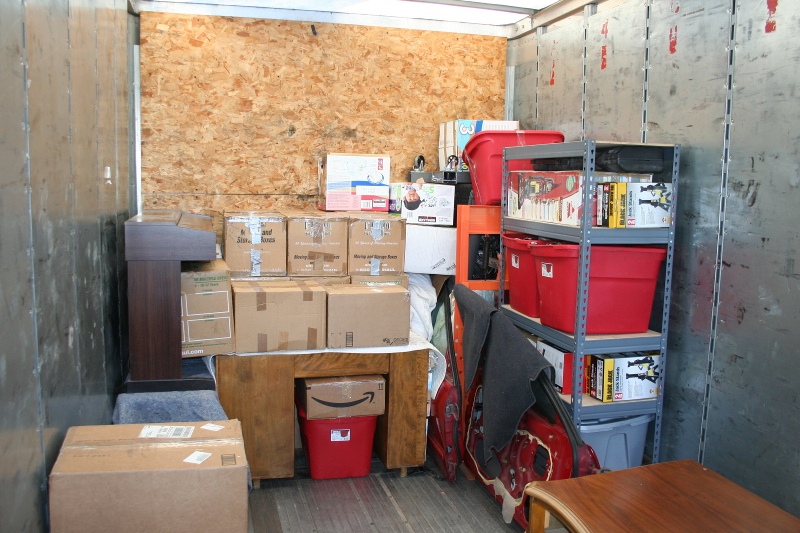
We used ABF UPack for the move. They just drop a semi trailer in front of your house and you fill up as much as you need. Then they do their own shipments and leave you the trailer at the destination when they are done. Sometimes it's way cheaper than UHaul and the customer service is miles better.
The car parts went in first, stacked on the right. It's weird to look at that pile and think there is a CAR in there.
There was a black widow outside the garage while we were loading:

The route from Reno to TX goes by a bunch of cool landmarks. With a 2 year old in the car we didn't have time for a lot of them, but we did see the Hoover Dam on day 2:

Refuling and stretching the legs in Santa Rosa, NM
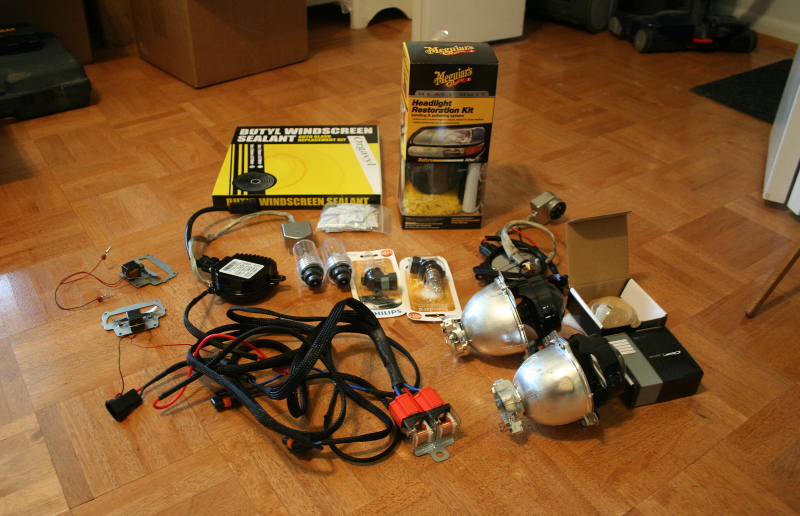
Indy's headlights were not doing well to say the least. The little man and Water Baby decided to see if a little polish would help:

Fortunately my wife and I didn't have to do all the driving.

Texas greeted us with some wintery weather and then a fantastic thunderstorm. It was nice to have real weather again:

The poor performance of the stock headlights necessitated a little bit of an upgrade. These arrived in TX not long after we did. More on this to come...
We used ABF UPack for the move. They just drop a semi trailer in front of your house and you fill up as much as you need. Then they do their own shipments and leave you the trailer at the destination when they are done. Sometimes it's way cheaper than UHaul and the customer service is miles better.
The car parts went in first, stacked on the right. It's weird to look at that pile and think there is a CAR in there.
There was a black widow outside the garage while we were loading:
The route from Reno to TX goes by a bunch of cool landmarks. With a 2 year old in the car we didn't have time for a lot of them, but we did see the Hoover Dam on day 2:
Refuling and stretching the legs in Santa Rosa, NM
Indy's headlights were not doing well to say the least. The little man and Water Baby decided to see if a little polish would help:
Fortunately my wife and I didn't have to do all the driving.
Texas greeted us with some wintery weather and then a fantastic thunderstorm. It was nice to have real weather again:
The poor performance of the stock headlights necessitated a little bit of an upgrade. These arrived in TX not long after we did. More on this to come...
05-16-2014, 08:36 AM
#333
Honda-Tech Member
Join Date: Jul 2013
Location: sleeping in a 368k 95 gs-r
Posts: 1,975
Likes: 0
Received 41 Likes
on
41 Posts
try some nufinish/poor boy's cleaner/clay bar/1000 grit sandpaper on the hood.
just ordered the dubious $4 fleabay clay from china, if it's any good i'll chime in.
my dad's a rabid k.u. alumni too lol, donates ridiculous amounts of $.
just ordered the dubious $4 fleabay clay from china, if it's any good i'll chime in.
my dad's a rabid k.u. alumni too lol, donates ridiculous amounts of $.
05-18-2014, 11:39 AM
#334

Last edited by GagnarTheUnruly; 05-21-2014 at 07:45 AM.
05-18-2014, 03:33 PM
#335
Honda-Tech Member
Your build thread was one of the first ones I came across when I got my first car (current integra) and started to hangout in the integra section, love the attention to detail through out the build. Kinda inspired my "B_swapped's recovery/progress thread" as it was more of a get the car nice again after the crash vs a build at the time. Your DIY's have helped me along the way too, the ASR subframe one especially lol. Is paint in the books for yours ? looks good! tons of hours put in which is always nice to see.
05-21-2014, 07:49 AM
#336
Your build thread was one of the first ones I came across when I got my first car (current integra) and started to hangout in the integra section, love the attention to detail through out the build. Kinda inspired my "B_swapped's recovery/progress thread" as it was more of a get the car nice again after the crash vs a build at the time. Your DIY's have helped me along the way too, the ASR subframe one especially lol. Is paint in the books for yours ? looks good! tons of hours put in which is always nice to see.
I'm really viewing this car as a restoration. I want to get it looking showroom ready some day, except modded. Sort of like a hot rod Chevelle but an Integra instead. I think in 20-30 years these will be true classics, including swapped LS's. I want to keep this car a long time.
05-21-2014, 09:57 AM
#337
Honda-Tech Member
Join Date: Jul 2013
Location: sleeping in a 368k 95 gs-r
Posts: 1,975
Likes: 0
Received 41 Likes
on
41 Posts
thanks for telling me to check the cel with the engine running.
i got 3- map sensor. not really sure what to do about it since it's
very intermittent and car seems to run fine.:shrugs:
cheers for the tip tho.
i got 3- map sensor. not really sure what to do about it since it's
very intermittent and car seems to run fine.:shrugs:
cheers for the tip tho.

Thread
Thread Starter
Forum
Replies
Last Post