
How to: Install ASR subframe brace and ITR sway bar on DC2 Integra
 02-17-2010, 01:07 PM
#1
I've seen a lot of writeups on how to install sway bars and braces, but no writeup I've found has shown how to install an ASR brace and ITR sway bar on an Integra. So, I decided to write a walkthrough. This is a step-by-step guide for how to mount an ASR brace and ITR bar, but it will work for any sway bar. For this guide I reused the stock endlinks and LCAs, and did not have to do break any bolts. I did drill threads out of two holes, however. This may be considered optional, but I think it's a good idea to do.
I ordered my ASR brace from Weaksauce (who are great, BTW) but it didn't come with instructions so that was another reason I thought this guide could be useful. Feel free to make comments or suggestions below.
Final note: this guide is ASR-brace specific, but should work for basically any replacement sway bar.
For ordering the Acura parts, I recommend OEMAcuraParts.com or AcuraOEMParts.com. I've had excellent experiences with both sellers and prices are competitive.
ASR Subframe Brace + ITR Rear Sway Bar Install on DC2 Integra
Warning: Use this guide at your own risk. I am not a professional mechanic and am not responsible for injury to you, your vehicle, or anyone/thing else if you chose to follow this guide, or for any false information presented here.
Tools:
10 mm socket
12 mm socket (deep and regular)
14 mm deep socket
12 mm open wrench
12 mm closed wrench, 12 pt ratcheting virtually necessary
Socket extender (useful but prob. not necessary)
1/8 inch hex key
Breaker bar and/or cheater bar
Vice grips
Floor jack and block of wood (bottle jack helps, too)
Jackstands & wheel chocks
A mallet and/or hammer
PB Blaster
Lug wrench
Torque wrench
Drill with 3/8" or 9.5 mm bit (semi-optional)
Touch up paint (if drilling)
Supplies:
ASR subframe brace for Integras (comes with its own mounting hardware)
ITR rear sway bar (52300-ST7-Z01)
2 ITR rubber swaybar bushings (52315-ST7-Z01)
2 ITR swaybar bushing ‘D’ brackets (52308-SS0-000)
2 ITR rubber endlink bushings (52316-ST7-Z00)
4 ITR endlink bushing inner collars (52312-ST7-Z00)*
2 Bolts for enlinks (probably optional -- 90175-ST7-Z00)
* For Integras equipped with a rear sway bar, the old single-piece bushing collars can be extracted with vice grips and reused
Note: These nuts are listed as required by other instructions but I didn’t need them. I’m not sure what they’re supposed to be for…
2 Flange nuts (94050-08080)
You may also want to order some new bolts that connect the LCA to the subframe. This is necessary if for some reason you’re adding a Beaks bar to your ASR, because the stock bolts are too short to fit through both the ASR brace and the Beaks tie bar. It also could be a good idea because the bolts can be quite tight and are known to break. If you weaken the bolt during removal it could break next time you try to remove it.
There's been some controversy on the web whether it's necessary to drill out threads or knock off any welded nuts to install the ASR. It seems that ASR has designed the brace so that knocking off a welded nut is no longer necessary for proper installation. However, drilling out threads is still recommended. The brace will mount up if you don't drill, but the rear plate will not snug properly against the subframe, meaning the brace will not be as strong as if you do drill. For an illustration of why it's important, see page 2 of this thread. ASR recommends drilling threads out of both sway bar mounting holes on the subframe. However, I see reason only to drill out the top threads. How you proceed is up to you. That said, it seems that many people have mounted without drilling, and have not had any problems.
ASR has published instructions on their website. The ones we use are also applicable to EG Civics. Here's a link to the instructions:
http://www.asrparts.com/instructions/egsubframe.pdf
Now, onto the walkthrough…
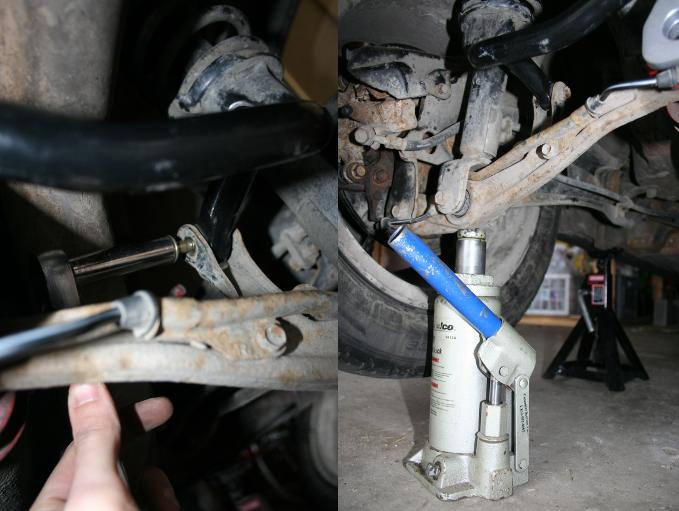
Step one is to jack up the car. Few walkthroughs show proper jacking and this is an early mod on most builds so I’m going to take a moment to describe it.
Before jacking up the rear of the car, put the transmission in reverse. It’s not necessary to put on the parking brake, but you can if you want to. Also, chock at least one of the wheels in the front and the back. I like safety, so I chock both front wheels front and back. Also, loosen the lugs on the rear wheels, in case you decide to remove the wheels. I removed the passenger side wheel, but not the driver side.
There are two spots to jack the rear of the car. One is the tow hook in back, but my jack can’t even lift this high enough for me to get jackstands in. So I use an ‘unofficial’ rear mounting point: the rear cross-member. To protect the frame from damage, you need to put a block of wood on top of your jack. This spreads the load and stops the frame from buckling or getting indentations from the jack.
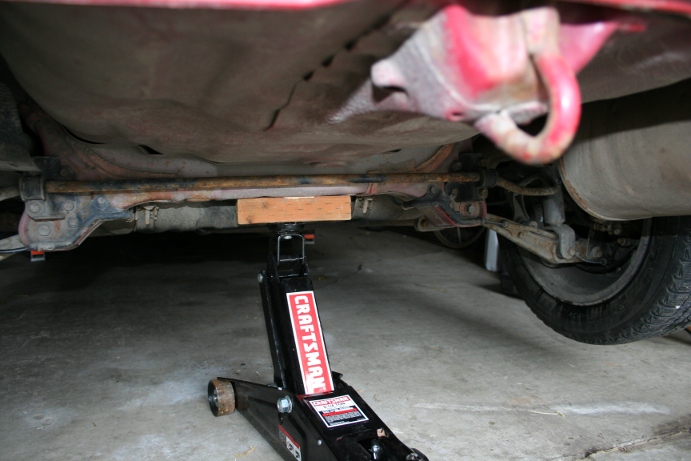
Next, place your jackstands under the reinforced tabs that stick down just in front of the rear wheels. It’s very important to place the stands here and only here. The tabs stick in indentations on the top of the jackstands and will stop the car from sliding sideways off the stands while you’re working, and they’re strong enough to hold the full weight of the car.
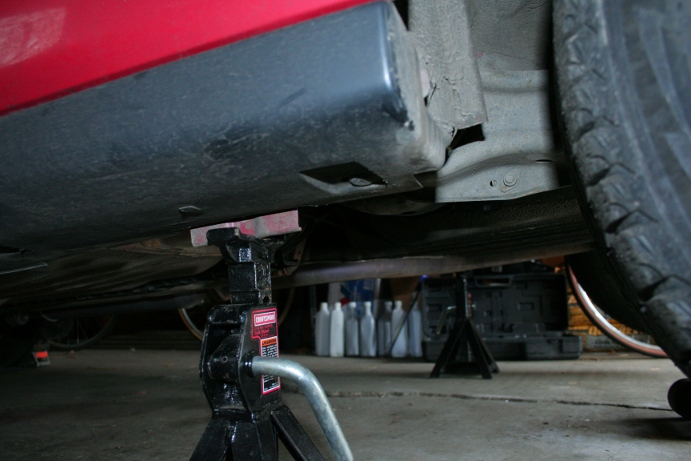
With the jackstands in place, lower the car slowly onto them. Once the weight of the car rests fully on the jackstands, close the valve on the jack so that it will stay mostly raised – this way, the jack will catch the car if the jackstands fail.
OK, with that done, it’s time to remove the old sway bar and everything else that will get in the way…
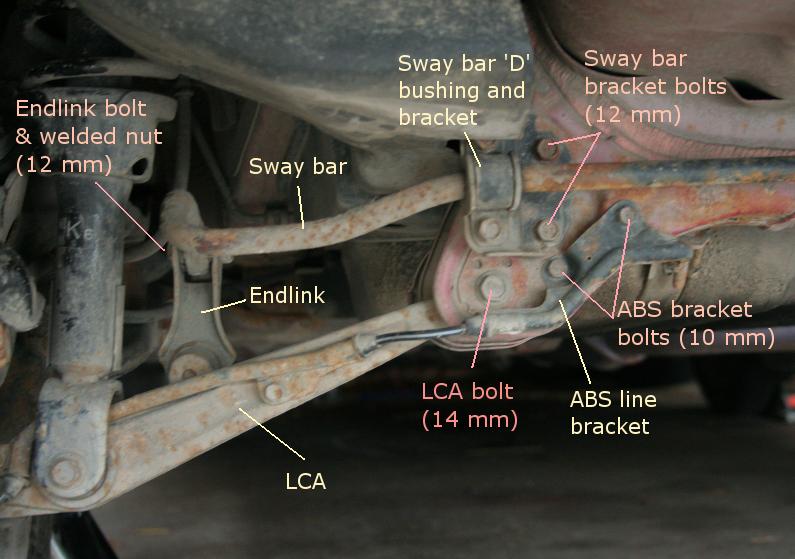
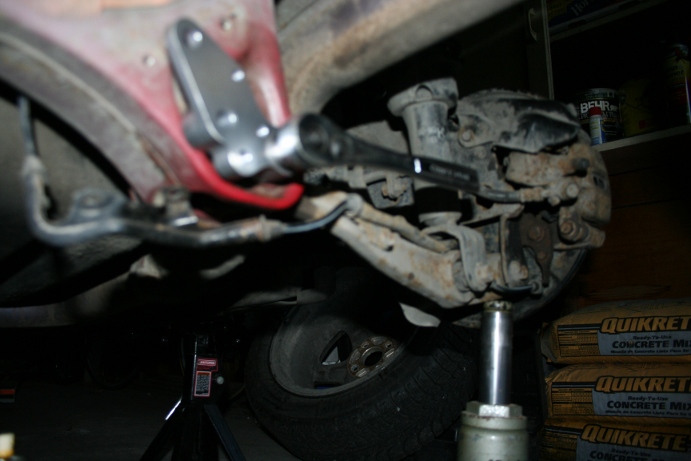
To put on the subframe brace you have to remove the bracket that holds the old sway bar, remove the bolts that hold the ABS line bracket to the subframe, remove the endlink bolt that connects the sway bar and endlink, and remove the LCA bolt that holds the LCA to the subframe – this is the toughest part and I recommend getting it out of the way for a few reasons, not the least of which is that the bolt can break, and if it does it’ll stop you in your tracks. It’s always better to get risky bolts out of the way early. Here’s a picture of all the bolts that have to come out:
The LCA bolts run through the LCA bushing to a welded nut in the back. All points on this bolt can seize, and these bolts can be very tough. It’s a good idea to spray these all over (front and back) with PB blaster and rap them in a couple places with a hammer to help the PB penetrate. Then go in and grab a sandwich or your choice of beverage and let the PB Blaster do some work for you. If you want, spraying days ahead of time may make things easier.
Removing the bolt will require a cheater bar, breaker bar, or impact wrench, and a 14 mm deep socket. I used a cheater first but switched to a large breaker so I wouldn’t damage my ratchet. The cheater I use is the pump handle for my ACDelco bottle jack. It works beautifully! Unlike many tight bolts, these don’t get easier once they’ve broken loose. I had to apply 60 or so ft-lbs for a half dozen or more turns of the bolt.
Caution: these bolts can break, and if they do you’ll need to drill them out, cut them out, or burn out the bushing, so go easy on the torque and hard on the PB Blaster.
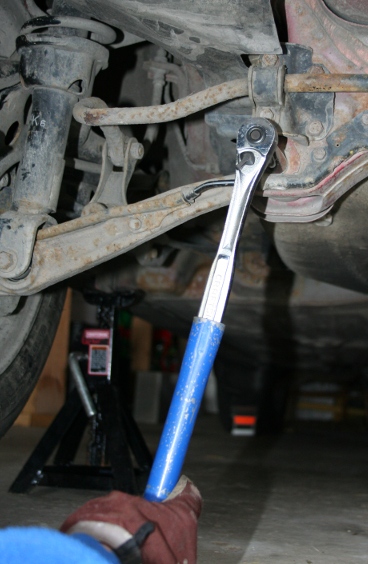
The only threaded part for this bolt is the welded nut on the back. When the bolt works out of that, it will become much easier to turn, but will stop working its way out. Grab it with some locking pliers and pull while twisting CCW. It will pull mostly out and then thread its way out of the hole in the subframe.
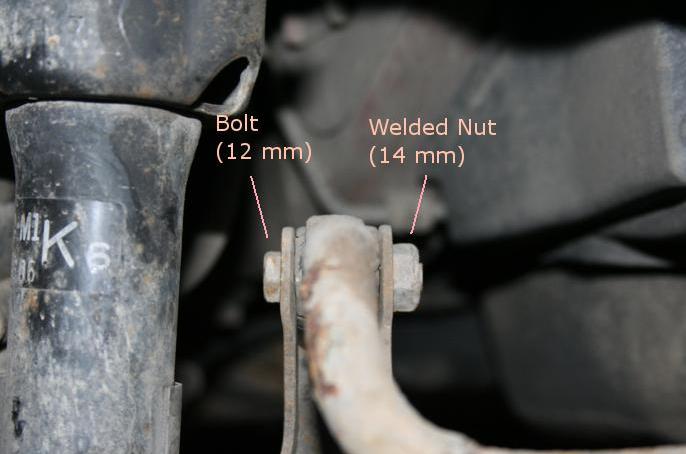
Next, remove the endlink bolt connecting the endlink to the sway bar. This is a 12 mm bolt that goes through the sway bar bushing and threads into a 14 mm welded nut on the other side. On my car the bolt head was always on the left side of the endlink. This should come out easily. It’s easier to reach if the wheel is off, particularly on the passenger side where the exhaust gets in the way.
After removing the endlink bolt, remove the lower/outer 10 mm bolt holding the ABS line to the subframe. That bolt will get in the way, but the other won't. Alternatively, you can just remove both bolts; the brace will hold the ABS bracket tight against the subframe even when the bracket isn't bolted in. The last two bolts you have to remove are the two 12 mm bolts holding the sway bar bracket to the subframe. Don’t worry about disassembling the bracket or separating it from the sway bar – you won’t be reusing it or the bolts. Here’s what the subframe should look like:
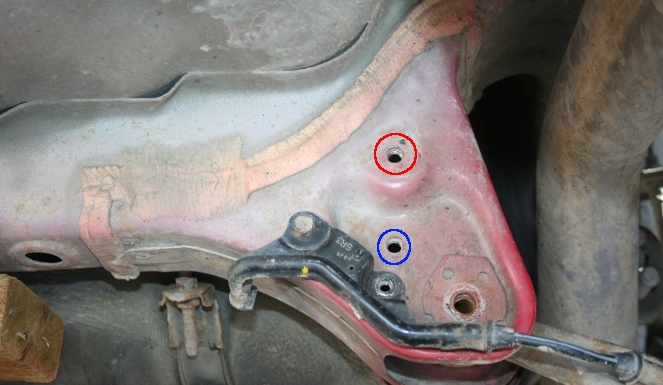
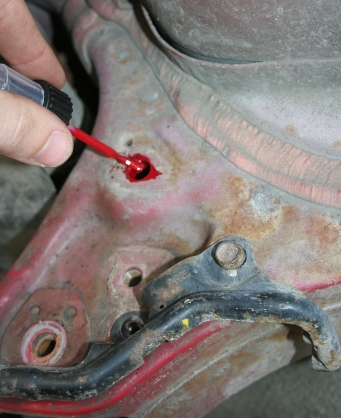
The holes to drill out are circled in the photo above. The upper hole is circled in red, and this is the hole that I recommend drilling. The lower hole is circled in blue. ASR recommends drilling this hole as well, but I don't honestly see the point. The point of drilling is to destroy the threads in the welded nuts behind these holes. Use a 3/8" drill bit (put a drop of motor oil on the end of the bit to keep it cool), and then protect the exposed steel with a little touch-up paint or primer. This requires a pretty large bit, and the way to do this is to push softly and let the bit do the work for you. Safety goggles are a good idea to protect yourself from metal shards.
After you drill, protect the bare metal with some touch-up paint.
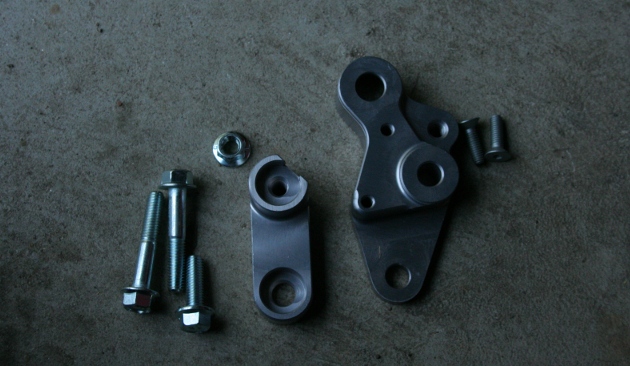
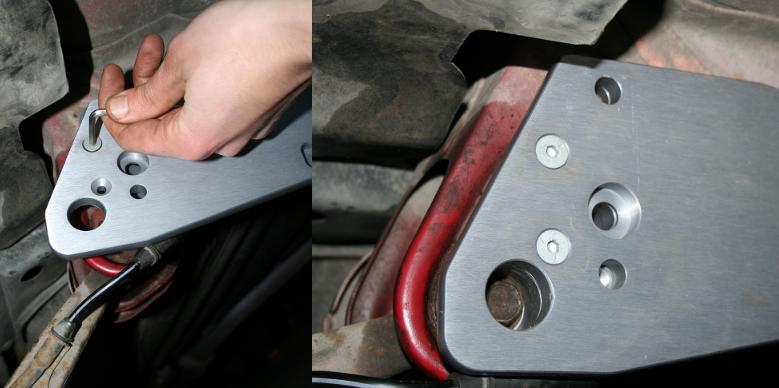
Now it’s time to put the ASR brace on. The brace comes with all its mounting hardware. This should consist of a large ‘front’ aluminum mounting plate, a smaller ‘rear’ mounting plate, two long-ish 12 mm bolts and one shorter 12 mm bolt, a 12 mm nut, and two small allen-key bolts for each side of the car. Here’s the hardware needed for the driver side:
The first step is to mount the large ‘front’ mounting plate (note: this is actually on the rear of the car, but it’s in front if you’re looking at it from the back while you’re doing the install). Orient it so that the flat side is facing towards you, and run the LCA bolt through the bottom of the plate and into the LCA and subframe. The LCA will probably have dropped a bit while you were removing the sway bar. To line it up with the subframe, jack it up from below (a bottle jack is probably best for this). The bolt will probably thread through fairly easily.

I ordered my ASR brace from Weaksauce (who are great, BTW) but it didn't come with instructions so that was another reason I thought this guide could be useful. Feel free to make comments or suggestions below.
Final note: this guide is ASR-brace specific, but should work for basically any replacement sway bar.
For ordering the Acura parts, I recommend OEMAcuraParts.com or AcuraOEMParts.com. I've had excellent experiences with both sellers and prices are competitive.
ASR Subframe Brace + ITR Rear Sway Bar Install on DC2 Integra
Warning: Use this guide at your own risk. I am not a professional mechanic and am not responsible for injury to you, your vehicle, or anyone/thing else if you chose to follow this guide, or for any false information presented here.
Tools:
10 mm socket
12 mm socket (deep and regular)
14 mm deep socket
12 mm open wrench
12 mm closed wrench, 12 pt ratcheting virtually necessary
Socket extender (useful but prob. not necessary)
1/8 inch hex key
Breaker bar and/or cheater bar
Vice grips
Floor jack and block of wood (bottle jack helps, too)
Jackstands & wheel chocks
A mallet and/or hammer
PB Blaster
Lug wrench
Torque wrench
Drill with 3/8" or 9.5 mm bit (semi-optional)
Touch up paint (if drilling)
Supplies:
ASR subframe brace for Integras (comes with its own mounting hardware)
ITR rear sway bar (52300-ST7-Z01)
2 ITR rubber swaybar bushings (52315-ST7-Z01)
2 ITR swaybar bushing ‘D’ brackets (52308-SS0-000)
2 ITR rubber endlink bushings (52316-ST7-Z00)
4 ITR endlink bushing inner collars (52312-ST7-Z00)*
2 Bolts for enlinks (probably optional -- 90175-ST7-Z00)
* For Integras equipped with a rear sway bar, the old single-piece bushing collars can be extracted with vice grips and reused
Note: These nuts are listed as required by other instructions but I didn’t need them. I’m not sure what they’re supposed to be for…
2 Flange nuts (94050-08080)
You may also want to order some new bolts that connect the LCA to the subframe. This is necessary if for some reason you’re adding a Beaks bar to your ASR, because the stock bolts are too short to fit through both the ASR brace and the Beaks tie bar. It also could be a good idea because the bolts can be quite tight and are known to break. If you weaken the bolt during removal it could break next time you try to remove it.
There's been some controversy on the web whether it's necessary to drill out threads or knock off any welded nuts to install the ASR. It seems that ASR has designed the brace so that knocking off a welded nut is no longer necessary for proper installation. However, drilling out threads is still recommended. The brace will mount up if you don't drill, but the rear plate will not snug properly against the subframe, meaning the brace will not be as strong as if you do drill. For an illustration of why it's important, see page 2 of this thread. ASR recommends drilling threads out of both sway bar mounting holes on the subframe. However, I see reason only to drill out the top threads. How you proceed is up to you. That said, it seems that many people have mounted without drilling, and have not had any problems.
ASR has published instructions on their website. The ones we use are also applicable to EG Civics. Here's a link to the instructions:
http://www.asrparts.com/instructions/egsubframe.pdf
Now, onto the walkthrough…
Step one is to jack up the car. Few walkthroughs show proper jacking and this is an early mod on most builds so I’m going to take a moment to describe it.
Before jacking up the rear of the car, put the transmission in reverse. It’s not necessary to put on the parking brake, but you can if you want to. Also, chock at least one of the wheels in the front and the back. I like safety, so I chock both front wheels front and back. Also, loosen the lugs on the rear wheels, in case you decide to remove the wheels. I removed the passenger side wheel, but not the driver side.
There are two spots to jack the rear of the car. One is the tow hook in back, but my jack can’t even lift this high enough for me to get jackstands in. So I use an ‘unofficial’ rear mounting point: the rear cross-member. To protect the frame from damage, you need to put a block of wood on top of your jack. This spreads the load and stops the frame from buckling or getting indentations from the jack.
Next, place your jackstands under the reinforced tabs that stick down just in front of the rear wheels. It’s very important to place the stands here and only here. The tabs stick in indentations on the top of the jackstands and will stop the car from sliding sideways off the stands while you’re working, and they’re strong enough to hold the full weight of the car.
With the jackstands in place, lower the car slowly onto them. Once the weight of the car rests fully on the jackstands, close the valve on the jack so that it will stay mostly raised – this way, the jack will catch the car if the jackstands fail.
OK, with that done, it’s time to remove the old sway bar and everything else that will get in the way…
To put on the subframe brace you have to remove the bracket that holds the old sway bar, remove the bolts that hold the ABS line bracket to the subframe, remove the endlink bolt that connects the sway bar and endlink, and remove the LCA bolt that holds the LCA to the subframe – this is the toughest part and I recommend getting it out of the way for a few reasons, not the least of which is that the bolt can break, and if it does it’ll stop you in your tracks. It’s always better to get risky bolts out of the way early. Here’s a picture of all the bolts that have to come out:
The LCA bolts run through the LCA bushing to a welded nut in the back. All points on this bolt can seize, and these bolts can be very tough. It’s a good idea to spray these all over (front and back) with PB blaster and rap them in a couple places with a hammer to help the PB penetrate. Then go in and grab a sandwich or your choice of beverage and let the PB Blaster do some work for you. If you want, spraying days ahead of time may make things easier.
Removing the bolt will require a cheater bar, breaker bar, or impact wrench, and a 14 mm deep socket. I used a cheater first but switched to a large breaker so I wouldn’t damage my ratchet. The cheater I use is the pump handle for my ACDelco bottle jack. It works beautifully! Unlike many tight bolts, these don’t get easier once they’ve broken loose. I had to apply 60 or so ft-lbs for a half dozen or more turns of the bolt.
Caution: these bolts can break, and if they do you’ll need to drill them out, cut them out, or burn out the bushing, so go easy on the torque and hard on the PB Blaster.
The only threaded part for this bolt is the welded nut on the back. When the bolt works out of that, it will become much easier to turn, but will stop working its way out. Grab it with some locking pliers and pull while twisting CCW. It will pull mostly out and then thread its way out of the hole in the subframe.
Next, remove the endlink bolt connecting the endlink to the sway bar. This is a 12 mm bolt that goes through the sway bar bushing and threads into a 14 mm welded nut on the other side. On my car the bolt head was always on the left side of the endlink. This should come out easily. It’s easier to reach if the wheel is off, particularly on the passenger side where the exhaust gets in the way.
After removing the endlink bolt, remove the lower/outer 10 mm bolt holding the ABS line to the subframe. That bolt will get in the way, but the other won't. Alternatively, you can just remove both bolts; the brace will hold the ABS bracket tight against the subframe even when the bracket isn't bolted in. The last two bolts you have to remove are the two 12 mm bolts holding the sway bar bracket to the subframe. Don’t worry about disassembling the bracket or separating it from the sway bar – you won’t be reusing it or the bolts. Here’s what the subframe should look like:
The holes to drill out are circled in the photo above. The upper hole is circled in red, and this is the hole that I recommend drilling. The lower hole is circled in blue. ASR recommends drilling this hole as well, but I don't honestly see the point. The point of drilling is to destroy the threads in the welded nuts behind these holes. Use a 3/8" drill bit (put a drop of motor oil on the end of the bit to keep it cool), and then protect the exposed steel with a little touch-up paint or primer. This requires a pretty large bit, and the way to do this is to push softly and let the bit do the work for you. Safety goggles are a good idea to protect yourself from metal shards.
After you drill, protect the bare metal with some touch-up paint.
Now it’s time to put the ASR brace on. The brace comes with all its mounting hardware. This should consist of a large ‘front’ aluminum mounting plate, a smaller ‘rear’ mounting plate, two long-ish 12 mm bolts and one shorter 12 mm bolt, a 12 mm nut, and two small allen-key bolts for each side of the car. Here’s the hardware needed for the driver side:
The first step is to mount the large ‘front’ mounting plate (note: this is actually on the rear of the car, but it’s in front if you’re looking at it from the back while you’re doing the install). Orient it so that the flat side is facing towards you, and run the LCA bolt through the bottom of the plate and into the LCA and subframe. The LCA will probably have dropped a bit while you were removing the sway bar. To line it up with the subframe, jack it up from below (a bottle jack is probably best for this). The bolt will probably thread through fairly easily.
Last edited by GagnarTheUnruly; 04-08-2010 at 03:46 PM.
 02-17-2010, 01:07 PM
#2
Continue threading the bolt through the LCA bushing until it stops going any farther. You will hear it turning against the inside of the subframe, and it will have about half an inch left to go in. The problem is that the springs twist the LCA, so if it’s lined up with one of the holes in the subframe, it won’t line up with the other hole. The trick is to move your jack to where the LCA links with the shock, and jack it from there. As the wheel hub raises, the LCA will twist back into the correct orientation. Just raise it bit by bit until the bolt lines up with the subframe and threads through. I had to raise my hub so that the LCA was roughly horizontal. Once I got it aligned, the bolt threaded easily. Line the mounting plate up properly and hand snug the LCA bolt for now.
Note: ignore the dangling ABS bracket in the picture below…
Now it’s time to bolt the brace to the front mounting plate. To do this you use the small allen key bolts and a 1/8 inch hex key. Snug each screw, and then go around tightening them all one by one until all are tight. I had to re-tighten some of them three or four times before the brace pressed correctly in place and all the bolts got properly tight. Note how the ABS bracket pokes out of the bottom behind the brace:
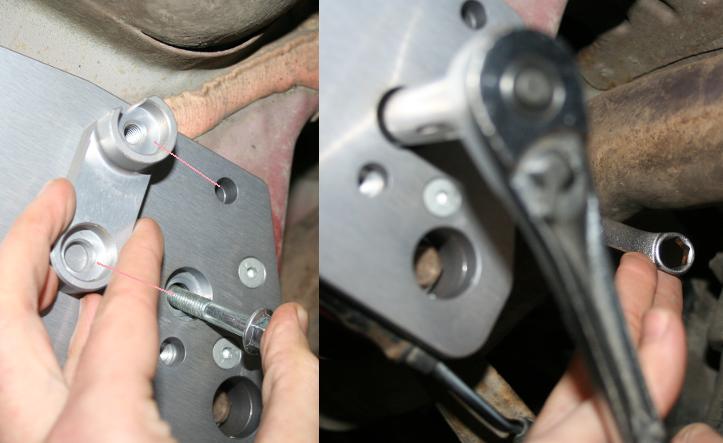
The next step is to mount the rear mounting plate using one of the long 12 mm bolts that comes with the kit. This bolt runs through the large hole in the brace, through the subframe, and into a non-threaded hole in the rear plate. It is fastened against the back of the plate by the 12 mm nut that comes in the kit. The easiest way to do this is to get the rear plate in position and hold it with your hand. With your other hand start the bolt through, then thread it in until it is just poking out of the hole in the rear plate. Next you can slide the nut over the tiny bit of bolt sticking out. If they are lined up the bolt will find the nut and start threading into the nut. As you tighten the bolt, hold the nut still with an open 12 mm wrench. Then, using a ratcheting 12 pt. 12 mm closed wrench, snug but do not tighten the nut. Because space between the LCA and body is limited, a 6 pt. wrench won’t work and a ratcheting wrench is practically necessary.
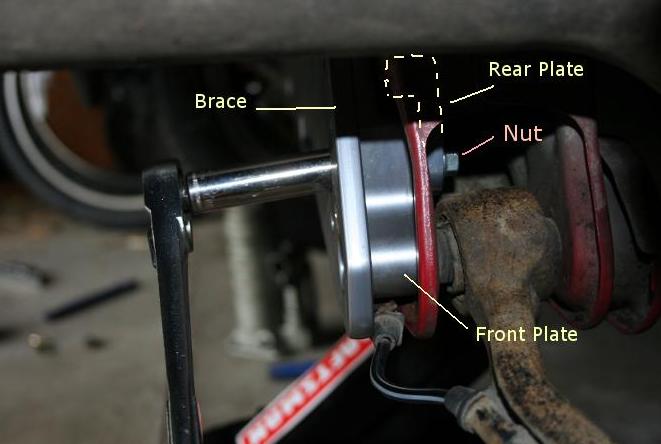
The rear plate should be oriented as shown, with the cutout on the inwards side of the plate, and the bezels facing towards the brace (these go around welded nuts in the subframe that at one time had to be knocked off to install the brace properly).
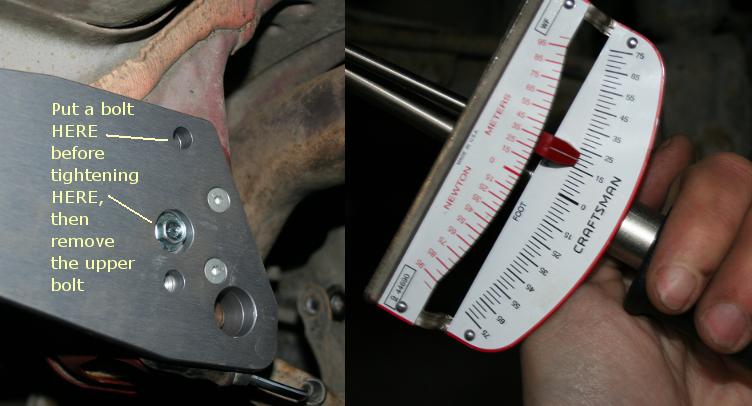
This picture shows the nut properly installed on the bottom of the rear bracket.
Now, run the other long bolt through the upper hole in the brace and snug it. Next, tighten the lower bolt and nut to 20 ft-lbs, and then remove the upper bolt. The point of doing this is to make sure the rear bracket is lined up correctly before you tighten the lower bolt.
At this point it’s time to prepare and install the ITR sway bar. To install the endlink bushings, just place them where they’re supposed to go and stand on them. Then put in the inner collars for the endlinks. These just go into either end of each endlink bushing. You need four of them – two for each bushing. These just pop in, but you may need to stand on them.
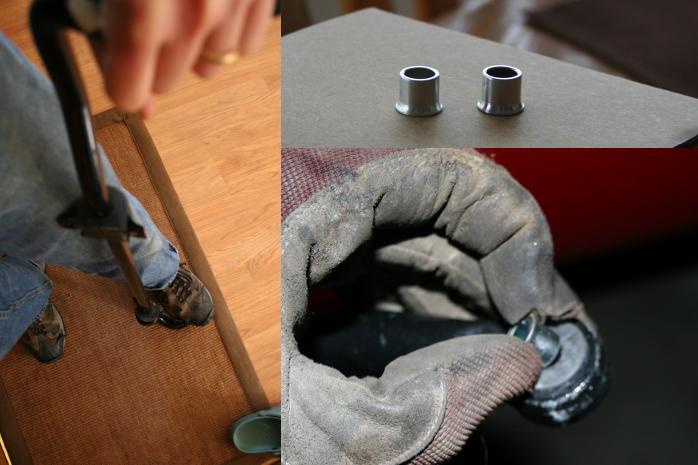
Next, put the D-shaped rubber sway bar bushings on (just open them up and squish them on), and press the sway bar bushing ‘D’ bracket on. The sway bar is now ready to go.
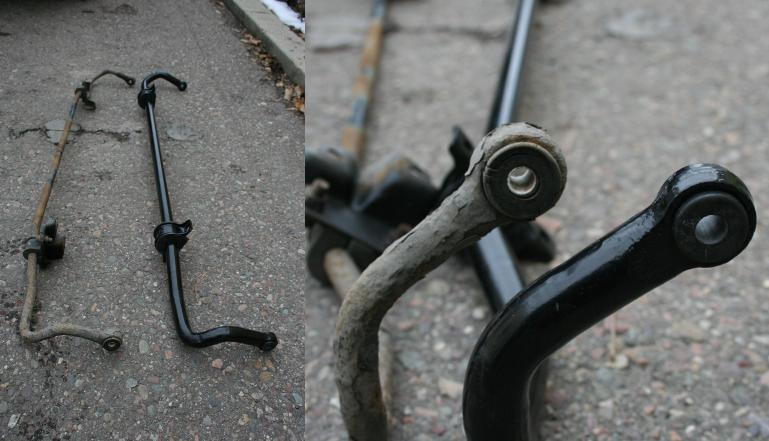
Here, I stopped to ponder how pathetic my old GSR sway bar looked compared to the beefy (and rust-free) ITR bar. I also used the old bar as a guide to where the D-bushings should be and how they should be oriented.
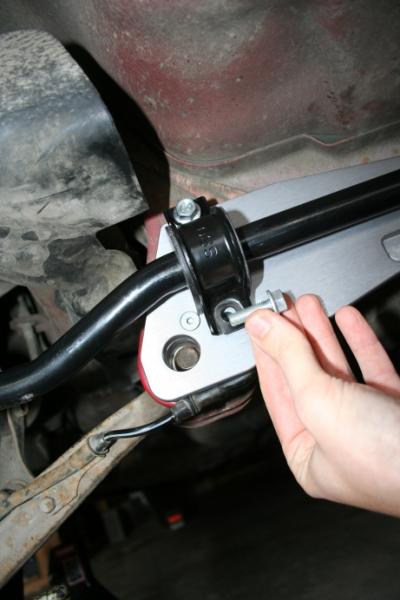
Finally, it’s time to install the new sway bar. It will go in the last two bolt holes on the subframe brace. The long 12 mm bolt that came with the brace goes in the top hole, and the short bolt goes in the bottom hole. Snug all four of these bolts, but don’t tighten them yet.
Now comes a slightly tricky part – getting the sway bar into the endlinks. This may be easier with a partner but it’s totally do-able with one person. The trick is just to rotate the bar close to the endlinks and work each side, gradually getting it farther into the endlinks. I just tapped the bar and enlinks with a mallet to line them up, and levered the bar into the endlink with the handle of my mallet. I went back and forth between each side a few different times, but eventually it was lined up enough on one side that I was able to thread the bolt through. Just reuse the old endlink bolt here. Snug it, but don’t torque it down.
The other side was more of a pain, and I found that jacking up the LCA from the shock mount helped to line things up.
An alternative strategy would be to remove the endlinks from the LCA (14 mm bolt), connect the loose endlink to the sway bar, and then re-attatch the endlink to the LCA.
The last step before lowering the car is to loosen the LCA bolts a little bit. It’s best to tighten it when the car is at its natural ride height. Make sure that the sway bar bracket bolts, endlink bolts, and LCA bolt are snug but not tight.
Now, lower the car (remember to put a block of wood on the jack before lifting the car from the crossmember), and push the back of the car down a couple times by setting your body weight on it. This helps the suspension to settle. Once you’ve done that, tighten all the bolts to spec:
Endlink bolts – 16 ft-lbs
Sway bar bracket bolts – 20 ft-lbs
LCA bolts – 40 ft-lbs
…and you’re done! Take a minute to admire your handiwork – and then go for a drive! It’s amazing how the sway bar completely changes the handling of the car close to the limits, and how much more willingly the car rotates.
Note: ignore the dangling ABS bracket in the picture below…
Now it’s time to bolt the brace to the front mounting plate. To do this you use the small allen key bolts and a 1/8 inch hex key. Snug each screw, and then go around tightening them all one by one until all are tight. I had to re-tighten some of them three or four times before the brace pressed correctly in place and all the bolts got properly tight. Note how the ABS bracket pokes out of the bottom behind the brace:
The next step is to mount the rear mounting plate using one of the long 12 mm bolts that comes with the kit. This bolt runs through the large hole in the brace, through the subframe, and into a non-threaded hole in the rear plate. It is fastened against the back of the plate by the 12 mm nut that comes in the kit. The easiest way to do this is to get the rear plate in position and hold it with your hand. With your other hand start the bolt through, then thread it in until it is just poking out of the hole in the rear plate. Next you can slide the nut over the tiny bit of bolt sticking out. If they are lined up the bolt will find the nut and start threading into the nut. As you tighten the bolt, hold the nut still with an open 12 mm wrench. Then, using a ratcheting 12 pt. 12 mm closed wrench, snug but do not tighten the nut. Because space between the LCA and body is limited, a 6 pt. wrench won’t work and a ratcheting wrench is practically necessary.
The rear plate should be oriented as shown, with the cutout on the inwards side of the plate, and the bezels facing towards the brace (these go around welded nuts in the subframe that at one time had to be knocked off to install the brace properly).
This picture shows the nut properly installed on the bottom of the rear bracket.
Now, run the other long bolt through the upper hole in the brace and snug it. Next, tighten the lower bolt and nut to 20 ft-lbs, and then remove the upper bolt. The point of doing this is to make sure the rear bracket is lined up correctly before you tighten the lower bolt.
At this point it’s time to prepare and install the ITR sway bar. To install the endlink bushings, just place them where they’re supposed to go and stand on them. Then put in the inner collars for the endlinks. These just go into either end of each endlink bushing. You need four of them – two for each bushing. These just pop in, but you may need to stand on them.
Next, put the D-shaped rubber sway bar bushings on (just open them up and squish them on), and press the sway bar bushing ‘D’ bracket on. The sway bar is now ready to go.
Here, I stopped to ponder how pathetic my old GSR sway bar looked compared to the beefy (and rust-free) ITR bar. I also used the old bar as a guide to where the D-bushings should be and how they should be oriented.
Finally, it’s time to install the new sway bar. It will go in the last two bolt holes on the subframe brace. The long 12 mm bolt that came with the brace goes in the top hole, and the short bolt goes in the bottom hole. Snug all four of these bolts, but don’t tighten them yet.
Now comes a slightly tricky part – getting the sway bar into the endlinks. This may be easier with a partner but it’s totally do-able with one person. The trick is just to rotate the bar close to the endlinks and work each side, gradually getting it farther into the endlinks. I just tapped the bar and enlinks with a mallet to line them up, and levered the bar into the endlink with the handle of my mallet. I went back and forth between each side a few different times, but eventually it was lined up enough on one side that I was able to thread the bolt through. Just reuse the old endlink bolt here. Snug it, but don’t torque it down.
The other side was more of a pain, and I found that jacking up the LCA from the shock mount helped to line things up.
An alternative strategy would be to remove the endlinks from the LCA (14 mm bolt), connect the loose endlink to the sway bar, and then re-attatch the endlink to the LCA.
The last step before lowering the car is to loosen the LCA bolts a little bit. It’s best to tighten it when the car is at its natural ride height. Make sure that the sway bar bracket bolts, endlink bolts, and LCA bolt are snug but not tight.
Now, lower the car (remember to put a block of wood on the jack before lifting the car from the crossmember), and push the back of the car down a couple times by setting your body weight on it. This helps the suspension to settle. Once you’ve done that, tighten all the bolts to spec:
Endlink bolts – 16 ft-lbs
Sway bar bracket bolts – 20 ft-lbs
LCA bolts – 40 ft-lbs
…and you’re done! Take a minute to admire your handiwork – and then go for a drive! It’s amazing how the sway bar completely changes the handling of the car close to the limits, and how much more willingly the car rotates.
Last edited by GagnarTheUnruly; 04-08-2010 at 03:47 PM.


Trending Topics
02-17-2010, 08:27 PM
#11
Honda-Tech Member
Join Date: Apr 2005
Location: Port St. Lucie, Fl, United States
Posts: 290
Likes: 0
Received 0 Likes
on
0 Posts
nice write up.looks great, definetly a nice added touch.So how's she handle after the upgrades??
02-17-2010, 08:52 PM
#12
Excellent write up. I bought a ASR sway bar from a member on here and recieved some weird little bracket things... this guide helped me determine what they were originally for!
Thanks, I'm lookin' for an ASR brace if you know anyone selling one!?
Thanks, I'm lookin' for an ASR brace if you know anyone selling one!?
02-18-2010, 06:23 AM
#13
Honda-Tech Member

Join Date: Aug 2009
Location: Pittsburgh, PA
Posts: 178
Likes: 0
Received 0 Likes
on
0 Posts
Very nice man, I will be doing this in the near future. I am waiting for my ASR brace to come in from weaksauce. I have everything else but thank goodness I saw this I forgot to get the 4 ITR endlink bushing inner collars. Do you think I would be able to pick this up at an auto parts store? Or is this just from the dealership? I would hate to pay 5+ bucks for one metal collar, but if I have to oh well I guess.
02-18-2010, 06:29 AM
#14
@all -- thanks, hopefully this will still help some people (except sometimes it seems like every Integra already has these installed LOL).
I didn't notice any difference at all in around town driving, even if it's semi-spirited. However, when you get to 8/10s and above, the handling of the car is completely different from before the upgrade.
I never had a problem with the car's handling before, but now it just dances around corners. The back end follows the car much more easily it's like it urges the car to rotate. If I accelerate out of a corner, the effect just increases and the car sort of slings around the corner. Overall the balance is still towards very slight understeer -- I think I'd have to brake to get oversteer, but the handling is so much closer to neutral now that it feels really great. The car is just much more willing to rotate through a turn. I'm looking forward to getting the car on a pass and getting to some real twisties. So far my only driving has been around the block, basically, so I had to be careful and my options for exploring the handling were limited to a few right hand turns and a traffic circle.
I never had a problem with the car's handling before, but now it just dances around corners. The back end follows the car much more easily it's like it urges the car to rotate. If I accelerate out of a corner, the effect just increases and the car sort of slings around the corner. Overall the balance is still towards very slight understeer -- I think I'd have to brake to get oversteer, but the handling is so much closer to neutral now that it feels really great. The car is just much more willing to rotate through a turn. I'm looking forward to getting the car on a pass and getting to some real twisties. So far my only driving has been around the block, basically, so I had to be careful and my options for exploring the handling were limited to a few right hand turns and a traffic circle.
02-18-2010, 07:21 AM
#15
Honda-Tech Member

Join Date: Jun 2009
Posts: 20
Likes: 0
Received 0 Likes
on
0 Posts
man, that's why my install was so damn difficult. they sent me the wrong brackets and it didn't have the holes for the DC i was so annoyed.
02-18-2010, 09:25 AM
#16
Honda-Tech Member
iTrader: (1)

Join Date: Nov 2002
Location: Normal, IL USA
Posts: 933
Likes: 0
Received 0 Likes
on
0 Posts
Awsome, thanks for the detailed how-to. One question-why did you decide to go with the OEM ITE sway as opposed to the ASR 24mm? This is my next mod and I am debating on which route to go. Right now I am leaning toward the asr 24mm bar.
02-18-2010, 10:27 AM
#17
http://www.team-integra.net/forum/di...0&ThreadPage=1
Here's some info:
22 mm is 610% (6x) stiffer than stock 14 mm
24 mm is 860% stiffer than stock 14 mm
24 mm is 140% stiffer than 22 mm
The stiffer it is, the more oversteer you dial in. Exactly how much depends on the stiffness of the front bar and the shocks. FWIW the USDM ITR has 22 mm rear and 24 mm front and is pretty damg neutral. For the JDM ITR Honda added a stiffer (25 mm) front to counteract somewhat the stiffer rear (23 mm), probably because they were trying not to add too much oversteer.
A couple other things to keep in mind: the stiffer your springs, the less of an effect the sway bar has. So if you're on a really stiff suspension changing the sway bar isn't going to affect handling as much as if you're closer to stock rates. Also, the F/R spring rate balance is also going to affect understeer/oversteer. If you've got an extra stiff rear (say 500 # front and back), you're already going to get oversteer, and stiffening the back more could be a bad idea. If you're more balanced (380/250 F/R or 500/350) you can get away with adding more oversteer.
On the streets, oversteer is risky because naturally oversteering setups can snap into oversteer on trail braking or lift-throttle situations. Even the ITR setup has a reuptation for being hair-raising from time to time, when unexpected oversteer occurs. On a track, it's best to dial out the understeer, but neutral handling is preferred because it's best not to be drifting too much through sweepers. For autoX in FWD cars, people like lots of oversteer because it helps to rotate the car around the tight corners.
For me, the 22mm ITR seems plenty stiff and I wouldn't want any more oversteer than I think I'm going to be getting with it (mostly street use). If you're doing autoX or track racing, you might want the ASR because it gives you the option of dialing in some oversteer, and then moving the endlink out to the softer setting for around-town. But if you're gonna get the ASR and stick it on the soft setting and leave it there, you might be better off with ITR.
You'll just have to decide what you want out of the car and what you'll be using it for.
02-18-2010, 11:11 AM
#18
Honda-Tech Member
iTrader: (1)
Join Date: Nov 2002
Location: Normal, IL USA
Posts: 933
Likes: 0
Received 0 Likes
on
0 Posts
Thanks for the link. After reading that, I am now leaning towards the same setup you went with.
02-18-2010, 06:16 PM
#19
Good write up. I didn't notice the first time I read this but your brace looks different than mine. I didn't have allen bolts and you didn't have to drill out a nut. ASR must have made some changes.
02-19-2010, 08:33 AM
#21
Honda-Tech Member
iTrader: (1)
Join Date: Nov 2008
Location: In a home,WA
Posts: 2,938
Likes: 0
Received 0 Likes
on
0 Posts
Very nice, just what i needed. I'm doing this once my bushings come in. ASR said that it requires drilling. But i guess thats only to use their LCA bolts. Jsut to confirm, the stock LCA will work correct?
02-20-2010, 09:34 AM
#24
Honda-Tech Member
iTrader: (1)
Join Date: Nov 2008
Location: In a home,WA
Posts: 2,938
Likes: 0
Received 0 Likes
on
0 Posts
The ASR kit you have now is the older version? looks different from mines? They changed their designs?