
DIY: Rear Brake Caliper Rebuild
 05-17-2015, 11:10 PM
#1

What's up H/T, since I wasn't able to find any tutorials on doing this, I figured I'd make one using the leftover caliper from my brake rebuild.
Disclaimer: This is what worked for me and isn't necessarily the best way of doing it, I'm not responsible for anything that happens to your car or you. If you aren't 100% sure of yourself, spend the $$$ at a shop or for a new caliper. Brakes aren't something to be taken lightly.
Tools needed:
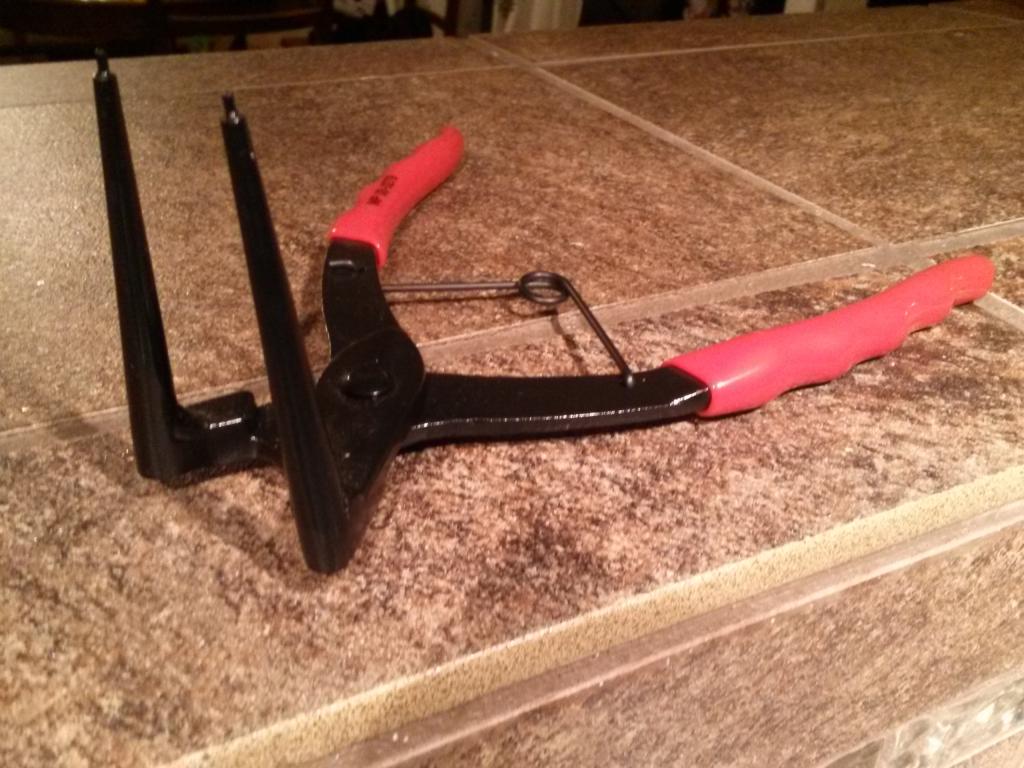
1) Snap ring pliers (long skinny ones, I ended up making some out of a set of needle nose pliers)
2) Gloves
3) Something to unscrew the piston with
4) Brake grease
5) Brake caliper rebuild kit, I used the Dorman D351783 kit
6) Banjo bolt crush washers, 2x per caliper you rebuild, OEM part 46472-568-000 (you can buy cheap copper ones at your favorite auto parts store too)
I should also note that my calipers are clean because I spent lots of time washing it so I could make this tutorial without making a huge mess. Yours will be soaked in brake fluid and nasty grease, and you will most likely make a large mess. Don't do this on your dining room table like I did. Also, the LED flashlight I used did weird stuff to the camera, so excuse the yellow pictures.
Start by reading the WHOLE TUTORIAL before you go remove parts from your car. Do you have all the tools and parts you need? Do you have another means of transportation in case you forget something or **** something up terribly? Go do all that stuff then come back.
First, put on your gloves, you'll thank me for this.
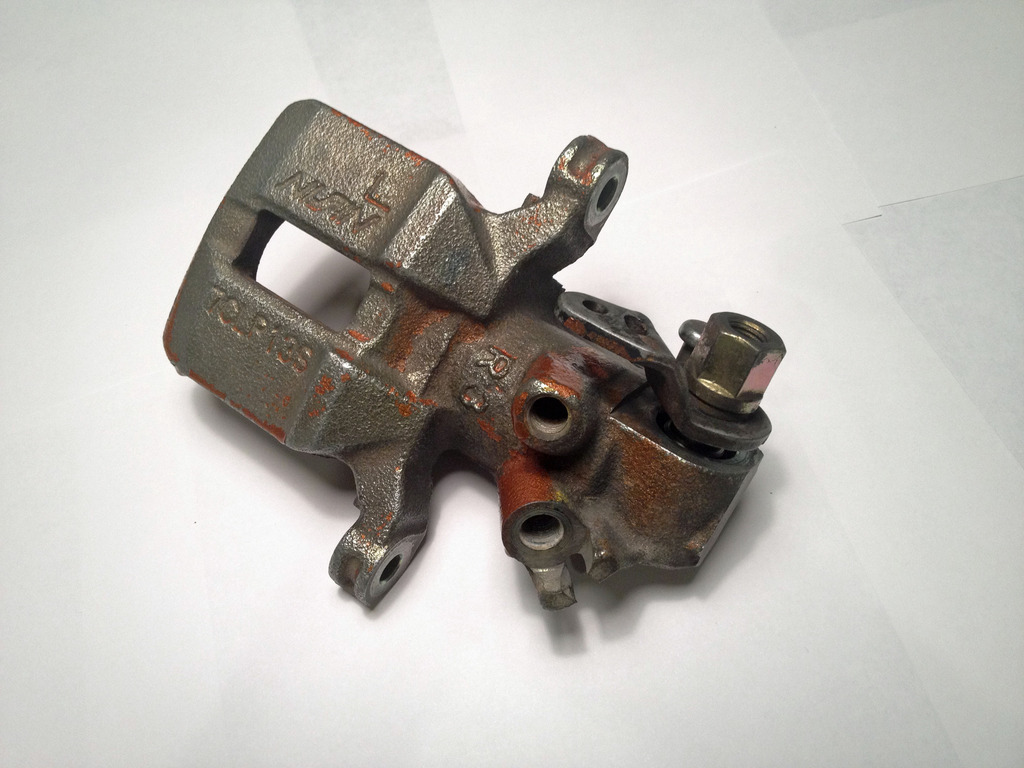
Now, remove the caliper from your car, I'm not going to talk about that since it's covered elsewhere. Remove the parking brake return spring as well as the bleeder screw.
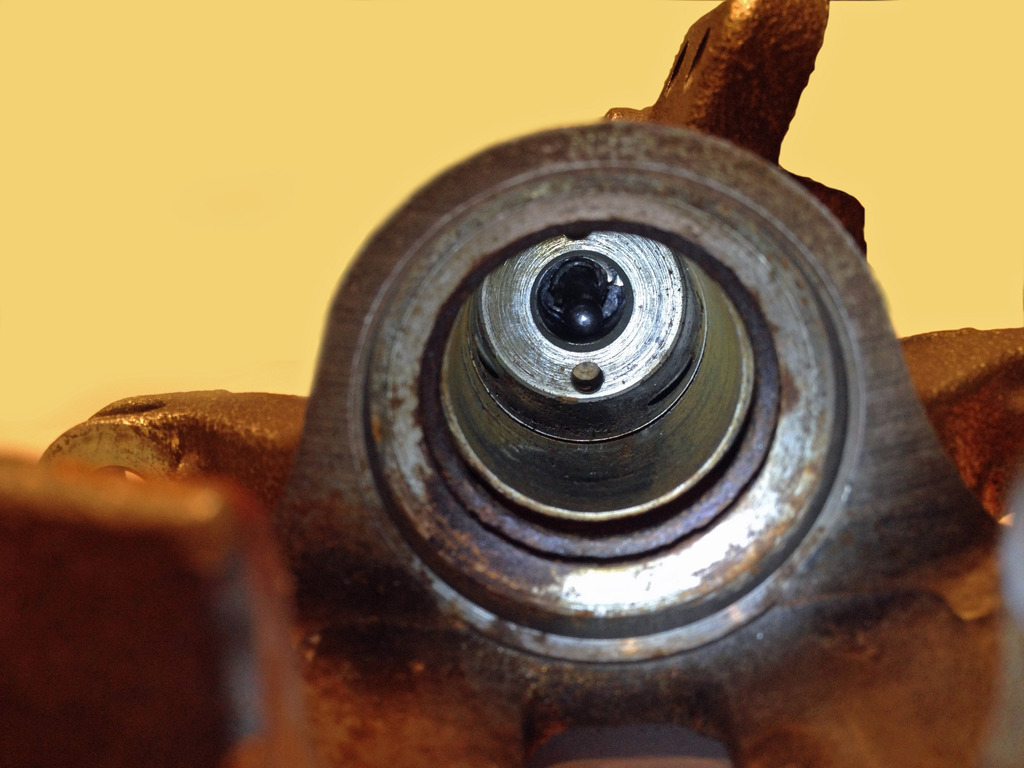
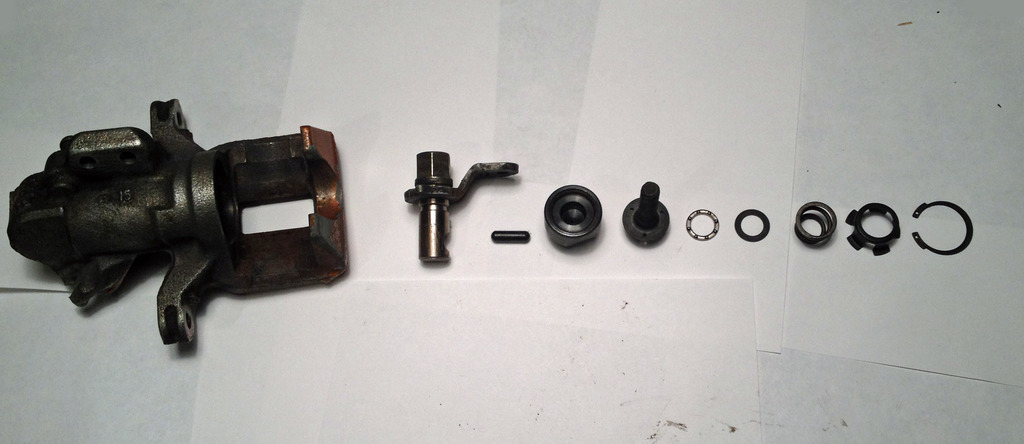
You should have something in front of you that looks like this, minus the shitty paint from a previous owner.
PHOTO #1
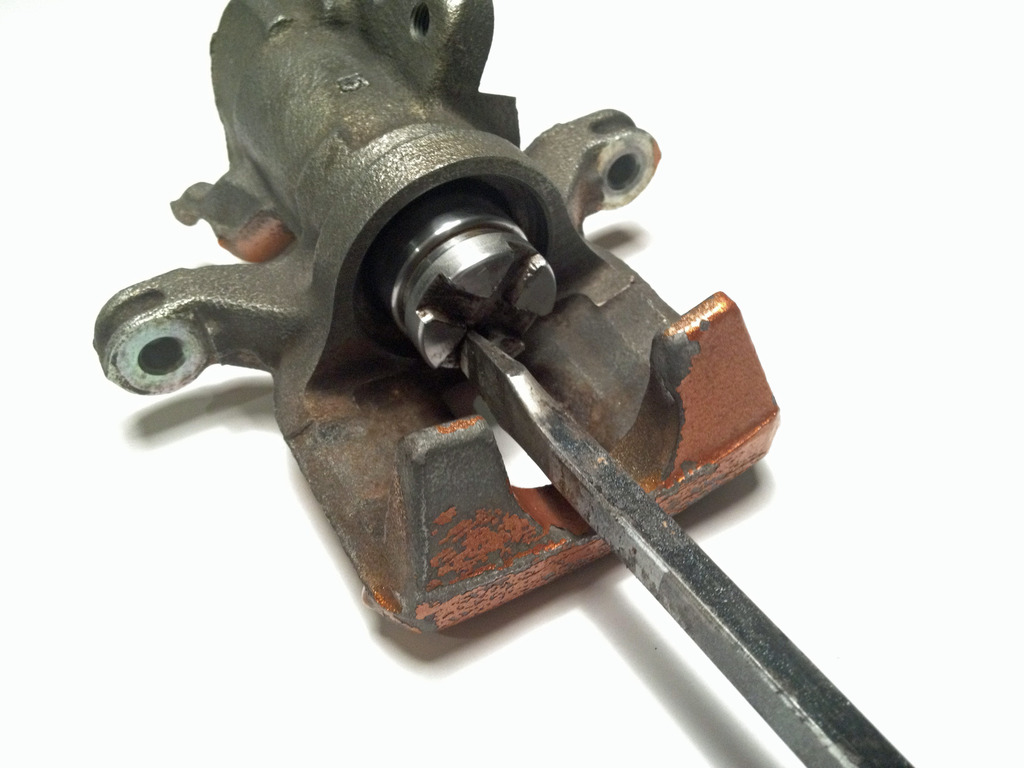
We're going to start by removing the piston, since I'm cheap and don't mind scratching it up I used a huge flat-head screw driver. Your will still have the boot and main seal installed.
PHOTO #2
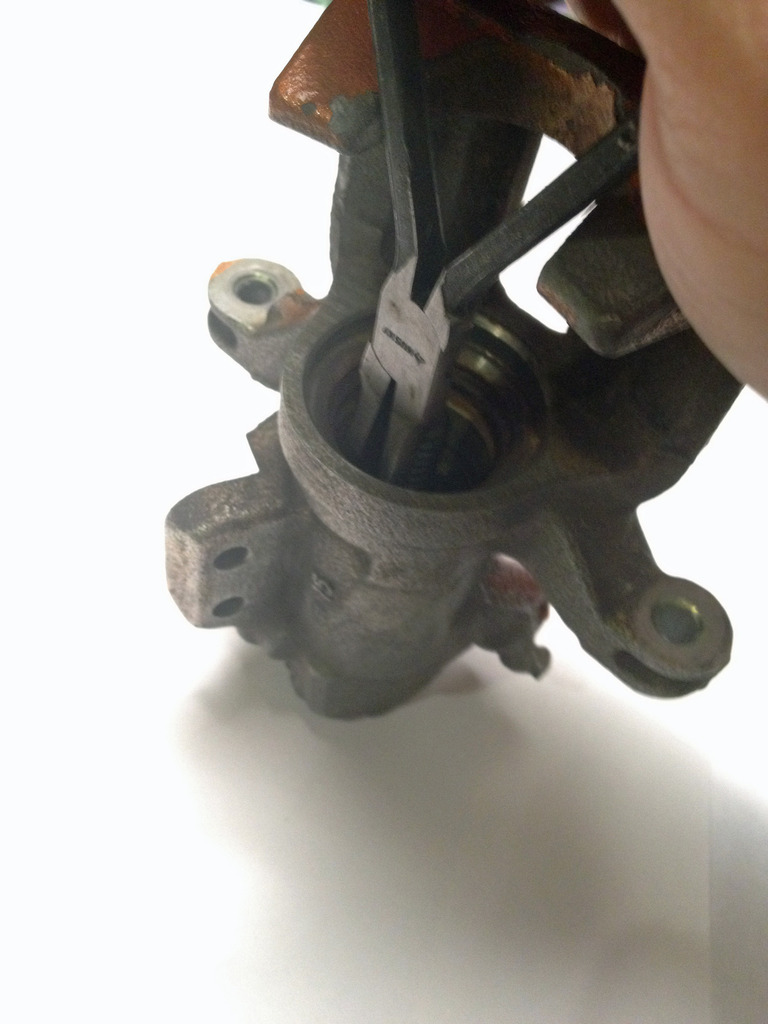
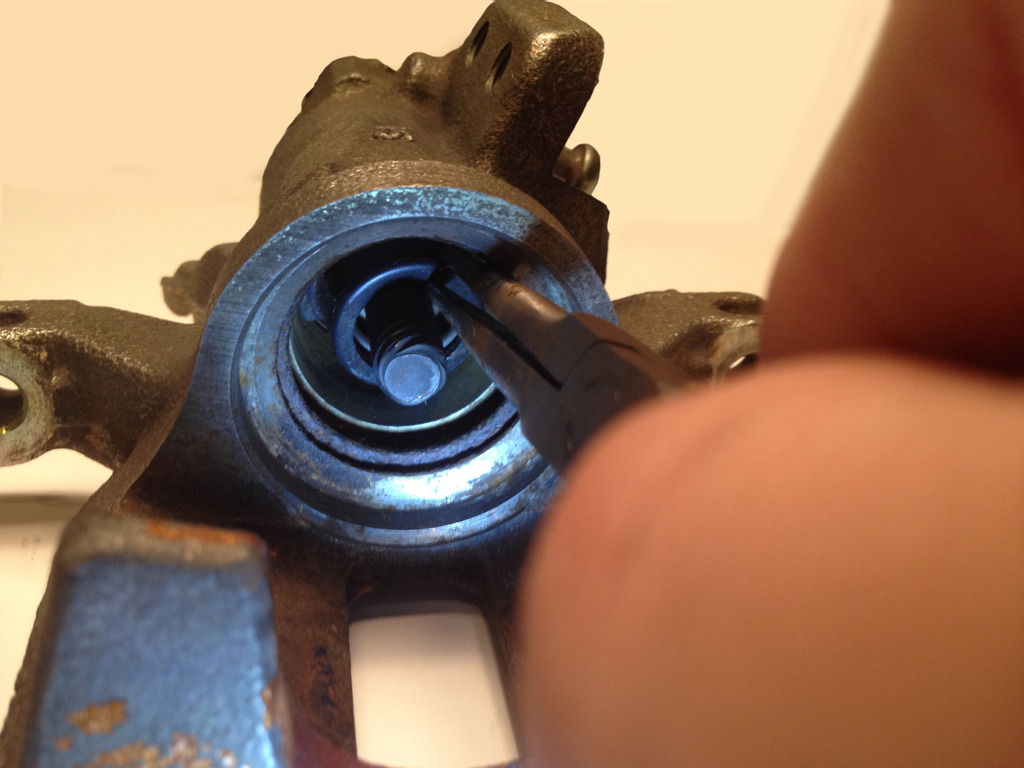
Now set the piston aside and look down into the hole you removed it from. You need to remove the main seal (not shown here) using a small flathead screwdriver or some tweezers. After that's out, look and you will see a snap ring way down in there. Most snap ring pliers will not work for this, if you want a cheap solution, buy a long skinny pair of needle nose pliers and file down the ends to make your own. It's not my fault if your homemade snap ring pliers slip and you get an eyeful of brake parts.
PHOTO #3
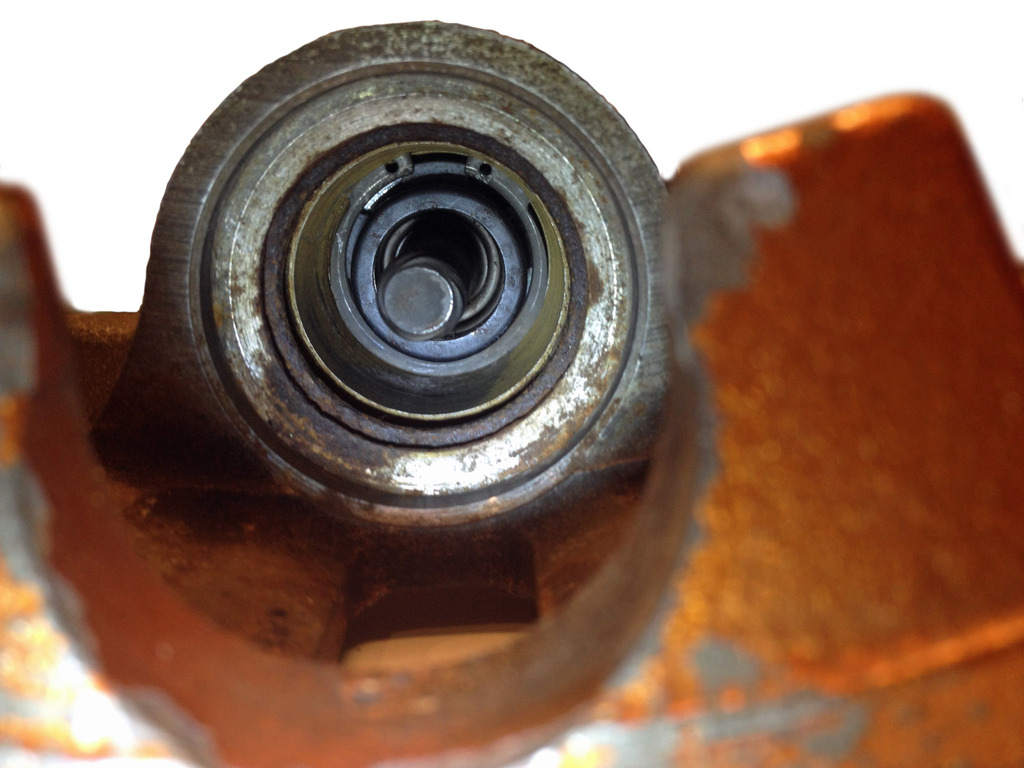
PHOTO #4
Now remove this little metal ring/basket thing, it pulls right out.
PHOTO #5
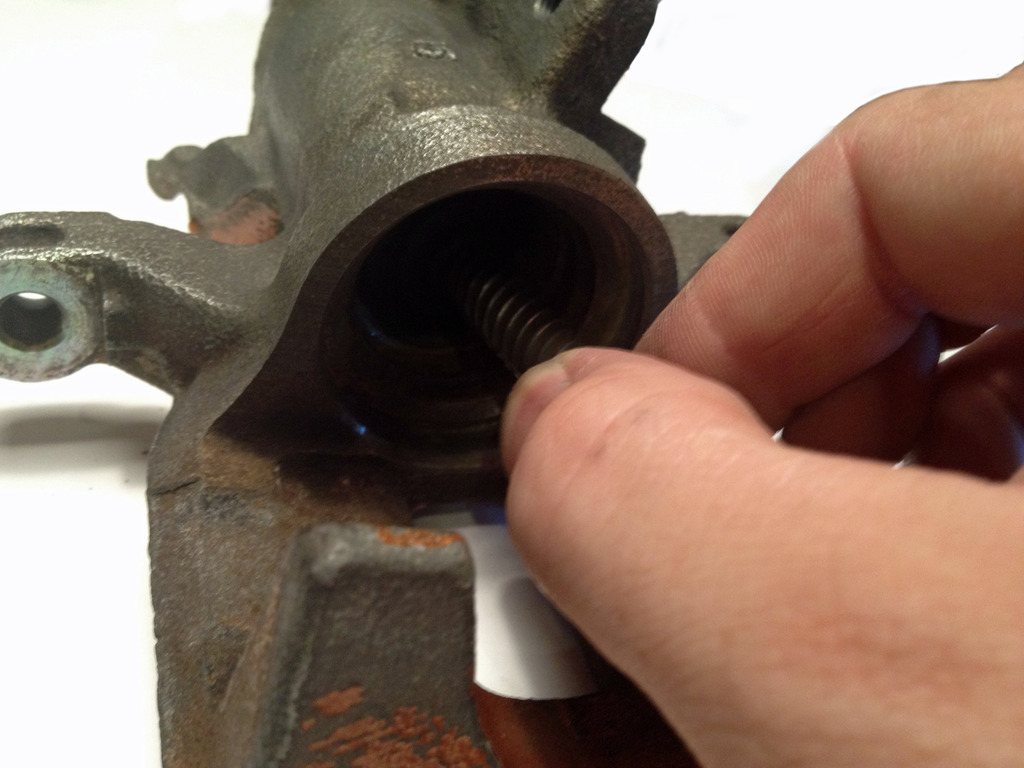
When that's out, you can pull out the rod that the piston screws into, if it won't come out, pull harder.
PHOTO #6
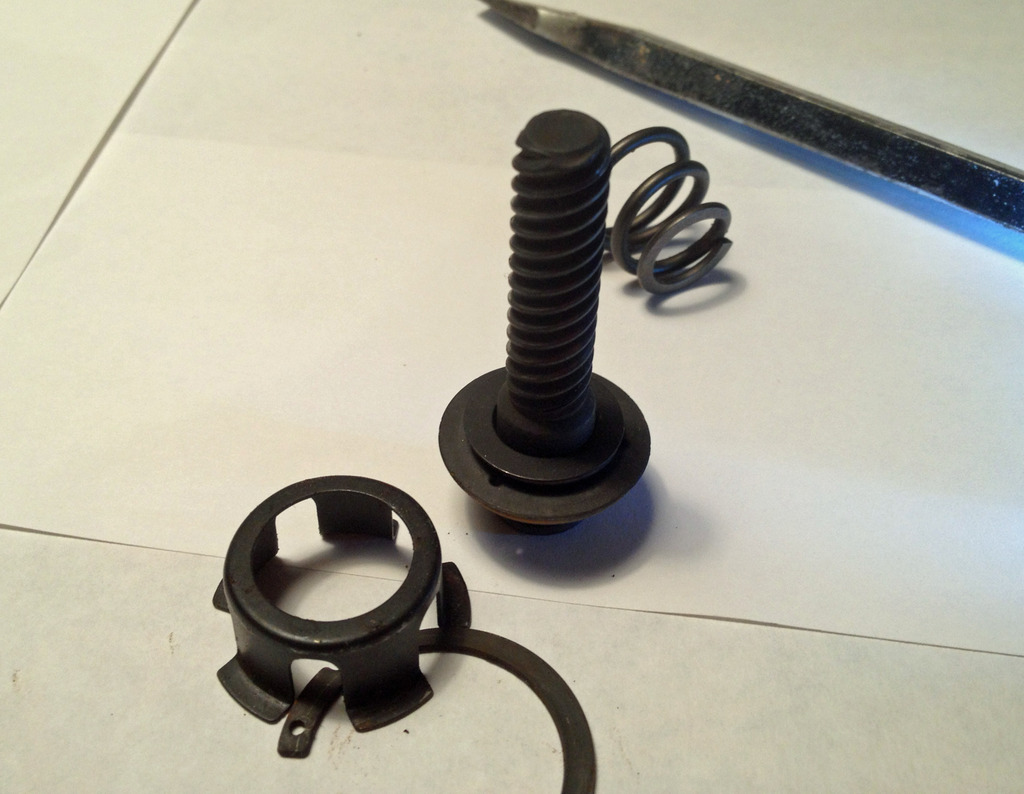
Here is a picture of everything you should have removed up to this point.
PHOTO #7
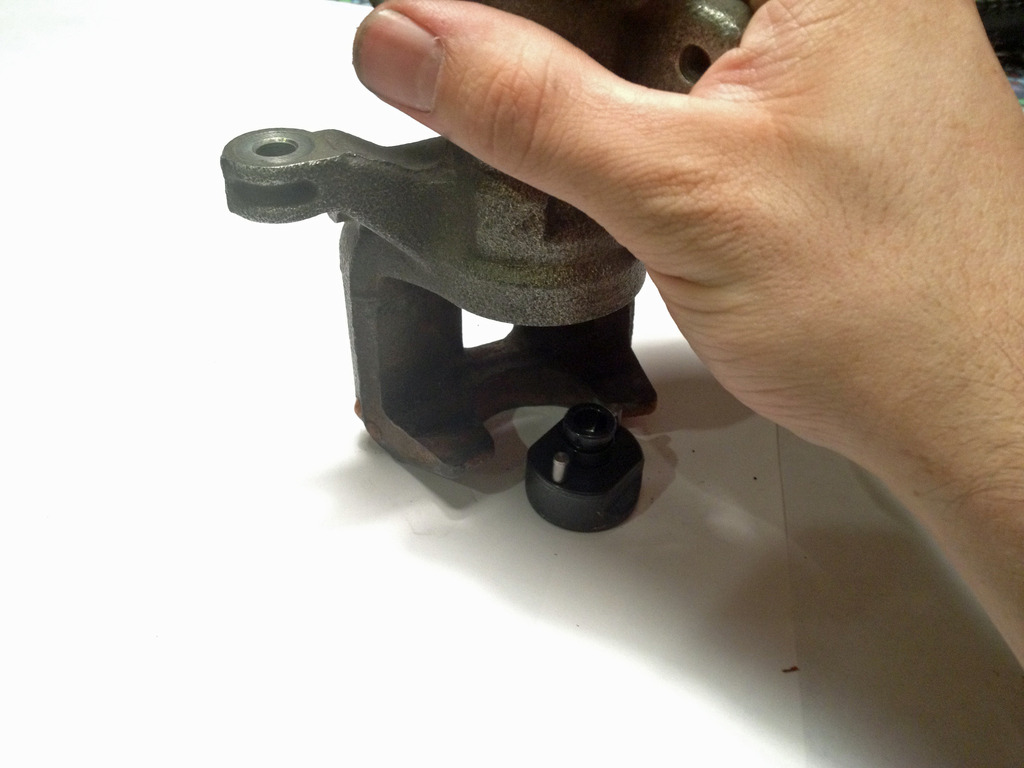
This next step might not be necessary for you, sometimes this part comes out with the rod that the piston goes onto, sometimes it doesn't, if it doesn't, then this applies. The best way of removing it that I've found is just to turn the caliper upside down and bang it on a block of wood on the ground. If that doesn't work, you're on your own.
PHOTO #8
This step might be optional as well. There's a small black thing that looks like a medicine capsule that is sometimes stuck to the part you just removed, look at the what parts you have and make sure it's not there. You can see it here stuck down in the caliper. If you can't remove it by banging the caliper like in the previous step, turn the parking brake level a few times to try to loosen it up a bit, grease is the only thing holding it in at this point. If that doesn't work, stick something down there and try to fish it out.
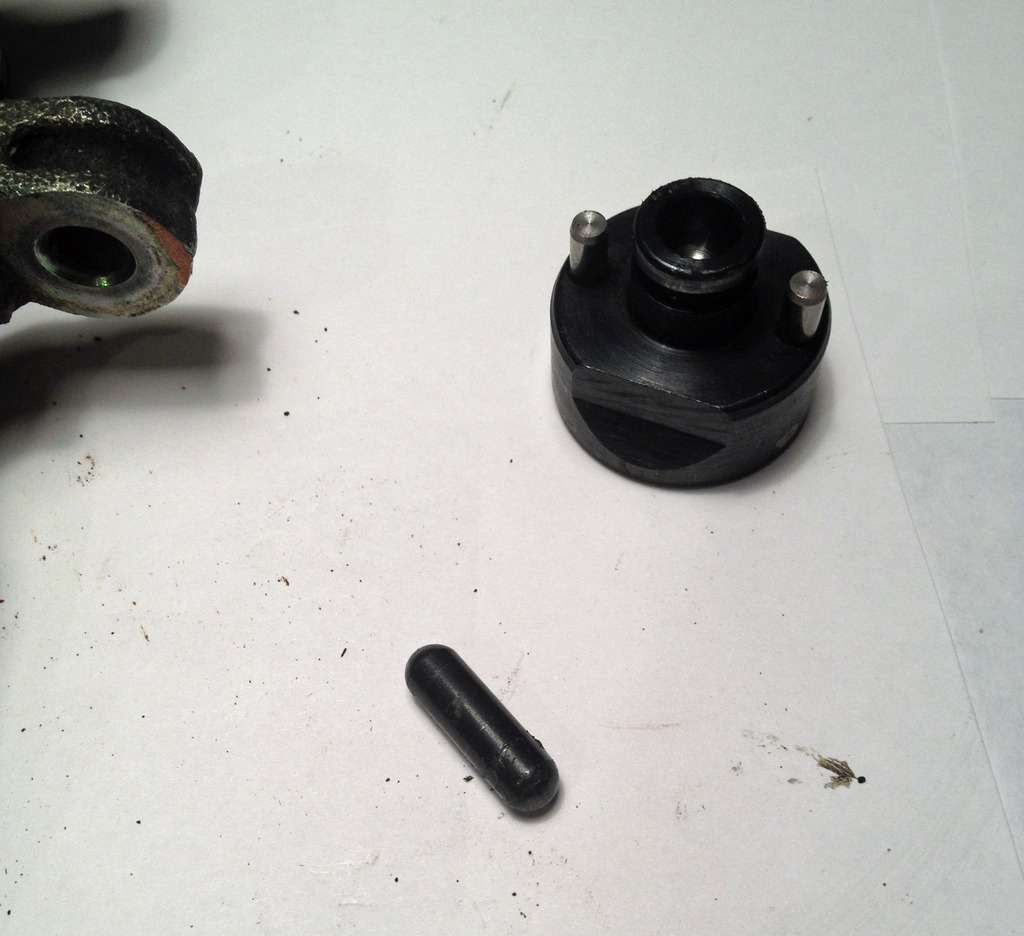
PHOTO #9
Here are the two parts after they've been removed.
PHOTO #10
Now grab the parking brake lever and yank it straight out. It will be difficult since the rubber seal will still be there on yours, but it will come out.
PHOTO #11
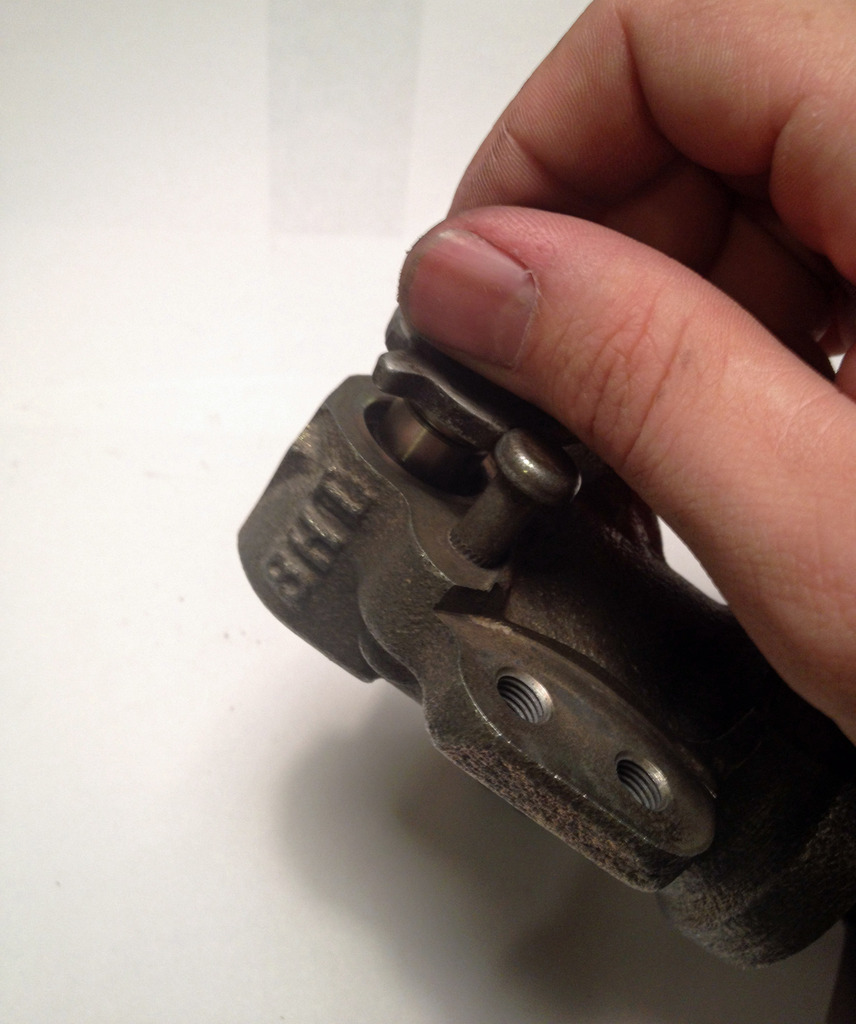
A picture of it removed. Down in the hole is a cylindrical bearing that the parking brake lever rotates in, it has some of the rollers removed so the capsule thing can move back and forth inside it. I have not figured out how to remove this bearing, so unless you know what you are doing, don't mess with it.
PHOTO #12
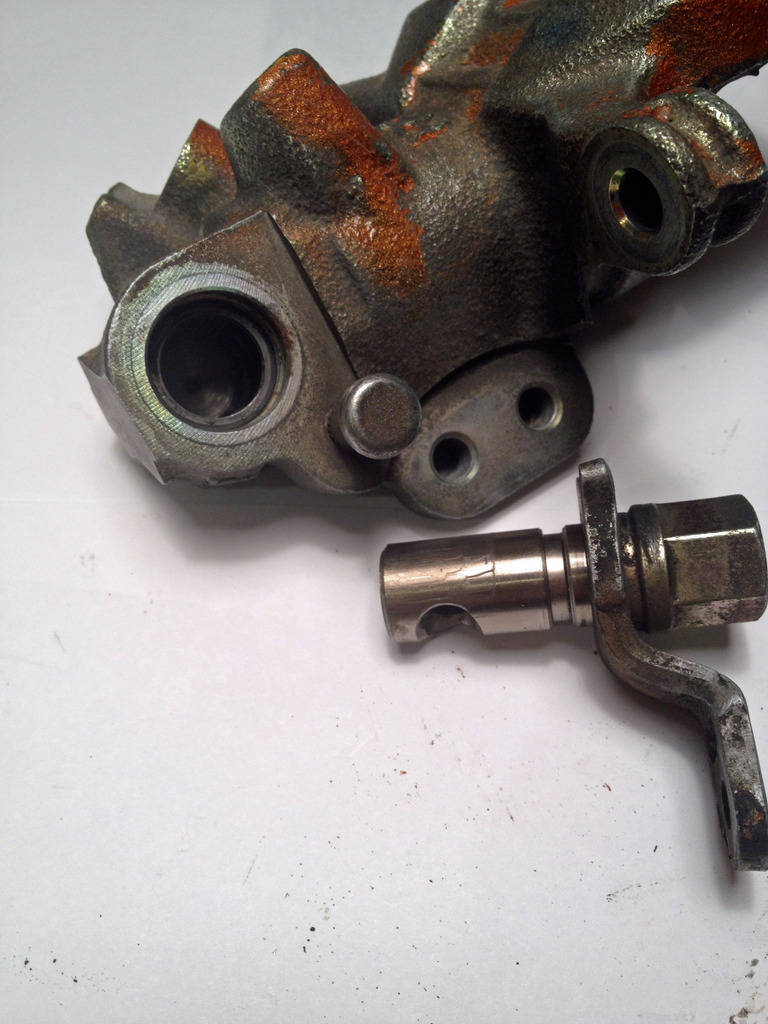
Here is a picture of all the parts, in order that you will put them back together.
PHOTO #13
At this point, clean all the parts and remove as much grease as you can from them.
RULE OF THUMB FOR GREASING PARTS: IF IT MOVES/TWISTS/SLIDES/ETC PUT GREASE ON IT
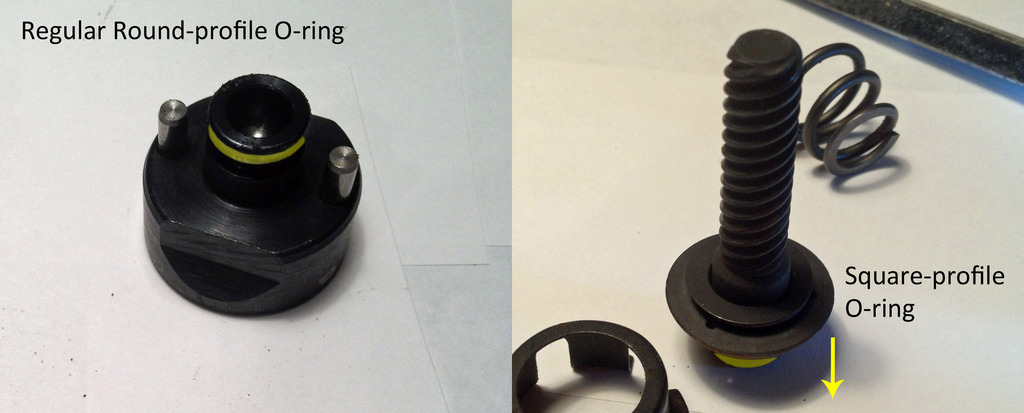
We'll start the rebuild by removing the old O-rings and putting on the new ones from the rebuild kit. There's two small O-rings, one of them is a regular one with a round profile, the other one has a square profile but the outer edge is angled slightly as to form a cone shape. The picture below shows where each O-ring goes, and the arrow is the direction the cone shape should point. Make sure to grease each O-ring before installing it, and grease the O-ring seat as well.
PHOTO #14
Now, reinstall the parking brake lever. Grease up the cylindrical bearing and make sure the open side of the bearing is facing the brake cylinder. Also put a dab of grease in the hole in the side of the lever shaft, that's where the capsule shaped thing will seat. Installing this seal is annoying, grease it up real good, install the seal in the hole, and then jam the parking brake lever down in there. It's not clever but it works.
Moving to the right in the overall picture, we see the round thing with the two studs on it. Those two studs need to line up with the holes you can see photo #9 above. Put a dab of grease underneath the medicine capsule thing, as shown below, and grease the two studs as well. You'll want to have a light coating of grease pretty much over this entire part.
PHOTO #15
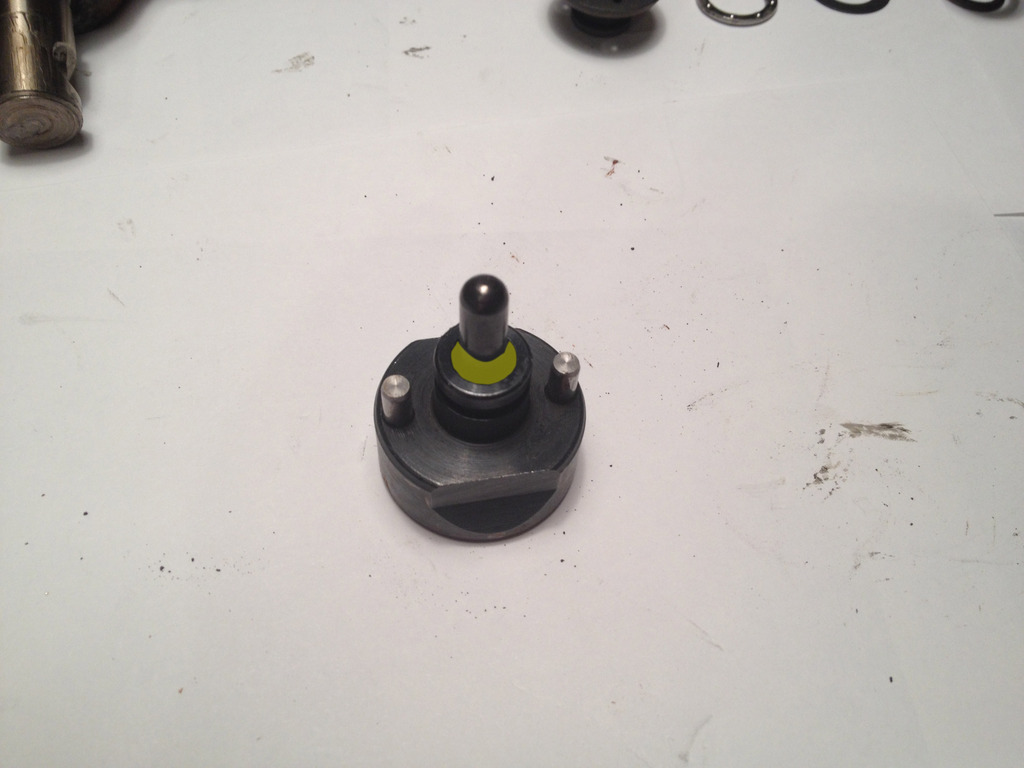
Once you've greased up the part in photo #15 and stuck the capsule in the hole (the grease should hold it in place) slide it back into the caliper, making sure to line up the studs with the holes.
Now, move on to the threaded rod part. Make sure to grease up the underside and O-ring, the thrust bearing, and the threads. I find it easiest to put the thrust bearing and the washer on before you install this part. Once it's nice and greased up, stick it down the hole from which it came.
Next up is the spring, stick it back in there with the narrow end against the washer and thrust bearing, then put the metal basket thing over it.
Finally, you're back to the snap ring. If your rebuild kit came with a new one use it, otherwise use the one you removed.
Lastly, you just have the main seal, dust boot, and piston. Grease up the main seal and put it back in the caliper. The dust boot is a bit more difficult and will take some trial and error. I find it easiest to grease up the piston and boot, put the boot on the piston, then slide the boot down so that the bottom lip of the boot is beneath the bottom of the piston. This way, the lip on the bottom of the boot can easily seat in the groove on the caliper, then you just push the piston down.
You do it this way because, when the boot is all the way around the piston, it can't give enough to properly seat in the caliper, so it is important that you get it to seat without the piston sliding down. It will take a few tries but should eventually go, and when it does, then you push the piston down onto the rod and screw it back on.
You're done! Not to bad, eh? Now just go regrease the brake pins and reassemble everything. (if you don't know how to do that, search for it) Anyways, let me know if you have question or comments, or if more pictures would be helpful. I have this thing just sitting in my garage since it's rusting and not useful anymore.
Disclaimer: This is what worked for me and isn't necessarily the best way of doing it, I'm not responsible for anything that happens to your car or you. If you aren't 100% sure of yourself, spend the $$$ at a shop or for a new caliper. Brakes aren't something to be taken lightly.
Tools needed:
1) Snap ring pliers (long skinny ones, I ended up making some out of a set of needle nose pliers)
2) Gloves
3) Something to unscrew the piston with
4) Brake grease
5) Brake caliper rebuild kit, I used the Dorman D351783 kit
6) Banjo bolt crush washers, 2x per caliper you rebuild, OEM part 46472-568-000 (you can buy cheap copper ones at your favorite auto parts store too)
I should also note that my calipers are clean because I spent lots of time washing it so I could make this tutorial without making a huge mess. Yours will be soaked in brake fluid and nasty grease, and you will most likely make a large mess. Don't do this on your dining room table like I did. Also, the LED flashlight I used did weird stuff to the camera, so excuse the yellow pictures.
Start by reading the WHOLE TUTORIAL before you go remove parts from your car. Do you have all the tools and parts you need? Do you have another means of transportation in case you forget something or **** something up terribly? Go do all that stuff then come back.
First, put on your gloves, you'll thank me for this.
Now, remove the caliper from your car, I'm not going to talk about that since it's covered elsewhere. Remove the parking brake return spring as well as the bleeder screw.
You should have something in front of you that looks like this, minus the shitty paint from a previous owner.
PHOTO #1
We're going to start by removing the piston, since I'm cheap and don't mind scratching it up I used a huge flat-head screw driver. Your will still have the boot and main seal installed.
PHOTO #2
Now set the piston aside and look down into the hole you removed it from. You need to remove the main seal (not shown here) using a small flathead screwdriver or some tweezers. After that's out, look and you will see a snap ring way down in there. Most snap ring pliers will not work for this, if you want a cheap solution, buy a long skinny pair of needle nose pliers and file down the ends to make your own. It's not my fault if your homemade snap ring pliers slip and you get an eyeful of brake parts.
PHOTO #3
PHOTO #4
Now remove this little metal ring/basket thing, it pulls right out.
PHOTO #5
When that's out, you can pull out the rod that the piston screws into, if it won't come out, pull harder.
PHOTO #6
Here is a picture of everything you should have removed up to this point.
PHOTO #7
This next step might not be necessary for you, sometimes this part comes out with the rod that the piston goes onto, sometimes it doesn't, if it doesn't, then this applies. The best way of removing it that I've found is just to turn the caliper upside down and bang it on a block of wood on the ground. If that doesn't work, you're on your own.
PHOTO #8
This step might be optional as well. There's a small black thing that looks like a medicine capsule that is sometimes stuck to the part you just removed, look at the what parts you have and make sure it's not there. You can see it here stuck down in the caliper. If you can't remove it by banging the caliper like in the previous step, turn the parking brake level a few times to try to loosen it up a bit, grease is the only thing holding it in at this point. If that doesn't work, stick something down there and try to fish it out.
PHOTO #9
Here are the two parts after they've been removed.
PHOTO #10
Now grab the parking brake lever and yank it straight out. It will be difficult since the rubber seal will still be there on yours, but it will come out.
PHOTO #11
A picture of it removed. Down in the hole is a cylindrical bearing that the parking brake lever rotates in, it has some of the rollers removed so the capsule thing can move back and forth inside it. I have not figured out how to remove this bearing, so unless you know what you are doing, don't mess with it.
PHOTO #12
Here is a picture of all the parts, in order that you will put them back together.
PHOTO #13
At this point, clean all the parts and remove as much grease as you can from them.
RULE OF THUMB FOR GREASING PARTS: IF IT MOVES/TWISTS/SLIDES/ETC PUT GREASE ON IT
We'll start the rebuild by removing the old O-rings and putting on the new ones from the rebuild kit. There's two small O-rings, one of them is a regular one with a round profile, the other one has a square profile but the outer edge is angled slightly as to form a cone shape. The picture below shows where each O-ring goes, and the arrow is the direction the cone shape should point. Make sure to grease each O-ring before installing it, and grease the O-ring seat as well.
PHOTO #14
Now, reinstall the parking brake lever. Grease up the cylindrical bearing and make sure the open side of the bearing is facing the brake cylinder. Also put a dab of grease in the hole in the side of the lever shaft, that's where the capsule shaped thing will seat. Installing this seal is annoying, grease it up real good, install the seal in the hole, and then jam the parking brake lever down in there. It's not clever but it works.
Moving to the right in the overall picture, we see the round thing with the two studs on it. Those two studs need to line up with the holes you can see photo #9 above. Put a dab of grease underneath the medicine capsule thing, as shown below, and grease the two studs as well. You'll want to have a light coating of grease pretty much over this entire part.
PHOTO #15
Once you've greased up the part in photo #15 and stuck the capsule in the hole (the grease should hold it in place) slide it back into the caliper, making sure to line up the studs with the holes.
Now, move on to the threaded rod part. Make sure to grease up the underside and O-ring, the thrust bearing, and the threads. I find it easiest to put the thrust bearing and the washer on before you install this part. Once it's nice and greased up, stick it down the hole from which it came.
Next up is the spring, stick it back in there with the narrow end against the washer and thrust bearing, then put the metal basket thing over it.
Finally, you're back to the snap ring. If your rebuild kit came with a new one use it, otherwise use the one you removed.
Lastly, you just have the main seal, dust boot, and piston. Grease up the main seal and put it back in the caliper. The dust boot is a bit more difficult and will take some trial and error. I find it easiest to grease up the piston and boot, put the boot on the piston, then slide the boot down so that the bottom lip of the boot is beneath the bottom of the piston. This way, the lip on the bottom of the boot can easily seat in the groove on the caliper, then you just push the piston down.
You do it this way because, when the boot is all the way around the piston, it can't give enough to properly seat in the caliper, so it is important that you get it to seat without the piston sliding down. It will take a few tries but should eventually go, and when it does, then you push the piston down onto the rod and screw it back on.
You're done! Not to bad, eh? Now just go regrease the brake pins and reassemble everything. (if you don't know how to do that, search for it) Anyways, let me know if you have question or comments, or if more pictures would be helpful. I have this thing just sitting in my garage since it's rusting and not useful anymore.
Last edited by MotorMouth93; 03-10-2016 at 11:22 AM. Reason: Moved photos from Imgur to Photobucket.
 05-18-2015, 09:31 PM
#2
Honda-Tech Member
iTrader: (19)
Join Date: Dec 2008
Location: NORCAL
Posts: 438
Likes: 0
Received 0 Likes
on
0 Posts
Nice write up! I rebuilt a pair of rear calipers recently and would have loved to have this write up accessible. I personally used a combination of the FSM and this how to
Rebuilding brake calipers
Here's a picture of the specialty snap ring pliers. IIRC they're about $25 on ebay.
Great work and thanks for taking the time to write this up!
Rebuilding brake calipers
Here's a picture of the specialty snap ring pliers. IIRC they're about $25 on ebay.

Great work and thanks for taking the time to write this up!
05-20-2015, 04:44 PM
#4
Honda-Tech Member
iTrader: (19)
Join Date: Dec 2008
Location: NORCAL
Posts: 438
Likes: 0
Received 0 Likes
on
0 Posts
Yeah I stumbled across that while searching but mostly just referenced the FSM. It has a fairly detailed procedure outlining how to do it. I tried the method/trick in the link for installing the dust seals and had no luck. I did it like you did, install the seals on the bottom of the pistons and work them in carefully. Definitely the most PITA part of the procedure.
Mine were working fine so I wouldn't have had to rebuild them but I wanted to powdercoat all 4 calipers and a complete disassembly is required for that. I'm sure other people are in the same position so definitely good to have this info out there!
Mine were working fine so I wouldn't have had to rebuild them but I wanted to powdercoat all 4 calipers and a complete disassembly is required for that. I'm sure other people are in the same position so definitely good to have this info out there!
05-19-2017, 03:50 PM
#5

MotorMouth93 thanks for writing this tutorial. it inspired me to make a video about this. not trying to promote it but this is the link for it.
thanks again man
11-22-2017, 07:32 AM
#6
Honda-Tech Member

Join Date: Nov 2017
Posts: 5
Likes: 0
Received 0 Likes
on
0 Posts
Hi! tnks for post, is excellent.
I'm stuck in the step of photo # 8, I've hit it hard and I'm not able to get that piece out.
Anyone else has happened?
tnks!
I'm stuck in the step of photo # 8, I've hit it hard and I'm not able to get that piece out.
Anyone else has happened?
tnks!
Trending Topics
11-22-2017, 01:37 PM
#8
Honda-Tech Member
Join Date: Nov 2017
Posts: 5
Likes: 0
Received 0 Likes
on
0 Posts
The same thing that you say I've tried, I've been trying for two hours to remove it without being able to move it, with the two brake calipers it's the same. 
11-22-2017, 06:15 PM
#9
That sounds rather frustrating, are the calipers rusty on the insides or anything like that?
And there should be a tiny hole in the middle of the recessed part of that piece you're trying to remove, you might be able to use a compressed air nozzle and piece of tubing to force air through that hole and push the piece out. I've never tried it but it's all I can think of, I've never seen this issue in the 3 sets of calipers I've done.
And there should be a tiny hole in the middle of the recessed part of that piece you're trying to remove, you might be able to use a compressed air nozzle and piece of tubing to force air through that hole and push the piece out. I've never tried it but it's all I can think of, I've never seen this issue in the 3 sets of calipers I've done.
 11-01-2018, 11:06 AM
#12
Honda-Tech Member
Join Date: Nov 2004
Location: Marshfield, Ma, USA
Posts: 12
Likes: 0
Received 0 Likes
on
0 Posts
Regarding Photo and description 12. The roller bearings can't be removed. If the cage that holds the bearings break, you'll be looking for a new caliper, unless, someone can find them. Dealer diagrams do not even show them. The hardest part of the rebuild is getting the c-clips out.
01-22-2019, 01:23 PM
#14
Honda-Tech Member

Join Date: Oct 2011
Location: UK
Posts: 24
Likes: 0
Received 0 Likes
on
0 Posts
Nice tutorial, spot on.
I will order a calliper rebuild kit, I hope I can find a kit with all the bits including the seals on the parking brake lever mechanism.
I hope with this kit I can cure the ticking noise on my ABS Pump.
Here are the symptoms, a few weeks ago I had to brake hard in order not to hit an idiot who crossed in front of my car. Straight after that, the ABS light was on and off. After 2 days it became on permanently. I started noticing that when I stop at the traffic lights or so, when I release the brakes and start accelerating, the ABS pump starts ticking. This started bugging me.
I checked all 4 wheels brake lines and figured out one of the rear callipers was leaking around the parking lever mechanism.
I�m assuming the �ticking� is because I have a leak. Every 10-15 or so miles I have to top up the brake fluid.
Does anyone here have a different opinion about this ABS ticking / clicking noise?
The car is a Civic 2001 1.4 D14Z4.
01-22-2019, 02:15 PM
#15

great right up, I always wondered how the rear brakes operated, they seem much more complicated than the front calipers. I'm kind of glad I bought remanufactured rear calipers (relatively inexpensive) rather than trying to do something like this myself lol.
01-22-2019, 03:25 PM
#16
Be careful with cheap remans. I had one of the parking brake cam seals blow out on a "Power Stop" brand rebuild. I ended up rebuilding all 4 myself with OEM rebuild kits and found other problems as well. https://honda-tech.com/forums/acura-.../#post51452679
01-28-2019, 10:15 AM
#17

Could anyone explain on why we would rebuild/ replace the rear calipers? What are the major symtoms? I'm a guy who loves to maintain his Acura.
01-28-2019, 07:15 PM
#18
The rubber seals in brake calipers, like any other part of the car, eventually wear out and start leaking, slide pins can seize, dust boots can tear leading to premature failure, etc. You can rebuild all 4 calipers with brand new OEM parts to make them like-new for about $25 per corner, it's a fairly easy job if you're comfortable removing and reinstalling calipers yourself and cheaper than you can get even a used caliper from a junk yard.
01-29-2019, 09:53 AM
#19
The rubber seals in brake calipers, like any other part of the car, eventually wear out and start leaking, slide pins can seize, dust boots can tear leading to premature failure, etc. You can rebuild all 4 calipers with brand new OEM parts to make them like-new for about $25 per corner, it's a fairly easy job if you're comfortable removing and reinstalling calipers yourself and cheaper than you can get even a used caliper from a junk yard.
Last edited by 91akira; 01-29-2019 at 09:54 AM. Reason: correct grammar
03-20-2019, 07:57 PM
#20
Honda-Tech Member
Join Date: Oct 2004
Location: San Diego, CA, United States
Posts: 840
Likes: 0
Received 0 Likes
on
0 Posts
Regarding Photo and description 12. The roller bearings can't be removed. If the cage that holds the bearings break, you'll be looking for a new caliper, unless, someone can find them. Dealer diagrams do not even show them. The hardest part of the rebuild is getting the c-clips out.
10-06-2021, 08:27 PM
#21

How do you install the piston seal, I bought the break hardware kit from autozone and The seal fits nice to the piston but not the caliper groove for it it looks a little bigger And when unscrew the piston the seal comes up detached.

Thread
Thread Starter
Forum
Replies
Last Post