
diy jdm 98-01 dc tail lights
 05-15-2015, 11:38 AM
#1
Honda-Tech Member
Thread Starter
Hey guys,
Tried this today and it worked out perfectly I'm very happy with the results, especially since the cost of jdm tail lights are expensive and will only go up, and this cost me zero dollars, since i had all the tools and material already, which is also awesome.
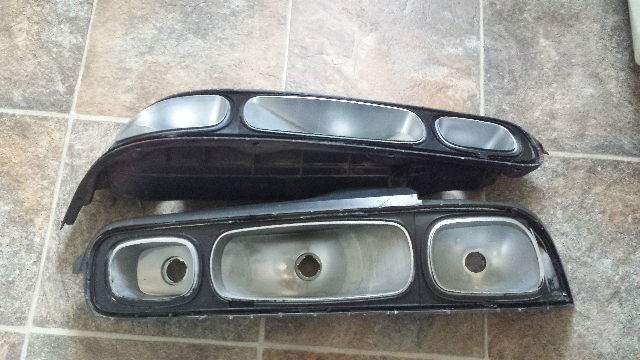
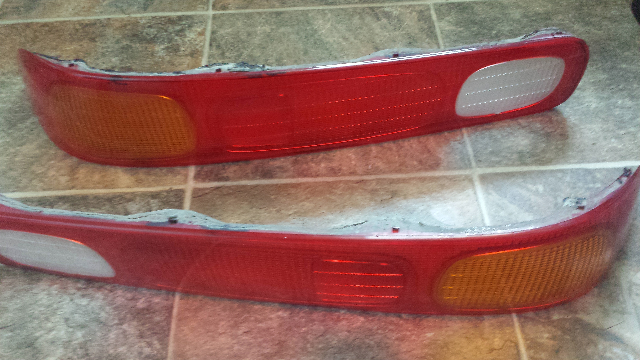
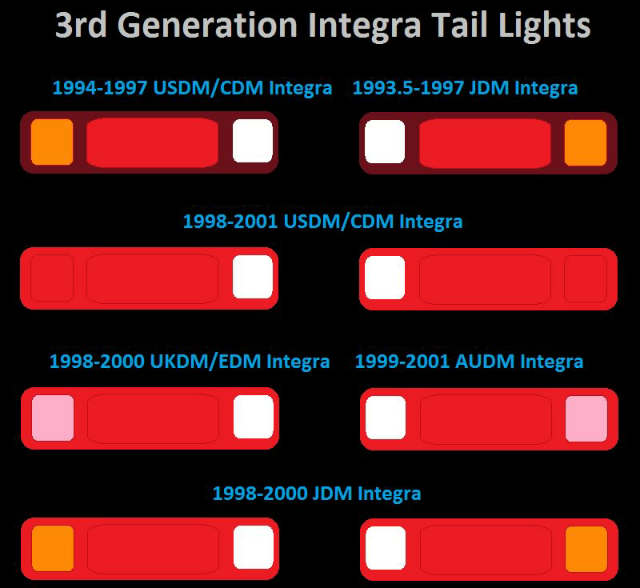
94-97 integra tail lights, jdm and usdm are the same, if you open them up you will see that the 4 openings in the tail light housings are all painted silver, and that the outside trim area is black. That's why 94-97 tail lights look darker, 98-01 tail lights, usdm or jdm have all silver housings, the openings and trim area. But the lens on the 94-97 tail lights are the exact same as the jdm 98-01, the only difference is the housing between the 2.
Required items:
-94-97 integra tail lights
-Oven big enough to house one tail light
-large flat screwdriver
-silver engine block paint (or any silver paint, but I chose one that can handle heat, to withstand the heat from the halogen bulbs)
-masking tape
-gloves
-clear automotive silicone or any silicone you choose.
1. First remove all the wiring from the tail lights, so you are left with a bare tail light.
Also it's probably a good idea to clean the lights before putting them in your oven.
Also, IMPORTANT!! there's a small screw at the end on the turn signal side, be sure to remove this screw or it will crack the lens when you separate the 2.
2. Pre heat oven to 200�f and place tail light in oven in the center rack for 7 minutes, no more no less.
3. Put on some gloves, I used some winter gloves that were thick enough to insulate my hands from the heat but thin enough that I could still work.
4. Remove tail light, and with large screwdriver and thin cloth place screwdriver into the wedge where the tail light lens meets the housing, and twist the screwdriver to get the 2 pieces to start separating, I started at the reverse signal end, I noticed that at least on my tail lights that they were already separated at that end by a small bit so it was easier to get separation there.
5. Once you have some separation you should be able to pull the 2 pieces apart with your hands, that's what I did.
6. Repeat procedure for second tail light.
7. Once you have 4 separate pieces, give them a good cleaning to get the built up dirt in all the corners out.
8. Mask off outside edges of tail light housing.
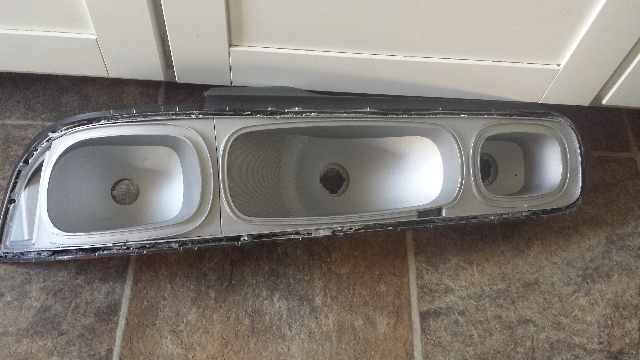
9. Spray tail light housing with silver paint, that should be straight forward enough.
10. Pre heat oven to 200�f again.
11. Once paint has fully dried, take one matching housing and lens and place them in the oven for 5 minutes, be careful that the lens doesn't rest on any of the painted surfaces or it will take the paint off with it.
12. After 5 minutes, remove tail light (while wearing gloves) and apply bead of silicone around the gap on the housing where the original glue still is.
13. Carefully press together the lens and the housing, making sure to line up the tabs on the lens and housing, and press together.
14. Lay the tail light face down on a soft surface, Place a object with some weight on the back side of tail light, if you have clamps then clamp them together.
15. Let sit for at least one hour.
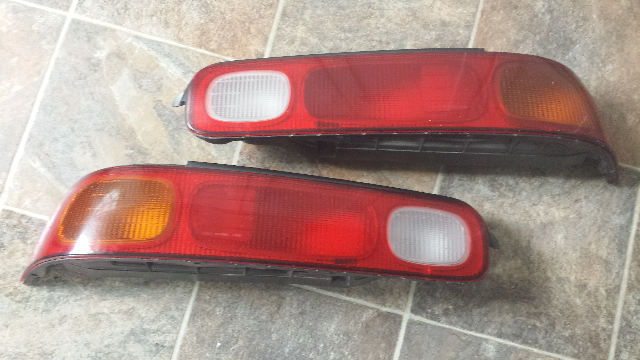
That's it, when finished you should have tail lights that look identical to the jdm version, but cost you a fraction of the jdm ones.
Tried this today and it worked out perfectly I'm very happy with the results, especially since the cost of jdm tail lights are expensive and will only go up, and this cost me zero dollars, since i had all the tools and material already, which is also awesome.
94-97 integra tail lights, jdm and usdm are the same, if you open them up you will see that the 4 openings in the tail light housings are all painted silver, and that the outside trim area is black. That's why 94-97 tail lights look darker, 98-01 tail lights, usdm or jdm have all silver housings, the openings and trim area. But the lens on the 94-97 tail lights are the exact same as the jdm 98-01, the only difference is the housing between the 2.
Required items:
-94-97 integra tail lights
-Oven big enough to house one tail light
-large flat screwdriver
-silver engine block paint (or any silver paint, but I chose one that can handle heat, to withstand the heat from the halogen bulbs)
-masking tape
-gloves
-clear automotive silicone or any silicone you choose.
1. First remove all the wiring from the tail lights, so you are left with a bare tail light.
Also it's probably a good idea to clean the lights before putting them in your oven.
Also, IMPORTANT!! there's a small screw at the end on the turn signal side, be sure to remove this screw or it will crack the lens when you separate the 2.
2. Pre heat oven to 200�f and place tail light in oven in the center rack for 7 minutes, no more no less.
3. Put on some gloves, I used some winter gloves that were thick enough to insulate my hands from the heat but thin enough that I could still work.
4. Remove tail light, and with large screwdriver and thin cloth place screwdriver into the wedge where the tail light lens meets the housing, and twist the screwdriver to get the 2 pieces to start separating, I started at the reverse signal end, I noticed that at least on my tail lights that they were already separated at that end by a small bit so it was easier to get separation there.
5. Once you have some separation you should be able to pull the 2 pieces apart with your hands, that's what I did.
6. Repeat procedure for second tail light.
7. Once you have 4 separate pieces, give them a good cleaning to get the built up dirt in all the corners out.
8. Mask off outside edges of tail light housing.
9. Spray tail light housing with silver paint, that should be straight forward enough.
10. Pre heat oven to 200�f again.
11. Once paint has fully dried, take one matching housing and lens and place them in the oven for 5 minutes, be careful that the lens doesn't rest on any of the painted surfaces or it will take the paint off with it.
12. After 5 minutes, remove tail light (while wearing gloves) and apply bead of silicone around the gap on the housing where the original glue still is.
13. Carefully press together the lens and the housing, making sure to line up the tabs on the lens and housing, and press together.
14. Lay the tail light face down on a soft surface, Place a object with some weight on the back side of tail light, if you have clamps then clamp them together.
15. Let sit for at least one hour.
That's it, when finished you should have tail lights that look identical to the jdm version, but cost you a fraction of the jdm ones.
Last edited by B16EJ; 05-15-2015 at 08:54 PM.

 05-15-2015, 05:21 PM
#4
Honda-Tech Member
Thread Starter
I have always wanted jdm 98-01 tails but it's hard to justify the 200$+ american plus shipping it would cost me, especially with the weak Canadian dollar that 200$ us is like a billion dollars Canadian at the moment lol, and this way I finally got the look of the jdm tails, not to mention I got to clean the tails out, it was nasty inside and the original silver spots were peeling so everything is fresh again and the tails look new again, so it's a win win situation.
I still have the original all red tails but I'm sure they won't be back on for a long time.
05-15-2015, 05:27 PM
#5
Honda-Tech Member
Man come to Toronto! you should see how cheap this stuff goes for 98+ tails in 9/10 60 bucks but either way I meant like use the 98+ for the ukdm style and silver paint the portion that needed to be clear or "silver". Honestly never knew that the jdm ones were different I always thought pre 98 and 98+ had to google it lol.
05-15-2015, 06:15 PM
#6
Honda-Tech Member
Thread Starter
It would be nice to be in Toronto to have access to the parts for sure... Jdm Honda parts don't pop up on the local classifieds that often, I actually just fluked out and bought jdm 16" itr wheels with tires for 500$ which was awesome, that usually never happens.
I can find usdm integra stuff no problem, I have a few sets of tails to have as spares from the junk yard but actual jdm parts aren't easy to come across. That must be nice having those big jdm parts places local.
How many months a year do you drive your car out there? Winter is so rough in Manitoba I only drive my R maybe 2 months total in a year.
The salt and cold etc. Will destroy any vehicle, im sure you know what I'm talking about.
Last edited by B16EJ; 05-15-2015 at 06:57 PM.
Trending Topics
05-16-2015, 04:58 AM
#8
Honda-Tech Member
From may to about October but it's been an extremely wet may, I've always heard the winter is brutal out west.
05-19-2015, 05:50 AM
#9
Honda-Tech Member
iTrader: (1)
Join Date: Aug 2003
Location: Left Coast : High Altitude, Top Floor
Posts: 7,616
Likes: 0
Received 1 Like
on
1 Post
The UKDM tail lights have a clear turn marker lens section. The inner housings are painted silver. The only way you're going to re-create a UKDM style light is finding a way to cut out the amber and replace it with a clear lens. Painting the red lens silver wont do you any good.
02-13-2021, 05:42 PM
#11
Trial User

Join Date: Feb 2021
Posts: 1
Likes: 0
Received 0 Likes
on
0 Posts
Hey guys,
Tried this today and it worked out perfectly I'm very happy with the results, especially since the cost of jdm tail lights are expensive and will only go up, and this cost me zero dollars, since i had all the tools and material already, which is also awesome.
94-97 integra tail lights, jdm and usdm are the same, if you open them up you will see that the 4 openings in the tail light housings are all painted silver, and that the outside trim area is black. That's why 94-97 tail lights look darker, 98-01 tail lights, usdm or jdm have all silver housings, the openings and trim area. But the lens on the 94-97 tail lights are the exact same as the jdm 98-01, the only difference is the housing between the 2.
Required items:
-94-97 integra tail lights
-Oven big enough to house one tail light
-large flat screwdriver
-silver engine block paint (or any silver paint, but I chose one that can handle heat, to withstand the heat from the halogen bulbs)
-masking tape
-gloves
-clear automotive silicone or any silicone you choose.
1. First remove all the wiring from the tail lights, so you are left with a bare tail light.
Also it's probably a good idea to clean the lights before putting them in your oven.
Also, IMPORTANT!! there's a small screw at the end on the turn signal side, be sure to remove this screw or it will crack the lens when you separate the 2.
2. Pre heat oven to 200�f and place tail light in oven in the center rack for 7 minutes, no more no less.
3. Put on some gloves, I used some winter gloves that were thick enough to insulate my hands from the heat but thin enough that I could still work.
4. Remove tail light, and with large screwdriver and thin cloth place screwdriver into the wedge where the tail light lens meets the housing, and twist the screwdriver to get the 2 pieces to start separating, I started at the reverse signal end, I noticed that at least on my tail lights that they were already separated at that end by a small bit so it was easier to get separation there.
5. Once you have some separation you should be able to pull the 2 pieces apart with your hands, that's what I did.
6. Repeat procedure for second tail light.
7. Once you have 4 separate pieces, give them a good cleaning to get the built up dirt in all the corners out.
8. Mask off outside edges of tail light housing.
9. Spray tail light housing with silver paint, that should be straight forward enough.
10. Pre heat oven to 200�f again.
11. Once paint has fully dried, take one matching housing and lens and place them in the oven for 5 minutes, be careful that the lens doesn't rest on any of the painted surfaces or it will take the paint off with it.
12. After 5 minutes, remove tail light (while wearing gloves) and apply bead of silicone around the gap on the housing where the original glue still is.
13. Carefully press together the lens and the housing, making sure to line up the tabs on the lens and housing, and press together.
14. Lay the tail light face down on a soft surface, Place a object with some weight on the back side of tail light, if you have clamps then clamp them together.
15. Let sit for at least one hour.
That's it, when finished you should have tail lights that look identical to the jdm version, but cost you a fraction of the jdm ones.
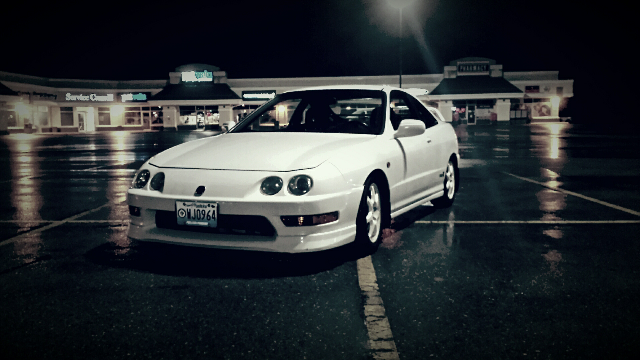
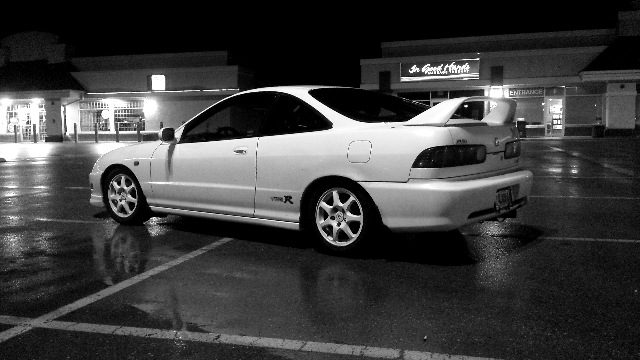
Attachment 395153
Attachment 395154
Attachment 395157
Attachment 395158
Tried this today and it worked out perfectly I'm very happy with the results, especially since the cost of jdm tail lights are expensive and will only go up, and this cost me zero dollars, since i had all the tools and material already, which is also awesome.
94-97 integra tail lights, jdm and usdm are the same, if you open them up you will see that the 4 openings in the tail light housings are all painted silver, and that the outside trim area is black. That's why 94-97 tail lights look darker, 98-01 tail lights, usdm or jdm have all silver housings, the openings and trim area. But the lens on the 94-97 tail lights are the exact same as the jdm 98-01, the only difference is the housing between the 2.
Required items:
-94-97 integra tail lights
-Oven big enough to house one tail light
-large flat screwdriver
-silver engine block paint (or any silver paint, but I chose one that can handle heat, to withstand the heat from the halogen bulbs)
-masking tape
-gloves
-clear automotive silicone or any silicone you choose.
1. First remove all the wiring from the tail lights, so you are left with a bare tail light.
Also it's probably a good idea to clean the lights before putting them in your oven.
Also, IMPORTANT!! there's a small screw at the end on the turn signal side, be sure to remove this screw or it will crack the lens when you separate the 2.
2. Pre heat oven to 200�f and place tail light in oven in the center rack for 7 minutes, no more no less.
3. Put on some gloves, I used some winter gloves that were thick enough to insulate my hands from the heat but thin enough that I could still work.
4. Remove tail light, and with large screwdriver and thin cloth place screwdriver into the wedge where the tail light lens meets the housing, and twist the screwdriver to get the 2 pieces to start separating, I started at the reverse signal end, I noticed that at least on my tail lights that they were already separated at that end by a small bit so it was easier to get separation there.
5. Once you have some separation you should be able to pull the 2 pieces apart with your hands, that's what I did.
6. Repeat procedure for second tail light.
7. Once you have 4 separate pieces, give them a good cleaning to get the built up dirt in all the corners out.
8. Mask off outside edges of tail light housing.
9. Spray tail light housing with silver paint, that should be straight forward enough.
10. Pre heat oven to 200�f again.
11. Once paint has fully dried, take one matching housing and lens and place them in the oven for 5 minutes, be careful that the lens doesn't rest on any of the painted surfaces or it will take the paint off with it.
12. After 5 minutes, remove tail light (while wearing gloves) and apply bead of silicone around the gap on the housing where the original glue still is.
13. Carefully press together the lens and the housing, making sure to line up the tabs on the lens and housing, and press together.
14. Lay the tail light face down on a soft surface, Place a object with some weight on the back side of tail light, if you have clamps then clamp them together.
15. Let sit for at least one hour.
That's it, when finished you should have tail lights that look identical to the jdm version, but cost you a fraction of the jdm ones.
Attachment 395153
Attachment 395154
Attachment 395157
Attachment 395158

Thread
Thread Starter
Forum
Replies
Last Post
D1AUTO
Honda Civic / Del Sol (1992 - 2000)
17
06-09-2005 03:55 AM