
1995 GSR CTR Intake Cam Install..article.
 10-29-2006, 07:29 AM
#1
Thread Starter
Join Date: Jan 2004
Location: rebuilding in, wv, United States
Posts: 1,122
Likes: 0
Received 0 Likes
on
0 Posts
Im not sure if anyone has ever posted anything like this here on HT, but id figure id post it up to help some people on camshaft installation on a b18c1..you can also use this to do your timing belt as well. I posted this last night on Team-Integra, and it will be an article there shortly..
Well today Brian(VR4Morris) and I, yes we are both Brian's, with black integra's, we know, we know..
Meanwhile, deciding to install his CTR IN cam, i decided to make an article on camshaft installation in his 95 GSR, being that there is no article on TI pertaining to Camshaft Installation. This article provides steps to install cams into a b18c1 95' gsr. ALl steps apply to IN and EX side.
This can also be used to replace your timing belt.
Begin, shall we?
Parts if you would like to get them to install when having everything out.
OEM Honda Timing Belt
Cam seals
Dist. O Ring
Crank Seal
Timing belt tensioner and spring
water pump
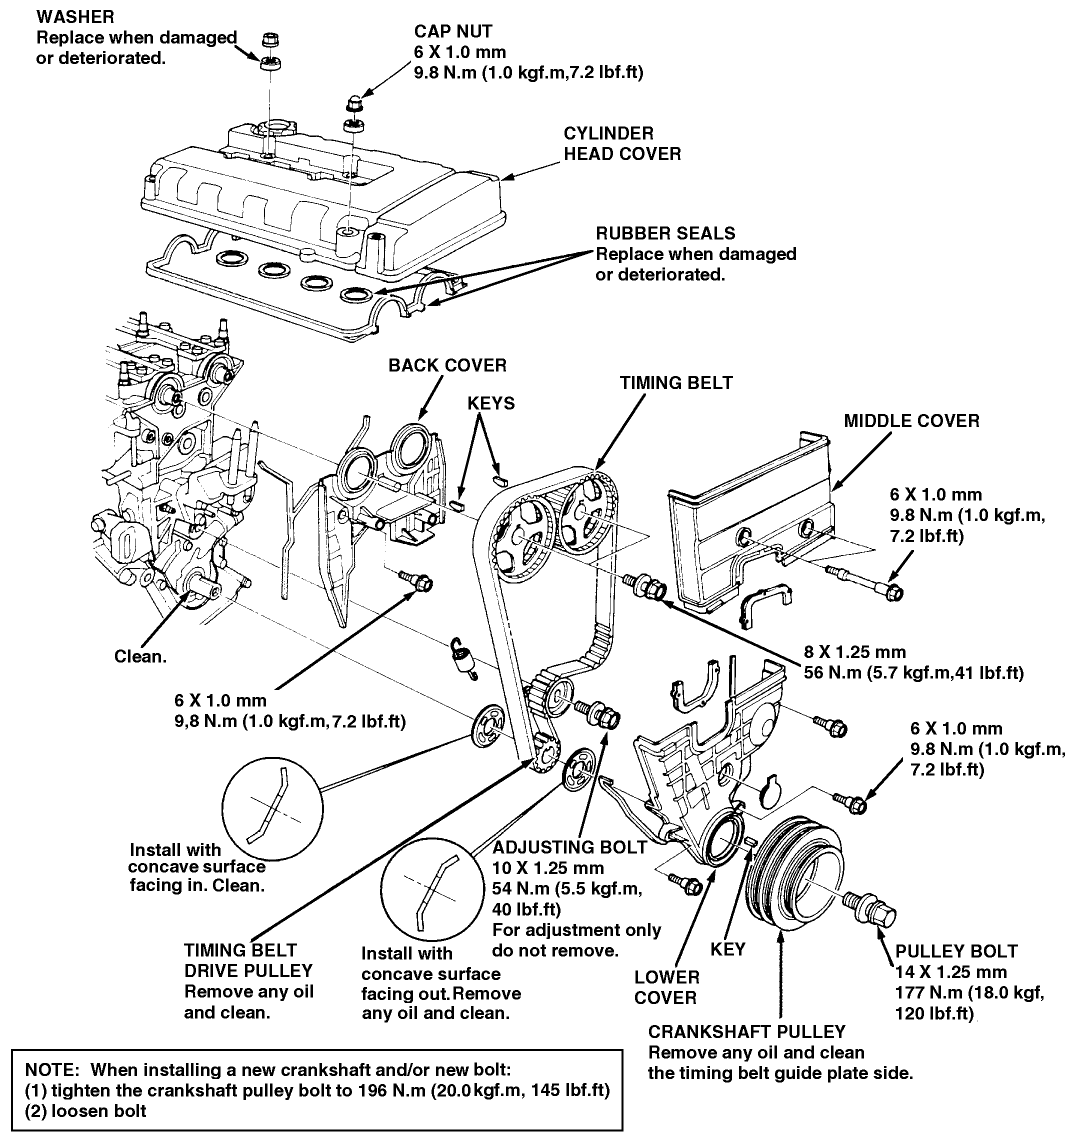
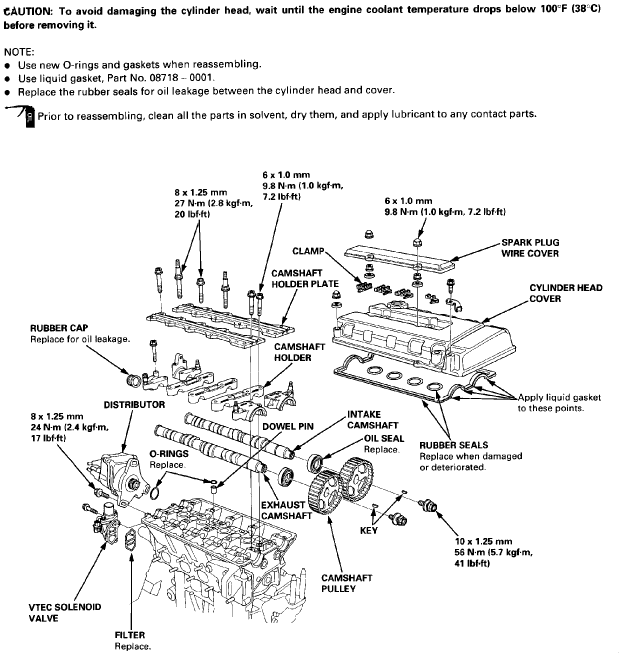
Part Explosion For Reference:
Tools Needed:
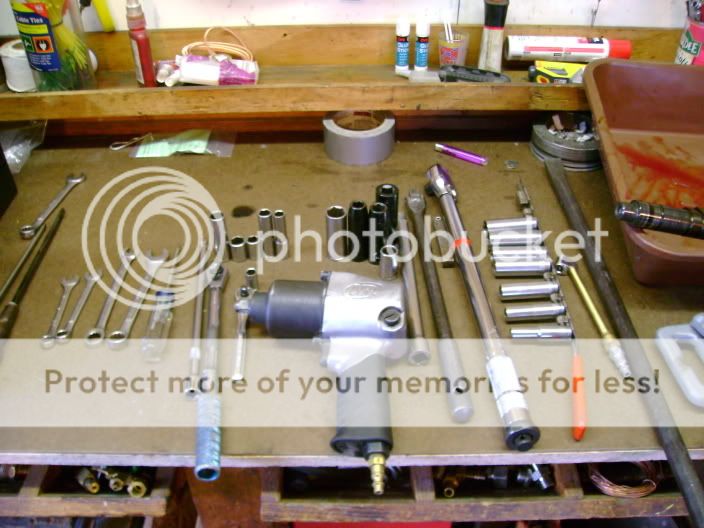
3/8" Drive Sockets:
3/8" Drive Ratchet, long and short handle.
- 10mm Deep
- 10mm Shallow
- 12mm Deep
- 12mm Shallow
- 14mm Shallow
- 19mm Deep
- 3/8" Long Extension
1/2" Drive Sockets:
1/2" Drive Torque Wrench
- 19mm Deep Socket
- 12mm Deep Socket
- 1/2" Drive Impact Wrench
- 10 Gal. Air Compressor
- Prybar
10,12,14mm Ratchet Wrenches
-Screwdriver, flat head, and or Phillips Drive.
- 1/2" Drive Breaker Bar
- Long 1/2" Extension
- Assembly Lube
- Feeler Gauges
Procedure
1, Disconnect Negative Battery Cable
2. Remove Air Intake Tube
3. Disconnect 4 plug wires from v/c and dist.
4. Remove Valve Cover Nuts
5. Remove Valve Cover, sometimes you might have to pry up on the V/C with a large flathead screwdriver.

6. Remove 3 12mm Distibutor Bolts, place Distributor
aside.
7. Next Remove 3 10mm Bolts attaching cruise control to body, place aside.
8. Loosen 2 12mm Power Steering pump to attaching bracket bolts.

9, Turn Wing Nut Counter clockwise to release tension on belt, remove belt.
10. Loosen 12mm Nut on top of alternator. Take Pry Bar and place between mounting bracket and alternator and pry alternator towards front of car. remove belt.
11. Once the belts are removed, proceed to removing top timing cover bolts. 2 10mm bolts that fasten the cover to the head.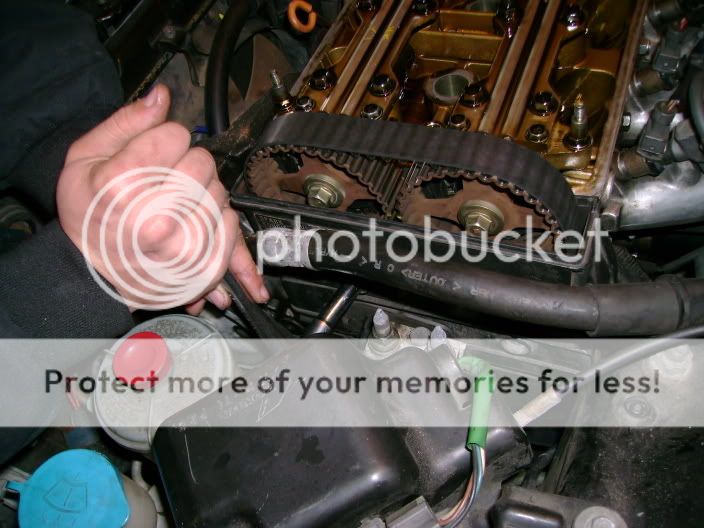
12. Once Cover is removed time to remove crank pully bolt, use the 19mm impact socket with air impact wrench to remove the bolt. DO NOT LOSE CRANK KEY. Place key where it cannot be lost.
13, Proceed to remove the lower timing cover. There are 4 10 mm bolts that fasten the cover to the block. Remove all 4 bolts and remove lower cover. Remove the large timing belt guide washer as well.
14. Install crank pully bolt with impact semi tight, just enough to hold it in there.
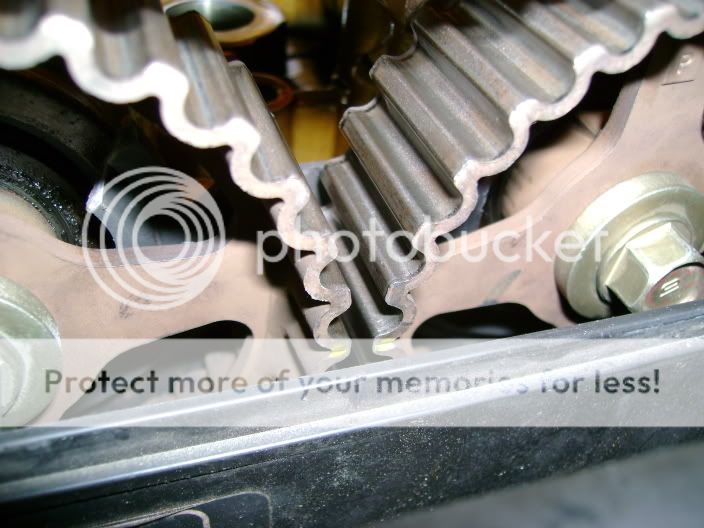
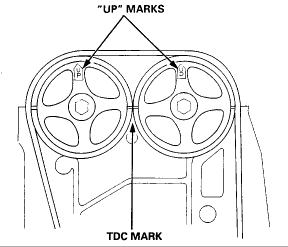
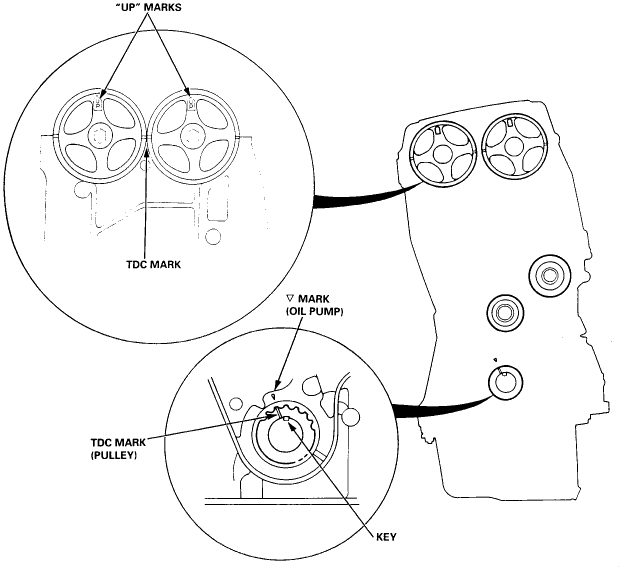
15. Rotate the Crank COUNTERCLOCKWISE until timing marks are lined up. There is a line on the Crank gear that lines up with the aarow on the oil pump directly behind the gear.. Once that is lined up make sure the cam gear timing arrows are UP and the lines in the timing belt cogs are lined up horizontally.

16. Loosen 14mm Timing Belt Tensioner bolt ,4 complete turns. After that, push tensioner towards firewall and retighten the bolt.
17. Remove timing belt from cam gears.
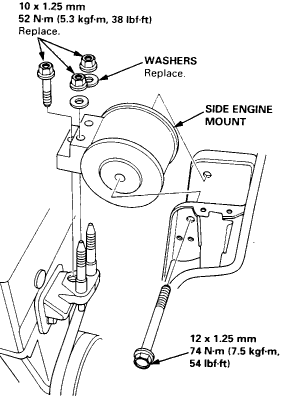
* IF REPLACING TIMING BELT YOU MUST REMOVE THIS MOUNT SHOWN HERE*:

18. Next Is removing the Cam Gear Attaching Bolt. use impact gun with 14mm impact socket to remove as shown:

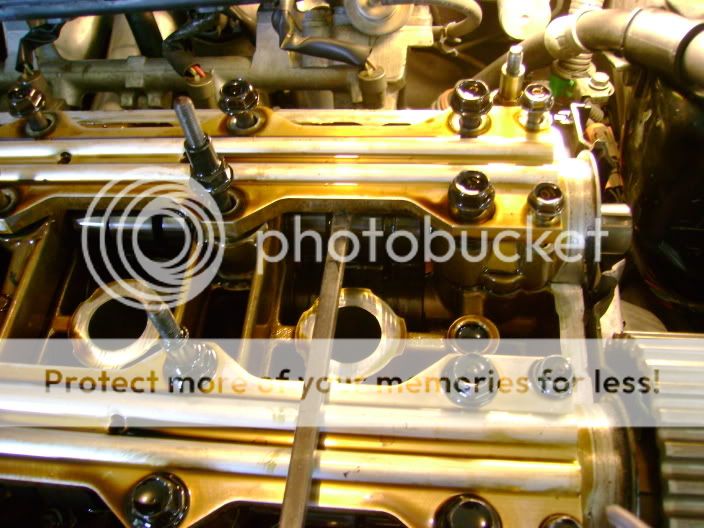
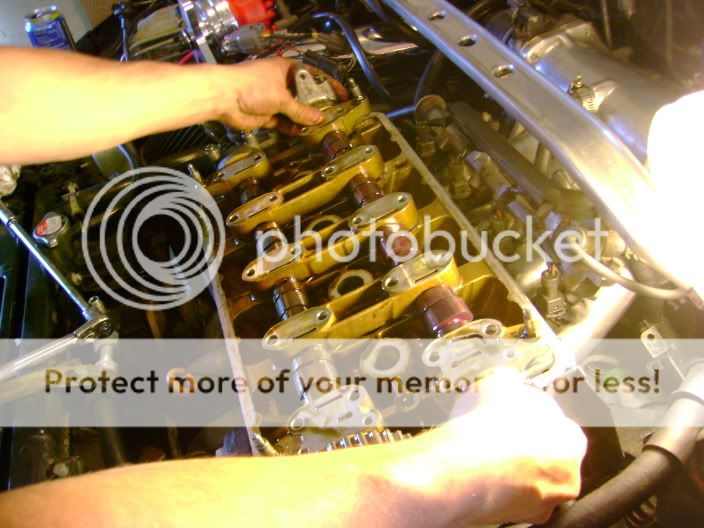
19. Loosen, but DO NOT remove all 14 Bolts on IN side Cam oil rail. 10, 12mm Studs/bolts and 4 10mm Bolts.
20. Once All bolts are loosened, pry up on oil rail with a flathead screwdriver to remove.. When lifting up, keep all bolts with rail and place on table as if you are looking at the head from the front of the car.
21. Remove Driver and Passenger Side Intake Caps from head, pry on them with a screwdriver or tap them with a rubber mallet to remove them from head.
22. When removing middle 2 3 4 cam cap girdles, use a flat head screw driver and insert it into the middle of the cap girdle and move side to side to loosen cap.
* Be sure to remove cam seal and place on new cams if you did not buy new ones*
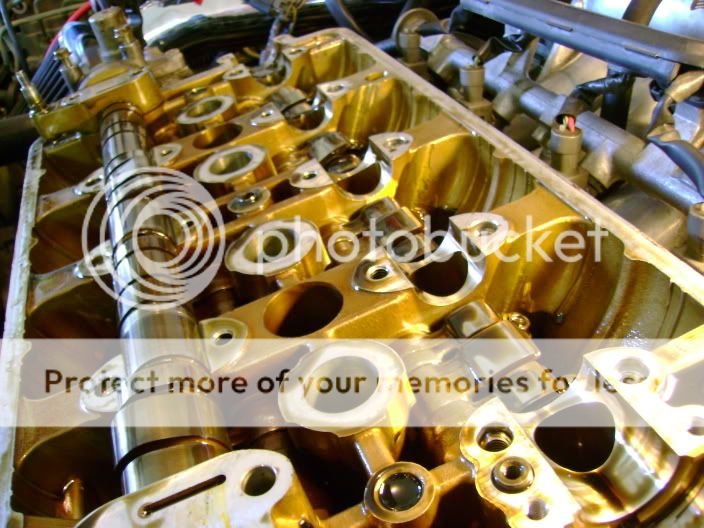
All Caps removed in order to remove IN cam.

Cam removed:
25. Make sure to lube up all surfaces the cam will ride on with assembly lube..
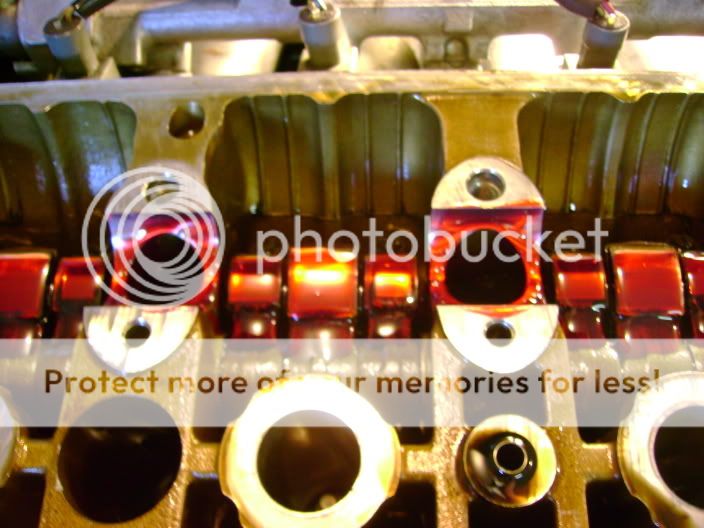
26. Wipe down entire cam with assembly lube before you drop the cam into the head.
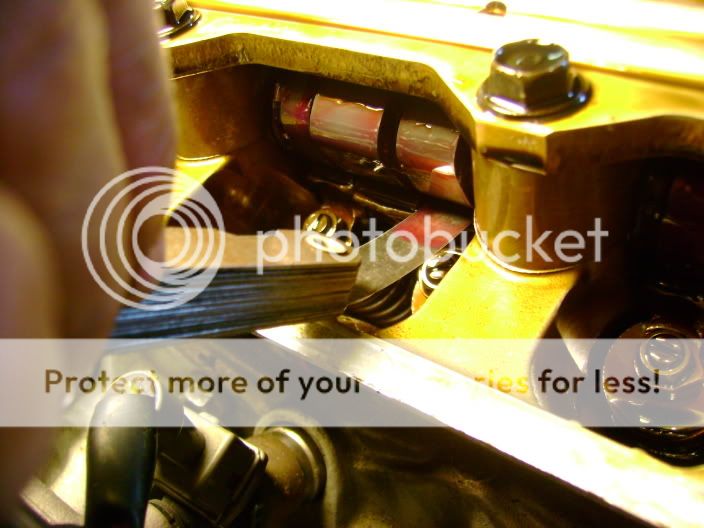
27. Install the cam into the cam journals on the head as shown. Make sure to have Keyway in cam facing up as close as possible.

28. Install cam caps as shown.
29. Then the Oil Rails w/ Bolts, studs installed.
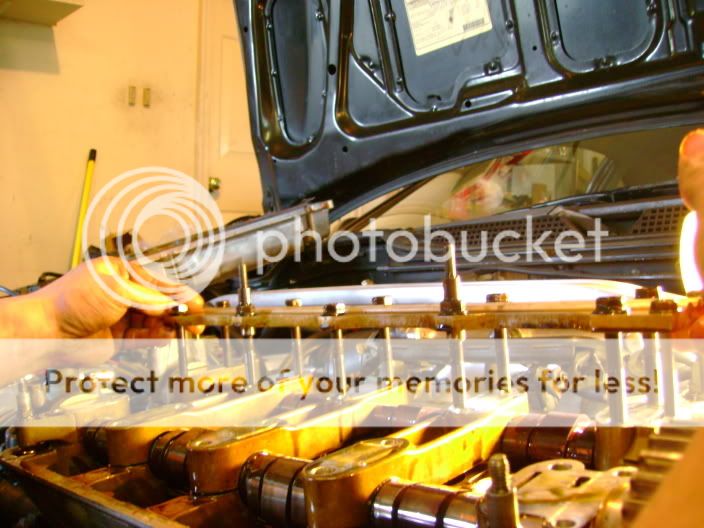
*UPPER ENGINE TORQUE SPECS*
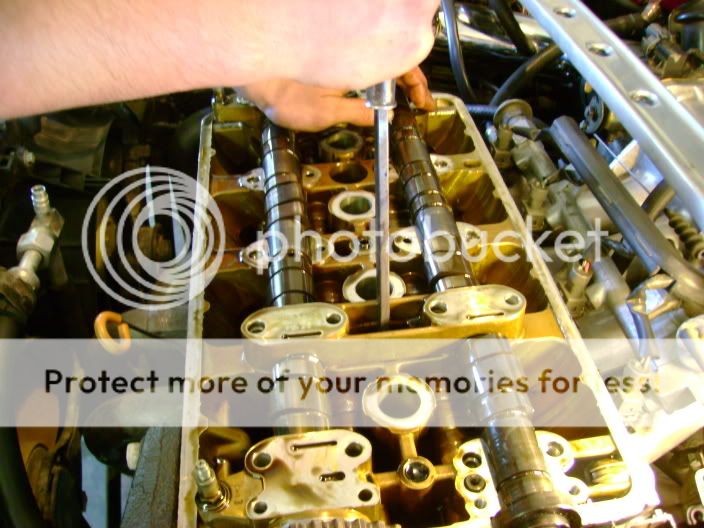
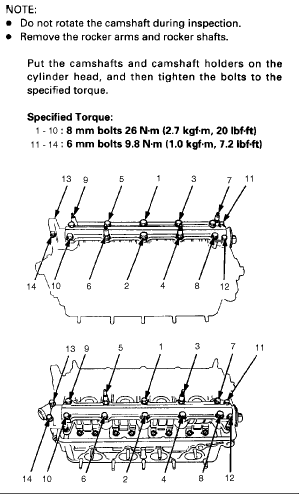
30. Torque all 12mm Bolts to 20 ft/lbs in this order:
31. Reinstall cam gear and key into cam. torque to 40ftlbs. or just use a imapct gun. works great.
32. realign the cam timing marks.
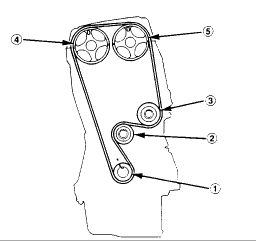
33. Reinstall timing belt, wrap the belt around in this order:
(1) Timing belt drive pulley (crankshaft)
(2) Adjusting pulley
(3) Water pump pulley
(4) Exhaust camshaft pulley
(5) Intake camshaft pulley
34. make sure all timing marks are dead center.
35. Release tensioner bolt 4 turns again.
36. Turn crank past tdc counterclockwise 2 crank teeth. IE. the rear edge of the crank sprocket cog will be lined up with the pointer on the oil pump.
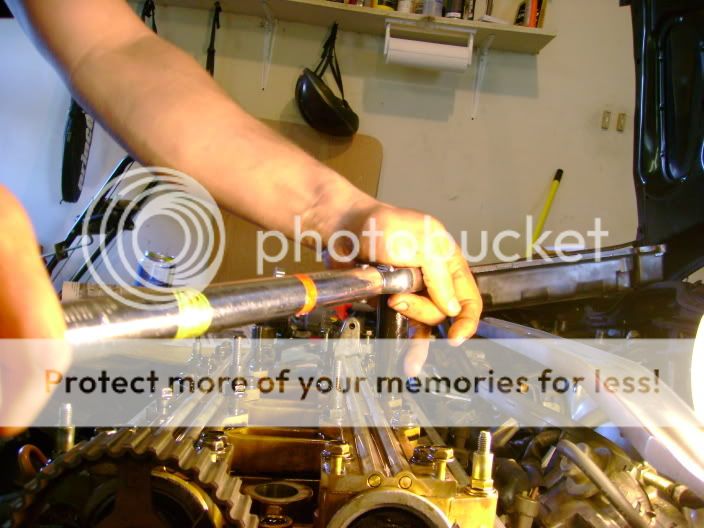
37. once that is achieved, check for good tension on the long side of the belt, and tighten the tensioner bolt to a good 40 ft lbs. Once turning over the two complete revolutions by hand, recheck timing marks to make sure it is dead on.
38. Reinstall camshaft guide washer with bevels facing outward.
39. Reinstall Upper and lower timing covers.
40. Install crank pully with crank key. Both alternator and p/s pump belts as well. 160 ft/lbs. just use the impact.
Valve adjustment.. We lucked out majorly here, valve lash was dead on @ .006" IN. Check out the valve adjustment article here on TI for more info.
41. Reinstall cruise control box
42. Install valve cover, torque bolts to 9 ft lbs starting in the middle and work out in a criss cross patern.
43. install distributor, only goes in one way, cannot be 180deg out.
44. 1-3-4-2 firing order from bottom left of dist. 1, is timing belt side.
45. make sure to re-check ignition timing. check out the article here on ti as well for more info.
46. Camshaft Break- In procedure..
2000 rpms for at least 20 mins..
We use the , pull the IAC plug, wont go over 2500 rpms even if you floor it.. so we drive around for about a half hour like that, reinstall IAC plug and go have fun!.
CHEERS.


Well today Brian(VR4Morris) and I, yes we are both Brian's, with black integra's, we know, we know..
Meanwhile, deciding to install his CTR IN cam, i decided to make an article on camshaft installation in his 95 GSR, being that there is no article on TI pertaining to Camshaft Installation. This article provides steps to install cams into a b18c1 95' gsr. ALl steps apply to IN and EX side.
This can also be used to replace your timing belt.
Begin, shall we?
Parts if you would like to get them to install when having everything out.
OEM Honda Timing Belt
Cam seals
Dist. O Ring
Crank Seal
Timing belt tensioner and spring
water pump
Part Explosion For Reference:
Tools Needed:
3/8" Drive Sockets:
3/8" Drive Ratchet, long and short handle.
- 10mm Deep
- 10mm Shallow
- 12mm Deep
- 12mm Shallow
- 14mm Shallow
- 19mm Deep
- 3/8" Long Extension
1/2" Drive Sockets:
1/2" Drive Torque Wrench
- 19mm Deep Socket
- 12mm Deep Socket
- 1/2" Drive Impact Wrench
- 10 Gal. Air Compressor
- Prybar
10,12,14mm Ratchet Wrenches
-Screwdriver, flat head, and or Phillips Drive.
- 1/2" Drive Breaker Bar
- Long 1/2" Extension
- Assembly Lube
- Feeler Gauges
Procedure
1, Disconnect Negative Battery Cable
2. Remove Air Intake Tube
3. Disconnect 4 plug wires from v/c and dist.
4. Remove Valve Cover Nuts
5. Remove Valve Cover, sometimes you might have to pry up on the V/C with a large flathead screwdriver.
6. Remove 3 12mm Distibutor Bolts, place Distributor
aside.
7. Next Remove 3 10mm Bolts attaching cruise control to body, place aside.
8. Loosen 2 12mm Power Steering pump to attaching bracket bolts.
9, Turn Wing Nut Counter clockwise to release tension on belt, remove belt.
10. Loosen 12mm Nut on top of alternator. Take Pry Bar and place between mounting bracket and alternator and pry alternator towards front of car. remove belt.
11. Once the belts are removed, proceed to removing top timing cover bolts. 2 10mm bolts that fasten the cover to the head.
12. Once Cover is removed time to remove crank pully bolt, use the 19mm impact socket with air impact wrench to remove the bolt. DO NOT LOSE CRANK KEY. Place key where it cannot be lost.
13, Proceed to remove the lower timing cover. There are 4 10 mm bolts that fasten the cover to the block. Remove all 4 bolts and remove lower cover. Remove the large timing belt guide washer as well.
14. Install crank pully bolt with impact semi tight, just enough to hold it in there.
15. Rotate the Crank COUNTERCLOCKWISE until timing marks are lined up. There is a line on the Crank gear that lines up with the aarow on the oil pump directly behind the gear.. Once that is lined up make sure the cam gear timing arrows are UP and the lines in the timing belt cogs are lined up horizontally.
16. Loosen 14mm Timing Belt Tensioner bolt ,4 complete turns. After that, push tensioner towards firewall and retighten the bolt.
17. Remove timing belt from cam gears.
* IF REPLACING TIMING BELT YOU MUST REMOVE THIS MOUNT SHOWN HERE*:
18. Next Is removing the Cam Gear Attaching Bolt. use impact gun with 14mm impact socket to remove as shown:
19. Loosen, but DO NOT remove all 14 Bolts on IN side Cam oil rail. 10, 12mm Studs/bolts and 4 10mm Bolts.
20. Once All bolts are loosened, pry up on oil rail with a flathead screwdriver to remove.. When lifting up, keep all bolts with rail and place on table as if you are looking at the head from the front of the car.
21. Remove Driver and Passenger Side Intake Caps from head, pry on them with a screwdriver or tap them with a rubber mallet to remove them from head.
22. When removing middle 2 3 4 cam cap girdles, use a flat head screw driver and insert it into the middle of the cap girdle and move side to side to loosen cap.
* Be sure to remove cam seal and place on new cams if you did not buy new ones*
All Caps removed in order to remove IN cam.
Cam removed:
25. Make sure to lube up all surfaces the cam will ride on with assembly lube..
26. Wipe down entire cam with assembly lube before you drop the cam into the head.
27. Install the cam into the cam journals on the head as shown. Make sure to have Keyway in cam facing up as close as possible.
28. Install cam caps as shown.
29. Then the Oil Rails w/ Bolts, studs installed.
*UPPER ENGINE TORQUE SPECS*
30. Torque all 12mm Bolts to 20 ft/lbs in this order:
31. Reinstall cam gear and key into cam. torque to 40ftlbs. or just use a imapct gun. works great.
32. realign the cam timing marks.
33. Reinstall timing belt, wrap the belt around in this order:
(1) Timing belt drive pulley (crankshaft)
(2) Adjusting pulley
(3) Water pump pulley
(4) Exhaust camshaft pulley
(5) Intake camshaft pulley
34. make sure all timing marks are dead center.
35. Release tensioner bolt 4 turns again.
36. Turn crank past tdc counterclockwise 2 crank teeth. IE. the rear edge of the crank sprocket cog will be lined up with the pointer on the oil pump.
37. once that is achieved, check for good tension on the long side of the belt, and tighten the tensioner bolt to a good 40 ft lbs. Once turning over the two complete revolutions by hand, recheck timing marks to make sure it is dead on.
38. Reinstall camshaft guide washer with bevels facing outward.
39. Reinstall Upper and lower timing covers.
40. Install crank pully with crank key. Both alternator and p/s pump belts as well. 160 ft/lbs. just use the impact.
Valve adjustment.. We lucked out majorly here, valve lash was dead on @ .006" IN. Check out the valve adjustment article here on TI for more info.
41. Reinstall cruise control box
42. Install valve cover, torque bolts to 9 ft lbs starting in the middle and work out in a criss cross patern.
43. install distributor, only goes in one way, cannot be 180deg out.
44. 1-3-4-2 firing order from bottom left of dist. 1, is timing belt side.
45. make sure to re-check ignition timing. check out the article here on ti as well for more info.
46. Camshaft Break- In procedure..
2000 rpms for at least 20 mins..
We use the , pull the IAC plug, wont go over 2500 rpms even if you floor it.. so we drive around for about a half hour like that, reinstall IAC plug and go have fun!.
CHEERS.
 10-29-2006, 08:12 AM
#5
Thread Starter
Join Date: Jan 2004
Location: rebuilding in, wv, United States
Posts: 1,122
Likes: 0
Received 0 Likes
on
0 Posts
Quick Review:
Needs a Re-Tune for sure..
A/F's Right after vtec hit were mid 14's..
starts to dip into the high 13' s WOT.
We chose to run the car with the vacuum line off the FPR for safety sake until we get a re tune.
Timing Is about 20 BTDC.
VTEC transistion is not smooth at all, will need to be changed.
but she does pull up top quite well..
thats before the MSD pro billet exploded.
Modified by Yambor at 12:35 PM 10/29/2006
10-29-2006, 08:16 AM
#6
STAR
Join Date: Mar 2005
Location: Jamaica, MD
Posts: 4,682
Likes: 0
Received 0 Likes
on
0 Posts
<TABLE WIDTH="90%" CELLSPACING=0 CELLPADDING=0 ALIGN=CENTER><TR><TD>Quote, originally posted by projectTeG »</TD></TR><TR><TD CLASS="quote">nice! one question though is that an oem dizzy?</TD></TR></TABLE>
No thats my MSD pro billet...........which happened to explode that night when the 2 screws holding in the rotor backed out and broke the cap.
No thats my MSD pro billet...........which happened to explode that night when the 2 screws holding in the rotor backed out and broke the cap.
10-29-2006, 08:27 AM
#7
STAR
Join Date: Mar 2005
Location: Jamaica, MD
Posts: 4,682
Likes: 0
Received 0 Likes
on
0 Posts
<TABLE WIDTH="90%" CELLSPACING=0 CELLPADDING=0 ALIGN=CENTER><TR><TD>Quote, originally posted by Yambor »</TD></TR><TR><TD CLASS="quote">Quick Review:
Needs a Re-Tune for sure..
A/F's Right after vtec hit were mid 14's..
starts to dip into the high 13' s WOT.
We chose to run the car with the vacuum line off the FPR for safety sake until we get a re tune.
Timing Is about 20 BTDC.
VTEC transistion is not smooth at all, will need to be changed.
but she does pull up top quite well..
thats before the MSD pro billet exploded.</TD></TR></TABLE>
dont lie, the timing is the entire way advanced so its more like 24 degrees. w00t.
Trending Topics
 10-29-2006, 09:41 AM
#9
Honda-Tech Member
iTrader: (1)
Join Date: Jan 2002
Location: Nowhere and Everywhere
Posts: 29,530
Likes: 0
Received 52 Likes
on
46 Posts
Good write-up. However I would suggest adding that pin punches or small screwdrivers can be inserted through the holes in the oil rails and into the cams to hold them in place when removing or tightening the cam gear bolts, if an impact is not being used.
Heh I have that same torque wrench and shop work light! That torque wrench is a POS for low torque settings, though, and when working on engine internals you really need to be precise. I finally went out and bought a Craftsman 3/8" 5-80 lb-ft torque wrench awhile back. $100 but it was worth it. It's sooo much nicer than that cheap $25 one, which I still use for things like wheel bolts, etc.
Heh I have that same torque wrench and shop work light!
That torque wrench is a POS for low torque settings, though, and when working on engine internals you really need to be precise. I finally went out and bought a Craftsman 3/8" 5-80 lb-ft torque wrench awhile back. $100 but it was worth it. It's sooo much nicer than that cheap $25 one, which I still use for things like wheel bolts, etc.
 10-29-2006, 02:37 PM
#13
Thread Starter
Join Date: Jan 2004
Location: rebuilding in, wv, United States
Posts: 1,122
Likes: 0
Received 0 Likes
on
0 Posts
hell yea hell yea..
i use drift pins @ work to hold the cams in place..
that is not my torque wrench, my 1/2 does not go that low.. i got one of those bling bling snap on digital ones..
i use drift pins @ work to hold the cams in place..
that is not my torque wrench, my 1/2 does not go that low.. i got one of those bling bling snap on digital ones..
10-29-2006, 05:19 PM
#14
Honda-Tech Member
iTrader: (1)
Join Date: Jan 2002
Location: Nowhere and Everywhere
Posts: 29,530
Likes: 0
Received 52 Likes
on
46 Posts
Yeah I hear ya, I think if I did any internal engine work I would probably want to get a torque wrench that reads inch-lbs. My grandfather has one from when he worked on lawn mower engines, maybe he'll give it to me
 10-30-2006, 08:26 AM
#18
Honda-Tech Member
iTrader: (1)
Join Date: Jan 2002
Location: Nowhere and Everywhere
Posts: 29,530
Likes: 0
Received 52 Likes
on
46 Posts
<TABLE WIDTH="90%" CELLSPACING=0 CELLPADDING=0 ALIGN=CENTER><TR><TD>Quote, originally posted by Yambor »</TD></TR><TR><TD CLASS="quote"> tru that..
are you on TI?</TD></TR></TABLE>
I signed up but only to post to a classified ad awhile back. Usually I only get on there to look at the articles.
tru that..are you on TI?</TD></TR></TABLE>
I signed up but only to post to a classified ad awhile back. Usually I only get on there to look at the articles.
10-30-2006, 11:03 AM
#20
STAR
Join Date: Mar 2005
Location: Jamaica, MD
Posts: 4,682
Likes: 0
Received 0 Likes
on
0 Posts
<TABLE WIDTH="90%" CELLSPACING=0 CELLPADDING=0 ALIGN=CENTER><TR><TD>Quote, originally posted by drtyhatch »</TD></TR><TR><TD CLASS="quote">what is the advantage of just using the Intake cam instead of the set?</TD></TR></TABLE>
advantage of just using the intake cam and not both? None, i only did it because i didnt want to run the EX. cam without having dual springs. Since the IN valvesprings are the same as ITR it is ok to run the cam on stock springs but i'd need to put dual springs on the EX side to run the EX cam......... and i dont have dual springs over there yet.
advantage of just using the intake cam and not both? None, i only did it because i didnt want to run the EX. cam without having dual springs. Since the IN valvesprings are the same as ITR it is ok to run the cam on stock springs but i'd need to put dual springs on the EX side to run the EX cam......... and i dont have dual springs over there yet.
10-30-2006, 12:51 PM
#21
Honda-Tech Member
iTrader: (1)
Join Date: Jan 2002
Location: Nowhere and Everywhere
Posts: 29,530
Likes: 0
Received 52 Likes
on
46 Posts
<TABLE WIDTH="90%" CELLSPACING=0 CELLPADDING=0 ALIGN=CENTER><TR><TD>Quote, originally posted by GSRmorris »</TD></TR><TR><TD CLASS="quote">advantage of just using the intake cam and not both? None, i only did it because i didnt want to run the EX. cam without having dual springs. Since the IN valvesprings are the same as ITR it is ok to run the cam on stock springs but i'd need to put dual springs on the EX side to run the EX cam......... and i dont have dual springs over there yet.</TD></TR></TABLE>
Hold up there, GS-R intake valve springs are the same as the ITR's EXHAUST valve springs. So when you buy valve springs you need to buy dual intake valve springs (OEM ITR or aftermarket or whatever) and then just move the intake ones over to the exhaust.
Hold up there, GS-R intake valve springs are the same as the ITR's EXHAUST valve springs. So when you buy valve springs you need to buy dual intake valve springs (OEM ITR or aftermarket or whatever) and then just move the intake ones over to the exhaust.
10-30-2006, 01:01 PM
#22
Honda-Tech Member
Join Date: Feb 2005
Location: MD, USA
Posts: 413
Likes: 0
Received 0 Likes
on
0 Posts
Excellent writeup, I just did this a couple weeks ago on my GSR, but I used the '00 ITR intake and exhaust cams (same as CTR from what I understand). The only thing I would add is that you should remove the cam cap bolts in the reverse order of the torque sequence, but other than that, you're spot on!
10-30-2006, 05:53 PM
#24
Thread Starter
Join Date: Jan 2004
Location: rebuilding in, wv, United States
Posts: 1,122
Likes: 0
Received 0 Likes
on
0 Posts
true that..
if you dont believe that the IN springs on a usdm gsr are not the same as itr's then you should research.. the coil bind , max lift and seat pressures are the same.
if you dont believe that the IN springs on a usdm gsr are not the same as itr's then you should research..
the coil bind , max lift and seat pressures are the same.
10-30-2006, 07:39 PM
#25
Member
Join Date: Dec 2002
Location: Midwest, USA
Posts: 2,497
Likes: 0
Received 0 Likes
on
0 Posts
FYI: you don't absolutely have to loosen the timing belt. Take all the cam caps off, "angle" the cam out and slide the t-belt out. Done it several times with great sucess. However...very nice writeup for the newbie.

